This guide will show you the step-by-step process on how to mod The Bloodline. If you’ve modded games before, but never tweaked a game that doesn’t support mods, this is the one, boss.
Preface
At the time this guide was written, The Bloodline doesn’t have any mods available. Various reasons contribute to this, with the main one being a lack of knowledge on how to mod the game. If you’ve dabbled in modding before, altering games by editing xml files or using a program tucked away in a hidden folder, or maybe even experimenting with a game’s SDK, you’ll notice that successful modding scenes usually have modding support and clear documentation.
The situation is different for The Bloodline. While the game’s main developer is open to mods, the method might seem unclear. Searching on Google yields results about adding mod support, forum posts from eight years ago discussing outdated tools, and YouTube videos urging you to subscribe to a Patreon for a self-made mod loader tool. The Discord community is sparse, making it challenging to find information if someone has actually made mods and not documented their process.
This guide aims to address this problem. Whether you’re a modding veteran or a complete beginner struggling to change a text field without assistance, this guide will provide straightforward answers. No more vague suggestions to “just google it,” no more outdated Unreal Engine advice. Read this guide, and you’ll find clarity.
A quick note about the author – I specialize in Game Design and Game Art, not Game Programming. If you’re seeking resources to create new mechanics or alter how The Bloodline functions, this guide may not be the best fit. It will still work for basic modding like replacing art or music assets, but you may need additional exploration for more advanced modifications. The hope is that this guide inspires some to discover answers and share them with the community, possibly in their own guide, sparing others from digging through comments years later.
Remember, you’re likely to encounter issues. Breaking things is okay; it’s part of the learning process. Don’t hesitate to experiment and push boundaries. If something goes awry, you can always reinstall the game or the engine, or start fresh with the project. Destructive methods can be the quickest way to understand how things hold together, so go ahead, break things, but don’t bother reaching out to me about it!
Getting Started
Ready to dive into modding The Bloodline? First, let’s gather some essential tools. All the tools mentioned here are free, aligning with the spirit of modding. Since I’m using Windows, the instructions are from that perspective. However, the tools listed either work on Linux or have Linux-compatible equivalents, though the process might differ.
Universal Tools
- Unreal Engine 4.26.2 – This is your main tool for building your plugin and converting it into a .pak file. Ensure that your project name is TheBloodline; otherwise, the modloader I’ll mention later won’t recognize your mod. Even if you’re not creating a scripting mod, it’s advisable to follow this naming convention.
- FModel – A convenient tool for exploring pak files. It allows you to export specific models and textures while maintaining the folder structure.
- Repak – This tool is recommended for packing your modded content into a .pak file. It’s straightforward to use, lacks unnecessary features, supports our version of Unreal, and has proven reliable. Repak can also unpack, allowing you to extract The Bloodline’s pak file. Keep in mind that unpacking the entire game may take a while, especially if you have an SSD. As of January 6th, 2024, the fully extracted game is 30GB with 68,745 files and 3114 folders.
- Unreal Mod Loader (UML) – This tool is primarily for script mods. It integrates into The Bloodline, providing two folders – Core Mods for managing SDK C++ Scripts (NOT UE4 C++) and Logic Mods for handling Blueprint Scripts. Don’t forget to download the Modloader profile from the Nexus to ensure the modloader recognizes the game you’re connecting it to.
Artist Tools
- Blender – Use it for modeling, UV mapping, animations, rigging, FX, and every aspect of the artist’s workflow. While Blender is versatile, I’ll also mention specialized programs for tasks where Blender falls short.
- Material Maker – Avoid using Blender for building materials, especially procedural ones. Material Maker is a better choice for this.
- Krita – Built for illustration and digital drawing, Krita is not overly feature-rich but offers a straightforward approach. If you prefer a program that focuses on specific tasks without unnecessary complexity, Krita is a reliable option.
- PaintdotNET – This painting program provides more advanced options and can export various file types like .dds. While it may seem complex, it becomes handy for tasks that Krita can’t handle.
- GIMP – An image editing tool, GIMP is not designed for illustration and drawing like Paint and Krita. It serves a different purpose in your artistic toolkit.
- LibreSprite – If you’re into pixel art, Aseprite is a go-to, but its free and open-source counterpart, LibreSprite, is a decent alternative.
- The VG’s Resource – This site gathers ripped assets from other games, divided into The Spriter’s Resource, the Model’s Resource, The Texture’s Resource, and the Sound’s Resource. Whether you’re aiming for a direct rip to port a mod or seeking good references, this site is a solid resource. Navigate between sections using the colored bar at the top.
Sound
- Audacity – A versatile tool for recording, mixing, and editing audio. This is especially useful for voice actors. With a variety of tools, you can enhance and tweak your sound, even if you recorded it in less-than-ideal conditions.
- LMMS – A Digital Audio Workstation (DAW) that allows you to produce, compose, and mix music and sounds. If you’re not specifically creating music, sticking with Audacity might be more straightforward. Forget about FL Studio and Ableton for now.
- FreeSound – A Creative Commons Sound Library with a vast collection of user-submitted samples. Whether you need the sound of a car door shutting or any other specific sound, this is the go-to place.
How to Create Your First Mod
This tutorial focuses on swapping assets like models or textures and doesn’t cater to scripting or game functions. While it might work, I can’t guarantee anything. It’s important to note that Pak Patching is an inefficient method for modding the game. I’m not sure about using more than one mod or how to handle naming in such cases. As of now, the alternative method involves a tool called Unreal Mod Unlocker. This method entails copying your cooked files and placing them in ..\Steam\steamapps\common\The Bloodline\Build5.51\WindowsNoEditor\TheBloodline\Content. This is known as loose file modding, but this guide does not cover that. Now, let’s dive into pak patching.
- Download Unreal Engine 4.26.2, Repak, and optionally FModel & Unreal Mod Loader based on your specific needs.

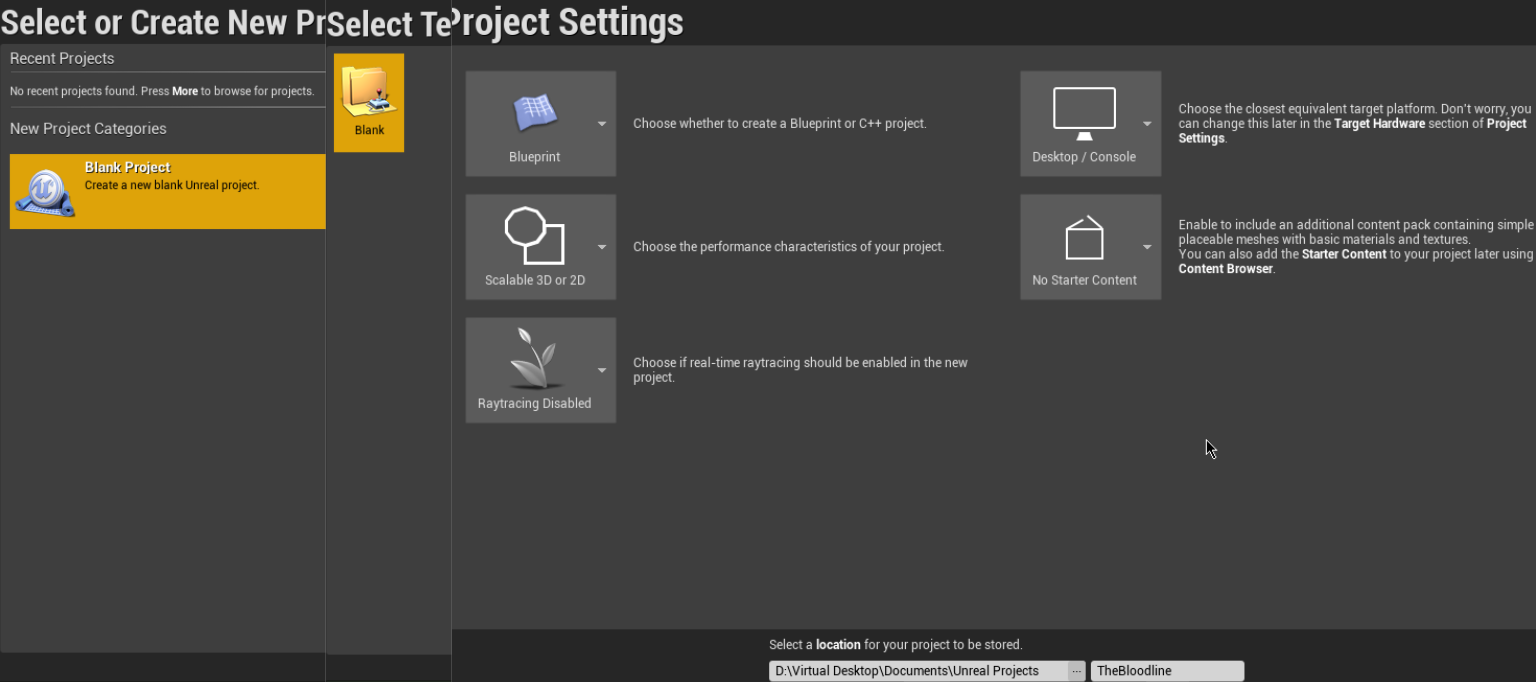
- Start by creating a new project without any Starter Content.
- Regardless of the specific mod you’re working on, name the project TheBloodline. Stick to this naming convention for consistency.
- Once in the engine, you’ll find yourself staring at the floor. Look at the bottom of your screen, and you should see the Content Browser. If it’s not visible, head to the top toolbar and click the Content Button to bring it up.

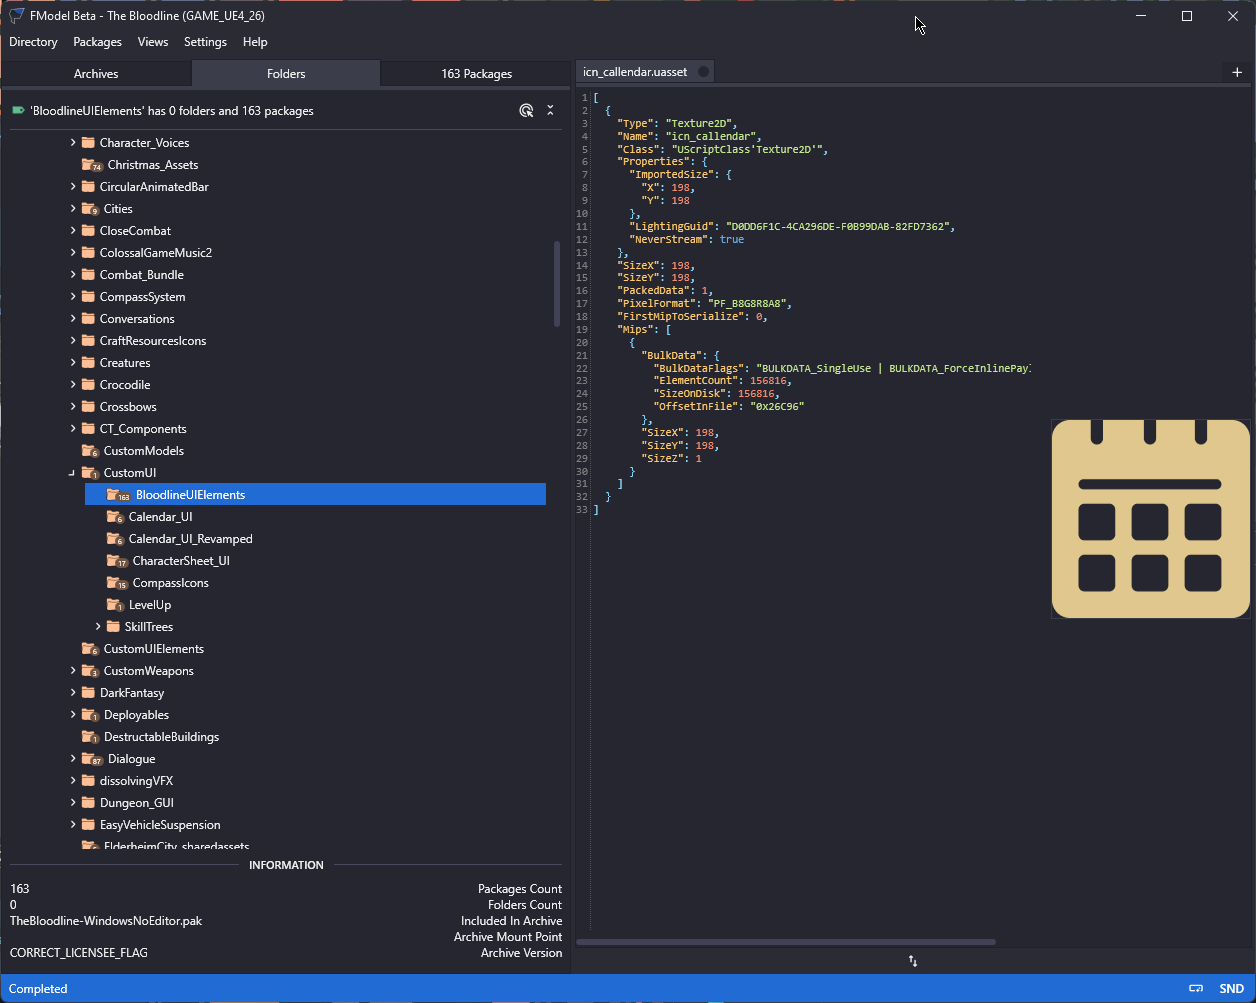
- Ensure you are already within the Content folder. Here, you need to align the file structure with that of Bloodline. Utilize the tool FModel to examine Bloodline’s pak file. You can locate this file at ..\SteamApps\common\The Bloodline\Build5.51\WindowsNoEditor\TheBloodline\Content\Paks.
- Observe and carefully note the location of the asset you wish to replace. You will replicate this path and the filename of the asset exactly, so pay close attention.
- At this point, there are two distinct paths. You can either create your Blueprint or start developing assets to substitute for those in The Bloodline. This is where the actual mod-making process begins.
- In my case, I’ll be incorporating some UI Icons I’ve created. Therefore, I’ll create a folder named CustomUI and then another folder named BloodlineUIElements. I’ll place my images in there and click save all. Notice the intentional misspelling for “calendar”? If it’s misspelled in the vanilla game files, that’s how it’ll be for your mod too.

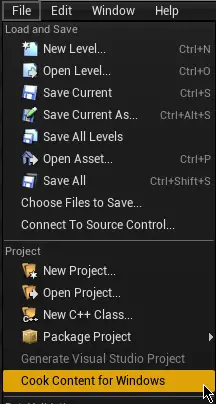
- The next step is to cook our work. In Unreal Engine, navigate to File > Cook Content for Windows. If your operating system is different, the option may not explicitly say “Windows,” but the process remains the same.
- If clicking this results in a pop-up saying something like “Unsupported Platform,” you need to cancel. Then go to File > Package Project > Supported Platforms…
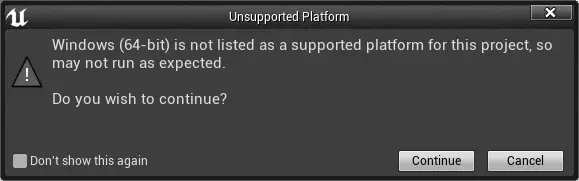
- In this menu, enable your operating system. For most users, this would be Windows (64 bit). Now, repeat Step 9.

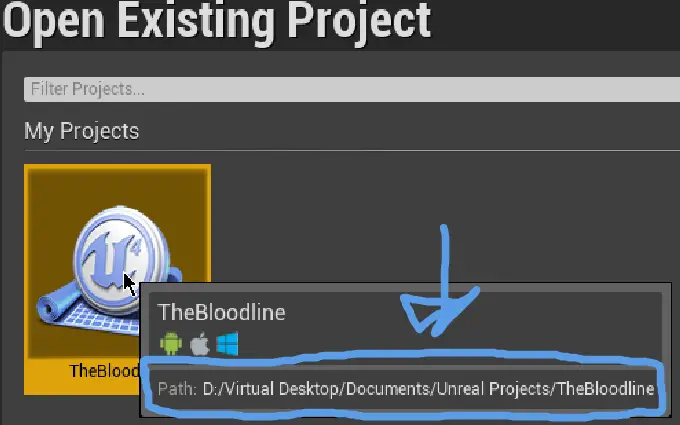
- Once your project has finished cooking, you’ll need to locate the results. First, find where your Unreal Project is stored on your PC. If you go to File > Open Project and hover over your file, you should see the path. In my case, it’s in My Documents.
- When you reach your project’s folder, navigate to ..\Saved\Cooked\WindowsNoEditor.

- You should see TheBloodline folder. Copy it.
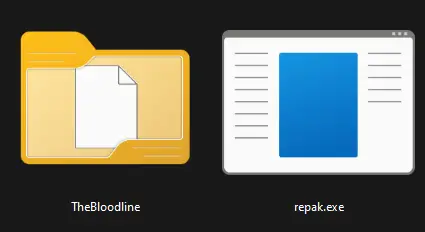
- Locate where you downloaded Repak. Ideally, you’re organizing all of this in a clean and easily navigable folder, but that’s up to you. The specific location where you extracted Repak doesn’t matter.
- Paste TheBloodline folder in the same directory as Repak. Now, Repak.exe and TheBloodline should be sitting side by side.
- Create a new folder here and name it TheBloodline-WindowsNoEditor_P. Move the TheBloodline folder into TheBloodline-WindowsNoEditor_P.

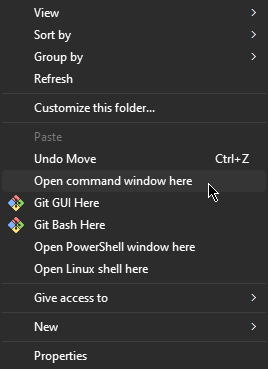
- While holding Shift, right-click an empty space in your Repak folder and choose to open the Command Window here. If you can’t do that, open your preferred terminal (most likely Command Prompt) and navigate to the current folder using the ‘cd’ commands.
- Run the command repak.exe pack TheBloodline-WindowsNoEditor_P.

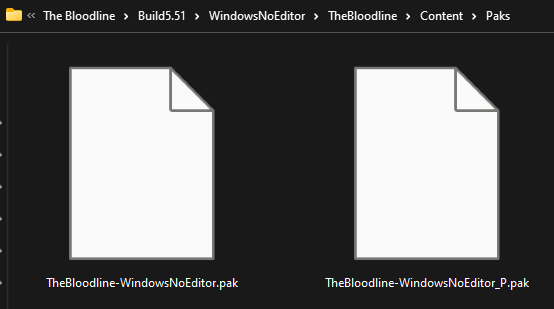
- Congratulations! You now have your Pak Patch. Move the TheBloodline-WindowsNoEditor_P.pak to ..\SteamApps\common\TheBloodline\Build5.51\WindowsNoEditor\TheBloodline\Content\Paks and run the game.
If your mod is a script and not an asset replacement, you might need to move your pak file to Unreal Mod Loader’s folders – either LogicMods or CoreMods. Unless you’re using SDK C++ for your scripting, your blueprint mod should go into LogicMods. This folder should have been generated within The Bloodline’s Pak folder.

Troubleshooting
The following could be some of the things that went wrong.
- You mistyped a file name.
- You didn’t precisely adhere to The Bloodline’s file structure. (Given the messy project structure, this might be the issue in 99% of cases. Take your time and double-check.)
- You attempted to pack files from your project’s content folder and not from the ..\Saved\Cooked\WindowsNoEditor folder.
- You forgot to move your cooked files into the newly created TheBloodline-WindowsNoEditor_P folder.
- You misunderstood which asset controls XYZ Content. (This happened to me with Grass. The seamless grass texture doesn’t seem to be what controls the look of grass.)
- The game updated, and the path/filename of the asset you’re patching has moved/changed/been deleted. Open the pak again in Fmodel. If it’s gone, it’s gone, chief. Keep in mind that this game is not in its final stages at all. Things change frequently, so expect this to happen at some point.
- Crashing? Check out this The Bloodline troubleshooting guide.
Misc Notes & Insights
- Most UI Textures seem to be in Content > CustomUI > BloodlineUIElements.
- Some elements in The Bloodline’s file structure contain typos. For example, after making an icon for a camp, you might think to name a calendar icon as icn_calendar. However, it’s actually icn_callendar in the files. This emphasizes the importance of double-checking everything.
- Texture sizes don’t appear to cause issues. The game seems to scale things to the necessary resolution without requiring adjustments on our side.
- Any modifications made to Texture2D carry over. For instance, turning off Texture Filtering for pixel textures prevents them from looking blurred.
- FModel doesn’t provide the full raw data of everything available. This can be an issue when trying to understand the logic behind a blueprint. Although there’s an option to import cooked assets into Unreal Engine in Project Settings > Engine – Cooker > Editor (Allow Cooked Content in the Editor), attempting to move assets from the unpacked Vanilla game results in unrecognized file type errors.
- To reduce your Pak file size and cooking time from raw to cooked, consider deleting objects in the Unreal scene such as the floor, the skylight, and everything in the outliner. Does it matter? Probably not, but it does make things smaller.
That's everything we are sharing today for this The Bloodline guide. This guide was originally created and written by It's Phoenix. In case we fail to update this guide, you can find the latest update by following this link.