After making several of my own custom solar systems by learning from scratch, I realized I could probably help out other players by making a guide on how to do it. So here we go!
1. Determine the planets you want to use
-Figure out what planets you want to use. If you want to use only vanilla planets, then this step doesn’t require any work. If you want to use planets from mods, make sure to subscribe to those mods and remember their names.
2. Set up a new game using “Empty World” preset
-From the main menu, click “New Game”, then click the “Custom Game” tab at the top. In the list of Custom Game presets, select “Empty World”. This preset starts you out with pure, empty space, allowing you to place your planets wherever you want. DO NOT start the game just yet, there are more things to set up.
-Now is the time to determine whether you want this star system to be for Creative or Survival. If you want players to use your star system for survival games, select Survival. If you want players to use it for creative games, select Creative. Note that this isn’t *strictly* necessary, because like all games, once players start they can simply go to Edit Settings and change the game mode to whatever they want. However, it is helpful to have the star system set to the game mode you intend before uploading.
2.5 Setting up the Advanced Settings
-Click the “Advanced” button to access the advanced settings. Most of the settings will be ignored in this guide, because you can change them after creating the world. However, there are certain settings you CAN NOT change after creating the world, which we will address here.
-The first setting to look at is “Asteroid amount”. The options for this will determine how many asteroids will spawn in your world. The higher settings result in many asteroids packed closely together, and the lower settings result in fewer asteroids with more distance between each one. Personally, I prefer the “Lowest density” setting, since I like having lots of open space, and the other settings feel too crowded for my tastes.
-Another setting to be changed is “Enable unknown signals”. This should be disabled, because having unknown signals spawn while you’re creating the star system will not only be very distracting, but will leave those grids in the world when it’s time to upload to the Workshop. Fortunately, this setting can be changed after the world is created, so disabling it for now is no big deal.
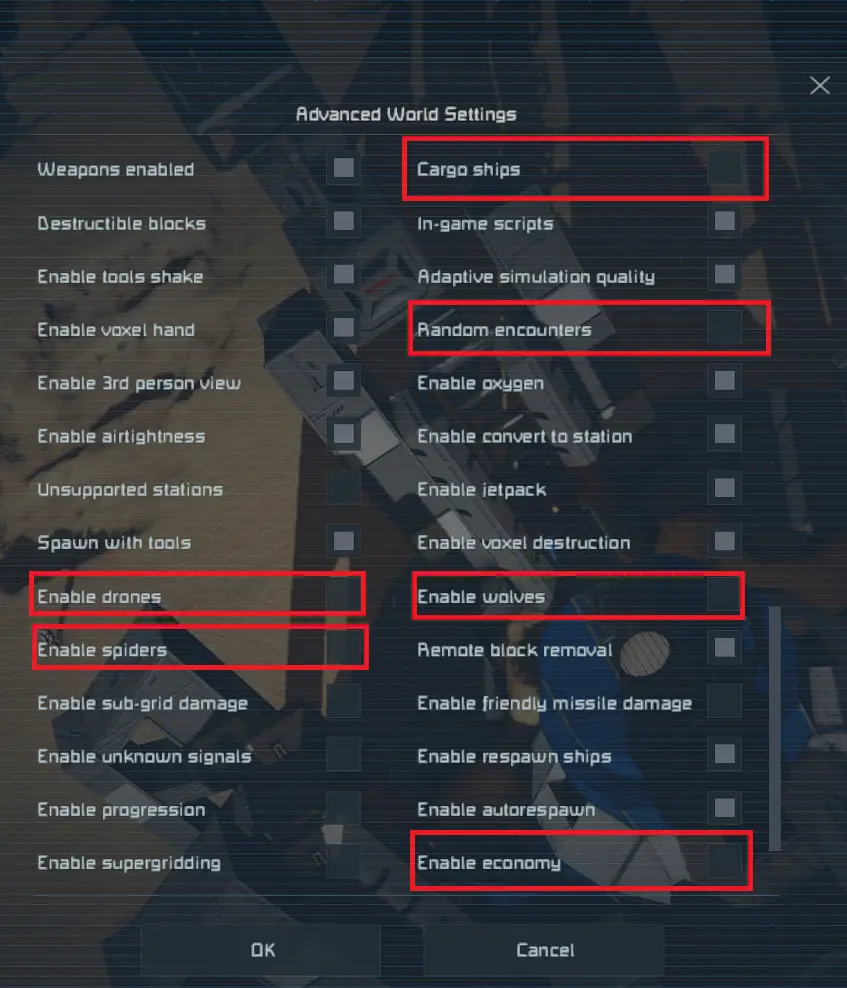
-The next settings to visit are all the settings involving NPC spawns. NPC spawns only take into account the planets that are in the world when it is first loaded; if you start the world with NPC settings active, in an Empty World preset they will never spawn because there were no planets when the world was created. However, if you disable the settings affecting NPC spawns BEFORE making the world, this “check” will not occur until you enable them. These settings are able to be changed after creating the world, too, so don’t worry.
So:
You must disable these settings (for now) if you intend your star system to have things like NPC stations, cargo ships, etc. This is especially important if you plan to use NPC mods with your star system!The image below will show you all the settings you need to disable if you want your star system to have functioning NPC spawns:
3. Adding desired mods
If you want to use modded planets in your star system, or if there are other mods you want this star system to use, now we will address this.
-After having changed the Advanced Settings to the way you want them, click “OK”. This will save your changes and take you back to the New Game menu. From here, click on “Mods” to open the mod selection screen.
-Now, you may add all the mods you want this star system to use. NOTE: Visual mods (examples: Milky Way Skybox; Better Looking Planets; Apothilight; etc) should be loaded BEFORE any planet mods. This makes the load order nice and organized, which should prevent any load-related problems.
-For example, let’s say I want to add four modded planets, a modded skybox, and the Better Looking Planets mod so the vanilla planets look nicer. Below is what that example load order should look like:
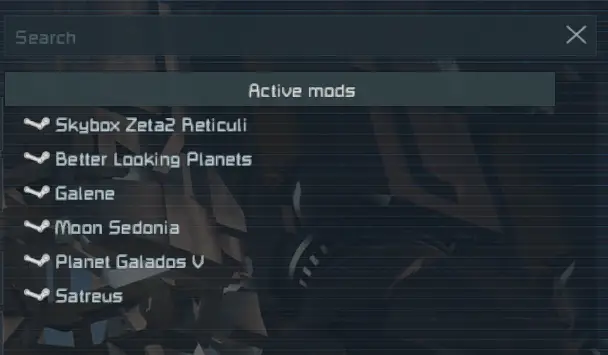
In this example, I placed the modded skybox first in the load order. I placed the Better Looking Planets mod (which affects only vanilla planets) after the skybox mod, but before the actual planet mods. This is because mods that are lower in the order will be loaded after the mods above it; if you use modded planets, it’s best to put the planets after everything else so that no other mod overwrites them. That said, in some cases modded planets may end up overwriting each other and producing conflicts. This usually results in the textures of the overwritten planet looking wrong or bad- sadly, there is no way to prevent this, other than removing any modded planets that conflict with the one you’re trying to use.
-After adding your visual mods and planet mods, last in the load order should be any miscellaneous mods you also want the star system to feature. To keep the overall star system’s file size as small as possible, ask yourself this before adding miscellaneous mods: “Is this mod something NECESSARY for the star system, something that I want to be packaged with the star system? Or is this mod optional, something that players could decide for themselves if they want to add it or not?”
If you think the mod is optional, leave it out. If you truly think the mod is necessary for what you want the star system to be like, then include it.
4. Starting the world and using the Admin & Spectator controls
-Now that you’ve made your mod list, you can click “Start” and create the world. Once you’ve loaded in, you may recall that planets are very big, and your character is very small. Navigating an entire star system with just your character takes a very long time. Thankfully, we have some special controls available to us that will turn you into a god!
-If you have the game set to Creative, skip the next sentence. If you have the game set to Survival, you will need to press Alt+F10 and click “Enable creative controls” in order to use the full Admin & Spectator controls.
Below is the list of controls and selections you will need to know to begin placing the planets and moving in between each one:
MOVEMENTF8: Activates spectator camera mode.
-To move around, use WASD like normal.
-To increase/decrease camera speed, hold Shift and scroll up/down, respectively.
-To teleport your character to where the spectator camera is, press Ctrl+Space
F6: Switches back to controlling your character.
PLACING PLANETSShift+F10: Opens the Spawn Menu.
-At the top, there is a drop-down box. Use it to select “Planets”.
-Select a planet by clicking once on its name.
-To change the size (diameter) of the planet, use the slider below the list of planets. To make smaller adjustments, press the left or right arrow keys.
-Once you have chosen the size, click “Spawn” to prepare placement of the planet.
Ctrl+Scrollwheel: Changes how near or far the planet will spawn from the camera.
Left Mouse: Places the planet.
DELETING A MISPLACED PLANETAlt+F10: Opens the Admin Screen.
-At the top, there is a drop-down box. Use it to select “Entity List”.
-Next to “Select:” is a drop-down box. Use it to select “Planets”.
-Below it you will see a list of planets that are currently in the world. To delete one, simply click on a planet and then press “Remove” down at the bottom.
NOTES ON MODDED PLANET SIZES:Most modded planets have a certain size that is ideal for the heightmap or general terrain. To figure out the ideal size of a modded planet, go to the Workshop page of that modded planet and look for the phrase “Recommended size”. 95% of the time, that is the phrase creators use when listing the ideal size of a planet. Once you find that number, make sure you spawn the planet using that number. If the recommended size is something like a range of numbers (e.g. “30km-50km”, then make sure you spawn the planet with a size that is within that range.
5. General tips on creating a star system
This section doesn’t contain anything strictly necessary, but while making my own star systems I thought of some things that others may find useful. Whether you use these tips or not is entirely up to you:
-Each time I place a planet, I like to place GPS waypoints at the edge of a planet’s atmosphere. This lets me measure exactly how far away I am when I spawn the next planet. To do this, just move the spectator camera near a planet, teleport the character there, and if your character is inside the atmosphere, move the spectator camera a little ways away from the planet and teleport the character again. Repeat this until you’ve found the edge of the planet’s atmosphere, then create a GPS waypoint with the name of the planet.
-If I want to create a realistic star system, I will think about which planets are “hottest” and which are “coldest”. Generally, the closer a planet is to the center of a star system (i.e. closer to the star), the hotter a planet is. Hence, I like to place things like desert planets, barren planets, lava planets, etc., at one end of the star system and pretend that is the “hot end”. Then I will place all other planets in the order of what I imagine their temperatures are. Earth-like planets are near the hot end (but not IN it), “average” planets with no noticeable climate can be placed wherever, and ice/snow planets are at the farthest away, making up the “cold end”.
6. Finalizing and uploading to the Workshop
Now that you’ve placed all your planets and made the star system how you want it to be, we reach the phase of finalizing and uploading.
-Before anything else, figure out which of your planets you intend as the “starting planet”. If you don’t care which planet players start on, skip this.
If your starting planet is a vanilla planet, it will be fine. If it is a modded planet, there is a chance players won’t be able to respawn on it with drop pods in survival mode. If your star system is intended for creative mode, you can ignore this. If your star system is intended for survival mode, test this out by pressing Backspace and respawning. At the respawn menu, make sure you see the planet you want to use as the starting planet in the list of available spawn locations. If you do not see it in the list, you have one of two options: 1. Choose another starting planet and make sure it’s on the list. If you want a specific kind of planet as the starting planet, you may have to find another modded planet that fits your criteria. 2. Build or place a “respawn shelter” on the intended starting planet and set the medical bay/survival kit to “Share with all”, or, if you have created a faction you intend the players to join as they enter the star system, choose “Share with faction”.
-After taking care of the above, save and exit to the main menu. Go into the “Load” menu, click on the save containing your star system, and click “Edit settings”. Rename the save to whatever you want your star system to be named (e.g. “Zork-98 Star System (Vanilla)”, “The Zork-99 System (Mods required)”, etc). After renaming, go to Advanced Settings again. You can ignore the other settings before that, such as the Online Mode and Max Players counter, because those things are able to be changed by players in their saves using that star system, like any other save.
-In Advanced Settings, change anything that isn’t already how you want it to be, that you didn’t change in Step 2.5. Things like the world size limit, the view distance, day duration, block progression, etc. Keep in mind that all of these can still be changed by the player in any save using that star system, like any other save. If you want NPC spawns to function in your world, now is the time to revisit the settings in the picture from Step 2.5 and make sure all the ones you want to spawn in your world are enabled. If you don’t want NPC stations, leave “Enable economy” set to off. If you want spiders and wolves, set them to on. So on and so on. Once you have configured the Advanced Settings to how you want them, click “OK” until you return to the Load Game menu. Now, we upload!
-To upload your star system, click on the save containing your star system, then click “Publish” on the left. You will be prompted to attach any desired tags, and choose where you want to upload it. Once you’ve made those choices, click “OK”. It should now open the Workshop page in your Steam browser.
-From the Workshop page, you can do things like edit the description, add preview images and videos, add required items, change visibility, etc. You don’t have to change any of these, but if you want people to have a better understanding of what your star system is like, giving it a detailed description and adding some preview images helps a lot. What you absolutely MUST do, however, is go to “Add/remove Required Items”, click the “Subscribed Items” tab, and add all the mods that your star system uses. Otherwise, players won’t be able to see which mods they need. Once you do that, click “Save and Continue” at the bottom-right to return to the Workshop page. If there’s nothing else you need to do, then make sure visibility is set to “Public” (or whichever option you want), and you’re good to go! Congratulations, you’ve uploaded your own custom star system! 😀
Epilogue?
There are some other things I’ve left out of this guide, such as tips on getting nice preview images, good formats for the description of the star system, how to make custom thumbnails, etc. These aren’t really important, and you can find plenty of lists on the forums or guides. Some final things I do want to cover though:
-If you want to test out your star system after publishing it to the Workshop, go to the main menu, click “New Game”, then “Workshop”, and find your star system. Start a game. Note that the game may give you an error saying “World already exists! Download and overwrite?” This error appears because the save file you uploaded to the Workshop, which is still in your list of saved games, has the same name as the game you’re attempting to create. It’s best to go back to the list of saved games, and rename the original to something like “Zork-99 System *ORIGINAL UPLOAD*”, etc. THEN you can start a new game with your star system and begin trying it out!
-If you find that you want to make some changes, you do not have to start all over again unless you plan on adding/moving around planets, or want to change things like the asteroid density. If you don’t have to start again from scratch, you can simply load the original save, make the changes, save and exit, and then click on “Publish” again. This will update the Workshop page with the changed save file, while also keeping the description, images, etc. that you originally had for the page.
-If your star system uses modded planets, make sure to credit the creators of those mods in the description of your Workshop page! This is basic Workshop etiquette! If you have to credit many different creators, a blanket statement such as “I did not create the mods used in this star system, all credit goes to each mod’s respective creator” is usually perfectly fine.
That should be all you need to know to create your own custom star system. If parts of this guide need clarification, or you think I’ve forgotten something, tell me in a comment and I’ll do my best to address it.
If you like this guide, consider rating and leaving feedback! If you really want to put a smile on my face, consider checking out my Workshop uploads 😀
That's everything we are sharing today for this Space Engineers guide. This guide was originally created and written by Mantha. In case we fail to update this guide, you can find the latest update by following this link.
Привет
Это старый обзор
А как добавить экономику на вставленные планеты из мода
Чтоб пр спавне на них появлялись торговые станции с контрактами
Hi, this is an old review, But how to add an economy to the inserted planets from the mod So that trading stations with contracts appear on them from now on