- Заголовок: Яркий рыцарь
- Дата выпуска:
- Разработчик:
- Издатель:
Information about Vivid Knight is still incomplete. Пожалуйста, помогите нам заполнить детали игры, используя это контактная форма.
An explanation of the mechanics and ways to approach them effectively. Also brief boss tips.
Basic Mechanics and Tricks
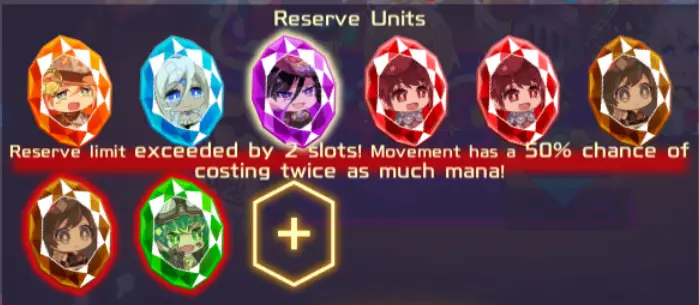
- Every step you take costs one mana. Однако, when you exceed your reserve limit (6 for Amelie, 5 for Zeola, max party size of 12 каждый), each additional unit will give you a 25% chance to spend 1 more mana. You can’t spend more than 2 mana per step, so having more than 4 units is equivalent to having 4 units over your limit.
- If you are over your reserve limit and have one mana, you will only spend one mana and not be penalized. Таким образом, a good trick is to have a mana front on hand and use only one charge at a time. Таким образом, if you roll such that you only spend one mana, you will get the 2nd step automatically at a one-mana cost. This can extend your range tremendously versus using all of your charges and potentially rolling 2-cost steps.
- Don’t be afraid of hitting 0 мана. You will not automatically lose if you run out of mana. Your units will take damage for every step while at zero mana, but the damage can be relatively minor at small distances. If you’re one or two rooms away from the stairs, don’t waste mana fonts. If you having healing potions, you can travel several rooms and then heal your party close to or at full HP. Healing potions can enable you to move far distances while over the reserve limit without too much risk.
- If you’re on a boss floor and running low on mana, a potion can save you. As long as your unit doesn’t die from the damage, you can go to the boss floor and heal back up to full hp AT the door. I find potions more useful than mana font for reasons like this; don’t be afraid of 0 мана.
- Symbols are the most important part of the game and will determine whether you win or lose a run. It can also shape how your team should look towards the 2nd half of the run. When you have three copies of the same unit, you can upgrade the unit. There are three ranks/grades; базовый, серебро, и золото. When you have two copies of a unit, you’ll see the third copy (in the store or in a treasure chest) with the sparkling as seen. Three basics = one silver, three silver = one gold.

- The most important part of this mechanic; when you upgrade a unit to silver, its symbols are stored on your character permanently for that run. That means you can sell your silver units and lose effectively nothing.
- Making a unit gold-ranked is usually not a good idea. As it requires 3 silvers (9 основы), it can be difficult to actually do. While the stats do increase greatly (and certain units, like healers/support, double their skill’s strength), it’s rarely worth the investment unless you’re at the last floor and have the gold and luck to do so.
- Across the units, по статистике… the bronze-tier units do have lower stats than gold units. Однако, the defense values and HP are largely the same same. These two important stats are not significantly different. Silver/gold tanks will have more defense than the bronze tanks, and there’ll be slightly higher HP with silver/gold units. Однако, getting bronze units to silver rank is much easier and they’ll have twice the HP of gold units at basic rank. The difference in defense becomes less meaningful and sometimes it’s better to use second-grade bronze units over basic-grade silver/gold units, especially if you don’t have green activated. You shouldn’t keep bronze units end-of-run, but sometimes they can be better than your gold and many players have beaten Witch’s Maze with bronze units.
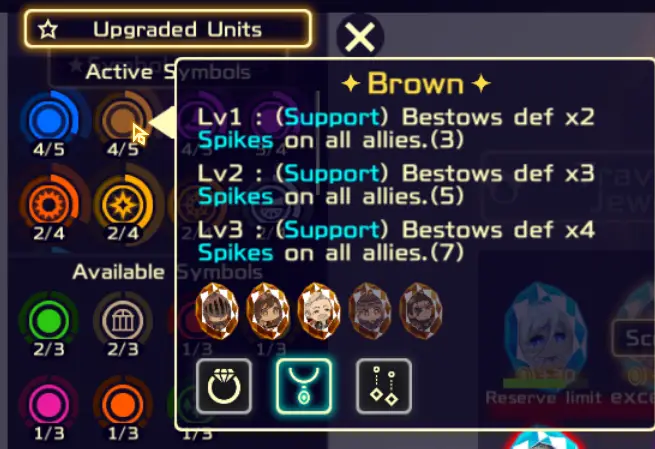
- When you hover over a symbol you have, you can see all of the units and accessories currently giving you that symbol (lit up as in the picture). You can also see what units that can give you that symbol (unlit) so you can plan accordingly and keep track of how likely you are to reach the next symbol level, which are the numbers in parenthesis at the end of each level.
- Every unit costs 30g to buy and 30g to sell. That means there is no downside to buying units other than filling your party. You should buy units that you are close to completing symbols with before refreshing the shop, on the off chance the refresh gives you your third copy. You can sell the units you buy and have the same amount of gold after as before. Однако, you shouldn’t waste 30-60g on units/symbols that don’t provide mid to long-term benefit, you’ll have to use your best judgment and risk management skills.
- There are two damage types in the game, physical and magical. Both types use the same “Атака” статистика. В общем, magic will do more damage as fewer enemies have a defense against it, однако, some enemies will have high magic defense and low physical defense. Ты, игрок, will also have low magic defense in general. Most of your units will have zero magic defense and both sources of increased magic defense (Wheel of Fortune symbol and Taima Necklace) offer lower magic defense versus their physical defense counterpart. Также, the status effect freeze only affects physical damage, not magical damage. Таким образом, you should always be warier of magic attacks. It’s best to save your shields for magic attacks, в целом. Click on enemies to view their skillset and make your best judgment on how to mitigate damage. Normal attacks seem to only do physical damage.
- You can tell when an enemy is using a magic attack versus a physical from their warning symbol.
- В начале игры, you won’t have many things unlocked. Таким образом, you should focus on units (for symbols), preferably towards bronze (so your early game becomes easier) and symbols of higher importance.
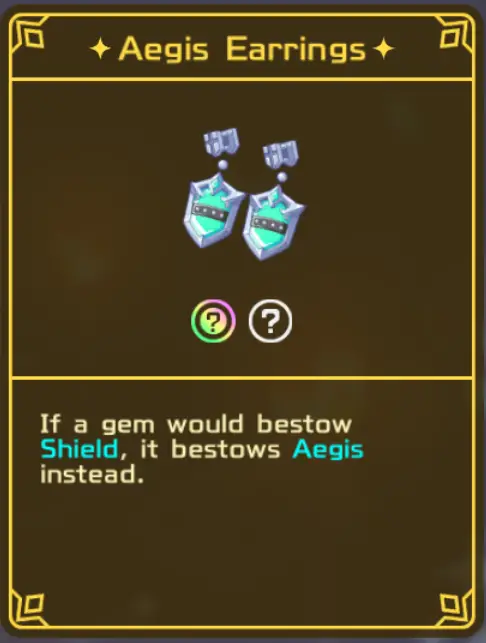
- В конце концов, you’ll unlock new shields. These shields are all extremely powerful, especially if you can get Aegis Earrings which remove the negative effect from the shield, allowing you to do full damage while taking half.

Arcane Shield is one of the best spells in the game. It reduces the cooldown of purple gems (щиты, лечит, and buffs). All shields have 7/6/5 turns of cooldown. This means three silver-ranked Arcane Shields give you infinite shielding after the first rotation with a single turn lag. Three gold = infinite turns no matter what, as they’ll always refresh each other. Two Arcane Shields are usually sufficient, as one or two of the other shields can be more valuable than a third arcane.
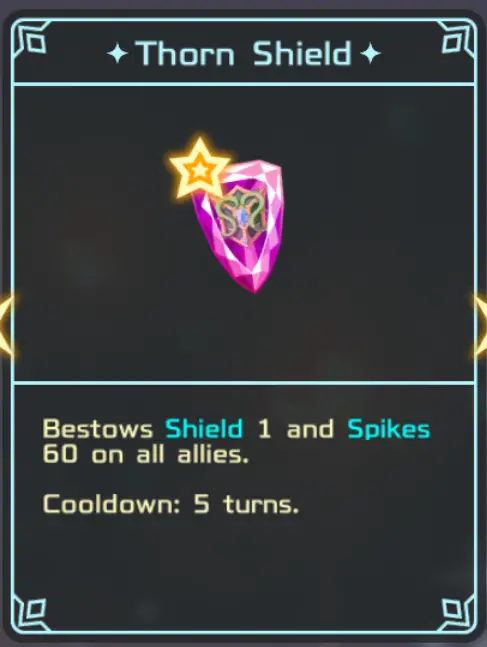
Thorn arguably the 2nd best shield. 60 spikes on gold are powerful and can add a lot of damage, especially as it isn’t affected by the shield’s negative effect. Silver ranked gives 30 spikes which is still substantial.
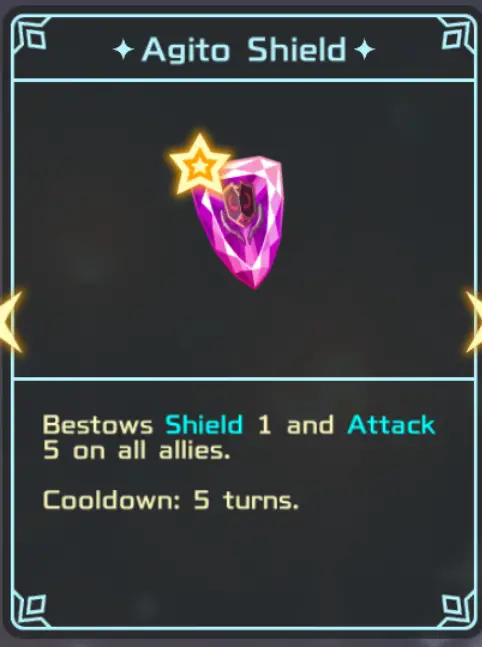
Agito is a solid shield but becomes the best with Aegis Earrings. Every use increases your attack stat by 5%, which can add up over time. Two Agito, an Arcane, and Aegis Earrings are a powerful combination.
Символы
Symbols are the core of the game and understanding how they function and how they interact with the rest of the game can be the difference between the game being obscenely difficult and the game being moderately difficult. Before a delve into each symbol, there are two exceptions:
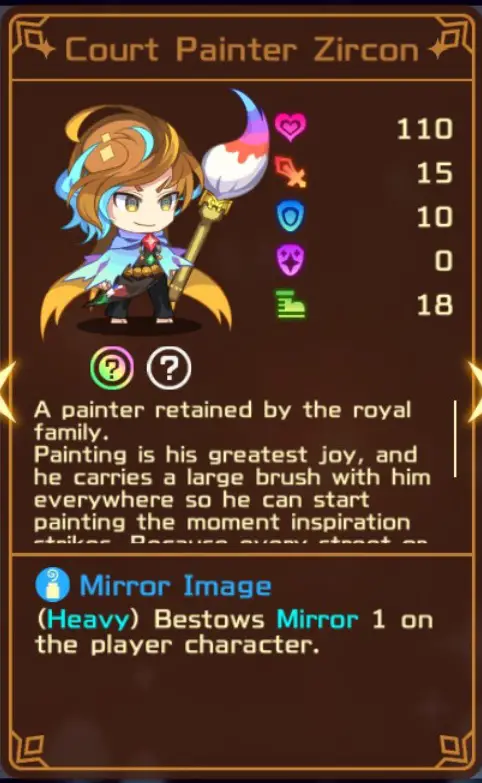
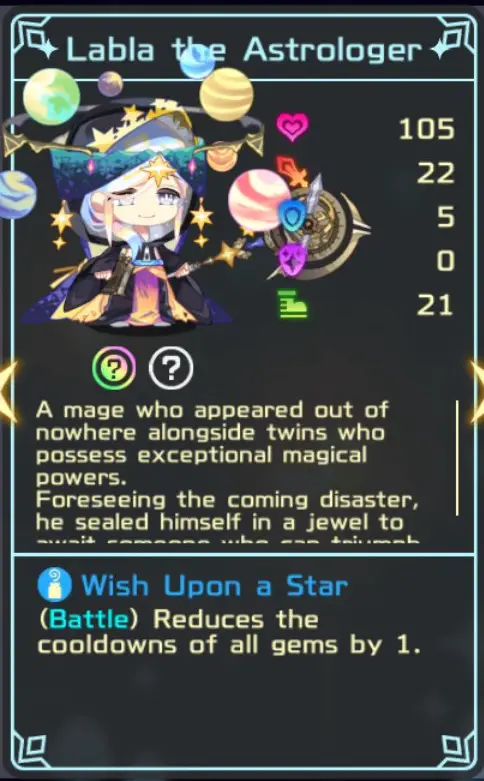
These two units give a random color and a random non-color symbol every run. Изредка, they’ll give you a symbol that is more difficult to get (fool, звезда, wheel of fortune) which can change how you approach each run.

Amelie has access to five blue units (this picture has one of the exceptions). Four of those units are bronze and the fifth is gold. Getting access to level 1 freeze is extremely easy as a result and level 2 is not too difficult. The gold unit, Сапфир, is a solid magic-damage unit that helps in accessing level 2. Уровень 3 freeze requires at least one accessory to give blue, so don’t expect to get it.
Freeze is incredibly powerful, особенно в начале игры. It reduces the physical damage enemies do to you equal to the frozen amount. This is a flat reduction after attack-defense calculations, which means you can turn normal attacks and physical skills to 0 damage with enough freeze. Уровень 1 freeze gives 8 freezes a turn (and naturally maxes at 16) что полезно. Однако, you should try to get level 2 как только сможешь, if you have a lot of physical bosses on your run, как 20 freeze/turn (40 max stack) can be the difference between dying and taking little damage.

Amelie has access to five green units. Они входят 2 бронза, 2 серебро, и 1 золото. Getting to level 1 green is extremely easy, especially as you should keep any accessory that gives a green symbol as your highest priority. Green gives you x10/x20/x30 health per symbol type you have activated. This generally translates to +100-150 health per unit at level 1 и +200-300 health per unit at level 2. As unit health is fairly consistent across grades and rank, green can give between +50% health boosts to +100% health boosts easily.
Getting to level 3 green is ideal, but it requires every unit upgraded (or in your party) and two accessories that give green. As this is very RNG-dependent, it’s not likely to occur. Уровень 1 и 2 green is sufficient for most runs and focusing on damage mitigation is as important as base health.
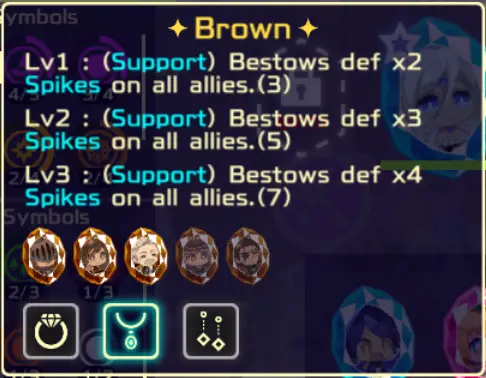
Amelie has access to five brown units. Three bronze, one silver, and one gold. The gold unit is the best tank, Bron, and the silver is one of the best healers. Таким образом, getting brown to level 1 и уровень 2 это легко. Однако, you shouldn’t worry if your accessory has brown or not. Уровень 1 brown gives you plenty of power if you are unable to make it to level 2. Уровень 3 is difficult to hit as it has the two accessory requirements and there are more important symbols to worry about filling.
Brown is deceptively powerful. It gives you spikes proportional to each units’ defense stats. As spikes halve at the end of each turn, this means that brown will, at the max stack, give you spikes equal to x4 the units’ defense at level 1 and x6 at level 2. This damage is not mitigated by defense stats and deals pure damage. This means Bron will have 80 spikes at level 1 brown and 160 spikes at level 2 коричневый.
ОДНАКО… if you have a defense command activated either through the symbol or the accessory, these multiples the number of spikes your units have. Star gives an additional 40/60 spikes per unit and the necklace gives 48/72 шипы. A truly broken combination is Protect Necklace+Double Earrings on top of level 1 Star giving you +34 защита (massively increasing physical damage mitigation on ALL units) и уровень 2 коричневый. This turns Bron into a unit that has 324 шипы, which will melt enemies who hit him, and even your squishy base 0 defense units will have tanks that have 204 шипы. Brown should not be underestimated as a damage source.
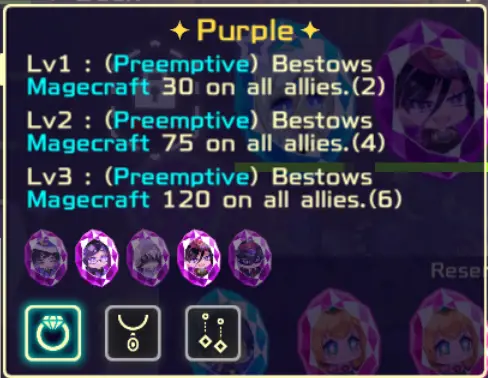
Amelie has access to five purple units. Two bronze and three silver units. Вдобавок к этому, it only requires two units to reach level 1, making it very easy to achieve and a good symbol-fodder for green. Magecraft is also a powerful symbol as it increases your magic damage a good deal. As many enemies don’t have good magic defense, this becomes more powerful even if it only works on certain skills. If you can get a strong magic attacker, purple level 2 is a good idea. If you don’t think you can, keeping it at level 1 is enough to power up green.
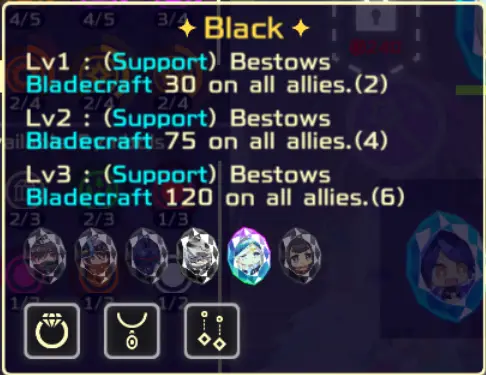
Amelie has access to five black units (снова, the exception unit in the picture). Two bronze, two silver, one gold. Black is similar to purple in needing only 2/4/6 symbols to level up and gives the same damage increase, однако, it does use a gold unit instead of a third silver. I personally like using the gold unit (Morion), but there are generally better attackers except under certain builds where she easily becomes the best damage-dealer in the game. Черный, в противном случае, is basically the same as purple, except it’ll add more consistent damage while being less potent due to enemies having more physical defense.
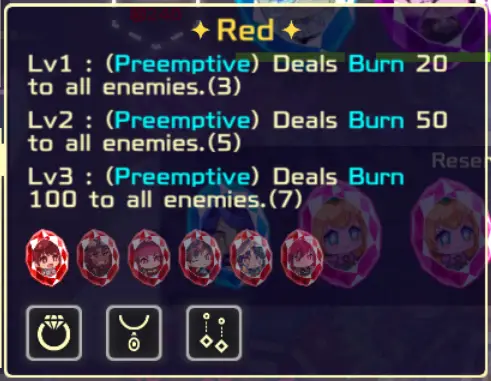
Amelie has access to six red units. Two bronze, three silver, and one gold. As the gold unit is one of the best physical attackers in the game, especially with a shock-based build, red can be either difficult to level up or easy depending on your build. Burn is powerful, однако, and can be good passive pure damage. Level 1’s 20 burn is decent but will not amount to much late-run. Level 2’s 50 burns will see plenty of value. Однако, under a shock-burn build, getting to level 3’s 100 burns is easy, and will see enemies and bosses melt. With only needing one accessory symbol to reach, it’s not difficult if you’re aiming for level 3.
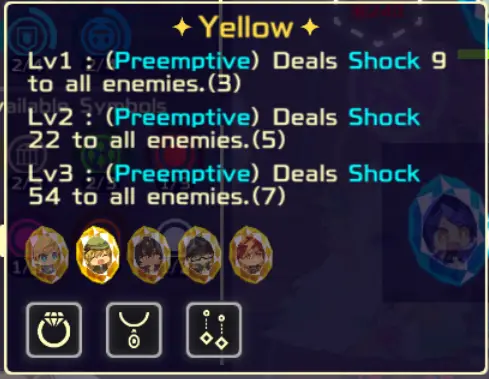
Amelie has access to five yellow units. Three bronze, one silver, and one gold. This makes reaching level 1 easy but level 2 сложнее. 9 shock damage per hit is nice but won’t amount to a whole lot late-run. Yellow is great fodder for green but really shines in shock-burn builds where you can do hundreds of damage on singular attacks. Can be incredibly broken, just like brown, but requires a similar level of RNG and planning.
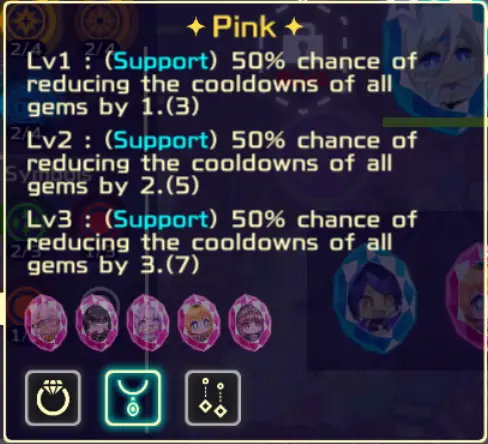
Amelie has access to five pink units. One bronze, three silver, and one gold. Lowering your gem cooldowns is always nice. Однако, в идеале, you’ll not have a shield available (see general tips) and you shouldn’t have many turns where you have nothing to cast. Плюс, you only get a 50% chance for a CD reduction across all levels, making the proc inconsistent and potentially meaningless, and you definitely shouldn’t need gems to be reduced by 2 или 3 поворачивается. Helpful but mostly fodder for green.
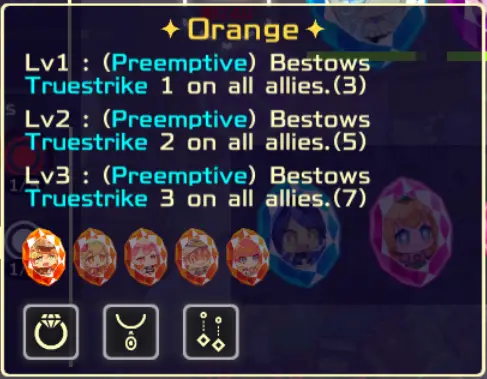
Amelie has access to five orange units. Two bronze, two silver, and one gold. The gold unit is Sol, which is a powerful unit. While she is better in shock-burn teams, she is solid in every team. Таким образом, getting level 1 orange is easy and very valuable. You shouldn’t even need to try and get orange units, получающий 3 will likely happen by the end of the run naturally. Уровень 1 orange is important as it gives your units Truestrike on turn 0. This turns characters who have the skill type “Особенный” on from the start; this includes Sol. Уровень 2 и 3 orange are still valuable, especially with the forest symbol, but level 1 is much more valuable for the reason to turn on special units immediately.

Amelie has access to two white units. One silver and one gold. The gold unit here is my favorite and thus I find white easy to turn on. Реген 25 is powerful as it gives a lot of healing to your units, even though it only triggers skill use. With Haste Necklace (bonus action on your front-most unit) and/or Fool, your tank can become very difficult to kill.
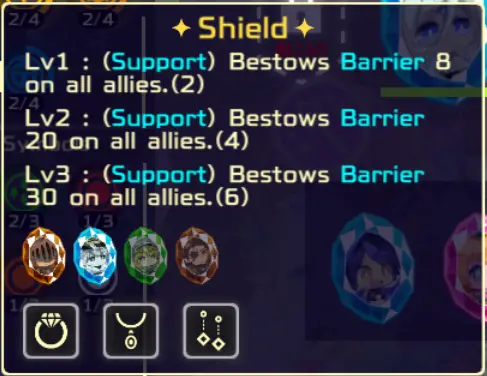
Amelie has access to four shield units. Two are bronze, one is silver, and one is gold. Однако, as the gold unit the best tank in the game, it’s easy to reach a level 2 щит. Как 8 barrier/turn is not a lot (между 4-8% of your HP/turn), getting to level 2 shield is important; thus you should try and keep accessories that give a shield symbol unless you’ve reached the four-unit threshold.
Естественно, уровень 3 shield is better as it gives +10 effective HP each turn, but as it requires at least two accessories with the shield, I don’t think it’s worth it to aim for a level 3 щит. Уровень 2 will give you plenty of survivability as 20 barriers will amount to roughly 5-10% of your HP/turn at the end of the game.
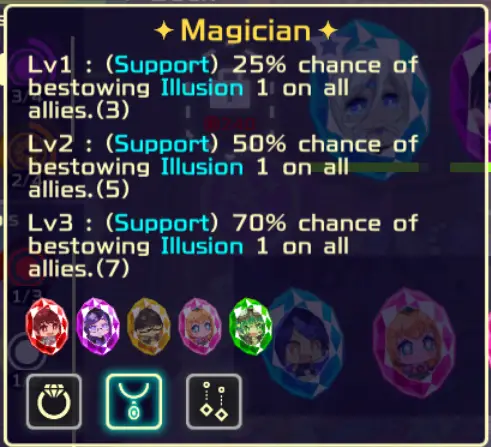
Amelie has access to five magician units. Two bronze, two silver, and one gold unit. The gold unit is a solid AOE magic attacker so getting to level 2 is not difficult. Однако, the magician is an underwhelming symbol. While illusion is a powerful buff, it only negates one attack (and every boss has at least 2 attacks on top of many having multi-hit attacks). На уровне 1, you only have a 25% chance of negating an attack, и 50% на уровне 2. В лучшем случае, the symbol might protect your backline from an AOE attack, but the value is inconsistent and unreliable. Useful if you get it, but not a symbol you should strive for over others.
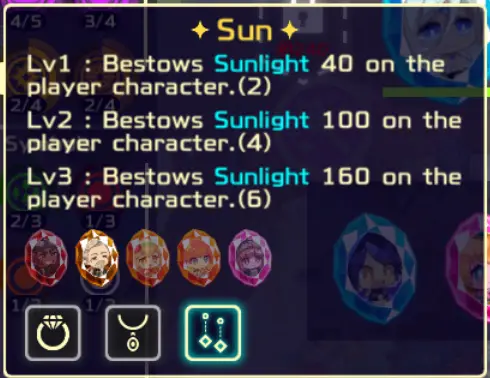
Amelie has access to five sun units. Three bronze and two gold. Getting level 1 sun is thus really easy but getting to level 2 sun is a bit harder. Sun is a strong symbol that boosts the damage of your spells. Однако, as that requires you to spend your single cast on a damage spell, will only see use in the turns where you can cast an offensive spell. 100 Sunlight (уровень 2 Солнце) can massively increase damage and turn fights against trash into easy battles with good offensive gems. I wouldn’t waste accessory slots on the sun but they are nice bonuses if they come with other good symbols. As both gold units are powerful (Siris does 300% magic damage to a single target and Sol gets 12 flame blades and 60 attack buffs), getting Sun to level 2 isn’t hard at the end of the run.
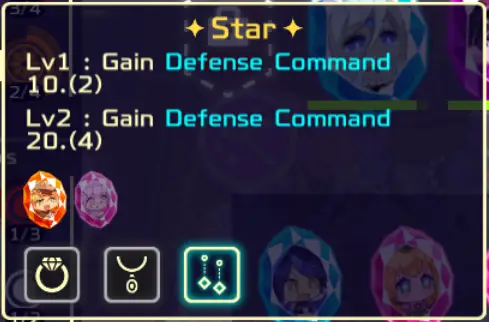
Amelie has access to two-star units. One bronze and one silver. Since there are only two units and you need two to get level 1, it can be difficult to fulfill. This makes star on an accessory incredibly valuable. Однако, the silver unit Pinto is one of the best defensive units in the game as she gives a massive barrier to multiple units (and double on one) so there is good reason to run her anyway. Очевидно, a star is a powerful symbol as it gives your units a flat defense boost, turning squishy units into not squishy units and tanks into super tanks.
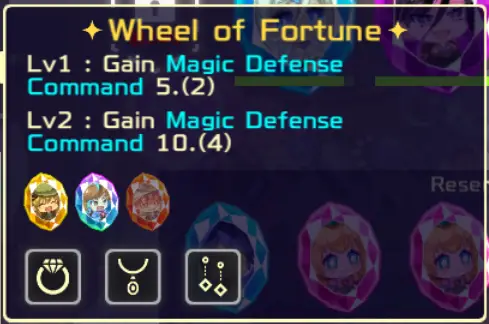
Amelie has access to two-wheel of fortune units. One bronze and one silver unit. На картинке, you can see one of the exception units giving the symbol, which shows how powerful they can be. Wheel of fortune is incredibly valuable as it’s one of the few ways to mitigate magical damage, even if it runs at half the rate of the star. As many of the most powerful attacks of bosses use magical damage, any mitigation is powerful.
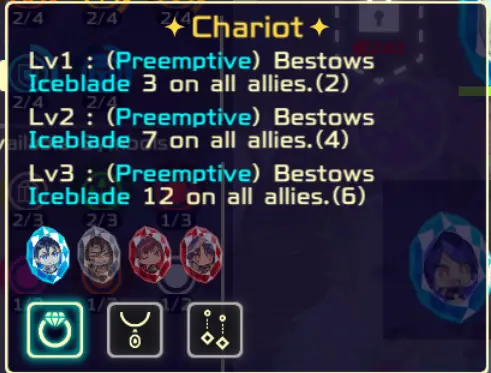
Amelie has access to four chariot units. Two bronze and two silver. The chariot is a good symbol as it gives additional freeze. Однако, it only triggers normal attacks and not skills. В лучшем случае, уровень 1 chariot gives 18 freezes/turns to a boss, which is decent, but level 1 is easy to acquire. Уровень 2 can give up to 42 freezes/turns which is massive and will turn physical bosses into punching bags. Однако, уровень 2 chariot can be a bit difficult to get, and taking an accessory with this might be a good idea depending on your run. While level 3 is tempting (до 72 freezes/turn), it’s a trap. Requiring two accessories is a steep cost and level 2 will give you plenty of value by itself.

Amelie has access to four hanged man units. Two bronze and two silver. The hanged man is insanely powerful, even at level 1. Giving enemies -12 physical defense can drastically increase your damage. Level 2’s -36 will turn even tanky enemies into squishy ones (and negative defense IS a thing). I wouldn’t go out of your way to reach level 2 unless you have a good setup for physical damage (black symbols, good units, и т. д.). But getting level 2 can make a huge difference. Уровень 3 is less of a trap than hanged man’s as more -defense is always good, but I still don’t recommend trying to force it.
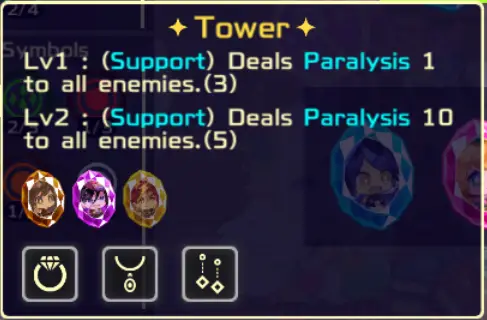
Amelie has access to three tower units. One bronze, one silver, one gold. The silver is a decent healer and the gold can be good in shock-burn teams. Однако, they’re not as amazing as other units, по моему мнению. The tower is a terrible symbol as it requires all three units just to reach level 1, и уровень 1 is terrible. 1 paralysis a turn means it’ll rarely proc. Good green fodder and nice if it procs, but terrible.

Amelie has access to five forest units. Three bronze, one silver, one gold. Уровень 1 forest is amazing in itself, as it’s an additional 100% attack in magic damage on each skill proc. If you can get level 2, which isn’t hard as two of the units also give green, your damage will spike. This is even better with the orange symbol and can lead to strong (or even short) battles against trash mobs. Уровень 3 требует 2 аксессуары, so I wouldn’t expect to get it. But a forest is a symbol worth considering aiming for level 3 в.
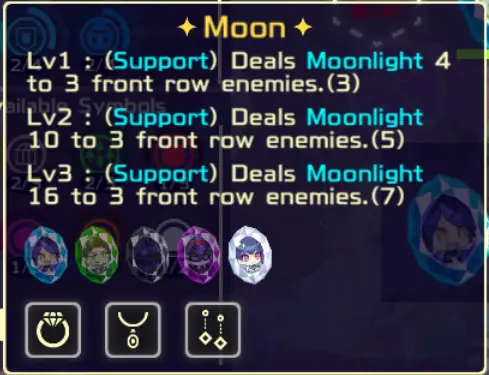
Amelie has access to five moon units. Two bronze, two silver, and a gold. Luna is the gold unit here, which is the white unit mentioned previously. Moon is thus fairly easy to get to level 1 и, if you love Luna like me, not difficult to get to level 2. While moonlight can be inconsistent with its’ damage as it may halve on each hit, it’s still a massive damage boost. 40% damage at level 1 и 100% на уровне 2 is massive. Естественно, units that have single-hit attacks benefit vastly more from this while multi-hit units will likely waste the debuff. Still a solid symbol.

Amelie has access to four fools. Two bronze, one silver, and one gold. The gold unit is Rubela, which is one of the units that have the potential to be the best in the game. Getting the fool requires some luck and planning but is a great target for an accessory. It’ll give your units a 2nd action many times and you’ll see consistent boosts in damage. Especially as every time godspeed gives you a second action, your character will roll on their skill again. As many damage dealers have around 20 ловкость, this effect is likely to occur every 2 к 3 поворачивается.
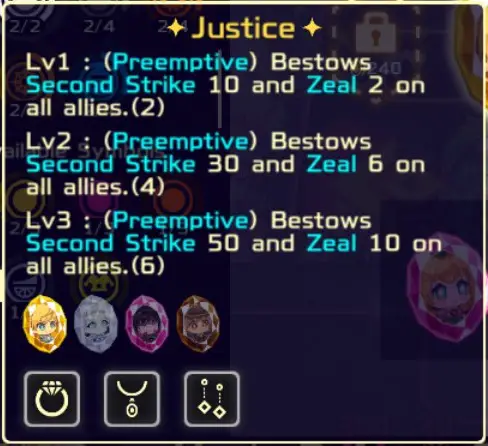
Amelie has access to four justice units. One bronze and three silver. Having only one bronze unit makes it a bit harder to access this, but requiring only 2 units for level 1 mitigates that as well. One of the silver units is Dia who gives white, making her a strong target to hunt for, and Petri is a solid healer (who gives strong barriers). So getting justice is not too difficult. Уровень 1 justice isn’t impressive but getting an additional 10 повреждать (that is lowered by the defense) приятно, plus it’ll increase by 2 on each normal attack. Уровень 2, однако, really shines in the ramping of damage. Morion benefits from this symbol immensely as she gets two actions per turn and her skill is the “особенный” type so she’ll always use a normal attack. Her damage will ramp up quickly. Add on godspeed/fool on her 25 ловкость, and she’ll turn into a ridiculously powerful unit.
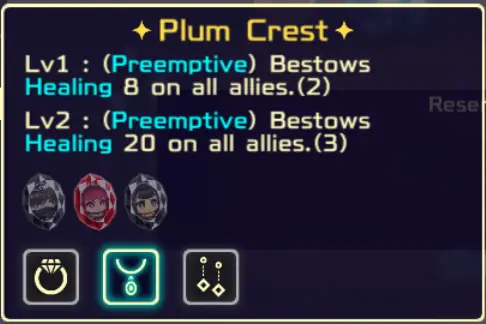
Amelie has access to three plum crest units. One bronze, one silver, and one gold. The gold is Morion so the difficulty in this depends on if you use her or not. Getting level 1 plum crest is easy, even if there are only two non-gold units, and is a symbol you should aim for. Выздоровление 8 hp on each activity will help your survival throughout the run. Level 2’s 20 hp per action is massive and should be one of your priorities. Plum crest on an accessory is definitely something to aim for if you don’t plan on using Morion or can’t upgrade her. Снова, это 20 hp per action; godspeed/fool and Haste Necklace allows this to trigger twice in a round.
Советы боссу
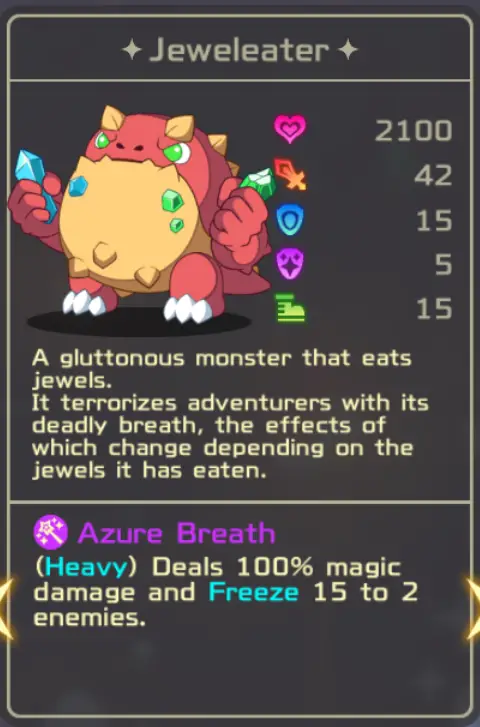
Jeweleater is the easiest of the first bosses. His attacks are simple and he has lower defenses than the other bosses, excluding Gunse Mushroom. The primary issue is that he can cast shock on your whole party, which adds up over time, and his physical attack hits one unit 4 times at 120%. Go into this with a solid tank at the front and try to build freeze. Any source of consistent healing, whether from crest plum or a healer, will cover the rest. Having one or two damage dealers to fill the last spots in your party should be sufficient.
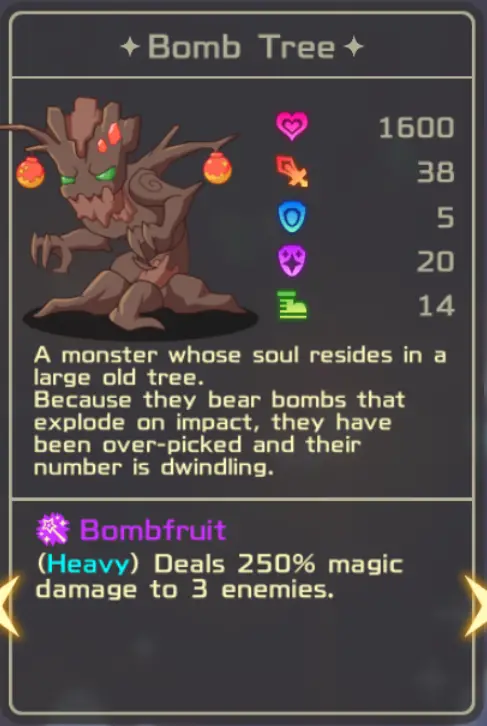
The worst boss of the first group. While his physical defense and health are low, he does a lot of AOE damage. As you’ll likely only have three or four units by this point, his skill hits your whole party. If you have access to Magic Defense Command, возьми. But really, you want as much barrier and healing as you can. He’ll die quickly, but he’ll kill you quickly. It’s a DPS race. Try and get three shields at least, a healing gem is a good idea, and a bombfruit to wipe his allies out on the first (or second if Bomb Tree starts with a skill) повернуть.
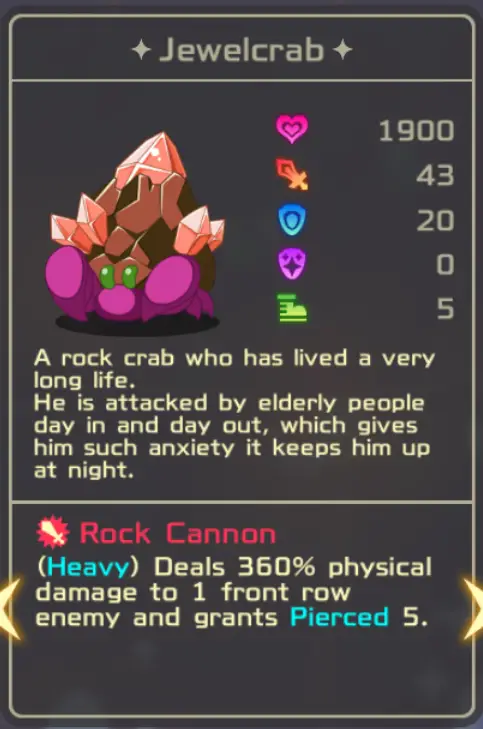
Jewelcrab can be difficult or easy depending on what you can roll. Freeze+shield+solid heals makes this easy. He hits a single unit for massive damage, so if you can mitigate that, he’ll be easy to beat. He starts off with really high defense but every use of his skill lowers his defense by 5. Действительно, хотя, you want to go into this with magic users. A bombfruit helps to remove his allies so you can focus on him ASAP. The less time you spend in this fight, the better your chances.
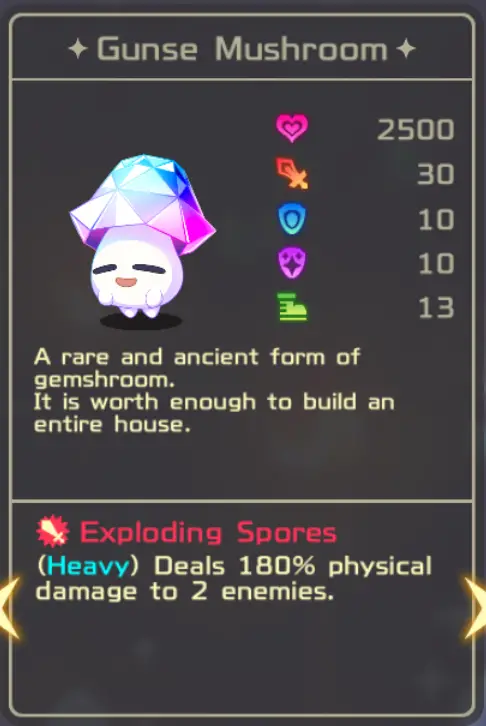
Is a weird one. The fight consists of two parts; the boss and his post-death ad. I find the second half harder as there are a lot of enemies and if you can’t kill them quickly enough, one or two may end up with a stack of 6 или 8 self-destruct. That can kill you at this stage of the run. Keeping a bombfruit for the 2nd half can help, but the mushrooms do have 30 magic defense (versus 0 физическая защита) so an AOE physical damage spell is a better choice. Однако, the boss can become deadly if you’re not careful, as he boosts his attack by 20% with his support skill and his counter skill decreases your defense by 5. No special strategy is needed; go in with what you can, freeze+shields+heals helps, especially with self-destruct.
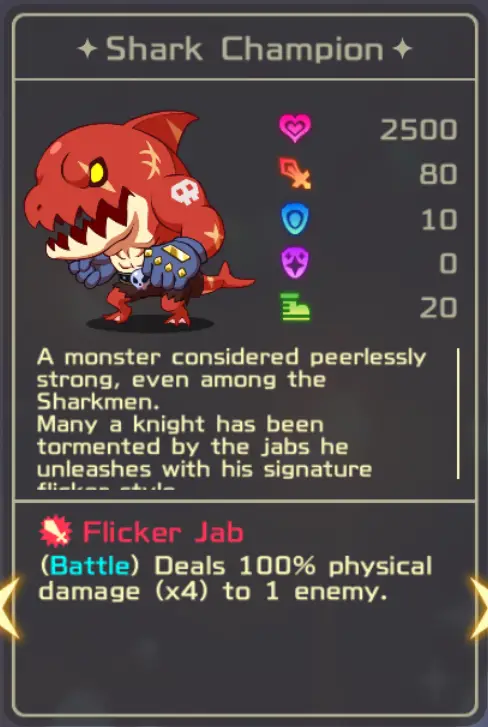
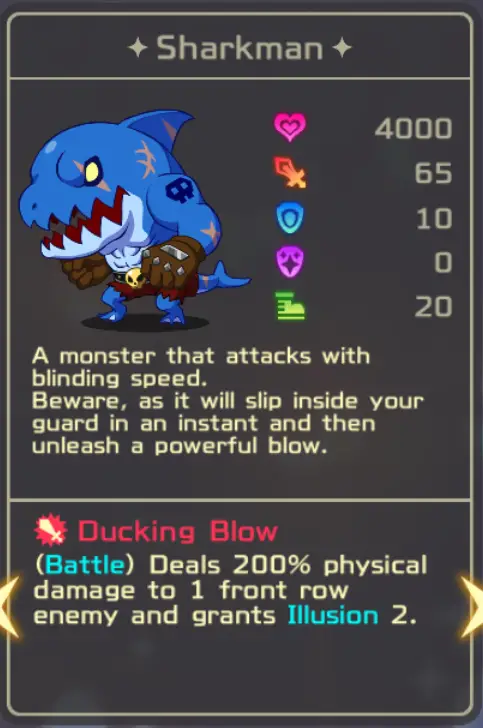
These bosses can be run-enders or easy. They do purely physical damage, so high freeze and defense are key. They have really high attack, so even their low % damage skills still hurt. The real problem is that if you kill the blue shark first, the red shark will enrage and likely kill you. AOE is incredibly important and any magic-AOE unit shines here. But you absolutely need to ensure you have solid physical defense stuff above all else. Multiple shields are important here.
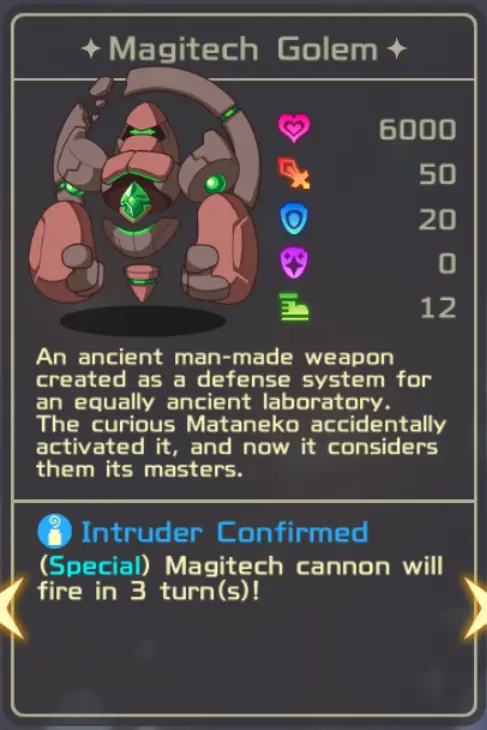
Magitech Golem can be difficult. Однако, he spends three turns charging up and you know his 4th turn will be a powerful attack. Таким образом, you should try and kill him by the 4th turn; his low agility means your units will get the 4th turn to act first. Однако, killing him in 4 turns can be difficult, so obviously shield is necessary here to survive. After the 4th turn, he becomes a lot easier, even though he’s one of the few bosses whose skill is “Боевой” вместо “Тяжелый”, meaning he could use his skill in both actions in a turn. It can be luck-dependent on how much he blasts you, but you shouldn’t need more than 5 или 6 turns to kill him anyway. Shield symbol is more important here, as getting 60-80 barrier on your units for turn 4 will help more than any other symbol.
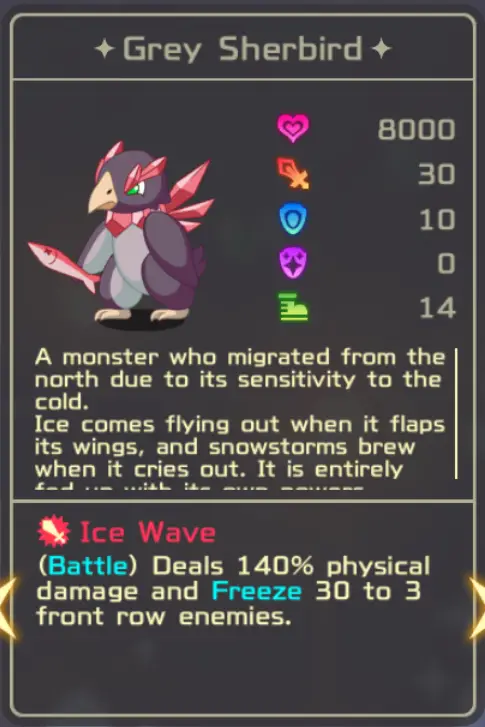
I find Grey to be easier than the last two bosses. He doesn’t hit hard (сначала) as he only has 30 attacks and his skill hits once at 140%. Фактически, the first tier of bosses has more attacks than Grey. Однако, he does freeze you heavily and grows stronger over time. Go into this with heavy magic damage and he’ll die without really hurting you. If you go in with physical-heavy units, you might struggle unless you have a solid build already.

I think Flame Emperor is the easiest of this tier, even though she has a powerful 370% magic attack. Однако, it only targets one unit and it doesn’t seem to trigger that often, nor is her attack high. Heavy shields and heals will make her substantially easier. As she does burn you for 15 (и еще один 15 в 50% л.с.), you need consistent heals to overcome that. За пределами этого, she’s a simple and easy boss.
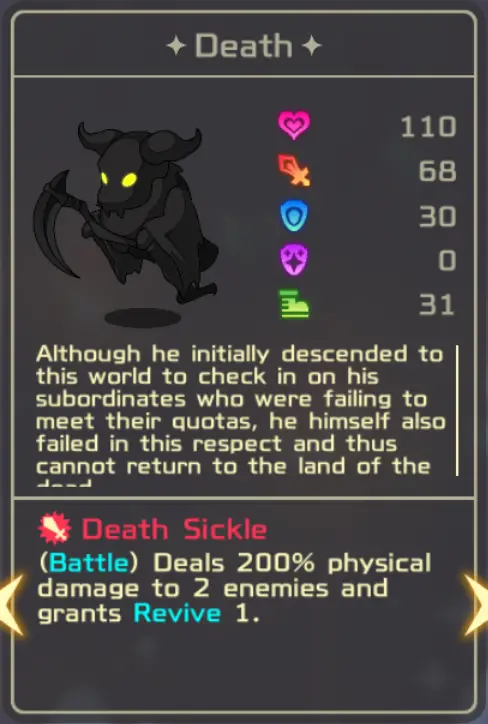
Death is tied with Portly Ghost for easiest boss in the game, по моему мнению. С одной стороны, he can be near-impossible for certain builds. С другой стороны, one symbol makes him easy. The gimmick is that he has 44 revives and grows stronger on every revive (up to ridiculously high attack). Every time he dies, all of the debuffs on him also fall off. Thus shock-burn and freeze strategies become worthless as the stacks will constantly fall off.
Трюк: brown symbol. He’ll literally kill himself. Даже всего лишь 60 шипы, he’ll kill himself once or twice a turn. You can just sit back, shield and heal, and watch his revive stacks turn to 0 in a few turns.
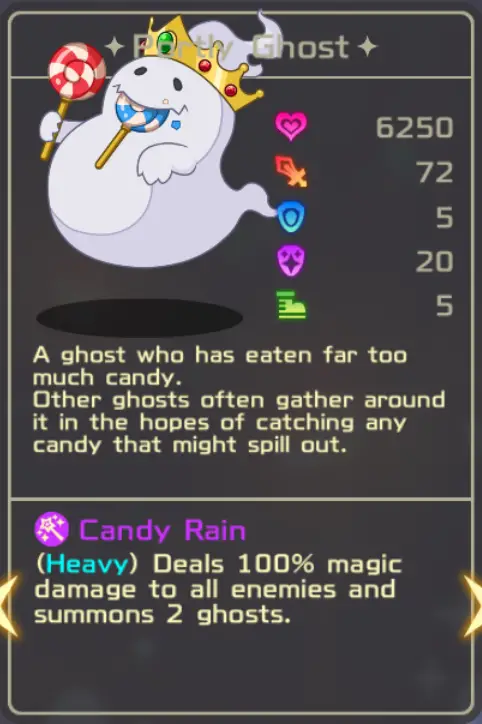
I find Portly Ghost incredibly easy. He has a decent attack and has two offensive skills. Однако, both do 100% damage and one is physical. While the disease is annoying to deal with, it’s not too hard to maintain good barriers through this and you should have Shield level 2 к настоящему времени. Bombfruit helps clear the early allies. When he summons his allies, have a strong spell gem clear them out quickly. The boss himself isn’t a threat if he’s alone.
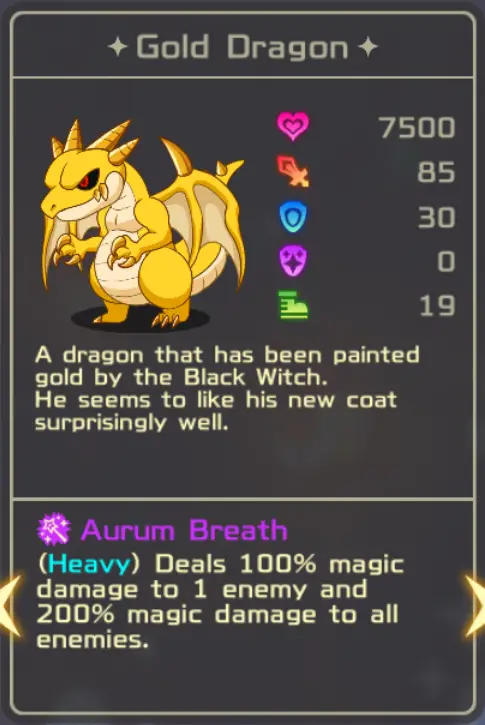
Gold Dragon is brutal and it’s a ridiculous spike in difficulty compared to the other two. High attack on top three actions per turn AND true strike 6. That means two full turns of him blasting you with his magic and physical skill. And they hurt. If you’re unlucky, he’ll use magic-physical-magical and it’ll be hard to recover from that. On top of him having aegis on those two turns.
Because of aegis, don’t expect to do damage at first. The first two turns are about survival – shields and more shields. His physical only hits one unit, so the key problem is surviving his magical attack which does 200% to everyone and 300% to one. There’s no real trick here, just shields, barriers, and heals. Повернуть 3+ will be much easier, but there is some luck to not get hit with magic-physical-magic skill turns.
Это все, чем мы делимся сегодня для этого. Яркий рыцарь гид. Это руководство было первоначально создано и написано Персонал РБ. На случай, если нам не удастся обновить это руководство, вы можете найти последнее обновление, следуя этому связь.