- Заголовок: Фиктерра
- Дата выпуска:
- Разработчик:
- Издатель:
Information about Ficterra is still incomplete. Пожалуйста, помогите нам заполнить детали игры, используя это контактная форма.
This guide goes over how to code in Ficterra. Introduces Miniscript, basic coding concepts, триггеры, and some examples of common things you might want to do.
Начиная
Let’s start by adding a code file to your mod. To add some code to your mod, click the Code panel on your’s Mod’s main menu, then click new file on the left pane. Name your code file something and click save.
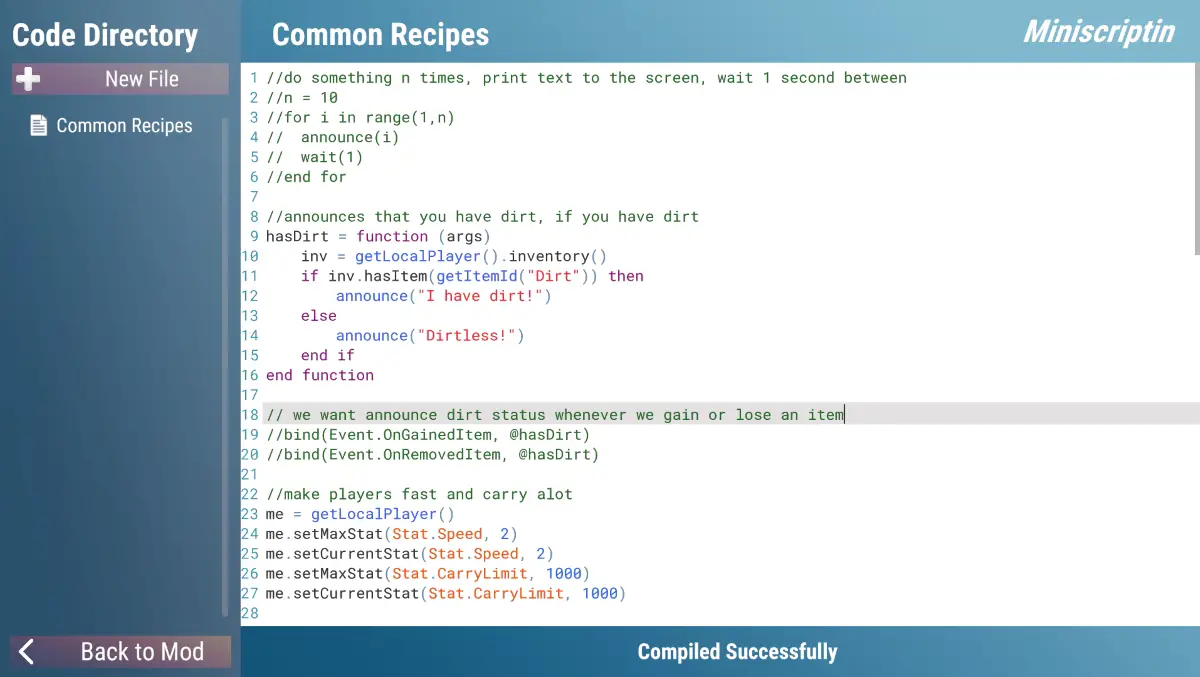
The Code Editor has several sections
- Вверху справа – Name of your mod
- Left Pane – List of this mod’s code files
- Вершина – Name of selected code file
- Середина – Your selected code file, with line numbers for reference
- Нижний – Compilation status – tells you if your code compiles ok (“Compiled Successfully”), or tells you the problem your code has (compile-time exceptions)
The middle section with your code is a text editor with syntax highlighting. The text you type into here is compiled and included with your mod. Creating a world, or loading an old world with your mod causes this code to run. You can bind functions you create to an event, and those functions will run when the event is triggered. Your mod’s code is separate from other mods’ code and game’s code (sandboxed).
If there is a run-time error in your code, it shouldn’t affect how the game normally runs.
Miniscript
The coding language Ficterra uses for mods is Miniscript. “MiniScript is modern, элегантный, easy to learn” according to its website. You can check it out here: Miniscript.
The website has a bunch of documentation and references to help understand the ins and outs of the language.
This guide will go over some basic programming ideas, coding in miniscript, and working with the Ficterra API. You can find the one-page summary of the language here: Краткое содержание.
To keep track of data you can assign variables:
х = 5
name = "My Name"
Miniscript is dynamically typed, so you don’t need to declare the type. String/words are surrounded by double-quotes.
To call functions that do things
ждать(5)
name.len
log(32,2)
You don’t need parentheses if your function takes no values. If the function uses a single value like wait (which waits the number of seconds given), put it in parentheses. If you have multiple values like a log, put in parentheses and use commas (,) between values.
To create your own functions, you assign a variable and use the function keywords:
myFunc = function(а, б)
//stuff function does goes here
end function
Then use myFunc(х,й) to run the function. You can use @myFunc to refer to the function itself; this is used in event triggers
If you want to do things but only under certain conditions then use if statements.
if x < 4 then
name = "Small Number"
else if x < 20 then
name = "Medium Number"
else
name = "Large Number"
end if
Ficterra API
The Ficterra API lets you interact with Ficterra from your code files. For this guide we are only going to go over some common commands.
- announce(текст) – Shows text on your screen
- runCommand(команда) – You can run any command you can type in the in-game prompt. This takes in a string
- getItemId(itemName) – Returns the unique id for an item based on its name. Many of the functions in the Ficterra API use ids for efficiency, so you’ll want to convert to an id for these. The ids are NOT the same between worlds with different mods. As such you should never just use ids as raw numbers in the code from ids you have observed in your game.
There are also similar functions for player, исследовать, квесты, and cubes
Here’s a few functions that directly affect players:
- getLocalPlayer() – returns a player object for your player
- player.giveItem(itemId, количество) – gives an item to a player of the specified amount
- player.respawn() – respawns the player to their nearest respawn point. You can use this to restart player progress or ‘force kill’ их. With spawn locations placed in the world, you can control where they respawn.
- player.setCurrentStat(статистика, ценить) / player.setMaxStat(статистика,ценить) – lets you change a player’s stats. You can increase their movement speed, give them health, let them carry more, и т. д..
- takeDamage(цель, повреждать, damageType) – deals damage of damage Type to a target. The target is either a playerId or an objectId
- createPlaceable(itemId, позиция) – create a new placeable object of itemId at the position
События
We often want to react to players when they take a certain action. After they get an item, enter a biome, complete a quest, enter a region, и т. д.. We do this in code with events. The bind function (and bindToItem) let you call your own functions after one of these events has happened.
связывать(событие, func) – call your function ‘func’ after the event happens. The list of events is in the Ficterra API guide, but some common ones are Event.OnGainedItem, Event.OnCompletedQuest, Event.OnKilledMonster and Event.OnBiomeEntered
An example call might look like
связывать(Event.OnBiomeEntered, @myFunc)
This will make it so myFunc is called whenever your player enters a biome. The @ symbol allows you to refer to the function without calling it. Event functions take in a single value ‘args’ which contains data relevant to the event. In this case args.id is the id of the biome being entered, and args .name is the name of the biome being entered.
bindToItem(itemEvent, func, itemId) – calls your function ‘func’ after an item event happens for a placeable with itemId. This lets you bind to specific actions taken on placeable objects by their item. ItemEvent.OnTriggerEntered, and ItemEvent.OnInteract are some examples.
Примеры
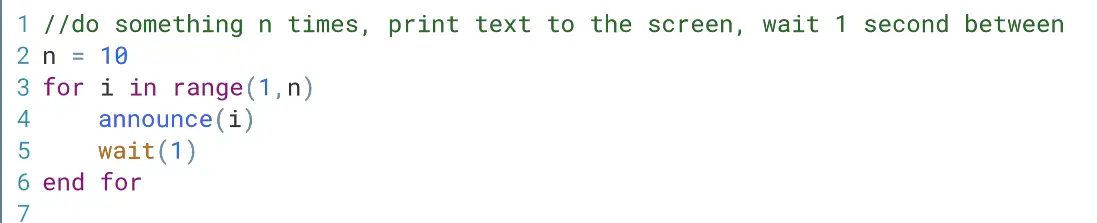
Пример 1: This counts from 1 к 10 and displays the results on screen. It waits 1 second before showing the next number. This example shows for loops, диапазоны, announce and wait. Since this is not in a function it will just run when the game starts up
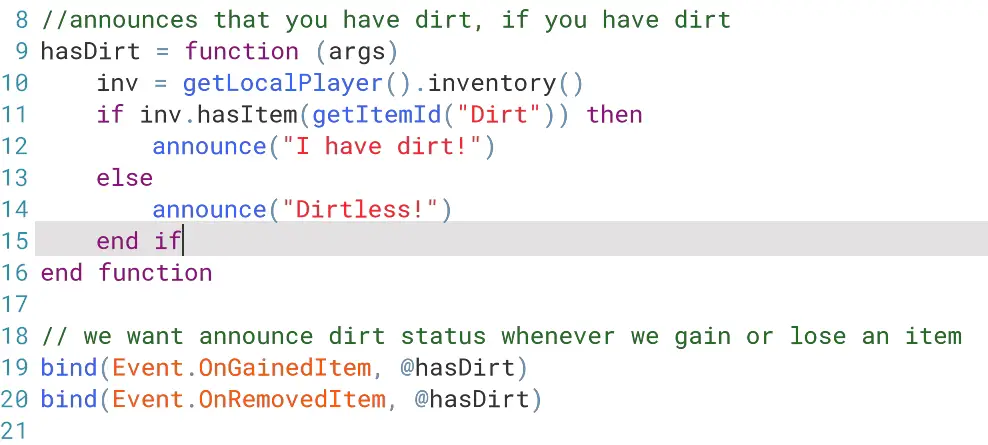
Пример 2: This shows how events work. We create our function hasDirt to print whether the player has dirt or not. We get the local player’s inventory and use an if statement with hasItem to determine which statement to announce. Since this is in a function it won’t run unless it is called. The bottom two lines use ‘bind’ to make the Events OnGainedItem and OnRemovedItem call hasDirt when they trigger. We use @hasDirt to refer to the function itself instead of calling it.
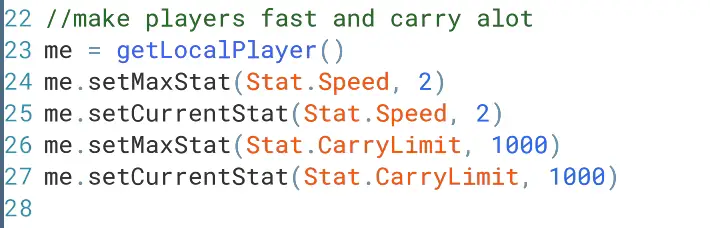
Пример 3: Here we change some of the player’s stats. We set the max stat first, then the current stat. This is especially important for stats like health, where if you just increase the max stat, they will have to heal the rest of the way. This example sets the player’s speed to 2 and their carry limit to 1000.
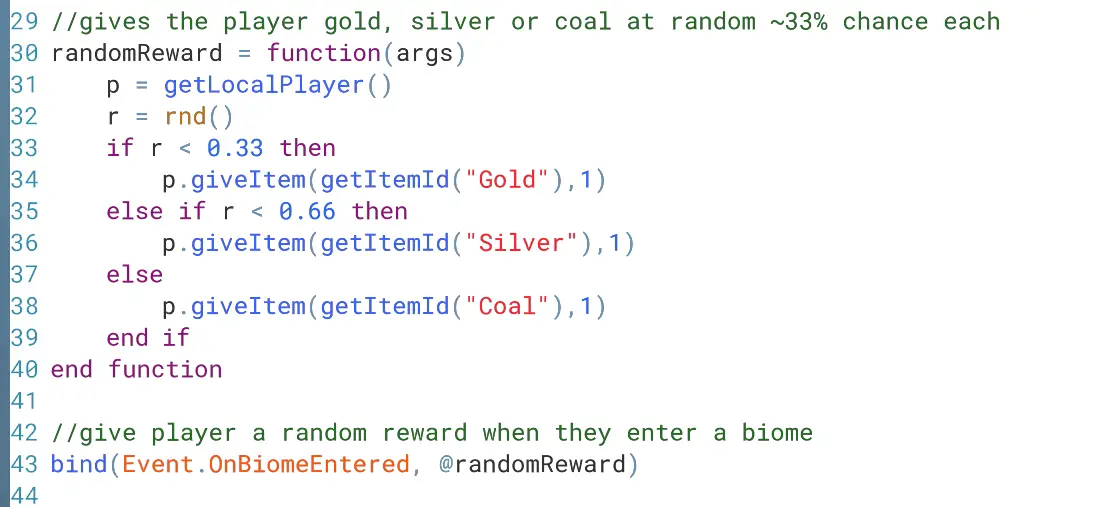
Пример 4: This example gives the player a random reward when they enter a biome. We use the OnBiomeEntered event to trigger our function. The rnd() function to generate a random number between 0 и 1, which we use to determine the reward. Next we use giveItem to give the player the reward we want.

Пример 5: We change the movement speed multiple on Grass to 4. When a player walks on it they will move 4 times as fast. This is how path cubes in the game work.
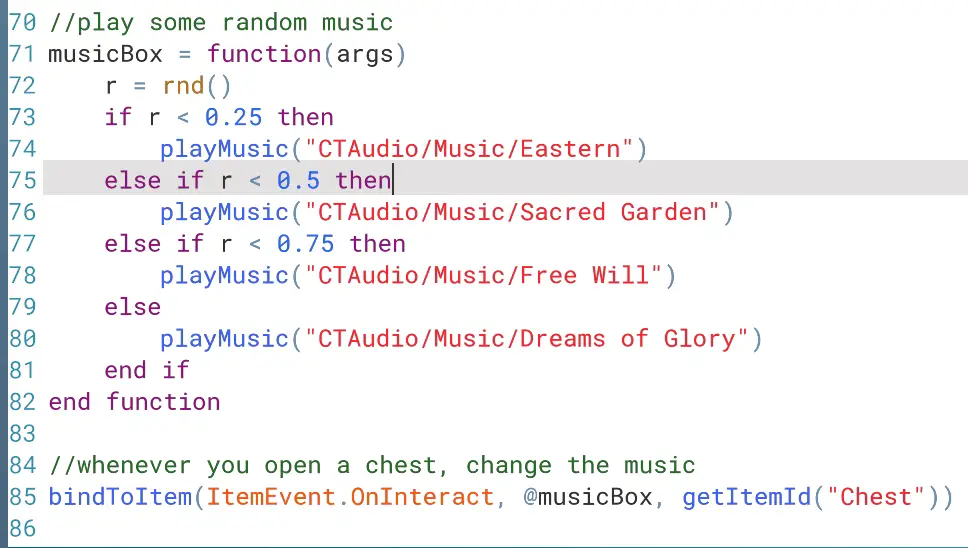
Пример 6: Here we set it so when a player opens a chest it plays music. The bindToItem function lets us bind our function to the Chest item and when the OnInteract event happens. In our function we randomly choose a music file and play it. This will override whatever music is currently playing.
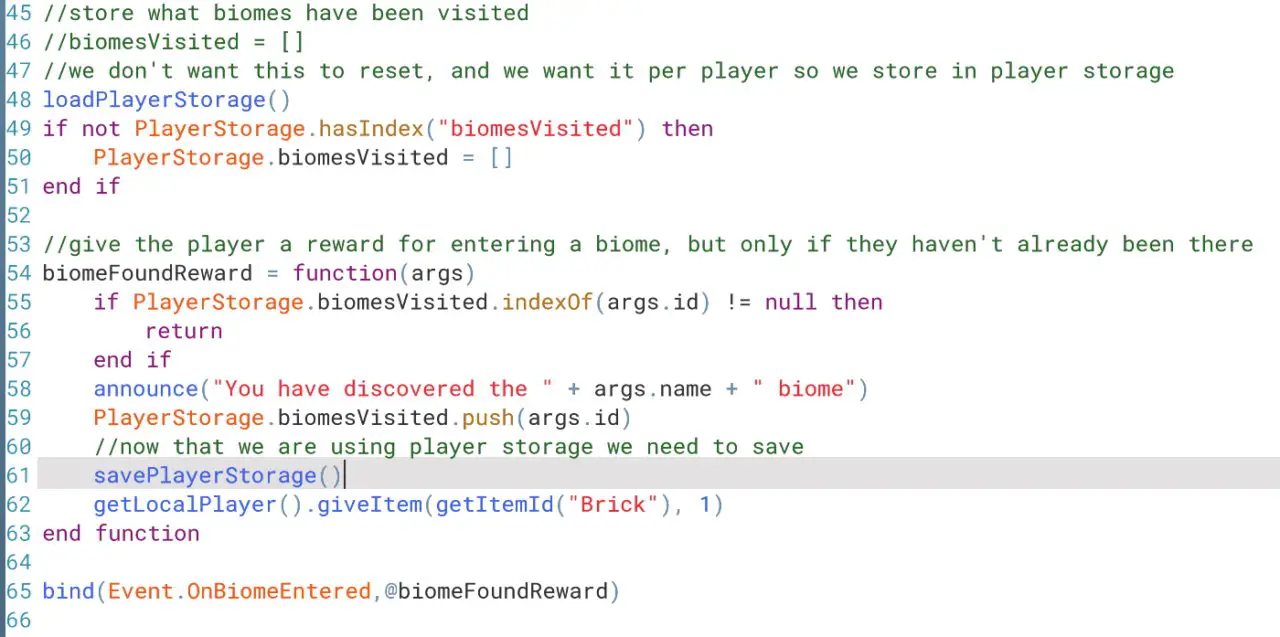
Пример 7: Out last example shows how to maintain state across plays. We give the player a Brick cube whenever they enter a biome for the first time. Unlike example 4, we keep track of the biomes the player has entered and don’t give a reward if they have been there before. We also save this information in PlayerStorage. This way if they load the game some other time, it will still have the list of biomes they have visited from their previous play session. This example shows arrays, экономия, загрузка, and accessing PlayerStorage.
Это все, чем мы делимся сегодня для этого. Фиктерра гид. Это руководство было первоначально создано и написано northernamusements. На случай, если нам не удастся обновить это руководство, вы можете найти последнее обновление, следуя этому связь.