- Título: Trepang2
- Data de lançamento:
- Desenvolvedor:
- Editor:
Informações sobre Trepang2 ainda estão incompletas. Por favor, ajude-nos a preencher os detalhes do jogo usando este formulário de contato.
This comprehensive guide is designed to provide you with essential strategies and a formidable loadout that will enable you to conquer the game’s rage mode.
O Básico
By adhering to these basic principles, you will not only survive, but also triumph effortlessly through the game’s easier levels. No entanto, due to the remarkably challenging artificial intelligence at this difficulty level, it may be necessary to employ trial and error tactics when confronting the more difficult stages, as it is simply not possible to complete them flawlessly on your first attempt without prior practice.
- Embrace sliding as a vital maneuver. – This technique is absolutely essential; make it a habit to slide whenever possible, as it will allow you to dodge a significant amount of enemy projectiles. Make sure the slide command is assigned to a key that provides optimal comfort for spamming, as you will be initiating and switching between slides frequently throughout the game. In order to maintain this sliding approach, it is imperative that you eliminate enemies sequentially to maintain your stamina, which leads us to the second guideline.
- Take advantage of your cape’s abilities. – Whenever your stamina or focus is low, use your cape’s abilities to gain the upper hand over unsuspecting foes and replenish your focus and stamina. The cloak can also be used to reload your weapons and avoid unnecessary damage. It also gives you the ability to quickly reposition yourself under intense enemy fire. Dispersing enemies before they engage in combat can tip the odds in your favor.
- Harness the potential of the grenade launcher. – Later in this guide, I will discuss the use of homing rounds with the grenade launcher, which is critical in Rage Mode. This technique allows you to generate Focus from cover or a safe distance by firing grenades into the air that automatically lock onto an enemy, resulting in a kill that replenishes your Focus. This allows you to immediately rejoin the action and start scooting around with shotguns again.
- Be careful with incendiary rounds. – In Rage Mode, using incendiary rounds can quickly lead to self-inflicted damage and escalating frustration. While they may be fun to use on lower difficulty settings, the subsequent burning of enemy corpses hinders your ability to slide over them and collect any dropped ammunition or armor, which can be the difference between survival and death. Given the frenetic nature of your movements in this mode, accidentally sliding into the fire can result in significant damage.
- Resupply between levels. – Before boarding the helicopter, make sure your ammo, armadura, and grenade inventory is maximized, as taking advantage of every opportunity becomes crucial.
- Avoid entering Fury Mode on your first playthrough. – It is ill-advised to attempt this without the Dual Wield Serum or unlocked attachments, which prove to be extremely beneficial at this difficulty level. Também, unless you have extensive game knowledge and skill, it is best to reserve Rage Mode for your second playthrough. During the subsequent playthrough, you can also tackle levels out of order, giving you the flexibility to tackle the most challenging stages as you see fit, thereby reducing frustration.
- Cultivate patience and take breaks. – This guideline is more about maintaining a positive attitude while playing the game. Recognize that this is more of a marathon than a sprint, and take some time to relax between level completions.
The Loadout
To succeed in the game’s most challenging mode, it is essential to equip a loadout that not only allows you to quickly eliminate enemies, but also allows you to regain your focus and safely dispatch stronger units. This brings us to the two weapons we have chosen for our strategy.
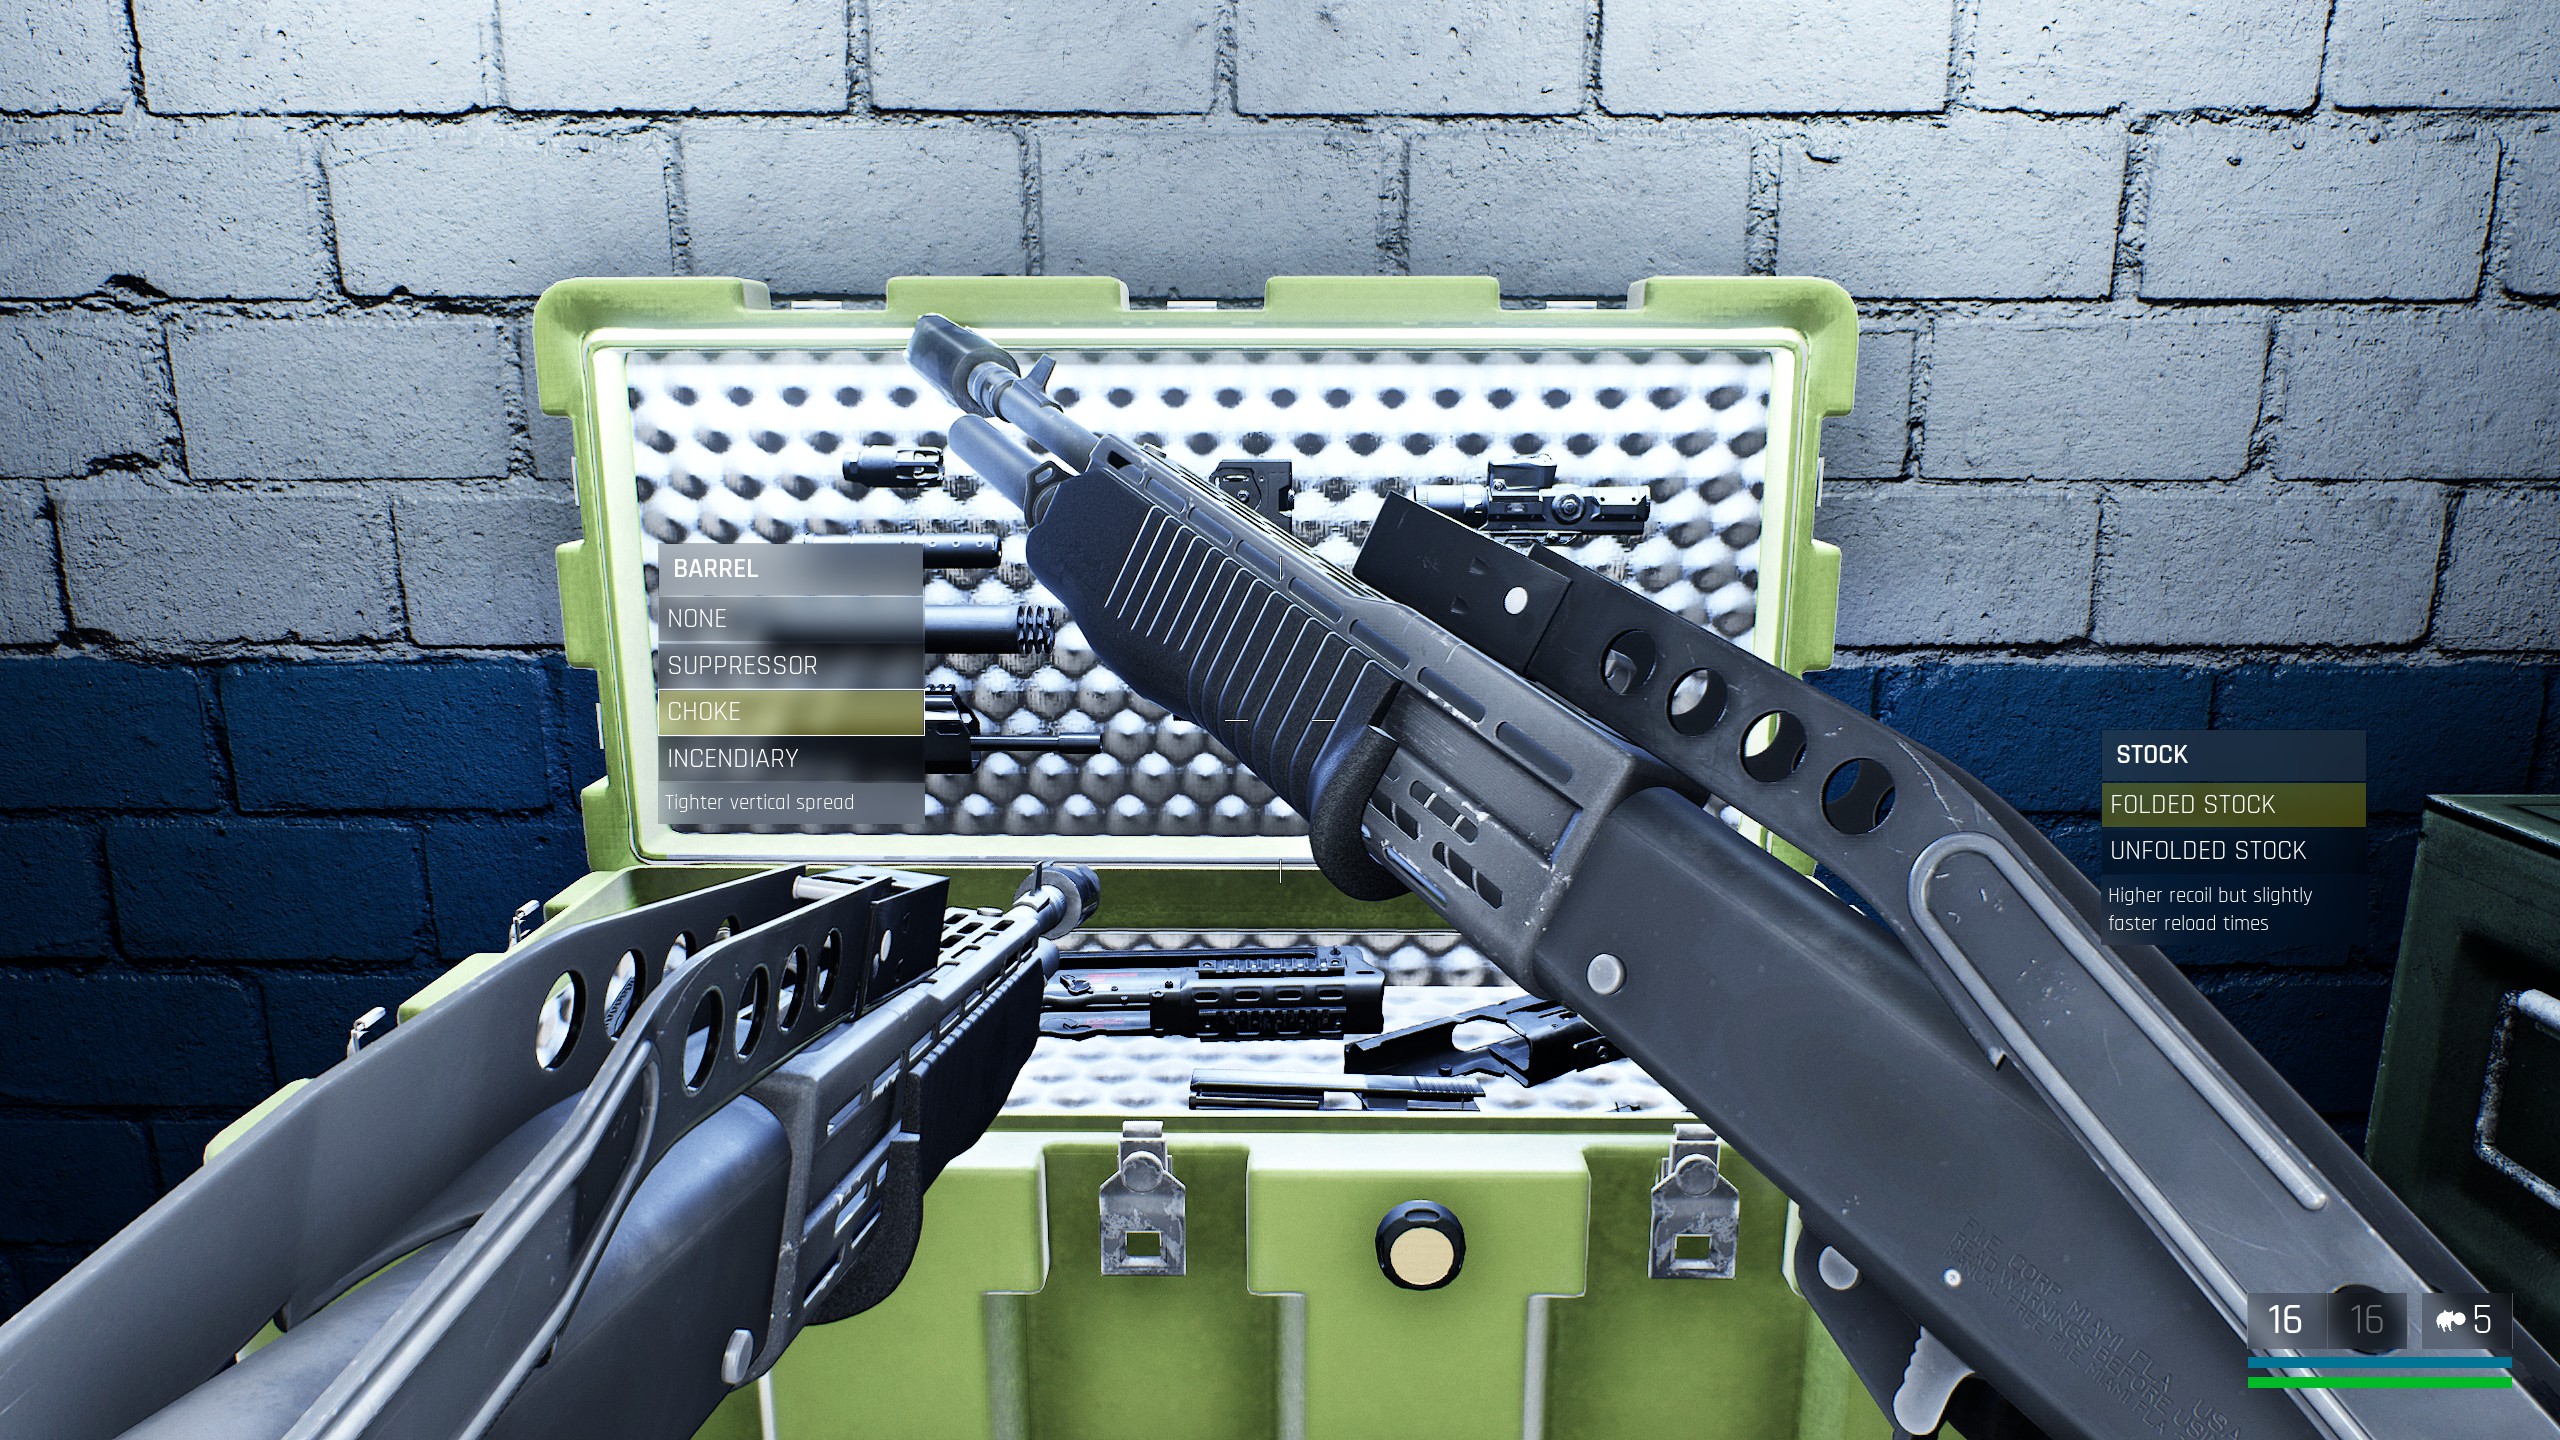
Primeiro, the Shotgun proves to be the most advantageous weapon in the game due to its ability to inflict significant damage while conserving ammunition. Given the game’s emphasis on aggressive gameplay and the scarcity of maps that require long-range combat, this weapon proves ideal. By quickly eliminating enemies while maneuvering past them, we can optimize our performance. Adicionalmente, by using the focus mode, we can use a minimal amount of focus energy to accurately line up a shot or two, saving valuable time. To enhance the shotgun’s capabilities, we will add a choke for improved accuracy at medium range encounters. Além disso, opting to keep the stock folded gives us the advantage of faster reloading, an invaluable asset at higher difficulty levels.
Using a grenade launcher in a state of heightened aggression, commonly known as “rage mode,” proves to be extremely advantageous. By equipping the launcher with a homing attachment, the grenades are given the ability to automatically track and target enemies. Como resultado, when our focus is depleted, we can fire the launcher from a position of cover or after a strategic relocation while using stealth, eliminating an enemy and replenishing our focus without exposing ourselves to enemy fire. Além disso, the launcher can serve as an effective means of engaging juggernauts or formidable boss enemies while maintaining a safe distance.

As for grenades, we will choose the Rat Grenade for its ability to traverse the ground and automatically target nearby enemies. This feature allows us to get quick kills while maintaining our speed and safety. These grenades can be thrown without much accuracy and still result in successful takedowns.
Requesting Reinforcements
In most support missions, you will find supply crates where you can purchase firearms and protective gear. No entanto, you may have overlooked the fact that you can also request TF27 squads to assist you. By scrolling to the bottom of the menu, you will find a number of units available for use, ranging from reconnaissance units (the least expensive) to smartgun units (o mais caro). I highly recommend using these units whenever possible, as the presence of friendly AI can alleviate much of the frustration during difficult stages. They are especially valuable in wave-based scenarios, where taking on 30-40 enemies single-handedly is extremely difficult, but with the assistance of friendly AI, the task becomes much more manageable. Além disso, you can use the grenade launcher or grenades themselves to eliminate enemies while keeping yourself out of harm’s way, effectively combining these strategies with the use of friendly units to make certain missions much easier.
The Patriarch

The boss fight against the Patriarch in Jorvik Castle presents a significant challenge on Rage Mode. This is mainly due to the potential scarcity of supplies at this stage of the level, as well as the fact that the boss summons minions while you’re trying to damage him. No entanto, it’s important to note that there is an autosave between each of the three stages of the boss fight, which can provide some relief.
When fighting the Patriarch, it is advisable to acquire the bolt launcher, which can be found among the various weapons on the arena floor as you enter. I recommend equipping both the shotgun and the bolt launcher for this encounter. Use the stealth ability to get up close and personal with the Patriarch, then unleash a burst of projectiles from the bolt launcher before quickly distancing yourself. Repeat this strategy, using Focus whenever possible, as it will make the fight much easier.
If the Patriarch summons additional enemies during the battle, use the shotgun or your secondary weapon to conserve ammunition for the bolt launcher. When the Patriarch returns, follow the steps above.
During the third phase of the battle, a meat golem will materialize. It is advisable to ignore this creature and focus on dodging its attacks while concentrating your efforts on the Patriarch, as defeating the Golem is not essential to victory. Use all available resources for this encounter, as it is the final challenge of the level.
Horizon HQ/The Final Battle
Em geral, Horizon HQ is a relatively straightforward level, especially considering that it serves as the final stage. No entanto, the final battle can prove particularly challenging due to the time constraints and the need to prevent the Brain Upload.
To increase your chances of success in this battle, make it a priority to eliminate the initial enemies that drop from the helicopter onto the roof at the start of each wave. Also make it a priority to destroy the brains as quickly as possible. Take advantage of the autosave points between waves to get through the early segments with relative ease after quickly eliminating the brains and clearing out the enemies.
When a cluster of five or six brains appear at once, you are in the penultimate stage of the battle. Ambush the incoming helicopters and once again quickly navigate around the brains to ensure their quick destruction. Once the brains are destroyed, you will be prompted to collect the breaching charges. No entanto, do not do so until you have cleared the roof of enemies, as picking up the charges will trigger the arrival of the helicopter, which is the final stage of the battle.
By eliminating all the enemies on the roof before the helicopter battle begins, you can concentrate solely on fighting the helicopter. This is recommended as there is no autosave between the last wave and the helicopter encounter. It is also advisable to retrieve a minigun from one of the dead soldiers before starting the helicopter battle. This is crucial because using the minigun with the focus ability will allow you to quickly neutralize the helicopter before it has a chance to do any damage to you.
Upon completion of the Ultimate Conflict and successful completion of Horizon HQ, the attainment of the Achievement will manifest. There is no need to engage in the epilogue in the mode of intense rage; once the achievement has materialized, it is permissible to lower the difficulty level for the subsequent epilogue without apprehension.

Isso é tudo o que estamos compartilhando hoje para isso Trepang2 guia. Este guia foi originalmente criado e escrito por ReFL3X. Caso não atualizemos este guia, você pode encontrar a atualização mais recente seguindo este link.