- Título: Trem Sim World 2
- Data de lançamento:
- Desenvolvedor:
- Editor:
Information about Train Sim World 2 ainda está incompleto. Por favor, ajude-nos a preencher os detalhes do jogo usando este formulário de contato.
General introduction to the newly released Cathcart Circle DLC, including the BR Class 314, Signalling and safety systems.
Introdução
The ‘Cathcart Circle Line’ refers to the suburban railway lines that run between Glasgow and Newton/Neilston. Entre 1885 e 1894, the route was built in stages. Em 1962, electric services began with Class 303 (Blue Trains) EMUs. The Class 314 EMU was the primary traction on the route for many years, mas desde então 2016, Aula 320, 380, e 385 EMUs, as well as some Class 318 e 334 unidades, have been introduced. Both branches and the circle are represented in Train Sim World 2, with the Class 314 EMU in ScotRail Saltire livery (though it is livery designer compatible), allowing for a network-style route not previously seen in the game.
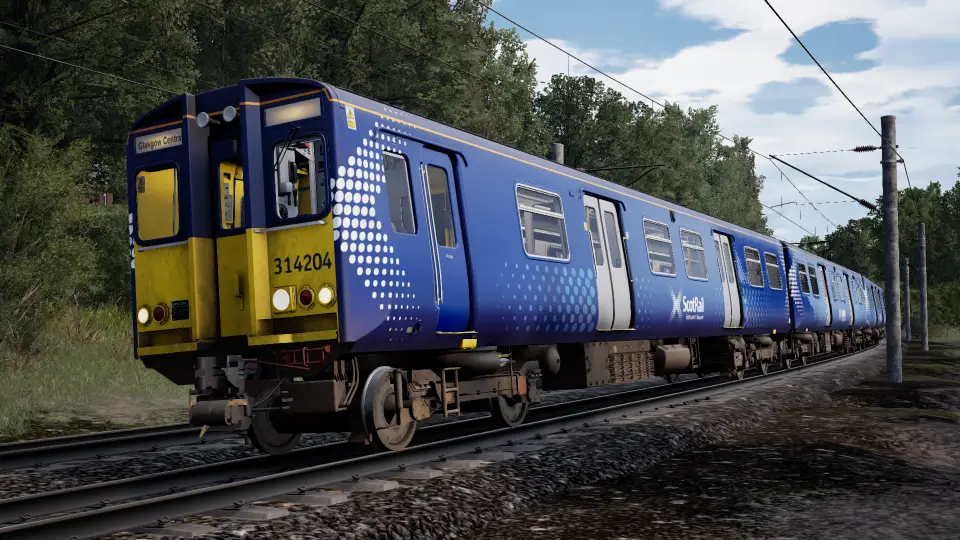
The BR Class 314
The 16-strong Class 314 frota, built by BREL York in 1979, was exclusively used on suburban services around Glasgow, initially on the Argyle and North Clyde lines, but later on services in south-west Glasgow. The Class 314s are members of the BREL 1972 family, which also includes the Class 313, 315, 507, e 508 tipos, all of which have very similar body shells. They are limited to a top speed of 75mph (120km/h).
The Class 314 units were withdrawn in 2019 because they did not comply with People with Limited Mobility (PRM) regulations, which went into effect on January 1, 2020. 15 units were scrapped, with one (314209) saved for a trial conversion to hydrogen power as part of a feasibility study that coincided with ScotRail’s commitment to phase out all diesel traction by 2035.
The Class 314 in Train Sim World 2 is painted in the ScotRail Saltire livery, which was introduced in 2008 and will eventually be applied to all trains operated by the ScotRail franchise holder, including those operated on behalf of the Strathclyde Partnership for Transport (SPT), which had its units painted in a carmine and cream livery at the time. Though the majority of the Class 314 fleet was still wearing this livery when it was withdrawn in 2019, it was not included in the pack.
Cab Diagrams
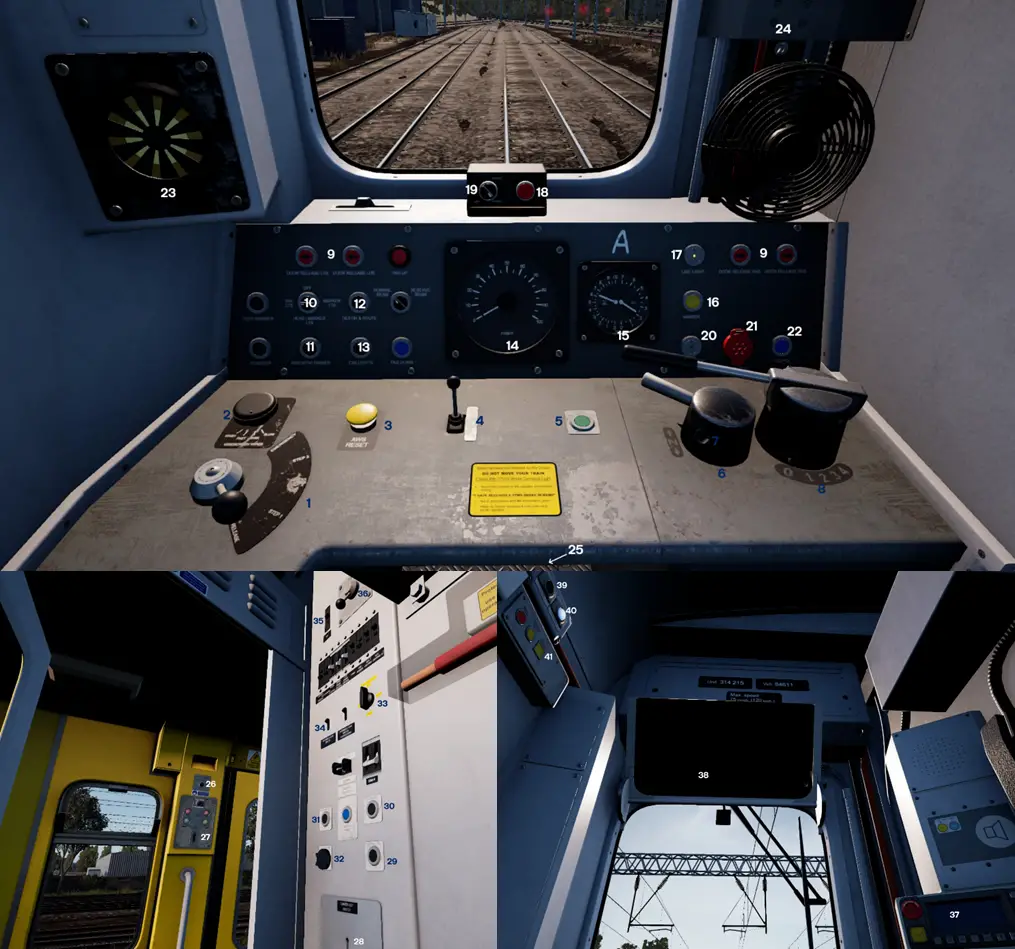
Functionalities
- Brake Handle
- Wiper Switch
- AWS Reset
- Buzina
- Guard’s Signal
- Direction Selector
- Chave mestre & Master Switch
- Throttle
- Passenger Doors Open
- Exterior Lighting
- Dial Light Dimmer
- Destination Light
- Cab Lighting
- Speedometer (MPH)
- Brake Gauge
- Sander
- Line Light (Power detector)
- DRA (Use when at Red)
- DRA Isolation
- VCB Tripped Light
- Uncouple
- Couple
- AWS Sunflower
- Fã
- DSD Pedal
- TPWS Temporary Isolation
- Guard’s Panel
- Guard’s Key (Required to use Guard’s Panel)
- Saloon Light Trip (Desligado)
- Saloon Light Set (Sobre)
- Auxiliaries Set
- Auxiliaries Trip
- Cab Heating
- Vestibule Lighting
- DSD Isolation
- AWS/TPWS Isolation
- GSM-R Radio (Non-functional)
- Sun Blind
- Passenger Doors Close
- Door Interlock (Lights up when doors are closed)
- TPWS Unit with TSS Override
Cab Set-Up and Changing Ends
The following steps should be taken to prepare the cab for service at the start:
- Set the brake handle to full service.
- Insert the master key, setting the master switch to on.
- Check the line light is on.
- Na parede de trás, enable AWS, TPWS, and DSD, se você desejar.
- Set the exterior lights to Head/Marker Lights
- Se necessário, set the Instrument Dimmer to High, and the Destination Light to on.
- Set the directional selector to neutral.
- Open the doors if necessary.
- Set the directional selector to forward.
- Close the doors, release the brakes, e você está pronto para ir.
To bring the cab to a halt:
- Set the brake to full service.
- Set the exterior lights to Tail Lights.
- Set the directional selector to off.
- Set the instrument dimmer to low.
- Set the master switch off, and remove the master key.
Freios
Aula 314 has a 3-step brake, which was standard on many new EMUs and DMUs in the 1970s and 1980s. This means you have three distinct braking steps, as well as release and emergency. The small gauge to the right of the speedometer allows you to see how the brakes are working.
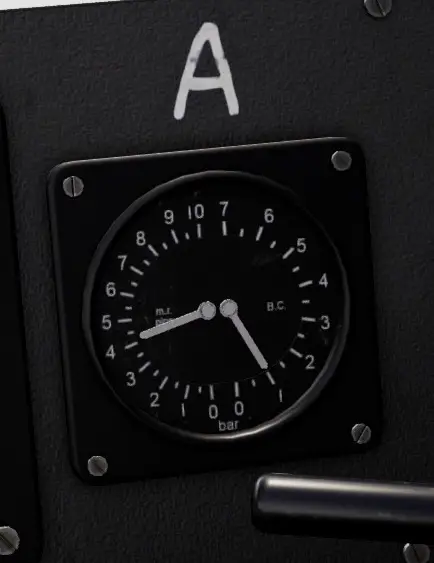
The main reservoir pressure is indicated by the needle on the left (MR). In order for the brakes to work properly, this must be greater than 6 bares. Se cair abaixo 6 bar, the compressor will kick in to bring it back up. The pressure in the brake cylinder is indicated by the right needle (AC). This indicates how hard the brakes are pressed.
The brakes are released if the BC reads 0. The higher it is read, the harder the brakes are applied. It’s worth noting that the Class 314 employs blended rheostatic braking, which means that the motors are turned in the opposite direction to slow the train down, along with some conventional braking. Como resultado, the BC will be low (typically less than 1 bar) until the train comes to a complete stop.
To perform a brake check on the unit, while stationary and with the passenger doors closed:
- Set the brake to step 1. Check the BC reads approximately 1 bar.
- Set the brake to step 2. Check the BC reads approx. 2 bar.
- Set the brake to full service. Check the BC reads between 3 e 3.5 bar.
- Set the brake to an emergency. Check the BC reads between 4 e 4.5 bar.
- Release the brakes. Check the BC reads 0, then immediately re-apply the brakes.
The Route
The Cathcart Circle line is approximately 22 miles long, with a short extension to Shields depot. The route is depicted in the diagram below, which is not to scale.
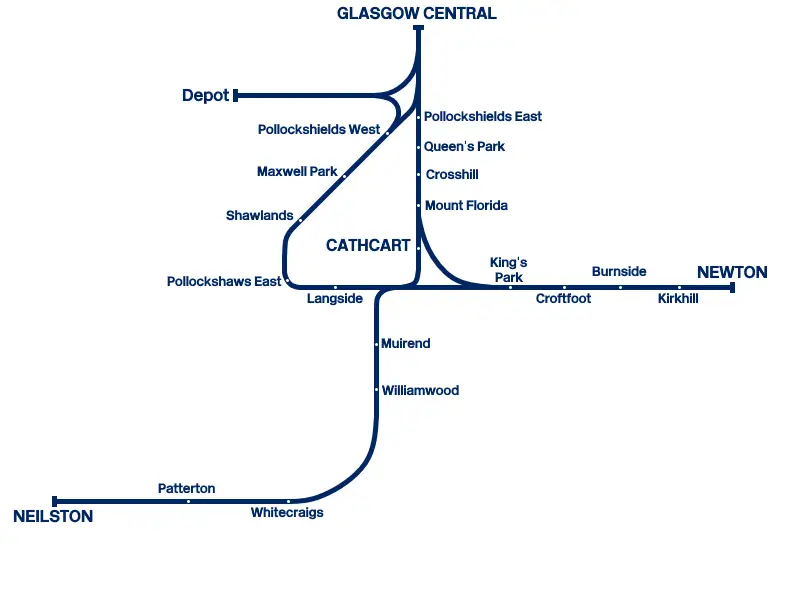
The services operated are:
- Glasgow – Glasgow via Cathcart (both clockwise and anti-clockwise)
- Glasgow – Neilston via Cathcart
- Glasgow – Newton via Mount Florida
- Glasgow – Newton via Shawlands
All services come to a halt at all stations, though there are some non-stop empty stock movements and depot movements.
Additional services can be gained through the following:
- One additional freight service between Newton and Glasgow is enabled for owners of the East Coastway DLC.
- A railtour service (split into two halves) between Glasgow and Newton via Neilston is enabled for owners of the Northern Trans-Pennine DLC.
The route comes with 6 scenarios and 2 tutoriais.
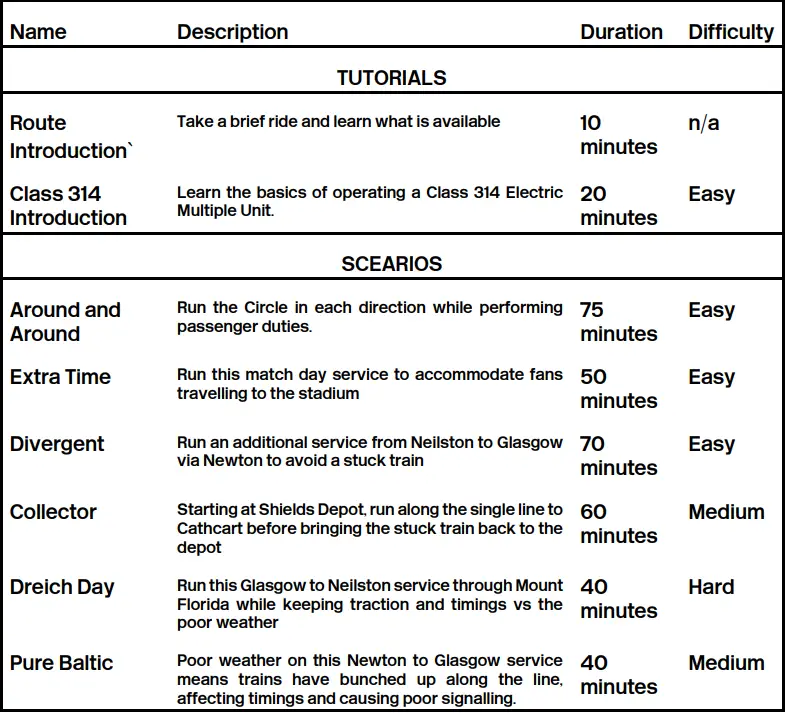
The route introduction automatically plays when the route is loaded for the first time.
Signalling
Since the mid-nineteenth century, the United Kingdom has used a route-based block signaling system, in which drivers are told which route they will take, as opposed to the speed-based system used in Continental Europe, in which drivers are told what speed they should drive at.
Signals in the UK can display up to 4 aspectos (cores), estes são:
- Red/Danger, which tells the driver to stop the train before the signal.
- Single Yellow/Caution, which tells the driver the next signal is in danger, so prepare to stop.
- Double Yellow/Preliminary Caution, which tells the driver the next signal is at caution, so prepare to slow the train down.
- Green/Clear, which means the line ahead is clear and no further action needs to be taken.
- A signal that is not displaying any aspect should be taken as a red/danger signal – obtain instructions from the signaller.
Some signals are not capable of displaying double yellows. These are typically used where the speed limit and route type are such that pre-trip caution is not required. Em contraste, four aspect signals can be used in areas with low-speed limits, such as on the approach to a terminal.
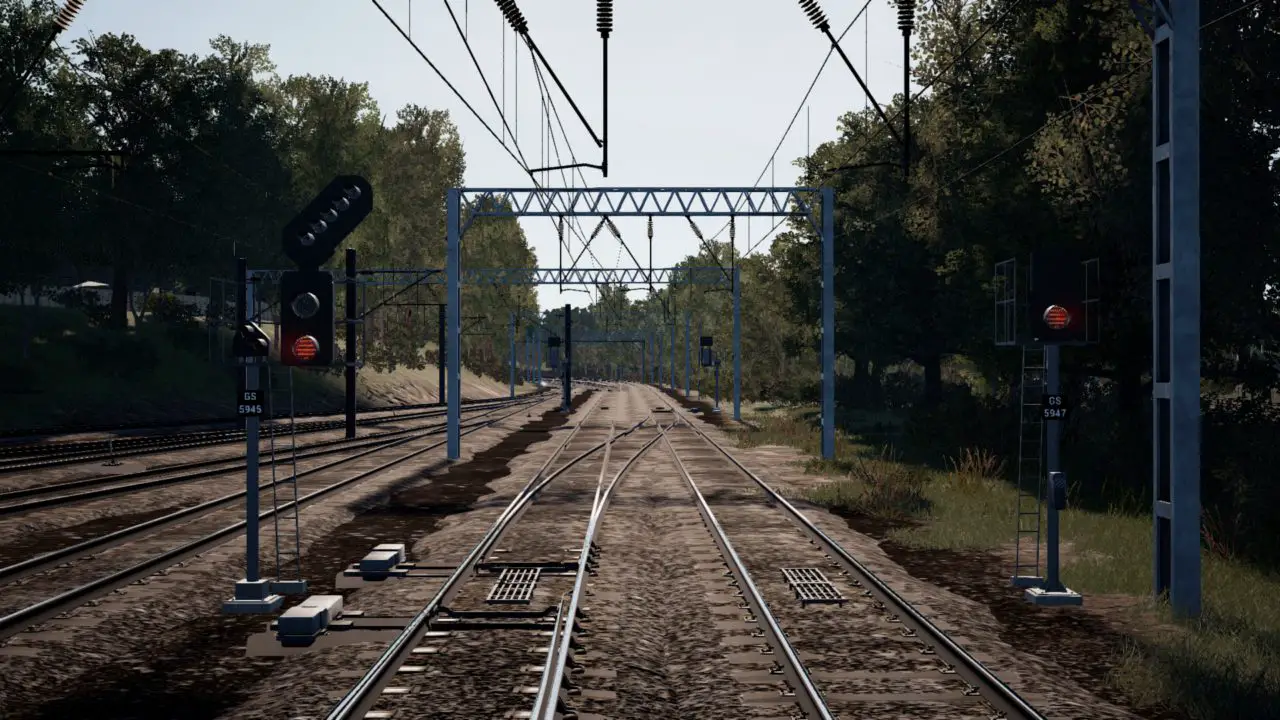
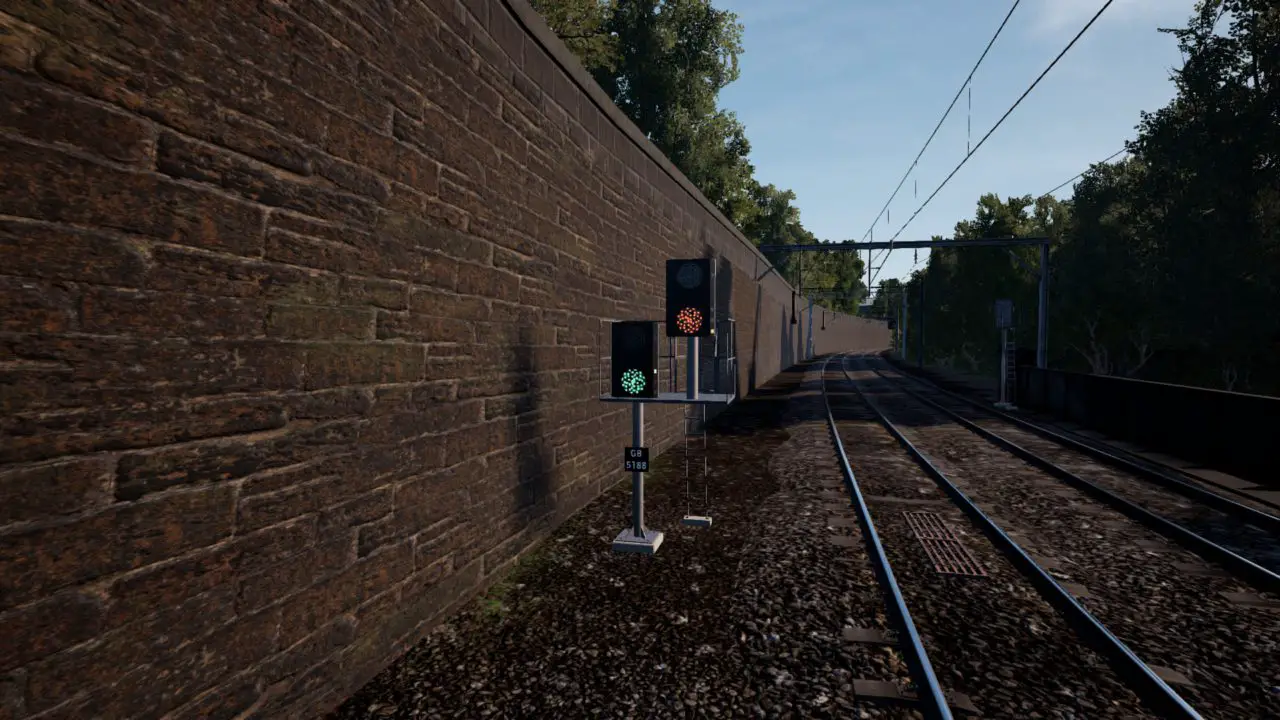
The two examples above are of newer LED signals. The signal on the left is a 4-aspect signal (it can display extra information, but we’ll get to that in a minute), and the one on the right is a 3-aspect signal. Unlike bulb signals, which look more like a standard road traffic light, LED signals to use the same light to display each aspect. On 3-aspect signals, preliminary warnings cannot be displayed.
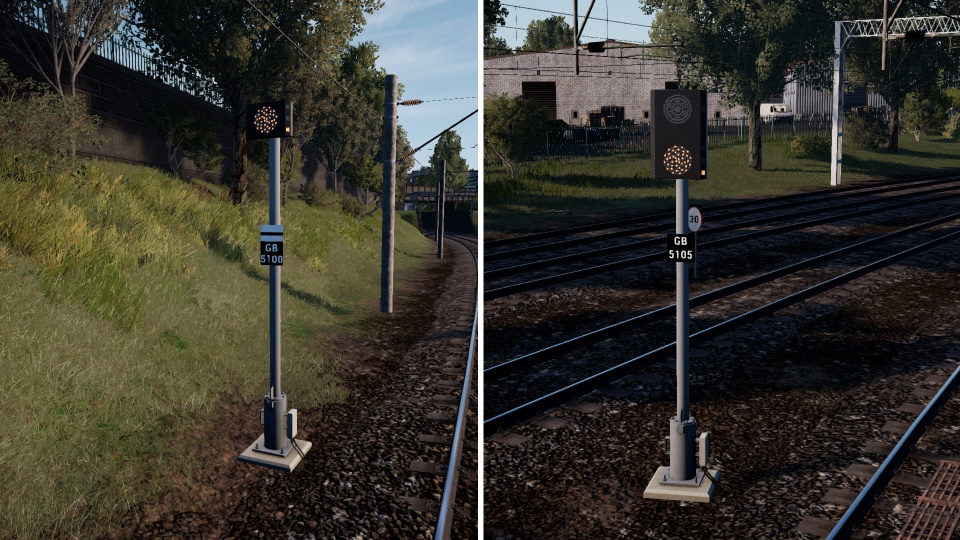
The examples above are VMS-type signals that can be found on many routes and have an extra indication as to the aspect it is displaying to the right of the signal itself (the small red square in the above images). These can have three or four aspects. The signals can be fitted with angled lights (feathered signals) or a digital display to indicate the route a train is set to take (theatre signals).
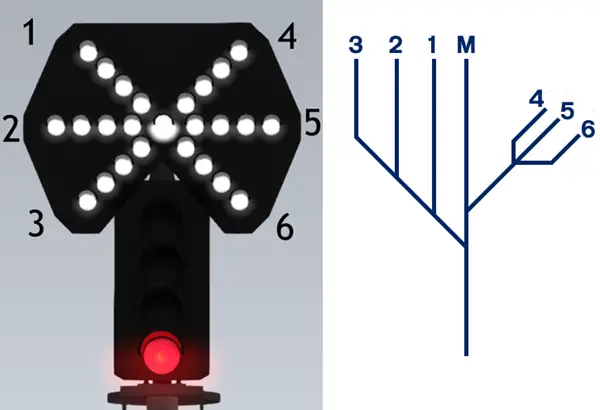
A feathered signal looks like this and indicates the route with a series of lights. These can be used to show 7 caminhos diferentes. The diagram below depicts what each feather represents.

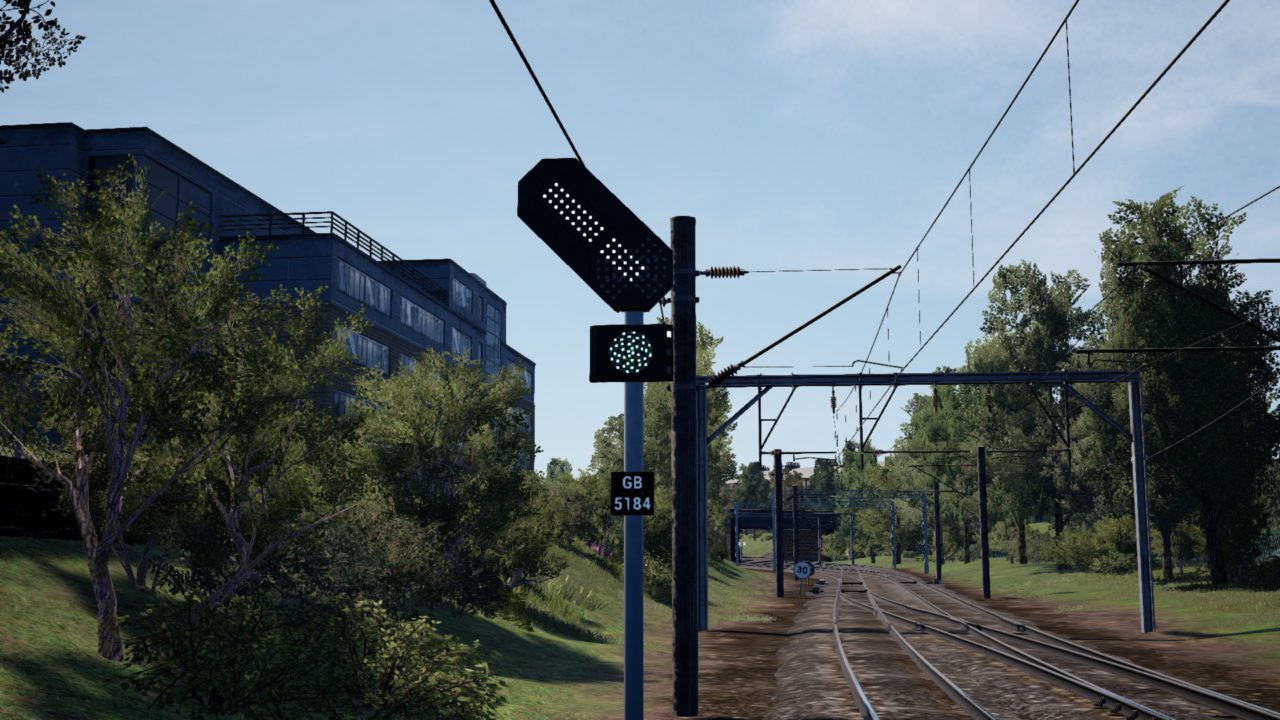
To indicate to the driver which path the train will take, theatre signals use digital screens to display alpha-numeric codes. It is impossible to list all of the possible paths because there is theoretically an infinite number of them, but here are some common ones:
- S: Siding
- B: Filial
- C: Cathcart (this route only)
- UM: Up Main
- Dm: Down Main
- A number will typically indicate a platform, ou, in the case of the above, a numbered track.
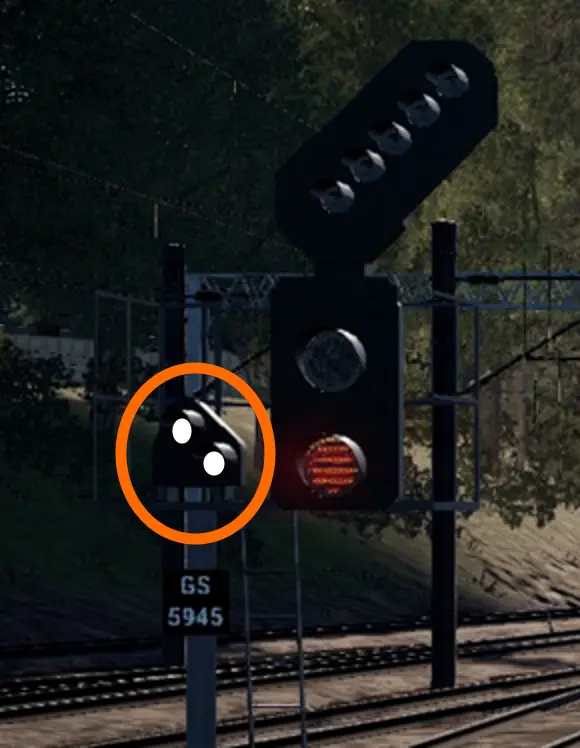
To enter a platform already occupied by a train, por exemplo, it is sometimes necessary to give a warning signal. When this is the case, a ‘call on’ is provided, which will illuminate two white lights at 45 graus, as seen on the left, once permission from the signaller has been obtained.
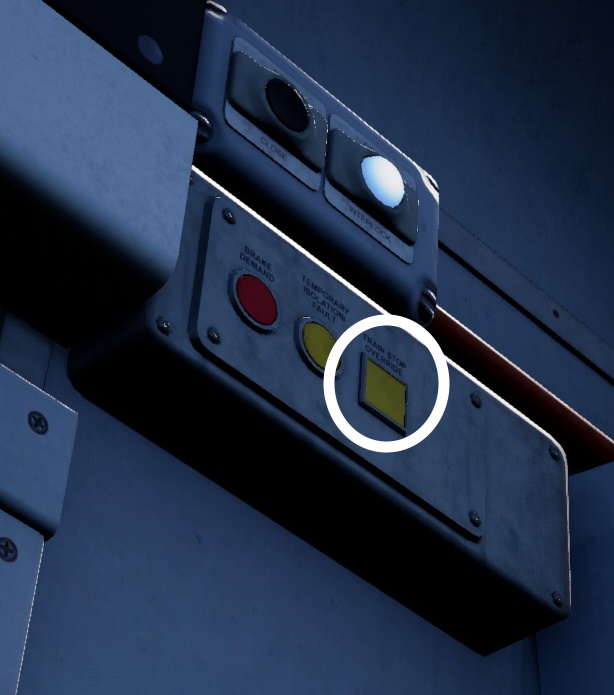
If no call is received and a signal is required to avoid danger (as in the ‘Collector’ cenário), the signaller will instruct the driver. If TPWS is enabled, the train’s TPWS Train Stop Override must be used in this case. This eliminates the need for brakes and the penalty for using them.
There’s an odd-looking signal in Pollockshields. This is a signal with a split distance. They are uncommon on the network and serve as a distant signal for an upcoming junction signal, providing advanced warning of the upcoming signal’s aspects. The left signal applies to trains traveling on the left line, while the right signal applies to trains traveling on the right line.
Safety Systems
Aula 314 is equipped with rather basic safety systems by modern standards. The Class 314, like all trains on the UK network, comes standard with AWS. The TPWS was installed later. The unit also has a DSD player but no DVD player. It also includes a DRA. Na realidade, these systems should not be isolated while the unit is running; em vez de, they should be removed from service as soon as any of them fails. No entanto, these are defaulted to being isolated in the game, allowing newer players to drive the train without encountering seemingly random alarms and automatic brake applications. Each of these systems is described in detail below.
AWS
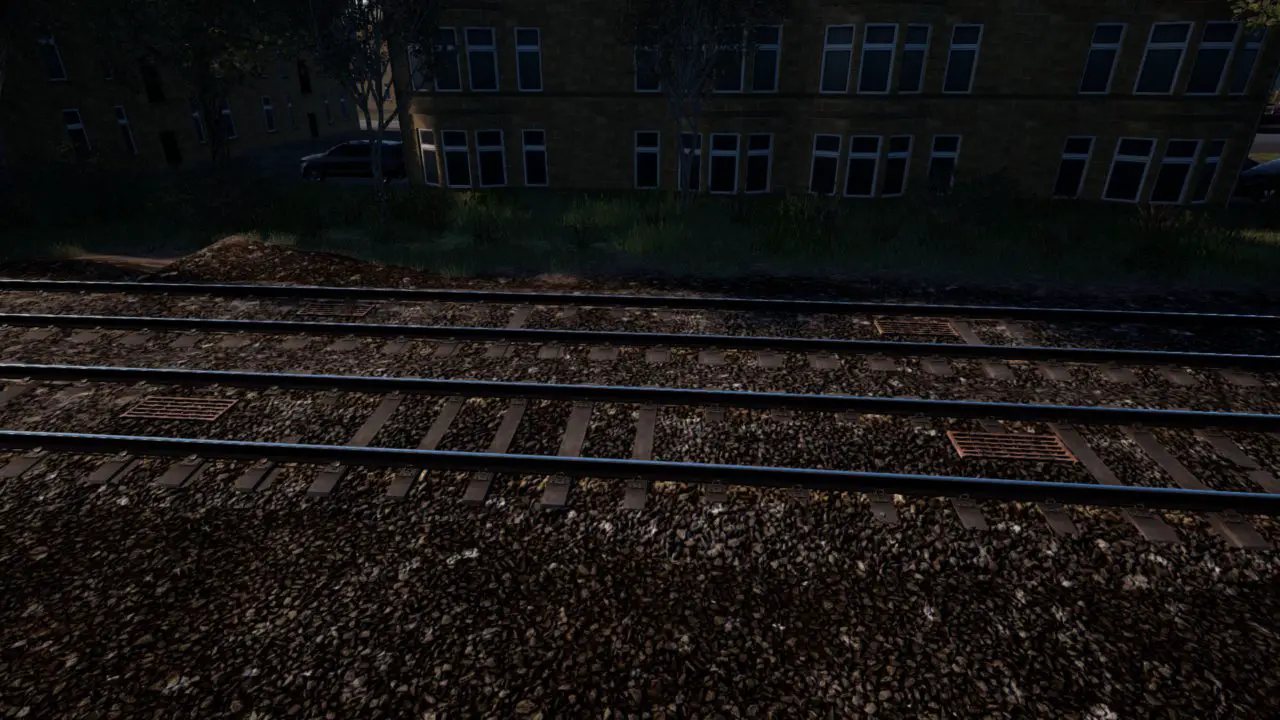
AWS (Automatic Warning System) was developed in the 1960s as a means of relaying the signal aspect to the driver – it is based on an earlier system known as ATC developed by the Great Western Railway in the very early twentieth century in response to the 1900 Slough Rail Accident, in which both the driver and fireman failed to see two danger signals that would have prevented the express train they were driving from being derailed. The primary distinction between ATC and AWS is that ATC relies on physical contact, whereas AWS relies on magnets (shown below) placed approximately 200m from the signal, but closer if necessary.
A bell will sound in the cab if and only if the signal ahead has a clear aspect. A monotone warning horn will sound otherwise. This must be acknowledged within 3 segundos, or you will be subjected to a penalty brake application.
When the TPWS brake demand light goes out after the train has stopped, you must wait a few minutes before releasing the brakes. Some magnets are always armed, so they always emit a warning tone. If the drop in speed limit is significant enough, these are typically placed in front of speed restriction warning boards, also known as Morpeth boards.
TPWS
The Train Protection & Warning System (TPWS) was developed in the late 1990s after it became clear that installing Automatic Train Protection (ATP) on the entire network, as seen on the Great Western Main Line and Chiltern Main Line, was not feasible.
Unlike ATP, the primary function of TPWS is to mitigate the effects of trains passing through red lights; Contudo, it should not be confused with the earlier Moorgate Protection (used on the London Underground) and Indus (German system used on the Tyne & Wear Metro) systems, both of which use electro-mechanical technology.
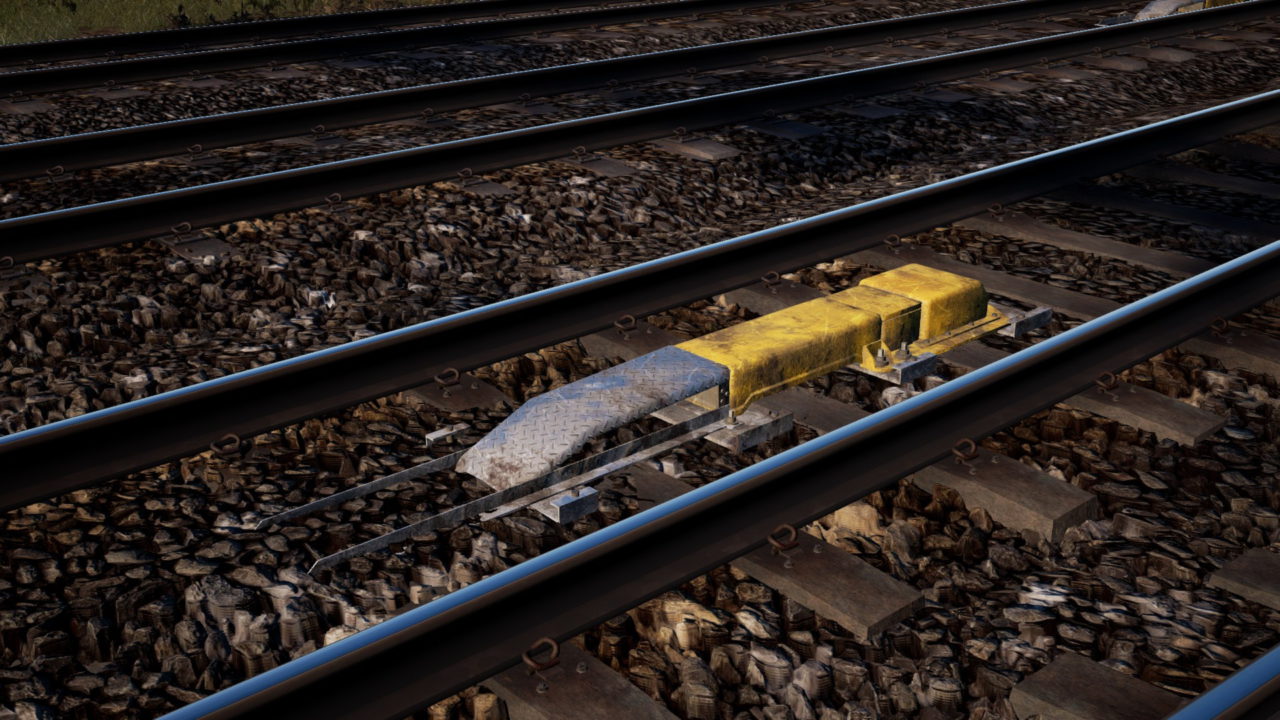
TPWS employs a tack-mounted transmitter. There are two types of TPWS in use. The Train Stop Sensor (TSS) grade (abaixo) is installed on the track next to the signals, and if the signal is in danger, it will activate an emergency brake if a train passes over it (provided the train is also fitted with TPWS).

The Overspeed Sensor (OSS) is a type of sensor that is installed in particularly high-risk areas, such as on a high-speed mainline or where many trains are likely to be running in a short space. These are placed ahead of the signal and ahead of some buffer stops to slow a train down if it is traveling too fast. This system makes use of two smaller grids that are spaced apart.
TPWS OSS is not currently functional in Train Sim World 2.
DSD
There is a Driver’s Safety Device (DSD), also known as the dead man’s pedal/handle. This is a very basic system. The driver must keep their foot on the pedal at all times while the train is moving, or the train brakes will be activated (they will release them as soon as pressure is re-applied). Aula 314 does not have a Driver Vigilance Device (DVD), which sounds an alarm (which must be acknowledged) todo 30-60 segundos.
DRA
In the cab, there is a Driver’s Reminder Appliance (DRA). It is intended for use at stations where the starting signal is in jeopardy or does not exist. Quando ativado, the DRA will prevent power from being applied to warn the driver of a potential danger signal ahead. Em tais casos, another method used by drivers is to put the train in neutral in conjunction with the DRA.
Lembrar – Sinal, Plataforma, Sinal, Ação – after performing platform duties.
- Sinal: Check the signal aspect.
- Plataforma: Check the platform to ensure it’s safe to depart.
- Sinal: Check the signal again.
- Ação: Move the train if the signal allows.
Isso é tudo o que estamos compartilhando hoje para isso Trem Sim World 2 guia. Este guia foi originalmente criado e escrito por Cameron's Gaming. Caso não atualizemos este guia, você pode encontrar a atualização mais recente seguindo este link.
Surprised there have been no comments so far. This is a very useful guide to the Cathcart Circle DLC along with signalling and protection systems.