For beginners and experienced players alike, this guide lists everything you need to survive the trials of Murkoff’s scientists.
Rigs
Unlike other Outlast games, you won’t be left defenseless against the enemies that come after you. Up to four different rigs can be used during the trials, each assigning its owner a specific role within the team.
Stun Rig
First on the list, the Flash Grenade is a great tool to use as a projectile. It can be used to remotely rescue a player who is trapped or surrounded by enemies, incapacitating them for a few moments. Much like the mine, the grenade will mainly be used to incapacitate enemies, but the grenade is effective immediately and from a distance. It will mainly be used in panic situations, when the player encounters a powerful enemy at the corner of a corridor, or to rescue an ally trapped by an enemy before the enemy can inflict damage. An excellent offensive and defensive tool, it is possible to use the grenade to safely revive an ally (if the stun duration is extended thanks to upgrades).
Blind Rig
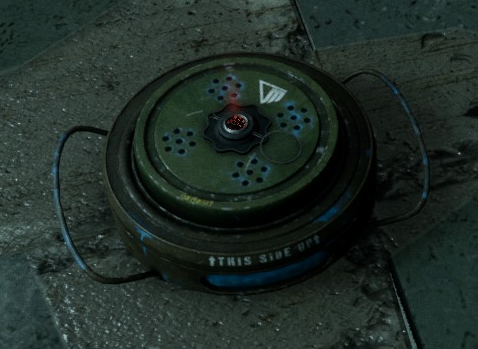
The Gas Mine is a piece of equipment that allows players to take control of an area. Triggered by enemies, it creates a thick, circular cloud that incapacitates any enemy caught in the smoke. Unlike the stun grenade, the mine’s effect lasts over time and can affect enemies after the mine is triggered if they are drawn into the area of effect. Any enemy affected by the mine will be immobilized and unable to attack the player, even if the player makes physical contact with the enemy. The Blind Mine, along with its Reactivation (Enhancement) ability and good positioning, is a great tool for the final stages of Trials or MK Challenges when a lot of enemies are expected around a time-consuming task, or to defend the exfiltration point until the shuttle arrives.

Infelizmente, the mine has a downside, namely its activation time. It is not instantaneous like other machines that can be used in extremis, and it immobilizes the player while the mine is being placed. This makes it risky to use in a chase, as the Expop has time to inflict damage on the players before the machine is triggered. Também, only one mine can be active at a time.
It is also important to note that while the mine can be placed anywhere on the ground, certain locations will prevent the mine from activating (por exemplo. too close to elevators that serve as Popex spawn points).
Medical Rig
The gas canister is a multi-purpose tool, capable of regenerating the health of players within its range, it can also act as an antidote and stun enemies for a brief moment (if upgraded), allowing for many uses.
This gear is extremely useful in Trials and Challenges that have difficulty modifiers that reduce the rate of items on the map, and is still a great piece of gear to take on a Trial.
X-Ray Rig
The outlier of the bunch, it is quite rare to see players using X-Rays, as it is not an offensive piece of gear, but an informative one. X-Rays provide a lot of information to the player, from the location of enemies to the location of traps and objects, and can even share this information with other players.

Though rarely used, X-Rays remain a not-to-be-missed piece of equipment and are quite viable on high difficulty. In addition to detecting patrolling and hidden enemies, locating objects on the map (and those locked in cupboards) allows the team to gather useful resources without wasting too much time.
Unid
During each event, a number of usable items are distributed on the map. While some can be easily obtained from corpses or the corresponding “peito,” others are rarer and require special conditions.
Medicamento
These items come in the form of small and large potions and can be found in medicine chests. Small potions can restore one health segment, while large potions can restore up to three health segments, allowing for full recovery.
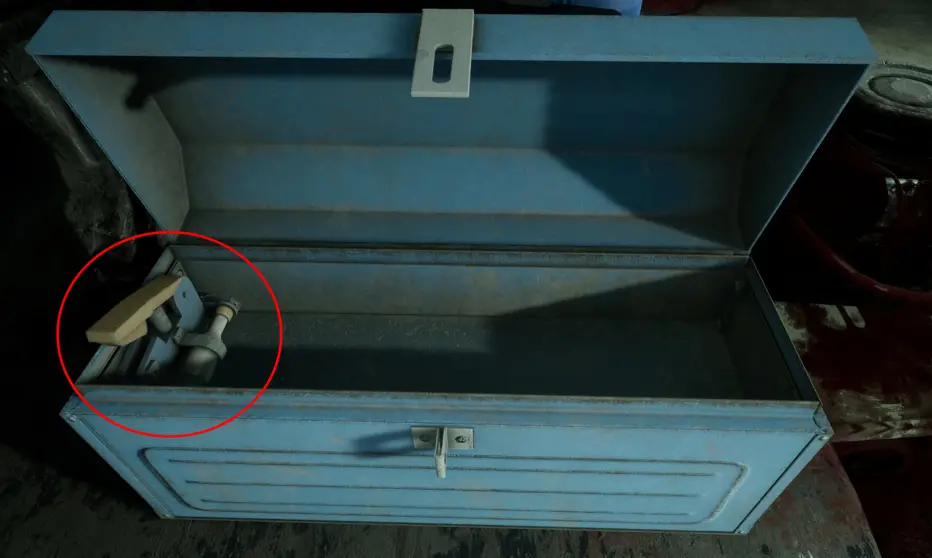
Baterias
These come in the form of small and large batteries and can be found in toolboxes and blue cupboards. If the small battery allows you to recharge your night vision goggles by a third, the large battery allows you to recharge them completely. Small batteries can also be obtained by disarming traps on doors.
Projéteis
Projectiles include glass bottles and bricks. Espalhado pelo mapa, these are throwable objects whose use varies depending on the object and the situation. Projectiles can be used to destroy gas mines and duck traps.
- Bottles shatter on impact and make a noise that can be used as a distraction. They can also be used on enemies to stun them for a short time. Infelizmente, bottles are almost useless against large enemies such as the Giant Grunt or Berserker, which will recover from the stun much more quickly.
- The bricks can be used up to three times before breaking, but do not make any noise when they hit. They do, Contudo, have a much higher impact potential. Além disso, a head shot will knock back normal-sized enemies, incapacitating them for a moment.
The Contraband Strong Arm perk can amplify the effects of projectiles and also doubles the stun time of a brick throw to the head, causing the expop to stagger for long seconds as they try to get away.

Antídoto
Found in medicine cabinets, the Antidote is a quick-use item that can fully restore the player’s mental health, even if the player is suffering from psychosis.
Adrenalina
Adrenalina, found in medical cabinets, allows the player to run without exhaustion for a short period of time, as well as slightly increasing their running speed. Adrenaline is a great aid when players need to move a quest item or push a heavy item.
Carregador de bateria
Found in toolboxes and blue lockers, equipment chargers allow you to instantly recharge your equipped gear. No entanto, you will need to wait until the rig has finished consuming something (such as health gas) to use the charger.
Picking Tool
Espalhado pelo mapa, Pick Tools allow you to unlock padlocked cabinets and toolboxes through a mini-game in the form of a QTE. Stopping the needle on a green area will advance the puzzle to the next level (three in all), and red areas will shock the player, causing them to lose some health. It is important to note that when the countdown on the padlock reaches zero, the player will receive a hallucinogenic gas discharge, the intensity of which varies depending on the difficulty of the puzzles.
Stimshot
Stimshots are items that can revive dead players (Death by Bleeding or Execution), but take a few seconds to use, just like a resurrection. They can only be obtained from first aid kits, which are only available in co-op, and only contain one charge (unless the player has the perk to use syringes twice).
Sala Secreta
In addition to a pool of common items, secret rooms also contain unique and very powerful items:
- Health Amplifiers: The Health Amplifier is able to regenerate all of a player’s health, in addition to adding an extra segment.
- Stamina Booster: The Stamina Booster increases the run time of the player who consumes it.
- Battery Booster: The Battery Booster recharges and greatly increases the reserve of Night Vision Goggles. The buff is also visible on the chest of the player who used it.
- Chave mestre: The Master Key is a variant of the Pick Tool that does not break when used. The Master Key allows you to instantly open any locked container.
Coração
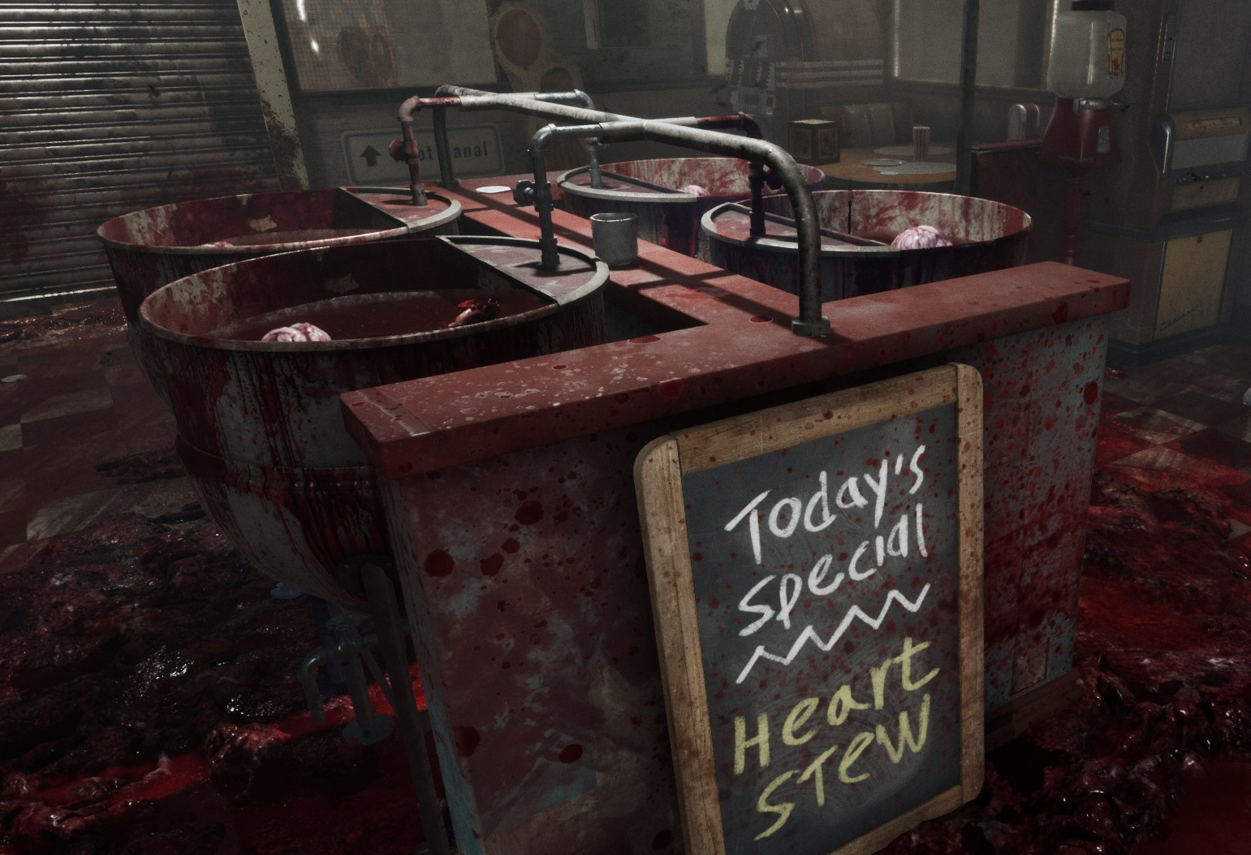
Hearts are items found only in the second program event’s amusement park, and are obtained from the candy floss vats in front of the entrance to the Dental Canal. Hearts are provided to players indefinitely and are used as projectiles to obtain the necessary tickets to enter the next area. Hearts do not make a sound to attract enemies upon impact, and cannot stun Expop.
No entanto, they can be used to destroy explosive mines/ducks and are sufficient to disrupt passive enemies and screamers, forcing them to move.
Inimigos
Primes Assets
Of all the Expop (Experimental Population), the Primes are the emblematic Enemies of the Trials, each ruling over their domain (the police station for Leland Coyle, the amusement park and orphanage for Mother Gooseberry). They do not have any unique abilities, except in certain difficulty levels where the slightest blow can be fatal.
Grunhidos
The common expop that roams the trials, they have no special abilities, but unlike the giant grunts, they are able to use windows and narrow passages to follow the player during the hunt. While the giants are slower during the hunt, they deal more damage to the players and are able to stun them during their attacks. It is important to note that the giant grunts, if the trial is of a high difficulty, can wield two-handed weapons capable of hitting multiple players at once, as well as destroying doors.
There is also a more passive and immobile group of grunts, often sitting or leaning against walls. These enemies will not follow the player, but will attack if the player gets too close.
Pouncer
Traumatized by the mutilations inflicted by Murkoff, the Pouncer is able to take up a hiding place (locker, trash can, trunk, etc.) and set a trap for players who get too close. As soon as a player passes near the hiding place, the pouncer will immobilize the player, dealing damage until they can get out or another player comes to their aid, after which they will change their hiding place. The pouncer will remain very vocal, Contudo, moaning and occasionally emerging from her hiding place to spy on the area, making it easy for players to spot her. No entanto, it is possible to pass unnoticed if the player moves slowly (and crouches) no escuro.

Pusher
Easily recognizable by his appearance and laugh, the Pusher is never present at the start of the trial, but moves around the area using the elevators. If a player is caught by the Pusher, he will use his hallucinogenic gas to cause psychosis before leaving the area via an elevator, and he can also perform zone attacks, which are rarer and can hit multiple players.
Skinner Man
A nightmare apparition of Dr. Easterman, the Skinner Man is an entity that only appears to players when they are under the effects of psychosis. It is impervious to projectiles and rigging, can pass through locked doors, and always knows the player’s location, making any attempt to hide impossible. The Skinner Man has no attack animation, but will deal damage over time if it gets too close to the player. The only way to avoid him is to wait out the psychosis or consume an antidote. The Skinner Man can also appear as a “Jumpscare” when the player’s sanity is affected but not at zero, with the intensity of the appearances increasing according to the amount of psychological damage suffered.It is important to note that each player has their own hallucination, if several players were to go into psychosis at the same time, each would be pursued by their own monster.

The impostor
Capable of taking on the appearance of a player (taking into account cosmetic elements), the impostor is able to display the nickname of the one he is imitating in order to approach and stab his target.

No entanto, Imposters can be spotted by various details, small mistakes in the nickname, and no rig will be equipped. Além disso, impostors will begin to breathe loudly when near their target. If the impostor is injured by a projectile, interrupted in its attack, or repeatedly fails to grab a player, it will run away and exit the area via an elevator.
It’s important to note that impostors have night vision goggles, just like players, so they can venture into dark areas in search of an unwary target.
Gritador
The Screamer is the only Expop that does not actively try to harm players, but instead stays in his corner in a semi-vegetative state. Easily spotted by the sounds emitted from the speaker attached to its chest, the Screamer can be found in various locations around the map, de pé, sitting or lying down. The Screamer’s stress level can be determined by the sound of his breathing, which becomes increasingly difficult as he gets closer to the Expop. Whenever a player performs a loud action around the Expop, he will emit a shrill sound that paralyzes players and drags down surrounding enemies. While paralyzed, players will have a much harder time spinning, but will still be able to use their items and rigs. Players who enter the radius of the Howl after the Paralysis effect (represented by the visual effect of the howl) will not be affected by the Paralysis.
This enemy, while only a utility, poses a real threat by leaving players at the mercy of enemies, but can be “defused” with a projectile without causing them to scream.

Berserker
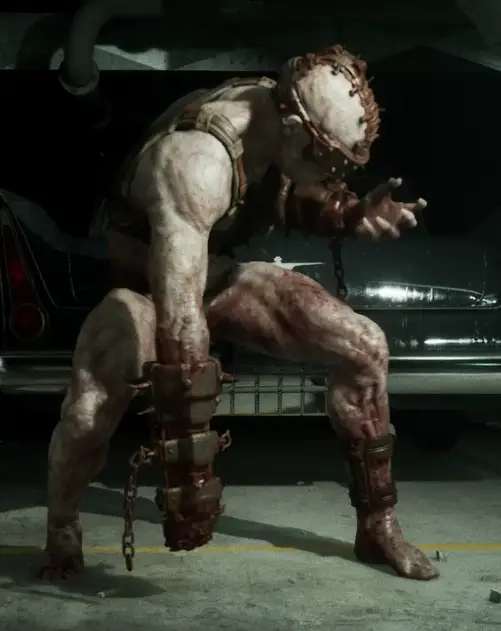
The Berserker is a giant, blinded by the experiments performed on him. Dangerous in both light and darkness, the Berserker is attracted to any source of noise in its environment, even footsteps (de pé, not running) if a player is too close. Extremely unpredictable, the Berserker will often slash around in the hopes of hitting something, making it very dangerous to get close even if a player is standing still. Bottles are a valuable tool in keeping this enemy away from areas of interest.
Night Hunter
The Night Hunter is an Expop with the same night vision as the players, thanks to the goggles screwed onto his skull. Patrolling dark areas, the Night Hunter will never venture into bright areas alone, and is able to ambush players by crouching behind obstacles. No entanto, he remains detectable thanks to his incessant monologues, accompanied by the green glow of his goggles. The best way to evade the Raider is to lead him into a bright area, which will blind and stun him. It is important to note that the Hunter is still sensitive to sound even when his vision is affected by light, and on higher difficulties he will be able to see players in bright light, but will not be able to run.

Game mechanics
Armadilhas
Scattered throughout the map to weaken players, the trials are full of traps designed to make players’ jobs more difficult, some of which can inflict damage and others that can alter players’ minds.

Exploding Ducks
In the shape of the theme park’s mascot, these explosives “charge” when a player gets too close to them, causing them to explode and deal minor damage. In co-op, it’s important to watch out for these traps, as one player may push the explosive to its limit, only to have the next player catch the blast. Explosive ducks can only be found on maps linked to Mother Gooseberry.
Gas mines
Easily ignored, gas mines are scattered throughout the map, and will emit an increasingly rapid beep as you approach. The mines only activate on contact, releasing a thick cloud of gas. No entanto, they have a rather small hitbox and can be safely avoided.
Trapped Containers
Lockers and toolboxes that are not padlocked may contain trigger traps that activate when opened, spraying the player with gas at a rate that varies depending on the difficulty of the event.
Trap Doors
Identified by a red glow on the door frame (esquerda, certo, or top of the door), trap doors are triggered when the door is opened by a player who is immobilized by a gas emitting device, which is triggered if the item is removed too late.

Trap doors can be opened without triggering the mechanism if they are opened slowly, and disarmed if the player removes the battery from the mechanism or opens the door while crouching to avoid the trap. No entanto, disarming and activating the trap will make a noise that may attract nearby enemies.
Electrical Grids
Randomly distributed throughout the maps, these grids change state periodically and are accompanied by an audible signal when they are about to start.
Cadeados
Cadeados, used to lock containers, are not considered traps per se, but can emit a gas discharge if the player allows the timer to reach zero.
Mental Health and Psychosis
In addition to physical health, the player must also monitor their mental health, represented by 3 segments, the loss of which will cause panic and hallucinations, and exposure to hallucinogenic gas, either from the traps or the gasser, will affect mental health depending on the difficulty of the trial.
On the first level, the player will experience a state of panic where his vision and perception of sound will be altered. While benign in itself, this alteration of the senses can be dangerous during a chase, as the visual and auditory details become more complicated to perceive. It is also possible that the Skinner Man will make some appearances in the distance.
On the second level, the crises will be more frequent and last longer. The intensity of the Skinner Man’s appearances will increase, and he will be able to scare the player with “jumpscares” without reaching them.
At the final level, the player will fall into psychosis. In addition to visual and auditory impairments, veins will appear on the walls and floor, and the Skinner Man hallucination will be strong enough to attack the player. If the player is able to survive the psychosis for a while, their sanity will fully recover.
Chases
Chases are an important part of Outlast Trials, it will be difficult for you to complete a trial without being noticed once. Each time the player performs a noisy action that will be heard by enemies, a specific sound will be played, and if the player is detected, the corresponding Expop will call out to the player.If players can get exhausted after running for too long, enemies cannot, so managing your stamina well is essential. Do not hesitate to run through dark areas (or light areas in the case of the night hunter) to force the enemy to search their last known location. On high difficulties, they will have no trouble tracking you by sound in the dark, so beware.
Abusing doors, even those without locks, as enemies cannot attack the player during the animation, even going so far as to “empurrar” Expop out of rooms if they are in the doorway. It is also possible to close a door behind you at full sprint without even turning around, if the player interacts with the door at the right time (just after crossing the threshold).
Police station
The object of this test is to “get rid” of the Snitch by getting him from point A to point B. The chair to which the Snitch is attached can be moved on a track that runs from the police station to the execution room. When left alone, the Snitch automatically retracts until it encounters a checkpoint placed on the rails in front of the locked doors.
The main expop, the cop, will appear in the underground garage and then not far from the execution room when the snitch has passed the last checkpoint. It is recommended that you use blinding mines to incapacitate enemies long enough to charge the electric chair. Once the objective is completed, players will tend to run to the garage door south of the execution room, but it is much easier and safer to go through the cell corridor to exit the police station.
- Garagem
After the last generator is repaired, parts of the basement will light up, making players visible. This is the area around the garage door, which makes a lot of noise and requires a group effort to open quickly. To avoid getting knocked down by the Berserker or the cop, it is recommended that one player open the door first while the others work on the last generator to keep the door open when they arrive.
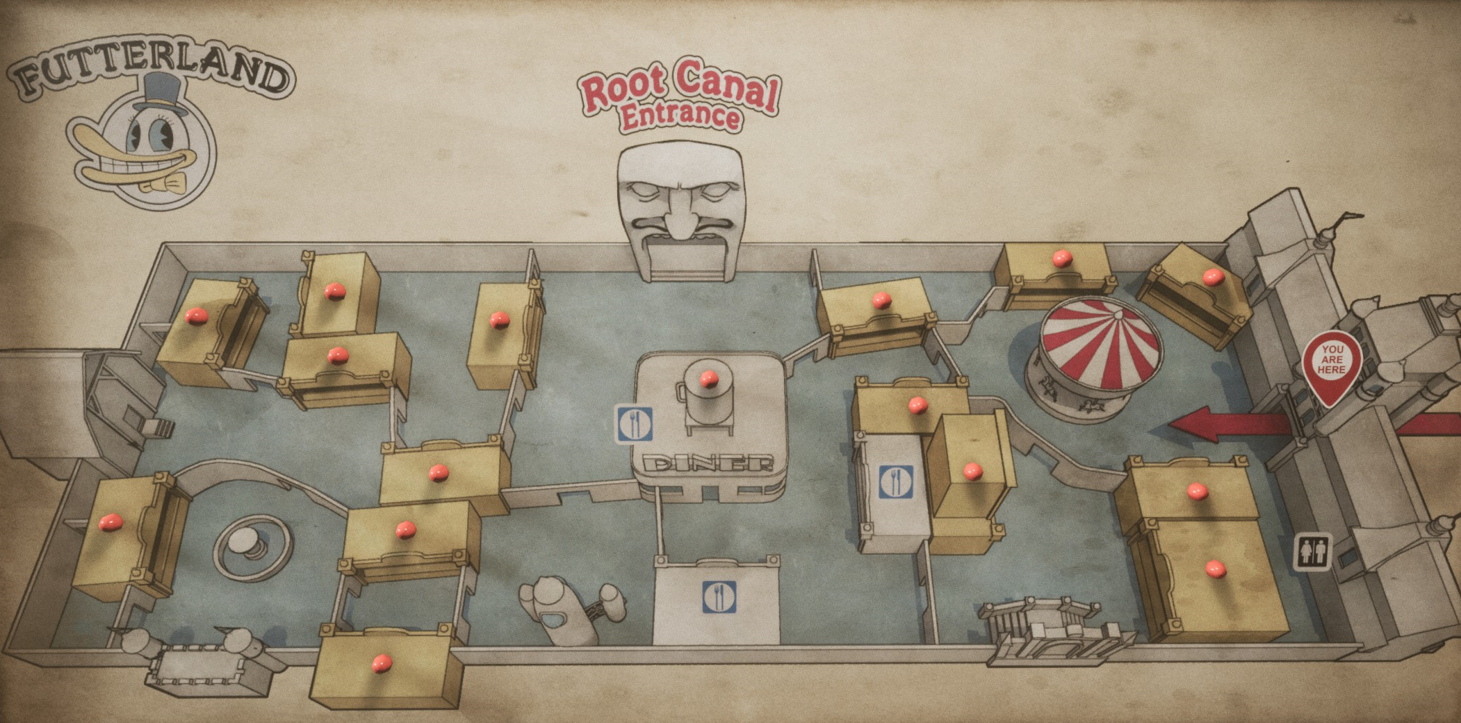
Parque de diversões
Carnival
The first part of the trial, the carnival, has several maps scattered around the park showing the locations of the tickets to be obtained to enter the canal. Each ticket requires 3 corações, which can be found in the cotton candy vats in the center of the area, to complete the challenges.
Just like the previous event, you will have to push the target until it is destroyed, but the boat in this trial is much heavier and therefore slower, even if the player uses his stamina. Players must remove the barriers by following the cables attached to them and remove the batteries. When the boat reaches the second floor, Mother Gooseberry will close the valves that feed the river and begin patrolling the third floor. Players must follow the pipes to identify the correct valves, otherwise they will take a hit of gas if it is not the correct one. As the boat approaches the “Punição”, Mother Gooseberry will enter the area via the nearest elevator and chase after the players trying to crush the boat. She can also be found in front of the shuttle during the escape.
Orphanage
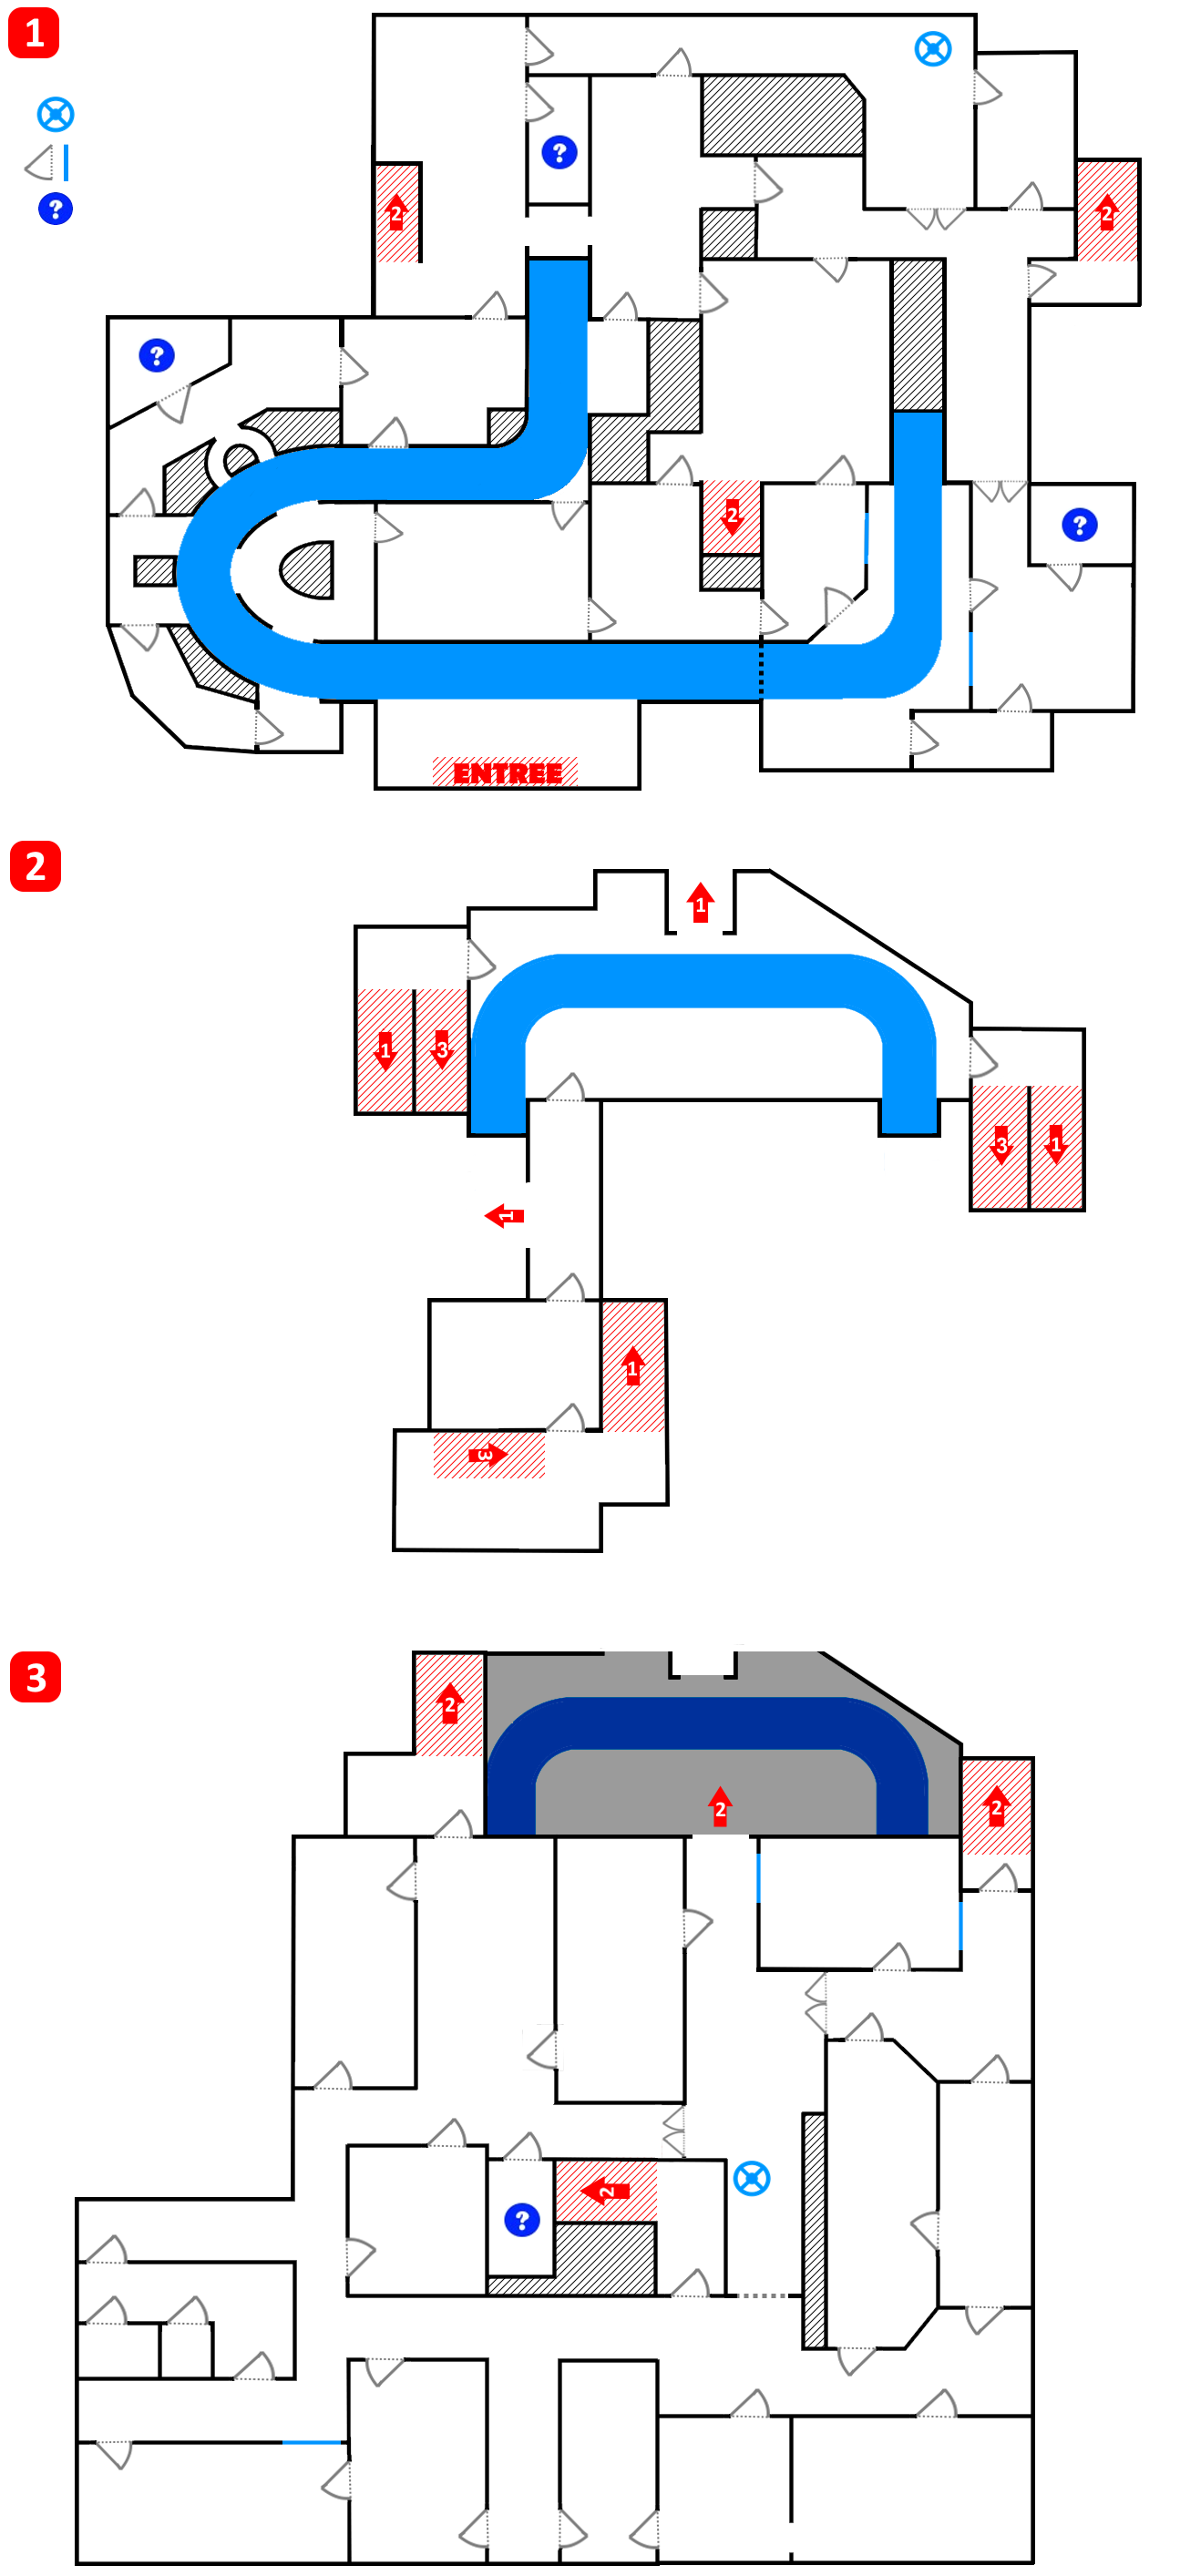
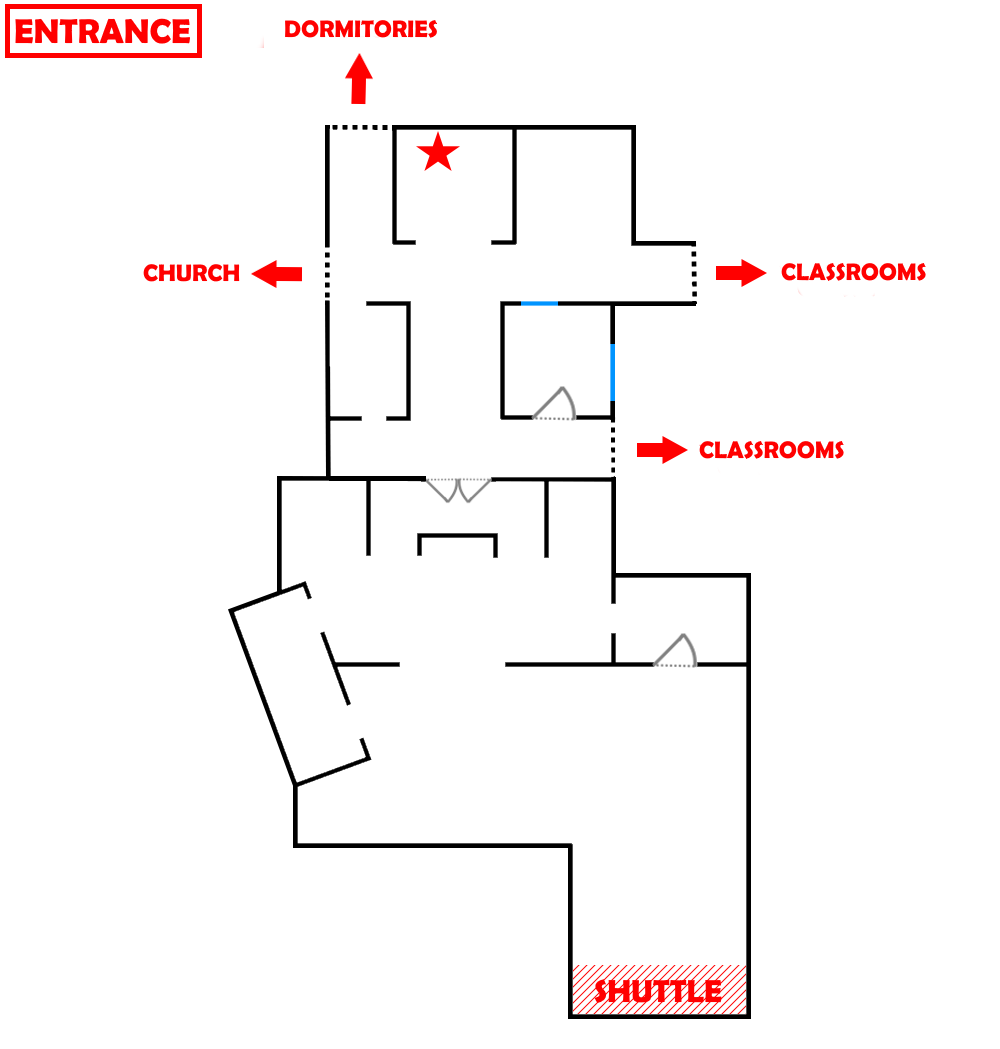
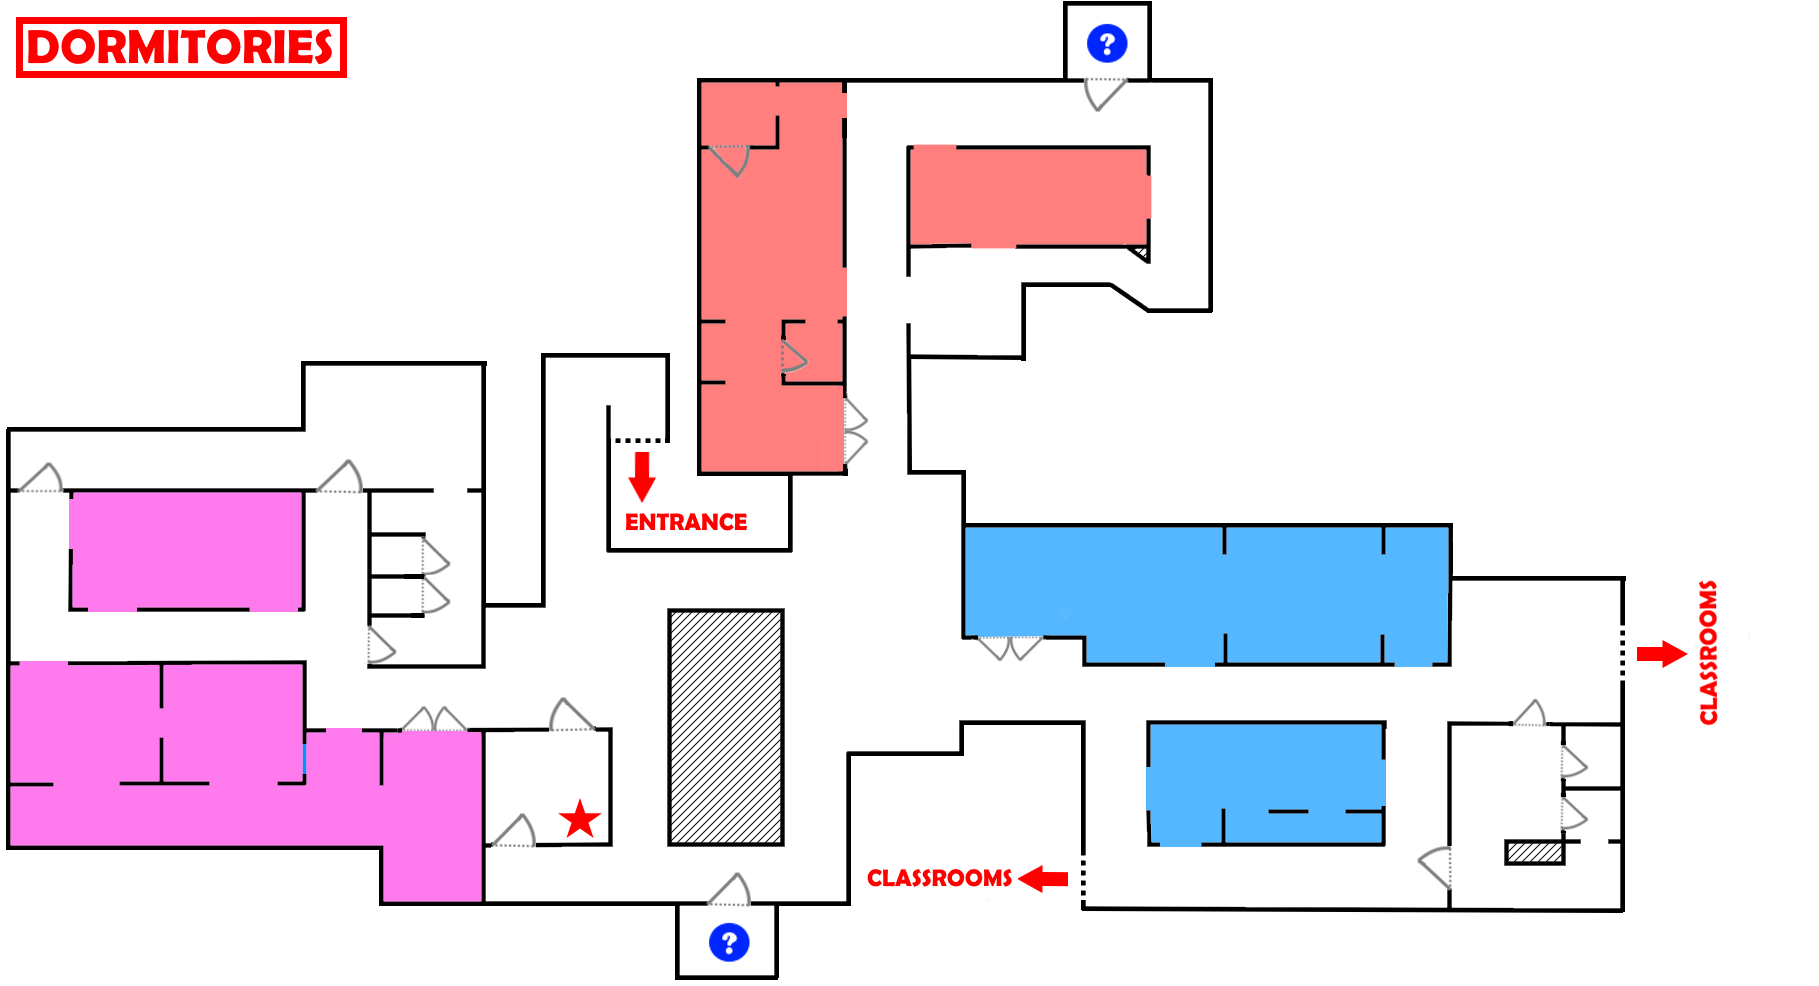
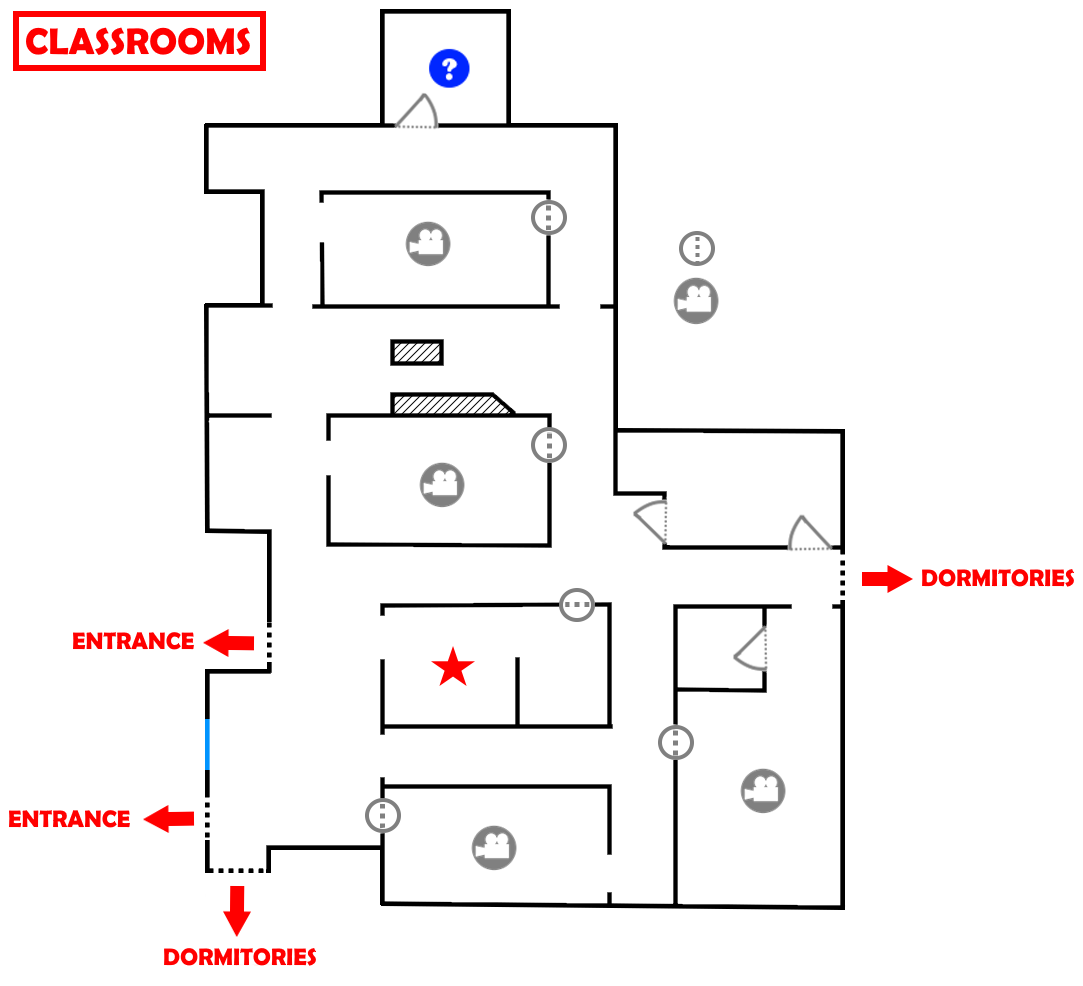
The orphanage quest is divided into several tasks corresponding to the different areas of the orphanage (dormitories, classrooms, and the church). Between each quest, the player must return to the central hall at the entrance of the building to begin the next quest.
The first task is to tune all the oscilloscopes in the dormitories to the “Radio Jesus” freqüência. Next to the first oscilloscope of the floor, there is a map of the floor showing the rooms concerned. The accesses to the rooms where the oscilloscopes can be found (in color on the map) cannot be opened on command and require the passage of mannequins dressed as nuns to open.
There are special doors in the classrooms that will block the passage of players who attempt to pass through them while carrying a reel. It will be necessary to use the pass-throughs to get the reels out and into the classrooms with the active projectors. The rooms in question can be identified from the outside by listening for the cocaine song playing through the projector.
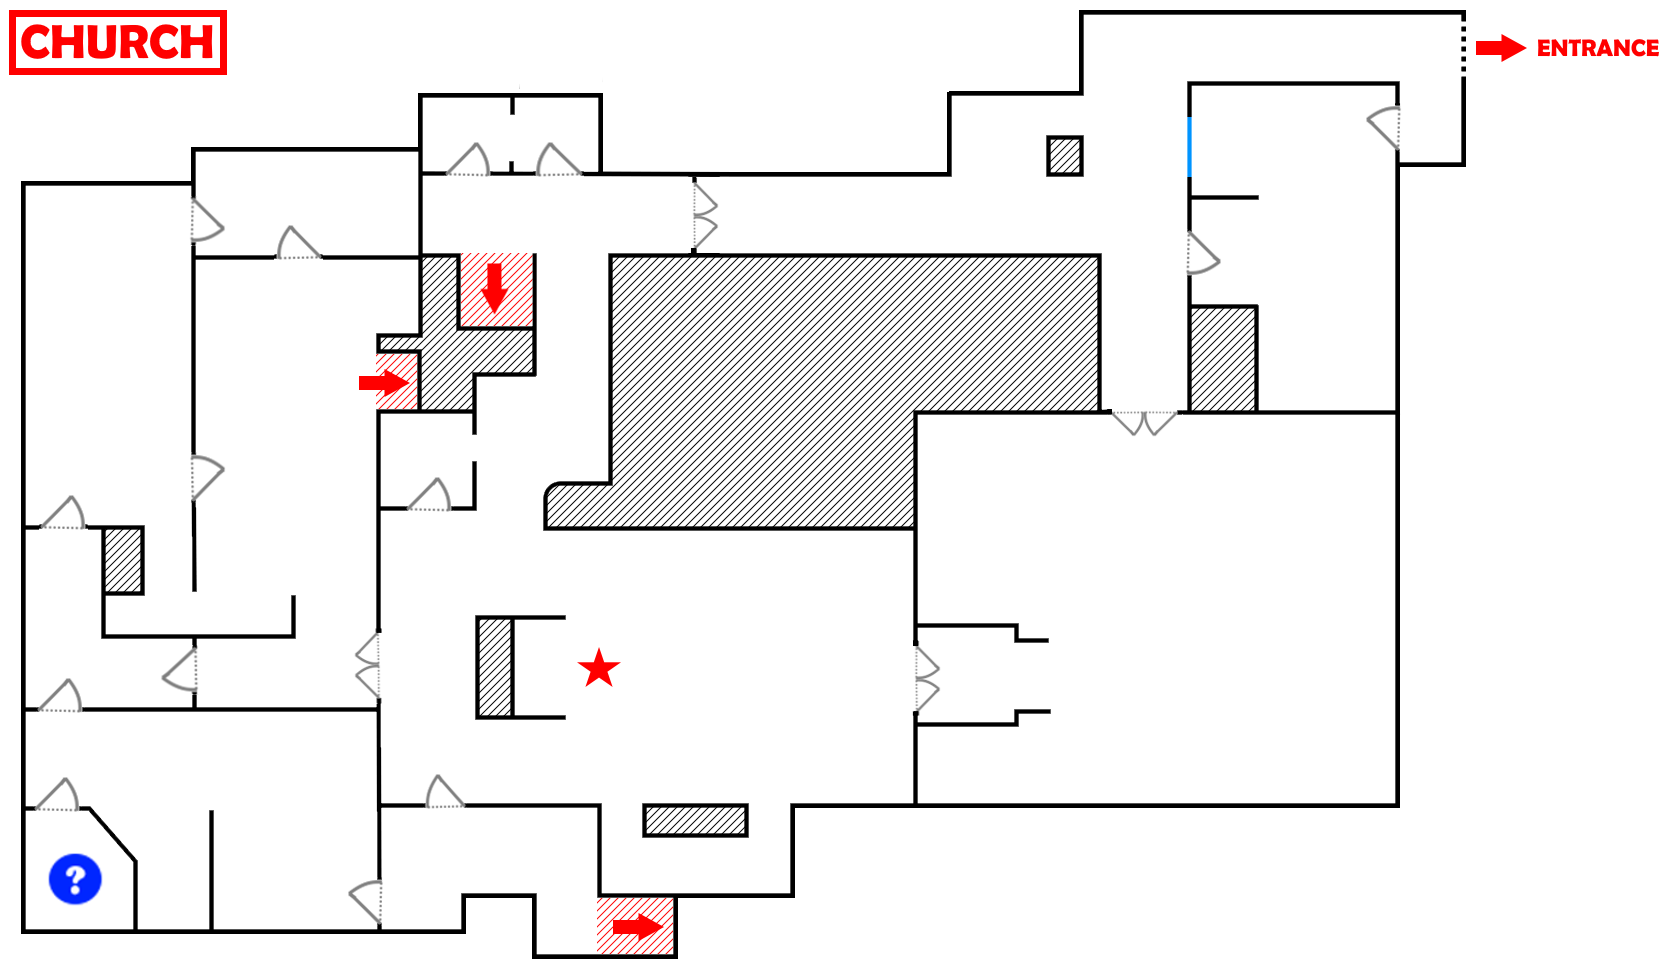
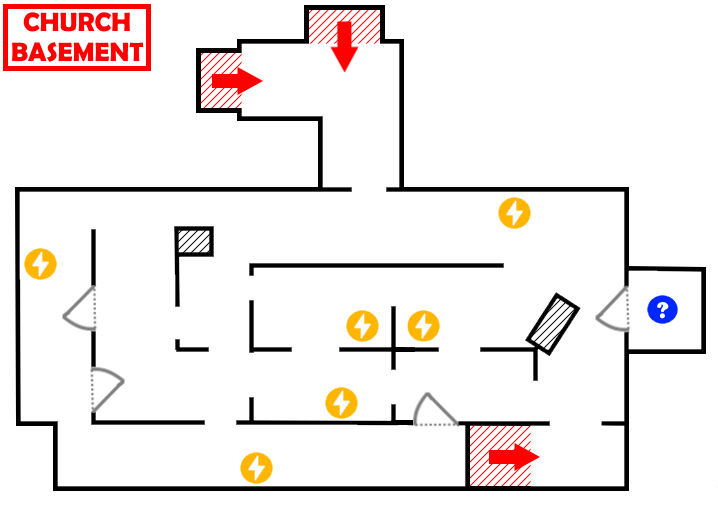
The mission of the church is to find the keys to continue the sacrifice of the crucified and to turn on the generators in the basement of the church.
After the ceremony, Mother GooseBerry will always appear at the entrance of the church to prevent players from escaping.
Isso é tudo o que estamos compartilhando hoje para isso As últimas provações guia. Este guia foi originalmente criado e escrito por ArtisteLemur. Caso não atualizemos este guia, você pode encontrar a atualização mais recente seguindo este link.