

This is a simple guide for setting up and using the Tick Timers script.
About the Script
Tick Timers is a script that aims to reduce the number of timers used in a grid. It also enables players to share their timer definitions with other players that have the same or similar setup. The script also provides custom functionalities that otherwise will not be accessible to a normal timer. These functionalities allow for better control over blocks like rotors and pistons.
Script Setup
To set up the script, put a programmable block on your grid. Load and compile the Tick Timers script and you are done! The script does not need any timer as it already triggers itself. Neste ponto, you are ready to add virtual timer (vtimer) definições.
Defining Virtual Timers
A virtual timer or vtimer is the representation of a timer in Tick Timers script. It is created by defining a vtimer definition on the Custom Data of the Tick Timers programmable block. Here is what makes up a vtimer definition:
@<timer name>:<number of ticks>:<optional, on load action>
- <timer name> – The name of the vtimer. This will be used to trigger the timer.
- <number of ticks> – The delay of the vtimer in ticks. Observe que 60 ticks = 1 segundo.
- :<opcional, on load action> – Opcional. These actions will set the initial state of the timer as either Off or On.
Here are some examples of a vtimer definition:
@MyTimer:60
@MyOnTimer:30:OnOff_On
@MyOffTimer:20:OnOff_Off
- MyTimer has a delay of 60 ticks (1 segundo) and is ON by default.
- MyOnTimer has delay of 30 ticks and is ON by default.
- MyOffTimer has delay of 20 ticks and is OFF by default.
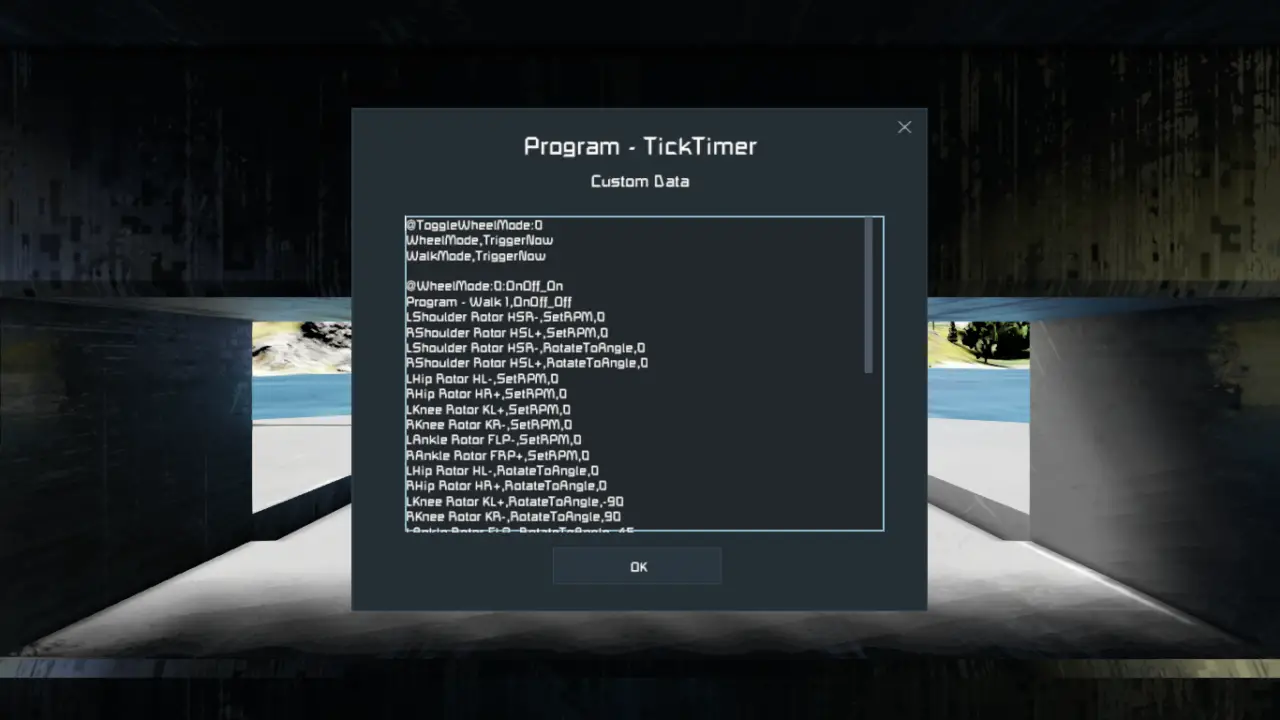
A sneak peeks at how complex you can get with a vtimer, this one is for a mech transformation sequence.
Defining Actions
Actions define what a vtimer does when it is triggered. It is similar to dragging a block to a timer toolbar and selecting an action to perform. Multiple actions can be defined (try to limit this to 10 but you can go beyond, just don’t go super crazy). Here is what makes up an Action definition:
<block or group name>,<action name>,<optional setting value>
- <block or group name> – The name of the block or group that will perform the action.
- <action name> – The name of the action to perform
- ,<optional setting value> – Opcional. This is for custom actions that accept a setting.
Here is some examples of timers with the added Actions:
@SetVelocity:0
Piston,SetVelocity,1

@SetRPMNeg:0
Rotor,SetRPM,-1

@SetAngleN60:0
Rotor,SetRPM,0
Rotor,RotateToAngle,90
- SetVelocity vtimer with 1 action SetVelocity. This will set Piston’s velocity to 1.
- SetRPMNeg vtimer with 1 action SetRPM. This will set Rotor’s RPM to -1.
- SetAngleN60 vtimer with 2 actions SetRPM and RotateToAngle. This will first set Rotor’s RPM to 0 then rotate the rotor to 90 graus.
Tome nota, Actions are performed from top to bottom sequentially.
Finding Actions for a Block
Malware generously provided us a list of the properties and actions for each block. You can check the link below for the list:
There are also actions called Custom Actions that are only accessible within the Tick Timers script. Please see the Custom Actions sections for details.
Here’s a really convenient feature of the script. As long as the block has the Action name defined, it will perform the action regardless. This means you can do things like group rotors and pistons together and doing the ShareInertiaTensor on them (there’s also a non-toggle version in Custom Actions).
How to Use a vtimer (Começar, Parar, Acionar, Ligado/Desligado)
So finally we are here. You have defined your vtimer, you have added actions to it, now what’s left is to use it. Vtimers are used by running the Tick Timers programmable block with the following:
<vtimer name>,<vtimer action>
- <vtimer name> – The name of the vtimer to use
- <vtimer action> – The action the vtimer will peform
To make it easier to use, vtimers have the exact same actions that are available to actual timers:
- OnOff_On – Turns the vtimer on.
- OnOff_Off – Turns the vtimer off.
- Começar – Start the vtimer.
- Parar – Stops the vtimer.
- TriggerNow – Triggers the vtimer.
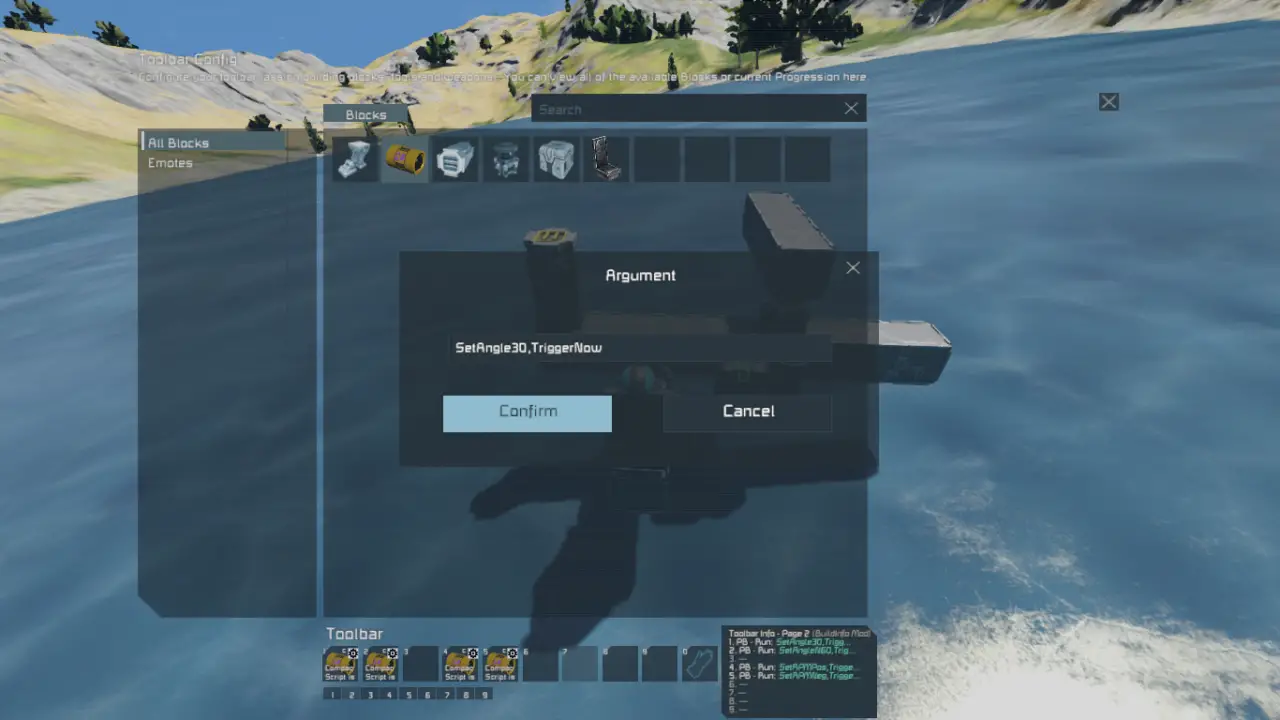
Here’s an example of me running a vtimer called SetAngle30 with a TriggerNow action which will cause the timer to trigger right away when I run it from my toolbar.
VTimer Chaining
VTimer Chaining is just calling a vtimer from another vtimer. Consider this example for a sequence I made to sequence fire Weapon Core guns:
@FireAA:30
Fire_0,TriggerNow

@Fire_0:0
Fire_1,Start
Fire_2,Start
FireAA,Start

@Fire_1:0
WeaponCore BoforsGun 1,ShootOnce

@Fire_2:10
WeaponCore BoforsGun 2,ShootOnce
Here the main vtimer is FireAA. To run this sequence I run FireAA,TriggerNow. To stop the chain fire, I run FireAA,Parar. So here’s what happens:
- FireAA triggers right way due to TriggerNow which in turn Triggers Fire_0
- Fire_0 starts both Fire_1, Fire_2, and FireAA. Fire_2 will trigger after 10 ticks and FireAA after 30 ticks.
- Fire_1 fires a WeaponCore gun called Bofors Gun 1
- Fire_2 fires a WeaponCore gun called Bofors Gun 2
- When FireAA triggers after 30 ticks, the process is repeated unless FireAA, Stop is ran.
Custom Actions
Here are custom actions that are only available through the TickTimers script:
Rotors and Hinges
- ShareInertiaTensorOnOff_On – Turns Share Inertia Tensor on for the block
- ShareInertiaTensorOnOff_Off – Turns Share Inertia Tensor off for the block
Rotors, Hinges
- RotorLockOnOff_On – Locks the rotor
- RotorLockOnOff_Off – Unlocks the rotor
- RotatePositive – Makes the RPM a positive value
- RotateNegative – Makes the RPM a negative value
- ResetRPM – Sets the RPM to zero (0)
- IncreaseRPM – Increments RPM by 1
- DecreaseRPM – Decrements RPM by 1
- SetRPM,<RPM> – Sets the velocity of a rotor to the desired rpm
- SetLowerLimitAngle,<angle in degrees> – Sets the lower limit angle of the rotor
- SetUpperLimitAngle,<angle in degrees> – Sets the upper limit angle of the rotor
- RotateToAngle,<angle in degrees> – Rotates a rotor to the desired angle
Pistões
- SetVelocity,<velocity in m/s> – Sets the velocity of a piston to desired m/s
- SetMinDistance,<limit in meters> – Sets the minimum length of the piston
- SetMaxDistance,<limit in meters> – Sets the maximum length of the piston
- AdjustToLength,<position in meters> – Adjust the length of the piston to the desired length
Isso é tudo o que estamos compartilhando hoje para isso Engenheiros Espaciais guia. Este guia foi originalmente criado e escrito por Khjin. Caso não atualizemos este guia, você pode encontrar a atualização mais recente seguindo este link.