- Título: Fronteiras Sônicas
- Data de lançamento:
- Desenvolvedor:
- Editor:
As informações sobre Sonic Frontiers ainda estão incompletas. Por favor, ajude-nos a preencher os detalhes do jogo usando este formulário de contato.
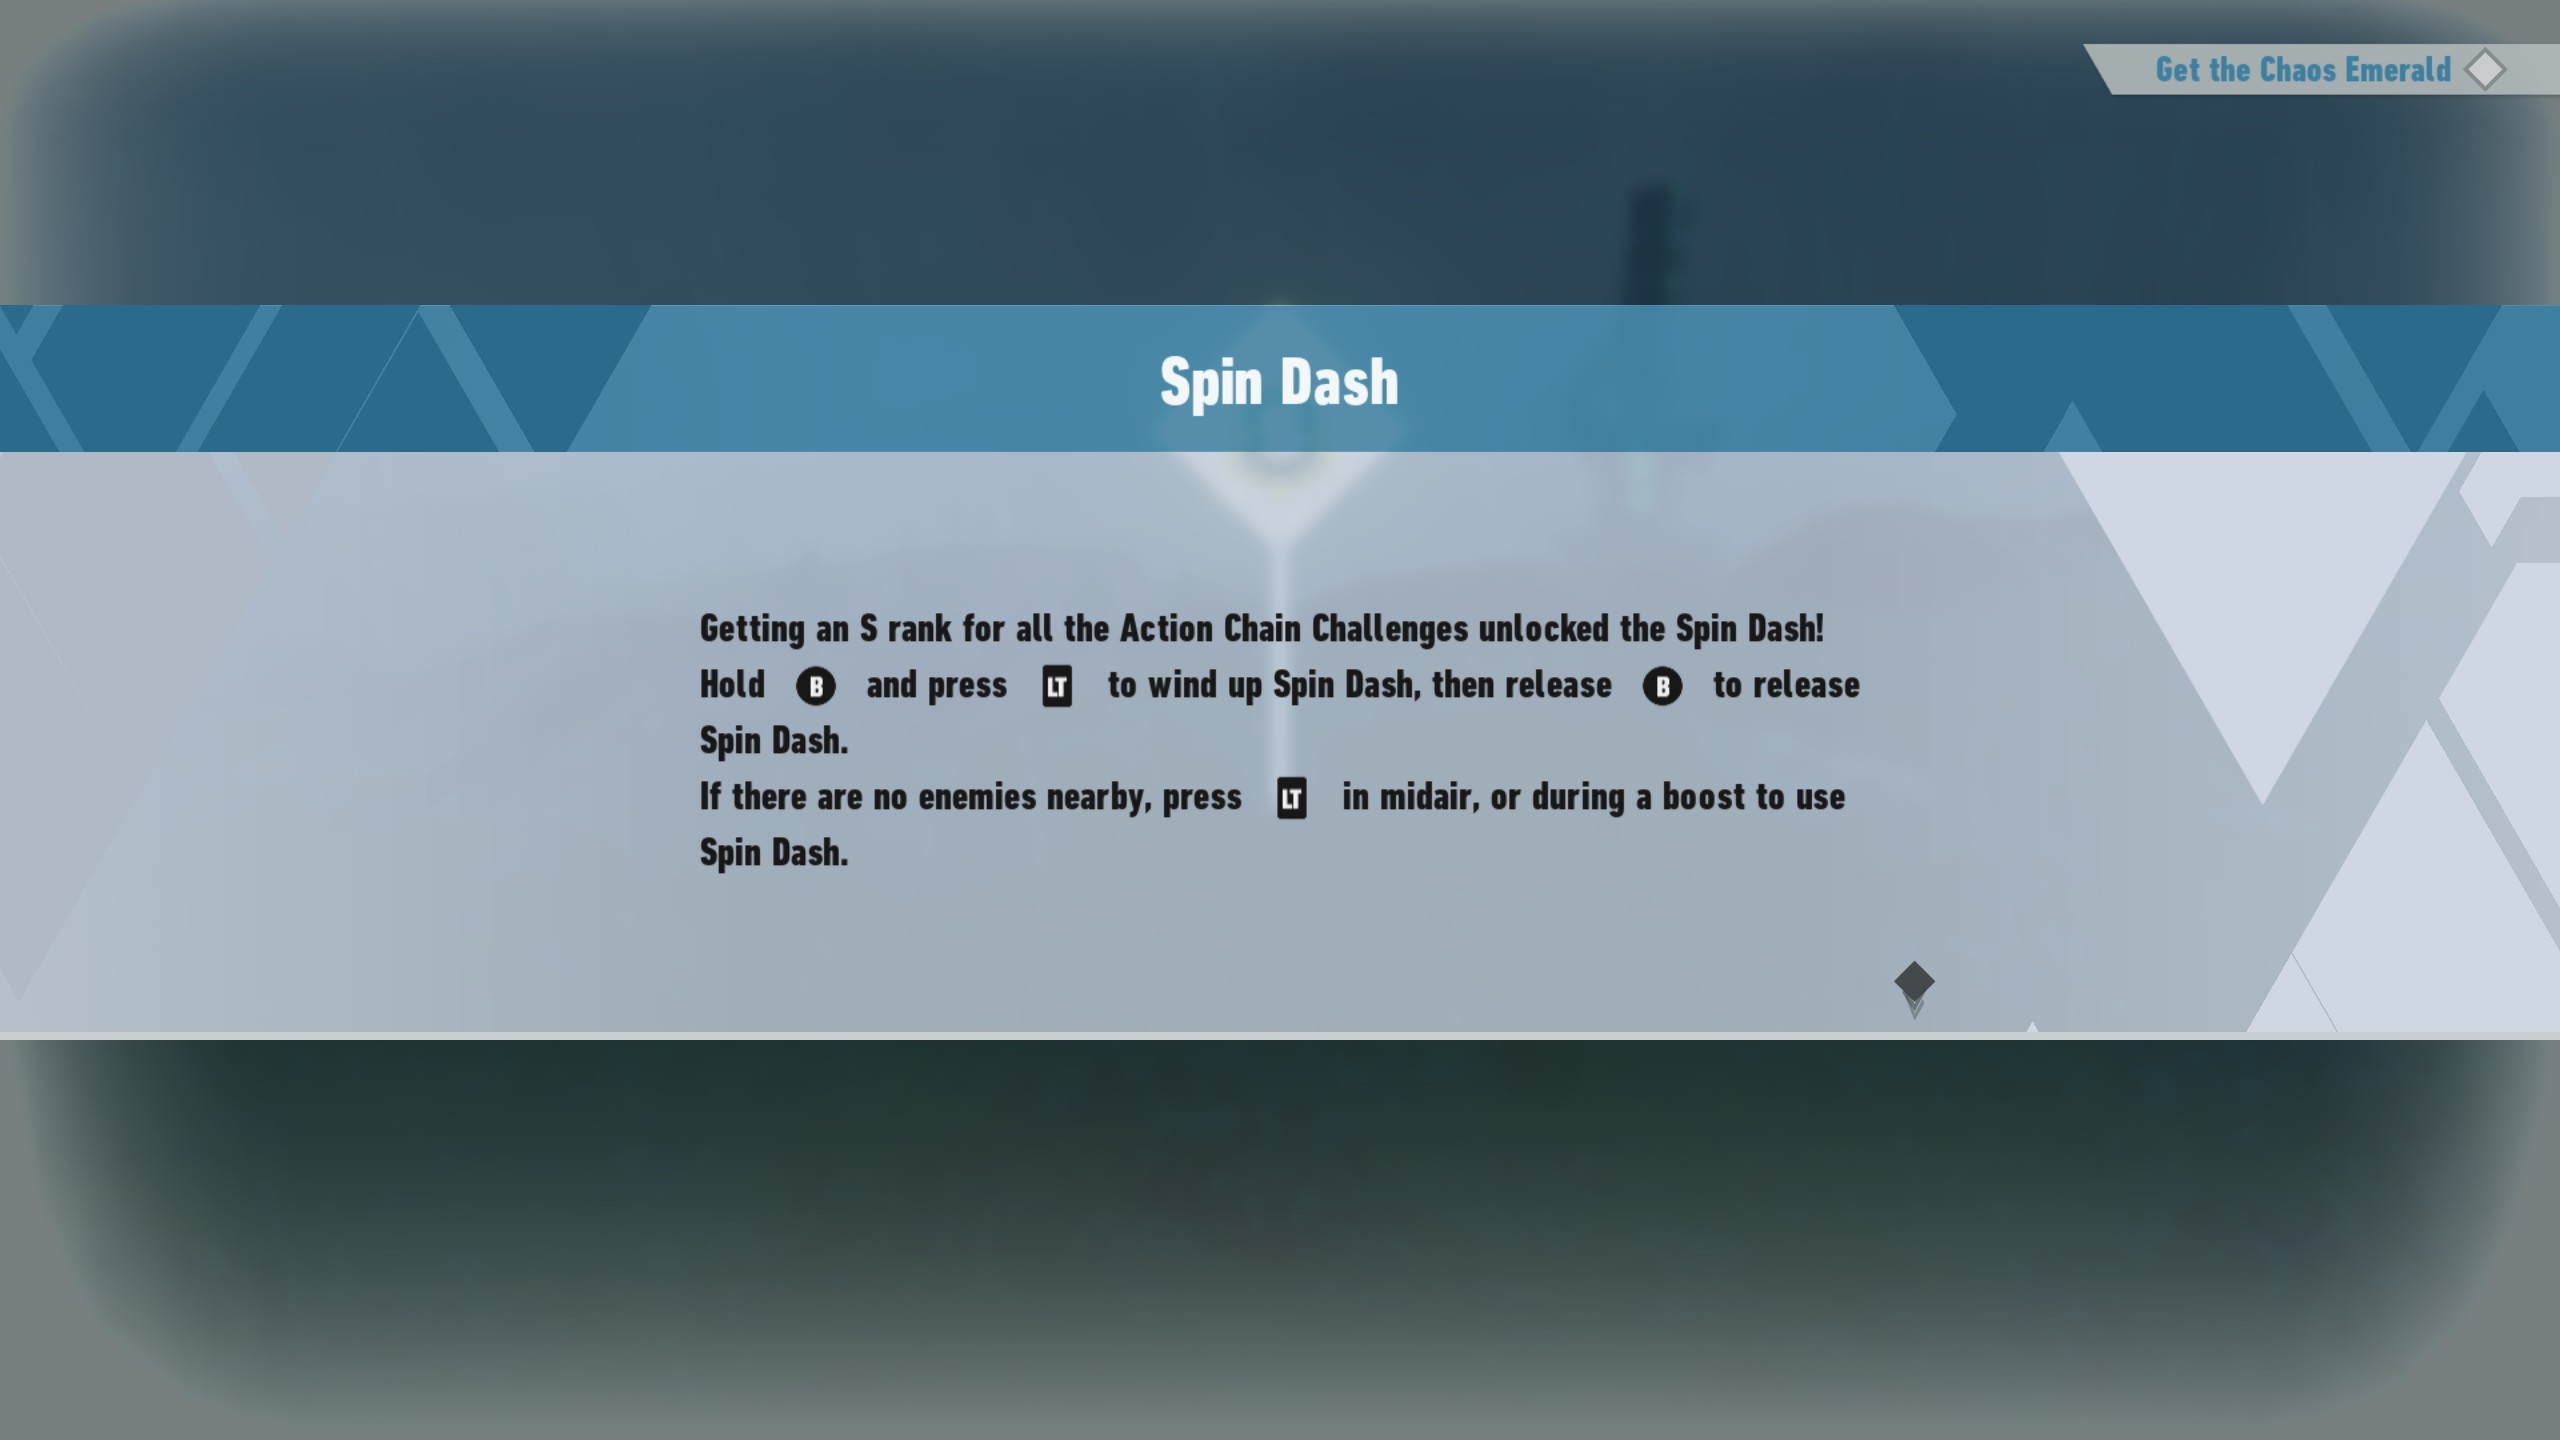
The implementation of the Spin Dash in the game has introduced an exciting addition, but acquiring it requires some effort initially.
Desbloqueando o Spin Dash
One question that likely arises is, “How can I obtain the spin dash?”
Achieving an S rank in ALL the newly introduced “Action Chain Challenges” on each island (except for Rhea) is necessary. These challenges were included in the Birthday Bash Update released in June 2023. If you now have the information you needed and wish to leave, feel free to do so. No entanto, if you’re encountering difficulties with the challenges and seek some guidance, the subsequent sections will cover the fundamentals of the challenge and provide advice for attaining a high score.
Chain Challenge Basics
Let me explain how the Chain Challenges, formally known as Action Chain Challenges, operar:
On the islands, you’ll find specific nodes resembling the map puzzles, distinguished by a clock icon instead of a question mark. To initiate the challenge, perform a Cyloop around the green aura.
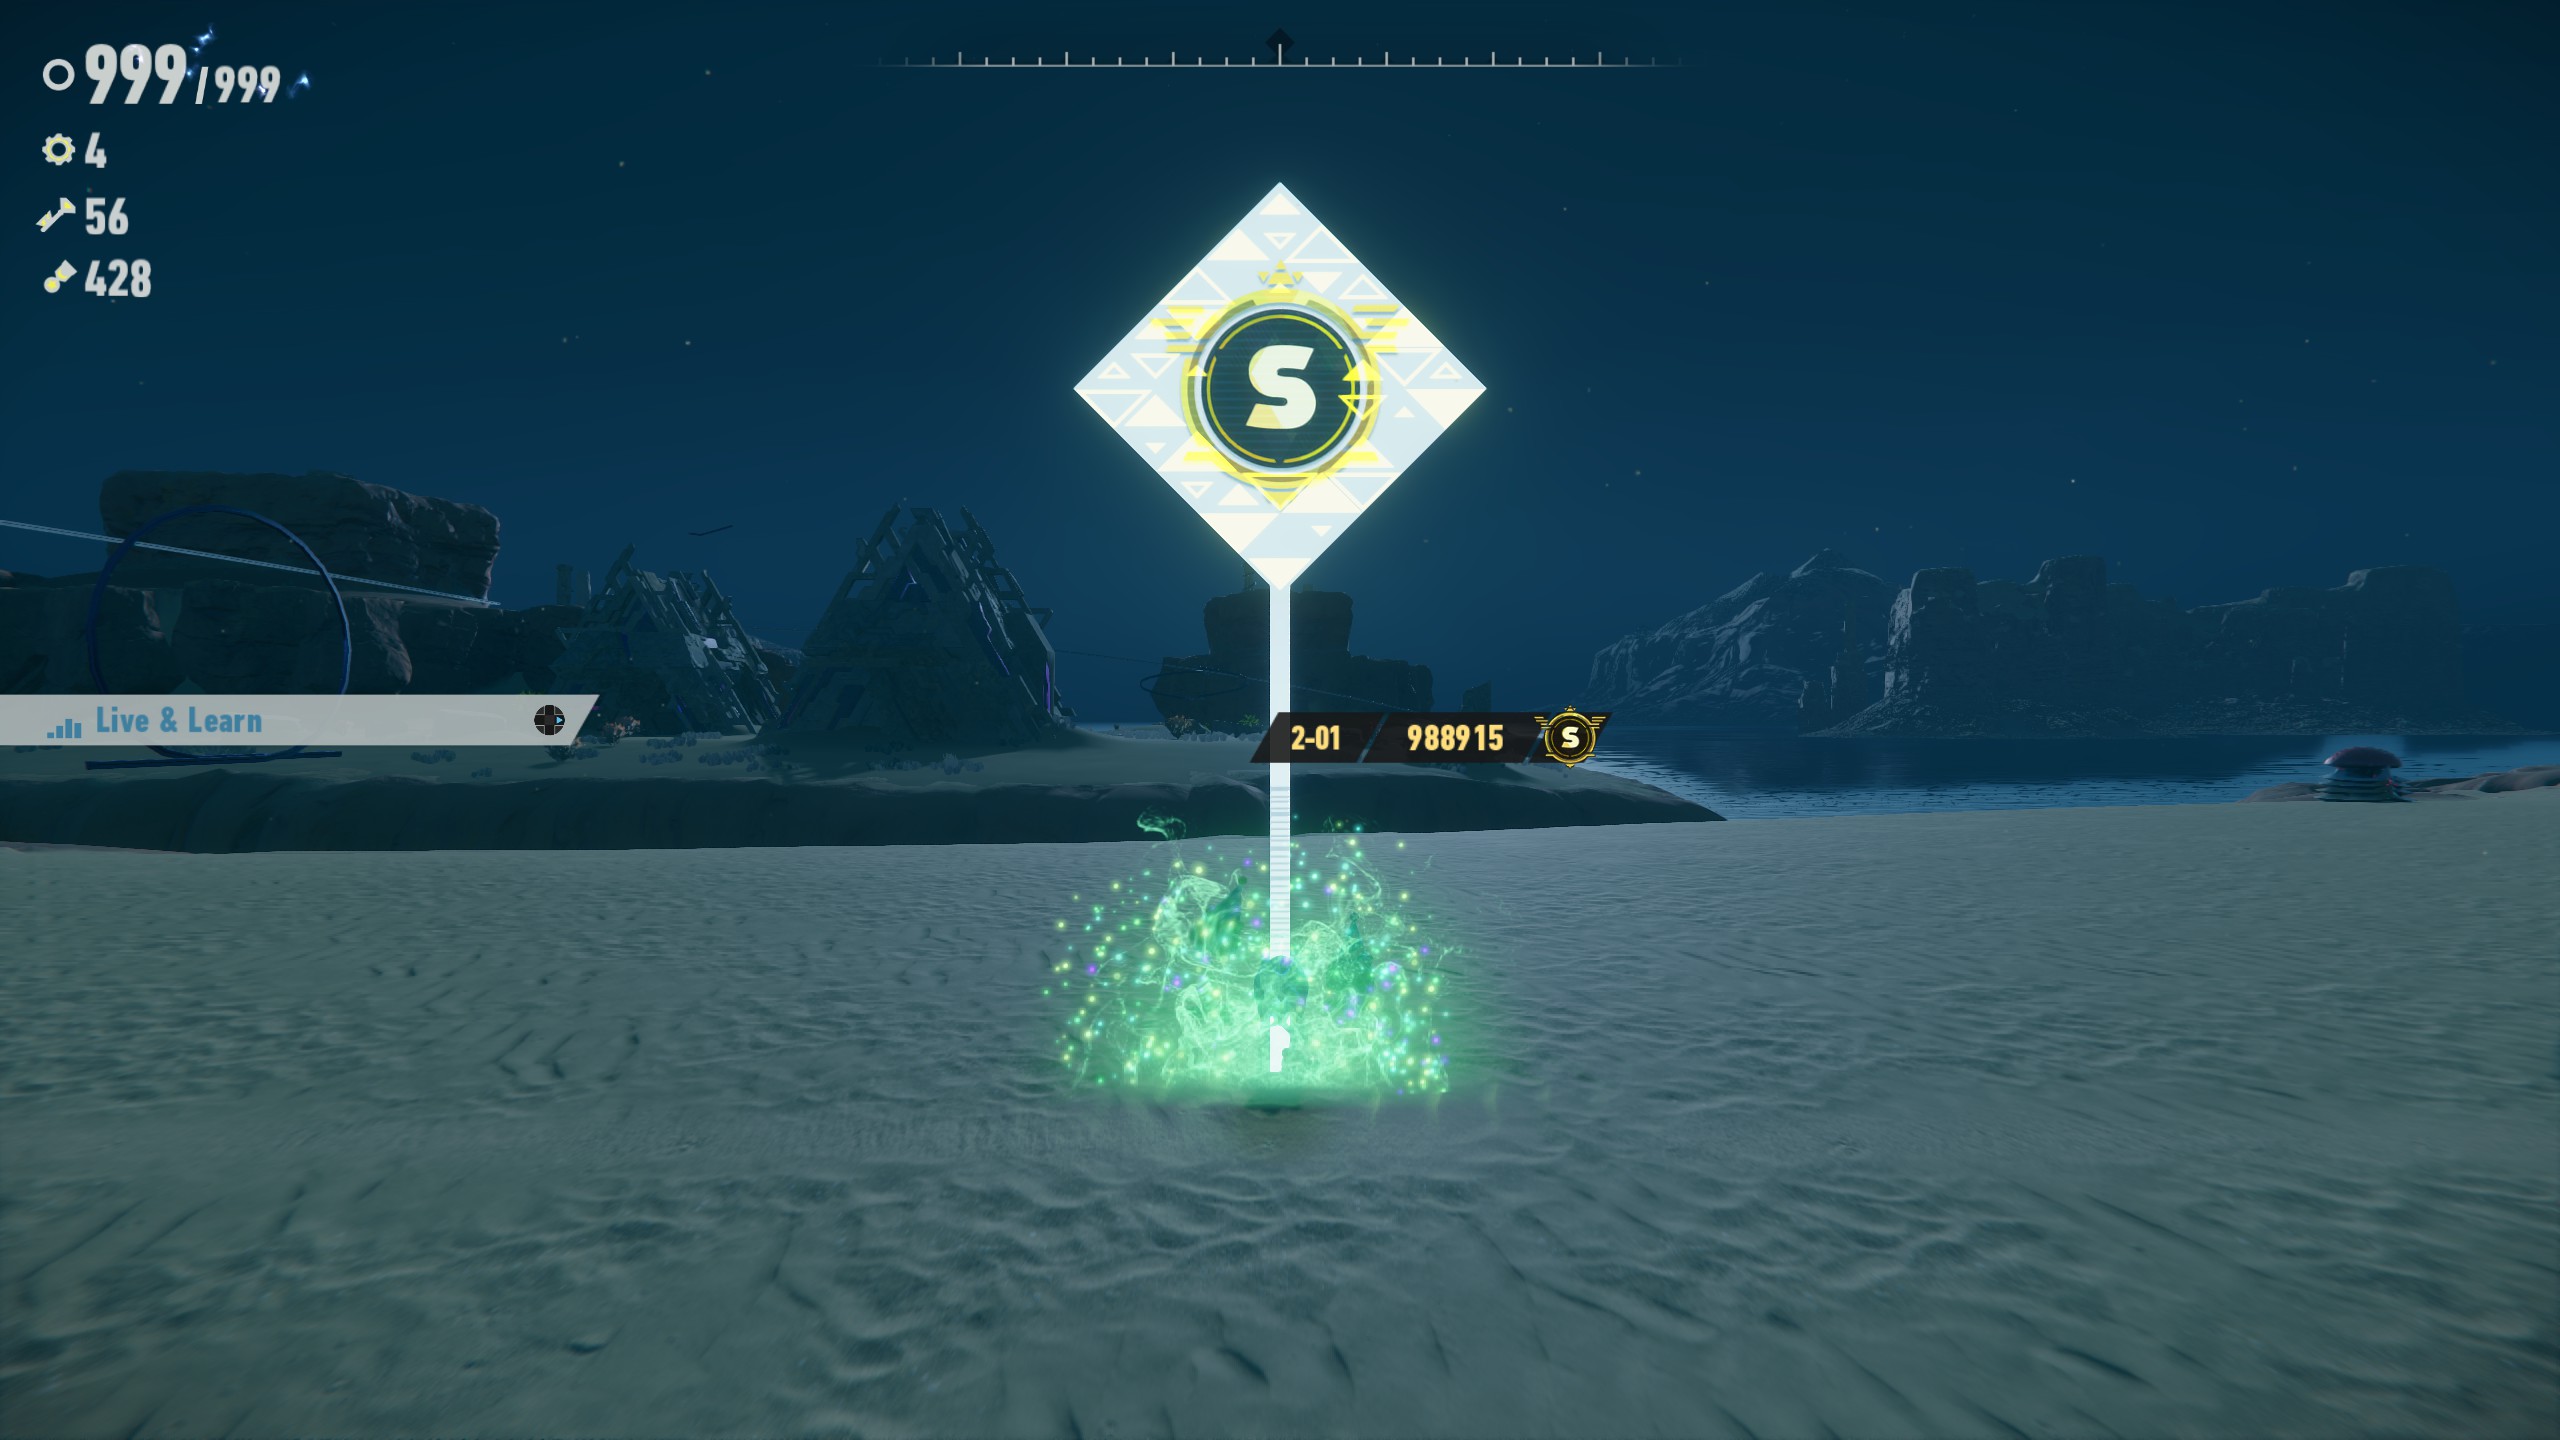
Upon triggering the challenge, a cluster of vibrant yellow orbs will materialize. Following a brief countdown, you’ll have a limited timeframe to accumulate the highest possible score using your preferred methods.
- Engaging in various actions will earn you points (outlined in the subsequent section) and increase the multiplier. It’s important to note that the yellow orbs that appear initially solely serve to raise the multiplier and do not grant points themselves.
- The multiplier commences at x1 and has the potential to reach x256, significantly boosting your score. No entanto, if you refrain from performing actions for an extended period, the multiplier will reset to x1.
- The timer, encompassing both the clock and multiplier gauge, will pause exclusively during cutscenes that introduce minibosses such as Asura, Lula, ninja, etc.
- Your final rank is determined solely by your score and not the variety of your combos. It’s crucial to keep this in mind, as there is no need to force yourself to alter tactics unnecessarily.
- It’s worth noting that sustaining damage from enemies or spikes does not disrupt the multiplier; por isso, your primary concern should be managing time effectively.
- Should you perish or fall into a pit, the challenge will automatically end in failure.
All Applicable Actions + Point Value Basics
Here are the actions that allow you to earn points and maintain the multiplier without depletion. Please keep the following considerations in mind:
- Crucial Note: Once you’ve utilized an object during the challenge, that specific object will no longer award you points. Por exemplo, if you rebound off a spring, that particular spring will no longer grant points if you use it again. No entanto, unused springs will still yield points.
- Points retain their full value regardless of how frequently you repeat the same action. Adicionalmente, you cannot lose any points that you have already earned.
- Points obtained from Sonic’s offensive moves, such as combo attacks and Cyloop, will only count if they cause damage to an enemy.
- Regarding combat, it is uncertain whether points earned from Sonic’s combat moves are based on the actual damage inflicted or if the moves themselves have fixed values. Based on my testing, I am inclined to believe that the points earned are contingent upon the damage dealt to the enemy. Portanto, the points you accumulate will vary depending on Sonic’s ATK stat. Devido a isso, I will not delve into points acquired from combat moves. The only fixed values I will provide are for using a Homing Attack on an enemy and defeating an enemy.
Agora, I will present all the point values.
Isenção de responsabilidade: The point values provided assume a multiplier of x256. I will explain this concept in detail later, mas por enquanto, focus solely on raising the multiplier to x256 before engaging in any other actions.
Actions in order of point value:
- Impulsionando – 256 (Maintaining a constant boost will give a never-ending supply of this many times per second)
- Running along a climbable wall – 512 (Same rules as boosting)
- Collecting 1 Anel – 768 (Rings earned from Cyloop and taking damage doesn’t count)
- Floating from a Fan – 1,536 (Constant rate)
- Riding a Zip Line – 2,560 (Constant rate)
- Breaking a Box/Ring Container – 3,840
- Destroying Environmental Debirs – 3,840 (These are things like the tower of rocks you can knock over in Kronos and Ouranos)
- Performing a trick mid-air – 5,120 per trick
- Bouncing off a “Clássico” Primavera – 12,800 (The flat short circled ones)
- Bouncing off a “Moderno” Primavera – 15,360 (The more detailed spherical ones)
- Homing Attack on enemy – 15,360
- Popping a Balloon – 15,360
- Performing a Wall Jump – 17,920 (2D Sections only)
- Bouncing off a Wide Spring – 20,480
- Using a Dash Panel – 20,480 (Applies to both the ones on the ground and on Grind Rails)
- Jumping off a Ramp – 20,480
- Jumping through a Hoop Ring/Trick Ring – 25,600
- Swinging off a Horizontal Bar – 25,600
- Shooting out of an Accelerator – 25,600
- Grabbing a Pulley – 30,720
- Defeating a normal enemy – 51,200
- Defeating a miniboss – 256,000
Estratégia
Before delving into the details, I want to highlight one additional point for your consideration, apenas no caso de:
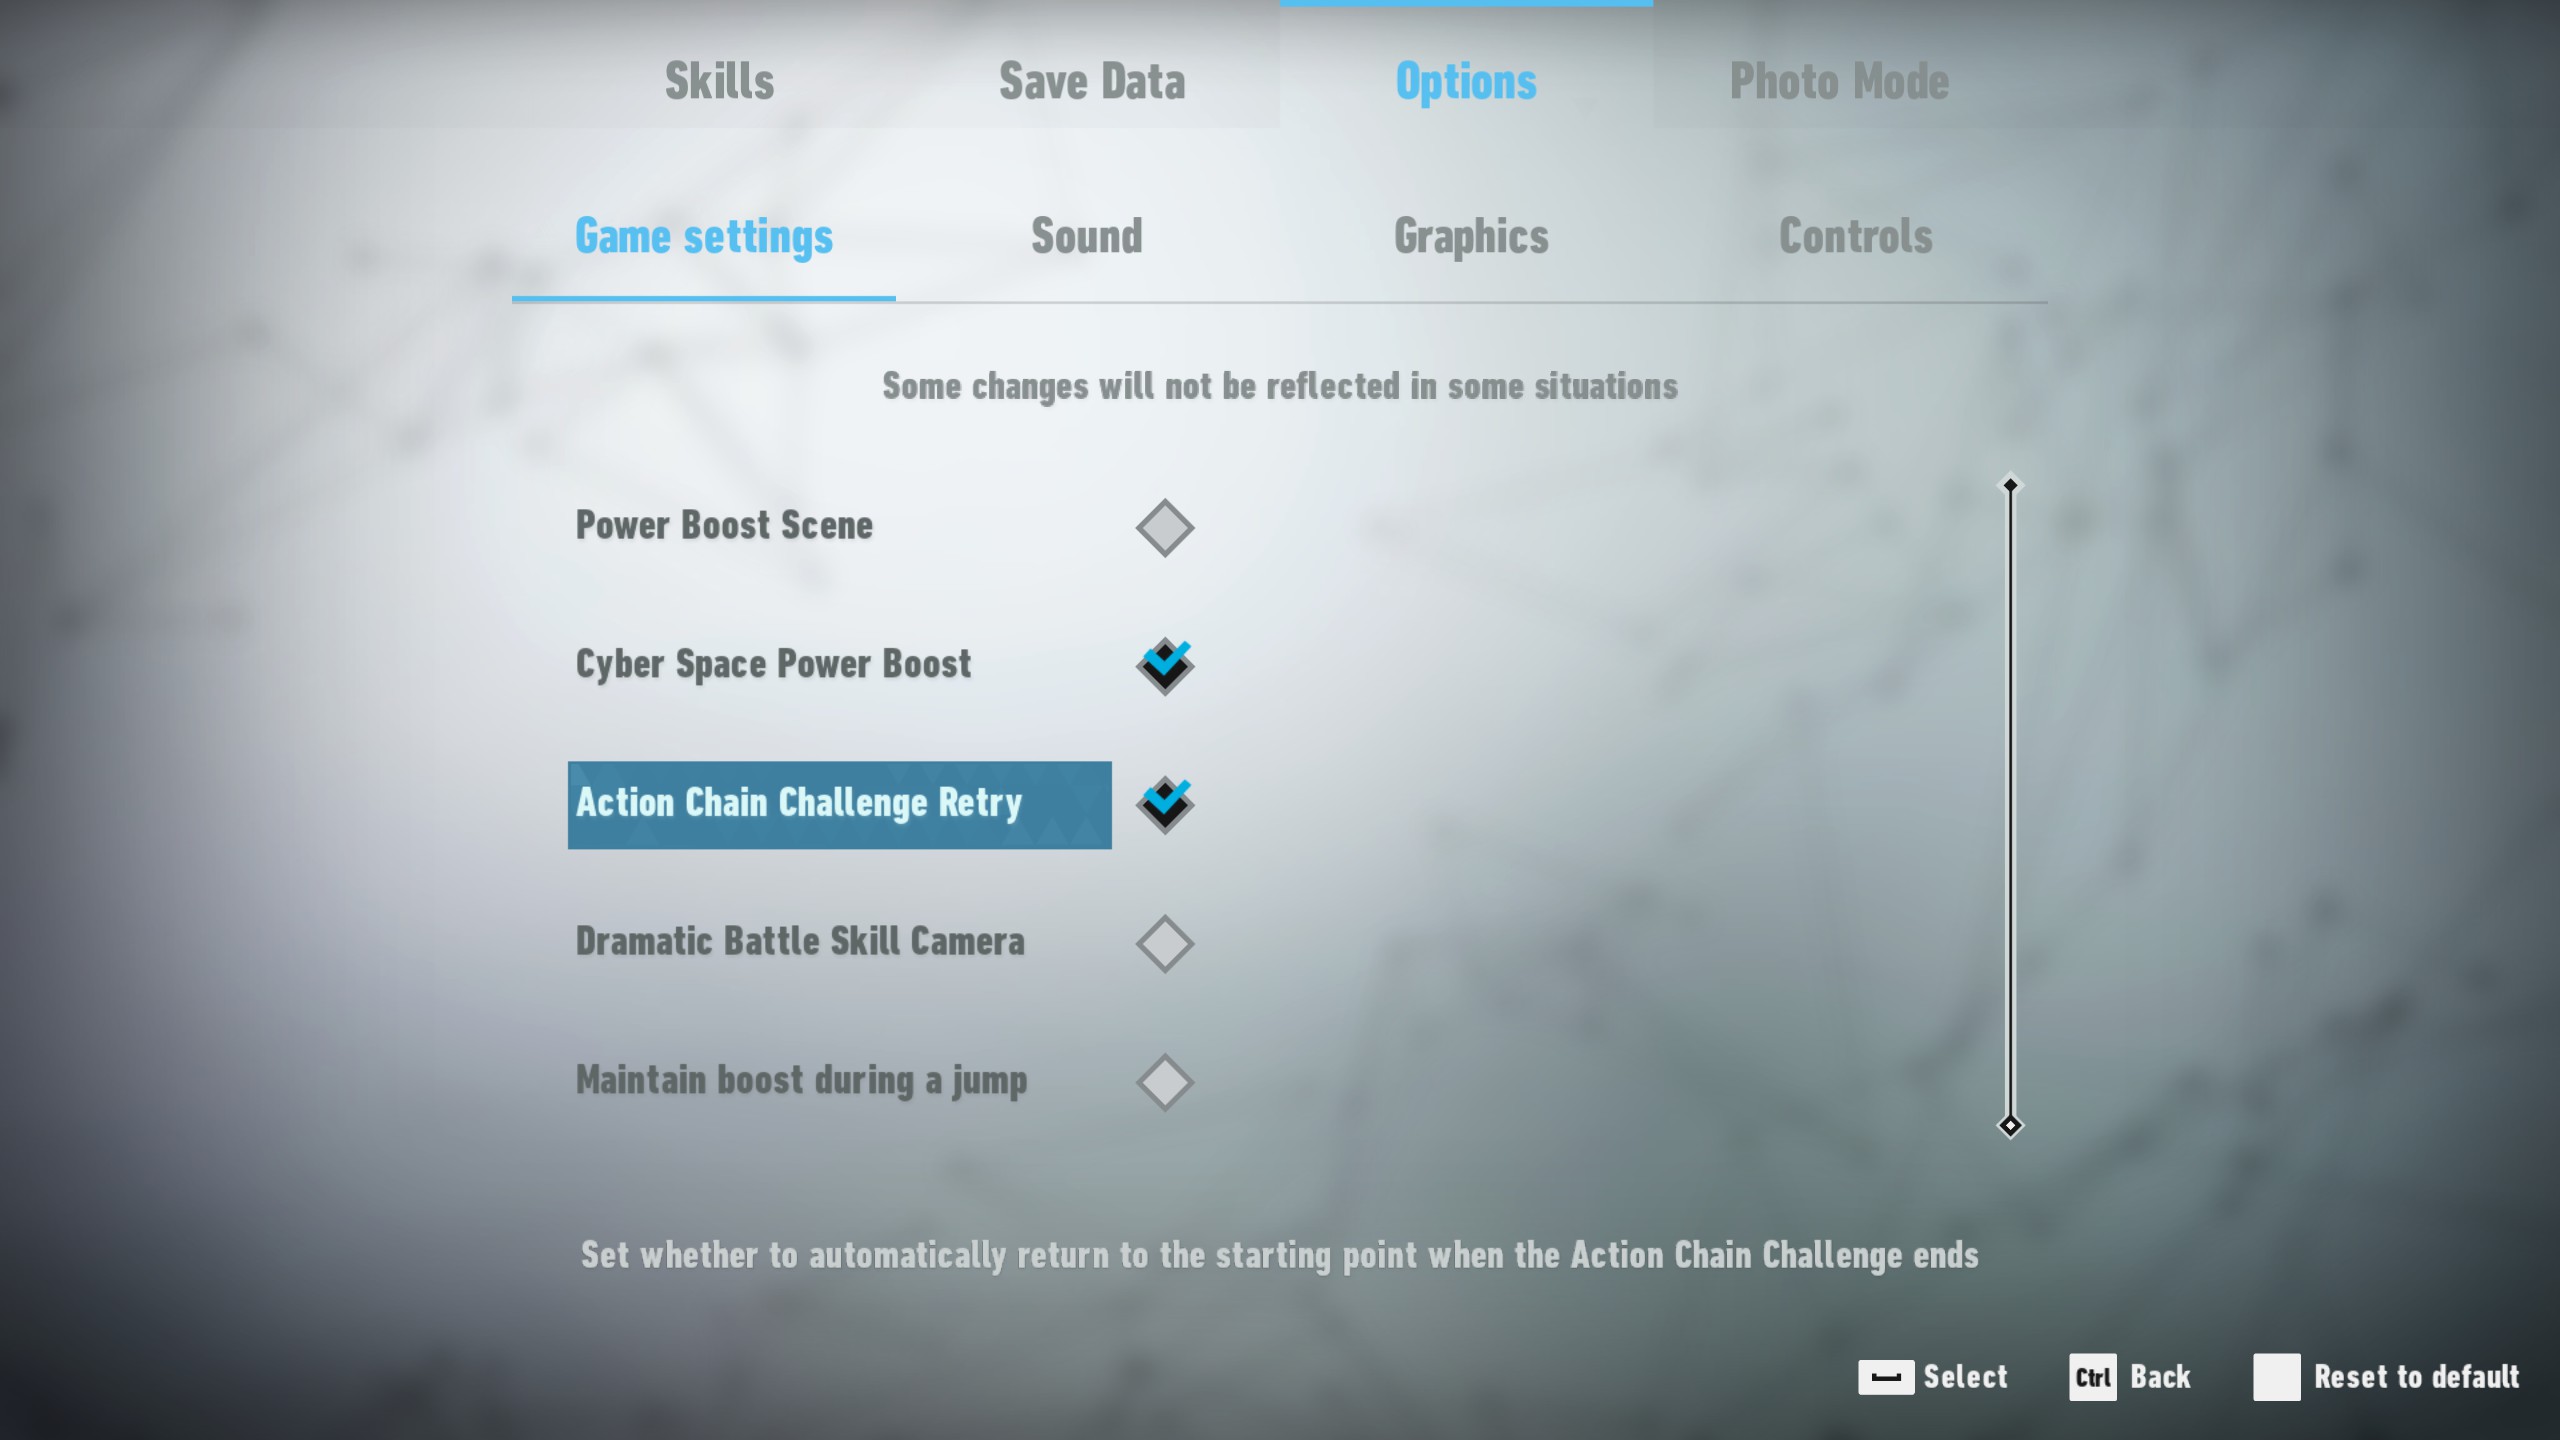
While I believe it is enabled by default, please ensure that the option “Action Chain Challenge Retry” is activated. This feature allows you to return to the node when the allotted time expires, enabling quick retries if necessary. Adicionalmente, you can pause the game during the challenge to initiate a retry or choose to quit early. Both of these methods will reset the enemy kills and collected rings, which can be quite advantageous.
Além disso, while undertaking the challenge, you have the ability to gauge your proximity to the next rank by observing the blue outline surrounding the rank letter. This visual indicator can be utilized to strategize your actions when the challenge is nearing its end, and you haven’t achieved an S rank yet. It provides insights into potential approaches such as exploiting additional boosts or tricks, eliminating an enemy, or swiftly locating another object to maximize your score. This knowledge can prove beneficial in your quest to attain the desired rank.
- Here’s a personal suggestion: If you feel up to the challenge, I highly recommend adjusting the “Jumping Deceleration” slider in the options menu to 0 ou abaixo 25. This setting determines how much momentum Sonic loses when jumping in the air. Setting it to 0 allows Sonic to maintain his airborne momentum, similar to how the boost mechanic works in games like Generations or Unleashed. No entanto, it’s essential to consider your comfort level with controlling such high speeds without sacrificing control. Practice can help, and remember that stomping to halt abruptly can be advantageous. Adicionalmente, maximizing Sonic’s top speed and turning speed can greatly assist you.
- Como mencionado anteriormente, your initial objective should be to raise the multiplier to x256 before interacting with anything else. The yellow orbs will rapidly boost the multiplier to its maximum level, usually taking only 5-15 segundos. Getting this out of the way early allows you to focus on the rest of the challenge without worrying about the multiplier and maximize your score from various obstacles. Some orbs can guide you towards the start of a mini course if you’re having trouble finding one, while others are randomly placed in a line or circle.
- Many of the actions that earn you points involve interacting with objects scattered around the island. Por isso, the most efficient strategy is to navigate through as many mini-obstacle courses as possible. The number of interactable objects may vary, but most courses will contain a good number of springs and/or Hoop Rings. While they may seem insignificant individually, their points accumulate significantly over time, allowing you to amass a substantial score. Se possível, try to identify courses with abundant springs or other interactables, but aim for smooth transitions between courses.
- If you enjoy exploiting the physics of the game, consider finding a geometry feature that can launch Sonic into the air. This allows you to perform multiple tricks consecutively, which grants a noteworthy amount of points when executed in quick succession. Take advantage of springs and hoop rings that enable trick maneuvers whenever possible, as they can supplement your score while transitioning between courses.
- Combat can be a viable strategy depending on the area and enemy types. Some enemies may not be worth the time investment due to their lengthy defeat process, which also relies on Sonic’s ATK capabilities. My recommendation is to prioritize killing enemies that can be dispatched quickly, such as most enemies on Kronos or groups of enemies that can be eliminated efficiently. Defeating enemies awards a decent amount of points, but speed is crucial to make it worthwhile. When it comes to minibosses, unless they belong to the Tower or Ninja types like Silver Hammer or Kunoichi, it’s generally best to avoid them. These two types can be swiftly defeated by utilizing Sonic Slash and powerful combo moves. If you do decide to tackle a miniboss, it’s advisable to do so either at the beginning or towards the end of the challenge.
- To state the obvious, consider leveling up Sonic’s maximum speed and ATK if you haven’t already done so, as it can provide you with an advantage. Adicionalmente, ensure you have access to the Power Boost at all times. If you’ve reached the maximum Ring capacity in the game (999), you will always have the Power Boost available, regardless of the number of rings you have collected.
Isso é tudo o que estamos compartilhando hoje para isso Fronteiras Sônicas guia. Este guia foi originalmente criado e escrito por Escoteiro. Caso não atualizemos este guia, você pode encontrar a atualização mais recente seguindo este link.