- Título: Nobodies: After Death
- Data de lançamento:
- Desenvolvedor:
- Editor:
Information about Nobodies: After Death is still incomplete. Por favor, ajude-nos a preencher os detalhes do jogo usando este formulário de contato.
A detailed written guide for Nobodies: After Death
Introdução
While most of the achievements are easy to get by selecting the particular mission and performing certain actions, the Hint Hater achievement requires you to play through the entire game (by selecting new game) without clicking the hint button once. This guide will help you through all the steps if you intend to finish your first playthrough with the Hint Hater achievement, or if this is your second playthrough and you just forgot little things you figured out during your first playthrough. I will also explain how to get the achievements for finishing the missions perfectly because there is no hint for that in the game, and sometimes you might lack some knowledge you’re assumed to have and you might not want to try every action combinations (por exemplo, I didn’t know how to erase a video tape because they basically don’t exist anymore).
Global and non-mission-specific achievements
It’s important to note that you have to be careful not to click the hint button by accident! I have done it way too many times before, so don’t rush through the game and mind where you’re clicking.

Há 10 killable characters in this game. Kill them all for this achievement. You don’t have to do it in a single game, you can just select the mission from the menu and kill the characters you missed.
- Operation Undertaker: kill the sleeping gardener com o broken fence from Area C
- Operation Canary: kill the chefe in the office with the bird spike from the hut
- Operation Canary: kill the worker in Area 1 inside the mine with the bird spike from the hut
- Operation Caldera: murder the park ranger com o machete from the bathroom area
- Operation Midnight: kill the chef com o pá from near the pool
- Operation Dead Drop: murder the guarda with the wrench from the gaveta in the victim’s home
- Operation Wonderland: murder the attendant (from the Bottle Toss game) com o metal ball (taken from the stanchions, you don’t need to paint it beforehand)
- Operation Dead Sea: kill the camera shop attendant com o helium tank from the cupboard inside the theater
- Operation Dead Sea: murder the doctor in the infirmary with the spoon from the restaurant
- Operation Dead Sea: kill the homem staring at the sea (at the area past the infirmary) com o oar from the concierge’s room. This must be done when the woman is gone (after accessing room 42)

As with the Serial Killer achievement, this one also doesn’t require you to do it in a single game or in any order. Há apenas 4 missions with dumpsters that you could dump the body in.
- Operation Roadkill: After getting they truck key, dump the body into the dumpster just outside the diner
- Operation Stowaway: Simply place the body inside the dumpster outside of the airport
- Operation Wonderland: Just put the corpse inside the garbage bin next to it
- Operation Countdown: After using the ladder to get the body to the construction site, use the elevator to bring it to the alley where the dumpster is

This is a callback to the previous game, in Operation V: Bolt Bucket, where you could call a number written on the side of the payphone to reach Lonely No More Hotline. This can be done during any mission that has a phone, so either payphone in Operation Dead Drop or the telephone in Room 42 during Operation Dead Sea.
The number is: 538-8655
Operation Drill Bit

This mission should be easy because it’s a tutorial so there is no way to get stuck or fail. Just follow the instructions and you should get this achievement.
Operation Quagmire
How to get rid of the body:
- Inside the hut, Pegue o mop e o fishing rod
- Go outside and get the wheelbarrow on the grass
- Go back inside the hut and use the wheelbarrow no dead body to pick it up
- Use o mop com o sangue on the floor to clean it
- Go outside and dump the dead body para dentro do rio. The crocodiles will gladly eat him.
- Clean the mop usando o rio to get rid of the blood
Neste ponto, you could safely exit the scene without failing the mission.
How to not leave any evidence behind:
- After the crocodiles finish eating the corpse, dele roupas will float on the river. Use o fishing rod no roupas to pick them up
- Put the wheelbarrow on the grass outside the hut
- Return into the hut and burn the roupas com lareira
- Coloque o mop on the right corner of the hut (click the counter)
- Coloque o fishing rod on the left corner of the hut (click the armchair)
You should now get this achievement:

Bogged DownComplete the swamp mission without leaving any evidence behind
Operation Roadkill
How to dispose the body:
- Go into the diner and talk to the bartender, asking for a cerveja
- Use the glass of cerveja com o chão. The bartender will be annoyed, but while she is cleaning, you can freely move around
- Clique no tip jar para conseguir alguns cash, e use o cash no jukebox
- Turn on the microphone so that the song from the jukebox will be played through the speakers outside
- This will cause the trucker who was sleeping to wake up and head to the diner. You can now get the chaves from the driver’s seat of the truck and use it to unlock the back porta of the truck
- Head left and talk to the construction worker. You’ll find out that Jerry has forgotten to pack them food, so they can’t take a break from their work.
- Head back into the diner and give cash to the bartender for a box of pizza
- Volte para o construction worker and give him the pizza. Leave so they can go take a break, and you will come back to find the construction area empty
- Pegue o pá and use it on the solo
- Obtenha o dead body do truck and place it inside the newly-dug hole in the solo
- Use o pá on the dead body to bury it
You can now exit the scene without failing.
How to not leave any evidence behind:
- Coloque o pá no sinal
- Close the back porta of the truck and use the chaves to lock it
- Put the chaves back at the driver’s seat of the truck
- Put the cash back into the tip jar
You should now get this achievement:

Speed Bump
Complete the diner mission without leaving any evidence behind
Operation Undertaker
How to dispose the body:
- Pegue o mapa do mesa
- Pegue o garbage bin à esquerda
- Use o mapa to navigate to the mausoleum
- Pegue o dead body and combine it with the garbage bin
- Pick up the rug from the floor
- Head to the shed and use the rug no gravel to make sure the sleeping gardener won’t hear you
- Pegue o chaves on the wheelbarrow and use it on the porta of the shed
- Pegue o pliers e o adjustable wrench
- Clique no electrical box, noting that only the timer labelled A is on
- There is a memorial service being held in Area B of the graveyard, and we need the guests to leave so we could do our thing. The sprinklers are off on all areas except A, so use the pliers sobre cable A e cable B, before using it again on cable A to connect the timer for Area A to Area B
- Vá para Área C e use o adjustable wrench no broken fence
- Vá para Area B, which should be empty as the sprinklers drove away the mourners, e use o broken fence no casket to open it
- Clique no garbage bin to take out the dead body, and put the dead body inside the casket.
- Close the casket
You can now safely leave the scene without failing.
How to not leave any evidence behind:
- Vá para Área C and return the broken fence
- Vá para o shed e use o pliers no cables to fix it
- Put the pliers on the right shelf and the adjustable wrench on the left shelf
- Volte para fora e use o chaves to lock the shed porta
- Coloque o chaves back on the wheelbarrow and then pick up the rug do chão
- Vá para o mausoleum and put the rug back on the chão
- Volte para o reception and put the garbage bin on the left (click door), e o mapa na mesa
You should now get this achievement:

Coffin Flop
Complete the cemetery mission without leaving any evidence behind
Other achievements:

No Sleeping on the Job
Interrupt the gardener’s beauty rest
Para obter essa conquista, before placing the rug on the gravel, just click on the keys as many time as you could. This should eventually wake up the gardener, and the cops will be called on you for suspicious behaviour.
Operation Stowaway
How to dispose the body:
- Pegue o luggage cart outside the airport
- Enter the airport and head right towards check-in
- Pegue o employee badge do tourist information balcão
- Use o luggage cart com o cart return to receive a moeda
- Pegar rubbing alcohol do first-aid kit
- Head back to the departures. You can now talk to the people there (because you now have the employee badge). After talking to everyone, you will find that the one who matches the description you were given is the guy in green hoodie who is reading a newspaper. Note that he is carrying a red luggage
- Usar moeda no máquina de café to get a cup of coffee
- Head right to the check-in again and use the coffee no balcão. The airport worker will get mad and call you an idiot, but he will leave, giving you the opportunity to use the computer
- You will need to enter the flight number and the passenger name to print out a boarding pass, so head all the way to the left to the baggage claims and talk to the baggage attendant. Note that the luggage most similar to Frederickson’s contact belongs to Ken Keyton, flight number 6249
- Go back to check-ins and type 6249 into the computer, e pressione 5 to print out Keyton’s boarding pass
- Head back to baggage claims and give the boarding pass para o baggage attendant. You will receive the red suitcase
- Use o rubbing alcohol no red luggage to remove the stickers so that you won’t get caught switching the suitcases out
- Head back outside and pick up the dead body to combine it with the red suitcase
- Use o red suitcase with dead body com o suitcase in the departures to switch them (next to the man in green)
You can now safely leave the scene without failing.
How to not leave any evidence behind:
- Go to the baggage claims to return the red suitcase para o baggage attendant
- Go to check-ins and place the employee badge back on the tourist information balcão
- Put the rubbing alcohol back in the first-aid kit
- Head outside and throw the boarding pass into the garbage bin to get rid of it
You should now get this achievement:

Body Bag
Complete the airport mission without leaving any evidence behind
Other achievements:

Asset Airways
Check in for your own flight
After using the coffee on the counter and before printing out the boarding pass, tipo 1080 as the flight number and you will get a funny message from your bosses
Operation Canary
How to dispose the body:
- Pegue o uniform from the car
- Head to the left towards the mine entrance and pick up the pliers no chão
- Head right and then to the beach and use the pliers no bird spikes on top of the hut
- Pick up the rotten peixe on the ground and use it on the man, woman or camera. They will make a reference to The Birds before leaving without their things. You can now take the câmera
- Go back to the mine entrance and head into the office. Use o câmera to take a picture of the mapa. You can now enter the mine
- Use the map to navigate to Area 02 (certo, meio, meio, certo, esquerda, certo) and pick up the rope
- Go back to the entrance and head to the cliff (certo, meio, esquerda, certo, esquerda, certo, meio) e use o corda no pedra. You can now use the rope to go back to the beach
- Head back to where the carro is and retrieve the dead body
- Vá para o cliff area and use the dead body com o corda
- Go back to the mine entrance and use the bird spike no bulldozer. The driver will leave to find a replacement tire and you can now take the jack
- Use o jack no escritório to simulate an earthquake. This will cause the mine to be evacuated
- Enter the mine and go to Area 01 (esquerda, esquerda, certo), The worker has left, so you can take the mallet from the toolbox
- Go back to the beach and use the mallet no hut, and you can now take an oxygen tank
- Enter the mine and go to the place with the hazard sign (esquerda, meio, certo, certo) so that you can fast-travel there later
- Go to the cliff via the mine again, and pull the dead body acima (you will also receive the corda)
- Go back to the place with the hazard sign and put the dead body inside the hole in the placas. Coloque o oxygen tank there too
- Use the mallet on the oxygen tank to cause that section of the mine to collapse
You can now safely leave the scene without failing.
How to not leave any evidence behind:
- Go to Area 01 and return the mallet into the toolbox
- Go to Area 02 and return the corda
- Go to the entrance and retrieve the bird spikes do wheel
- Put the pliers on the ground near the office
- Pegue o jack from under the office and place it back under the bulldozer
- Put the uniform back on the car and close the trunk of the car
- Get rid of the mapa picture by putting it into the trashcan
- Head to the beach and put the bird spike on the hut
- Close the hut de novo
- Put the câmera back inside the bag
You should receive this achievement:

Shafted
Complete the mine mission without leaving any evidence behind
Other achievements:

Damning Evidence
Take a picture of the mine’s map after killing the boss
Use the bird spike on the boss inside the office to kill him, and take a picture of the map using the camera before heading out
Operation Caldera
How to dispose the body:
- Follow the path towards the park entrance and pick up the licence plate no chão
- Head into the park and pick up the machete, pitchfork, e mapa
- Clique no trashcan to get an empty garrafa
- Look at the sign and note that Geyser C is the only one that is inactive
- Use the map to go to the trail. Pegue o bean pods e alguns pedras do chão
- Use the machete on the rope to borrow it
- Go to the campsite. Combine the garrafa com o bean pods to create a rattle and use it to scare the campers away
- Once they leave, Pegue o multi-tool, mochila, e cart
- Go back to the bathroom area and use the multi-tool no lawn mower para obter um wheel
- Combine the wheel with the cart to repair it
- Go back to where the body is and use the machete no bamboo
- Combine the bamboo com o corda to create a raft
- Use o raft no rio, pick the dead body up and put it on the raft
- Click on the raft once to flip it over, and one more time to push it off
- Head back to the campsite and combine the pitchfork com o license plate to create a makeshift paddle
- You can now pick up the kayak and use it on the rio to retrieve the raft e o dead body
- Combine the cart e o kayak, before combining the kayak on cart com o dead body to hide it
- Go to Geyser C and fill the mochila com pedras
- Obtenha o dead body from the kayak on cart and combine it with the mochila filled with rocks
- Use o body with rocks com o geyser to hide it there
You can now safely leave the scene without failing.
How to not leave any evidence behind:
- Go back to the trail and use the machete com o raft para obter o corda e bamboo voltar
- Coloque o corda no caminho
- Go to the campsite. Clique no kayak on cart to separate them. Put the kayak no chão
- Use o multi-tool no cart para obter o wheel voltar
- Return the multi-tool e o cart on grass
- Go to the bathroom area and return the wheel para o lawn mower
- Return the pitchfork to the shed and put the map back
- Put the machete no registro and throw the rattle para dentro do trashcan
- Go to the park entrance where the park ranger stands and put the license plate no caminho
- Go to where the body was and put the bamboo back
You should now get this achievement:

Natural Causes
Complete the national park mission without leaving any evidence behind
Other achievements:

Fail Fast
Dispose of the body within ten seconds of starting a mission
Immediately after starting the mission, pick up the dead body and put it in the river.
I’m not sure if it’s possible to get this achievement through other missions. I have tried to do it in Operation Quagmire but I can’t do it fast enough. Please let me know if there are other ways to get this achievement!
Operation Midnight
How to dispose the body:
- Pegue o mistletoe from above the basement door
- Go downstairs to the basement and take the gas mask, ball of yarn, e knitting needle
- Go back out and enter the kitchen to take the can opener
- Go back and head upstairs. Pegue o framed diploma hanging on the wall and use the can opener on it to get an empty frame e o diploma
- Slide the diploma sob o porta e use o knitting needle to push the chave out of the keyhole
- Pull the diploma back out to get the chave, and use it to open the porta
- Pegue o chave dentro do candy bowl and head back out
- Combine the mistletoe com o ball of yarn, and put the mistletoe with yarn no railing. This will create a distraction for the DJ
- Go to the kitchen downstairs and head outside. Use o chave from the candy bowl on the shed to find a bottle of chloroform. Pegue o pá e registro from outside the shed.
- Go back inside and to the lounge where the party is. The DJ should be busy kissing a woman, so you can use the chloroform no fog machine
- Take the box of partidas na mesa
- Go to the basement and put the registro para dentro do forno. Use o partidas to light it up
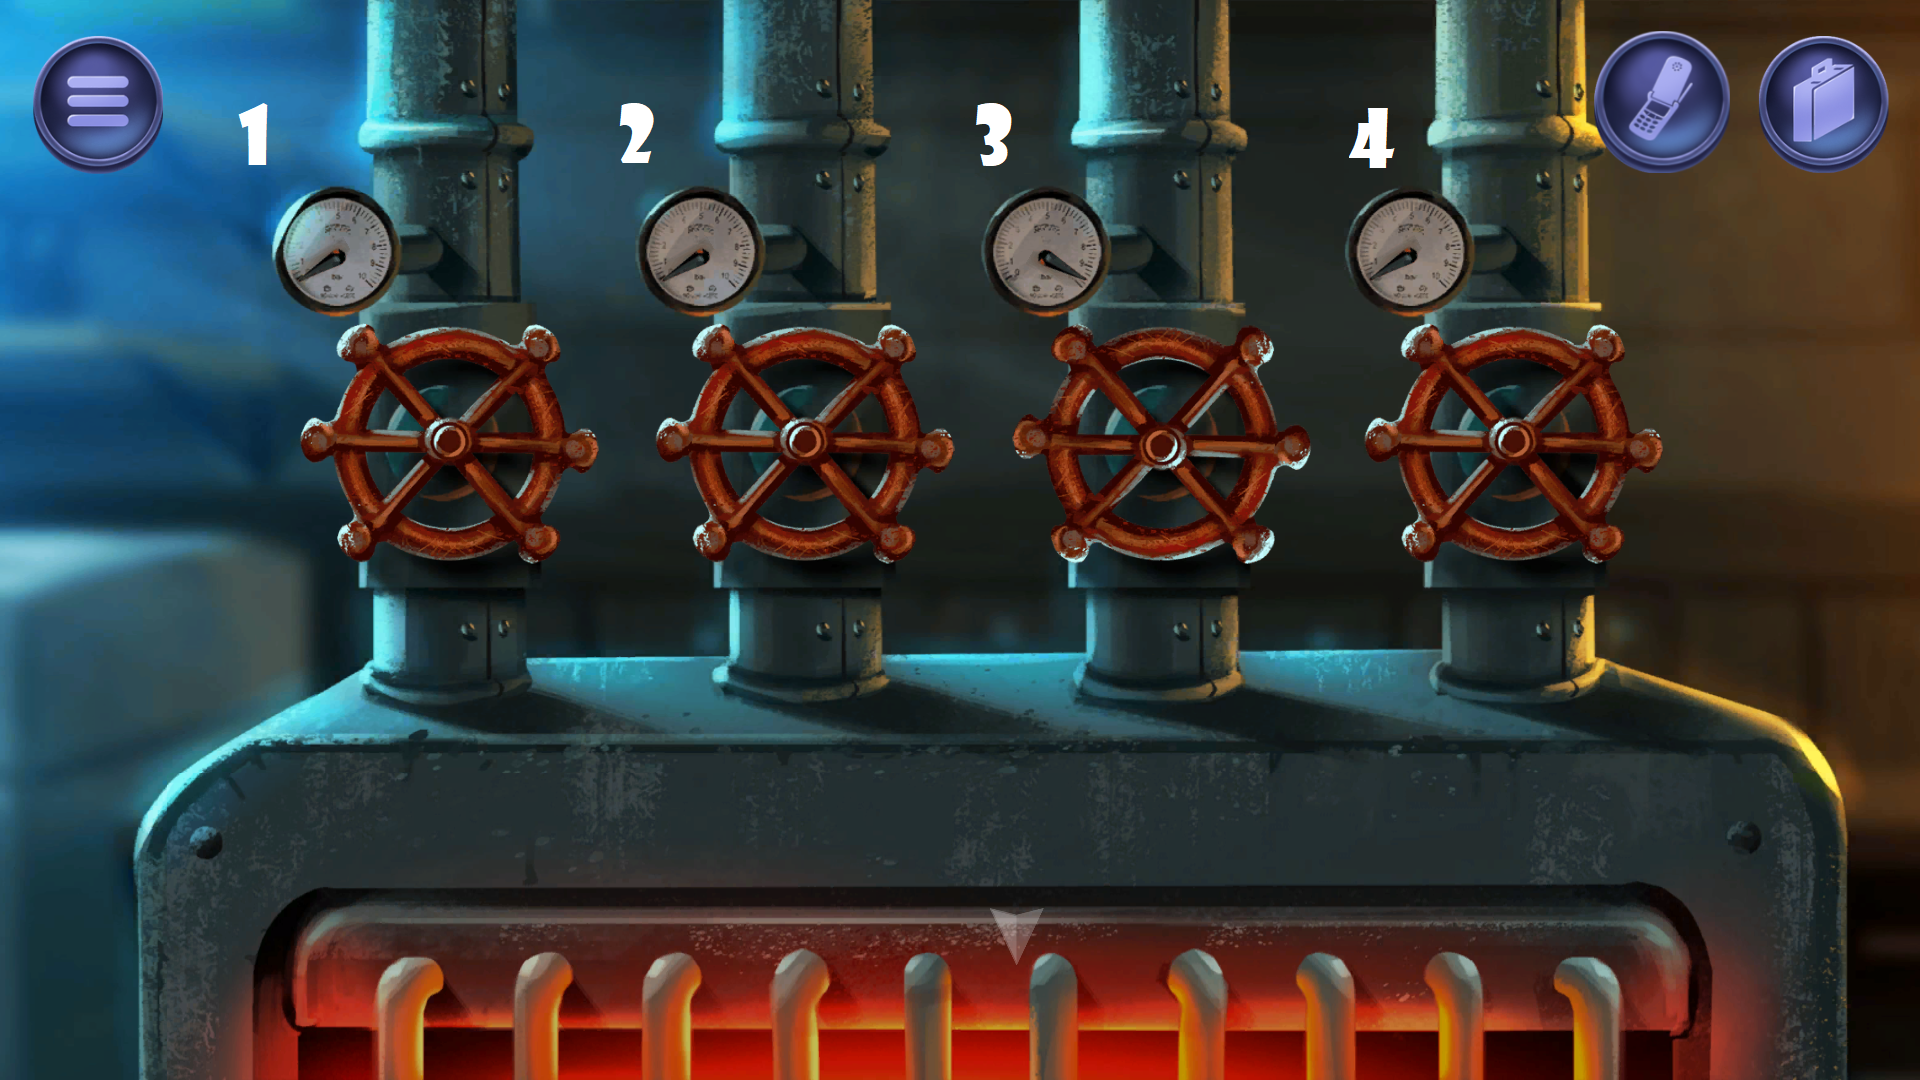
- We need to turn the heat up in the kitchen so that the chef will leave. Turn off all the valves except for the third one (click valves 1, 2, e 4)
- Go back to the kitchen. The chef will freak out and leave so you can pick up the cake server
- Go back out and use the cake server no relógio to open it. Mude o horário para meia-noite. This will cause the DJ to use the fog machine, and everyone will fall asleep.
- Go upstairs and get the dead body
- Go to the kitchen and use the dead body com liquid nitrogen to freeze it.
- Use the shovel on the frozen dead body, and put the dead body chunks para dentro do sink to make use of the garbage disposalYou can now safely leave the scene without failing.
How to not leave any evidence behind:
- Put the cake server e o can opener on the counter in the kitchen
- Go outside and put the chloroform back in the shed. Use o chave from the candy bowl to lock it
- Put the pá no chão
- Combine the empty frame com o diploma and put it back on the wall upstairs
- Go into the room where you found the body and put the chave back into the candy bowl
- Lock the door to this room with the other chave and slide it under the porta
- Obtenha o mistletoe do railing and head back downstairs to put it above the basement porta
- Go into the basement and return the knitting needle, ball of yarn, e gas mask. Click on the furnace to turn it off
- Go to the lounge and return the box of partidas onto the mesa
You should now get this achievement:

Crushed Ice
Complete the mansion mission without leaving any evidence behindOther achievements:

Journey of Discovery
Become one with the universeBefore putting everyone to sleep with the chloroform, talk to the dancer with round glasses. Pick the first option, and then the second option.
Operation Dead Drop
How to dispose the body:
- Pegue o tickets, laxatives e o corda. You can pick up the wrench and the hanger, but you don’t need them yet and you can’t bring them to the tower so it’s better to leave them for now.
- Head outside and through the street to Sky Tower. Pegue o gum do payphone. Give the tickets para o guarda. You can now move freely inside the tower as long as you’re not carrying any metal objects
- Pegue o water bottle do cooler and a pair of sunglasses de locker número 14
- If you plan to get the Drop the Kids off achievement, this is where you would do them
- Use the elevator to get to the observation floor. There is a worker there. Combinar water bottle com laxative and switch the doctored bottle with the attendant’s water bottle. Leave the area, and when you come back, the bungee jumping attendant should be gone (poor sap)
- Use o gum no coin slot of the binoculars. When you leave and come back, você vai conseguir um moeda
- Head back to the house and get the hanger e chave inglesa
- Use o hanger com o carro para desbloqueá-lo. Obtenha o wheelchair do trunk
- Pegue o dead body inside the house and combine it with the wheelchair e sunglasses. Don’t forget to put the hanger back inside the wardrobe.
- Go to the outside of Sky Tower and use the corda e chave inglesa com o balloons. Click the balloons to sneak the wrench up
- Clique no payphone. Use o moeda on the coin slot. This is where you would call Lonely No More Hotline if you want to get the Looking for Love achievement here.
- There was a phone number on the maintenance log inside the elevator. Call this number (395-2438) and tell Daisy that your name is Keyton Douglas
- If you want to get the Memory Error achievement, you can do it now. De outra forma, use the code given by Daisy (9364) to access the maintenance level. Pegue o uniform do hangers and head outside using the escada
- The balloons with the wrench should be there. Pegue o chave inglesa and use it on the winch. Leave the wrench attached to the balloon.
- Go to the observation level (keeping the uniform) and put the dead body no harness. Click it once to push the dead body off
You can now safely leave the scene without failing.
How to not leave any evidence behind:
- Go to the maintenance level and return the uniform
- Go to the lobby and return the sunglasses to locker 14
- Go back to the house and put back the laxative, corda e chave inglesa
- Return the wheelchair to the trunk of the car outside the house
You should now get this achievement:

Splat
Complete the tower mission without leaving any evidence behind
Other achievements:

Drop the Kids off
Use the bathroom in Sky Tower
Gain access to the maintenance floor (by using code 9364) and use the bathroom there. This must be done before giving the bungee jumping attendant the doctored water, because it will smell really bad after that

Memory Error
Forget the elevator passcode so many times that you fail the mission
Before entering the correct code for the maintenance floor, call Daisy 4 more times after getting the code. She will call the cops on you
Operation Wonderland
How to dispose the body:
- Pick up all of the weights off the floor (deveria haver 5 no total) and take the blanket off the console
- Head to the warehouse area where the body is, and pick up the pliers under the dumpster
You can now safely leave the scene without failing.
Isso é tudo o que estamos compartilhando hoje para isso Nobodies: After Death guia. Este guia foi originalmente criado e escrito por Discosaurus. Caso não atualizemos este guia, você pode encontrar a atualização mais recente seguindo este link.