- Título: Êxodo do Metrô
- Data de lançamento:
- Desenvolvedor:
- Editor:
As informações sobre Metro Exodus ainda estão incompletas. Por favor, ajude-nos a preencher os detalhes do jogo usando este formulário de contato.
Guide on how to install the Exodus SDK and explanation of basic features.
Requisitos
- You must own a copy of Metro Exodus (2019) or Metro Exodus Enhanced Edition, and have it installed on your PC.
- SO: Windows 10
- CPU: Intel Core i7-4770k or equivalent
- Memória: 8 GB RAM
- Gráficos: Gtx 1070 / Rtx 2060 / AMD RX VEGA 56
- DirectX: Versão 12
- Armazenar: 31 GB (in addition to 70.1 GB for Metro Exodus (77.95 GB with all DLCs) ou 79.6 GB for Metro Exodus Enhanced Edition)
Instalação (Vapor)
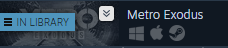
- Open your steam library.
- Click on the filter button
- Select TOOLS from the list
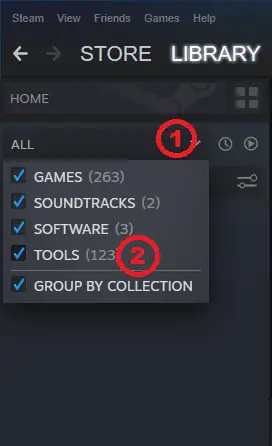
- Click on the search bar and type exodus SDK
- Click on Exodus SDK
- Click on the install button
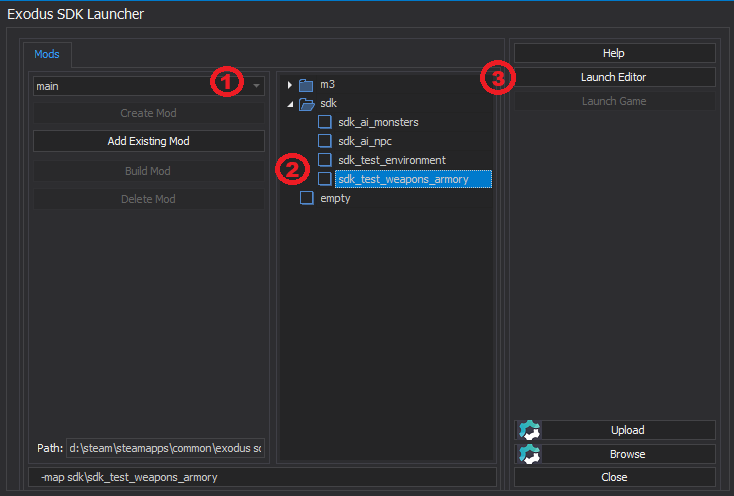
Running the program
- Run the SDK
- Select the mod (by default it is “principal”). (1)
- Select a map in the level list. Opening the vazio map may cause errors while trying to run the SIMULATION. (2)
- Clique “Launch Editor” to load it. (3)
Basic Features
Editing modes:
- S – Selecting objects.
- A – Adds the selected object to the Entity List.
- T or W – Moves the selected object.
- E or Y – Rotates the selected object.
- R or H – Scales the selected object.
Running the simulation: F5 or Ctrl + F5
Exiting the simulation: Ctrl + Esc
Adding objects:
- Há 3 types of objects: entidades (dynamic world objects), static props (static world objects), and effects (special versatile world objects)
Entidades:
- Open the Entities toolbar menu on top of the screen.
- Go to General —> entity. After selecting it, place it on the map.
- Select the placed entity.
- Go to the Properties window.
- Go to Model property.
- Clique no |…| button to access the Select Model browser window.
- Set it to something for example dynamic\objects\radio_station\radio_train01
To give our radio collisions, Selecione, go to Properties —> PhysX, and set Allow to true. If you want to move the object around, set Kinematic to false and Collision Group to move control.
Static props:
- Open the Entities toolbar menu on top of the screen.
- Go to General —> static prop. After selecting, place it on the map.
- Select the placed static prop.
- Go to the Properties window.
- Go to Model property.
- Clique no |…| button to access the Select Model browser window.
- Set it to something for example static\electric_poles\light_tower
To make our light tower cast shadows, go to Properties —> Render and set Shadow Cast to true.
Efeitos:
- Open the Entities toolbar menu on top of the screen.
- Go to General —> efeito. After selecting, place it on the map.
- Select the placed effect.
- Go to the Properties window.
- Go to Particles property.
- Clique no |…| button to access the Select Particle Effect browser window.
- Set it to something for example fire\fireplace1_barrel
To make the effect animation loop, go to Properties —> Modelo —> Startup Animation and set Force Looped to looped.
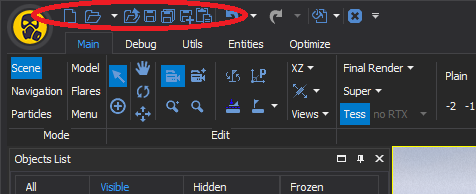
To save or load a map you can use the buttons located in the upper-left corner of the program.
For more info and tutorials you can visit this site. It contains not only the stuff that I mentioned above but also more advanced tools and techniques.
Isso é tudo o que estamos compartilhando hoje para isso Êxodo do Metrô guia. Este guia foi originalmente criado e escrito por tateprotest.com. Caso não atualizemos este guia, você pode encontrar a atualização mais recente seguindo este link.