
This guide explains how to create unique weapon versions for your mercenaries. These variations won’t change your other weapons and won’t make them stronger, so don’t worry about that. The attachments on these unique variants can be different, and if you don’t like some of the negative effects, you can remove them. You can access these variants in the game using a combining recipe.
Isenção de responsabilidade
Please note that this guide covers the fundamental steps for creating weapon mods, and it should not cause any problems in your game. I cannot predict what other mods you might have, and I’m not responsible for any issues that may arise from your actions.
Keep in mind that much of this process involves trial and error. If something doesn’t go as planned, you can simply uninstall the mod you create and go back to your most recent saved game without it.
I created this guide in a single afternoon, so there may be some errors, as nobody is perfect.
How to Use Mod Editor
To access the mod editor, follow these steps from the main menu:
- Vá para o menu principal.
- Select Mod Manager.
- Choose Mod Editor.
Once you’re in the mod editor, the mod manager window will appear. Nesta janela, you’ll find various buttons for loading, unloading, deleting, editing, e mais. To create a weapon mod, siga estas etapas:
- Right-click in the mod manager window.
- Selecione “New mod.”
Name your mod, e então:
- Right-click on your mod.
- Escolher “Edit.”
The editor will open, and you can begin working on your mod.

How to Create a Weapon Mod
Inside the Editor, you’ll find various tools that can help you accomplish a variety of tasks. I recommend exploring all these tools to understand how they work. The more you experiment with them, the more you’ll learn.
Antes de prosseguir, it’s a good idea to provide a description for your mod in the window on the right.
To begin creating a craftable weapon, siga estas etapas:
- Right-click in the editor.
- Selecione “New.”
- Escolher “Item.”
- Então, escolha “Inventory Item.”
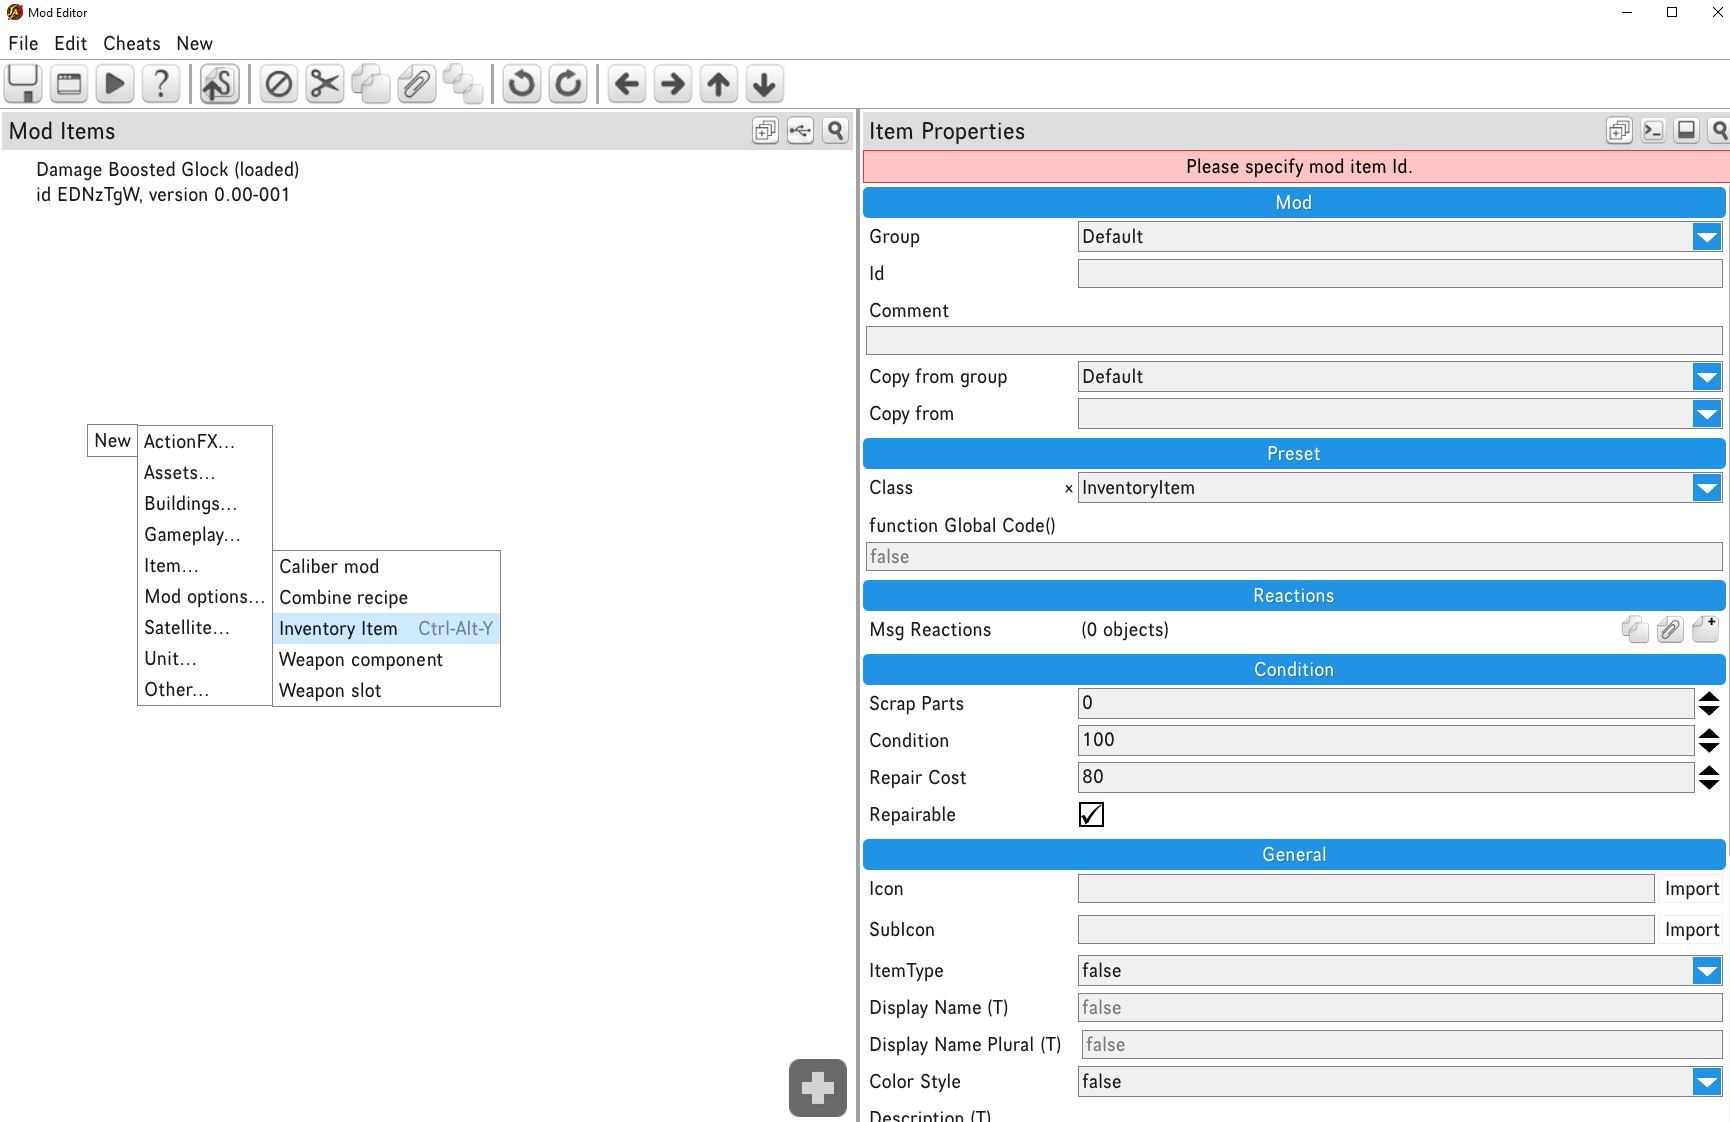
This is the actual item that will serve as the foundation for your mod to work. To keep things straightforward, I’ll guide you through creating a variant of the Glock 18.
- Select the new inventory item you created in the left window.
- Provide an ID for the weapon, como “ModdedGlock18.”
To carry over most of the essential weapon properties, under the blue mod tab, enter the following details:
- Copy from Group: Firearm – Handgun
- Copy from: Glock18

Click OK, and it might seem like you’re done, but there’s more to do!
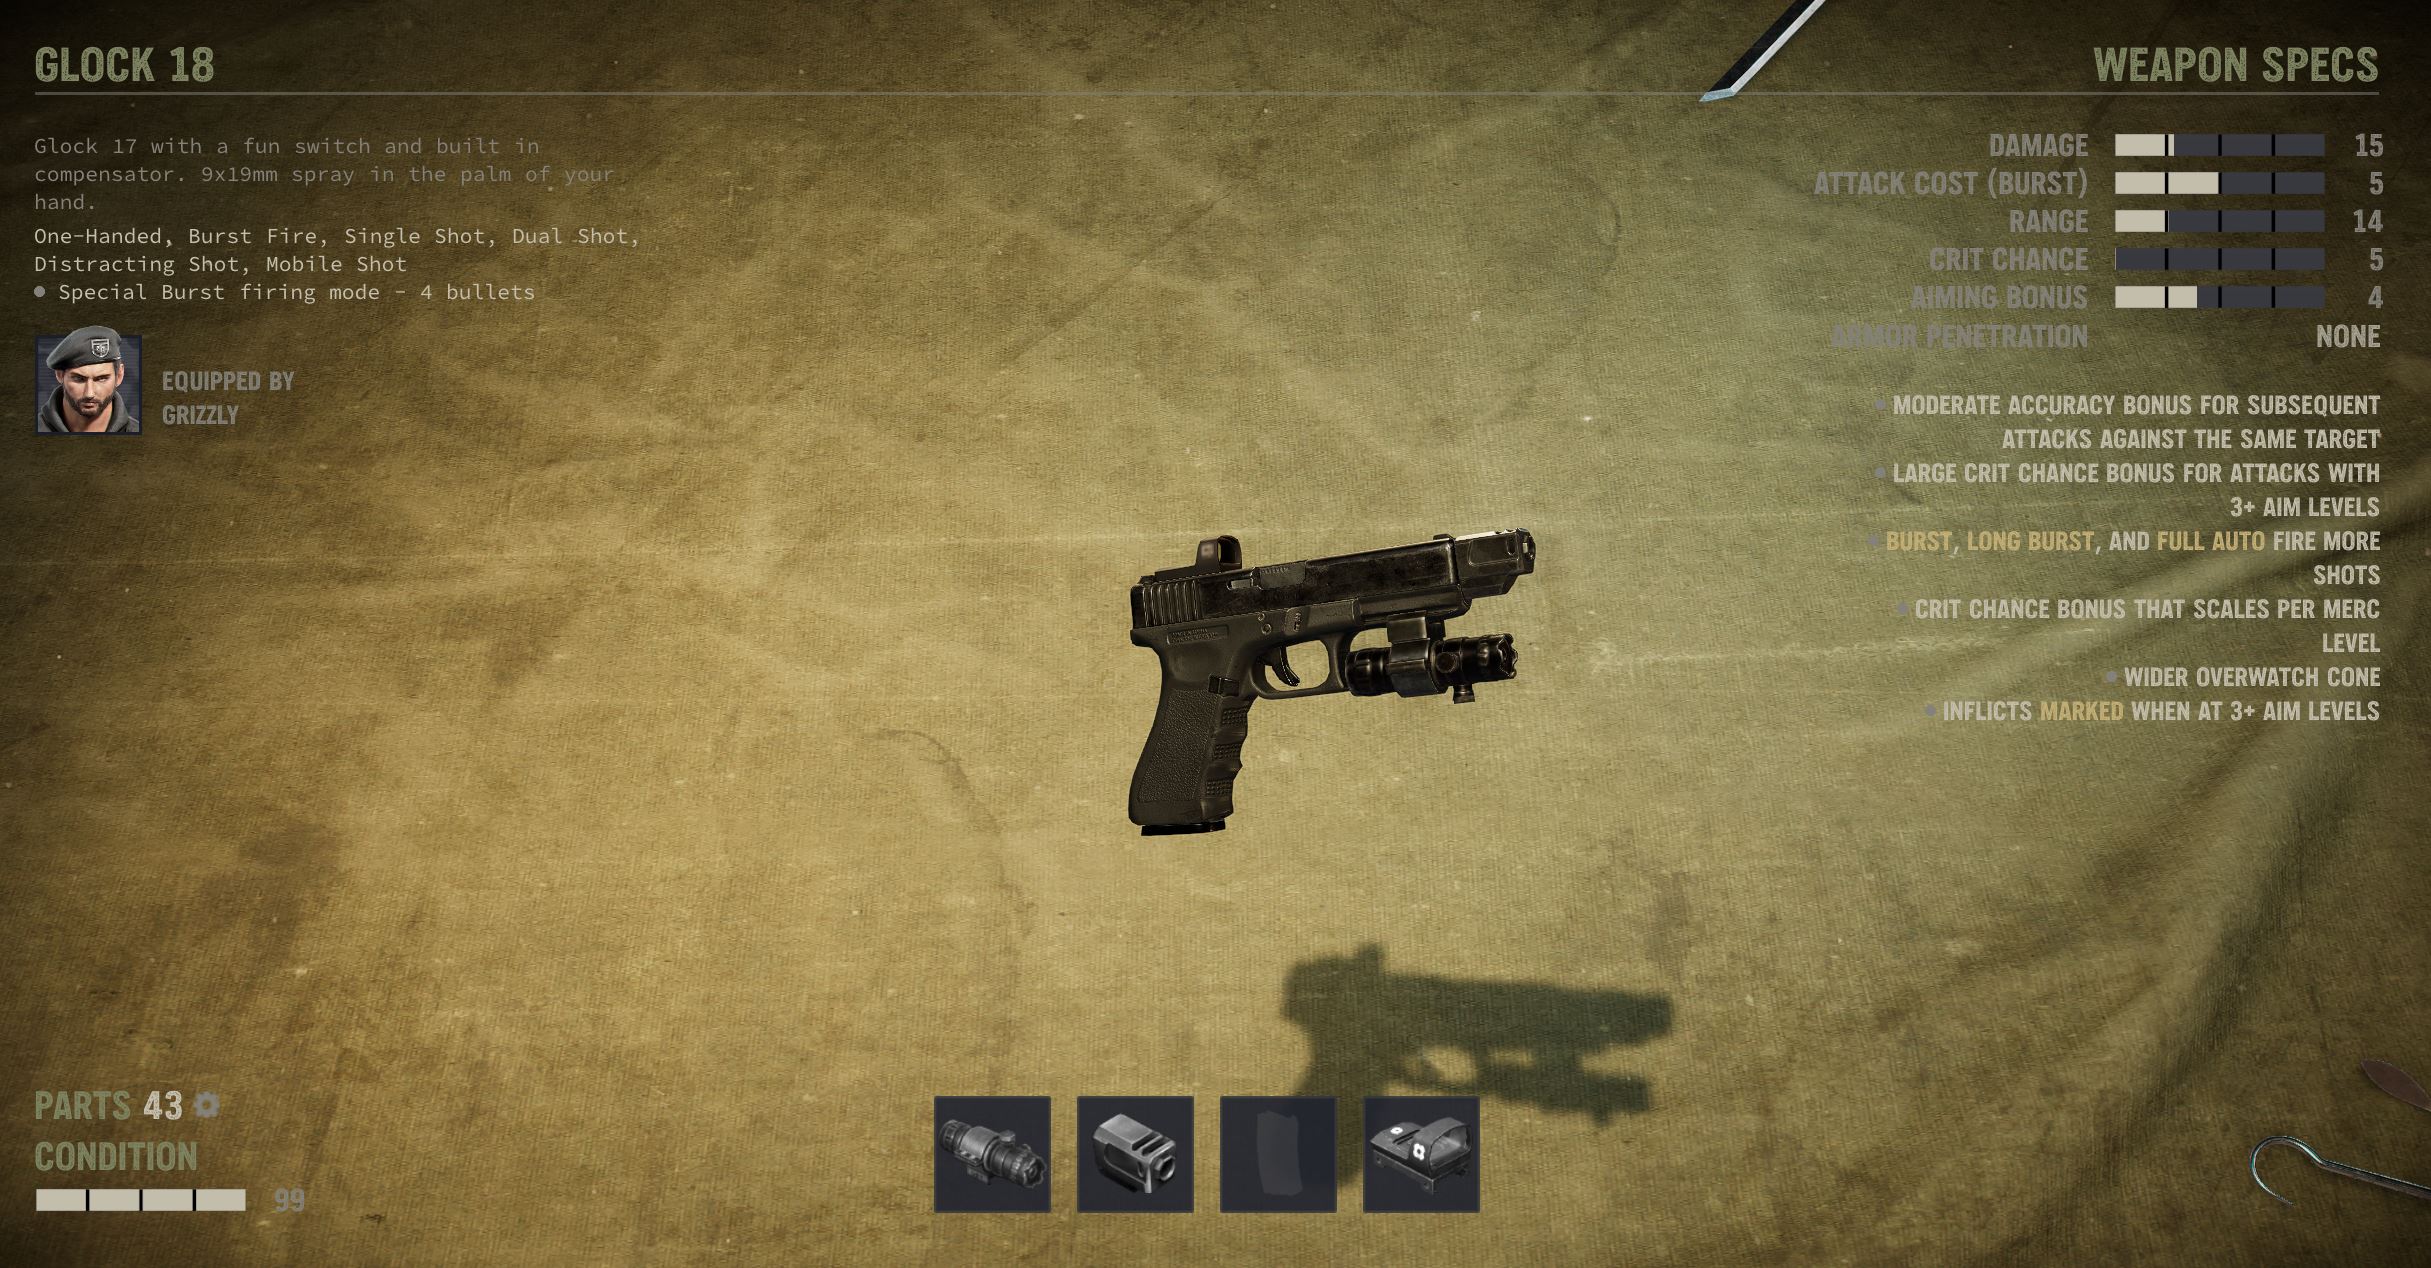
A partir deste ponto, you can make any modifications to the weapon that you desire. Por exemplo, if you navigate to the caliber tab, you can adjust aspects like damage, ammo type, magazine size, e mais. You even have the option to add or remove available attacks, such as adding AutoFire for full-auto mode.
To avoid confusion in the game, I recommend starting with changing the display name to something that makes sense to you.
How to Create Weapon Components
To customize your weapon, especially if it’s not a standard one, you’ll need components. This is where you can tweak how components work to your liking. Por exemplo, you might love the look of a reflex sight on your AR15 but prefer the critical chance bonus of the prism scope. You can make these changes using the mod editor.
Let’s say you want to add critical chance to the reflex sight on the Glock. Para fazer isso, you’ll first need the components. Aqui está como:
- Right-click in the editor.
- Escolher “New.”
- Selecione “Item.”
- Escolha “Weapon Component.”
Once you have the component, select it in the left panel, give it an ID, and copy properties from an existing item, assim como antes.
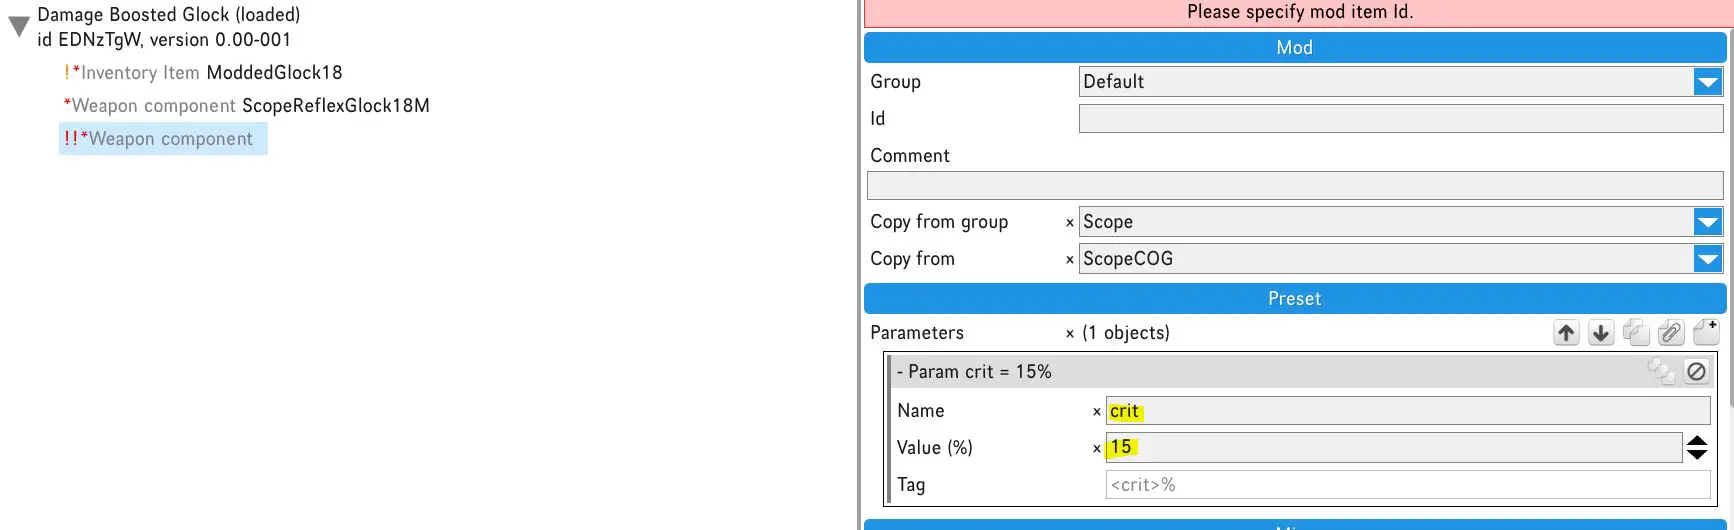
Here’s an important note: If the component you’re copying from is exclusive to the weapon you’re copying from (por exemplo, the advanced reflex on the Glock), then you have to select “[…] específico” in your “Copy from Group” campo. Then choose “Copy from [desired component].”
To determine if your desired component is exclusive, click on your weapon inventory item in the left panel, and scroll to “Corpo & Components.” Lá, select the slot you’re looking for, como “scope” for the reflex sight, and read the component name. Exclusive components typically mention the component name followed by the weapon name, como “ReflexSightAdvanced_Glock.”
Por simplicidade, let’s use a standardized component, like the regular reflex sight for the Glock. Configure assim:
- Copy from Group: Escopo
- Copy from: ReflexSight
This will populate the item with all the properties and instances where the reflex is used in the game. Since you’ve created a copy from the original item, you’re free to make changes without affecting anything else in the game.
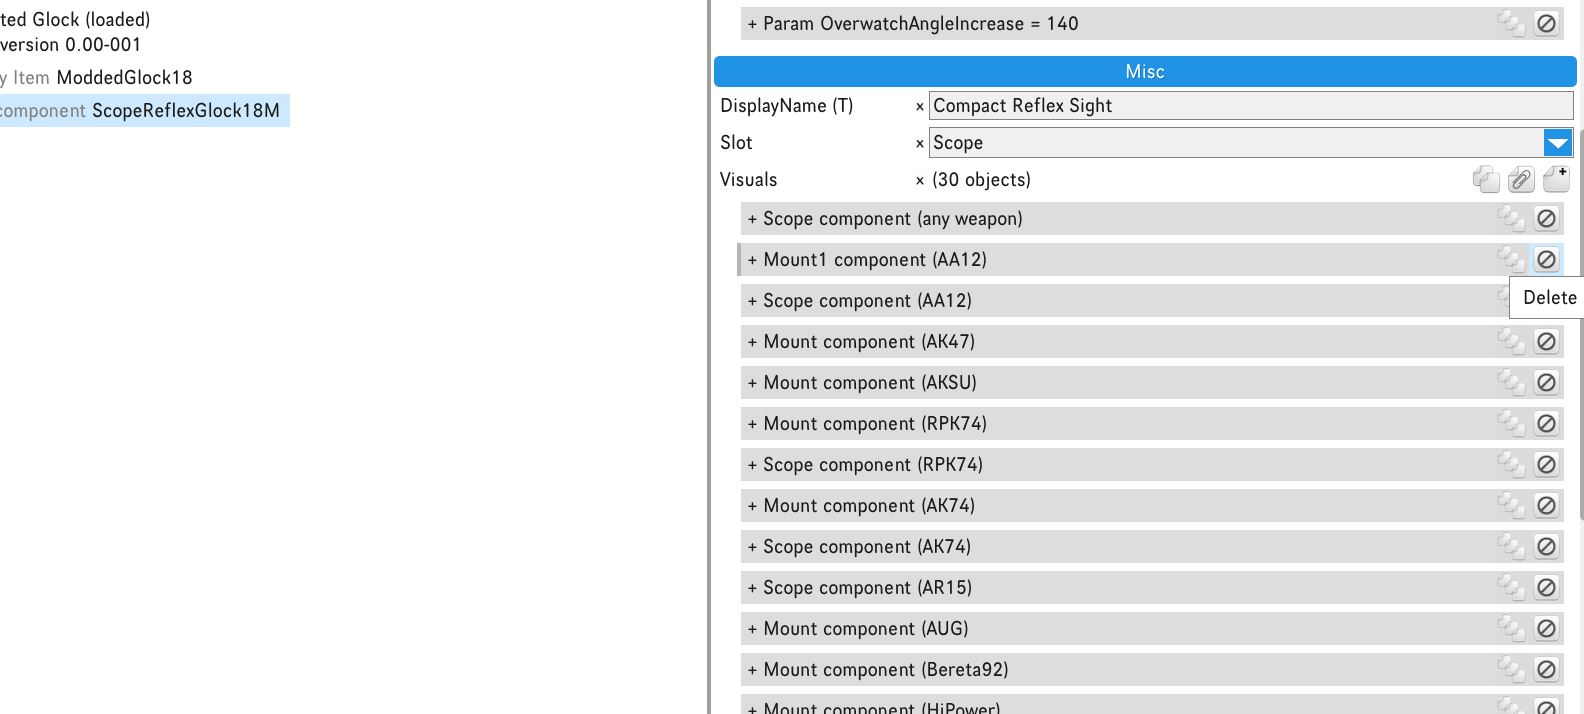
Por agora, leave the parameters as they are, as you may need to adjust them later. Scroll to the “misc” section and delete any instances that don’t apply to your original weapon. Keep in mind that your weapon might have a standardized component, so if you can’t find your weapon in the entries, it’s probably listed as “qualquer arma,” as in my case for the reflex on the Glock.
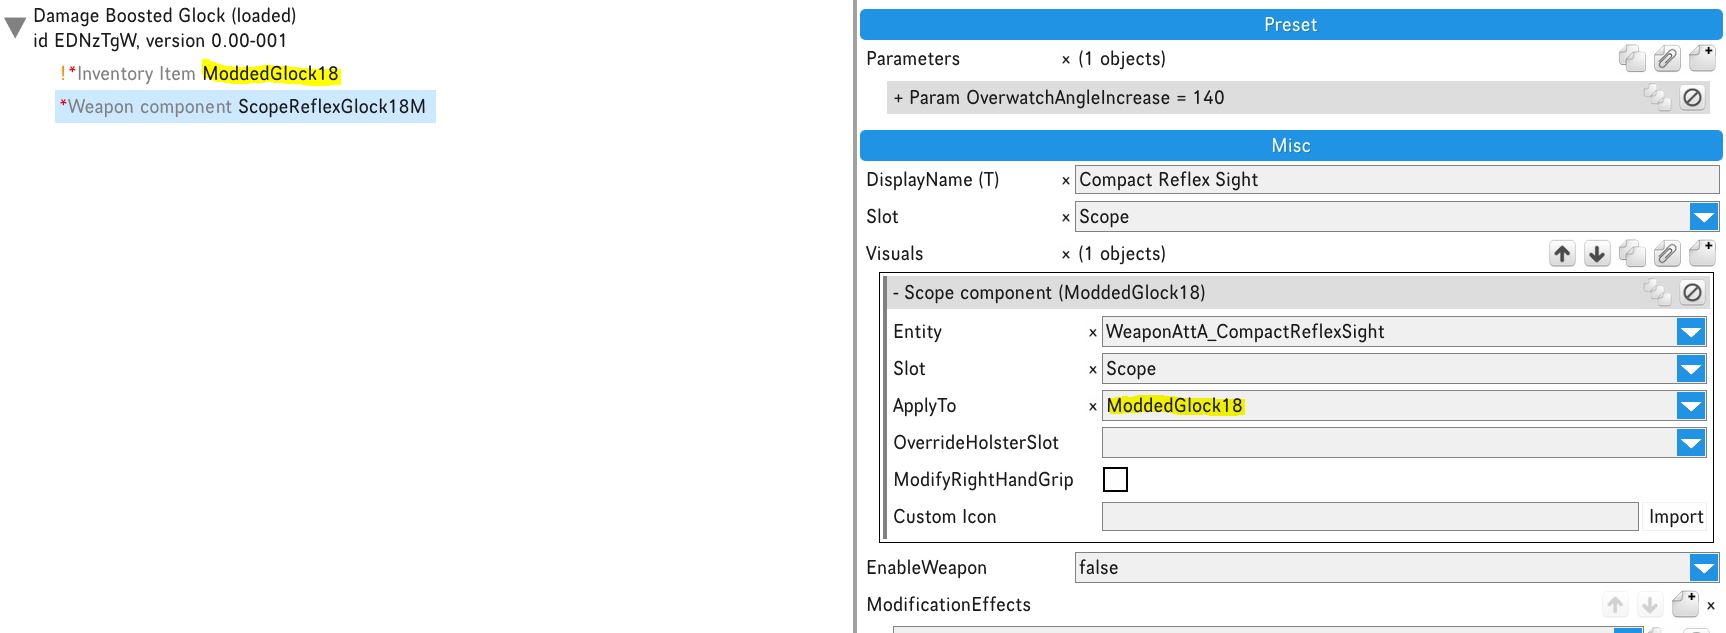
Now that you have one entry left, click on that entry and change the “Apply To” field to your weapon item ID. Nesta fase, refrain from altering anything else within the entry. This step associates the component with your weapon entity.
You can now adjust the parameters. To figure out the modifications and parameters needed, you can examine an existing component that’s similar to what you want. Por exemplo, to add crit bonus when fully aimed, you might check a prism scope component.
Adicionar “CritBonusWhenFullyAimed” to your component’s “Modification Effects” campo. To input a specific value, you can create and copy a new “ScopeCOG” (prism scope) component to see which parameter you need.
You can put the same effects on your weapon component by copying them. Então, you need to remove the prism scope component.
Depois disso, go back to your weapon Inventory Item on the left panel. Find the body and components section, and open it where you want to add the component, qual, nesse caso, is the Scope.
If there are any other entries there, remove them, and make a new entry. Quando você abre, clique “novo” next to available components, and fill in the ID of the component you created.
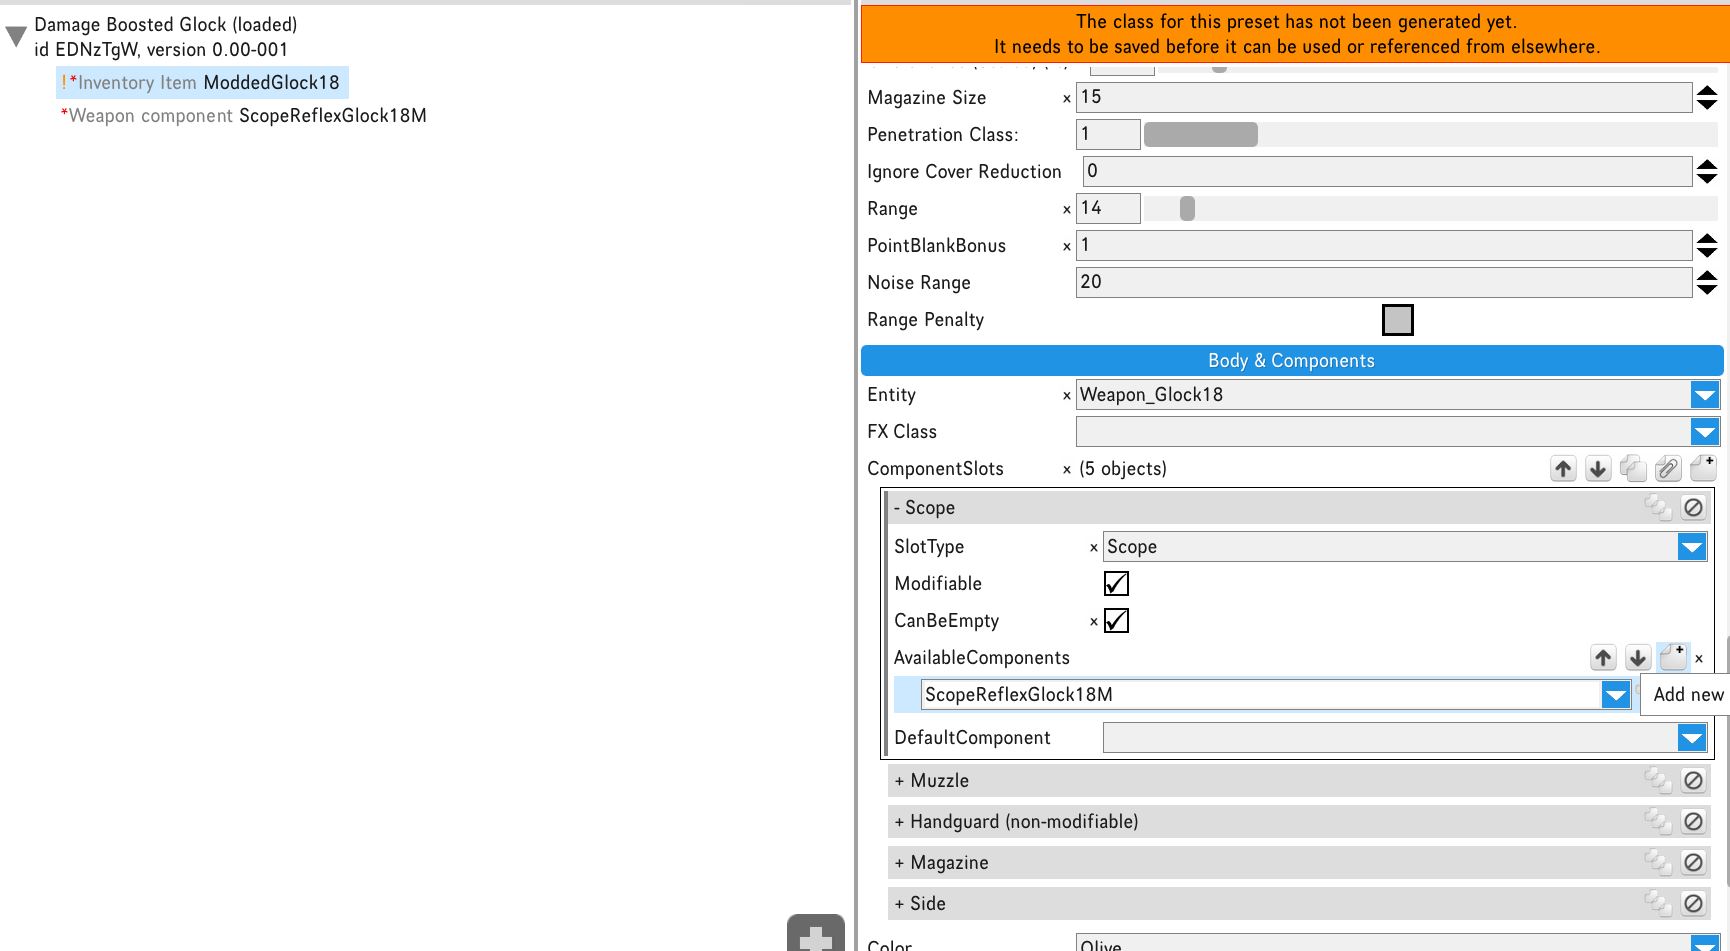
Remember to save your progress frequently to avoid losing any work. Repeat the process for all the weapon components to ensure you have unique components for each slot.
For each slot entry, choose whether it’s modifiable (which is often the case for most slots) and then decide if it can be left empty. Components that are crucial to the weapon’s function, like the barrel and magazine, usually cannot be left empty. Por outro lado, components like side or underslung attachments can typically be left empty. Se você não tiver certeza, refer to the weapon you’re copying from. Create a new inventory item and copy the original vanilla weapon as you did at the beginning. Check its component items and remember to delete them afterward.
Próximo, select the default item that your weapon will use in each slot. Tipicamente, it’s a good idea to keep this the same as the vanilla weapon. Por exemplo, you can keep the modified Glock’s scope default as empty.

Fase de Teste
Once you’ve made all the necessary changes to your weapon inventory item, created all the components, modified them, and assigned them to your weapon item, your weapon should be good to go.
To access it in the game, the easiest way is to create a combine recipe. If Glocks are difficult to come by in the game, you can make one from a HiPower.
Veja como você pode fazer isso:
- Right-click and choose “Novo,” então selecione “Item,” e finalmente, clique em “Combine Recipe.”
- Enter an ID for the recipe.
- Scroll to the “misc” tab and add the required ingredients, nesse caso, a HiPower and some parts.
- Add your modded weapon’s ID as the result item.
This will allow you to craft your customized weapon using the HiPower and the specified parts in the game.
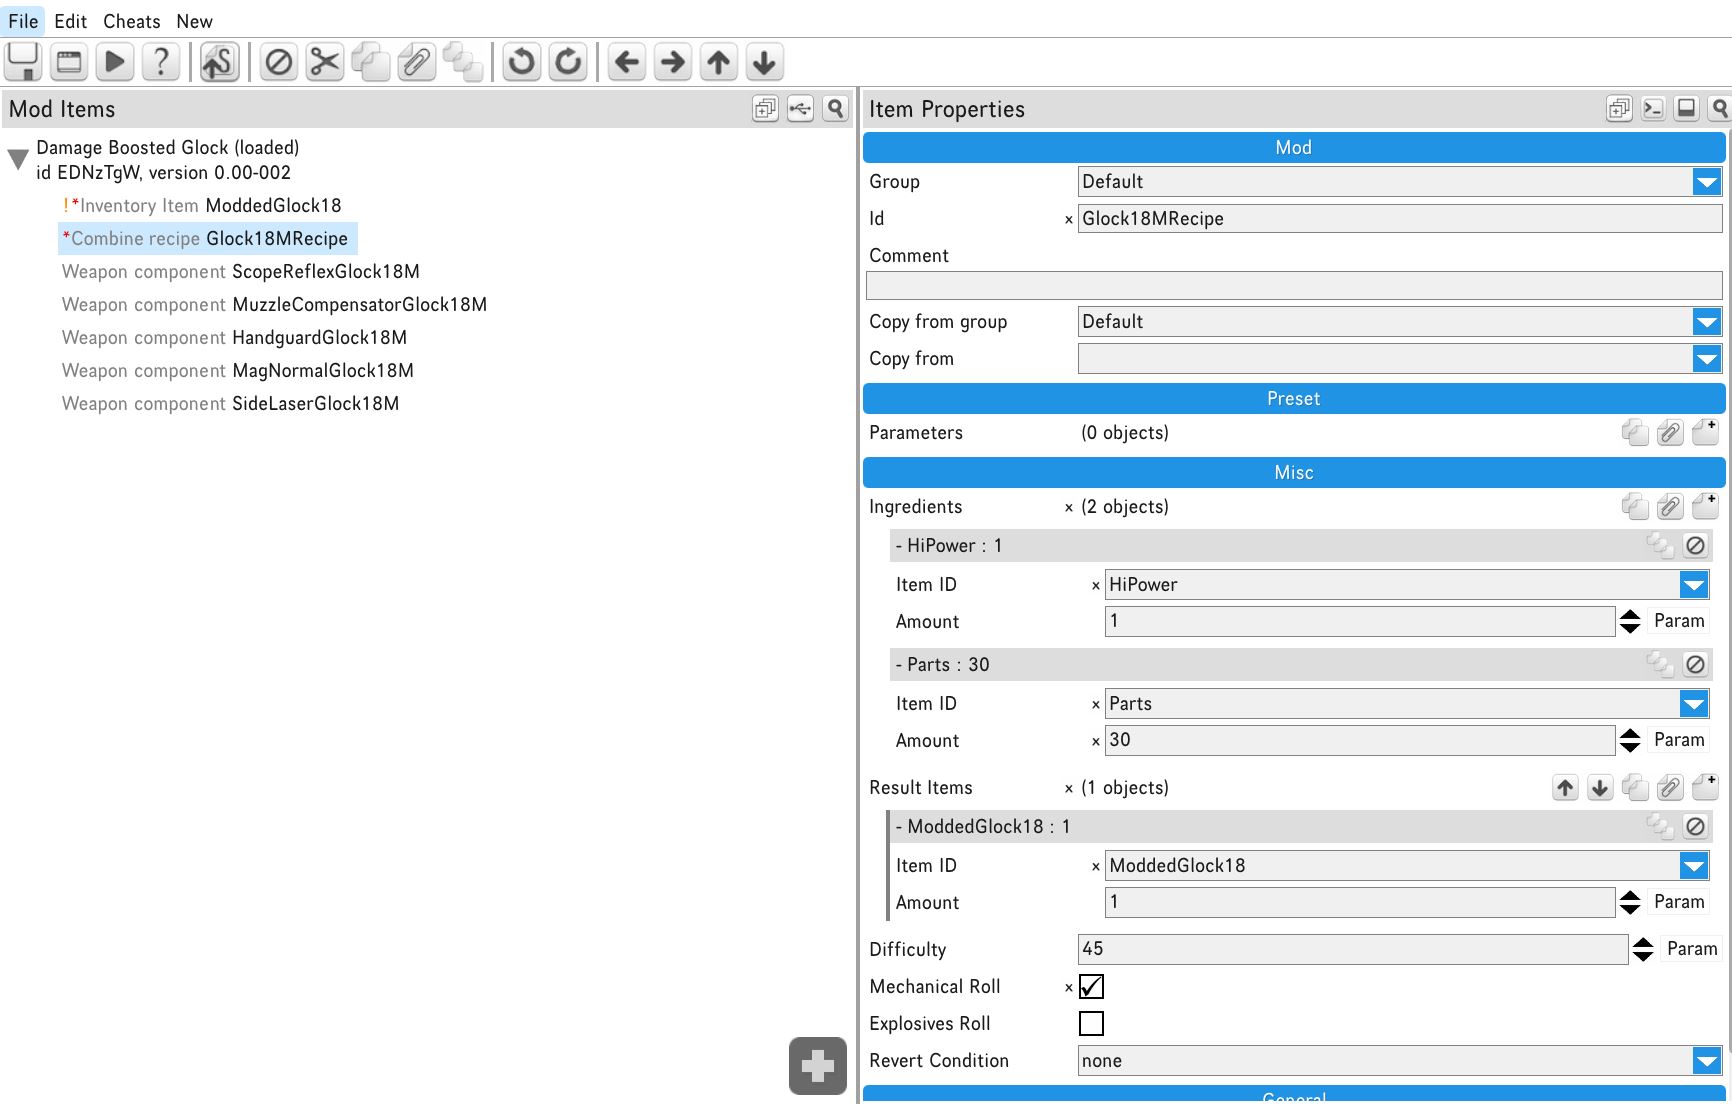
You can also adjust the difficulty level and select the roll type you prefer. Por exemplo, you can choose the mechanical roll.
Agora, there’s not much left to do but to test your changes. Make sure to save your progress and exit the mod manager by pressing “Esc” and going to the Main Menu.
Então, load up a save file, find the required ingredients, and give the right-click combine recipe a try to see how your customized weapon works in the game.

After you’ve crafted the weapon, be sure to test it to see if the components work as intended. Se você encontrar algum problema, here’s how you can troubleshoot:
- Open the mod editor again and check if default component slots and difficulty for mods are set the same as vanilla weapons.
- Review the weapon’s visuals to ensure your weapon doesn’t have any specific components that should have been copied from instead of using standard components.
As you spend more time experimenting with this process, you’ll gain a better understanding of where things might be going wrong.
This guide covers the basics of creating a working variant, but it’s possible that I’ve missed something. If you run into issues, feel free to play around with it and try to figure it out. If you still need help, don’t hesitate to leave a comment, and I’ll do my best to assist you. É isso; we’re finished. Paz!
Isso é tudo o que estamos compartilhando hoje para isso Aliança irregular 3 guia. Este guia foi originalmente criado e escrito por Luxiin. Caso não atualizemos este guia, você pode encontrar a atualização mais recente seguindo este link.