- Título: Hellsplit: Arena
- Data de lançamento:
- Desenvolvedor:
- Editor:
Information about Hellsplit: Arena is still incomplete. Por favor, ajude-nos a preencher os detalhes do jogo usando este formulário de contato.
Played through the normal difficulty campaign? Tired of going through training sandboxes because for some reason the game doesn’t give you the option to have every item unlocked? Do you actually want a challenge that makes you regret living? Welcome to Hell(dividir)’s Hardcore difficulty! Hardcore on Hellsplit is quite the challenge, the enemies may be a bit the same, but reckless mistakes are punishing, and dying makes you wish you were dead IRL. Learn how to not die in this in-depth guide and learn a few things about the enemies and levels in the game!
What’s the Difference from Other Mode
Bem, the only thing that’s different luckily for you, is nothing like increasing the health or damage of the enemies, but more so has to do with the fact that zombies and skeletons will dodge and block more frequently. I don’t actually know the full list of things that are different, but these are the main two things I’ve noticed as I played and died over and over again.
Beating Chapter 1
Capítulo 1 and its boss is extremely easy. A bunch of unarmored zombies and a boss skeleton. You don’t even need to use any weapons. No entanto, I should mention: dying in this game means restarting from the very first chapter and the very first level, redoing the bosses you’ve killed, and re-unlocking the weapons and armor you’ve missed out on. Luckily for you, if you purchased a set of say Plate Armor or Templar Armor before you died and have a Longsword before you died, you keep those weapons as long as they remain in your sheathes.
INVESTMENTS
You don’t need to invest in anything. If you want to be safe, buy Brigandine, de outra forma, you’re fine. Save up until Chapter 2 when you’re able to purchase the Longsword which costs 12,800 moedas.
OTHER LEVELS
You’ll enter the Armory and the Fort levels, both of which are easy since they’re unarmored zombies. You can find bombs and explosive barrels around but BE CAREFUL as turning around with snap-turn for some reason SOMETIMES causes your bomb/barrel to explode in your hand and you’ll be left at death’s door. When this happens, quickly find apples and bananas around the map to heal yourself up.
ENEMIES
As far as levels go, you will only face the basic unarmored zombie. The easiest way to dispatch them is jumping, kicking them onto the ground (or grabbing their arm or neck), then punching into their chest and ripping their hearts out or ripping their heads.
You can rip heads effectively by grabbing the very top of the head and gripping either upper arm or neck in both front and back sides and tearing the head away. Se não funcionar, make sure your hand is at the very top of the head and the other hand is not grabbing the head in any way.
The Fire Skeleton champion boss guy is an easy boss. You’re able to move around the arena once you spawn in. Once you do so, face the right to an open gap in a stone wall in front of a stone house.
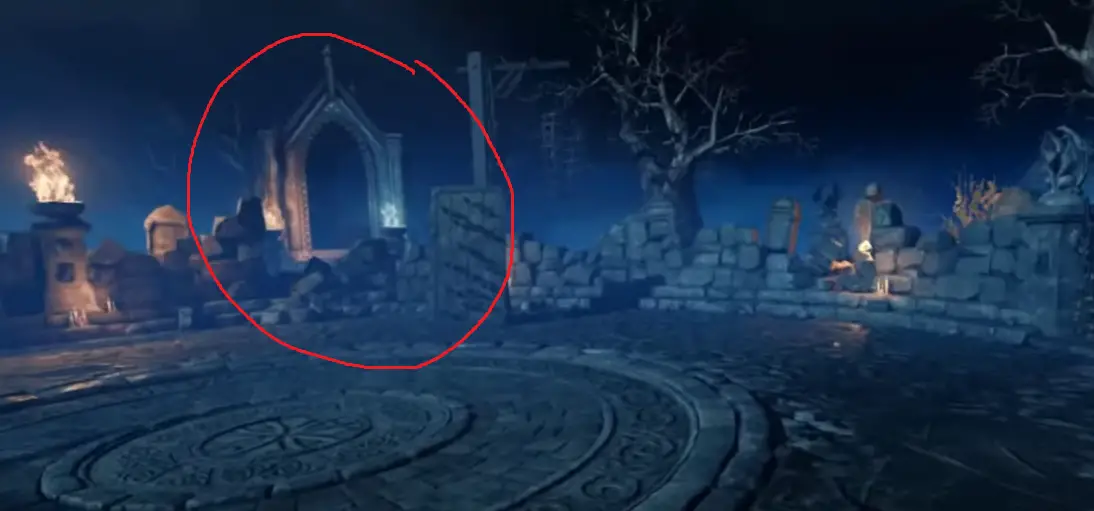
Once you’ve faced this direction, go towards the gap in front of the stone building and wait for the boss to come out. Once the skeleton is out and he jumps into the arena, start running into him and punching and kicking wildly until he falls to the ground.
Beat the hell out of him until he explodes into a moshpit of bones. Parabéns! You beat Chapter 1!
Beating Chapter 2
No capítulo 2 you’ll eventually be introduced to the skeletons. They’re easier to kill when you get a good hit on them, but they’re extremely agile. Shields become a lot more common and this becomes the bane of my existence. When a skeleton rolls and you make a downward cut if he has a shield, sometimes the shield will block it and they’ll try to either attack you or backstep or roll again… Mid-roll.
INVESTMENTS
You will unlock Heavy Brigandine and the Longsword eventually at around level 9. Save up until you can at least purchase the Longsword as two-handed swords are extremely versatile and handy in this game, and certain HEMA techniques can actually be used, which I also respect. Lamellar will also eventually be unlocked later on. You can purchase either or, but whichever one you decide on buying, do not purchase anymore armor until you’ve unlocked Plate Armor at Chapter 4, since it costs 60,000. You can also try to save up for Heavy Plate Armor which is 90k, which I’ll make a separate investment list on later.
OTHER LEVELS
Every other level will be training levels, though specifically, Frozen Lake, Bar, and Knight’s Court (i think, I don’t remember chapter 2 much since it’s easy) will be your maps. Frozen Lake comes before you unlock the Longsword, so if you haven’t kept a weapon like an axe or club, that’s fine. It’s just gonna take more time to beat since chainmail and helmeted zombies make their appearance here as well for some reason. This means you won’t be able to rip their heads off or tear their hearts out. Try ramming them with the Horse and then beating them on the ground or while you’re grabbing them.
Once you get the longsword, you can start using the first half-swording technique. Para fazer isso, simply grab the blade of the longsword with both hands and use the crossguard like a two-handed hammer and smash away at their helmets!
ENEMIES
As I said, you start off with unarmored zombies and skeletons. To beat the skeletons, simply run into them until they ragdoll on the floor or jump kick them, or simply punch them. Grab their bodies, then punch away until they explode into bones. Chainmail zombies start appearing, and to kill them, simply lure them to a trap or drop kick them and drag them to the trap to kill them.
Once you’ve unlocked the Longsword, capítulo 2 becomes a breeze and it will be your friend in chapter 3. It is best to always two-hand the longsword to make better swings. Também, por algum motivo, if you swing too fast, the game sometimes has a hard time recognizing the swing so you won’t end up doing damage. Do it too slow, and you already know how it goes. The idea is to make strong, wide swings and complete the direction of your swing to make it effective. Perfecting the swings of every two-handed sword weapon will one-shot break helmets, one-shot weak shields, and severely damage better shields. This gets better if you also have better swords like the Bastard Sword and the Claymore.
Capítulo 2 should be a breeze after unlocking the Longsword. The bosses are enemies that will also appear in Chapter 3, so they’re easy to defeat.
Once you’ve spawned in, you’ll face forward. The Three Royal Guards will spawn from their tombs and enter the arena one at a time. All the easier! Once one steps into the arena, run straight into them and knock them into the ground. Once they’re on the ground, use the half-swording technique and bash their helmets in quickly until it breaks and then stab them or keep beating their brains out. Rinse and repeat until all 3 are dead. Flawless Victory!
Beating Chapter 3
Capítulo 3 starts getting difficult. You now have to deal with helmeted zombies and skeletons with better shields. Sometimes with even weapon boosters. You unlock the Templar Armor here, but to be honest you could skip the Templar Armor. You do unlock the Bastard Sword, which is the better longsword since it’s slightly longer and girthier, so you can chop things in half more easily and get some nice noticeable reach advantage while fighting.
INVESTMENTS
Start buying Full Health Potions and keep a Phoenix Potion on your belt. You otherwise don’t need to buy any armor, and the Bastard Sword is optional. The BS can’t be sheathed in your side sheath, which is the only sheath aside from the back-left sheath that doesn’t sometimes remove the weapon from existence when you enter any level. Então sim, keep in mind to put your longsword into your left sheathe before entering or exiting a level.
Before the boss fight, purchase a Poison bottle for the fight and keep it on your belt along with the Phoenix Potion. De outra forma, keep a Full Heal pot in your belt at all times. Sometimes you get hit a bunch and the apple/orange expires after you bat an eye towards it, so it’s nice to have a full heal at your disposal.
OTHER LEVELS
Frozen Lake and Knight’s Court return, the two maps with horses in the back. Abuse your enemies with Horseback riding and two-handing Longsword.
Torture Chamber is also another map and is a fun execution map. Just stand by the lava pit upstairs and throw enemies in, occasionally throw a bomb if it doesn’t explode on you. Remember if a bomb explodes in your face, it’s better to take the full heal than rush for the fruits if there are enemies in the way or you’re not sure if you’re gonna die after tanking a literal bomb in your hand.
ENEMIES
Heavily armored (chainmail+helmet) zombies and skeletons will spawn. Better shields. Do you think your longsword is obsolete? Não, não é. Try to attempt perfect swings. Fast-moving but not panicked or super fast swings or thrusts at your target. Make full horizontal swings when targeting the shields or the helmets. If it’s an open helmet, try to thrust into their faces (sometimes the helmets are weird and you’ll hit the helmet instead of the face). To make that easier, use half-swording by holding the handle of the longsword with your dominant hand, and then using your other hand to hold the blade itself so you have a lot more control when thrusting.
Make swift vertical swings downward or swift horizontal swings from left to right on skeletons. Skeletons even with armor are easy to kill, but the shields make it unbearably stupid. Hitting a weapon also for some reason stops the momentum of your blade, so try not to hit the weapon if possible. A good swing can instakill even an armored skeleton at the right spot. If the skeleton rolls, face them and right as they’re finishing their roll animation, strike down on their shield-holding arm at the right distance and you’ll severely damage or outright kill them.
Sim, you can still grab enemies, but it’s not recommended since you can get struck by a weapon-enhanced undead.
If you get poisoned and you haven’t been hit at all, take the full-health potion after a few groans from your character. Poison can kill you super hard. Fire can tick away at your health fast, and ice is the least worrying of them since it doesn’t deal damage. Every time you’re poisoned or burning, pop the full heal.
Now you’re at the boss! This boss can one-shot you. The Ogre can actually be decapitated, but it’s risky and moreso a lucky or well-timed hit. You can’t move at all while the narrator is giving his speech about how the Ogre is so awesome and cool and dangerous so you can’t cheese this. Surpreendentemente, he CAN be knocked down, but this is EXTREMELY risky. I won this by buying the poison bottle, enchanting my longsword/bastard sword, and making swings with the very tip of the sword. Try to bait his attacks by standing at the edge of his attack range and then stepping back as he winds up an attack. Once he finishes one or two attacks fully, strike him once or twice, then step away while the poison eats away at him. Eventualmente, he’ll drop dead from a sword strike or the poison and you’ve beat Chapter 3!
Beating Chapter 4
Bem, this is as far as I made it. I died somewhere in chapter 4 so I have to restart this playthrough. But I can still give you some insight.
INVESTMENT
Assuming you did not buy the Bastard Sword, buy the Claymore and Plate Armor. Plate Armor first. If you can’t afford it, you can buy the Templar Armor. The Claymore, Contudo, is a must-have and others may disagree with me. Why is the claymore a must-have? You have long reached with this greatsword, so you can hit and easily knock down Dark Knights with good swings. It can one-shot helmets and shields with good swings, and easily blow through skeletons like cardboard.
If you want to save up for Heavy Plate Armor, você pode, but I advise you at least buy either Claymore or Bastard Sword to compensate since you want to have the extra reach when dealing with Dark Knights.
Keep a Full Heal and Phoenix on you at all times. Don’t be afraid to pop a full heal, you can always buy another.
OTHER LEVELS
Knight’s Court Dark is quite dark, with lightning and dim torches only lighting up the map. Outra vez, use the Horse and abuse your enemies. Frozen Lake is also another map. Use the Horse. Dungeon is also a fun map, just stand by the edge of the huge lava pit and throw all of your enemies in.
ENEMIES
Dark Knights. Deus, I hate Dark Knights. They hit hard, take just as hard hits, and can really screw your run over if you’re reckless. Sim, you can knock them down, but you can’t grab them and they can easily shrug off every other swing. If you were doing well in Chapter 3, you’ll do fine on the rest of the enemies in Chapter 4, Contudo, be careful of the Dark Knights. If you’re struggling against them, lure them over to a spinning trap — it always instakill them.
At the 2nd to the last level, you’ll face all the bosses again. Abuse the crap out of the Fire Skeleton and the 3RGs. Save a poison bottle for the Ogre. Rinse and repeat, easy boss fight moshpit.
The last level, claro, is the hardest. You have to beat the hell out of the narrator. I can’t really say much here since I haven’t gotten to this point in Hardcore, and I beat the boss out of pure luck in Normal. All I know is that he can be decapitated and you should probably bring a shield since he has all elemental stuff. I Will update when I get back to the end.
Isso é tudo o que estamos compartilhando hoje para isso Hellsplit: Arena guia. Este guia foi originalmente criado e escrito por Slenderp123. Caso não atualizemos este guia, você pode encontrar a atualização mais recente seguindo este link.