
- Título: Das profundezas
- Data de lançamento:
- Desenvolvedor:
- Editor:
Information about From The Depths is still incomplete. Por favor, ajude-nos a preencher os detalhes do jogo usando este formulário de contato.
This guide will be showing you the step-by-step process on how to build an aircraft carrier in in From The Depths.
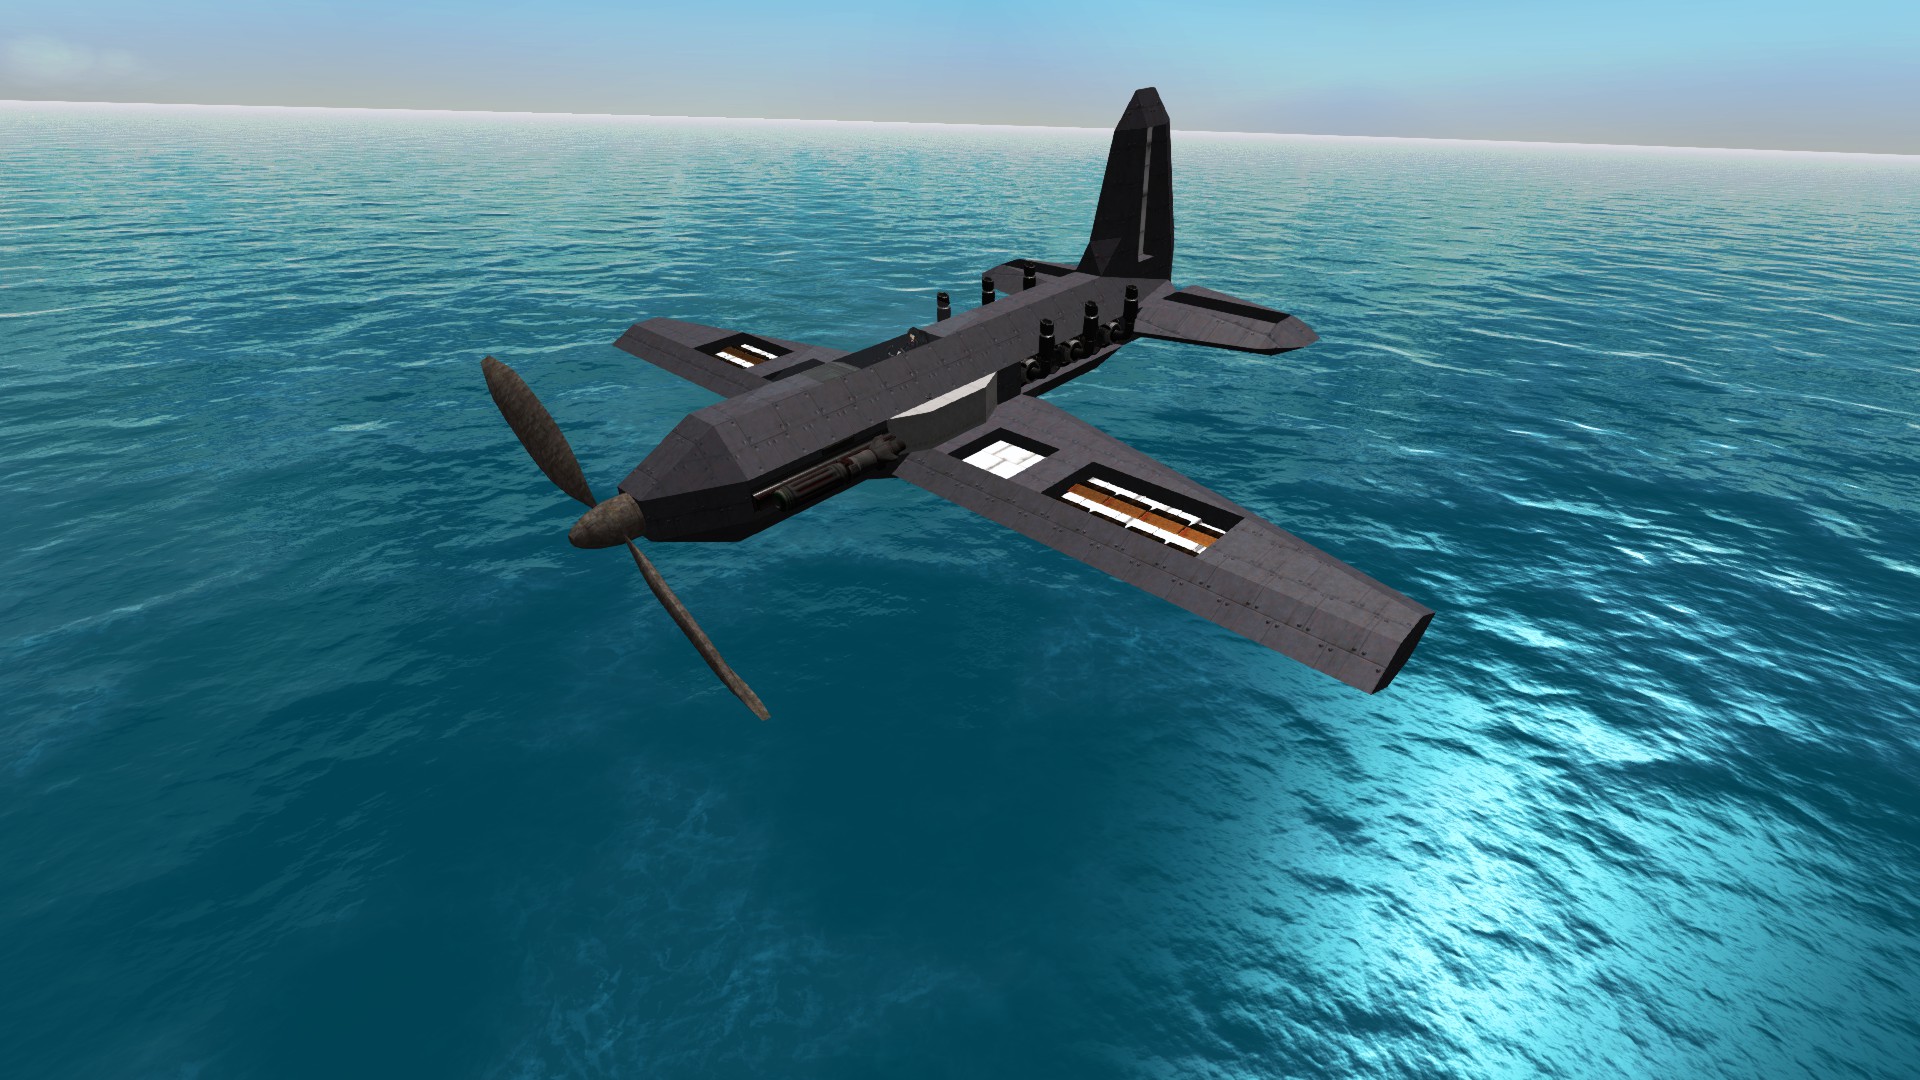
The Aircraft
Naturalmente, an aircraft carrier requires aircraft for launching purposes. No jogo “Das profundezas,” you have a variety of options when it comes to aircraft, including helicopters, propeller planes, jet planes, airships, balloons, missiles, and even spacecraft. If you don’t have a specific design ready, you can start by using the pre-made propeller plane blueprint.
To make it functional, add a frontal propeller, a small engine, and an artificial intelligence module. For effective radar coverage, attach one radar unit on the underside of the plane, and incorporate an inter-vehicle transmitter so that your fleet can share detection data. Don’t forget to equip the aircraft with suitable weapons. Por último, ensure the stability of the plane by carefully placing the wing blocks to achieve a balance where the center of lift matches the center of mass. Once your modifications are complete, set up the AI as required and save your customized aircraft design.
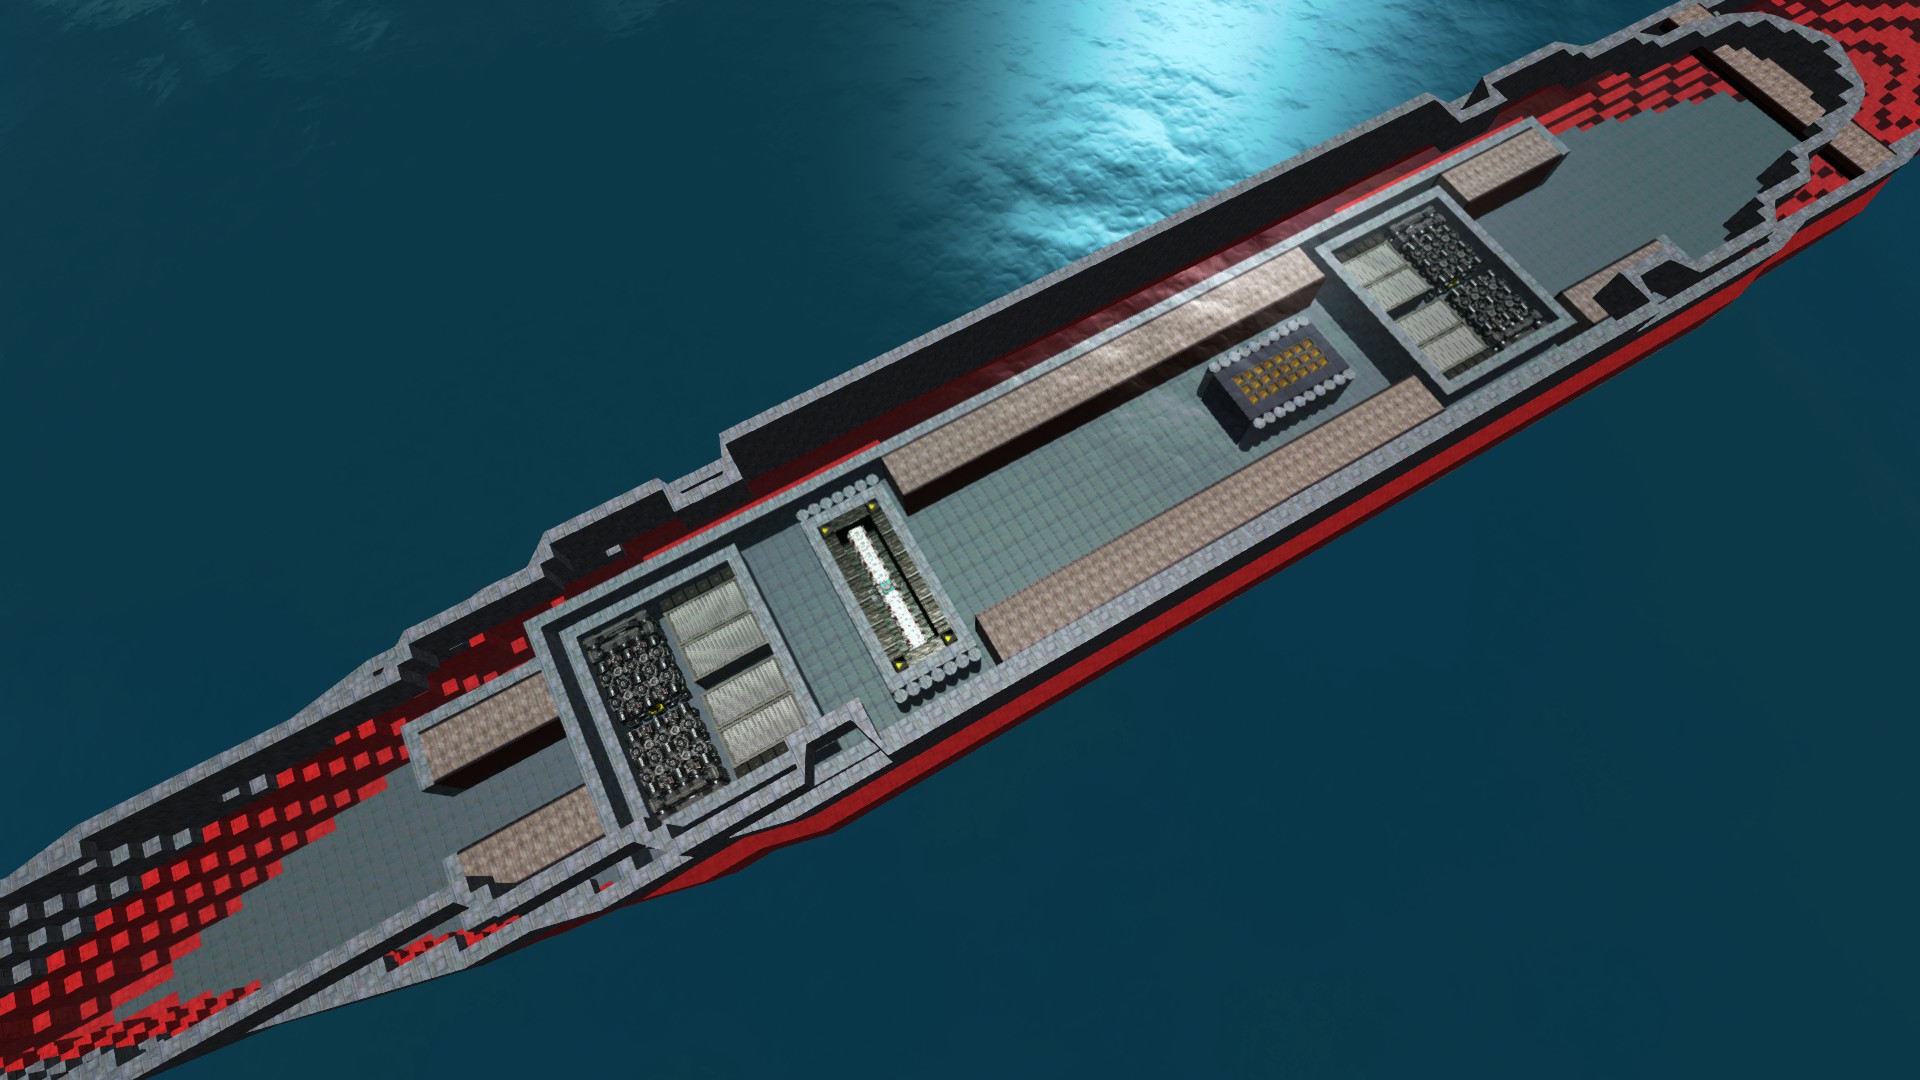
The Hull
When selecting a hull for your aircraft carrier, it’s important to consider that a larger hull will have an easier time accommodating planes compared to a smaller one. If you don’t have a custom hull design prepared, I suggest utilizing the pre-made dreadnought components and creating an elongated central flight deck. To ensure the carrier’s functionality, add basic engines, armazenamento de carga, and an artificial intelligence module.
Adicionalmente, for durability and resilience, it’s essential to armor your ship’s systems adequately. To ensure buoyancy without relying on pumps or power, incorporate enough wood or alloy into the design to keep the ship afloat even under adverse conditions. This robust construction will help ensure the carrier’s stability and longevity in the game.
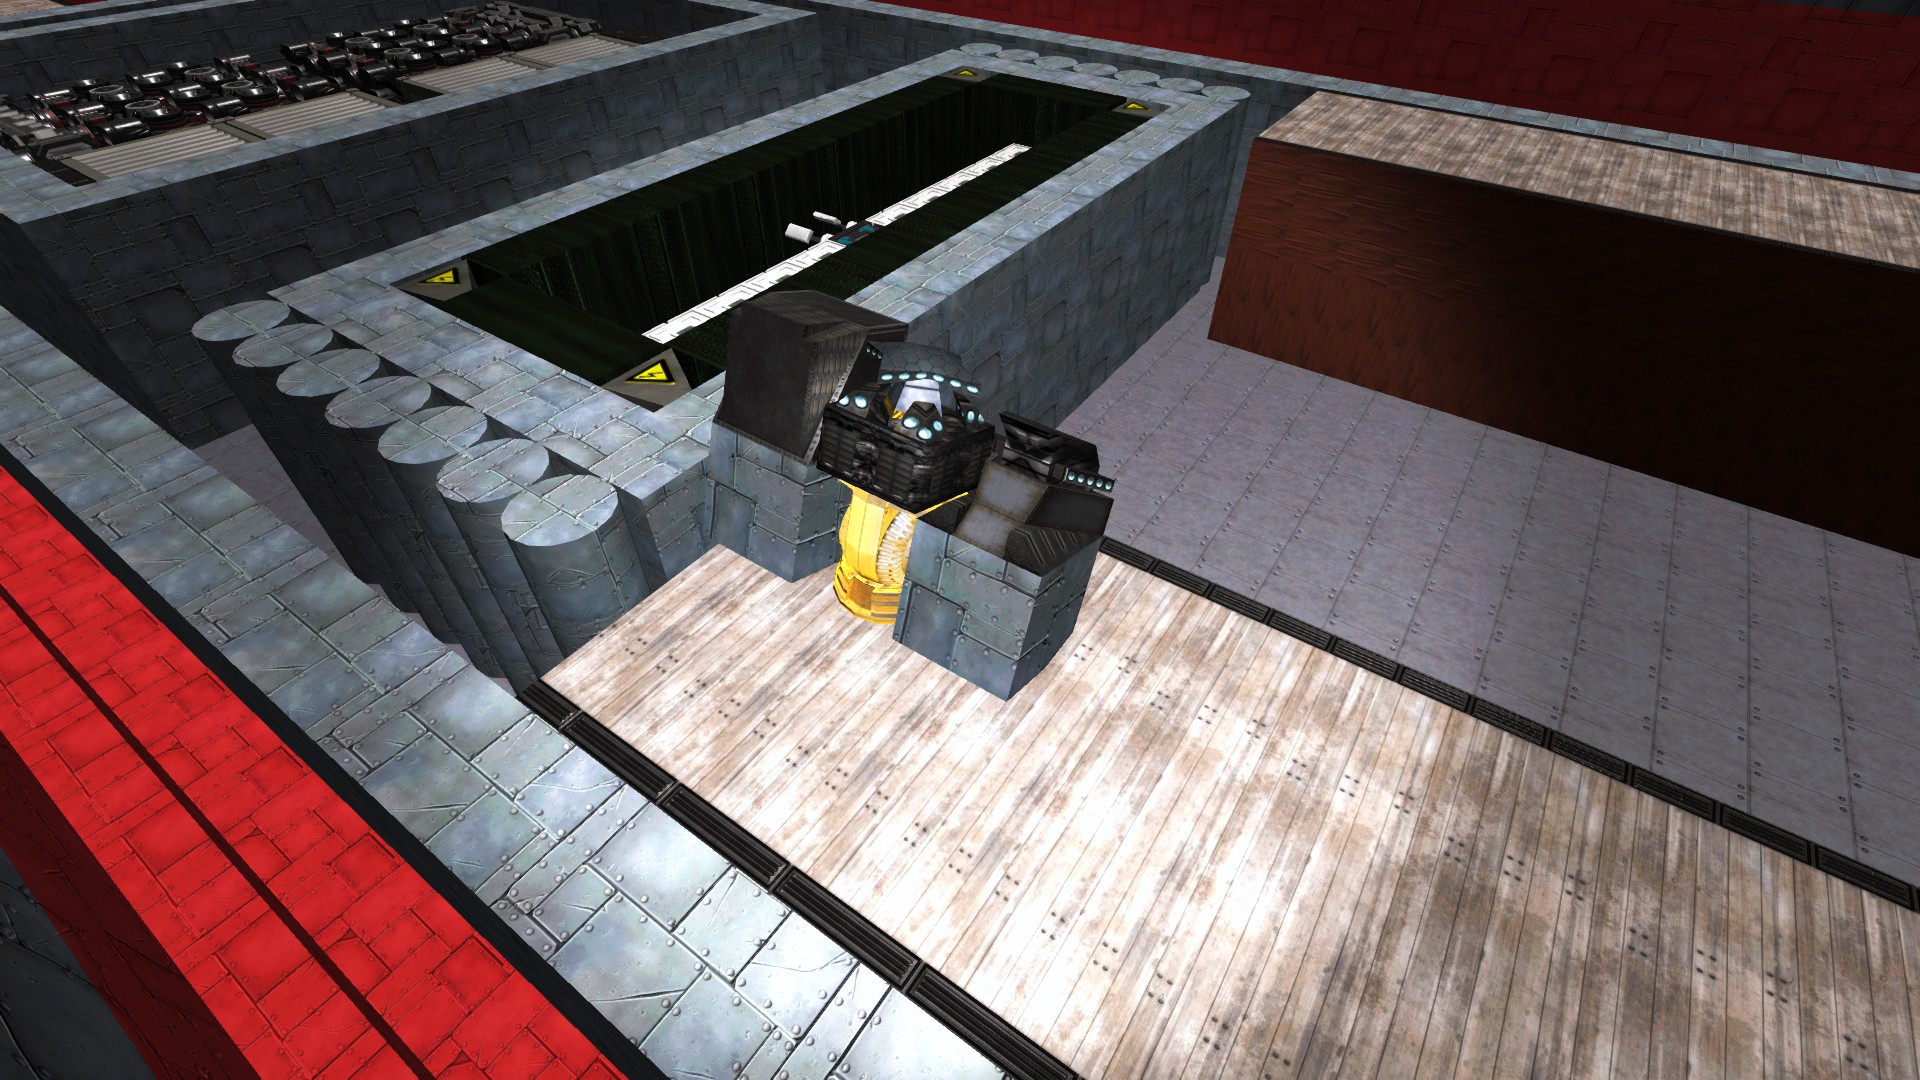
The Hooks
To ensure that the Carrier is equipped with attached units, it becomes essential to incorporate docking stations, often referred to as tractor beams, for securing these units. Adicionalmente, the inclusion of sub-vehicle spawners facilitates the storage of drone units within the primary carrier blueprint. A practical approach to streamline this process involves the creation of an elevator, or a two-axis turret sub-component, to which both the docking stations and sub-vehicle spawners are affixed. Além disso, integrating a repair tentacle to maintain and repair your drones is crucial.
The advantage of employing a turret-based structure is its versatility. It allows for easy replication and placement onto various surfaces or objects. Além disso, when adjustments to the location of drone storage are required, a simple modification to the turret’s idle angle suffices.
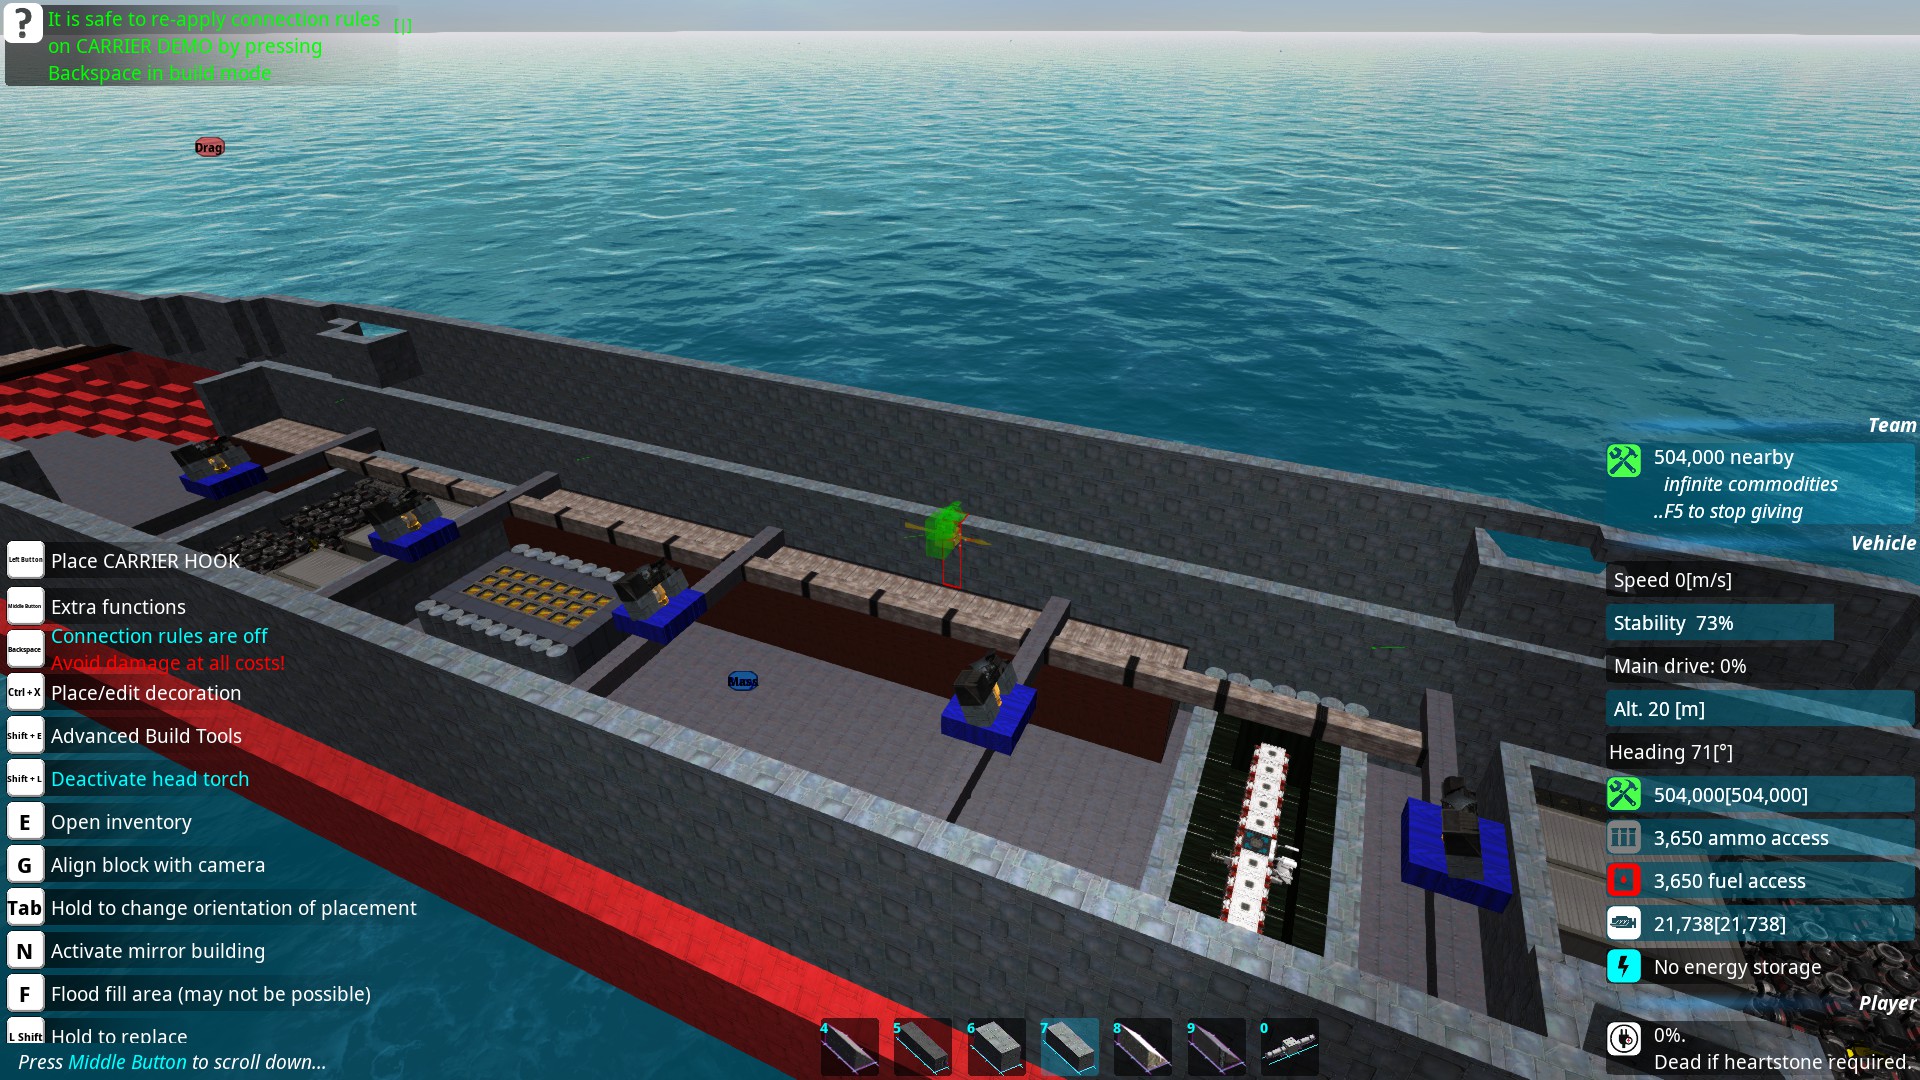
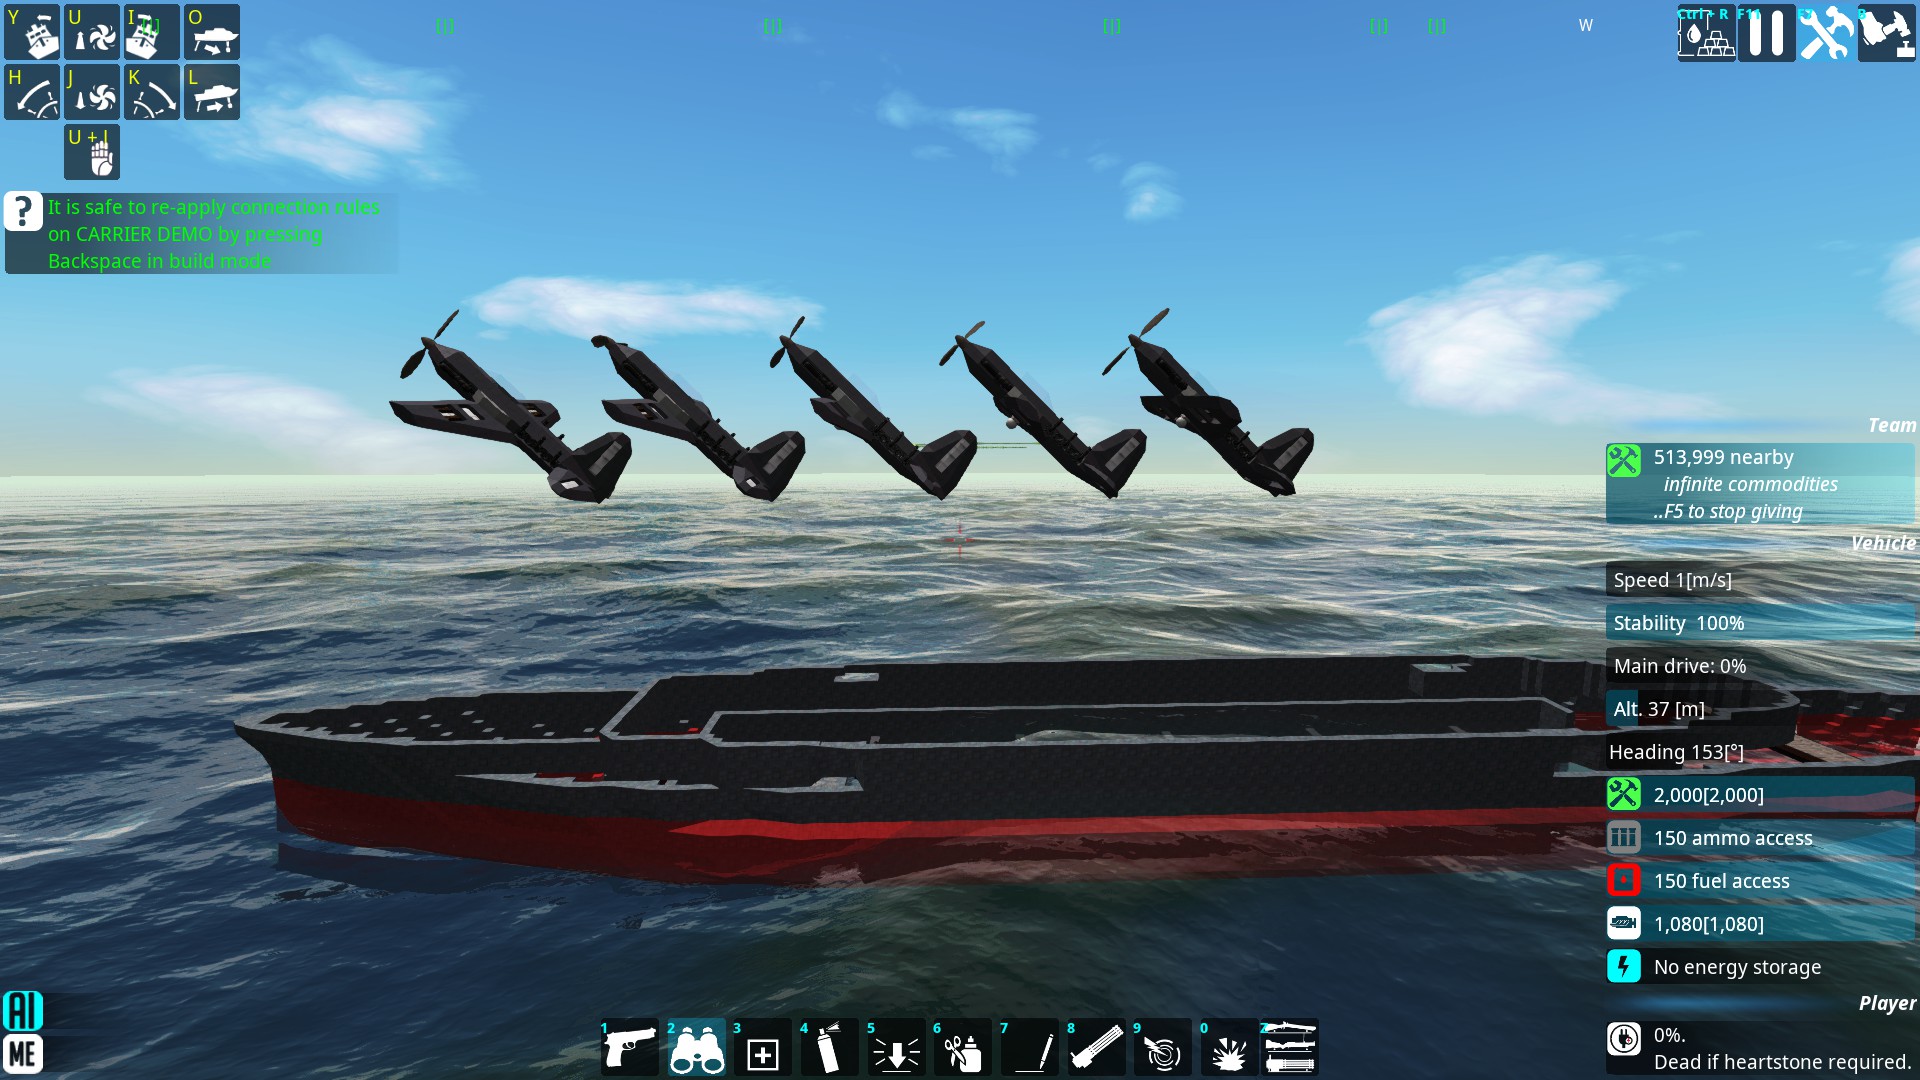
In the carrier I constructed for this guide, there are precisely five hooks, evenly distributed along the central axis of the hull.
Creating Drones
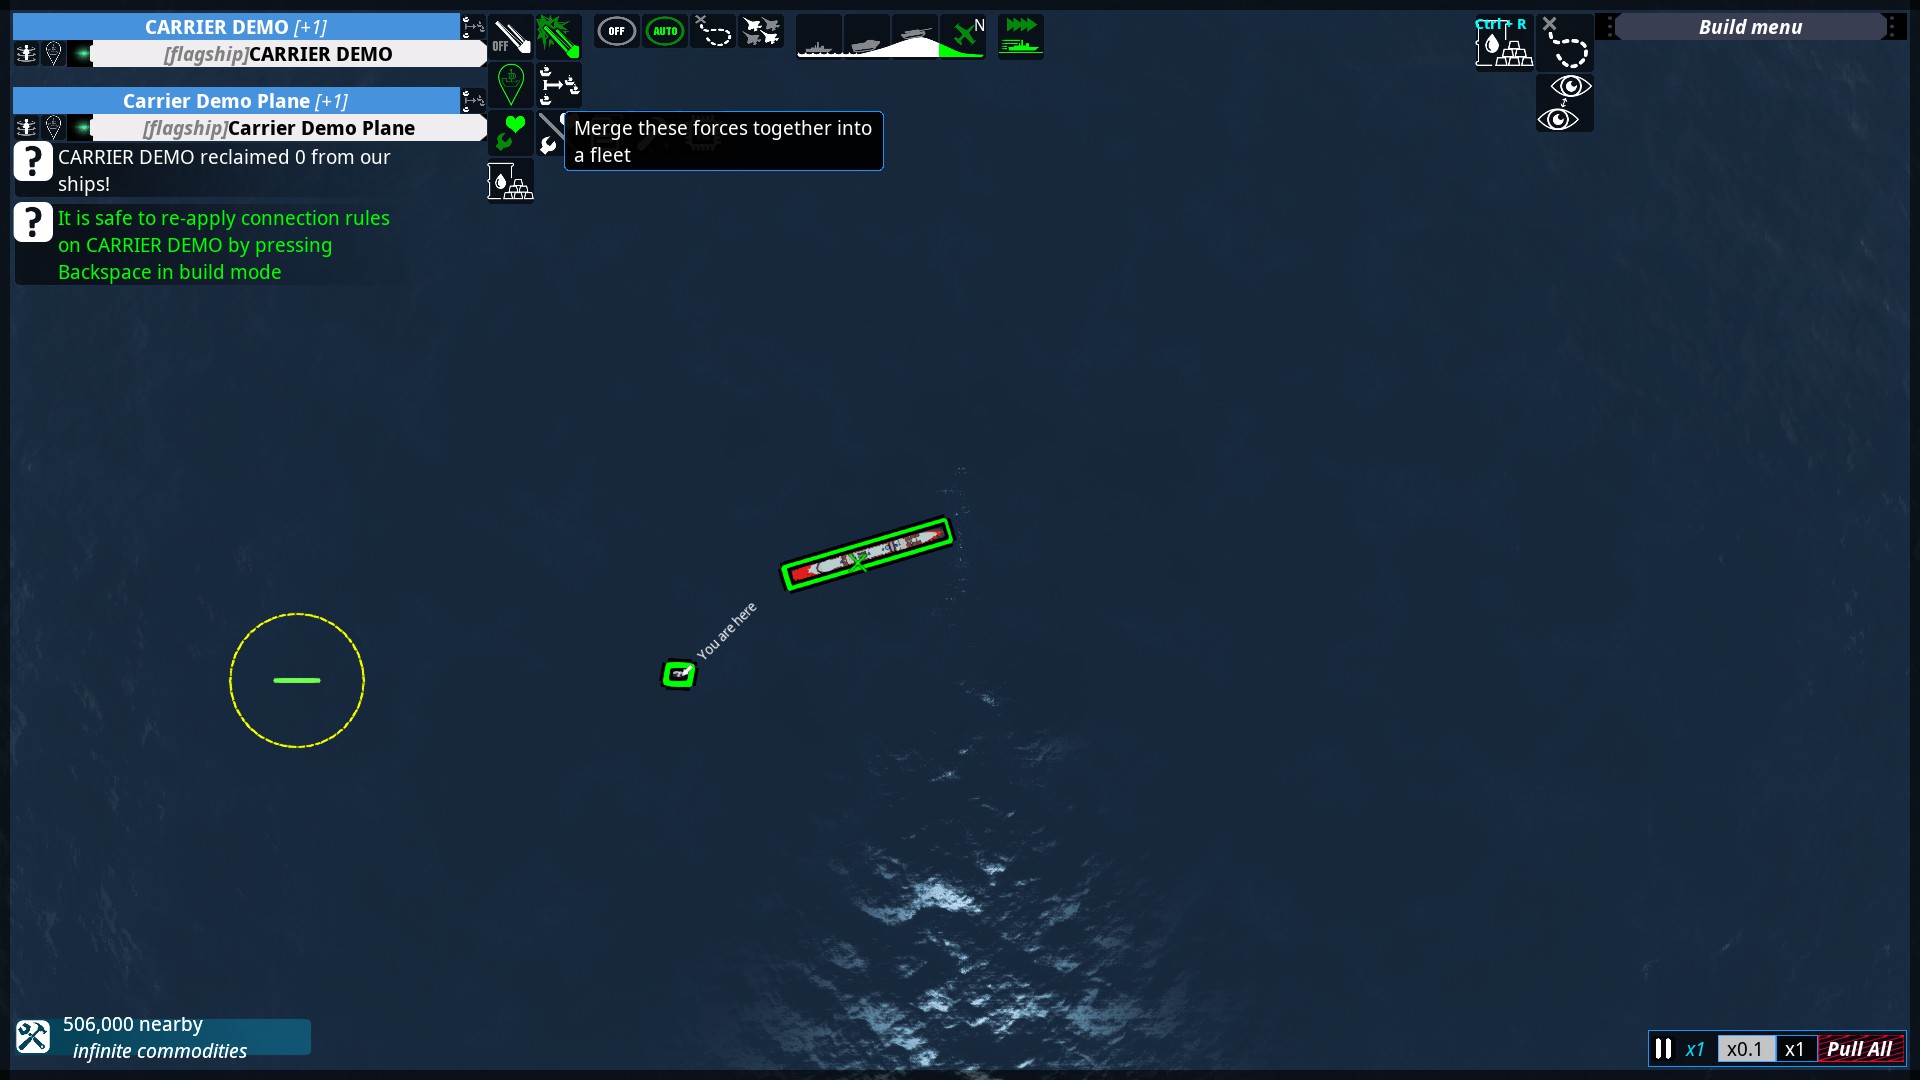
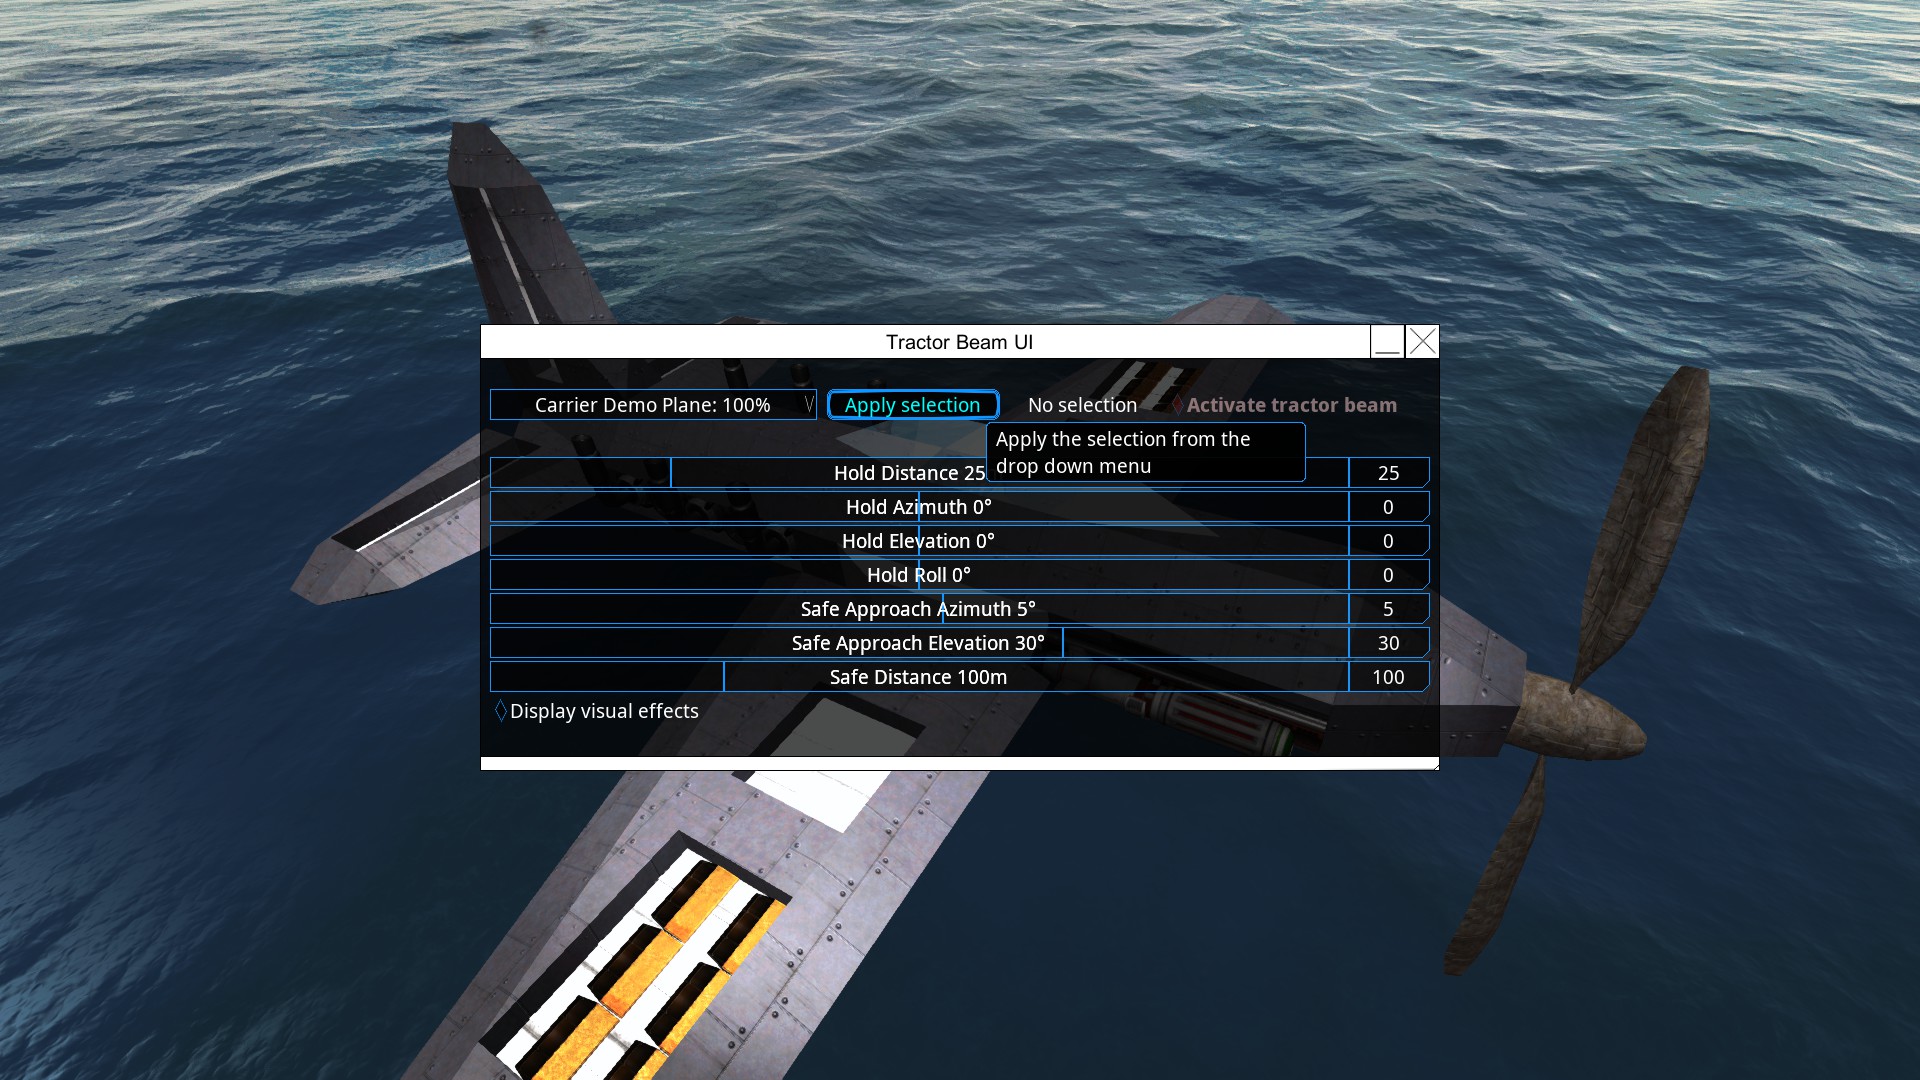
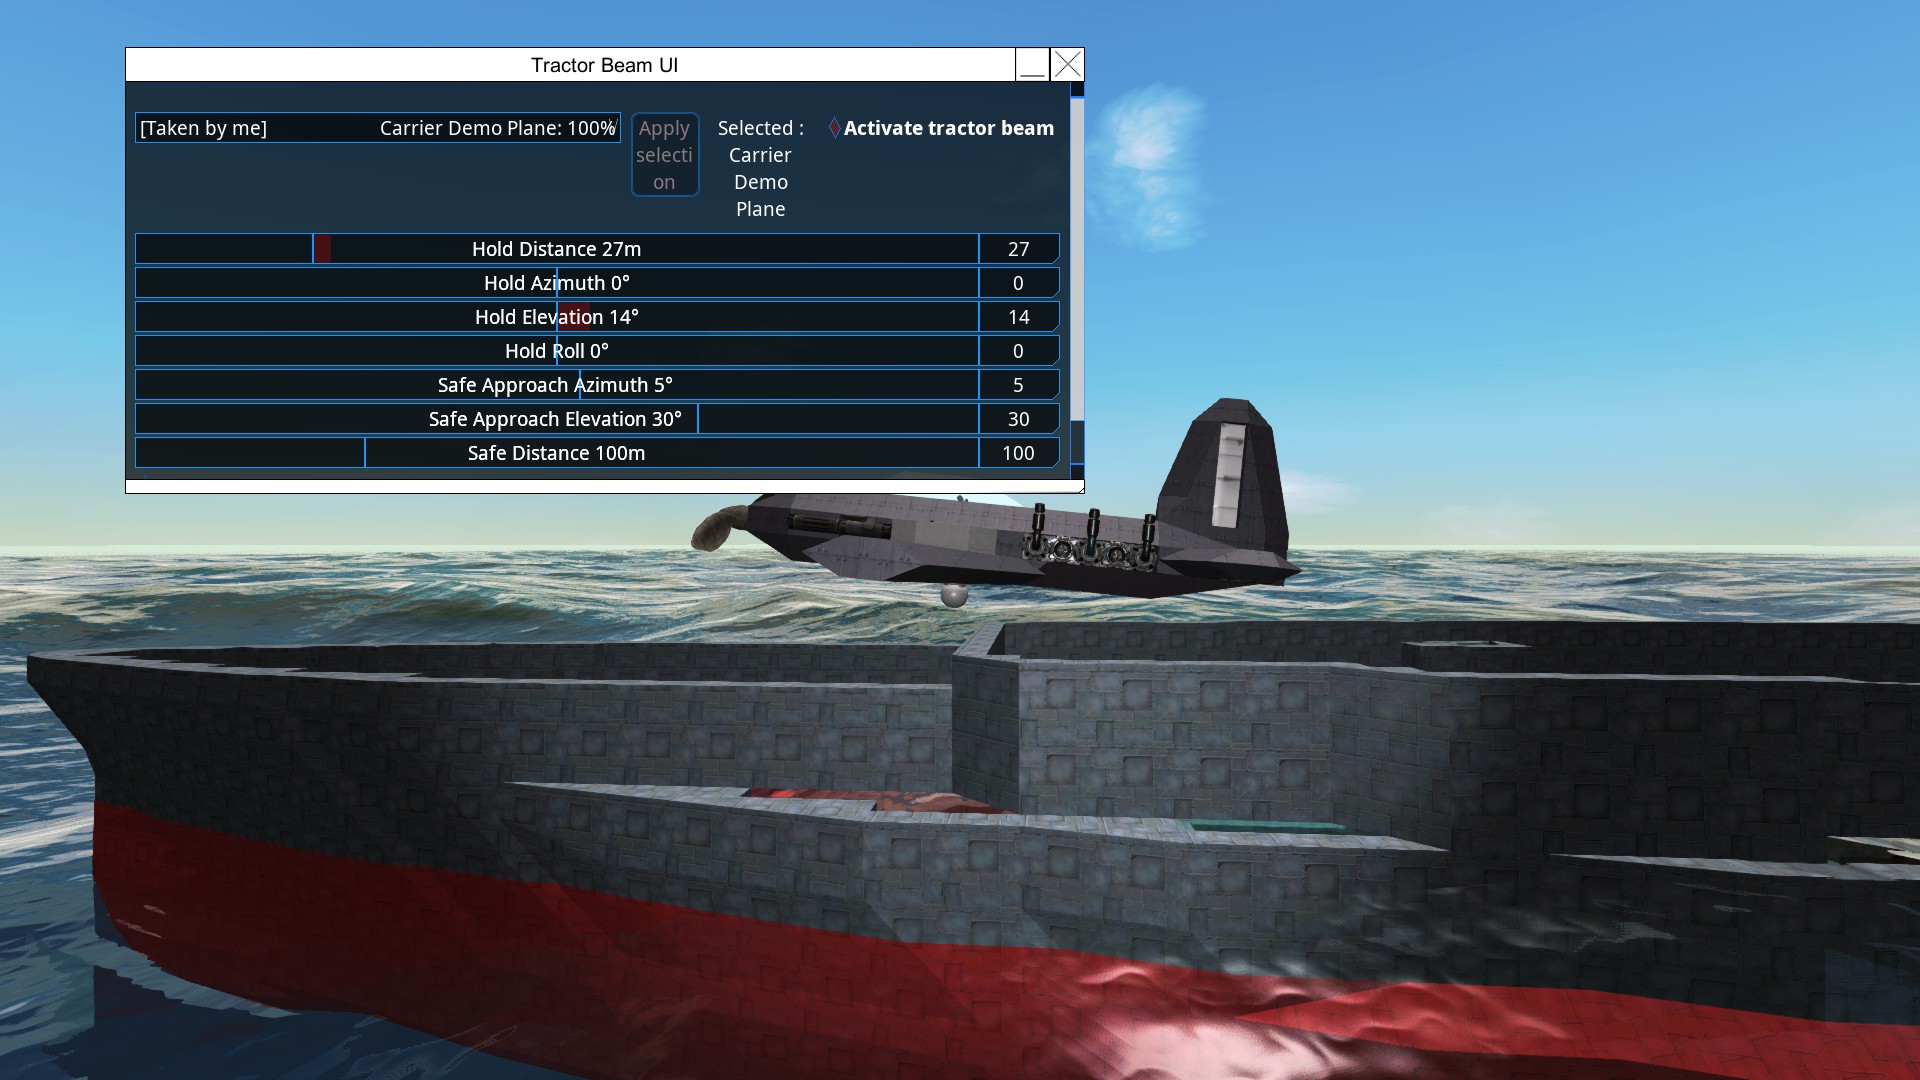
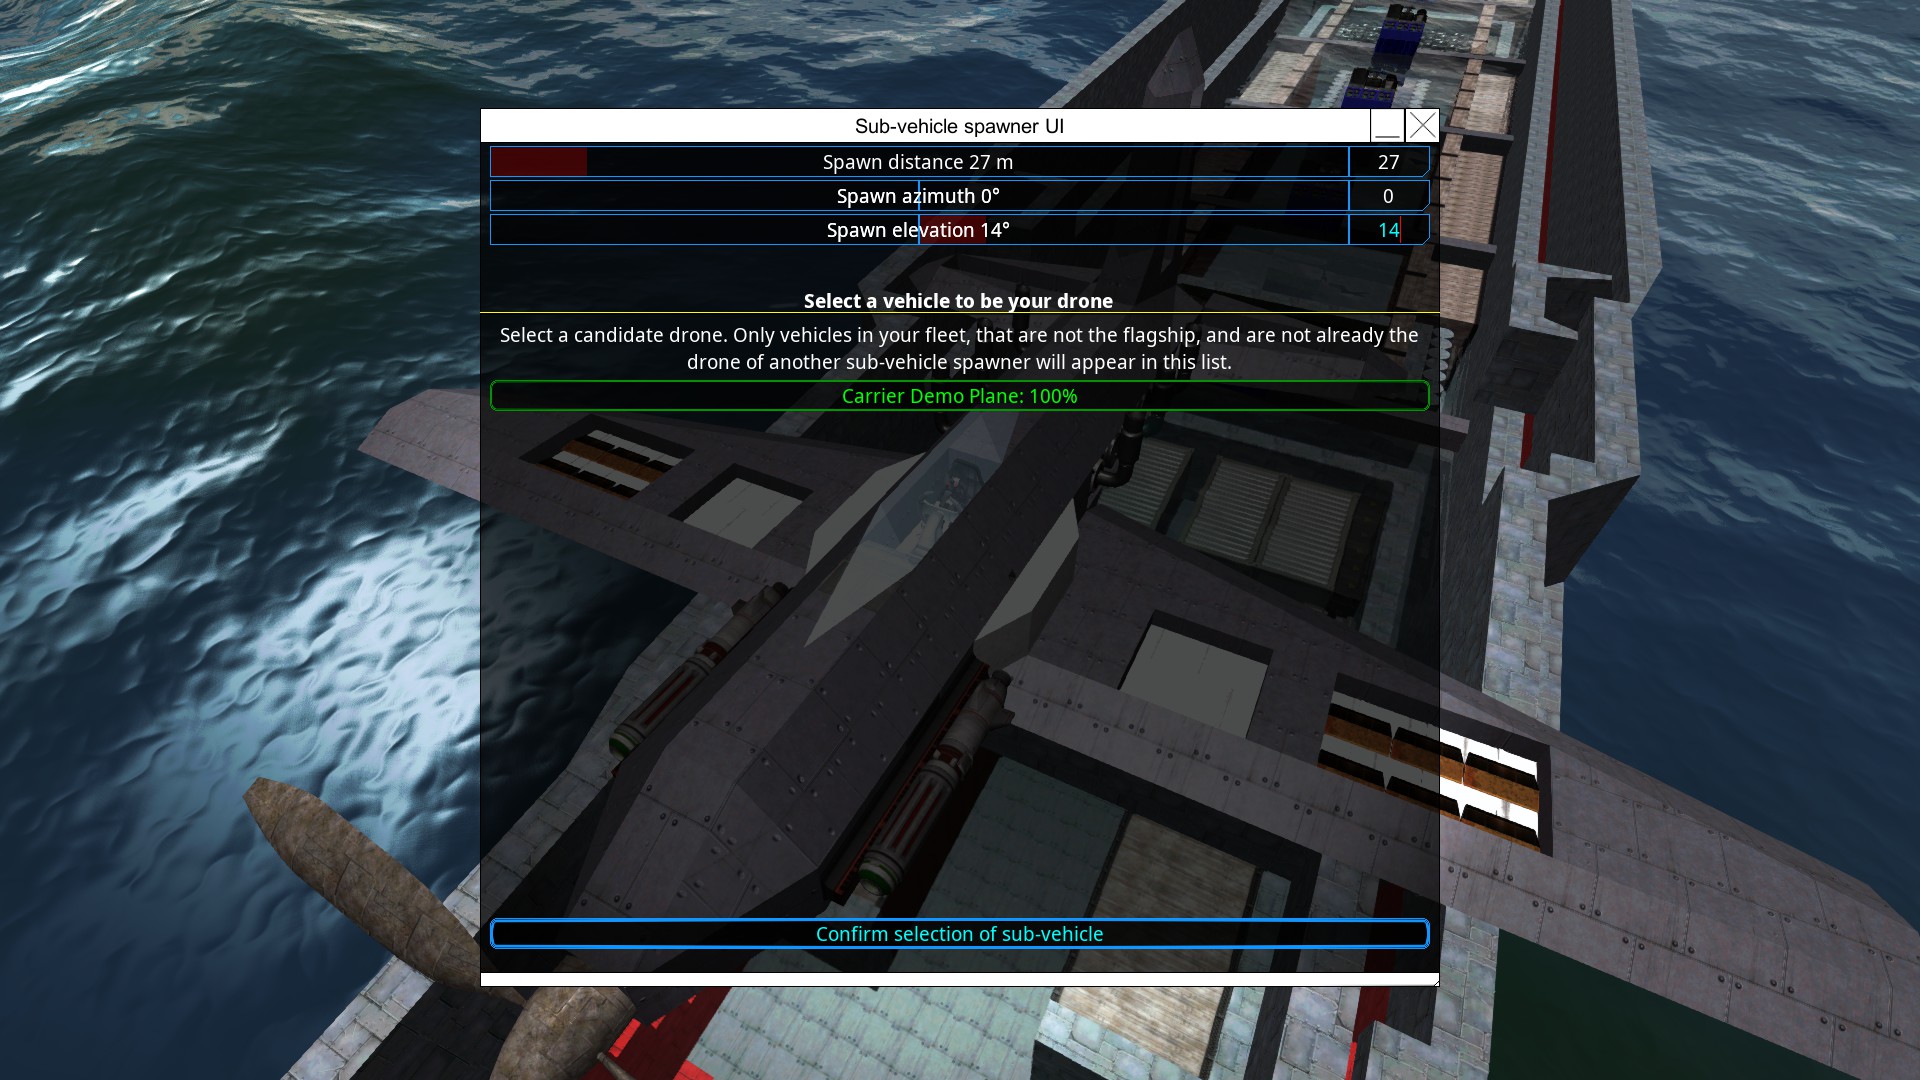
To transform your units into carrier drones, follow this step-by-step process. Primeiro, spawn each unit individually in close proximity to the carrier. Merge each unit with the carrier to form a fleet. Próximo, navigate to the designated hook, assign it to the tractor beam, and activate it. Determine the desired distance at which you want the unit to be held, and then input this distance into the spawning distance setting of the sub-vehicle spawner.
Finalmente, assign the unit to the sub-vehicle spawner. This procedure effectively stores the unit within the carrier; Contudo, please note that it won’t be saved as part of the sub-object, and you cannot directly duplicate a hook with drones already attached.
Fitting the Carrier
Although there might be an inclination to arrange and orient your planes meticulously on the flight deck for aesthetic purposes, this approach will severely limit your capacity and efficiency. Como exemplo, consider two planes positioned on hooks with a 16-meter separation. In this configuration, they tend to intersect, and had it not been for godmode, they would have suffered damage or even destruction.
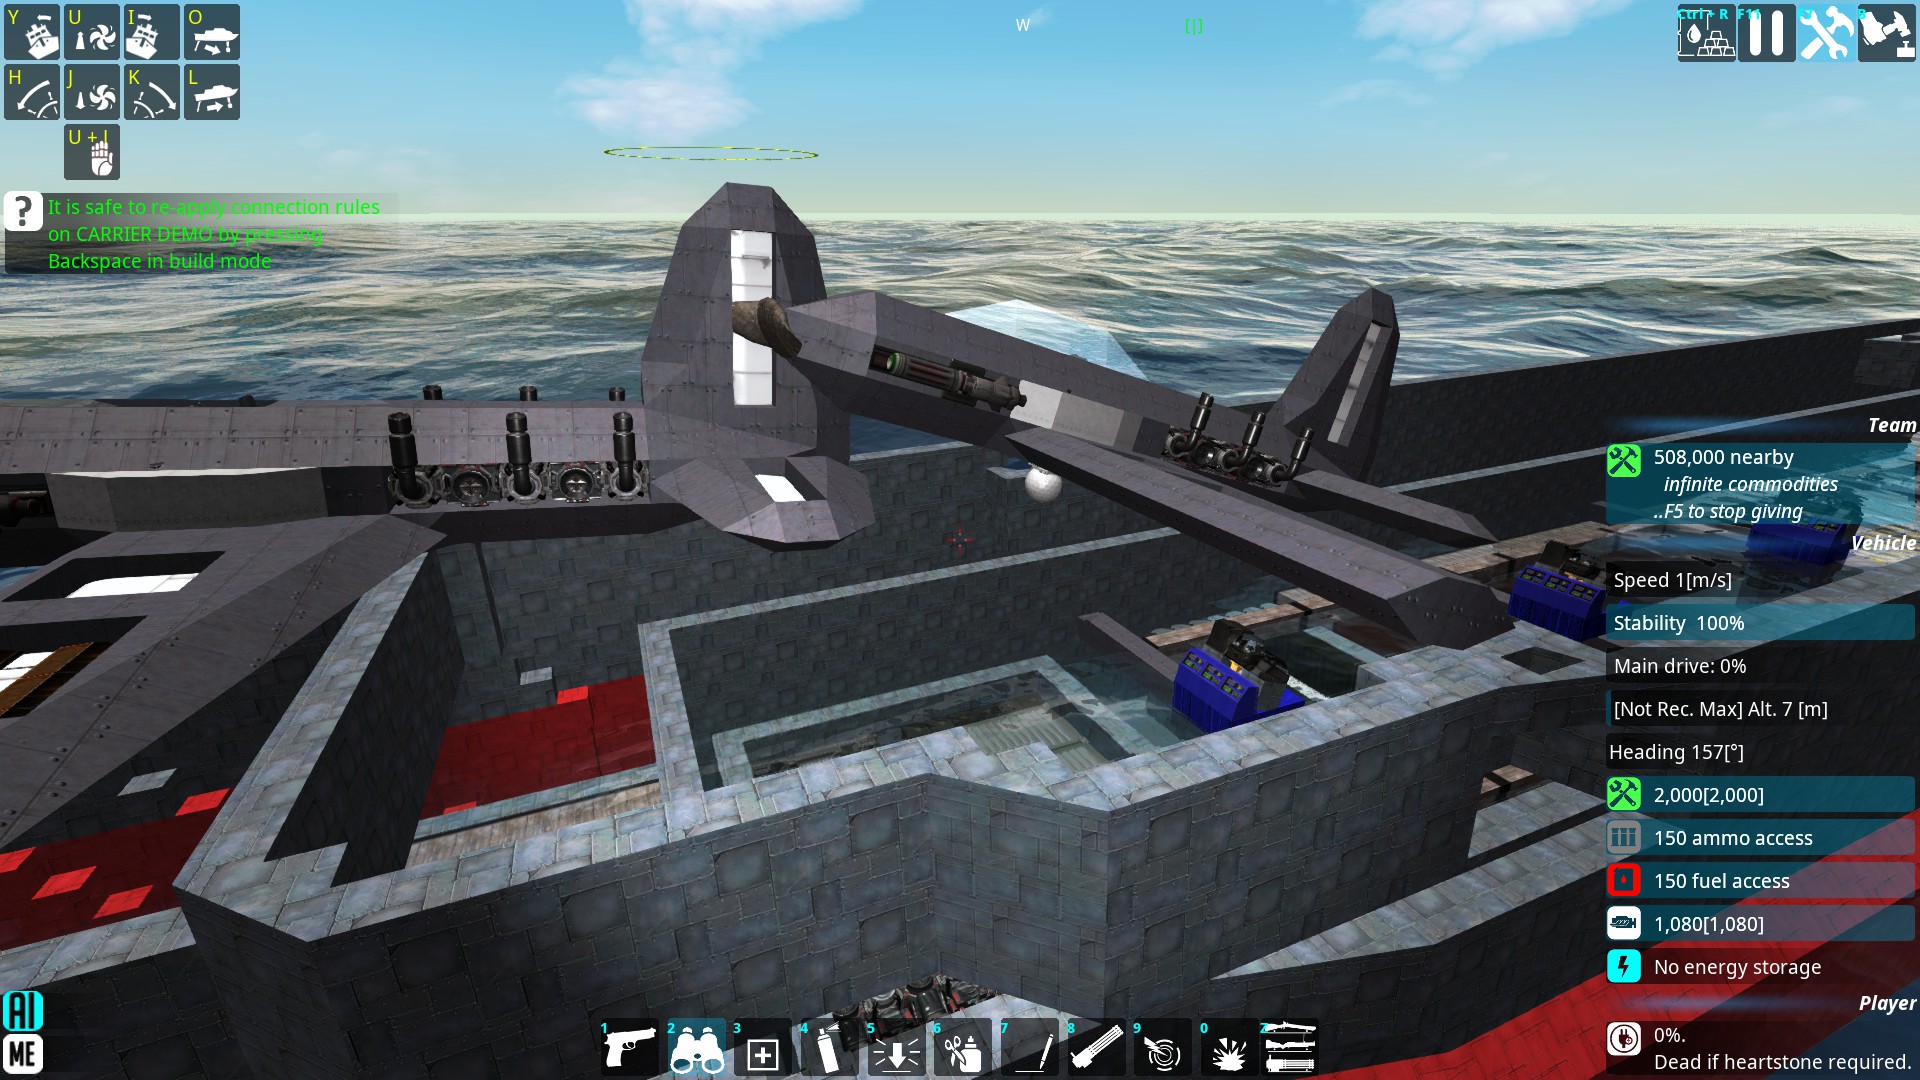
The purpose behind implementing carrier hooks is to optimize the storage of planes by positioning them at an angle. When planes are upright at an angle, their overall length is relatively reduced, allowing for a more efficient stacking arrangement. In this particular instance, the hooks are set at a 45-degree angle and spaced 16 meters apart to achieve this efficient storage configuration.
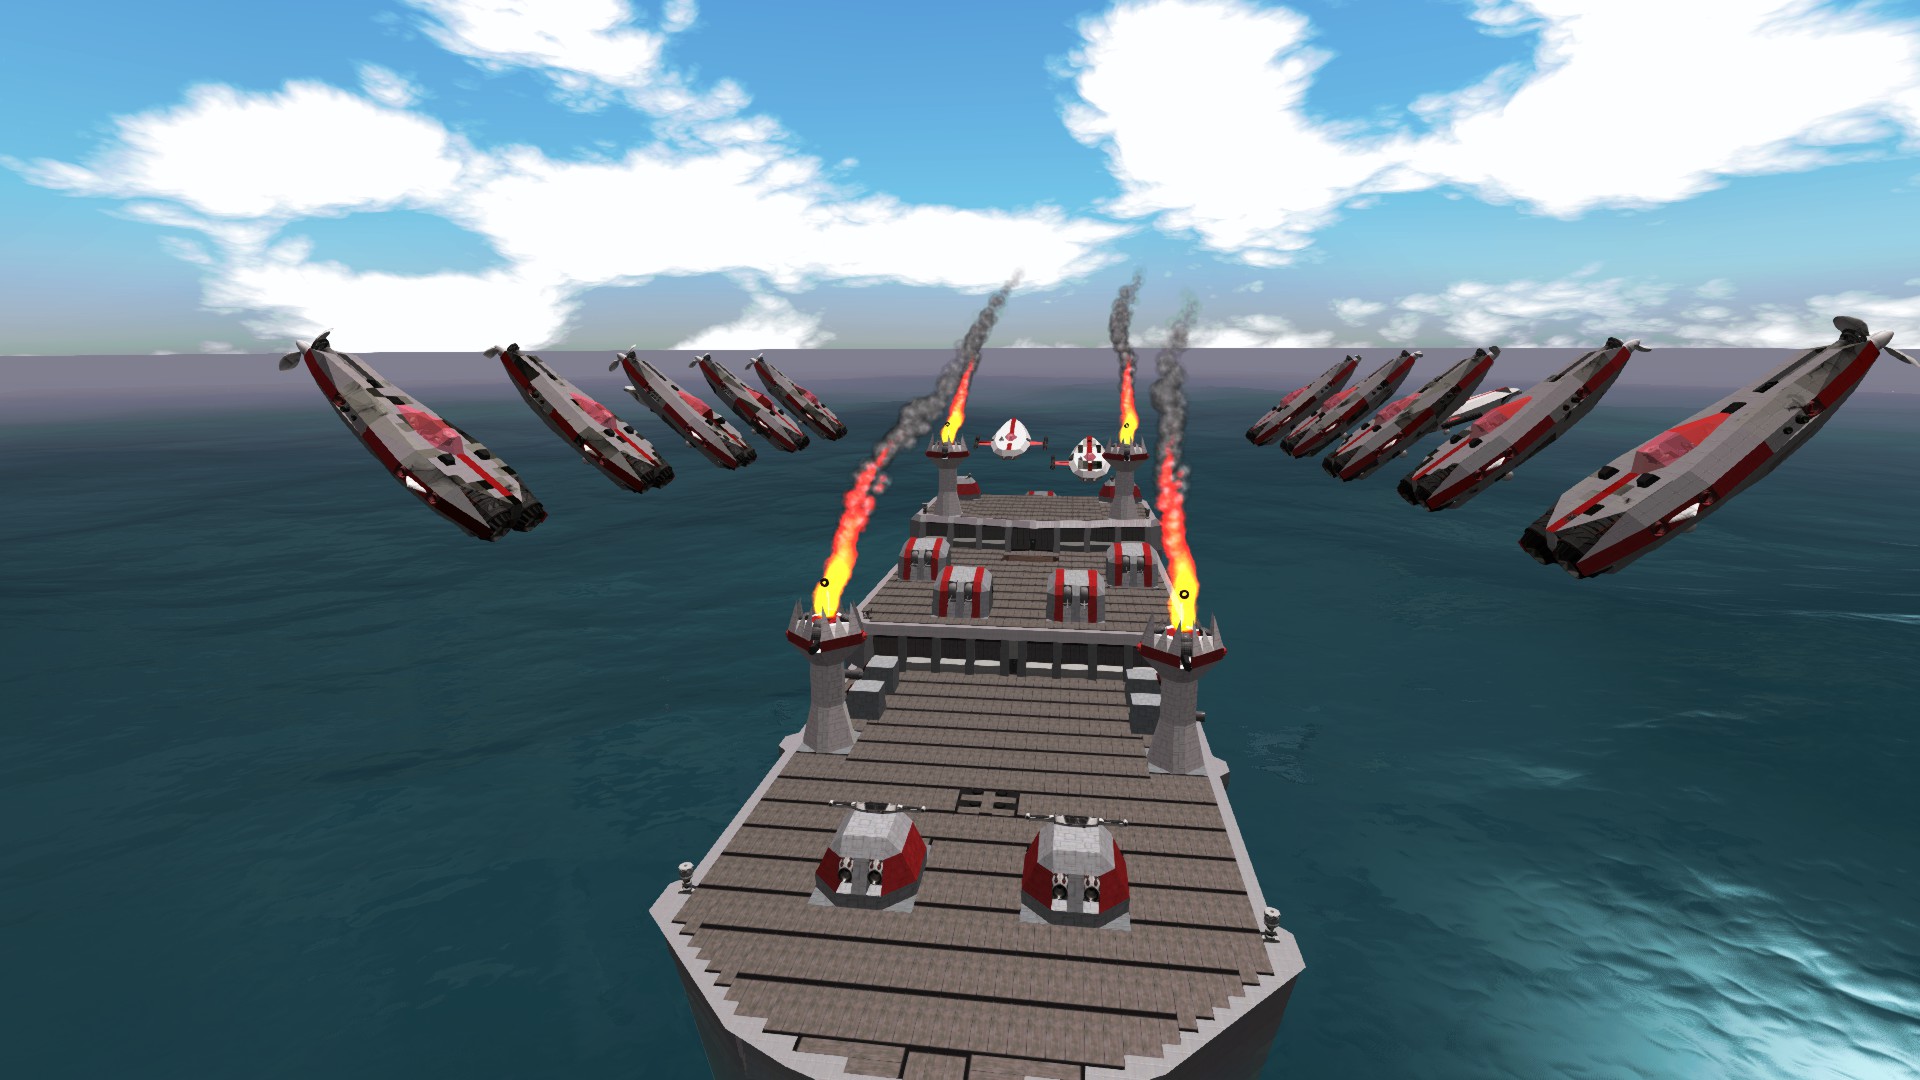
Another viable option for accommodating fighters on your carrier is to suspend them from the sides using outward-facing hooks, as illustrated in the example shown here.
The ACBs
To streamline the control of each hook, it’s advisable to use the renaming tool and adopt a standardized naming convention. Por exemplo, you can label them as “FDL1” for Flight Deck Left Spot 1.
Each hook requires three Autonomous Control Blocks (ACBs) for effective management. Placing these ACBs near their respective hooks, rather than the AI core, has advantages, such as quick access for renaming and troubleshooting in case of hook damage.
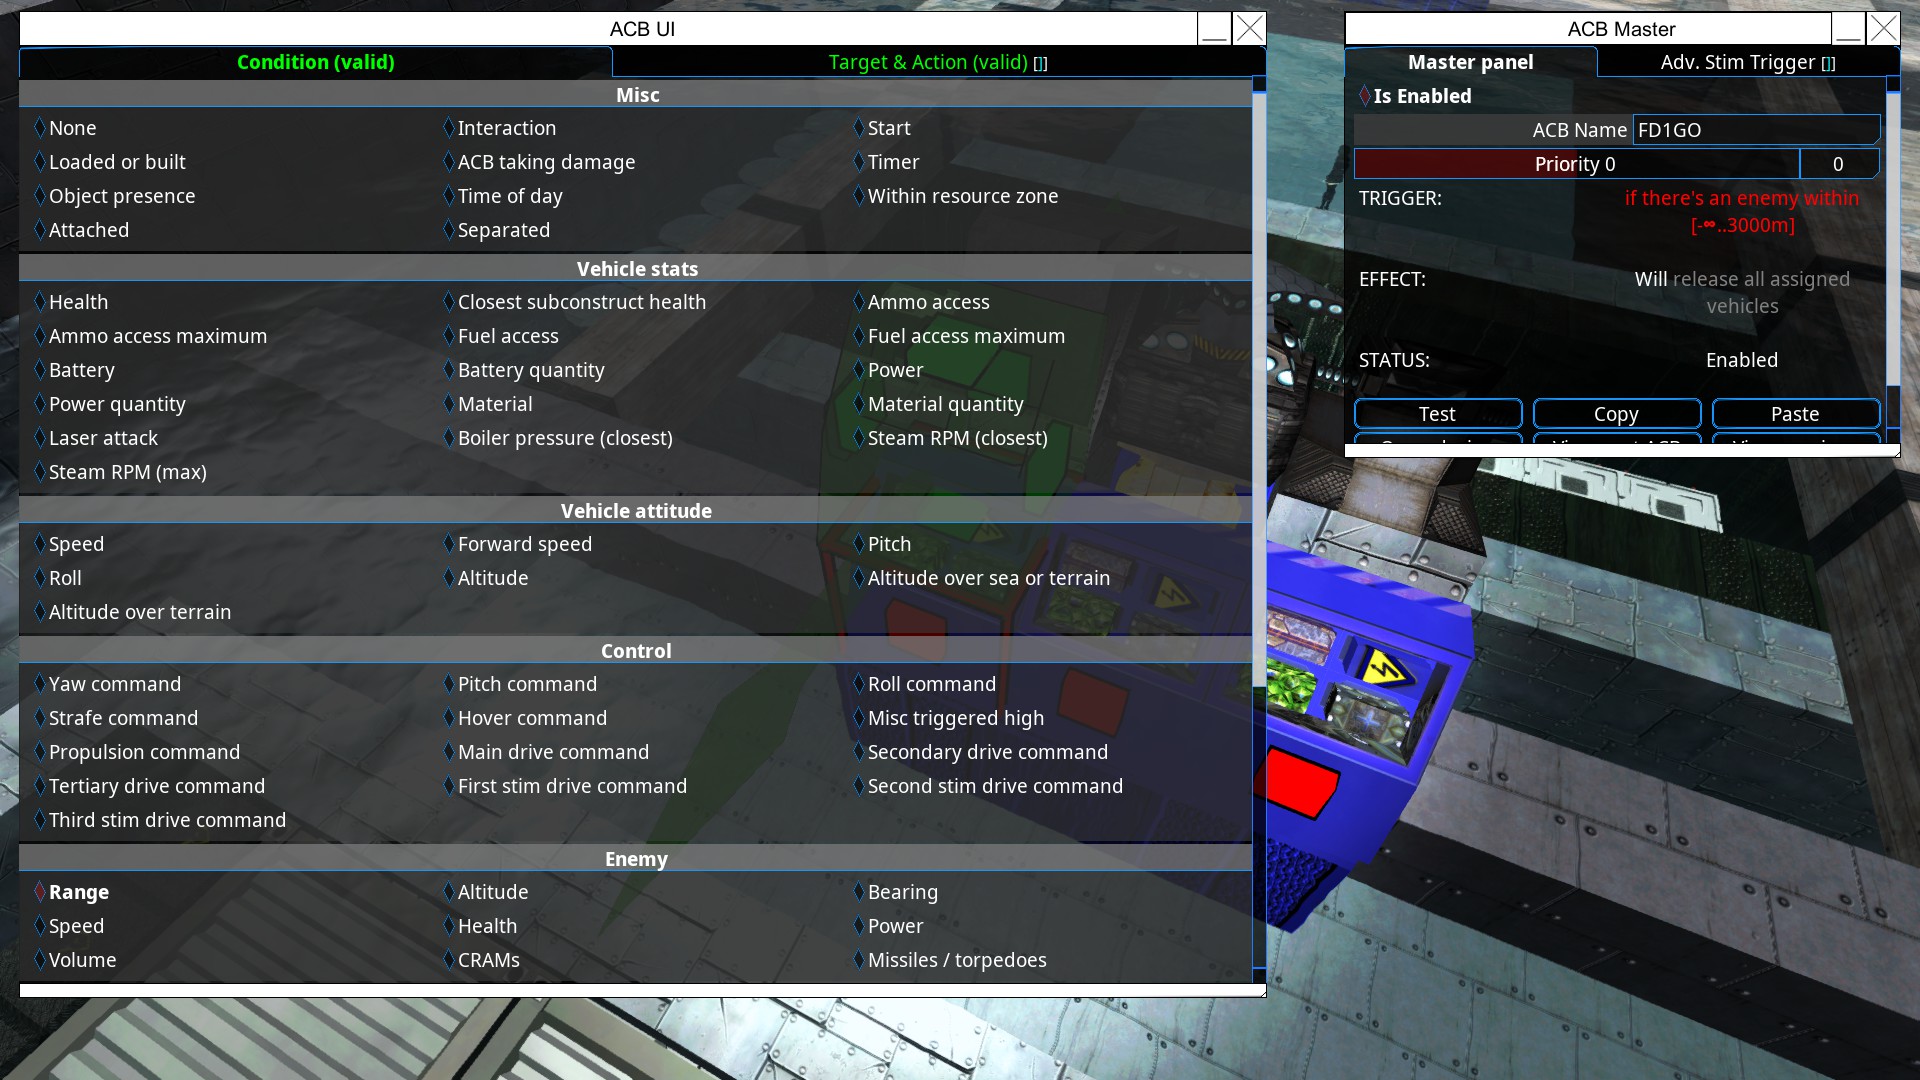
For ACB 1, configure it as follows: “if an enemy is within a 3km range, release all sub vehicles from the docking station.” Remember to apply target block filtering based on the docking station’s name and incorporate an appropriate delay effect depending on the hook’s position in the line. Por exemplo, the first hook should have an instant release, the second a 2-second delay, the third a 4-second delay, e assim por diante. Adicionalmente, assign a descriptive name to your ACB, como “FDL1GO,” as it is responsible for releasing the fighter and should be deactivated later to initiate the recall and repair of the craft during combat.
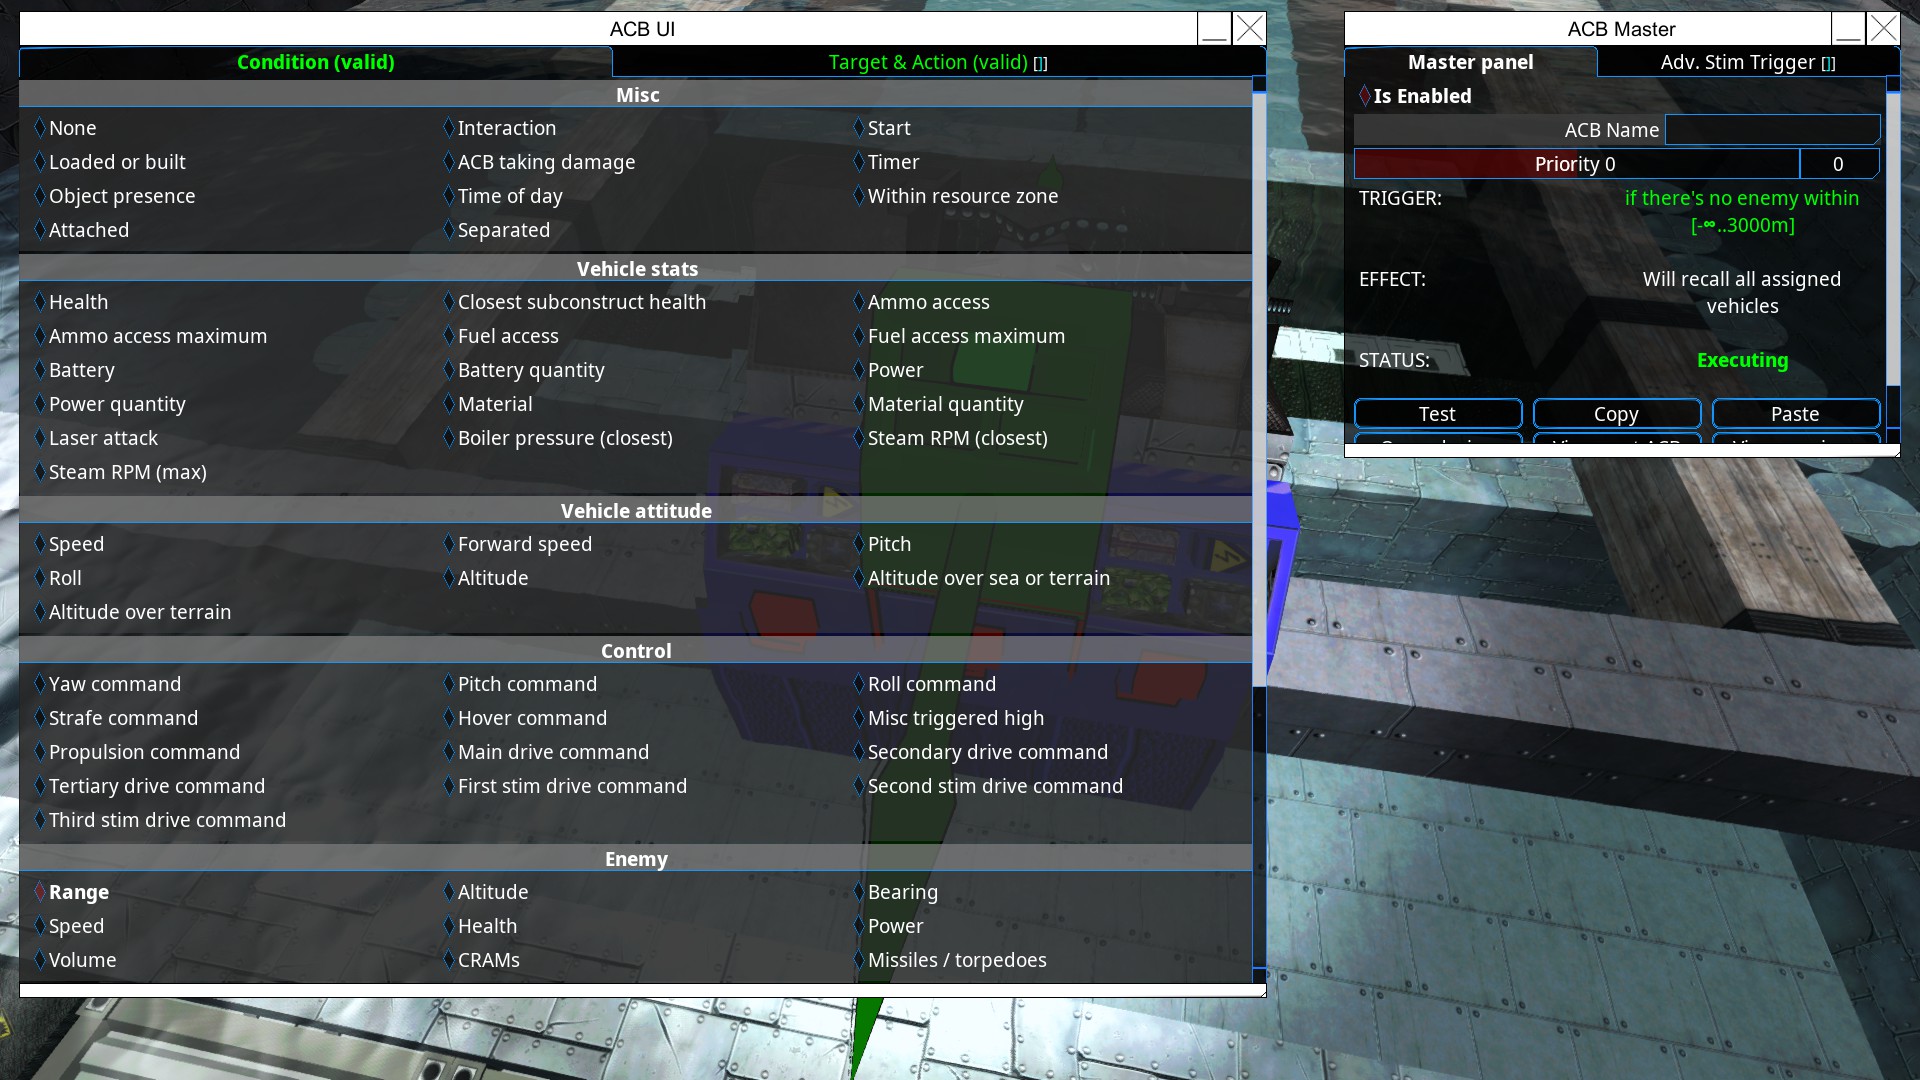
ACB 2 simplifies the process and doesn’t necessitate a distinct name. Configure it as follows: “if there are no enemies within range, initiate the recall of all sub vehicles from the docking station.” To prevent fighter collisions during recall, it’s a prudent practice to stagger the timing for the 2nd, 3terceiro, 4th hooks, e assim por diante, by introducing a 2-second delay.
ACB 3 presents a unique case. If you prefer not to implement automated repairs, you can safely disregard this ACB and the subsequent breadboard section. No entanto, it’s worth noting that automated repairs not only enhance functionality but also add a touch of sophistication and efficiency to your setup.
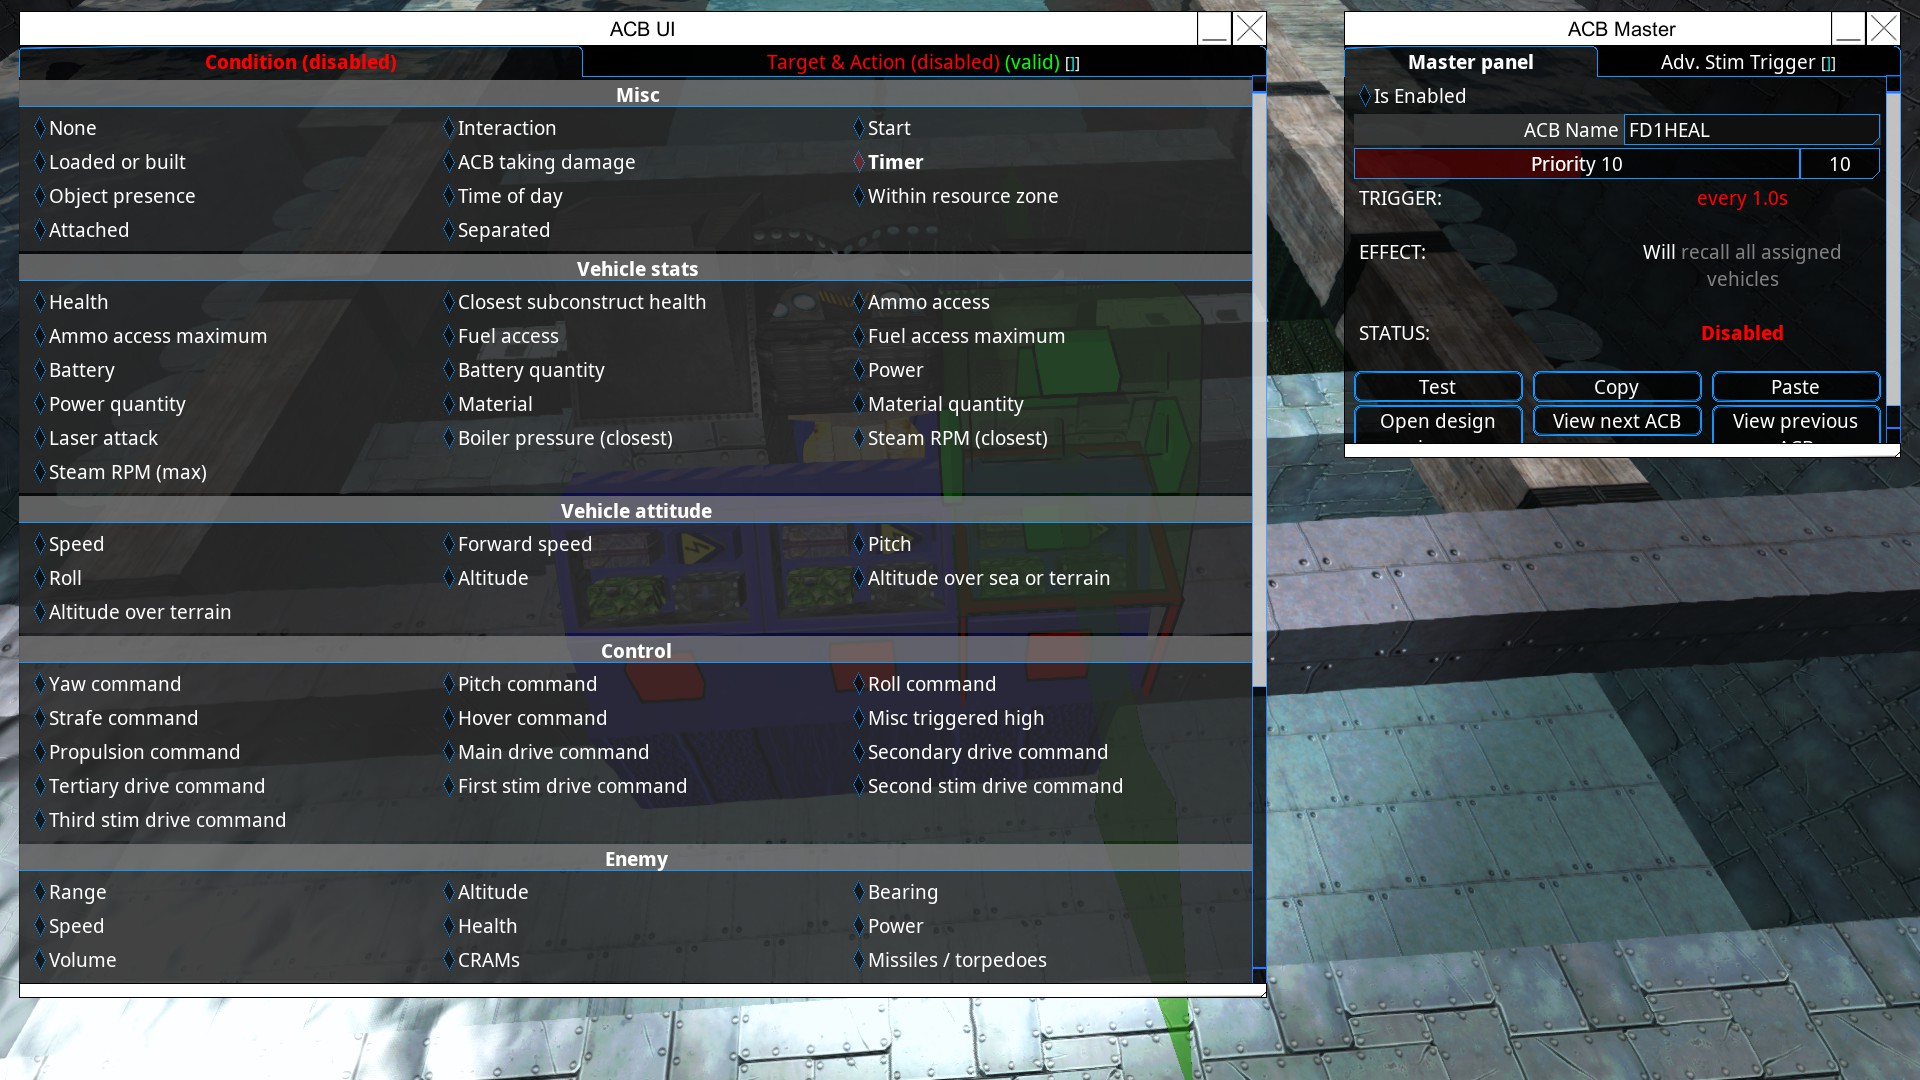
To configure ACB 3 for automated repairs, siga estas etapas:
- Disable ACB 3 inicialmente.
- Assign it a priority higher than that of ACB 1.
- Set a timer for 1 second to trigger the recall of all sub vehicles and target the appropriate fighter hook.
- For ease of breadboard control, give it a descriptive name like “FLD1HEALER.”
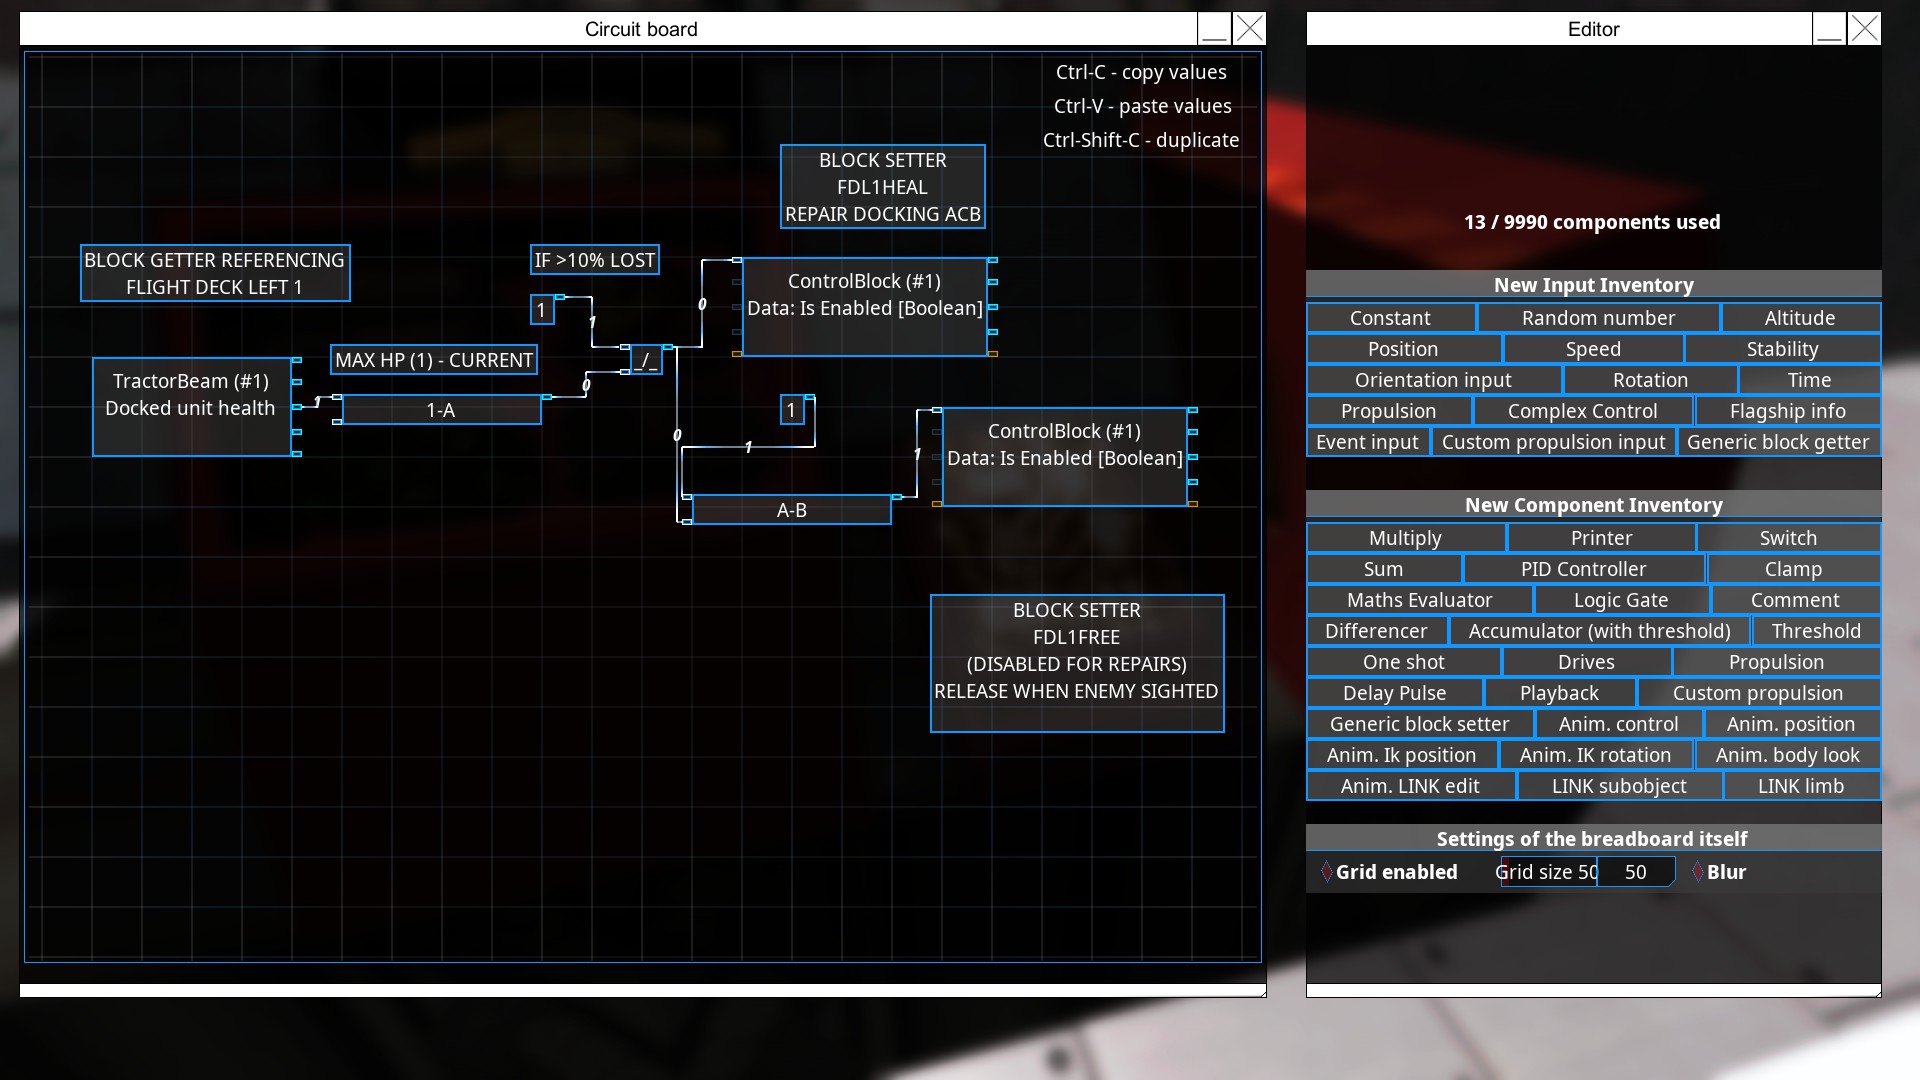
Creating the breadboard repair system involves a series of steps. Follow these instructions carefully:
- Selecione “Block Info GETTER” from the upper right options.
- Place the Block Info GETTER on the board.
- Select the Block Info GETTER.
- Change the target block type to Docking Station 1 (or 2m, depending on the one you used).
- Enter the name of your target hook, por exemplo, “FDL1 Flight Deck Left 1.”
- Change the data type to UNIT HEALTH (important, as this works when undocked too).
- Deselect the Block Info Getter.
- Create a “Math Evaluator” from the bottom right options.
- Place the Math Evaluator on the board, then select it.
- Change the expression to “1-A,” which represents one minus A.
- Exit the Math Evaluator.
- Click on the THIRD output of your Block Info Getter.
- Click the input for your Math Evaluator to link them.
- Create a SWITCH component from the right options and place it on the board.
- Create a CONSTANT component from the right options, placing it above your switch.
- Set the constant to 1.
- Connect constant 1 to the TOP INPUT of the switch.
- Connect the output of the MATH EVALUATOR as the second input on the switch.
- Click on the switch.
- Ensure its open value is set to 0.
- Set a Threshold value to determine when fighter repairs are initiated. Por exemplo, a value of 0.1 means repairs will occur at 90% health and below.
- Exit the switch.
- Create a GENERIC BLOCK SETTER from the BOTTOM RIGHT (not a GETTER).
- In this SETTER, target ACB 3, como “FDL1HEALER” or its respective name.
- Change the setter’s operation to ON/OFF BOOLEAN.
- Plug the switch from step 20 as the input.
Com essas etapas concluídas, your fighters will be recalled when their health is low. No entanto, ACB 1 (“FDL1GO”) still wants to send them into battle and must be disabled.
- Create a constant with a value of 1, placing it somewhere below the setter.
- Create another Math Evaluator near the constant.
- Set the Math Evaluator’s expression to A-B.
- Set constant 1 as the top input.
- Take the switch from step 26 as the second input for the Math Evaluator.
- Create another Generic Block SETTER.
- Target ACB 1, “FDL1GO.”
- Change the operation to ON/OFF BOOLEAN.
- Set the Math Evaluator from step 28 as the input.
Com essas etapas concluídas, your breadboard should control the recall ACB and disable the releaser as needed. When the craft is healed, it will disable the recall status and allow it to resume its mission.
Solução de problemas
When dealing with the intricacies of managing a carrier, numerous complications can arise. Portanto, rigorous testing is essential. While your carrier’s performance against Marauders may appear satisfactory, it’s crucial to assess its effectiveness against submarines, airships, and even distant space nuisances. Ensuring that your carrier possesses adequate repair resources and mechanisms to address fighter damage is paramount. De outra forma, your fighters might remain grounded due to minor damages inflicted by persistent flak gunfire.
Here are some key considerations:
- Preventing Fighter Collisions: If your fighters collide during launches or recalls, you should increase the time gap between launches and/or expand the distance between the units while they are held in place.
- Troubleshooting Launch Failures: When fighters fail to launch or be recalled, several issues may be at play. These include potential typographical errors in block naming, target path inaccuracies within the Automated Control Blocks (ACB), errors in the breadboard configuration, or damage to the ship itself, rendering the computer inoperative.
- Optimizing Repair Cycles: If your fighters return for repairs excessively or linger on the carrier for extended periods, consider increasing the number of repair tentacles. Adicionalmente, contemplate raising the threshold for acceptable damage taken. No entanto, exercise caution, as a 5% decrease in health may result from the AI being incapacitated, damage to the propeller, or engine malfunctions.
In managing a carrier, thorough testing and vigilant maintenance are imperative to ensure its functionality and combat readiness across various scenarios and adversaries.
Isso é tudo o que estamos compartilhando hoje para isso Das profundezas guia. Este guia foi originalmente criado e escrito por budisourdog. Caso não atualizemos este guia, você pode encontrar a atualização mais recente seguindo este link.