- Título: Forts
- Data de lançamento:
- Desenvolvedor:
- Editor:
Information about Forts is still incomplete. Por favor, ajude-nos a preencher os detalhes do jogo usando este formulário de contato.
This in depth guide explains how to create a campaign mod and campaign missions with custom dialogues and script.
What is a Fort custom campaign
The first thing to note is that the campaign published through the workshop do not have access to all the features official campaigns have. Custom campaigns can’t have a world map or save specific information for later use.
Na verdade, a Forts custom campaign can be described as a list of map (missões) player will go through in order, having to win each mission to play the next one and without the possibility to go back to an earlier mission.
Still this system allows to create extremely rich campaigns by giving campaign creator a lot of freedom inside maps deliver an original experience.
Structure of a workshop campaign
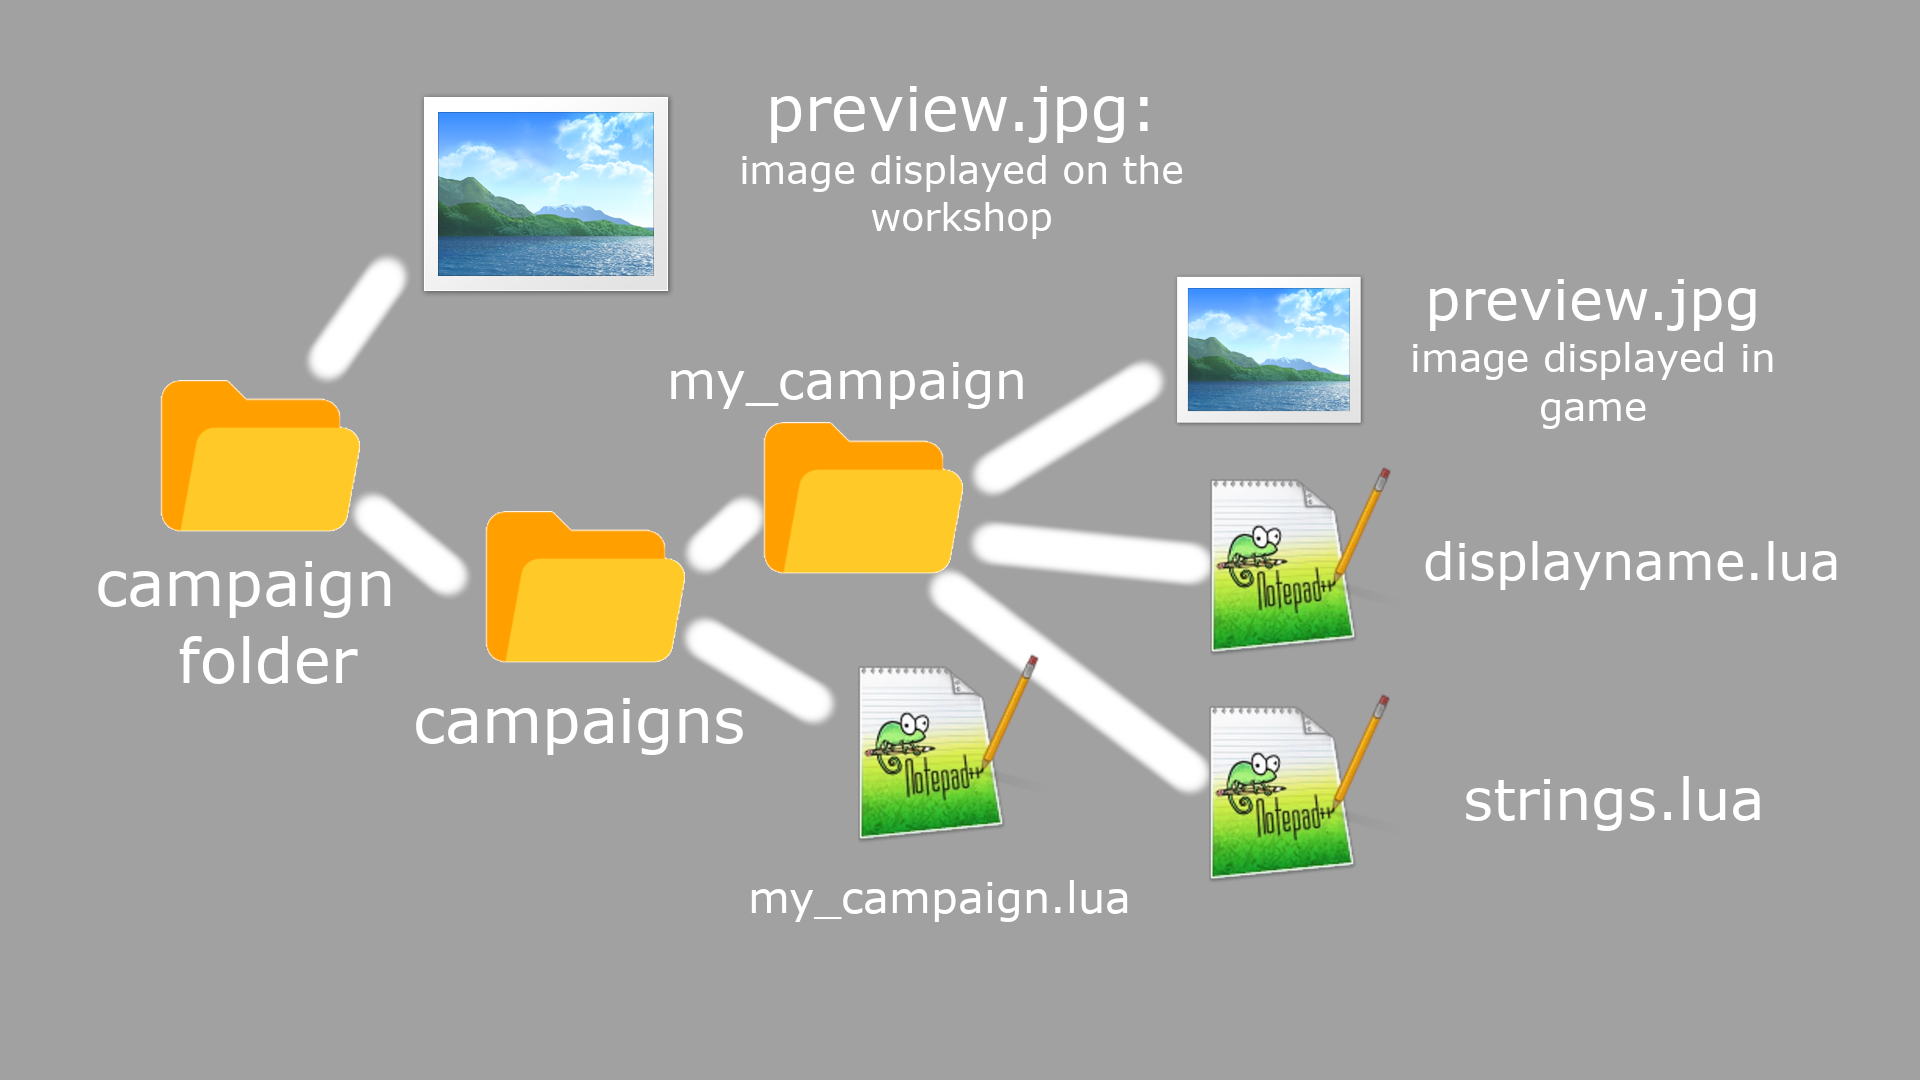
Here is an illustration of all the files expected by the game and their structure. You can replace my_campaign by the name of your own campaign as long as the folder and the .lua file share the same name. Publishing a campaign is done like publishing a mod, place the campaign folder in the mods folder found in Forts files then go to the workshop tab in the main menu, select the upload tab, select your campaign and publish it.
displayname.lua and strings.lua
These files contain the name of the campaign used by the game in the campaign menu.
displayname.lua has a similar content to the one found in mods:
DisplayName =
{
    ['English'] = L"My campaign",
}
You can add more lines for different languages so you campaign displays the right name according the the language of the player’s game.
strings.lua has a similar content:
Page =
{
    Name = L"My campaign",
}
On top of the files already described two files named publishedfileid.lua and itemversion.lua will be added by the game when the campaign is published, these files track the associated steam workshop item as well as the current version of the campaign to track updates.
The campaign script
Now a bit more detail on the last and most important file in the campaign: the campaign script (my_campaign.lua in the illustration).
Habilitado = verdadeiro
Campaign =
{
— Each line is of the following form. Everything is optional except for Map as in this example (AI is disabled unless assigned a specific fort, aleatório, or empty).
— A shared prefab AI fort can be used e.g. AIShared = “ai/forts/vanilla/long/fort-t2f1-Template-1.lua”
— { Map = “Mission 101”, Structure = “Mission 101”, Mission = “Mission 101”, AI = “fort-t2-Mission 101-1”, Easy = 0, Normal = 0.5, Hard = 1, },
{ Map = “1371272178”, AI = “fort-t2f1-DemoMission1-1” }, — Terreno elevado
{ Map = “1371272372”, AI = “aleatório”, }, — Double Team
{ Map = “1371272592”, AI = “vazio” }, — Bunker Buster
}
Here is the campaign script from the demo campaign published by the developers to show how to create a campaign.
The campaign table contains the list of all maps to play in the campaign, their order as well as information regarding the parameters of the AI for the mission.
In a line:
Map tells the game which map to play in the mission, the value is the name of the map (for a map in the base game) or the id of the steam workshop item for a map published on the workshop. The steam id of the map can be found in the publishedfileid.lua in the map folder or in the url of the item on the steam workshop (exemplo: https://steamcommunity.com/sharedfiles/filedetails/?id=1559334031 with the id being the part after the id=).
AI tells the game which recorded ai base should be used. If this parameter is not present in the line the AI won’t be active in the mission. The parameter can be used in three way: if it’s the name of an AI file in the map (without the .lua) then this recorded AI base will be used for the mission. Se isso’s set to empty, the AI will be active but without any build instruction (it rebuilds the starting base). Se isso’s set to random then all bases controlled by an AI will select a random build instruction file in the map (acts as empty if no recorded file).
Please note that by default the player is controlling side 1 and the AI side 2 in coop mod. If you want side 2 to be in team deathmatch mode (ie one independent AI in each base) use the random option and specify forts order in the mission script of the map (see the map making guide for more information)
Overview of the Map Mission script
As was already explained in the previous sections, the campaign mod itself barely contains anything about the content of the campaign missions and everything happens in the maps themselves. Here is a visual explanation of the content of a newly created map and the purpose of each file:
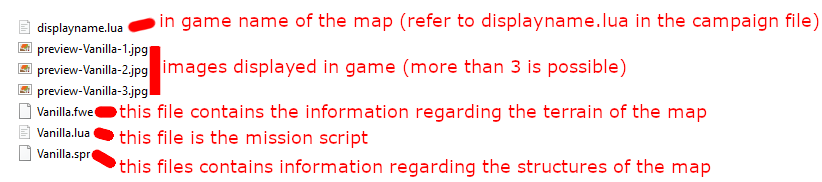
Once the map is published publishedfileid.lua and itemversion.lua will be added like a campaign. The file discussed in this section is the mission script with a generic name yourmapname.lua (Vanilla.lua in the example). For a campaign mission, this file will usually contain at the top a few variables telling the game to adjust several options when the map is played like the mods to use in the mission. Após esta seção, information regarding the dialogue to play and for the rest lua code to define when and how to use dialogues as well as more code to create mission specific scripted events or mechanics. Nesta parte do guia, você’ll find explanation about the options you can adjust through the mission script and following part will detail how to create dialogues or scripted events.
Your maps are located in the maps folder of Forts files. If you have no idea where to find it, Forts provides a way to open your map files by going to the workshop tab in the main menu, selecting the upload tab, selecting your map in the map list then clicking the rectangle with an arrow button under the map preview. This should open your file explorer at the right location, displaying files similar to the example above.
Manage mods
Managing the mod to use in the campaign is a bit specific indeed, unlike when you create your own lobby no game extension will be active by default which means players won’t be able to use any related weapons. This section can also be useful outside of campaign creation since direct edition of the mission script is the only way to change mods in the map after it’s created.
The game was expended quite a bit since release with the ton of gun free expansion, the moonshot dlc and the high sea dlc. O que’s more the balance of the original campaign is also very different from the state of the game today.
Fort both reasons you’re probably going to want to enable some base game mods in your campaign. Currently this has to be done for every individual mission. You can add some mods at map creation but not all of them.
-- Insert mods here, por exemplo. Mods = { "shortrange", "rapidfire" }
Mods = {}
Se você não’t select any mod when creating the map this section will be at the top of the mission script. Any mod selected when creating the map will be added to the mods list. In the mods list, add all the names of the mods (default or workshop mod) you want to use in the mission in quotes (separated by comas). For mods in the base game, the name is the name of the mod folder, for workshop mods the id of the mod should be used (you can get it with the same methods as maps).
Useful base game content mods:
- “weapon_pack”: this mod activates the free ton of gun expansion
- “repair_station”: this mod adds the repair station device
- “dlc1_weapons_skirmish”: this mods adds moonshot weapons with multiplayer balance
- “dlc1_portal_skirmish”: this mods adds portals with multiplayer balance
- “dlc1”: this mods adds all moonshot content including material like barriers and blastdoors
Balance mods:
- “skirmish”: adds multiplayer balance to vanilla content (ex: swarm missile build cost of 500 metal while it’é 700 metal in the campaign)
- “weapon_pack_skirmish”: adds multiplayer balance to ton of guns weapons (ex: uniform spread on shotguns)
The downside of the current system is that enabling a dlc mods in your map will force the map and by extension de whole campaign to require the dlc. This means you may have to publish several version of your campaign even if you don’t use dlc feature so player can use dlc weapons in campaign missions while not preventing people without the dlc to play your campaign.
Change default faction sprite
By default when no commander is used (which is what happens in campaign or sandbox), lado 1 weapons use the Eagle Empire appearance and side 2 weapons use the Dragon Army appearance. You may want to change it and it’s possible through the mission script.
-- Change default faction to fit the script
Factions = { Team1 = "BPO", Team2 = "CF" }
Adding this to your mission script will change side 1 base weapons appearance to BPO style and side 2 to Coalition style.
Possible styles are:
- “” (leave string empty): Eagle Empire
- “Asia”: Dragon Army
- “Rússia”: Iron Bear Alliance
- “CF”: Coalizão
If you have already modded Forts you may notice the names match the name of the different faction mods with Eagle Empire being the base style for all weapons.
Disable auto anti-air
--Remove auto-antiair for the mission
DisableHumanAssist = true
Adding this section to your mission script will disable auto-anti-air in your mission and force the player to shoot down projectile by manually using weapons.
Choose in which game mode your map can be played
-- Determines where the map will show up
Sandbox = true
Skirmish = false
Multiplayer = false
These three variable define if the map can be selected in sandbox, skirmish and multiplayer. true means the map will show up in the map selection list for the game mode, false it won’t be in the list. Considering you’ll design your maps as campaign missions they may be broken or not fun to play outside of campaign so you may want to choose to hide them from multiplayer or skirmish for example.
Continue reading the full guide aqui.
Isso é tudo o que estamos compartilhando hoje para isso Forts guia. Este guia foi originalmente criado e escrito por Thonio. Caso não atualizemos este guia, você pode encontrar a atualização mais recente seguindo este link.