- Título: Gerente de futebol 2023
- Data de lançamento:
- Desenvolvedor:
- Editor:
Informações sobre Football Manager 2023 ainda está incompleto. Por favor, ajude-nos a preencher os detalhes do jogo usando este formulário de contato.
Do you find it frustrating to constantly come across the same unattractive regenerated faces? Are you looking for a way to change them, but find the options in the new regen facepack limited or too space-consuming to download? Bem, você está com sorte! With the advent of Artificial Intelligence in the realm of the internet, you now have the ability to create your own regenerated faces. Artificial Intelligence can generate customized regen faces according to your preferences.
To embark on this journey, you will need a few prerequisites:
- A web browser
- An active email address (required for registration on an AI art-producing website, especially if you plan to modify numerous regen faces)
- Snipping tool
- FM XML (only necessary if you are already proficient in creating logo/kit/facepacks; de outra forma, it can be omitted)
Programs highly recommended for optimal experience:
- FM Genie Scout: I highly recommend obtaining this program, as it is free to use. It provides a superior method for searching and obtaining unique player IDs compared to in-game methods, na minha opinião.
Programs recommended for usage:
- Gimp/Photoshop: If you possess photo editing skills, these programs will greatly enhance your ability to modify images.
Etapa 1: Selecting an AI Website
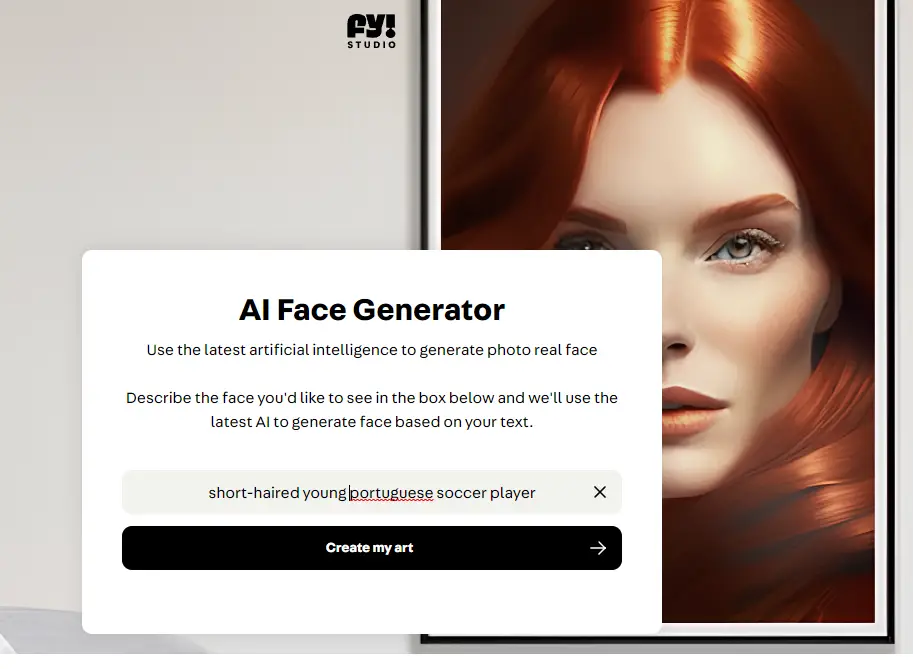
There are numerous websites available that utilize AI to generate faces. No entanto, many of them require payment or impose certain limitations or slow internet connectivity for free usage. Felizmente, there is one website called iamfy that offers free AI face generation, provided you create an account with them. If you already have a preferred AI website, you can proceed with Step 2 as the process will likely be similar.
Etapa 2: Describing Your Player on the AI Website
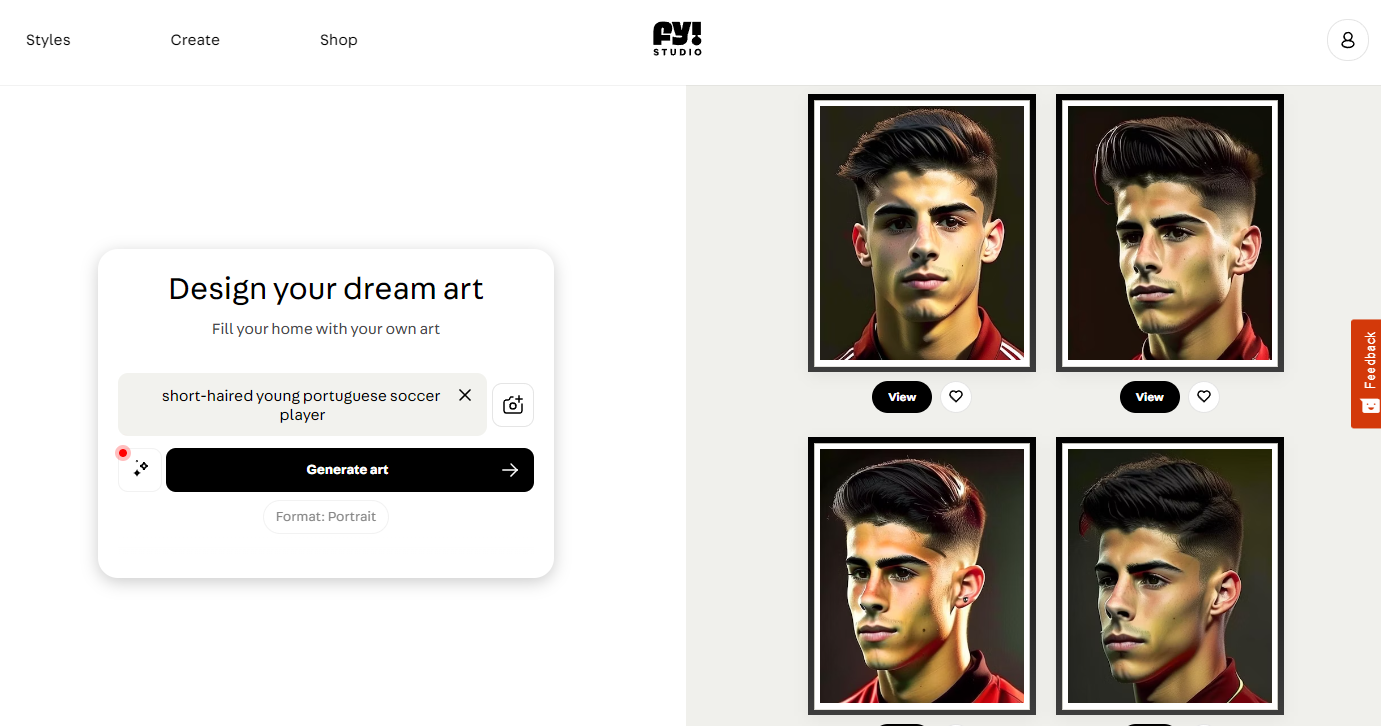
Access the AI face generator on the iamfy website (or your preferred AI website) and begin describing the general appearance of your player. It is important to strike a balance between being specific and providing too much information, as an excess of details can confuse the AI and potentially result in an outcome you may not prefer. Como exemplo, let’s say you want to replace the face of your Portuguese regen player and you desire him to have short hair, based on his regen face and in-game model. In the text box for ideas, you can enter “short-haired young Portuguese soccer player” to convey your preferences.
Please be aware that when using the AI, there is a possibility that it may generate faces with stereotypical racial features. Por exemplo, if you are searching for a face for a Brazilian regen and simply input “short-haired young Brazilian soccer player,” there is a high chance that the AI will provide a face that stereotypically represents a black or mulatto Brazilian player.
This happens because the AI might assume that a typical Brazilian soccer player is black. If you prefer a white Brazilian player, it is important to be explicit in your description. Por exemplo, you can specify “short-haired young white Brazilian soccer player.”
It’s crucial to note that this discussion is not meant to promote racism but rather to highlight potential stereotypical outcomes that can arise with AI-generated faces. If you desire a Brazilian player with distinctively black features, you can adjust the description accordingly, como “short-haired young black Brazilian soccer player.” Similar considerations may apply when working with Colombian players due to population stereotypes.
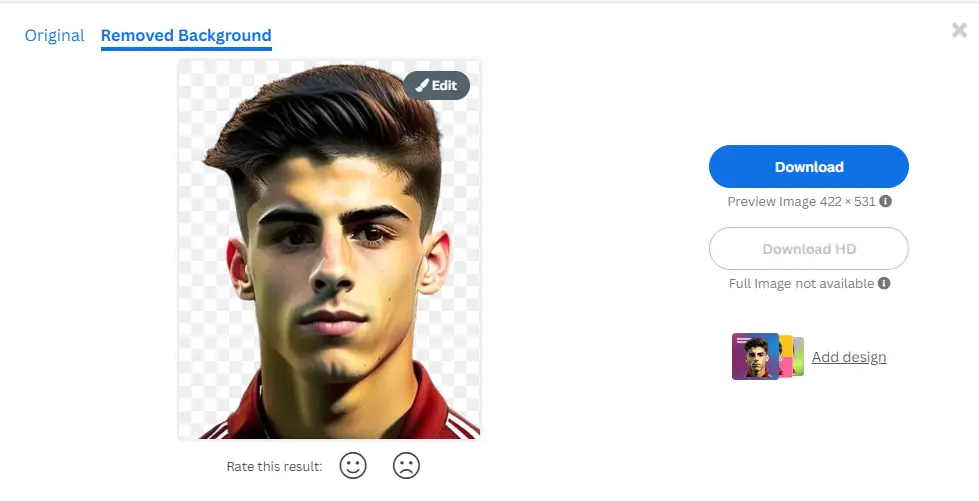
Etapa 3: Capturing the AI Picture
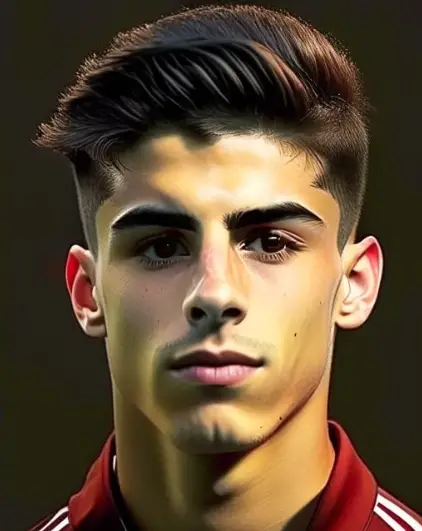
Once you have submitted your description on the AI website, you will need to wait for a few minutes. Depois, the website will provide you with four different choices or variations of the generated face. From these options, you can select the one that best aligns with your preferences and desired appearance for your player.
Once you have made your selection, proceed to the generated image and open the Snipping Tool. The reason for using the Snipping Tool is that directly saving the image might result in a different file format that cannot be opened properly. With the Snipping Tool open, use the square selection tool to capture the desired image and save it. It is important to note that you should already have created an account on the AI website in order to have the option to backtrack and access any previous AI images in case you change your mind about the picture.
Etapa 4: Removing the Background
Próximo, navegue até o “remove bg” website and upload the AI-generated face image that you previously saved. alternativamente, Se você preferir, you can utilize software such as Gimp or Photoshop to manually remove the background and potentially enhance the image further according to your preferences.
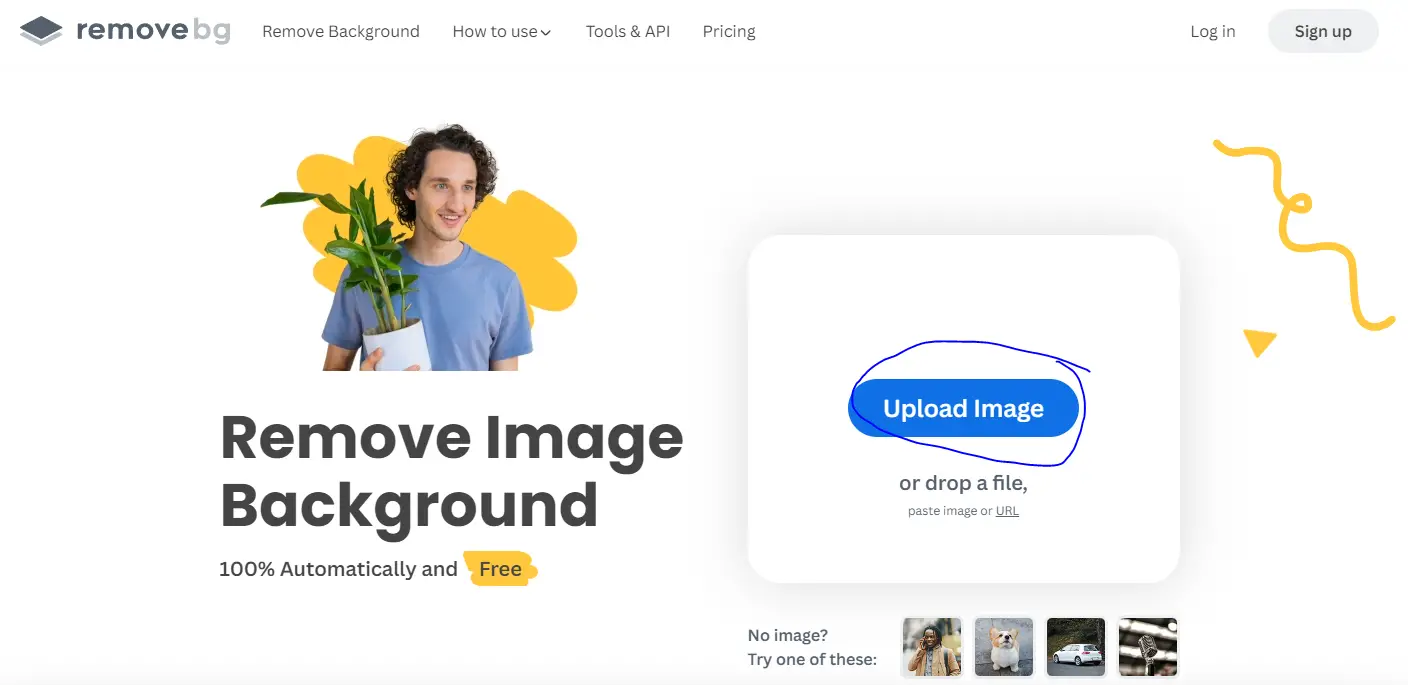
After a brief processing time of approximately a minute or so, o “remove bg” website will provide you with the AI-generated image without the background. You can then proceed to download the image from the website.
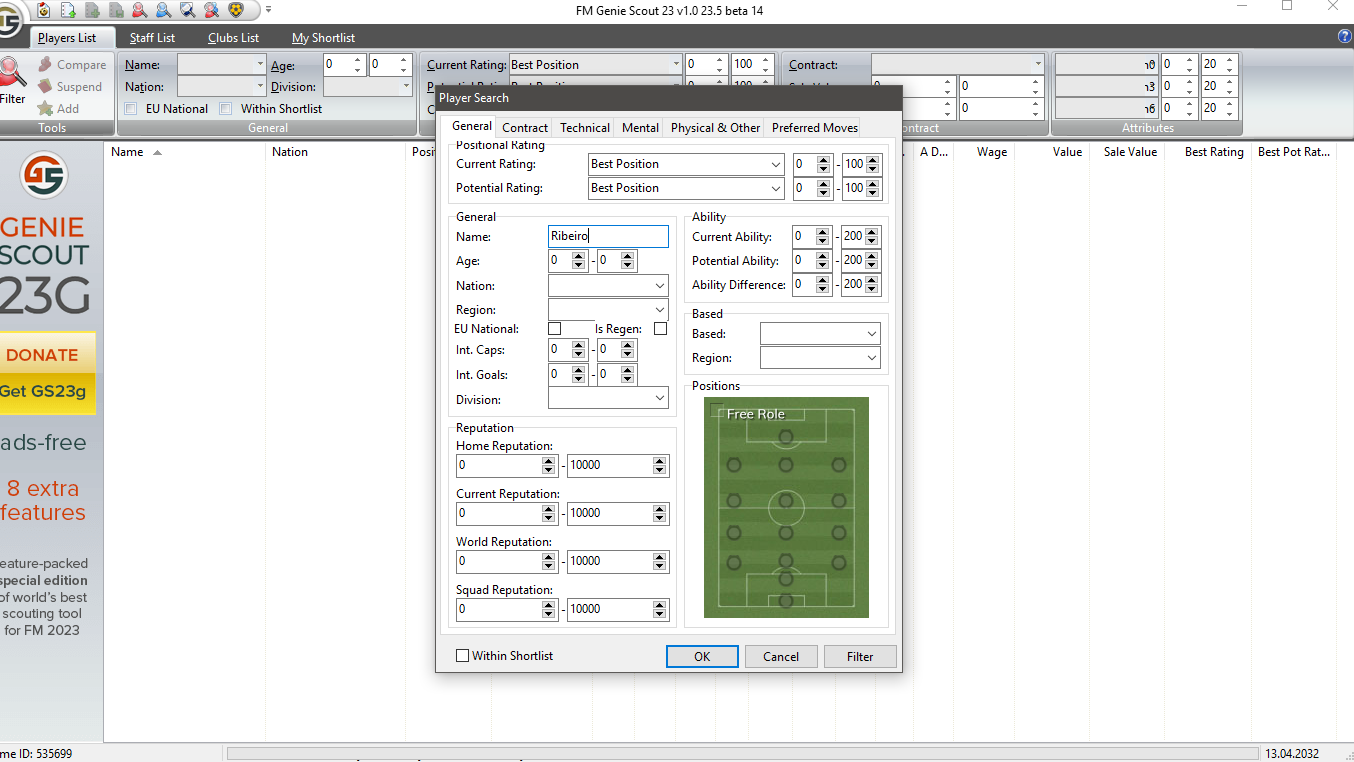
Etapa 5: Adding Your Unique ID
To add your unique ID to the regenerated player, I typically use FM Genie Scout, but you can also try obtaining it in-game. Here’s how you can find the unique ID:
- Nas configurações do jogo, locate the option to show player unique IDs and enable it. This will allow you to view the unique IDs of players within the game.
- Uma vez ativado, navigate to your regen player’s profile within the game. You should now be able to see their unique ID displayed.
If you’re using FM Genie Scout, siga estas etapas:
- Launch FM Genie Scout and search for your regen player by their name.
- Open their profile, and you will find the unique player ID listed next to their name.
- Copy the unique player ID, as you will need it for the next step.
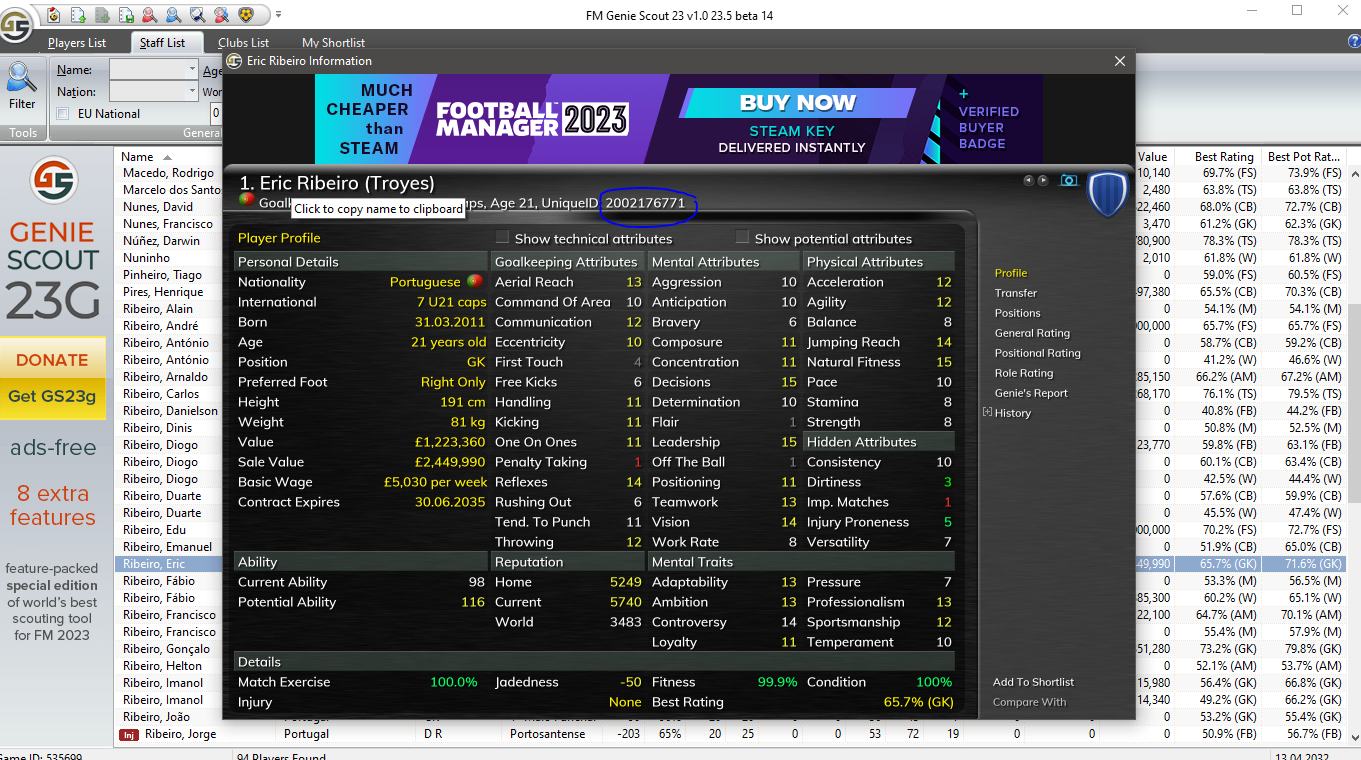
Once you have obtained the unique ID of the regen player, rename the downloaded image file with the copied unique ID. This ensures that the image file is easily identifiable and associated with the specific regen player.
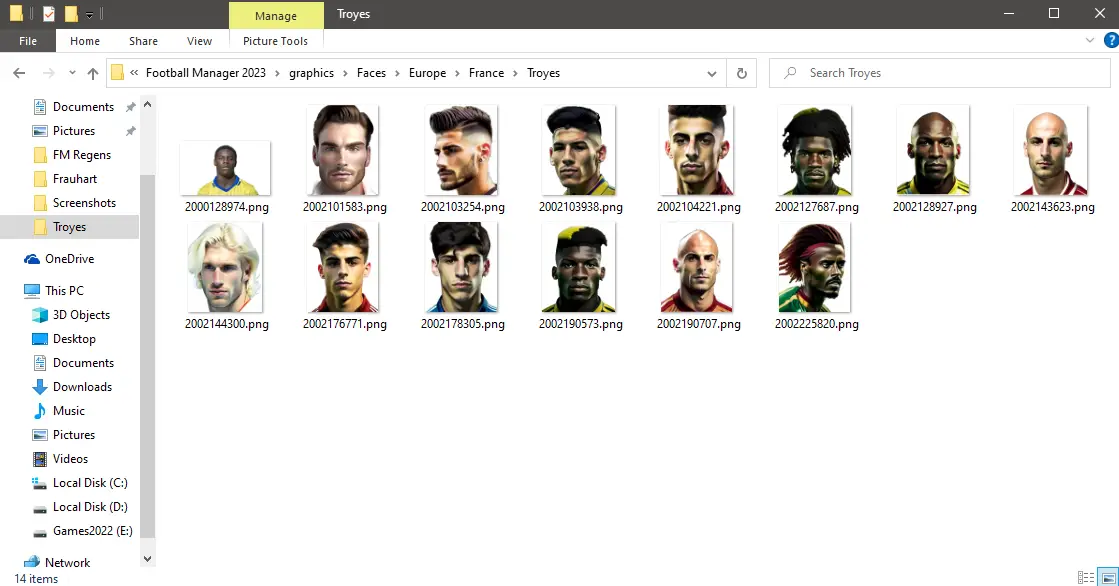
Etapa 6: Copying the Image to the Graphics Directory
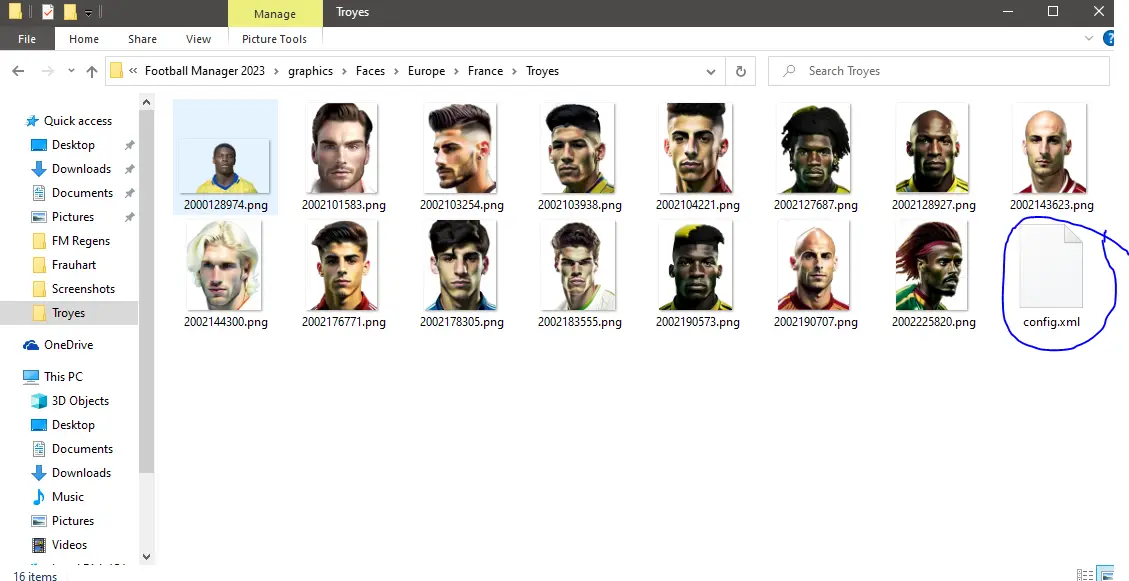
In case you have previously installed a logo, kit, or facepack, you will already be familiar with this step. No entanto, if you haven’t, navigate to your game’s directory located in your documents folder, specifically under “sports interactive,” “football manager 2023,” e então “graphics.” Inside this directory, create a new folder dedicated to storing faces. Adicionalmente, create another folder within the faces folder and assign it a suitable name. Pessoalmente, I prefer organizing my folders further with subfolders such as “Europa,” “França,” e “Team.” Agora, proceed to copy the renamed image of your regen, ensuring it consists solely of numbers, and paste it into the designated folder.
Begin by accessing the FM XML file. Within the software, locate your designated folder and ensure the option to generate a config.xml file is selected. It is crucial to note that all filenames within the program are represented as IDs. Once these steps are complete, proceed by clicking the “Ir” button to initiate the process.
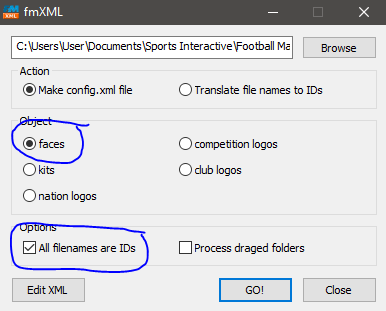
After receiving the confirmation message from the program stating “Image added to XML” and verifying that the config.xml file is present within the designated folder, we can proceed to the final step.
Etapa 7: Refreshing the Cache in FM23
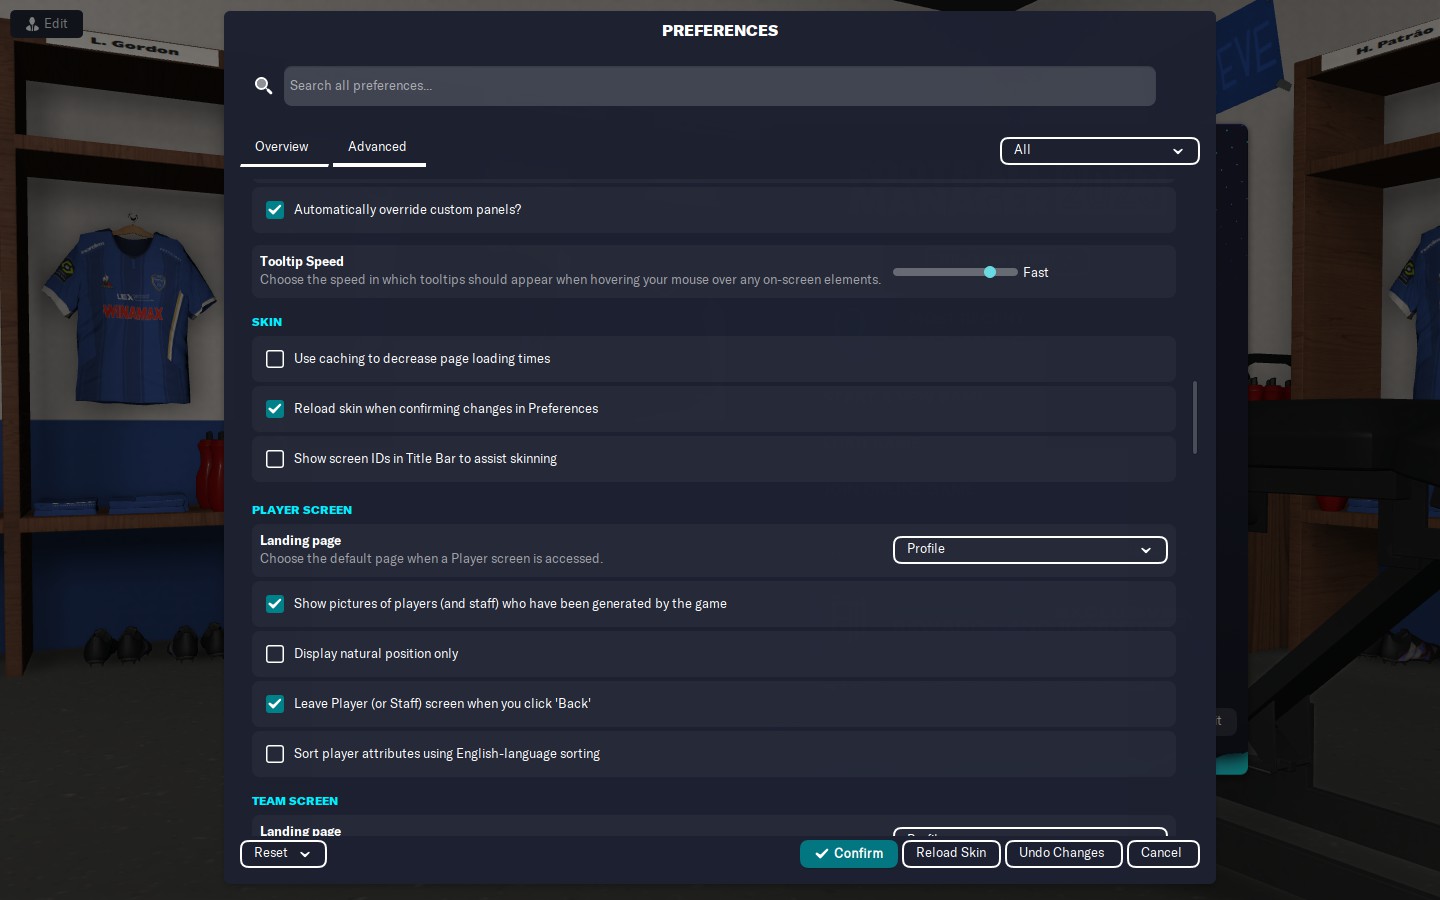
Within the game’s preference tab, locate the option to enable cache reloading when making changes, and ensure it is selected. Adicionalmente, make sure to disable the use of page caching to reduce loading times. This step is crucial as it requires clearing the current cache to generate a new one. Finalmente, scroll to the bottom of the page and click on the “reload skin” botão. This action will refresh the game’s interface, after which you can return to the preferences section.
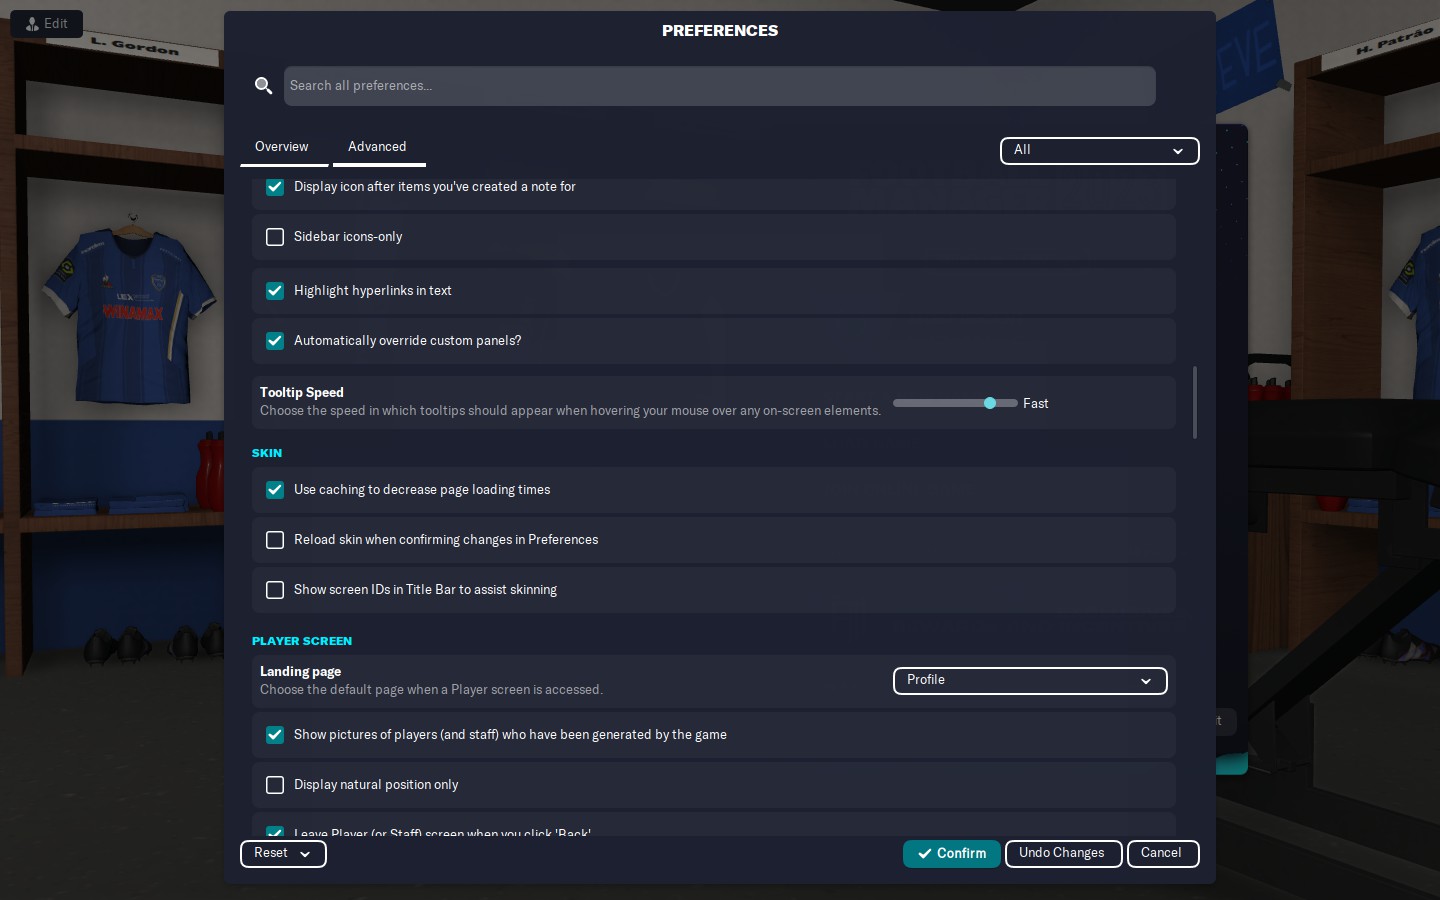
To optimize loading times, Ative o “use page caching” option by ticking the corresponding checkbox and save the changes. Proceed to launch your game and verify the effects of the regeneration process.
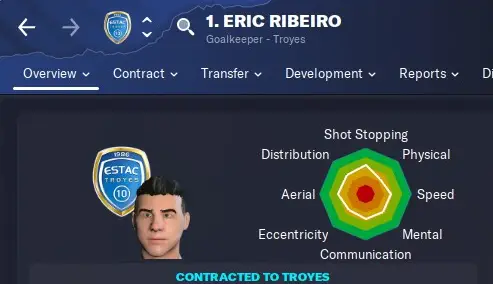
If the steps were executed correctly, you should already observe a new regen face. In my particular scenario, the regen for the Portuguese goalkeeper transformed from the initial unimpressive appearance to a more aesthetically pleasing representation of a Portuguese individual.

Saída
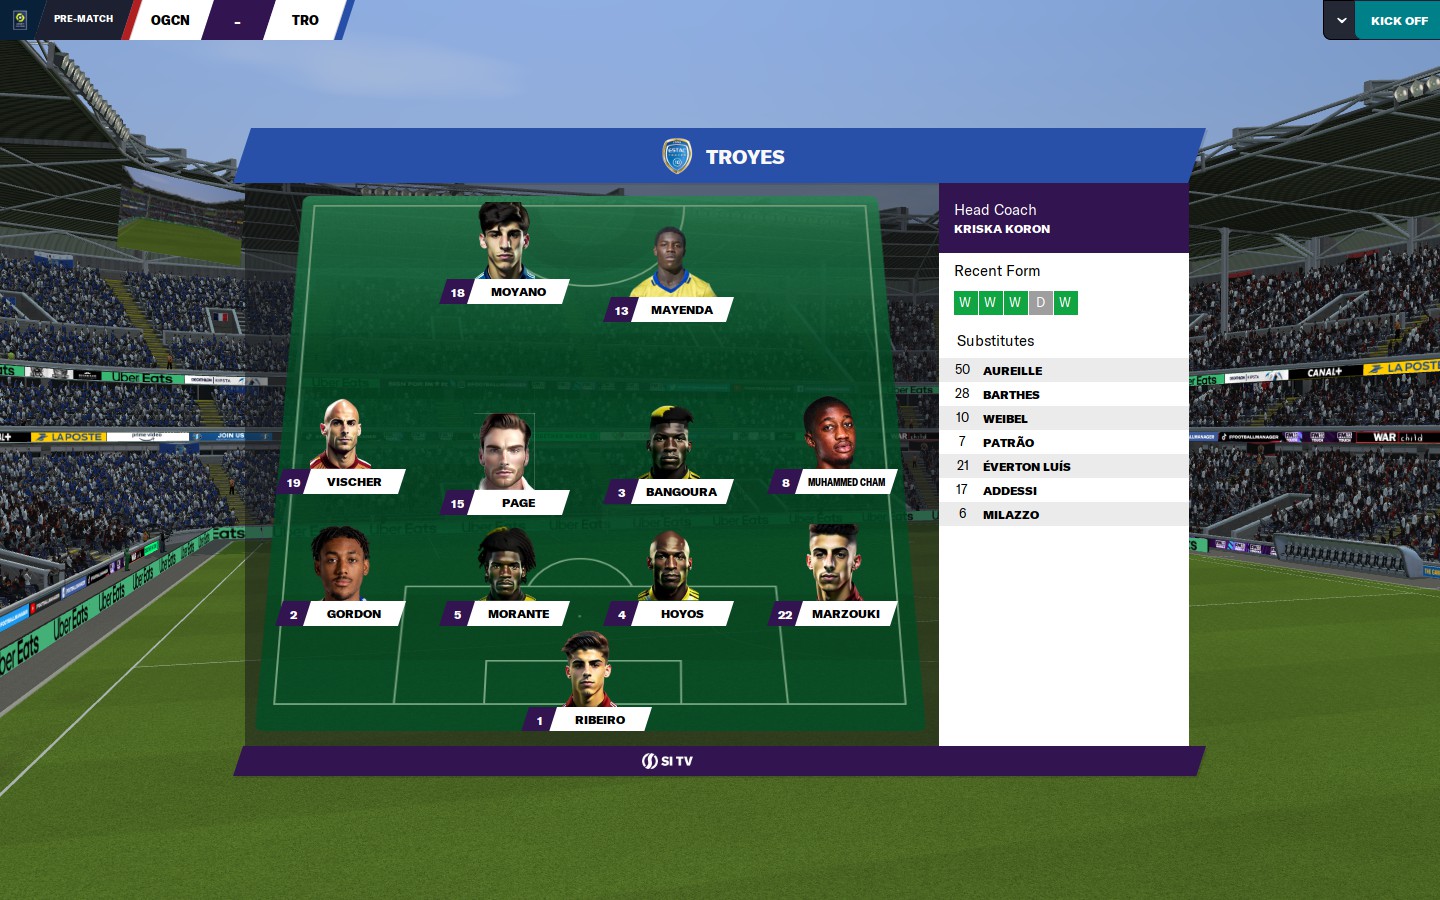
After replacing numerous regen faces, I am pleased to present the current appearance of my team. Here is an image showcasing the transformed visuals of my players.
A friendly reminder: If you plan to add a new regen face, remember to remove the existing XML file and follow the FM XML step once again. Adicionalmente, don’t forget to reload the cache to ensure the changes take effect. Thank you for taking the time to read this guide! I hope these steps contribute to a more immersive and realistic gaming experience for you.
Isso é tudo o que estamos compartilhando hoje para isso Gerente de futebol 2023 guia. Este guia foi originalmente criado e escrito por MarfamGaming. Caso não atualizemos este guia, você pode encontrar a atualização mais recente seguindo este link.
Salut j’ai suivi a la lettre toutes les étapes et impossible gratuitement . Cela me demande tout le temps 10euros .