
Celem tego przewodnika jest omówienie większości z nich, jeśli nie wszystkie, bodźce i podać podstawowe informacje na temat artefaktów. Bodźce są kluczowym aspektem nauki, dostępnych jest jednak niewiele kompleksowych przewodników. Ten przewodnik jest w trakcie tworzenia, ponieważ nadal istnieją pewne bodźce, które nie są w pełni poznane. If you notice any missing or incomplete information, please feel free to mention it in the comments. Credit will be given at the bottom of the guide for any contributions.
Analysis Console and Artefact Analyzer
The basic of basics, the console and the pad. The console is a computer that has four whole buttons and the pad… Is a pad.
Analysis Console

Server list:
Sci’s research data is stored on a server. Typowo, this button isn’t significant because there’s usually only one server. Jednakże, if Salv acquires another server, you can invest in multiple tier three technologies by utilizing multiple servers.
Skandować:
- This button is frequently utilized! It provides information on the node number and the stimuli required to activate it. Jednakże, scanning takes thirty seconds. You can enhance the scanning speed by upgrading the pad with parts crafted or found during gameplay.
Print:
- Pressing this button will generate a report detailing the node number and stimuli. It’s a convenient option if you want to save time while using a node scanner.
Ekstrakt:
- This function extracts all available points from the artifact on the pad. Some artifacts yield points every time, while others allow them to accumulate over time.
Artifact Analyzer

The Artifact Analyzer is a straightforward pad. Simply drag an artifact onto it to begin your analysis. Jak wspomniano wcześniej, upgrading it with superior parts enhances its efficiency, allowing you to work faster. Sporadycznie, the console and the pad may start unlinked. In such instances, use a multitool to establish a connection between the console and the pad.
Analysis Menu and Printouts
Więc, you’ve checked out an article, and now you’re wondering what’s next? Dobrze, it seems like there’s some urgency here—something about calling RD. Let me break it down for you.
- Node IDThis is basically the identification number of the node itself. If you used the pocket tool node scanner to scan it, this number will be displayed. It’s a handy way to save time instead of waiting for the pad to scan for 30 towary drugiej jakości.
- DepthDepth refers to how deep you are in the “Drzewo” of nodes. The further you go in, the more points you earn from each activation. Jednakże, be aware that the reactions might become more dangerous or intense as you delve deeper.
- ActivatedThis one’s straightforward. If you’ve already activated this node before, it’ll be marked as true, and you won’t earn points for activating it again. If it’s false, it means you haven’t activated this node yet, and activating it will earn you points.
- StimulusThe stimulus is what you need to do in order to activate the artifact and earn points. It’s basically the action required to trigger the reaction.
- ReactionThis is what will happen when you apply the stimulus and activate the node. It’s the outcome or consequence of your action.
- EdgesEdges indicate how many “paths” there are from this node. I’ll explain this in more detail in its own section below, including paths and the concept of the “tree”.
- Current_ValueThis shows how many points you’ve accumulated and are ready to extract!
- PrintoutsPrintouts are named after the node they represent, making it easy to check if you’ve already done a node before. Using the node scanner saves a lot of time. The paper itself contains information about the stimulus and reaction, so just pick it up and take a look to see what needs to be done!
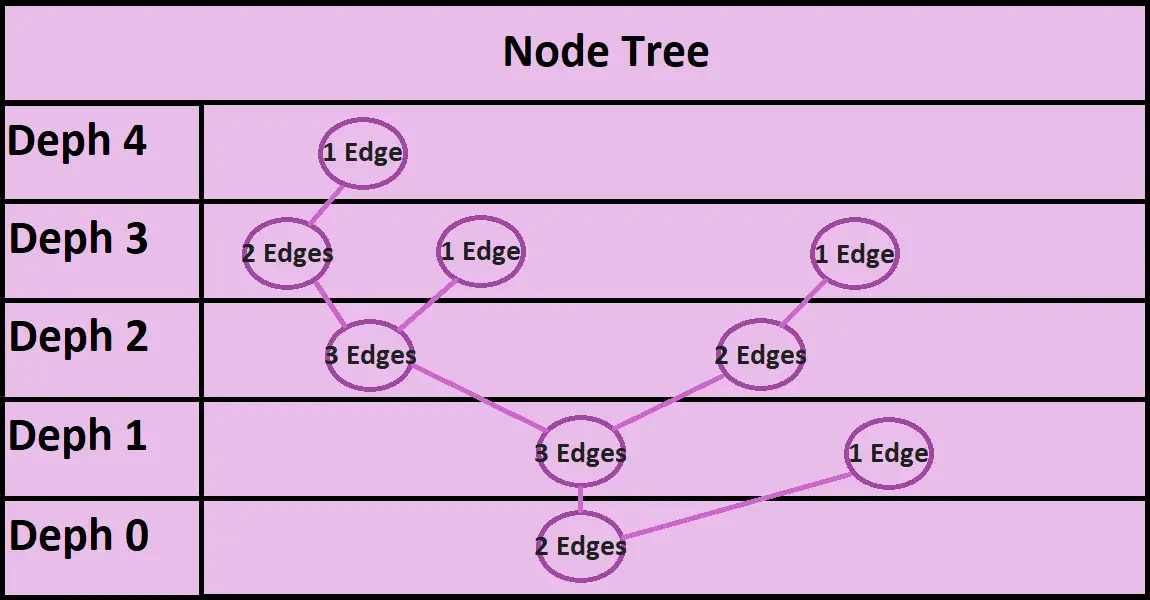
Node Tree
Drzewa? Not about plants here… Tak, artifacts have trees, showing how complex they are. But not all are equally intricate.
Here’s a sample tree I made, all in sci-fi purple! Each edge moves forward and backward, so you might get stuck on a node sometimes. But there are tools to push the node deeper. Hope this makes sense! W przeciwnym razie, try cargo.
Tools and Other Useful Things.
- Node ScannerA basic but handy tool, the node scanner scans the ID of an artifact and provides information. It’s most useful if you’re meticulous about keeping records.
- Traversal DistorterThe traversal distorter is a highly effective tool. It can manipulate an artifact to delve deeper or shallower, which is great for pinpointing specific points or prompting favorable responses. Użyć go, position it over the analyzer and under the artifact. It has a toggle for outward (deeper) or inward (not deeper) ustawienia.
- Artifact CrusherAn artifact crusher is a researched technology that creates a large press for crushing artifacts, and sometimes unfortunate individuals! Crushing an artifact yields useful fragments that can be used to create a new artifact, traded to cargo for a reward, or ground into Artifexium using a grinder.
- ArtifexiumWho doesn’t love the aroma of freshly ground artifact in the morning? This incredibly useful fluid, Artifexium, is employed to activate stubborn or troublesome nodes without cost. When sprayed or splashed onto artifacts, it instantly activates the node. Only a small amount (5ty) is needed, so I recommend using a spray bottle for convenience.
Stimuli
W porządku, let’s dive straight into the good stuff: stimuli! This section is a work in progress, so if you spot any missing stimuli, please drop a comment, and you’ll get the credit you deserve. Thanks for your help!
- Hydro Reactive: Spray it with a fire extinguisher or pour liquid from an open container onto it.
- Sonic Vibrations: Activate an instrument, no need to play a specific tune, just open the menu.
- Magnetic Vibrations: Activate a pair of magboots in close proximity to the artifact.
- Extreme Pressure: Subject it to the vacuum of space; sometimes multiple gas tanks are needed.
- Physical Trauma: Apply force to it, sometimes requiring various types of damage.
- Electricity: Use a multitool to make contact with it.
- Active Deceleration: Only applicable to holdable artifacts; throw it.
- Gaseous Plasma: Submerge the artifact in plasma or request a plasma tank from atmospherics.
- Life Essence: Satisfy the artifact’s demand for a sacrifice by killing something nearby.
- Promieniowanie: Place uranium ore, bananium ore, or another radiation-emitting artifact nearby.
- High Temperatures: Increase the temperature significantly, or decrease it if extreme cold is required. If spacing isn’t effective, use a lit welder on it.
- Exterminate: Simply examine it by shift-clicking on it.
- Standard Atmosphere Gases: Flood it with carbon dioxide.
- Tool Usage: Secure the artifact in place by wrenching it.
Reactions
Did science just explode or was that a synd…
Pamiętać, lower depths’ effects are usually harmless, while higher depths can be really painful.
- Matter Creation: This power creates various things, from monkeys to carps to trees to bananas and beyond.
- Cerebral Influence: It messes with your mind, making the screen wavy and displaying some flavor text; it can even lull you to sleep.
- Environmental Disruption: This ability wreaks havoc, tossing objects around or breaking them.
- Transmogrificional Activity: Temporarily transforms you into something else, like lizards or monkeys.
- Biochemical Disruption: Results in the creation of a random fluid.
- Magnetic Waves: Sometimes it has no effect, other times it causes objects to spin around it.
To wszystko, co dzisiaj udostępniamy w tym celu Stacja Kosmiczna 14 przewodnik. Ten przewodnik został pierwotnie stworzony i napisany przez Zyleak. Na wypadek, gdybyśmy nie zaktualizowali tego przewodnika, możesz znaleźć najnowszą aktualizację, postępując zgodnie z tym połączyć.