- Tytuł: Resident Evil
- Data wydania:
- Wywoływacz:
- Wydawca:
Information about Resident Evil is still incomplete. Pomóż nam wypełnić szczegóły gry za pomocą tego formularz kontaktowy.
This is a guide made by a casual completionist. I like the game a lot and wanted to get all the achievements for it. But especially when mansion is a bit of a maze with all the locked doors it can be a bit frustrating. I did my best to clear things up and optimize. The guide only includes main objectives and M.O disks. If you’d like to explore in between you totally can, it’s one of the most fun parts about RE.
Another reason I wrote this is because I prefer to follow screenshots to quickly check what to do next and keep playing rather than reading long texts or watch hours long videos to figure things out. This works best for me and I hope it does for you too.
Jill – Beginning to Lab
1) Check Kenneth and go back to main hall.
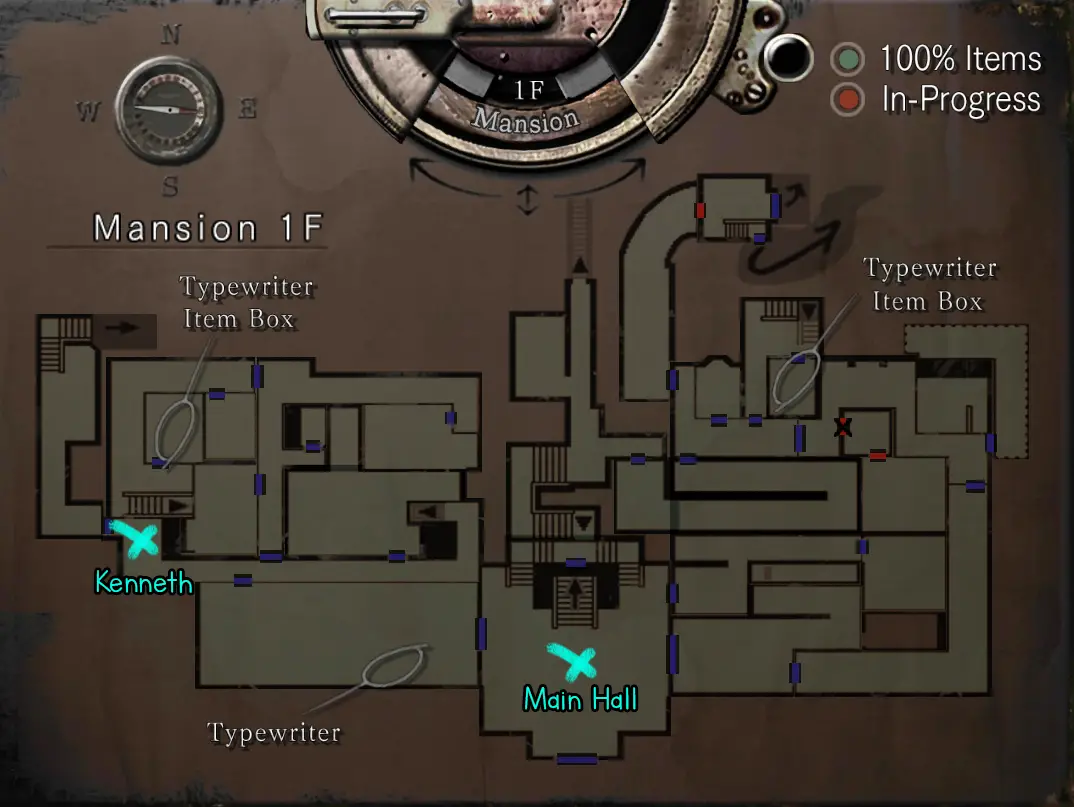
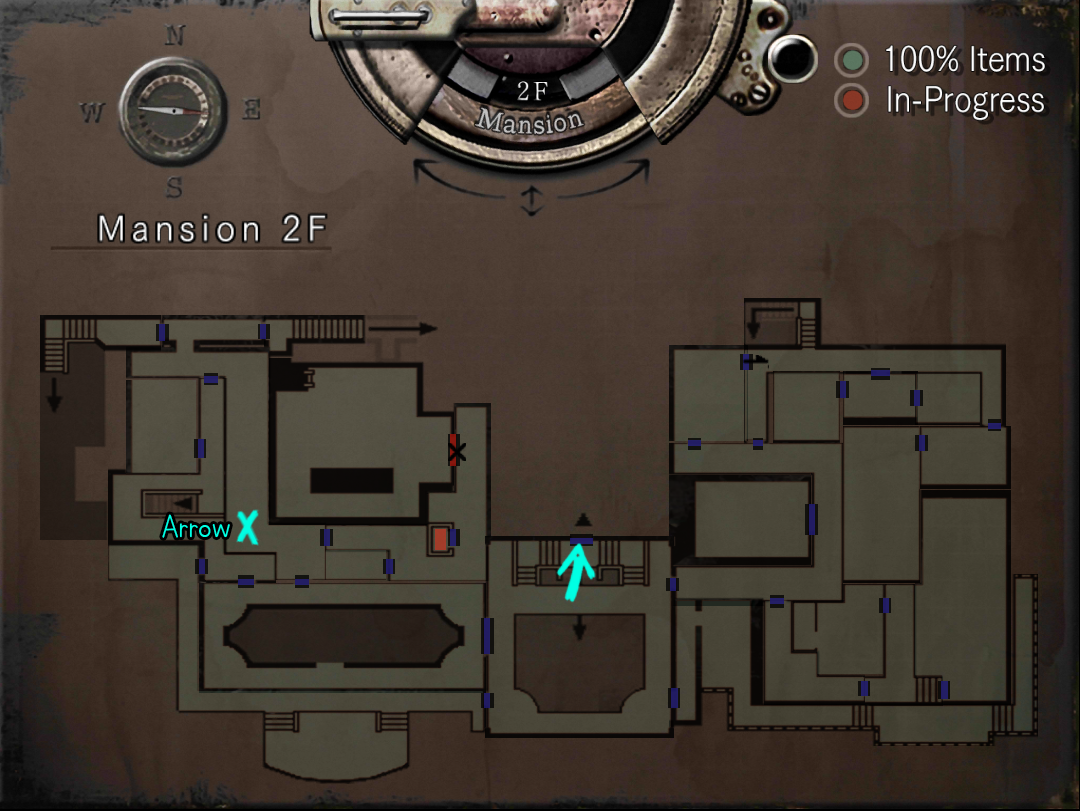
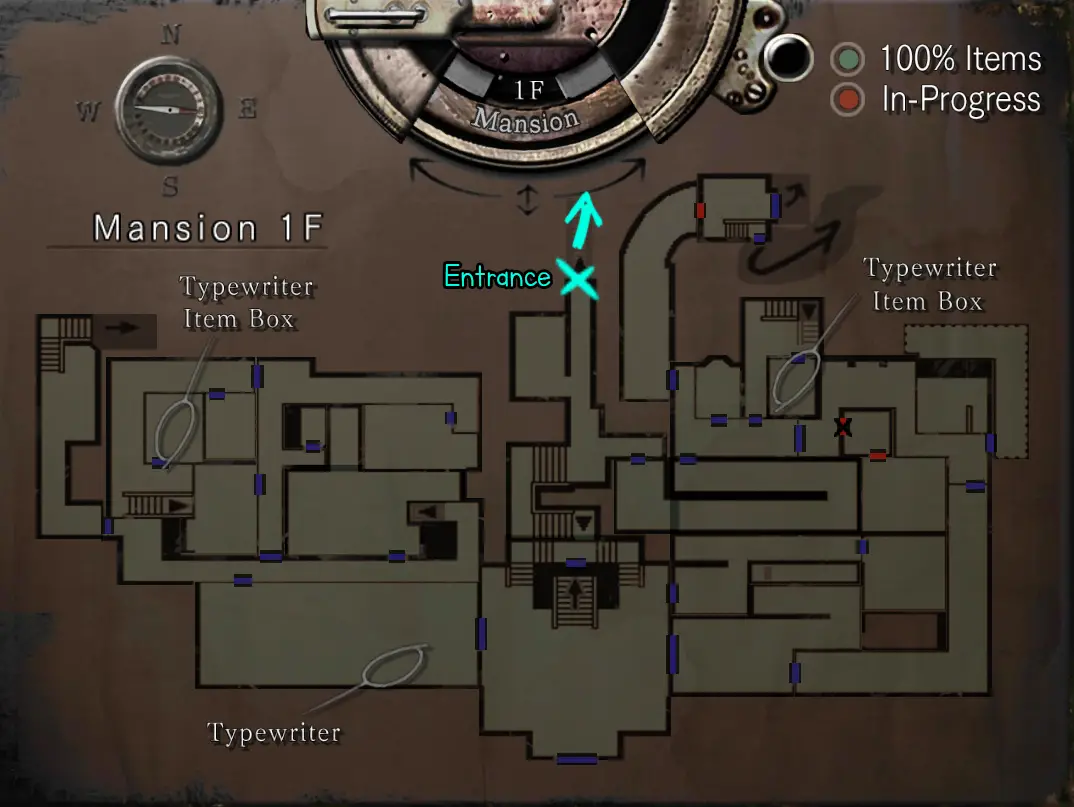
2) Go upstairs and come back to trigger another cutscene, then go for the golden arrow at the location below. Examine it to get an arrowhead. Proceed to backyard and enter the tomb. Pick up the book from the stand and inspect it to get a key.
3) Pick up herbicide. (plant chemical)
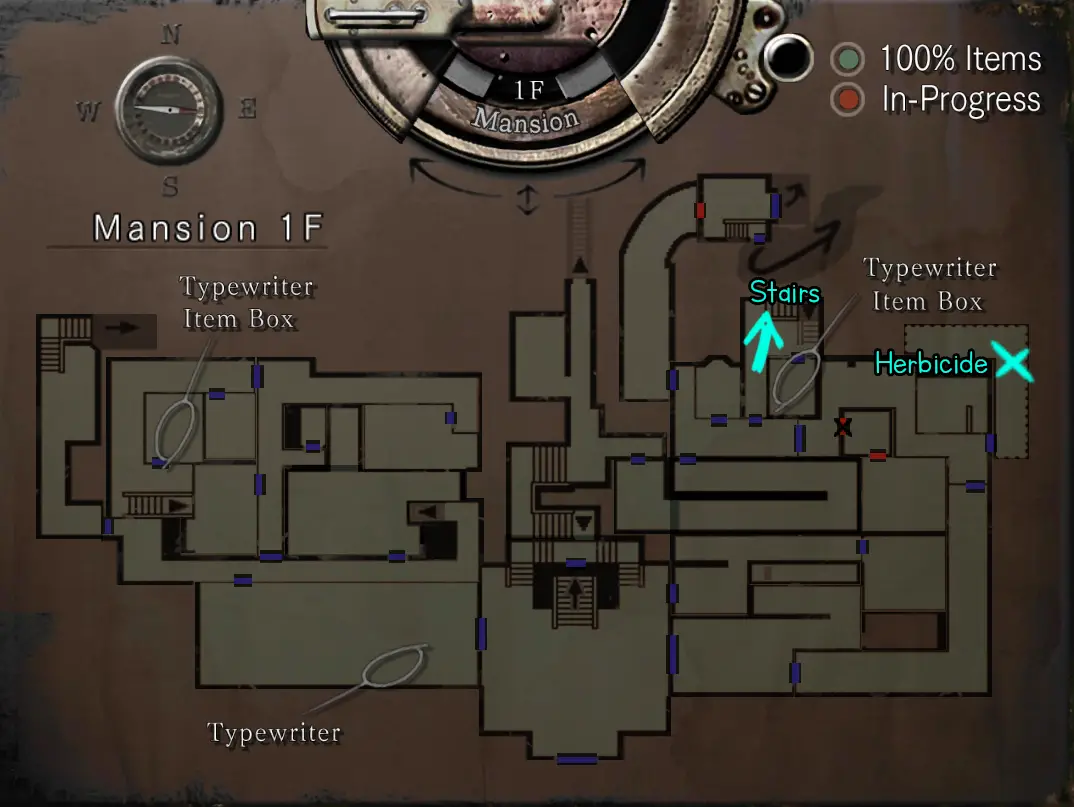
4) Pick up dog whistle and lighter. Use the dog whistle on the balcony to get a collar. Inspect the collar to get an imitation key.
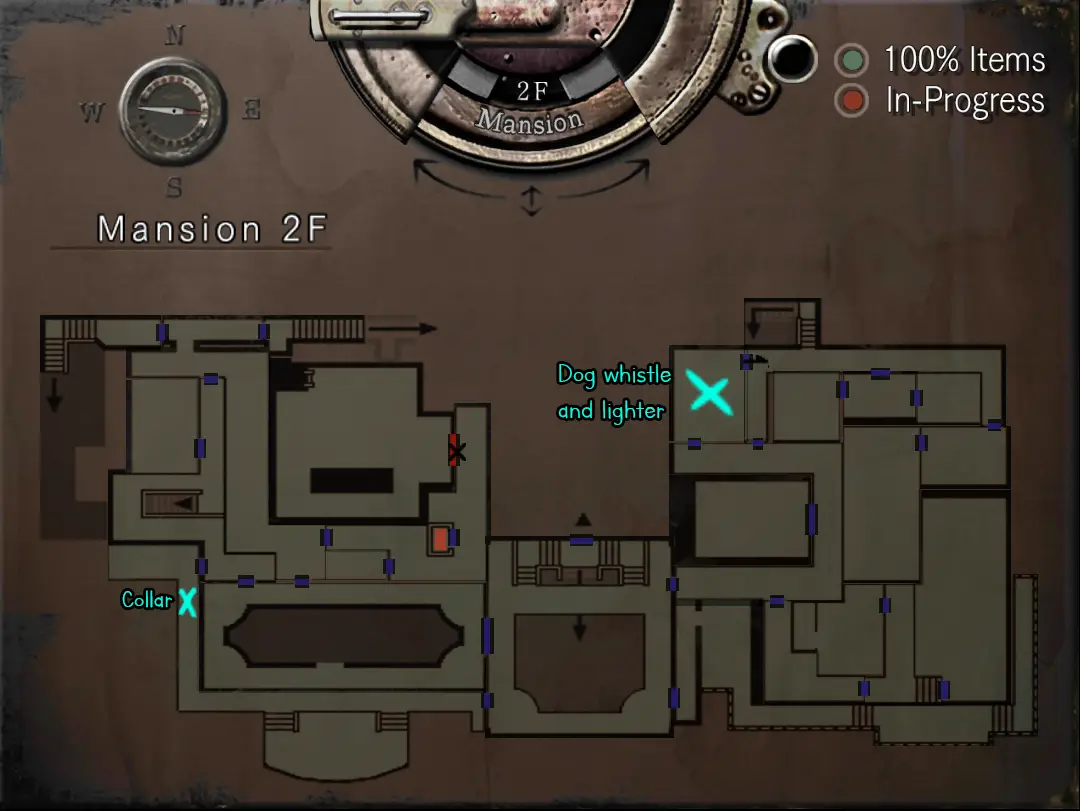
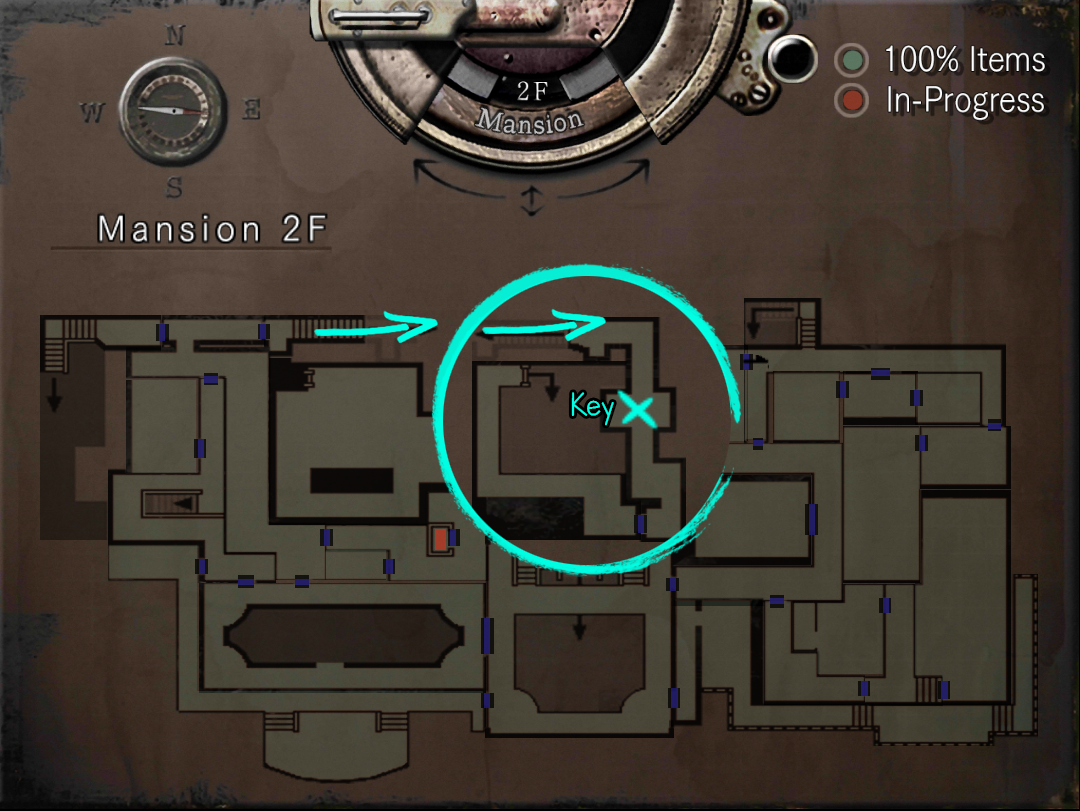
5) Pick up the real armor key and put the imitation key in its place.
6) Use herbicide and obtain the first mask.
(Czerwony) 
7) Statue room puzzle and mask #2. Then trigger Richard’s time and bring him the serum (or don’t? your choice.) After dealing with Richard take the first musical score.
Statue room puzzle:
Top right
Bottom left
Bottom right
Press the two sun pieces on the box.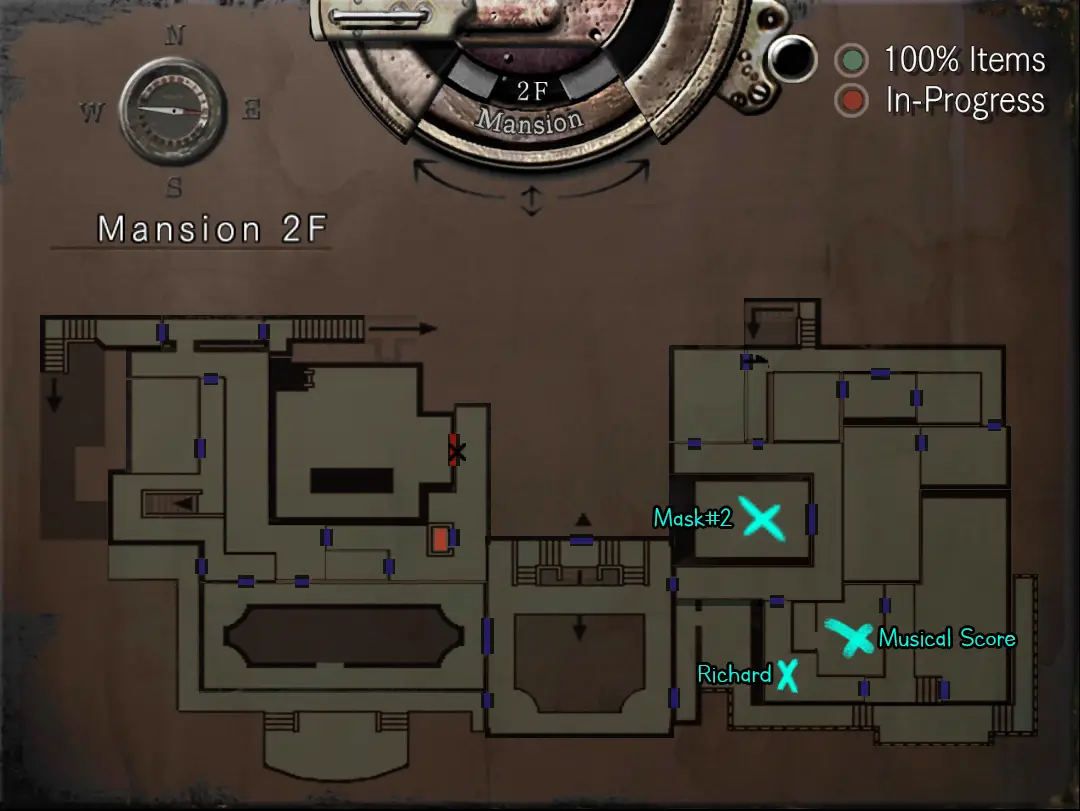
8) Pick up the fake emblem from the dining hall (above the fireplace), go to the bar/piano room to obtain the other half of the musical score and combine both scores. Play the piano and take the golden emblem from the hidden room (Put the fake emblem in its place to get out). Go back to the dining hall to put the golden emblem in the original emblem spot above fireplace. This is going to make the clock puzzle available. You’ll obtain the key that opens Yawn battle room after solving clock puzzle.
(Large-Right x2) 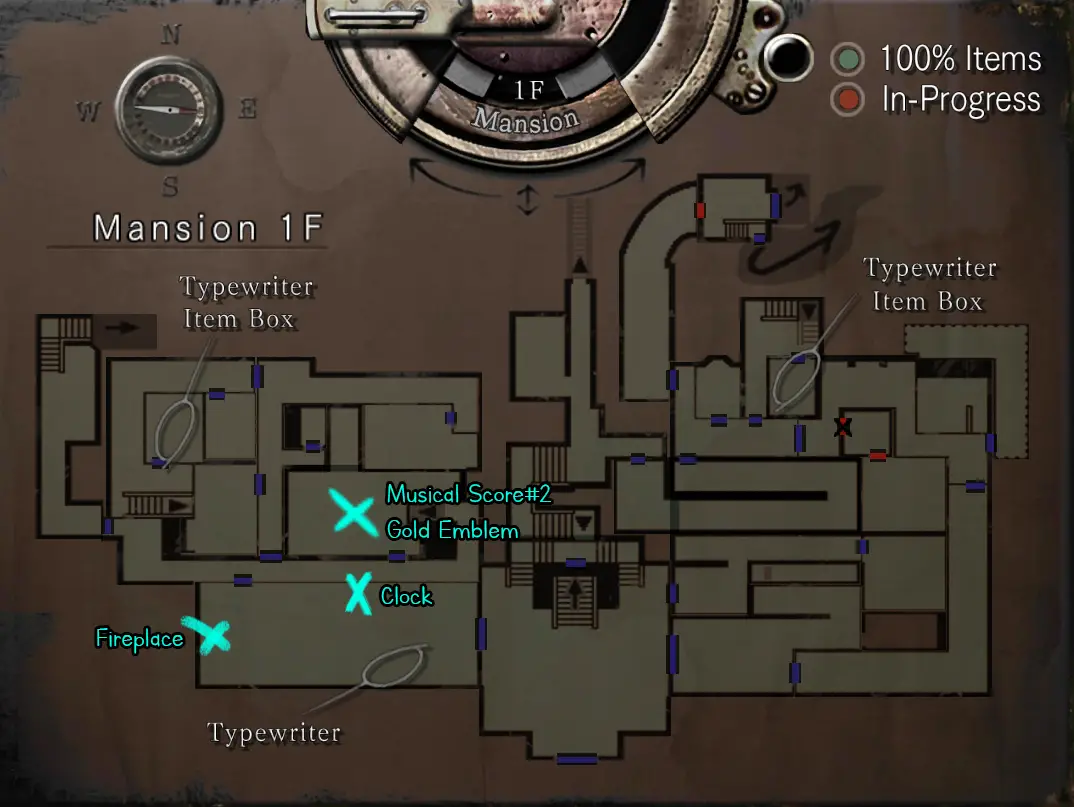
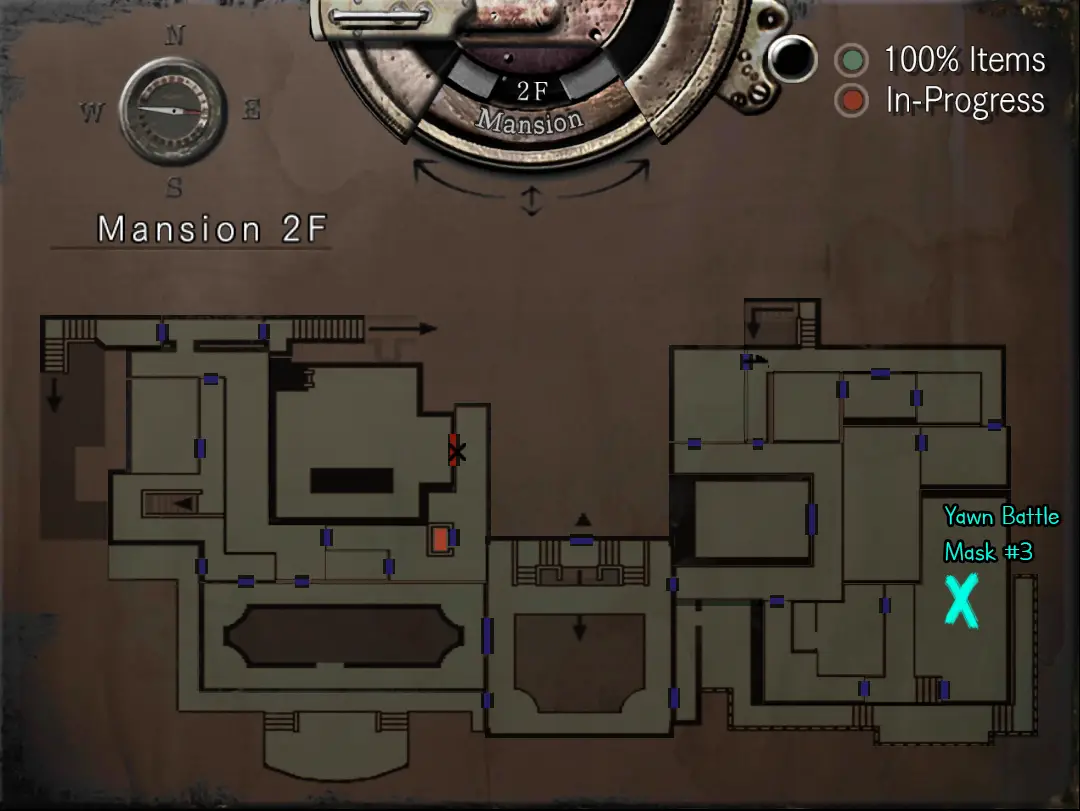
9) First yawn battle, pick up the mask#3 from the corner of the room
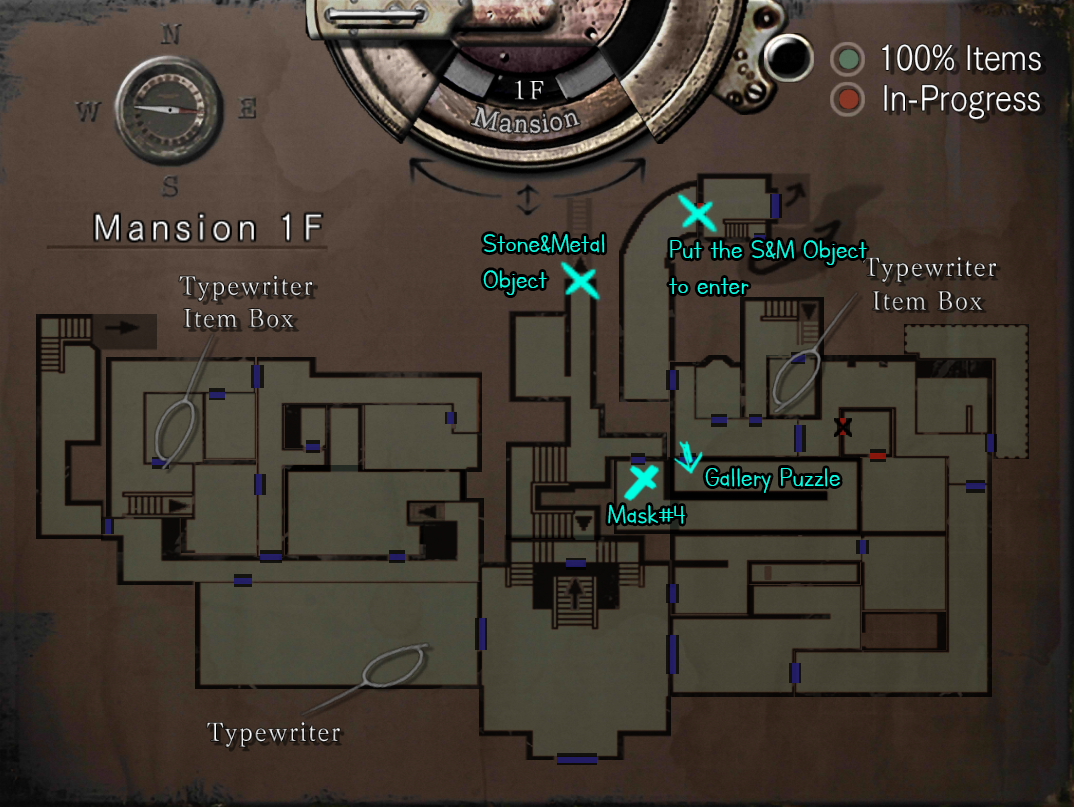
10)
, obtain mask #4. Then put all of the masks in place for crimson prototype fight. When you are done with the crimson prototype you’ll find a stone and metal object inside of the coffin. This is the key to enter the courtyard.
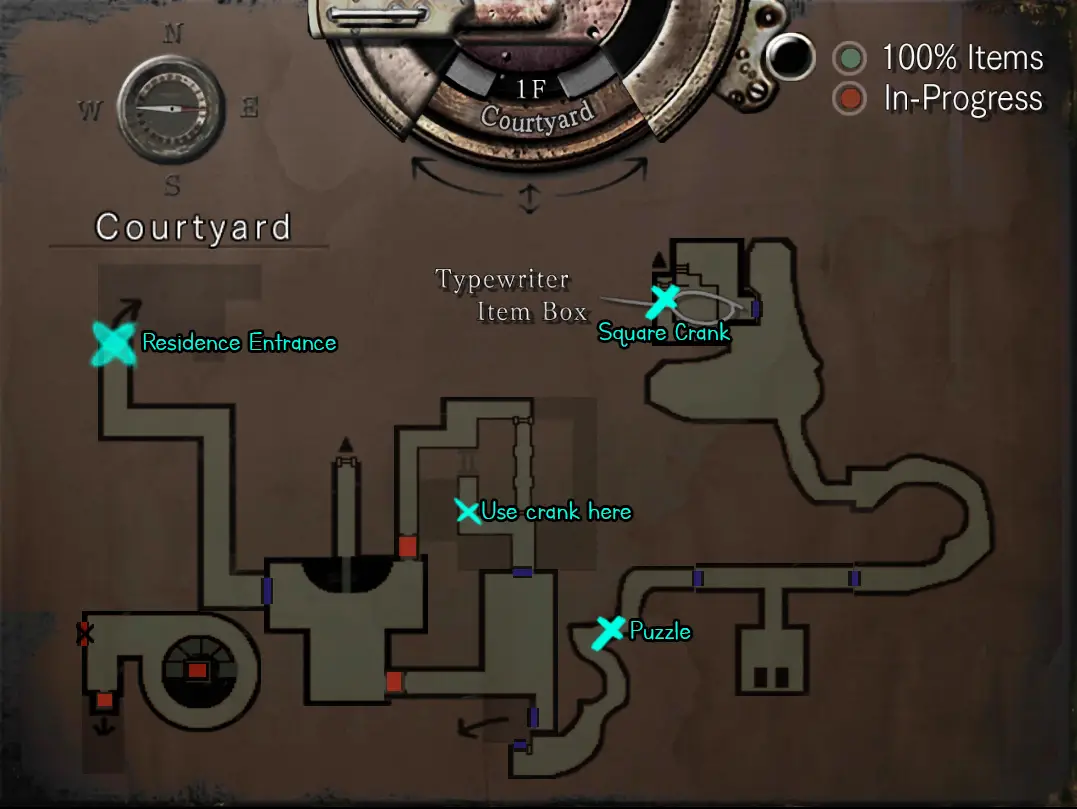
11) After a smol puzzle (Red -> W, Blue-> N) to open the gates, proceed to the cabin to get the crank. When you try to leave you’ll have the first Lisa encounter. When you are out of the cabin, backtrack to the beginning and go for the pool. Use the crank, proceed through the pool and take the elevator. Follow the path to enter the residence.
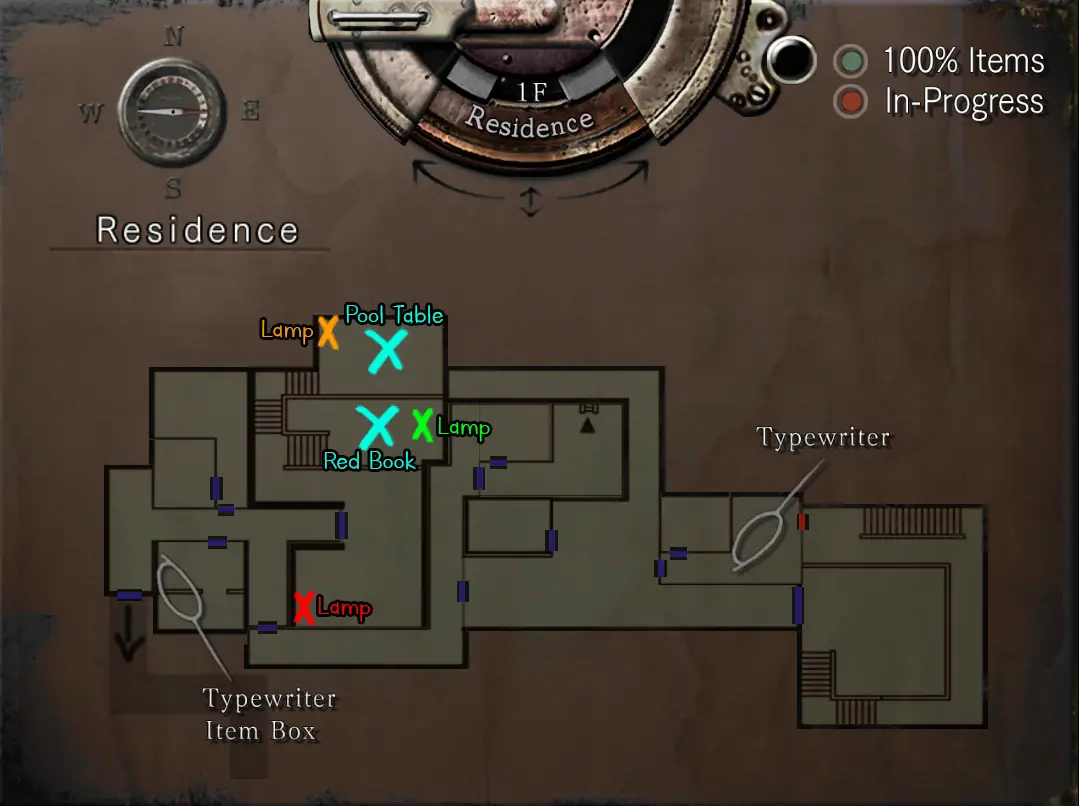
12) Go to the billard room, pick up the book from downstairs and light the lamps(candles? not sure.) Make a mental note or screenshot of those with the billard balls for future use so you won’t have to come back here.
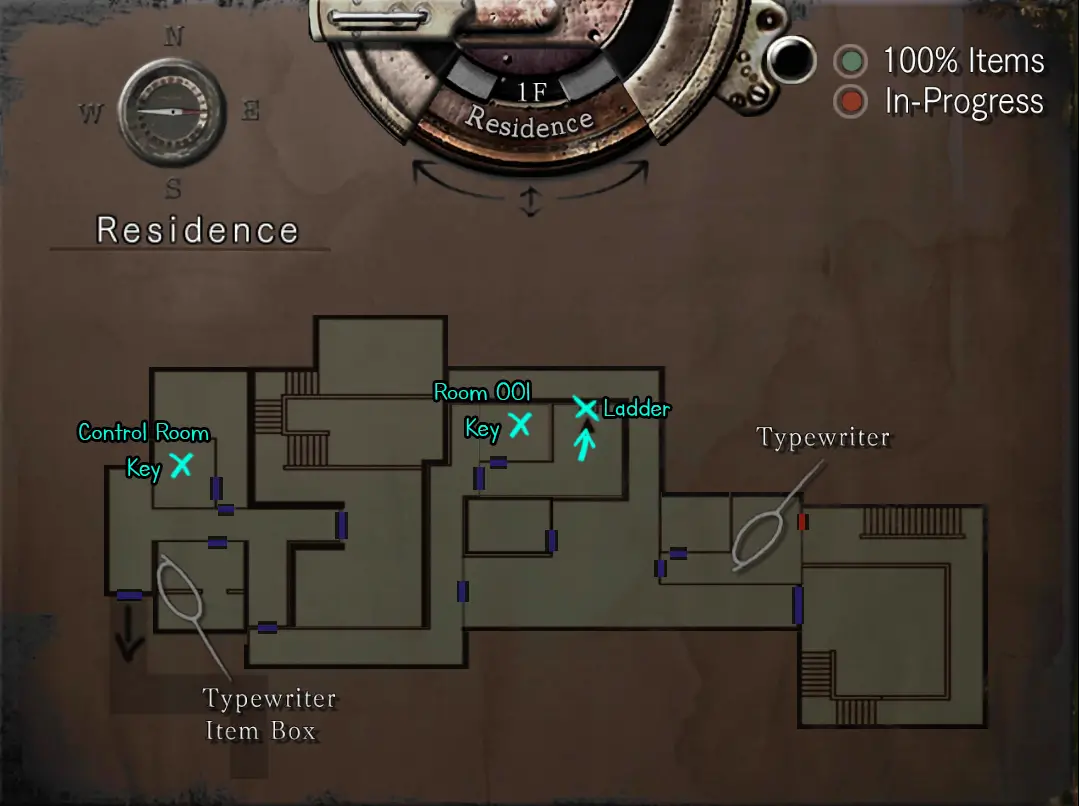
13) Obtain room 001 key from the bathroom shelf. Go to room 001 and pick up the control room key. Go back to room 002 and push the bookshelves to get to the ladder. Climb down.
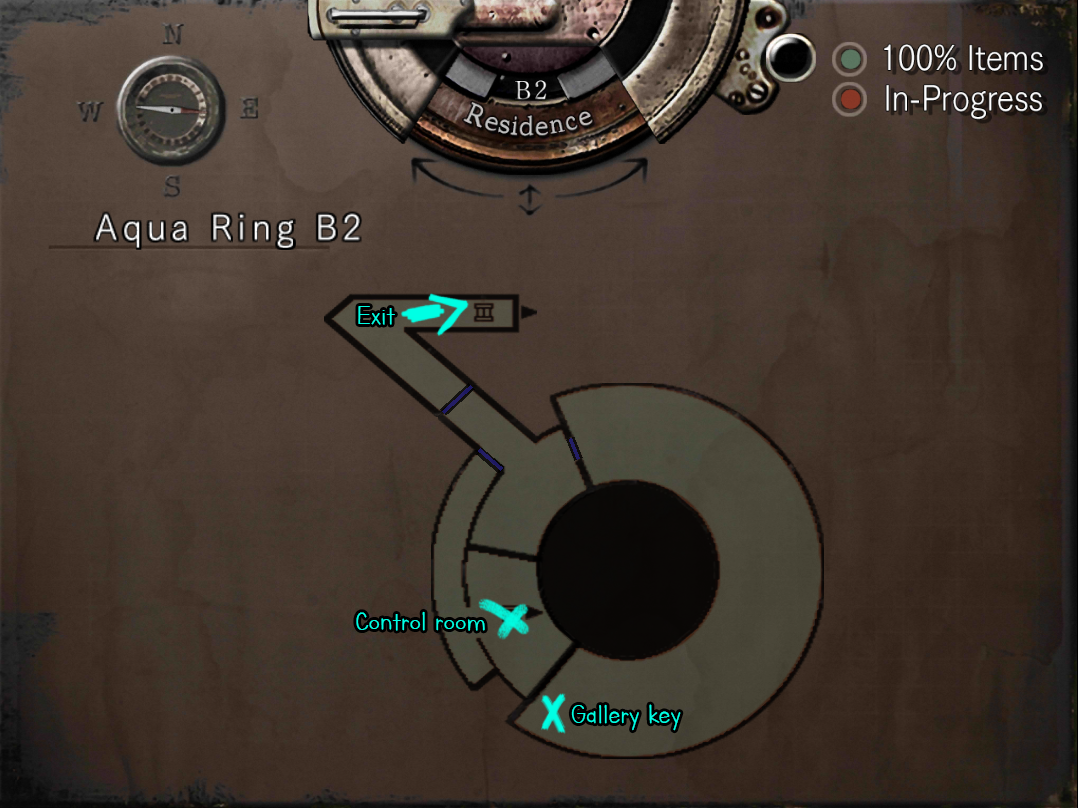
14) Run around the sharks, go downstairs and do the control room. Then pick up gallery key. Then go back upstairs to the residence.
15) Enter the gallery, pick up the pesticide spray from the corpse and use it on the bee nest. Then use the code from the billard room we checked earlier (lamps and billard balls) to open the medical room and make V-JOLT. (V-JOLT is optional, you won’t have to fight the Plant 42 if you make it.) Skip the next step too if you are skipping V-JOLT.
V-JOLT Recipe:
UMB No.3 + Water = NP-004
NP-004 + Yellow-6 = UMB No.10
Yellow-6 + Water = UMB No.7
UMB No.10 + UMB No.7 = VP-017
VP-017 + UMB No.3 = V-JOLT.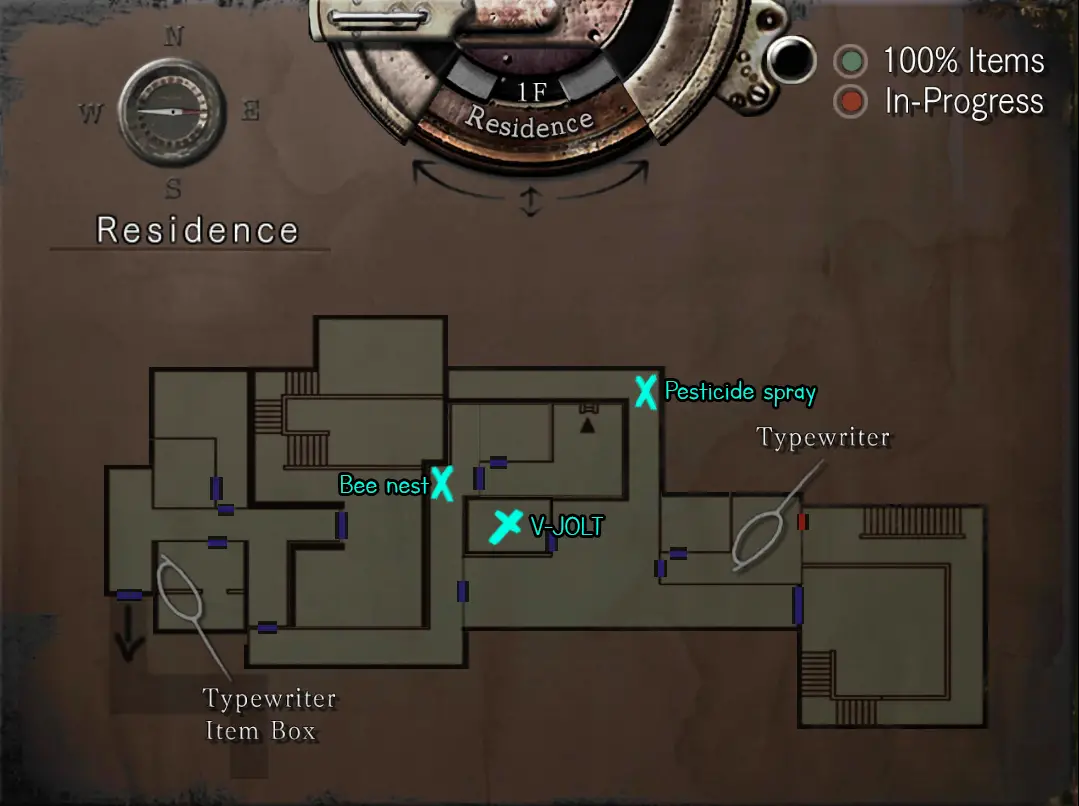
16) Make your way to the aqua ring again and use V-JOLT on the Plant 42 roots.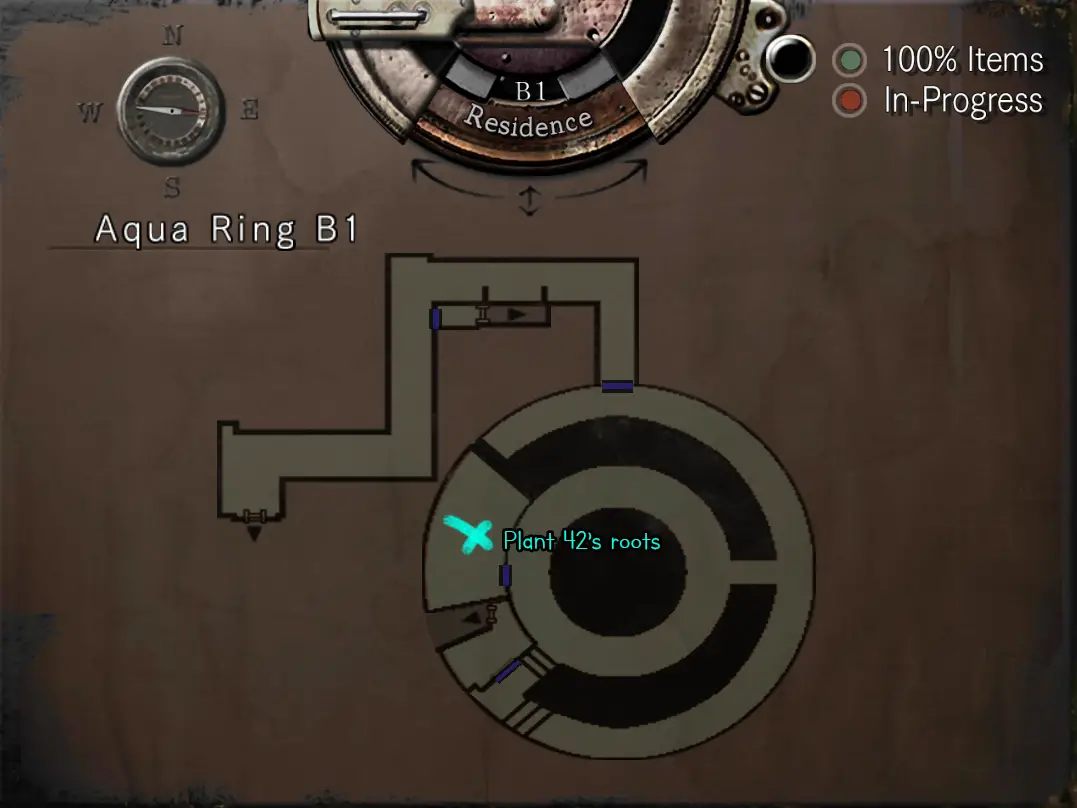
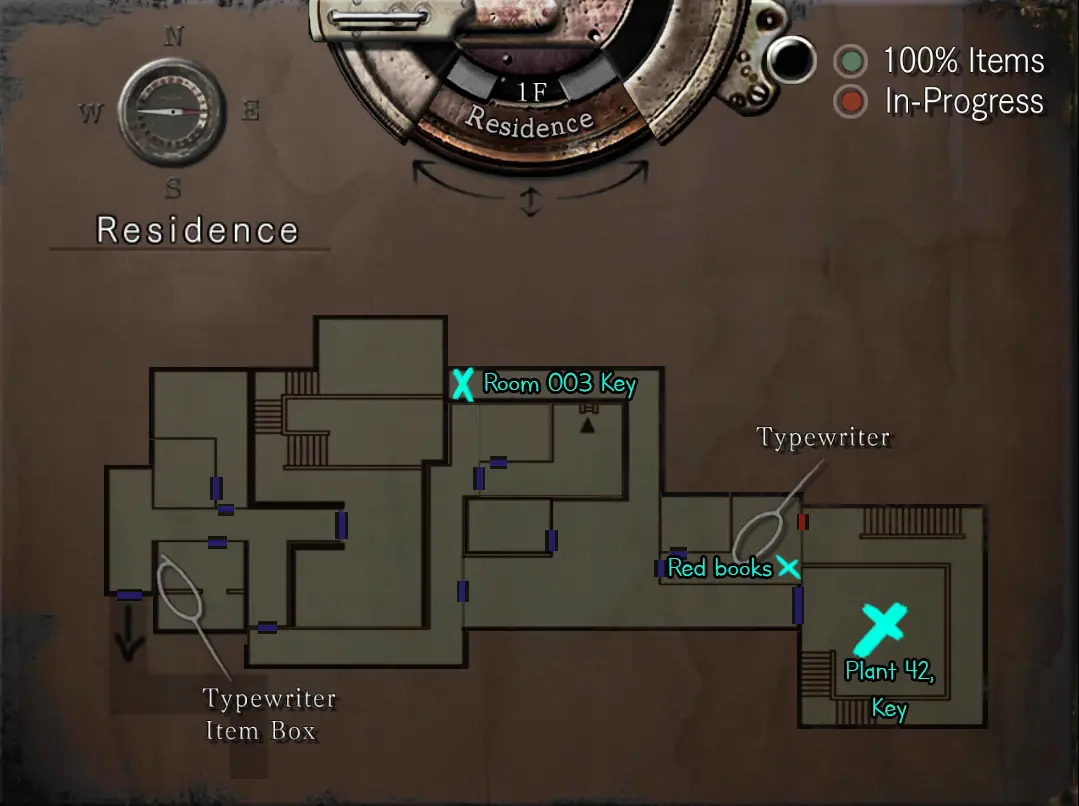
17) Pick up room 003 key now that the bees are gone. Wejdź do pokoju 003, sort the books on the shelf by using the red book we picked up earlier (it’s my fav. venus painting yay) and enter the Plant 42 room to progress. After defeating Plant 42 pick up the key from the fireplace.
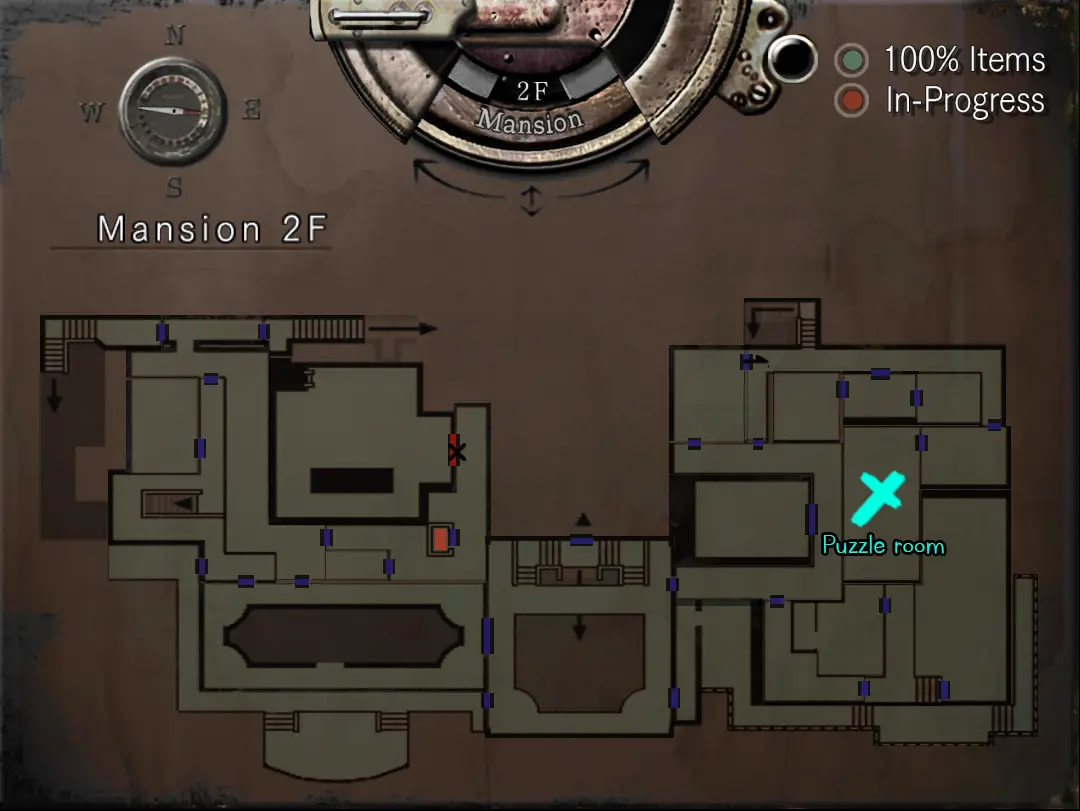
18) Backtrack aaaaall the way to the mansion again. Make your way to another statue room,
to reveal a hidden passage below. Before you descend further you’ll find a book with a medal inside.
19) Fix the power supply, get in the elevator.

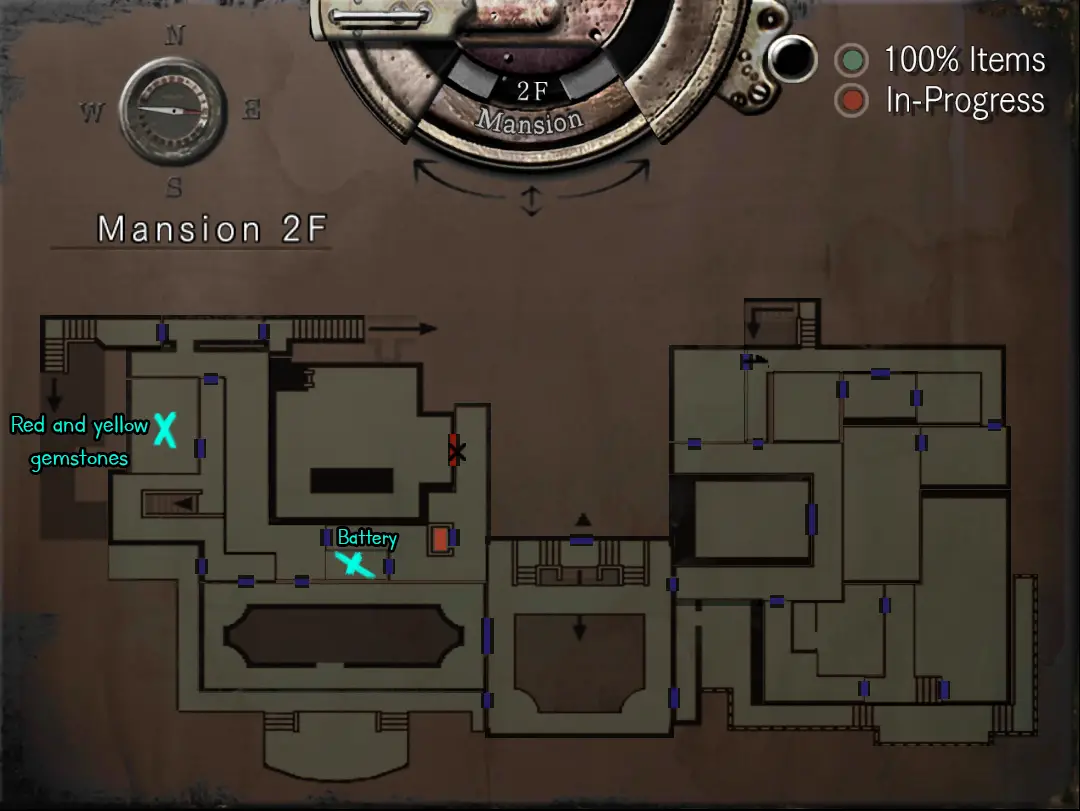
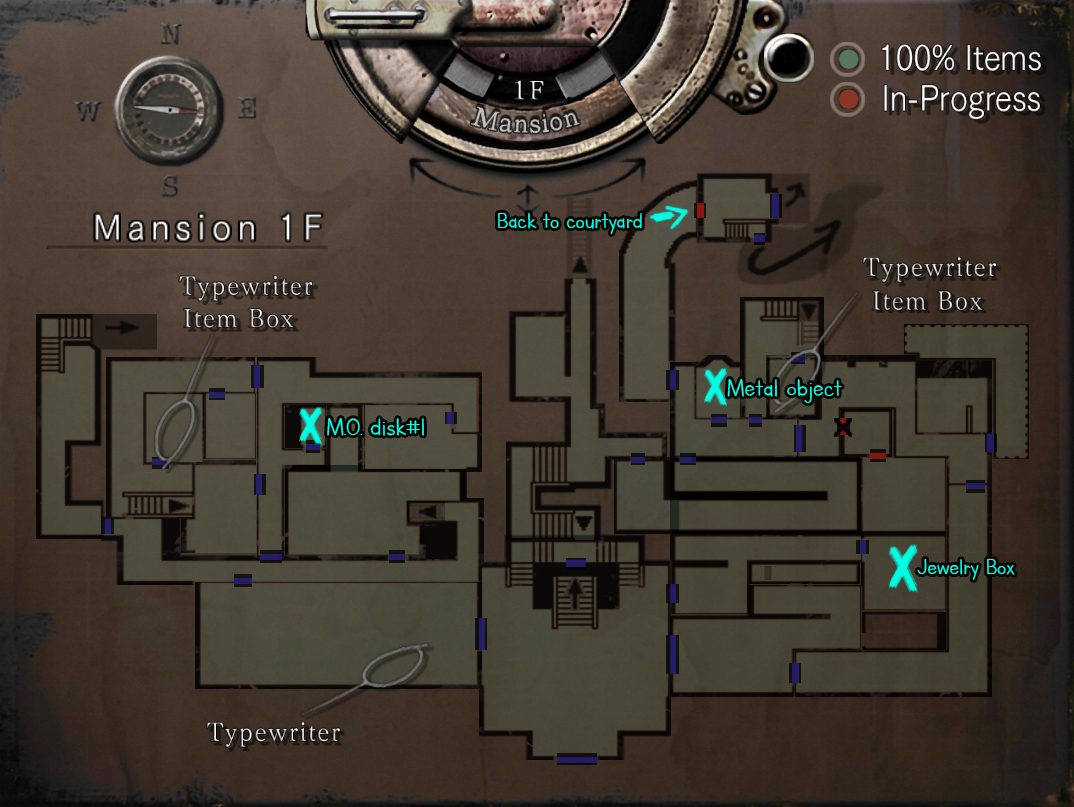
20) Pick up the battery. Pick up the red and yellow gemstones from the hawk room. Yellow is only needed for the first M.O disk. If you aren’t planning to save Chris later you can skip this and just pick up red gemstone.
21) We can now kill Yawn, after defeating him pick up the book and inside of it you’ll find another medal.
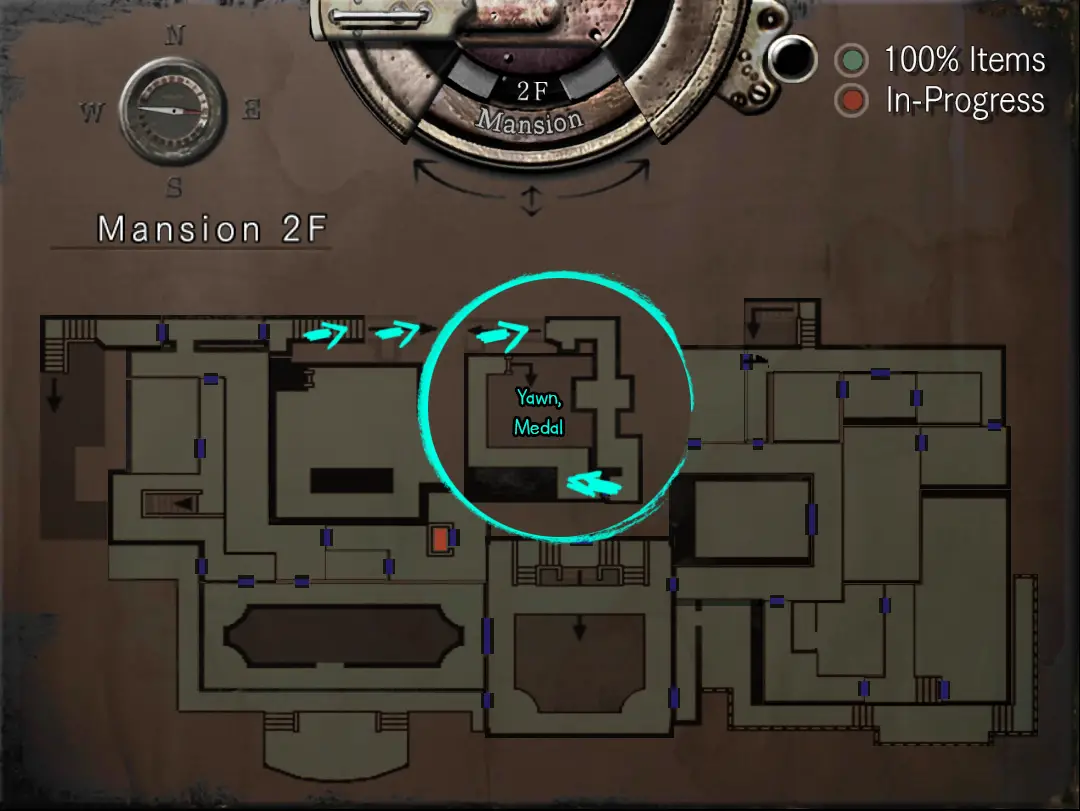
22) You can get the M.O disk now if you picked up yellow gemstone.
Pick up jewelry box and combine it with red gemstone to open it. Examine the broach, it’s going to transform into a key. Then you can enter the study room to pick up a metal object. After that go back to courtyard.
23) Take the elevator to the fountain area, use the battery pack on the broken elevator and go back to the pool. Use the crank on the pool. Then take the fixed elevator back to the waterfall and go down from the ladder.
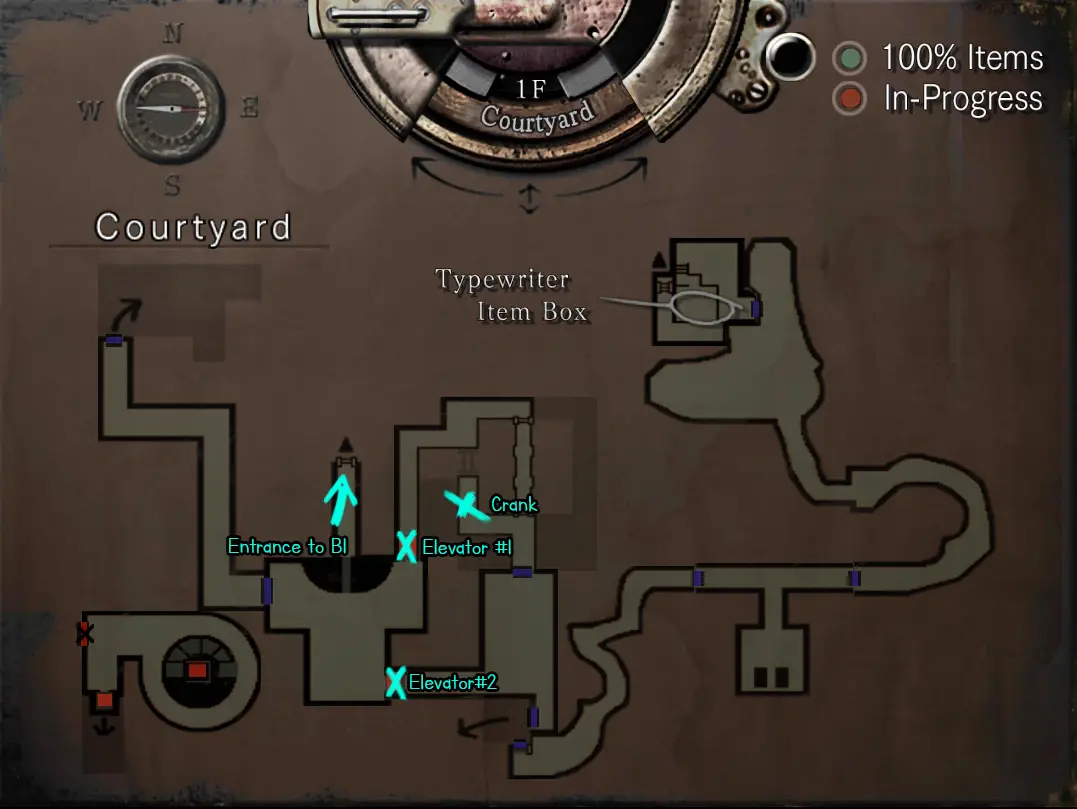
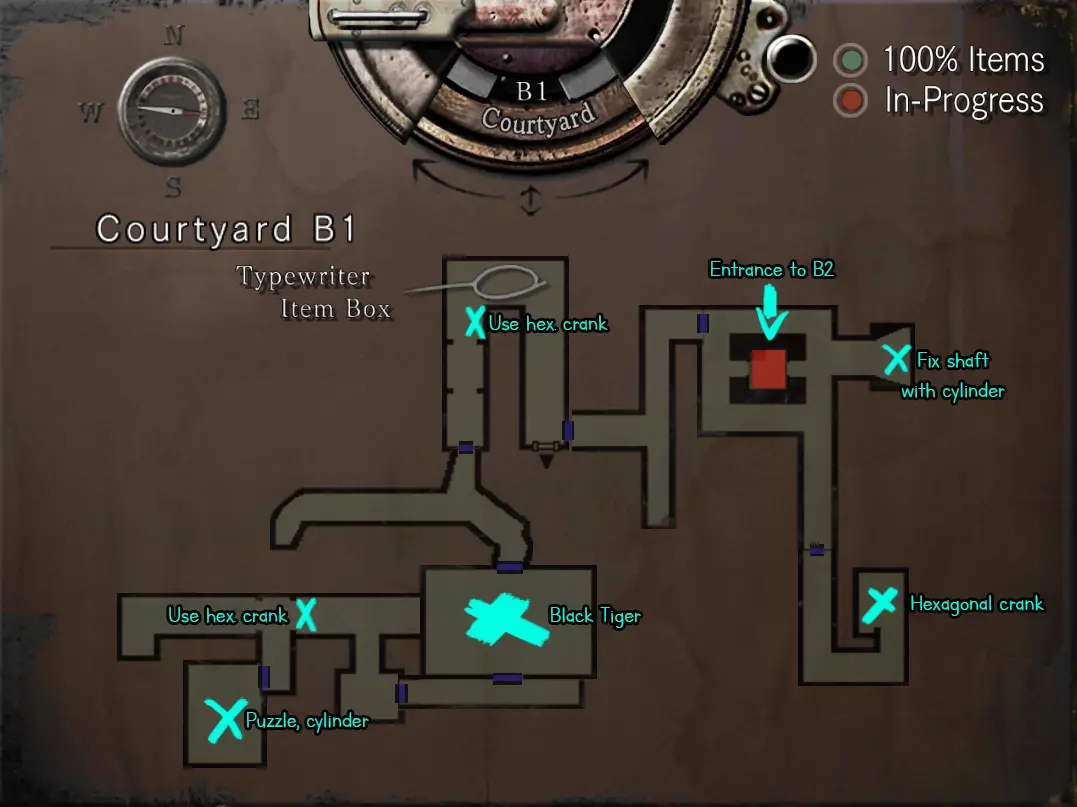
24) Pick up the hexagonal crank from Enrico’s body. Either defeat Black Tiger or pass through the room. You need to use the survival knife to clear up the door and go through. Solve the puzzle to get cylinder and go all the way back to the elevator. Pick up the shaft, combine with the cylinder and put it back (order of buttons are on the shaft) then take the elevator.
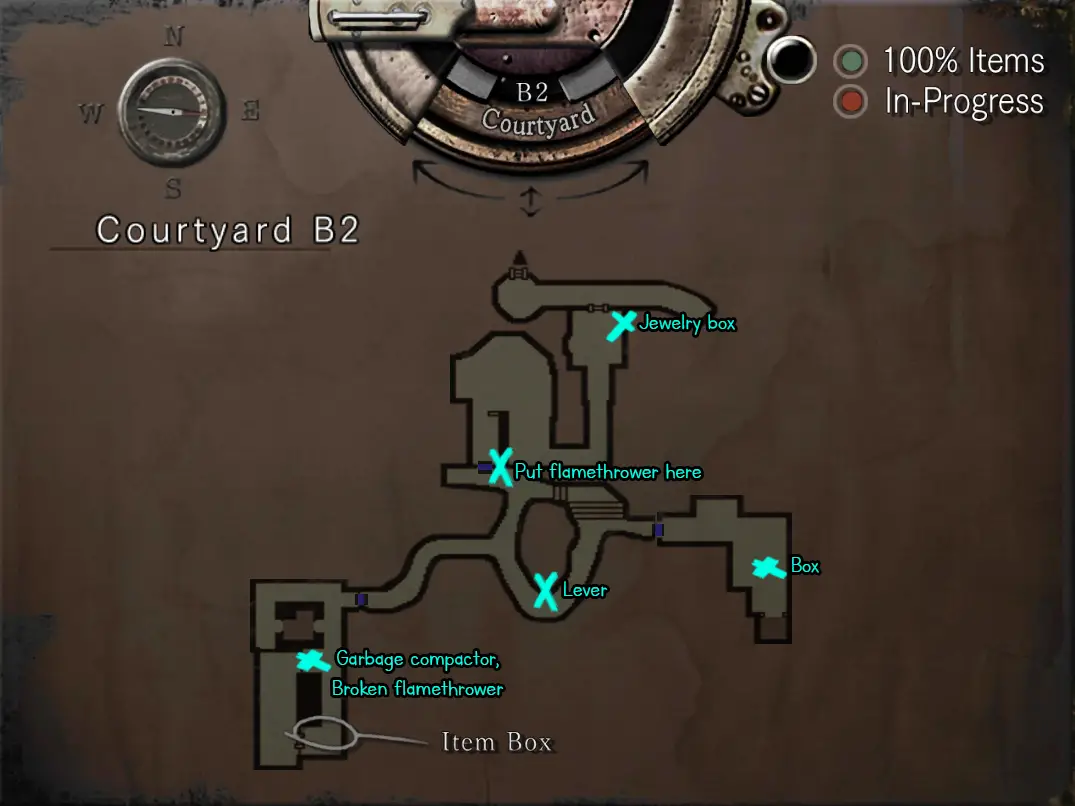
25) Push the box in the room to the device and move it downstairs. Then go back to the elevator room, take the ladder downstairs and use the garbage compactor to break the box. Pick up the broken flamethrower. Pull the lever in the hallway that Lisa is wandering around, use the broken flamethrower on the device next to the locked door to unlock it and enter. Pick up the jewelry box and use the ladders to climp up. Inside of the jewelry box you’ll find a stone ring. You can now combine stone ring and metal object.
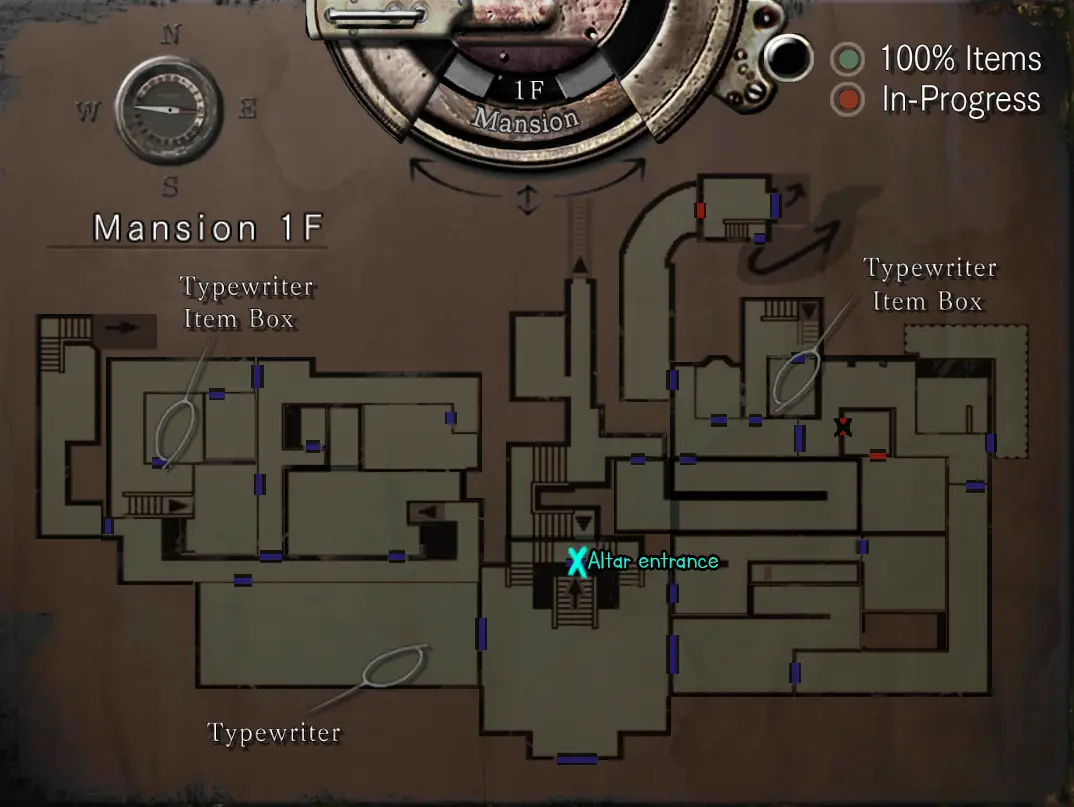
26) Go back to the mansion. You can enter the altar now.
Jill – Laboratorium
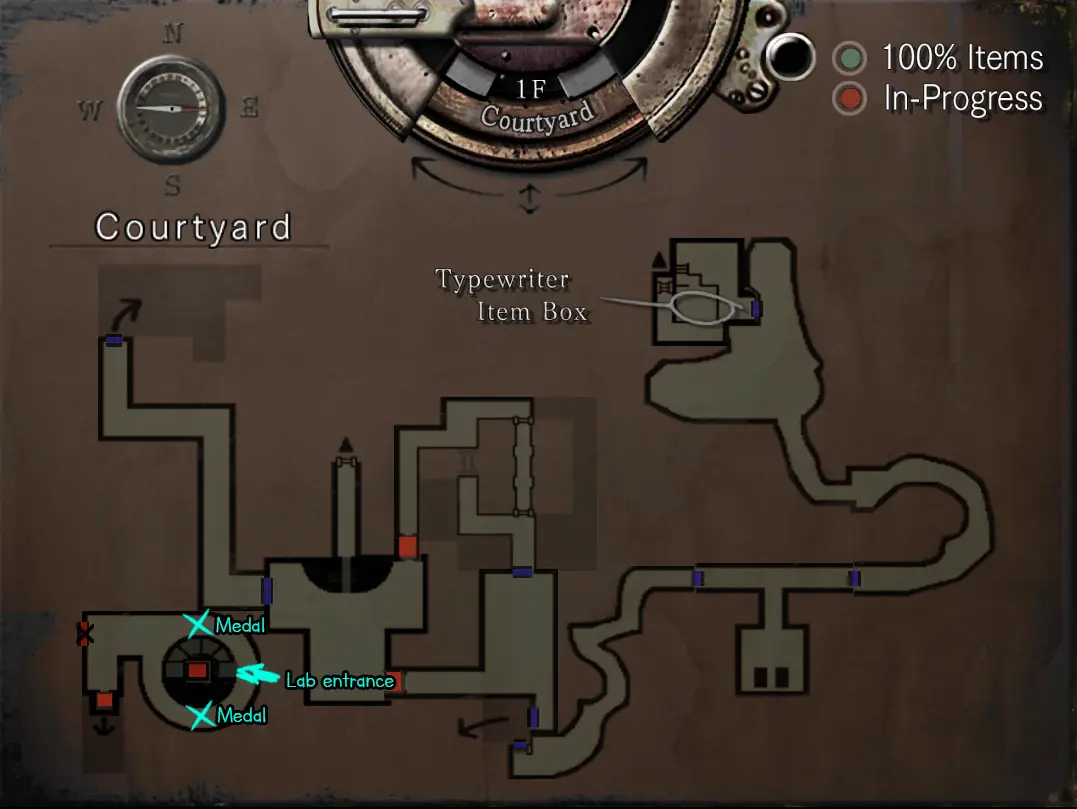
27) After you enter the altar, it’s pretty straightforward. Just follow the path and good luck with Lisa. After that proceed through the elevator and put both medals in their spots. Fountain/Pool thingy is going to be drained and we can enter the last part, underground laboratory.
28) Keep descending to Laboratory B3, enter the operating room and use the PC.
ID:JOHN
Hasło: ADA
Next password: CELL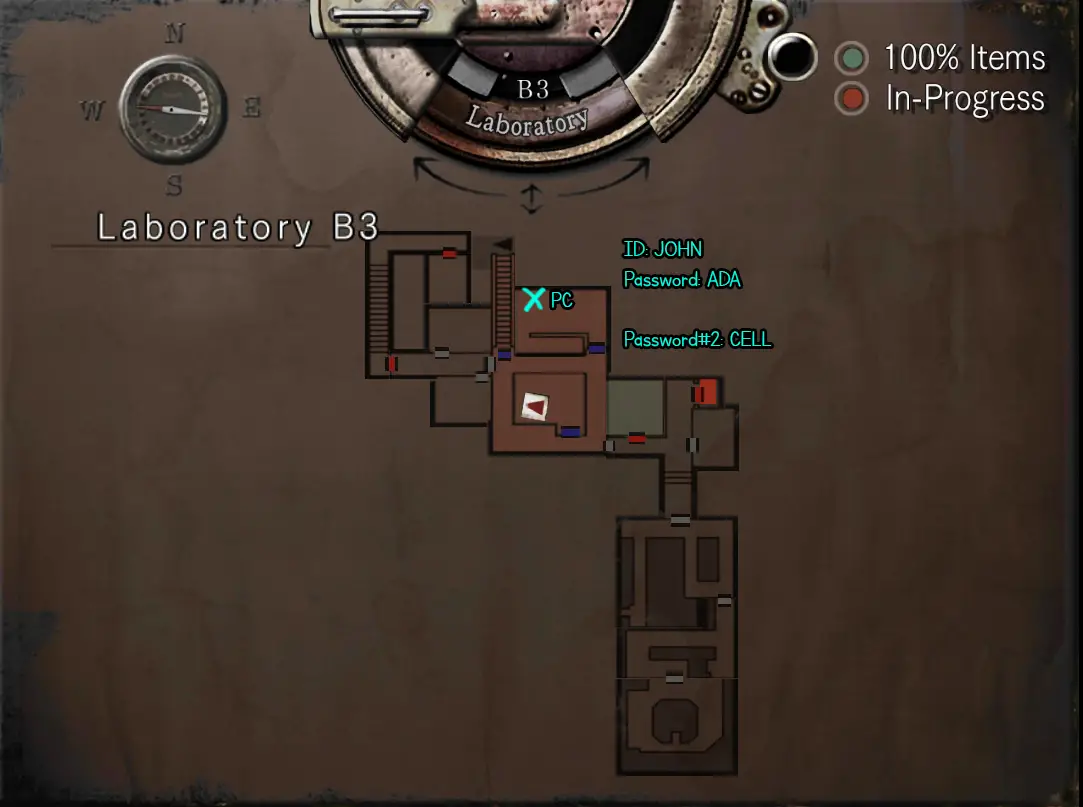
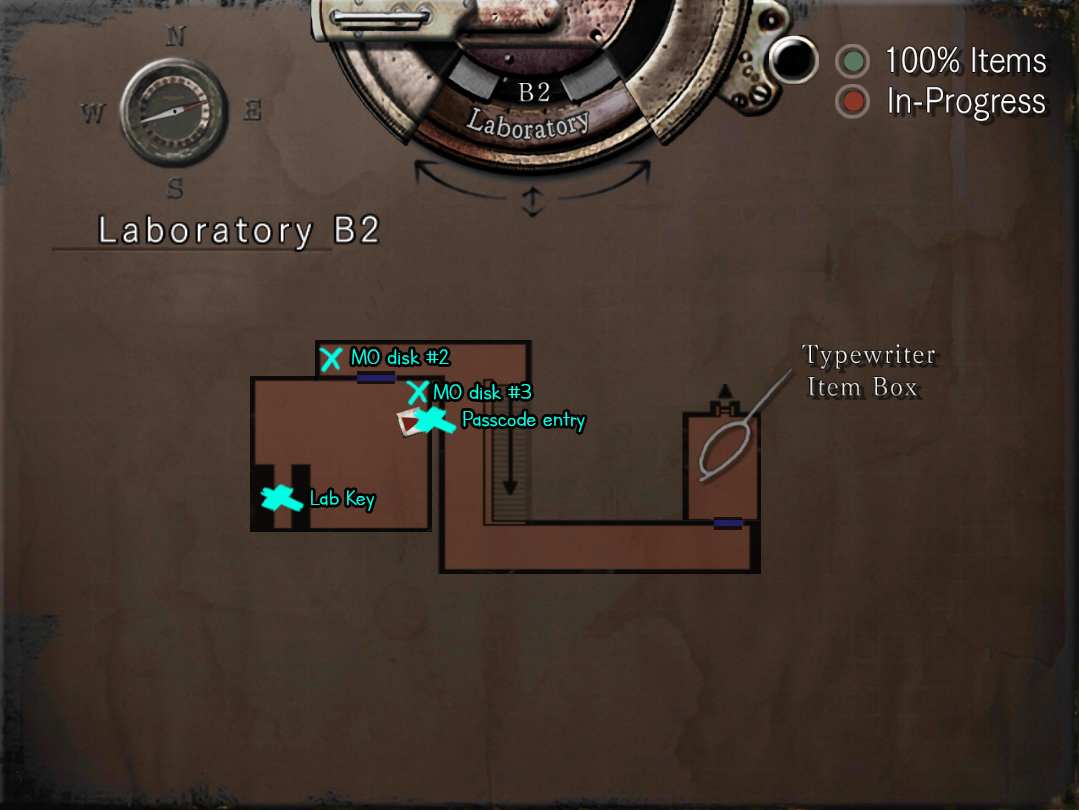
29) Go back upstairs, you now have access to the previous locked room. Before you enter pick up the 2nd MO disk from the desk. Enter the room and pick up the last MO disk from the corner on your left. (Ponownie, if you are not planning to save Chris just skip the disks.) In front of it on the wall there’s a passcode entry terminal,
code is 8462.Pick up the Lab Key from the desk inside of that area.
If you’d like to transmit MO disks to save Chris, here are the locations: 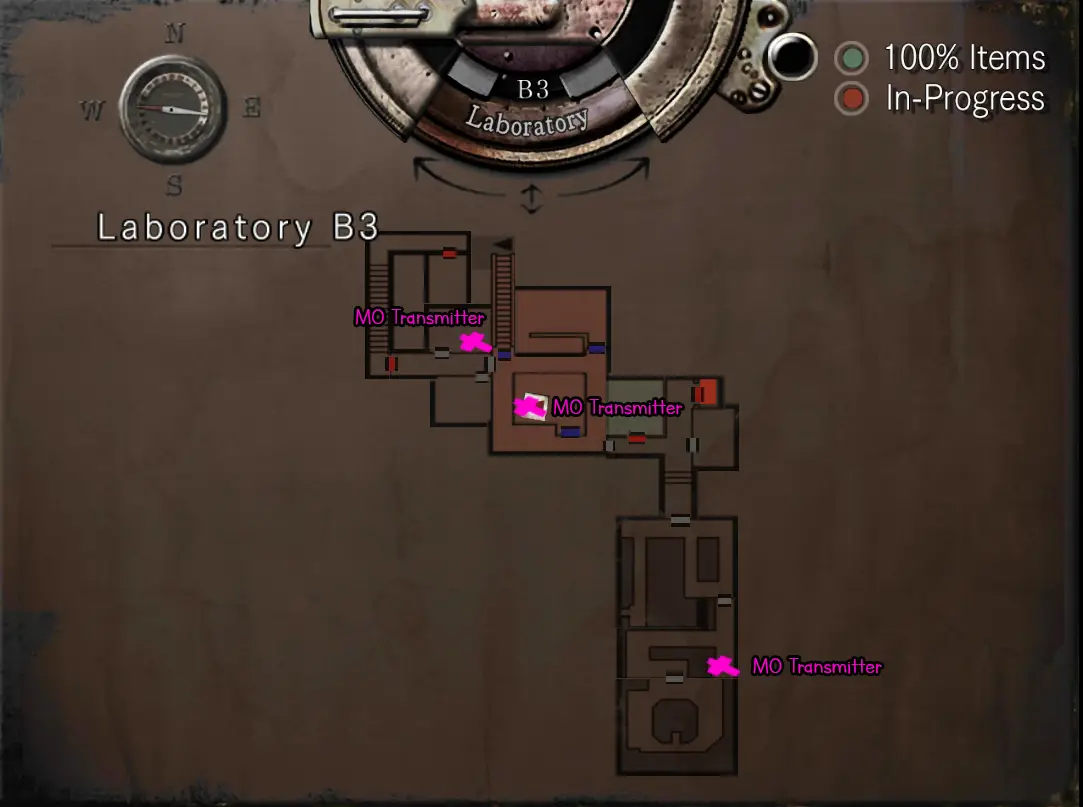
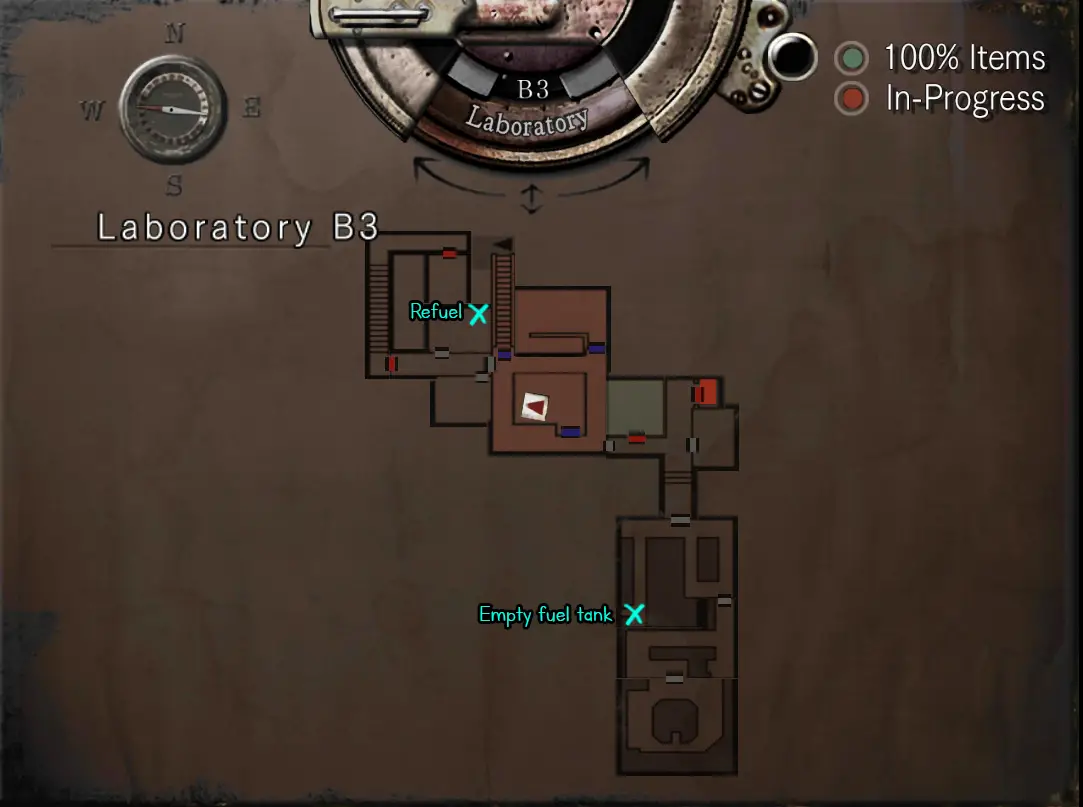
30) Proceed through the little corridors and pick up the empty fuel shell, refuel and place it back into its place. DO NOT RUN while carrying the full shell.
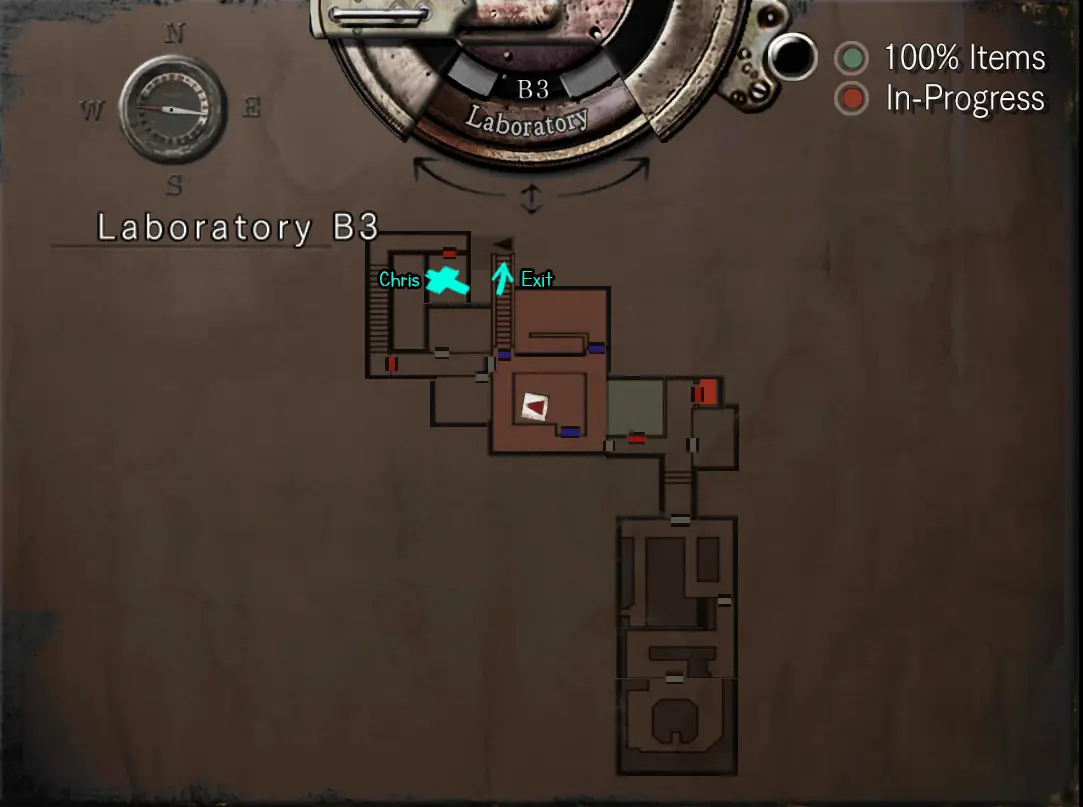
31) Reach the power switch thingy at the end of the little maze, power it up and then take the elevator.

32) Enjoy the cutscenes and Tyrant fight. If you didn’t save Barry don’t forget to pick up the key from the floor, if you saved Barry emergency alarm will start and locks will be released. Unlock the main lab by using the pc in the corner of the room and exit. If you transmitted the M.O disks you need to go to the cell Chris is being kept and take him out of there.
33) Run all the way to Laboratory B1 and fix the elevator’s fuse (missing piece is right in front of it). Signal Brad when you are ready.
Chris – Beginning to Lab
1) Check Kenneth and go back to main hall.
2) Go for the golden arrow at the location below. Examine it to get an arrowhead. Proceed to backyard and enter the tomb. Pick up the book from the stand and inspect it to get a key.
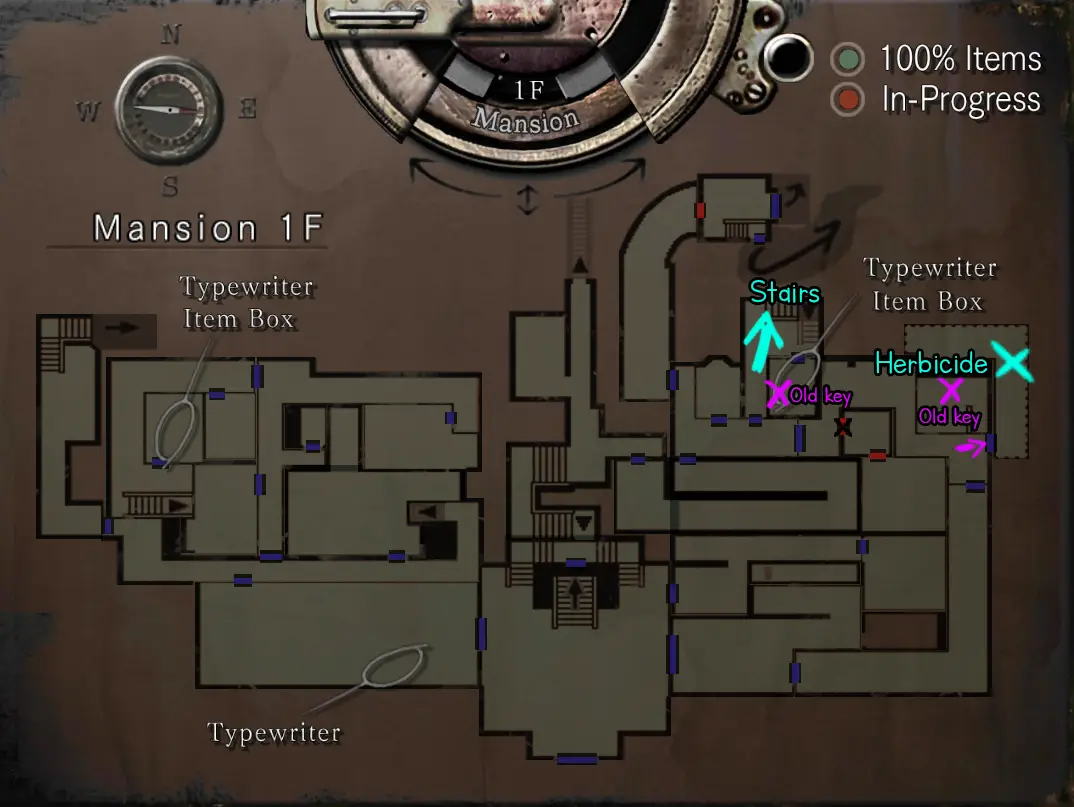
3) Pick up the old key from the bahtub, then use it to open the outside boiler door and pick up herbicide/plant chemical. On your way to the next location, pick up the old key from next to the typewriter.
4) Pick up dog whistle. Use the dog whistle on the balcony to get a collar. Inspect the collar to get an imitation key.

5) Pick up the real armor key and put the imitation key in its place.
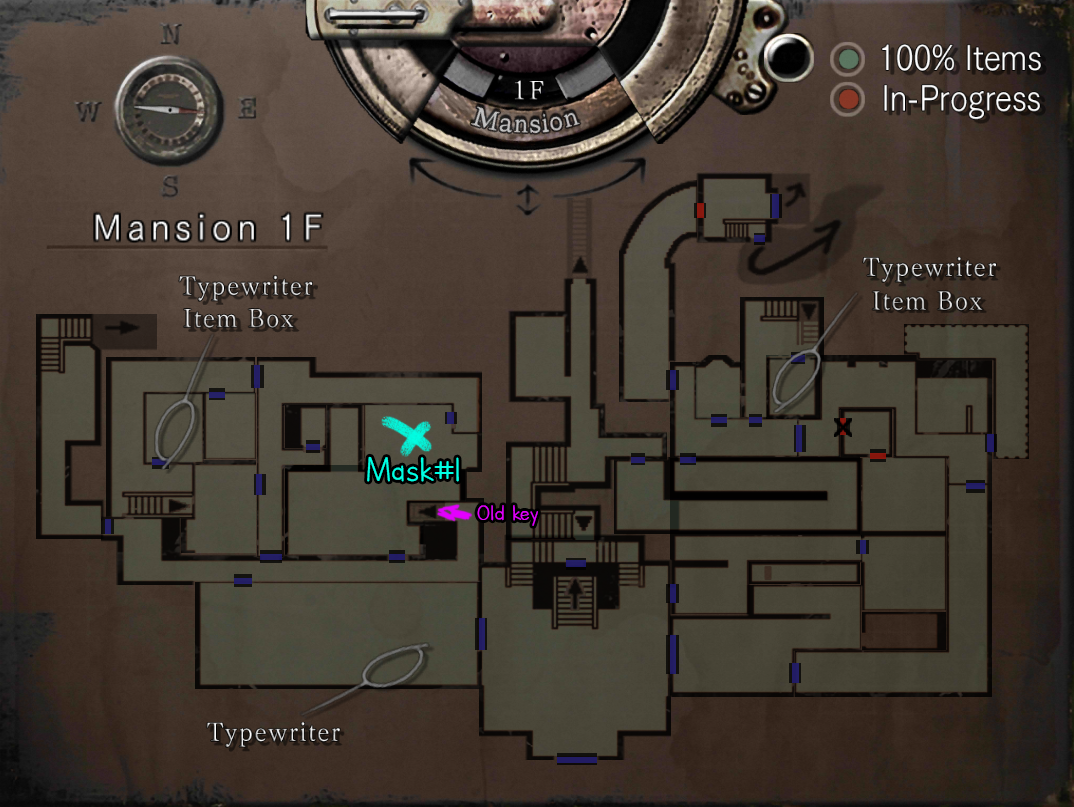
6) Use herbicide and obtain the first mask.
(Czerwony) Pick up the old key from basement (on the shelf in the corner.)
7) Statue room puzzle and mask #2. Then trigger Richard’s time and bring him the serum (or don’t? your choice. You can’t make V-JOLT later if you save him.) After dealing with Richard take the first musical score.
Statue room puzzle:
Top right
Bottom left
Bottom right.
Press the two sun pieces on the box.
8) Pick up the fake emblem from the dining hall (above the fireplace), go to the bar/piano room to obtain the other half of the musical score and combine both scores. Try to play the piano and Rebecca will come to help. Go to main hall and come back to take the golden emblem from the hidden room (Put the fake emblem in its place to get out). Go back to the dining hall to put the golden emblem in the original emblem spot above fireplace. This is going to make the clock puzzle available. You’ll obtain the key that opens Yawn battle room after solving clock puzzle.
(Large-Right x2)
9) First yawn battle, pick up the mask#3 from the corner of the room
10) Gallery Puzzle, obtain mask #4. Then put all of the masks in place for crimson prototype fight. When you are done with the crimson prototype you’ll find a stone and metal object inside of the coffin. This is the key to enter the courtyard.
11) After a smol puzzle (Red -> W, Blue-> N) to open the gates, proceed to the cabin to get the crank. When you try to leave you’ll have the first Lisa encounter. When you are out of the cabin, backtrack to the beginning and go for the pool. Use the crank, proceed through the pool and take the elevator. Follow the path to enter the residence.
12) Go to the billard room, pick up the book from downstairs and light the lamps(candles? not sure.) Make a mental note or screenshot of those with the billard balls for future use so you won’t have to come back here.
13) Obtain room 001 key from the bathroom shelf. Go to room 001 and pick up the control room key. Go back to room 002 and push the bookshelves to get to the ladder. Climb down.
14) Run around the sharks, go downstairs and do the control room puzzle. Then pick up gallery key. Then go back upstairs to the residence.
15) Enter the gallery, pick up the pesticide spray from the corpse. Use the spray on the bee nest. Go back to where the nest was and pick up room 003 klawisz. Get in the room and reorder the red books. It will open a door to Plant 42 walka. If you didn’t save Richard, when you enter the door you’ll switch to Rebecca to make V-JOLT. If you saved Richard just skip the next 2 steps and don’t forget to pick up the key from the fireplace after Plant 42 walka.

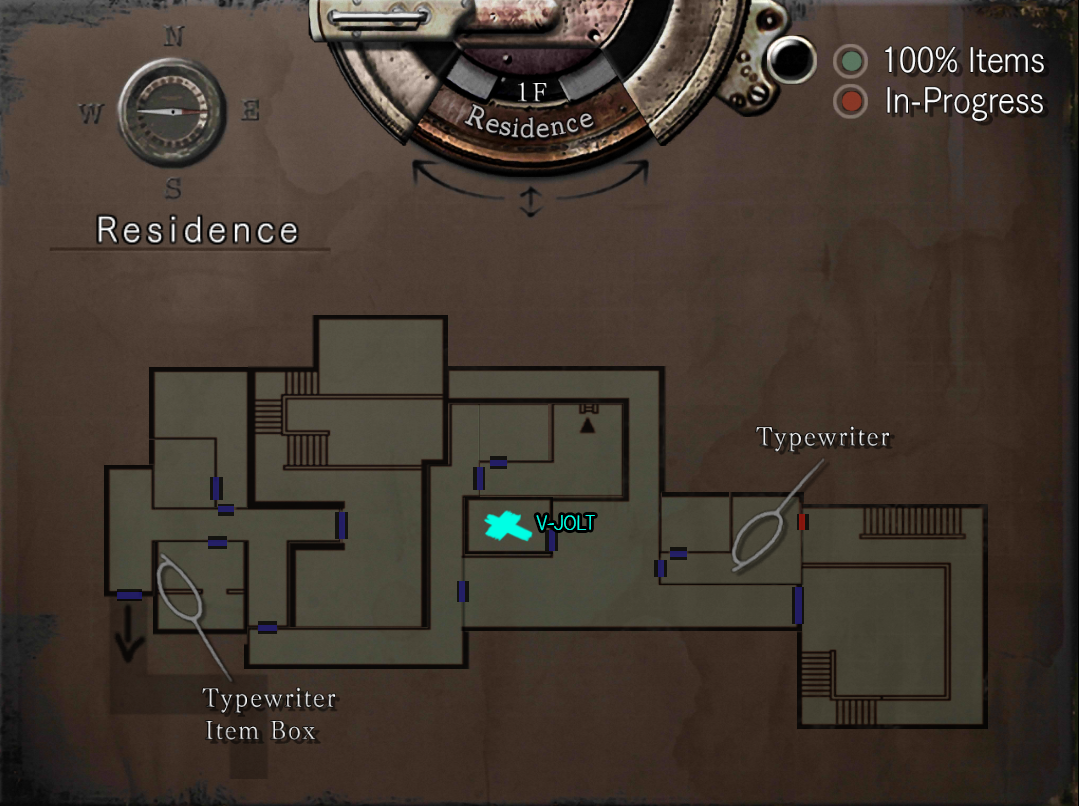
16) Use the code from the billard room we checked earlier (lamps and billard balls) to open the medical room and make V-JOLT.
V-JOLT Recipe:
UMB No.3 + Water = NP-004
NP-004 + Yellow-6 = UMB No.10
Yellow-6 + Water = UMB No.7
UMB No.10 + UMB No.7 = VP-017
VP-017 + UMB No.3 = V-JOLT.
17) Make your way to the aqua ring again and use V-JOLT on the Plant 42 roots.
18) Backtrack aaaaall the way to the mansion again. Make your way to another statue room, solve the puzzle to reveal a hidden passage below. Before you descend further you’ll find a book with a medal inside.
19) Fix the power supply, get in the elevator.
20) Pick up the battery. Pick up the red and yellow gemstones from the hawk room. Yellow is only needed for the first M.O disk. If you aren’t planning to save Jill later you can skip this and just pick up red gemstone.
21) We can now kill Yawn, after defeating him pick up the book and inside of it you’ll find another medal.
22) You can get the M.O disk now if you’d like to save Jill later.
Pick up jewelry box and use the red gemstone to open it. Examine the broach, it’s going to transform into a key. Then you can enter the study room to pick up a metal object.
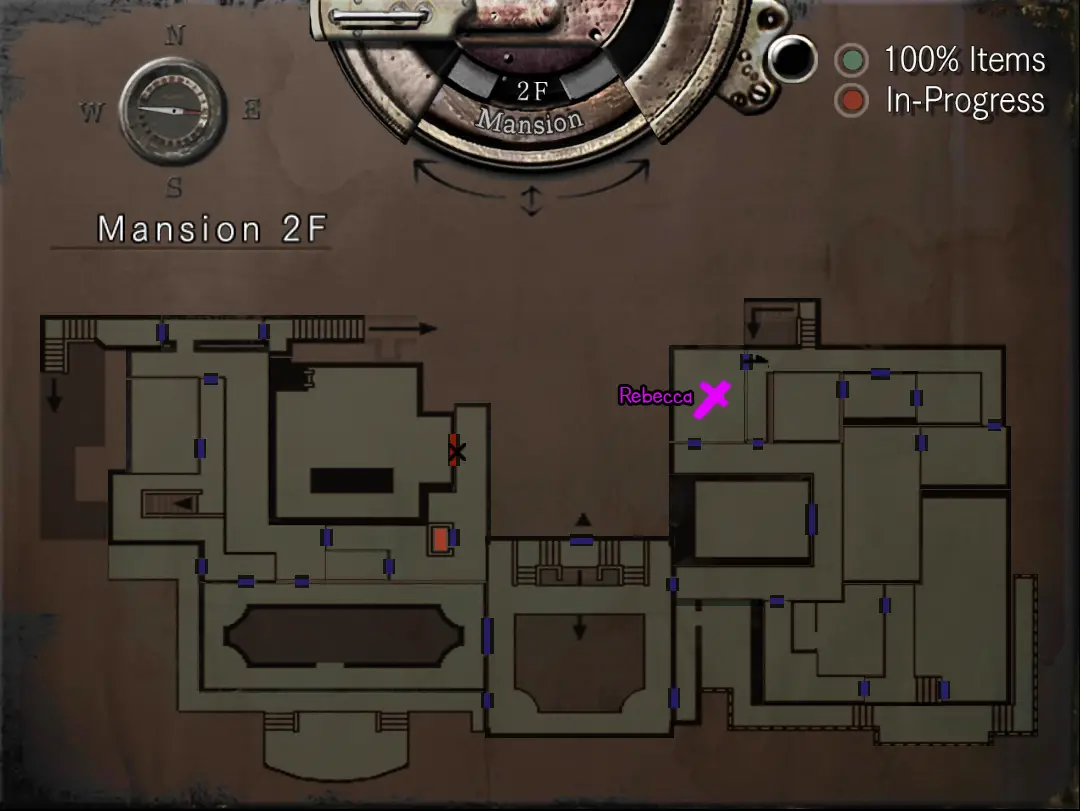
When you enter the room you’ll hear Rebecca scream. If you’d like to save her she’s upstairs. After that go back to courtyard.
23) Take the elevator to the fountain area, use the battery pack on the broken elevator and go back to the pool. Use the crank on the pool. Then take the fixed elevator back to the fountain/waterfall area and go down from the ladder.
24) Pick up the hexagonal crank from Enrico’s body. Either defeat Black Tiger or pass through the room. You need to use the survival knife to clear up the door and go through. Pick up and move the flamethrower on the ledge to unlock the door. Solve the puzzle to get cylinder and go all the way back to the elevator. Pick up the shaft, combine with the cylinder and put it back (order of buttons are on the shaft) then take the elevator.
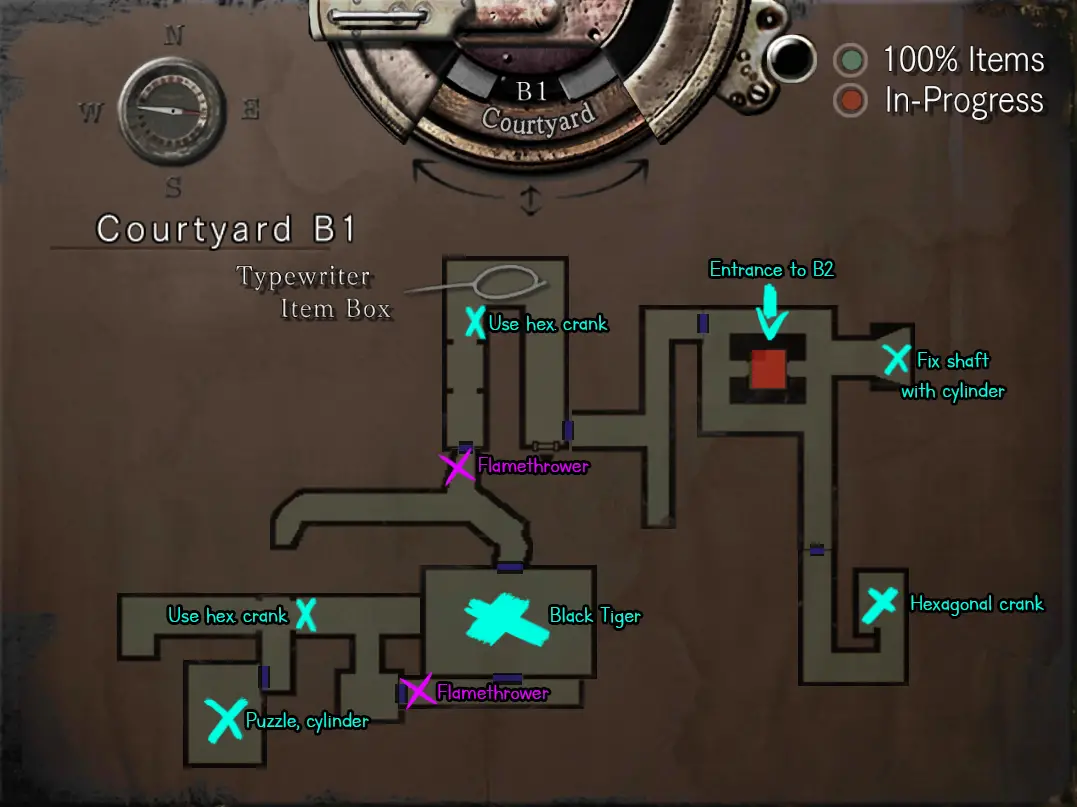
25) Push the box in the room to the device and move it downstairs. Then go back to the elevator room, take the ladder downstairs and use the garbage compactor to break the box. Pick up the broken flamethrower. Pull the lever in the hallway that Lisa is wandering around, use the broken flamethrower on the device next to the locked door to unlock it and enter. Pick up the jewelry box and use the ladders to climp up. Inside of the jewelry box you’ll find a stone ring. You can now combine stone ring and metal object.
26) Go back to the mansion. You can enter the altar now.
Chris – Laboratorium
27) After you enter the altar, it’s pretty straightforward. Just follow the path and good luck with Lisa. After that proceed through the elevator and put both medals in their spots. Fountain/Pool thingy is going to be drained and we can enter the last part, underground laboratory.
28) Keep descending to Laboratory B3, enter the operating room and use the PC.
ID:JOHN
Hasło: ADA
Next password: CELL
29) Go back upstairs, you now have access to the previous locked room. Before you enter pick up the 2nd MO disk from the desk. Enter the room and pick up the last MO disk from the corner on your left. (Ponownie, if you are not planning to save Jill just skip the disks.) In front of it on the wall there’s a passcode entry terminal,
code is 8462.Pick up the Lab Key from the desk inside of that area.
If you’d like to transmit MO disks to save Jill, here are the locations:
30) Proceed through the little corridors and pick up the empty fuel shell, refuel and place it back into its place. DO NOT RUN while carrying the full shell.
31) Reach the power switch thingy at the end of the little maze, power it up and then take the elevator.
32) Enjoy the cutscenes and Tyrant fight. If you didn’t save Rebecca don’t forget to pick up the key from the floor, if you saved Rebecca emergency alarm will start and locks will be released. Unlock the main lab by using the PC in the corner of the room and exit. If you transmitted the M.O disks you need to go to the cell Jill is being kept and take him out of there.
33) Run all the way to Laboratory B1 and fix the elevator’s fuse (missing piece is right in front of it). Signal Brad when you are ready.
To wszystko, co dzisiaj udostępniamy w tym celu Resident Evil przewodnik. Ten przewodnik został pierwotnie stworzony i napisany przez Aurora. Na wypadek, gdybyśmy nie zaktualizowali tego przewodnika, możesz znaleźć najnowszą aktualizację, postępując zgodnie z tym połączyć.