
- Tytuł: Port Royale 4
- Data wydania:
- Wywoływacz:
- Wydawca:
Information about Port Royale 4 jest nadal niekompletny. Pomóż nam wypełnić szczegóły gry za pomocą tego formularz kontaktowy.
This guide will take you step by step through the first campaign in Port Royal 4. The Spanish campaign is the first and only campaign available when you first start the game. Upon completing the campaign you will unlock the English, French and Netherlands campaigns and can choose to complete any of those in any order you would like.
To get started let’s open up Port Royal 4 and click the Campaign button. If you have yet to complete the Spanish campaign it will be your only option available. Click the continue button to begin the Spanish campaign.
Creating a character & choosing classes
When starting out a new campaign you have to choose a class to play as, your choice will not alter the campaign however, the class you choose will make a significant difference to your play style during the campaign.
There are four available classes to play during the campaigns they are Merchant, Buccaneer, Pirate and Adventurer. The Spanish campaign serves as a long tutorial for the game and teaches you many of the basics of how the game is played. The tutorial stages will help get you started but skipping them is possible. Let’s take a look at each of the available classes. As a side note as you are selecting your class they will sometimes be either male or female there is no difference to how the class plays regardless of it’s gender. If however you want to be female or male and get the opposite sex just keep clicking through the classes the next time you come around to that class it should be the opposite sex as the last time. This only works if you keep clicking the right or left arrow to cycle through the choices if you go back and forth the sex does not change.
If you’re not interested in the classes you can skip to Objective 1 tasks due by June 1572 – Grudzień 1572
The Merchant Class
As this game is mostly about trading I would consider the merchant class to be the easy mode of the game especially in free play sandbox mode. There are some aspects of the campaign that will be more difficult as the Merchant class but the bonus for trade and resulting increased wealth will generally more than make up for any short comings the class has. There are few problems you can’t just throw money at.

Let’s break down these traits.
Does not require a trade license: In Port Royal 4 in order to trade with a town you must have a license. The merchant class gets these for free but any other class will have to buy one at each town they wish to trade. During the Spanish campaign you can trade in any Spanish port without a trade licenses but they start at 50,000 gold each for other countries ports. They also scale with your wealth as you progress with the game so it’s not uncommon for these to cost tens to hundreds of thousands of gold later on for the non-merchant classes.
Is able to trade with all nations, even at war: This perk will not come into play during the Spanish campaign as there are no wars. However if you were in free play mode this perk allows you to trade even during wars. Sometimes that risk reward is worth it others it’s more about convenience.
Combat vessels will cost twice as much fame points: Again as there is not much combat in the Spanish campaign this doesn’t make much of a difference. The only ships that cost fame in the campaigns are the top tier ships and you wont even need them for this campaign.
Merchant conclusion: The Merchant doesn’t need trade licenses to trade with the other countries, that’s convenient at the start but hardly a bonus to write home about. As the first campaign every class gets a bonus allowing them to trade with any Spanish port without a license thus the Merchant class brings almost no upside to the first campaign.
The Buccaneer class
So the Buccaneer class is basically billed as a Privateer with some advantages to help during the legal combat covered by “Letters of Marque”. During the Spanish campaign they get the bonus of not needing trade licenses for Spanish ports but will have to pay to trade with other nations.
Let’s break down these traits.
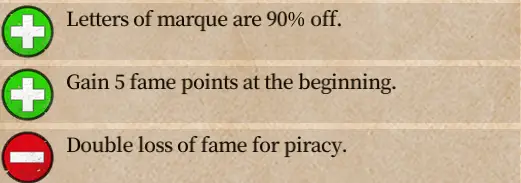
Letters of Marque are 90% wyłączony: These are commonly several hundred thousand gold and scale with your wealth. This is a huge discount if you plan to attack other countries as the letters are only good during a war and you have to buy them over and over as wars stop and start. During the Spanish campaign there is no war they might make you buy one for one of the tasks but that’s it.
Osiągać 5 fame points at the beginning: This is a flat one time bonus at the start of the game granting you an extra 5 fame points. You need fame to hire captains, unlock different production buildings and perks from the viceroy and to purchase administration rights to a town. Overall this is a helpful perk.
Double loss of fame for piracy There are two types of attacks in Port Royal 4, legal attacks against a country during wartime using “Letters of Marque” and piracy which let’s you attack convoys of your own or other nations when not at war. Piracy is hard. Losing fame is not good as you will need it for most of the tasks your given so you can’t afford to be giving any away. This isn’t Sid Meir’s Pirates! but play how you like.
Buccaneer conclusion:
You won’t get much help from the Letters of Marque discount or the double fame losses for piracy. Getting to start with an extra 5 fame is a good leg up and since you can already trade with Spanish towns without a license there is some real value in the extra starting fame.
The Pirate Class
I am sure lots of people pick this class just because it’s a pirate. Well being a pirate is hard in this game. Once you start attacking others you will be hunted and none of the traits are helpful for the Spanish campaign. If you want to be a pirate in free play sandbox mode more power to you but it won’t help much in the Spanish campaign.
Let’s break down these traits.
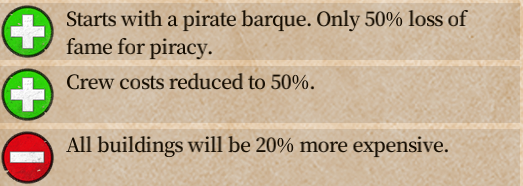
Starts with a pirate Barque and only 50% loss of fame for piracy: The piracy loss perk is nice so you don’t take as many fame hits but you won’t likely do much pirating during the campaign. The Pirate Barque is a nice little bonus to start you get an extra ship. It can hold a little less than a regular Barque but it does have 24 guns on it. I should probably mention that only ships with guns can attack in Port Royal 4 so a regular Barque is just a unarmed merchant ship so you start with the tools to attack others. You will also start with a captain their skills and level are random so some will be helpful others not so much. A captain is required since you need a command point to use the Pirate Barque.
Crew costs reduced to 50%: This is a really nice bonus as the crew on convoys that can attack is a huge expense. Since there is little fighting in the Spanish campaign this bonus will be mostly loss. Later in the game a large battle convoy can cost about 13k (lub więcej) per day just for the crew if you can cut that in half you could be saving upwards of 200k per month on just that one convoy.
All buildings will be 20% more expensive: This is a big penalty for the Spanish campaign. There will be many objectives which will require you to build in the various cities, this penalty make that more expensive.
Pirate conclusion:
Like most of the non-merchant classes the Pirate suffers from a lack of combat in the Spanish campaign that make most of their traits less than helpful. Additionally the building cost penalty is one of the harsher ones based on how this particular campaign plays out.
The Adventurer class
Like all the non-merchant classes for the Spanish campaign the Adventurer will be able to trade with all Spanish ports to start without a license but must pay to trade with other countries. It is a solid rounded pick that does not suffer to much under the rules that govern the campaign.
Let’s break down these traits.
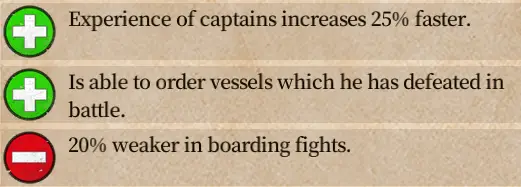
Experience of captains increases 25% szybciej: Gaining experience faster is a nice perk during the Spanish campaign you will need at least one captain for the battles so you will still get some use out of this trait. You could get some specialized captains that could help you with some tasks and level them up faster than the other classes could.
Is able to order vessels which he has defeated in battle This is a nice perk that will let you order some ships that would not be available to you normally. This can be useful in free play sandbox mode but in the limited combat from the Spanish campaign it likely won’t help you much.
20% weaker in boarding fights In Port Royal 4 there are two types of combat Automatic and Manual. If you choose Automatic I am not sure how much this trait will hurt you and with the limited amount of combat in the Spanish campaign it likely won’t make much difference for you. In Manual battles where you control the ships there are three options, attacks that sink your enemy, attacks that reduce the crew of your enemy, and boarding attacks which seize control of enemy ships. If you sink enemies you get no cargo or ships from them but if you board and seize them you can take their ships for yourself and or sell them back to the person you attacked for gold. I prefer to capture ships so this trait is bad for me but if your not fighting it doesn’t matter and you will not be fighting much during the Spanish campaign.
Adventurer conclusion: The faster captain experience is nice, you might get a chance to buy a ship you captured but would not have been able to buy otherwise. The penalty to boarding fights will only come into play twice unless you go crazy with some piracy.
Cel 1 tasks due by: Czerwiec 1572 – Grudzień 1572
The Spanish campaign begins on January 1, 1572 the Spanish colonies occupy thirty towns or one half of the map. You will start in the town of Seville which is centrally located on the map. You are appointed as the administrator of this town which means you are in full control of what buildings and businesses are placed you can even buy out businesses that are owned by the AI and once you own them move them around in the town.
To start the game you are given three objectives.
These objectives are setup to be easy and you are given ample time to get your feet wet with how trading works. Note if you fail to complete any of the objective by the end of the date listed it’s game over you lose and have to start over or reload a save game.
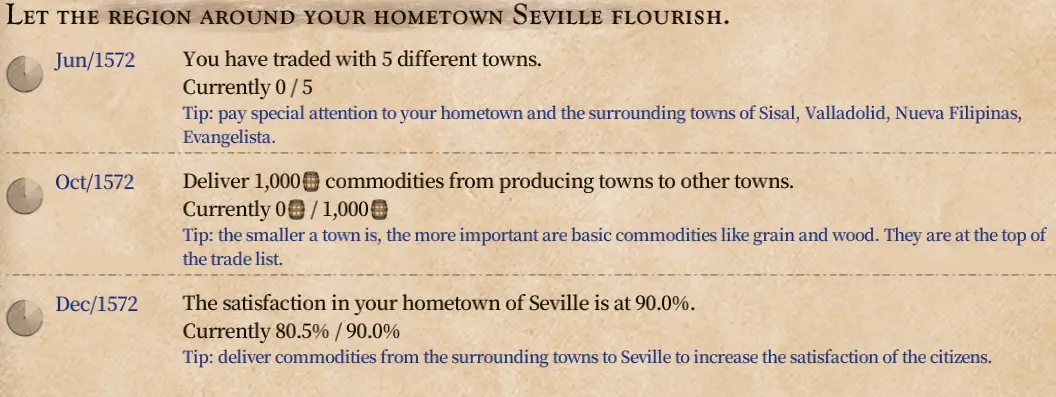
Trade with 5 different towns:
Every game of Port Royal 4 will rely heavily on trade. It is a main component of the game, even if you want to be a privateer or a pirate it would be best to set up a few trade routes to provide income for your other adventures. Here your given six months to trade with five or more towns. As every class has been granted permission to trade with Spanish colonies you can just trade either automatically or manually with a few other towns to satisfy this goal.
Dostarczać 1,000 barrels of commodities:
You should fulfil this objective just by working on trading with a few towns basically buy stuff where it is made and sell it where you can get more money from it. (Or not technically there is no rule about having to make a profit) However you should aim to make some gold here.
Satisfaction in your hometown of Seville at 90%:
This is the only task I have noticed that can have different starting levels, I have seen games start as low as 50% or as high as mid 80%. Either way the best way to raise satisfaction is to simply provide commodities that are in short supply in your home town. Buy products that Seville is either short of or can’t produce and bring them there and sell that’s all there is to this one.
Overall you have a year to complete these three objectives (make sure you complete them by their individual due dates so you don’t fail. If you complete them early you can start working on the next set of objectives, completing objectives early or at the last moment will not change the dates of subsequent objectives.
Cel 2 tasks due by: Feb 1573 – Aug 1573
Congratulations you have completed the first set of tasks and are ready for more. The next set of tasks need to be completed somewhere between February and August 1573. If you completed the previous tasks early you may want to spend a little time buying some extra ships and setting up your trade empire, If you already did some of that lets get started on these tasks.
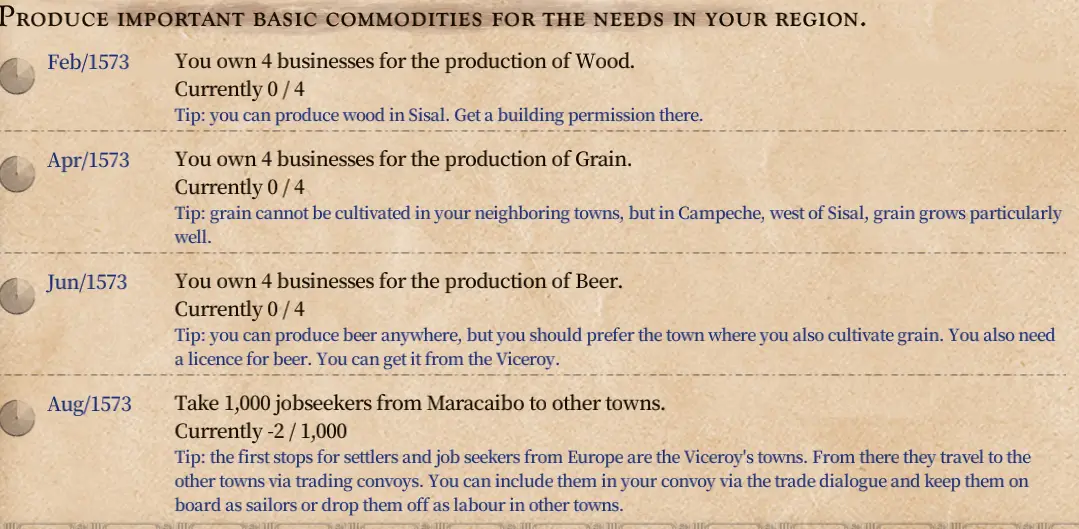
Own 4 businesses for the production of wood in Sisal: For this task and the other ones that say own production buildings you will need to buy a permit to build in the individual colonies you want to build businesses in. Buy the permit to build in Sisal it’s just to the west of your starting home city. Once you have that you can start building Tartaki you will need four of them, if you build them adjacent to each other you get a production bonus.
Own 4 businesses for the production of grain in Campeche: This is a repeat of the above task only in a different town, once again buy a building permit and this time go about building four Cropland in Campeche which you will find just to the south west of Sisal.
Own 4 businesses for the production of beer: This is another repeat with a small twist, while you can build a Browar anywhere grain is required for the production of beer. You can save yourself some money and utilize your own business for supply by also building these buildings in Campeche. For another twist you will need a concession from the viceroy so you can build these buildings. See the notes below on how to get fame and concessions.
Brać 1,000 jobseekers from Maracaibo to other towns: This task is annoying but easy, if you wait for your trade convoys to do this one automatically you will fail, this one is a manual kind of task. First take one of your convoys to Maracaibo the town of the Spanish viceroy. It is marked with the crown and is a decent trek to the south east if you have not already been there. To move the job seekers you need to manually trade them like a commodity and make them part of your crew. Note you can only move as many job seekers as you have room for crew so you may want to bring a convoy with multiple ships. Second note while Jobseekers will not cost you a purchase price you will have to pay them as crew once they are on your ship so they are not free. Once loaded onto your ship as crew take them to the closest ports and just offload them. Rinse and repeat until you have moved 1,000 of them fortunately there are no other tasks like this one.
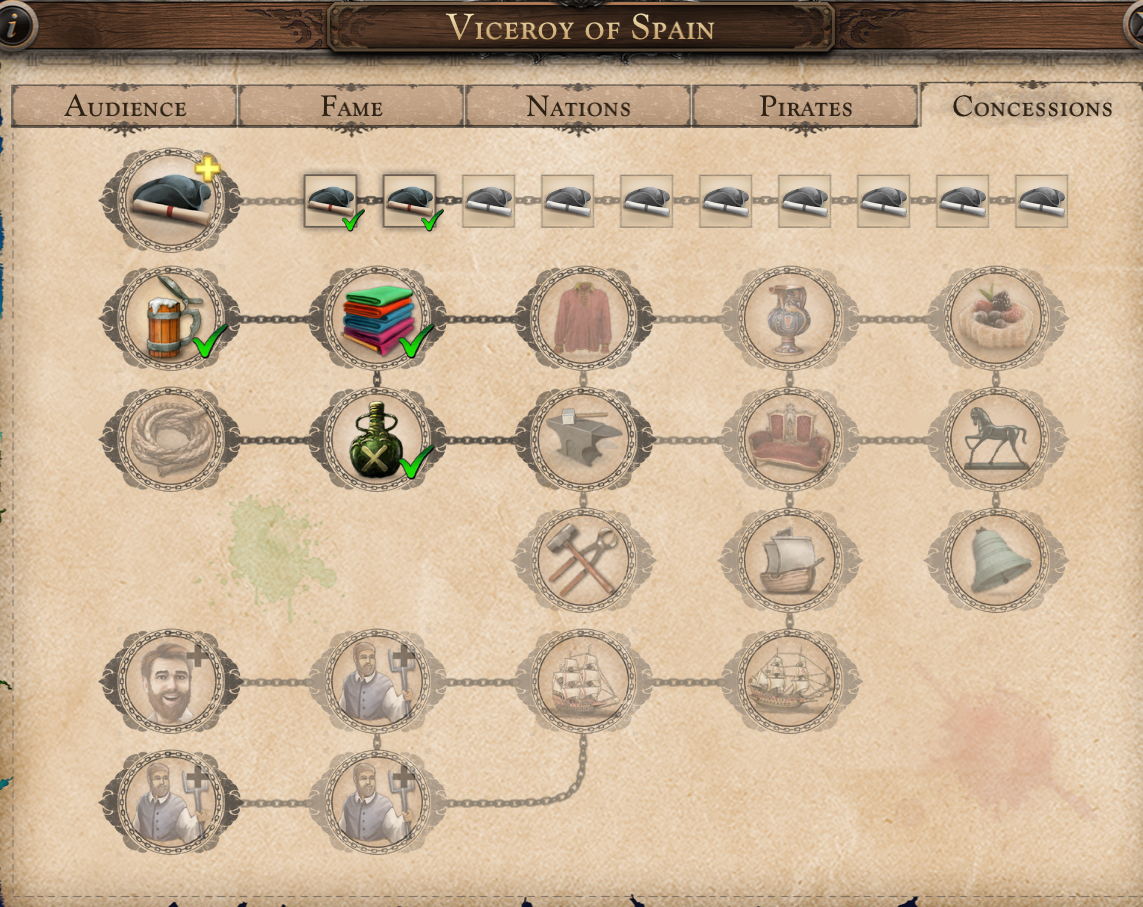
There are going to be two main ways to get fame during the Spanish campaign (really during any game) Complete missions that are marked with a star they appear randomly a few times a month on the map, they can be several categories but during the Spanish campaign they will almost all be trade related, either buy a number of a product in a port or deliver a number of a product to that port. You may want to keep a fast convoy available to complete these as they reward both fame and tactics or pieces of treasure maps.
The second way to earn fame is by delivering the colonial staple products to your viceroy’s city each month so they can be taken back to Europe on the treasure fleet. The products they are looking for are Cotton, Tobacco, Kawa, and Cacao. The amount of each product they are looking to send can be found on the viceroy fame tab. Once you collect so much fame you get a concession from the viceroy which you can use to unlock various perks, businesses etc. This is where you will need to spend one concession to be able to build the brewery in towns.
Cel 3 tasks due by: Oct 1573 – Czerwiec 1574
The next set of objectives is more building production and more good to deliver.
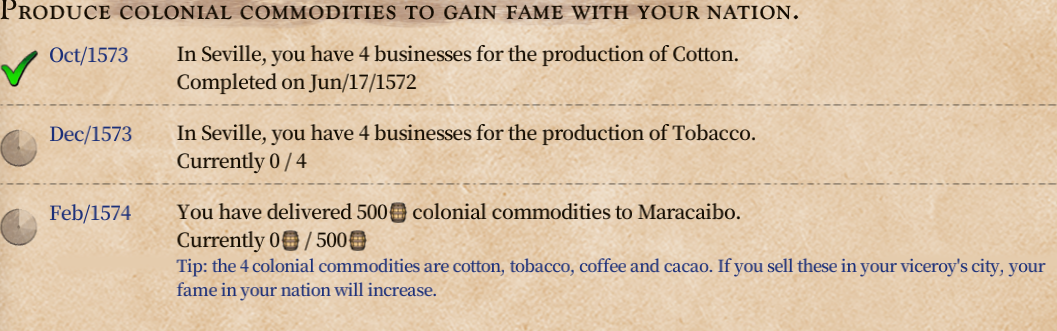
For this task your building in your home port of Seville you need to build four of each cotton and tobacco plantations. Once you have built these buildings or even before hand you need to deliver 500 total colonial products (Pamiętać: Bawełna, Tobacco, Kawa, Cocoa)
Once you have completed the above tasks you will be given two more as part of these objectives.

Here your just building eight more total businesses this time in Puerto Cabezas which you can find south east of Seville.
Note you must complete building these various production buildings by the deadline dates. You will need lots of bricks and wood to build all these buildings and may want to consider delivering it manually.
At this point you may have noticed you own a good few businesses, 4 each of Cotton, Tobacco, Kawa, Cacao, Drewno, and Grain as well as 2 Piwo. At this point you want to make an effort to be buying those products mostly from your cities that make them buying elsewhere will generally cost you more.
Be sure to take the four colonial products to the viceroy in Maracaibo each month so you can get more fame for more concessions. Spain is looking for lots of each commodity and it’s not unusual to have to manually deliver the products to get so many there each month.
You have been building a lot lately be sure to keep an eye on placement of the buildings, you can get a production bonus if you build plantations and farms in four adjacent hexes. There is also bonus for buildings next to raw materials they need and or next to residential. Try to avoid building residential too close to plantations though they don’t like that.
Also it is not uncommon for the prices of those products to drop as you are delivering so many which generally leaves you with two options, take a hit to profits for fame or invest in a warehouse in Maracaibo and dump all those products there and set a minimum price to sell so you don’t lose a bunch of money.
You may also want to consider building a market in Seville which will increase the amount of products that can go to market before the price drops.
Cel 4 tasks due by: Sept 1574 – Dec 1574
You finally completed building all those buildings and delivering a bunch of colonial products to the viceroy so he has some new tasks for you. If you were looking for a different kind of task I am sorry to disappoint you as I said earlier a huge chunk of this game is a trade simulation game so you now have to build more businesses.
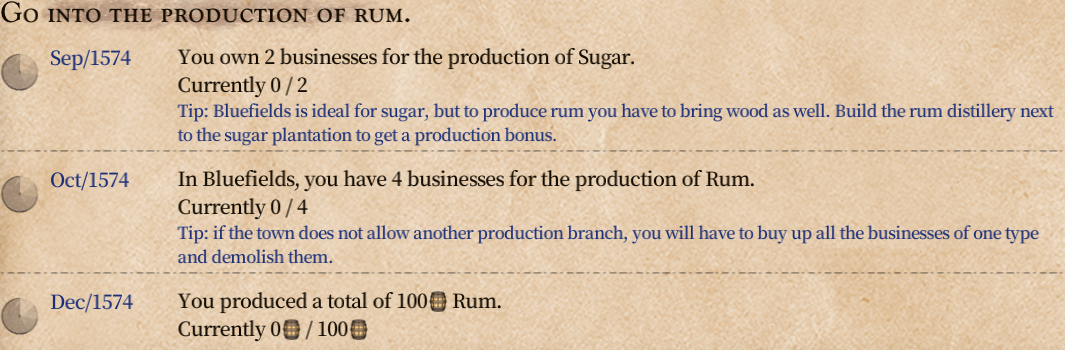
This time we are going into the rum business, it’s about time we got down to making some rum. For this task we have to build some sugar plantations and rum distilleries. For the Spanish campaign we are to place them in the town of Bluefields which lies to the south east of Seville.
Depending on how much time you took getting here it’s possible that you may have to destroy a production branch to have enough space to place both productions here like the campaign wants. Each town can only produce seven different commodities. If there is no room for both of them you will have to go through the extra step of buying out other businesses just to demolish them. Hopefully that is not needed.
You will have to buy the concession for Rum to be able to build those buildings.
Depending on how you spent your concessions there are multiple paths to get there. As you already had to buy Browar you can buy the Weaving mill then the Destylarnia. Alternatively you could have bought Ropeyard to get there instead.
I have decided to hit up a Weaving mill and built them in Sewilla to help tend to all the cotton there.

Once you complete the Rum distillery task you will get a special new task the privateer John Hawkins shows up and starts plundering your towns and trade routes. You are tasked with defeating him but your likely ill prepared for this task. We have after all been doing nothing but trade and building to this point.
First things first your going to need a captain since they are the ones with command points and you need that for any ship that can carry guns. John Hawkins will be vastly superior to any captain you likely have so hopefully you have been doing missions to unlock tactics and have been using them on trade routes to level them up. Your going to need a captain around level 5-6 ideally with skills useful to combat.
If you have been neglecting your captains chair until now it’s not the end of the world spend a concession or two on unlocking captains. Don’t just hire the first one that comes along, new hire captains can be between level 0-3 and skills are random. If you reject a captain they may come back to you at a higher level or better skills.
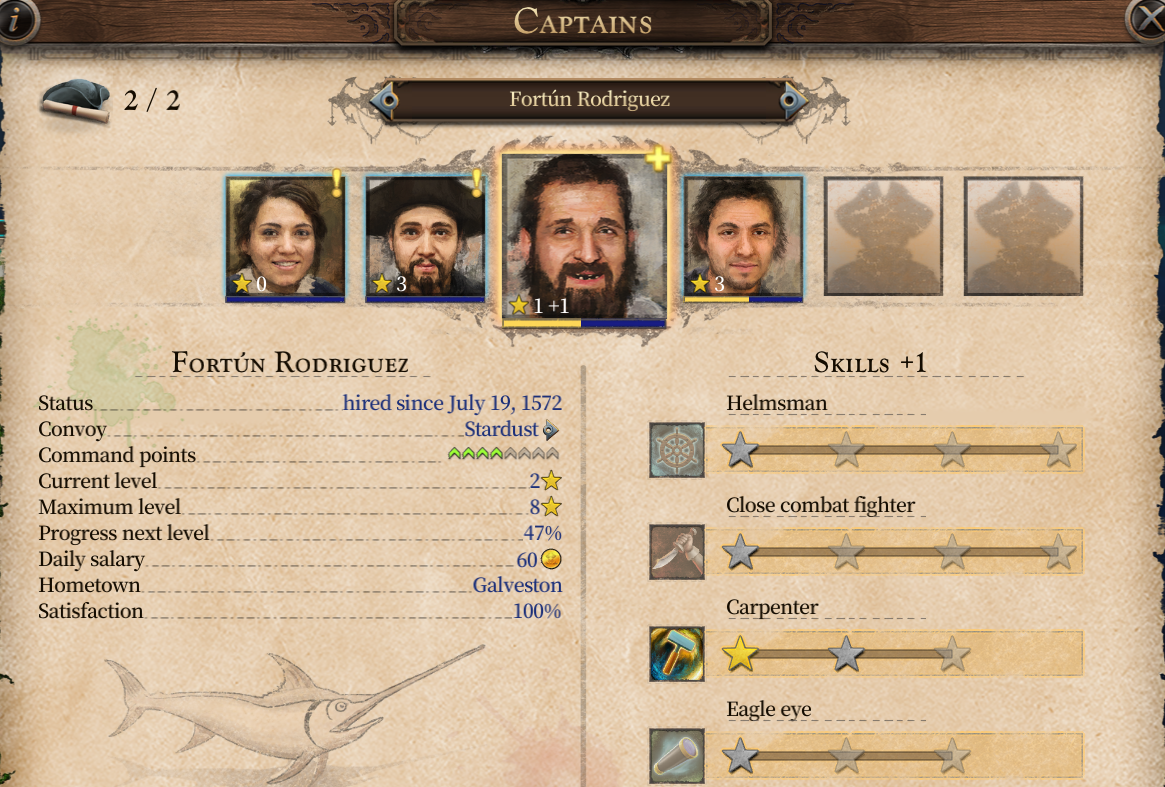
Let’s take a look at this captains page, As you can see the selected captain is only level 2 and can get to max level 8. John Hawkins is level 12. So know your going to be at a disadvantage. While the selected captain isn’t great by any means he has carpentry at one star and has one point to spend elsewhere possibly close combat. The main focus however is he already has 4 combat points. These points will allow him to command up to four smaller warships. That might be enough to beat Hawkins but to be safe you really want a captain with 6 command points usually that can be reached around level 4-5.
Tips for taking out Hawkins
Start training a captain early, if possible try to get a level 3 captain that has some combat skills before you even hire them. I would suggest spending a concession on captains right after you spend the one needed for Beer. If you open captains that early you have plenty of time to be picky about who you take but you should only need one captain. If you want to open two slots you can increase the odds of finding someone good faster.
If you can get a captain to six command points you will have an advantage against Hawkins this will allow you to field either six single command point warships or a double point ship and four single point ones.
Pay attention to your viceroy they offer aid in fighting Hawkins including sending you free warships that you can either pick up in Maracaibo or Seville watch for where they tell you and check the lighthouse for free ships.
Cel 5 tasks due by: Aug 1575 – Dec 1575
Congratulations Hawkins is no more and your fighting for this campaign is at an end now back to building stuff.
It is important to note one of the tasks here is the easiest to fail in the entire campaign.
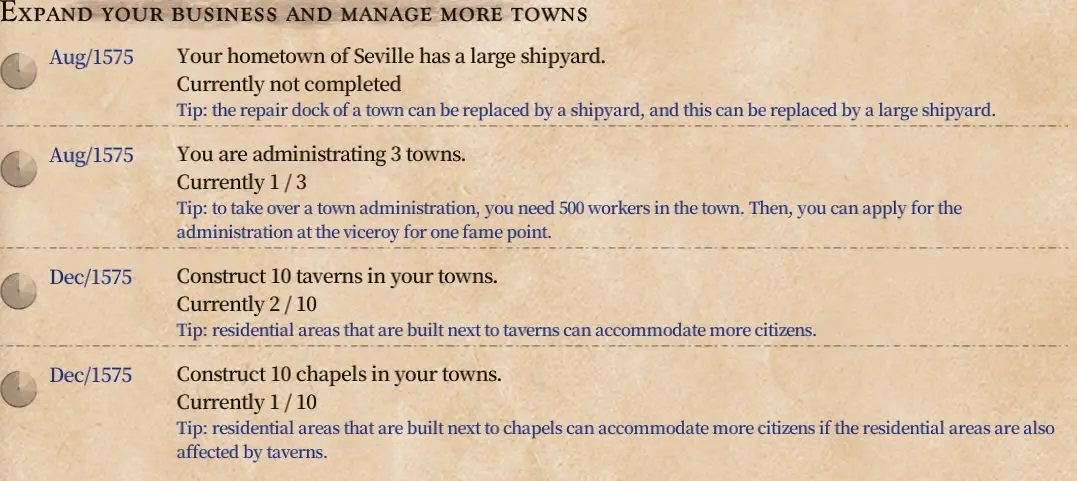
Your hometown of Seville has a large shipyard
To complete this task Seville needs to have a population of 6,000 ludzie. To get here your going to have to build businesses and create jobs. Also to build the large shipyard you will need a concession from the viceroy (Actually you will need to spend a minimum of 5 maybe more depending on where you have been spending)
Hopefully you have been delivering your colonial goods to the viceroy and didn’t waste too many concessions on big ships.
There is a hard population cap you will have to deal with as you will need to build a church to pass 4,000 population and you need (6000/4 = 1500 available jobs) **note population caps at 4 times the number of jobs All these buildings are going to need lots of wood and brick, fortunately you have wood production near by but you will need bricks, don’t wait for automated trade routes to get the stuff for you go get it manually.
You will also need lots of residential buildings as population won’t increase if there is no available living space. Your going to be building lots of churches and taverns as well (more wood and brick just fyi.)
You are administrating 3 miasta
This one isn’t that bad you will need to spend a concession to become the administrator of a town you can do this on the Fame tab at the viceroy. In order to become the administrator of a town you need to employ 500 workers there. The easiest places to do this would be the cities where you already built up businesses. You start as the administrator of Seville so you only need two more and you have lots of jobs already in four different towns. See where you might round out production lines or create new productions if you have extra concessions available. Don’t spend every concession you have there might be a surprise purchase.
Again note (Construction must be complete by the due dates if they are working on building it and time runs out it’s game over)
Cel 6 tasks due by: Apr 1576 – Dec 1576
And we have reached the final collection of tasks in the campaign and shocker, its more production and buildings.
Production buildings in Seville
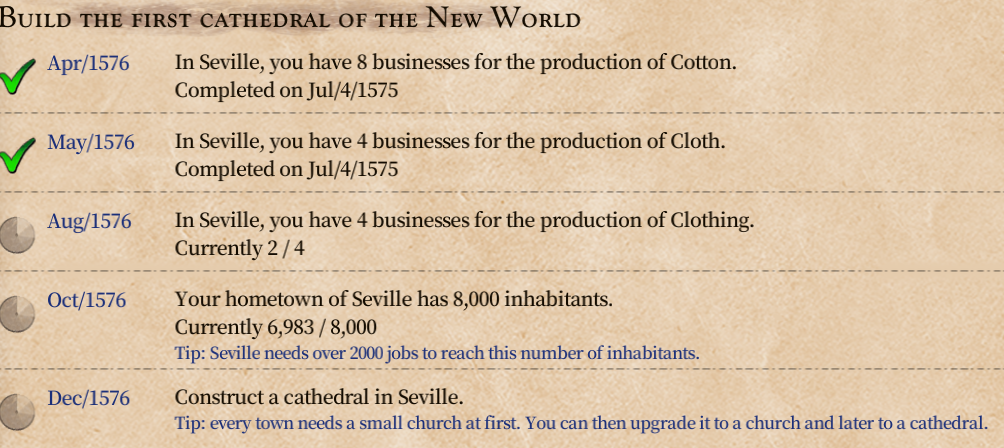
For this task your going to have to keep building up Seville, będziesz potrzebować 8,000 populacja (z 2,000 jobs available) to complete these tasks.
You will need to build:
- 8 – Cotton Production
- 4 – Cloth Production (concession required)
- 4 – Clothing Production (concession required)
These buildings will help you get to jobs you need to get 8,000 population and 2,000 praca.
Construct a cathedral in Seville
This is the final task it will require a concession from the viceroy (at minimum you will need to have spent 7 concessions). You also have to fill every spot in the town before it will let you build the cathedral. You will have to build extra houses, hospitals, taverns, production buildings, parks etc. to completely fill out the town. Then you can build a cathedral.
Once again you will be using a ton of wood and bricks, go get them manually.
Porady
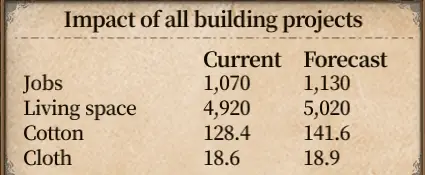
When your building residential houses you are given a forecast prediction of living space make sure you have over 8,000 or you won’t get high enough population for the cathedral you will hit a hard cap. Likewise when your building production facilities you will see a forecast as well unfortunately it does not show you before you build just after, it looks like this.
Make sure you are getting the max out of your population by keeping taverns, chapels and hospitals near by generally you want to build in the dark green area this indicates there is a bonus to be had by building there.
Tips to make the campaign easier
Toggle wind current
If you did not know or accidently turned it off you can toggle the display of wind currents using the ALT key, try to sail with the wind where you can.
Pay attention to the trade route estimated duration
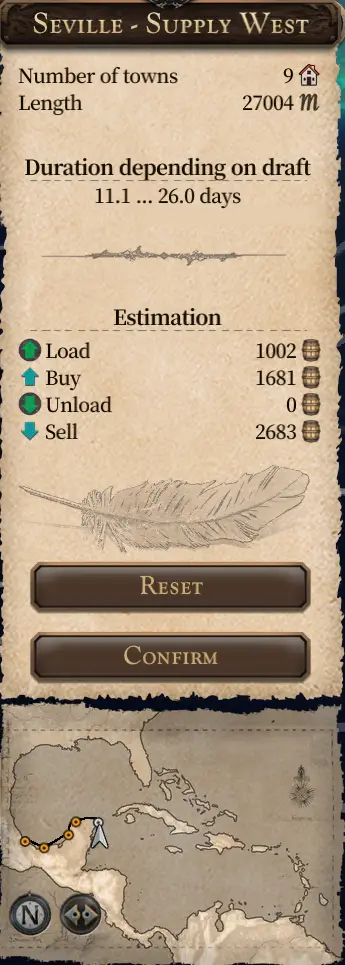
When creating a trade route on the right side you can see information about the number of towns and the “Duration depending on draft” this is an estimate based on the draft of your ships on the route, if you use a ship with a small draft like a sloop or brig your looking at the first number, if you use a ship with a deeper draft like a warship your looking at the right number if you use something in the middle like a Fluyt then your time will be in the middle. There are captains that can improve this time using the skills Helmsman (increases speed at sea) and Navigator (which negates the affects of shallows, calm areas and storm damage)
Hire a captain early
I would suggest spending a concession to open hiring a captain early, you only need one for this campaign but I would consider it right after unlocking the concession for Beer. Put them on an automatic trade route to gain experience and you can start picking up tactics by completing missions.
Utilize your own business production and bonus
Once you start building production lines make an effort to use products you produce this will save you money over buying them. Also consider the bonus to production when building production lines if you build four farms adjacent to each other it becomes a large farm and you get a bonus to production.
You can build a small warehouse in Maracaibo and use it to get better colonial goods prices
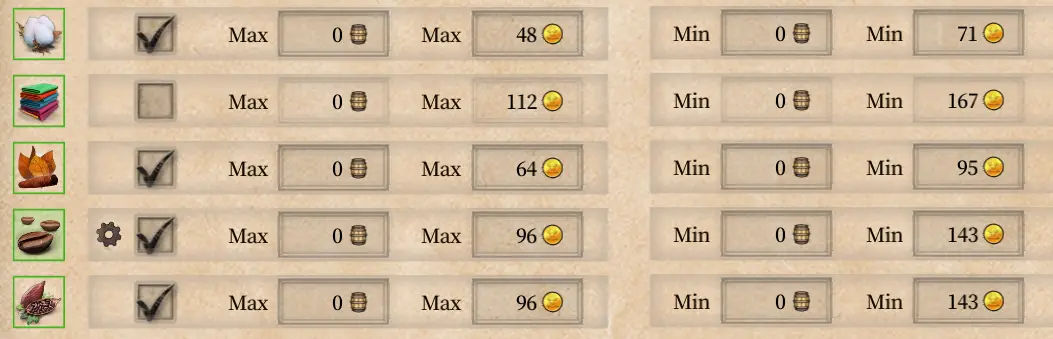
This one is a little more complicated as warehouses can make a mess of things but this one is worth it. Build a small warehouse in Maracaibo, hire an administrator on the trade tab. Set a minimum price for the colonial commodities like in the picture here. Then when you bring colonial goods to Maracaibo instead of selling for bad prices unload them to your warehouse and the administrator will sell them over time at a much better price.
Extra Warehouse Tip: When you click on a port to bring up the information for it if you have a warehouse built in that port you can press the “Y” hotkey to switch back and forth between town info and warehouse info. (PC Version)
Make it easier to defeat Privateer John Hawkins
Start training a captain early, if possible try to get a level 3 captain that has some combat skills before you even hire them. I would suggest spending a concession on captains right after you spend the one needed for Beer. If you open captains that early you have plenty of time to be picky about who you take but you should only need one captain. If you want to open two slots you can increase the odds of finding someone good faster. Use your captain once you have them, just assign them to an automatic trade convoy if nothing else.
Be sure to complete missions they reward tactics sometimes which can help make the fight easier.
If you can get a captain to six command points you will have an advantage against Hawkins this will allow you to field either six single command point warships or a double point ship and four single point ones.
Pay attention to your viceroy they offer aid in fighting Hawkins including sending you free warships that you can either pick up in Maracaibo or Seville watch for where they tell you and check the lighthouse for free ships.
You will have to defeat John Hawkins twice, the second time he has more advanced ships but still only 3-4 focus individual ships and deploy tactics that either prevent you from getting hit, prevent him from moving or repair your ships.
Get the most out of population and production
When your building residential houses or production facilities you will see a forecast of the results on Jobs, Living space, Production lines keep an eye on this while building. Unfortunately it does not show you before you build just after, it looks like this.
Make sure you are getting the max out of your population by keeping taverns, chapels and hospitals near by generally after you have built some houses you can click on the satisfaction increasing buildings and look for green hexes this means a positive bonus if you build there but look around sometimes you can impact several buildings at once not all green hexes are created equal. Having taverns, and chapels near by will dramatically increase population.
To wszystko, co dzisiaj udostępniamy w tym celu Port Royale 4 przewodnik. Ten przewodnik został pierwotnie stworzony i napisany przez jelnoh. Na wypadek, gdybyśmy nie zaktualizowali tego przewodnika, możesz znaleźć najnowszą aktualizację, postępując zgodnie z tym połączyć.