- Tytuł: Pixel Boy: The Legend of Tain
- Data wydania:
- Wywoływacz:
- Wydawca:
Information about Pixel Boy: The Legend of Tain is still incomplete. Pomóż nam wypełnić szczegóły gry za pomocą tego formularz kontaktowy.
This walkthrough will help you to finish the game.
Informacje ogólne
Time to finish: ~1.5h
Note that you can technically reach the boss room in less than 5 minutes if you skip all fights, although I’m not sure if you’ll be able to beat the final boss that way.
- Enemies don’t respawn. Kill all enemies that you find.
- Your HP will be restored after you level up.
- The game autosaves whenever you move screens.
- Reload your save if you get poisoned by Venom. You can’t cure that early game. Just press F5 right away and don’t wait for the battle to end.
- Use all stat increase items in battle as soon as you got it.
Osiągnięcie
The only achievement in the game can be obtained just by starting the game.

Pixel Boy
Start Your Journey
Opis przejścia
Go around the building from the east side until you are close to the big purple flower. Interact with the flower to obtain Napój. Exit the area and head south until you reach Formal Garden.
Head to the south area, za mostem. There is a twinkle near the east bridge. Interact with it to get Resistance Increase. Open the box nearby to get nothing too. Continue heading west to Flooded Plain, then northeast to reach Special Blossoms.
Interact with the twinkle near the body of water to get Attack Increase. There is another twinkle on the right side of the big flower tube that contains Mana Potion. Return to Flooded Plain.
Head to the southwest corner of the map. Jest Defense Increase lying near the waterfall’s left side. Head to the west exit.
Follow the north path until you see a twinkle near the sunflower fields (the yellow colored ground). Odebrać HP Increase. Head to the northwest corner of the map to reach the next screen.

Enter the rightmost house.
Jest Napój next to the potty to the north. You also can rest in the bed to recover your HP and MP here. Feel free to come back to this place whenever you need it. Exit the building and enter the building to the left. Use the right door.
Ulec poprawie Magic Increase near the sink. Exit the building and use the left door.
Ulec poprawie Super Potion to the east. Return to Park Entry and head to the north exit.
Follow the path until you reach a tent, then cross the bridge. Follow the east path to find Resistance Increase lying on the floor. There are two exits in this area: north and west. Let’s explore the west exit first.
Ulec poprawie Agility Increase I Mana Potion to the south. There’s nothing more to do here, so return to Campsite and head to the north exit.
Watch out for the enemy. It’s strong. Enter the building.
Ulec poprawie Luck Increase w lewo. You can buy potions by interacting with the twinkle to the right. Return to Firewatch and head to the north exit.
Tam są 2 exits here: inside the cave north from the area entrance and the northeast exit. Explore the northeast exit first.
Ulec poprawie MP Increase to the northeast corner. Open the box next to it to get 0G. Return to Resonant Cliffs and enter the cave, then proceed to the east screen.
Head to the north exit.
Ulec poprawie Attack Increase na ziemi. Return to Asta Cave (Crossroads) and head to the south exit.
There are several exits here: northwest, southwest, and east. Let’s start with the northwest exit.
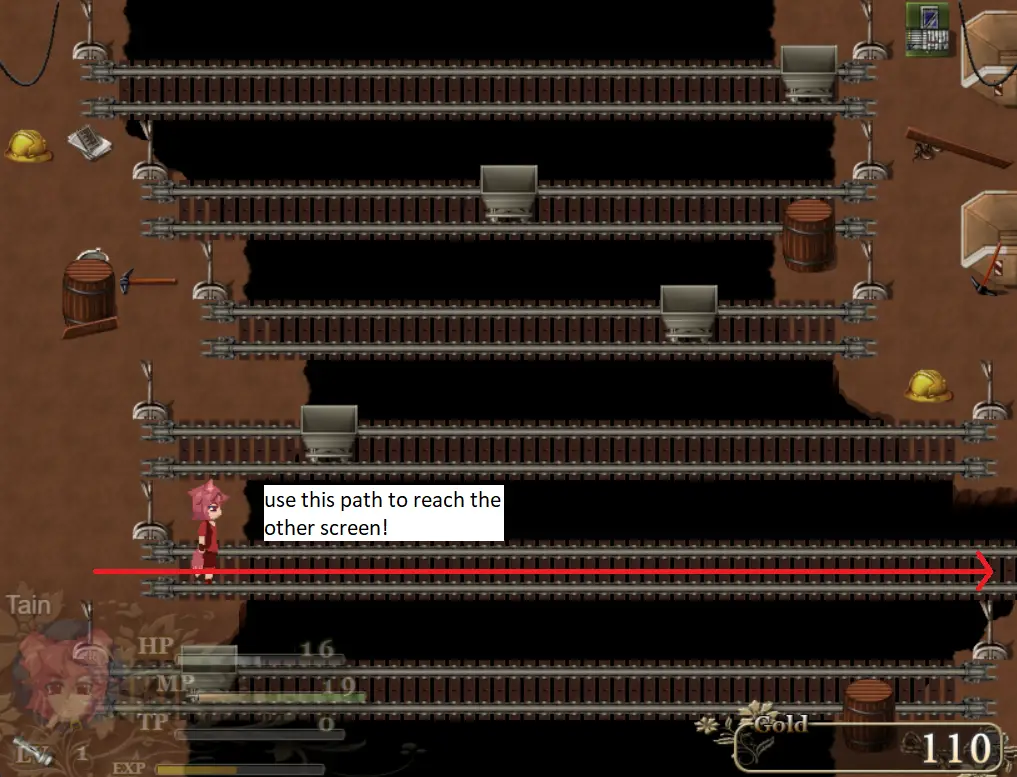
Ulec poprawie MP Increase na ziemi. Return to Asta Cave (Underground Lake) and head to the southwest exit. If you don’t know how to access it, just follow the train tracks from the north exit, then head north at the end of the tracks.

Ulec poprawie Defense Increase w lewo. You can save by interacting with the crystal. Your HP and MP will also be recovered after you save your game. The sword also sells some potions if you are interested. Once you are done, return to Asta Cave (Underground Lake).
Head all the way to the east to pick up HP Increase. You can explore the east exit to find 2 wrogowie, but there is nothing to do apart from that. Feel free to battle them for extra exp if you wish. Gdy już skończysz, feel free to go to Asta Cave (Crossroads) and proceed to the east exit.
There is nothing much to do here, but if you somehow can’t find the area exit, you need to use the second track from the bottom.
Watch out for the bunny enemies (Ammereit) in this area. They are strong. I advise you to just use Spell Enhancement + 2x Crispy Flare II, then rest at Asta Cave (Living Space) after you finish the fight. W każdym razie, once you’re done, kieruj się na północ.
The 2 houses on the cave has nothing of interest, so just head to the north exit.
Wyjechać 1 monster alive in this map. Ulec poprawie HP Increase near the left building. Ponownie, there is nothing on the 2 houses here, so proceed to the north exit.
Pesper! Now we have another objective. The 5 Star Keys are scattered between the whole map. Before you find them, pick up MP Increase I Attack Increase to the west and east. You can use the stat increase with the enemy in the previous area if you keep it alive.
W każdym razie, time to find the Star Keys! Here are their locations. Just reexplore the whole map and check the area names for reference.
- Starland (Grasslands), inside the left house.
- Asta Cave (Living Space), this is the place with the save crystal. From Asta Cave (Crossroads), Kieruj się na południe, then southwest exit.
- Asta Cave (Diamond Mine), in the southeast corner of the map. From Asta Cave (Crossroads), Kieruj się na południe, then east exit.
- Giant Bird’s Nest, located north from Resonant Cliffs.
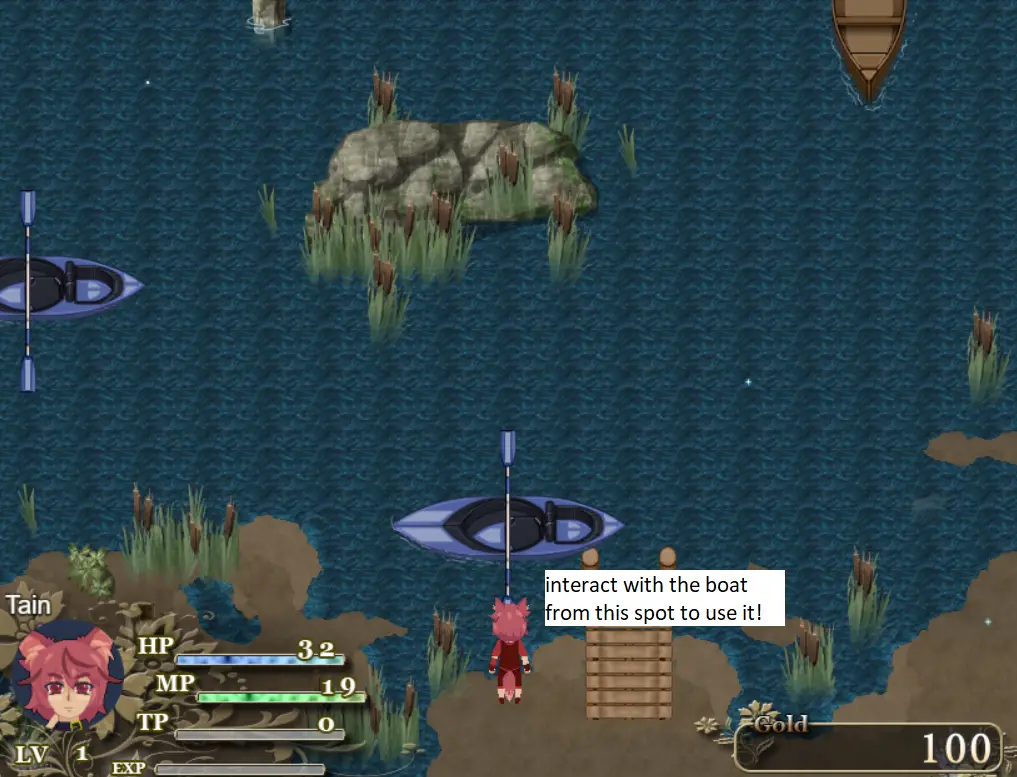
- Miejsce połowowe. From Campsite, head to the west exit. Press Z on the purple boat to use it, then land on the southwest corner.
- Lumberjack Workshop. From Firewatch, enter the building to reach Park Souvenir Shop, then enter the door to the northeast corner.
- Tęczowe Pola, in the southwest corner of the area (down the cliffs).
- Special Blossoms. From Flooded Plain, head to the northeast exit.
Kiedyś 8 Star Keys, return to Starland (Startop) and use the Star Keys on the colored pillars on the star bridge.
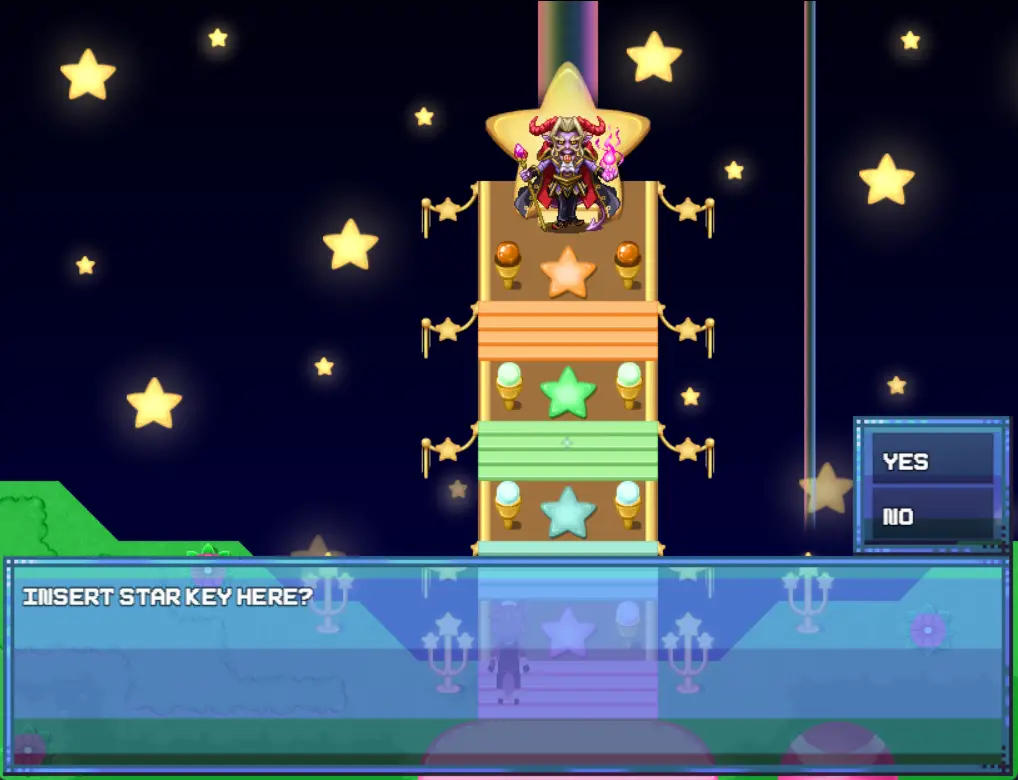
Interact with the twinkle between the green and blue star too to obtain 2 extra levels.
Szef: Akesha
Spam attack or Heavy Strike. Heal whenever your HP is less than 100.
To wszystko, co dzisiaj udostępniamy w tym celu Pixel Boy: The Legend of Tain przewodnik. Ten przewodnik został pierwotnie stworzony i napisany przez aquatorrent. Na wypadek, gdybyśmy nie zaktualizowali tego przewodnika, możesz znaleźć najnowszą aktualizację, postępując zgodnie z tym połączyć.