This guide will show you the complete list and breakdown of all enemies in PAYDAY 3.
Kamery, Gwardia, and Civilians
When you’re trying to stay hidden, the things that can give you away are cameras, guards, and regular people. Let’s talk about each of them.
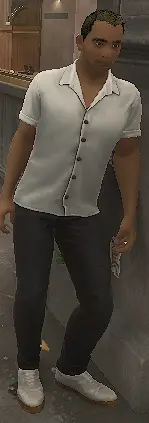
Civilians/Employees
- Mają 1 HP (like a heart in a video game) I 0 Zbroja (no protection).
- They can notice you from about 20 metry dalej.
There are two types of civilians: regular people and employees. You can’t tell them apart by looking at them, but you can figure it out by where they are in the building. Regular people are in public areas, while employees are usually in private or secure areas. When we say “civs,” we usually mean both regular people and employees, unless we’re specifically talking about employees.
Civilians will call for help if they see something strange. It takes them 10 seconds to make the call, and then they go back to what they were doing. Civilians can’t hurt you, but they’ll get scared if they see a masked robber. If a scared civilian manages to leave the area, they’ll call the police, which will set off the alarm.
You can use civilians as hostages, trade them for supplies, or even shield yourself with them to keep the cops from shooting you. But when you’re using a hostage as a shield, you can only move slowly, use your backup weapon, and it takes longer to reload. Cops will only shoot at you if they’re sure they won’t hit the civilian, so you’ll take less damage from the front. Czasami, regular enemies will come close and try to hit you with a melee attack, making you drop the civilian you’re using as a shield.
If you kill a civilian (or any other enemy you’re using as a hostage), it will cost you money to clean up the mess. This money gets subtracted from the money you earn at the end of the heist, and it can add up quickly if you kill a lot of hostages. Killing a hostage will also make you spend more time in custody. You can move a dead civilian to hide their body in a better spot, but while you’re carrying a body, you can’t crouch or run.


Kamera
- It can see things within about 10 metrów.
Cameras are part of a security system in each heist. If you hack into one camera, you can control all the other cameras too. These cameras move from side to side every 10 towary drugiej jakości, but they have a blind spot underneath.
Every heist has a security room somewhere in the building. To get inside, you need a blue keycard. Inside the security room, there’s a security guard sitting at a computer. That computer watches all the cameras. You can use the computer to access the cameras, even while the guard is there, if you sneak up behind him.
If you kill the security guard in the security room, the cameras won’t work anymore for the rest of the heist. The red camera lights will go off, and the cameras won’t move anymore. Even after the guard is dead, you can still hack the cameras.
Regular cameras can be destroyed by shooting them, throwing a knife, causing an explosion, using the Hacker Aced skill, or hitting them with a melee attack. Titan cameras, chociaż, can’t be destroyed at all. If you break a security camera, it won’t work anymore and can’t be hacked, and it’s treated like something you sabotaged (which matters for how sneaky you’re being).

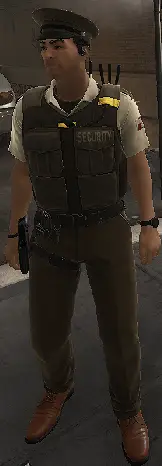
Strażnik
- Mają 100 HP (like a health bar in a game) and no armor.
- They can see things within about 20 metrów.
In each heist, there are guards with their own walking routes. On harder levels, there might be more guards with trickier routes. Guards walk between specific spots on their route, pausing at each spot for a while. Czasami, they stand still, walk in circles, check their phone, or smoke a cigarette, but what they do depends on the spot they’re at. Watching their actions at each spot can help you know when they’ll move to the next one.
If a guard doesn’t notice you, you can sneak up behind him and grab him to use as a shield, just like you can with a civilian. You can also quietly take him down, which is called a “takedown.” When you kill a guard, do a takedown, hold him as a shield for a while, or make him surrender, his radio will go off after 10 towary drugiej jakości. Następnie, you or your team need to answer the radio. If you’re carrying the guard’s body, you can answer the radio while holding it.
You can only answer a limited number of radios during a heist. If you use up all your chances, the next radio you try to answer will set off the alarm. If you don’t answer the radio, the heist will go into search mode, or if it was already in search mode, the alarm will sound.
If you mess up answering a radio or stop before finishing, you’ll lose two chances to answer radios. The closest guard will come to check where the radio was when you failed. If you move the body before the guard arrives, he’ll just look around and then go back to his usual route.
If a guard sees something suspicious, it only takes him 3 seconds to call for backup or start a search.
After the alarm sounds, guards will keep shooting at you until the assault indicator says “First Responders Incoming.” W tym momencie, all guards will surrender and follow the same rules as civilian hostages for the rest of the heist, including the penalties for harming them.
Lead Guard
- Just like regular guards, mają 100 HP and no armor.
- They can see things within about 20 metrów.
The lead guard is an extra tricky guard that only shows up in certain heists with a “Lead Guard” security setting. Only one lead guard appears. The lead guard is almost the same as a regular guard, but with two important differences: they have an unlimited radio, and their patrol route is very tough to deal with.
When the lead guard is killed, his radio goes off after a short delay, just like a regular guard. But after you answer or ignore it, a timer starts for 70 towary drugiej jakości. Potem, his radio goes off again. This process keeps repeating, and it uses up your chances to answer radios as long as the lead guard is dead. Więc, it’s usually better to leave the lead guard alone when trying to be stealthy.
The only way to stop this never-ending radio cycle is to kill the lead guard using the “Cover Up” umiejętność. This skill uses one radio but prevents his radio from going off in the first place. Without his radio going off, there’s no 70-second timer, so you can kill him without worrying about the radio.
The lead guard also has a patrol route that’s designed to make things much harder for the players. He goes all over the heist, often entering rooms and paths where heisters might hide. Some of his patrol spots are in rooms that no other guard ever visits, turning usually safe hiding spots into risky ones.
Apart from using the “Cover Up” umiejętność, another common way to deal with the lead guard is to attach a micro camera or motion detector to him. The micro camera helps mark him at any time, and the motion detector keeps him marked all the time. Tędy, you’ll always know where he is, making it easier to avoid his tricky patrol path.
Common and Uncommon SWAT
When things get noisy, there are three types of police units you’ll deal with, and they each show up in their own way.
Common Enemies
Common enemies are the most common foes you’ll face during a heist. There’s a limit to how many of them can be on the map at once, and this limit might change depending on how difficult the heist is.

First Responders
- Mają 100 HP and no armor.
These are the cops who show up in police cars when things get loud. The negotiation period starts when they arrive, but if anyone in your team gets too close to them, makes noise, or completes specific tasks, like lighting the thermite, the negotiation period is skipped, and the police attack begins. First Responders come with the first wave and are not very tough. No more will come once you defeat them.

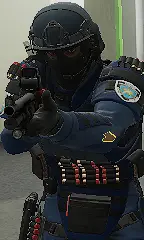
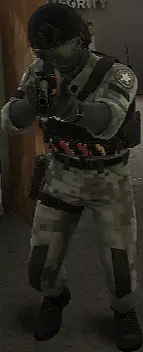
SWAT
- Mają 150 HP and 70 zbroja.
These are the heavily armored cops you’ll face most of the time. They have set locations where they can appear in each heist, but they tend to spawn near the players. Some SWAT officers carry SMGs, others have ARs, and some have shotguns. You can tell what weapon they have by looking at their chestpiece and badge. Shotgun SWAT officers switch to a weaker pistol if there’s a hostage nearby.
Heavy SWAT
- Mają 150 HP and 170 zbroja.
Heavy SWAT officers replace regular SWAT officers later in the heist, usually when bulldozers start showing up. The only difference between them and regular SWAT is their stronger armor. They deal the same amount of damage and have the same health. Heavy SWAT officers can carry shotguns, SMGs, or ARs, just like regular SWAT officers. Note that Sabotage Specialists and Hostage Rescue Squads are also replaced by their heavy SWAT versions.
Uncommon Enemies
Uncommon enemies show up with regular enemies, but not as often. They have specific roles to support the regular enemies. Each type of uncommon enemy can appear with several copies, up to the maximum number allowed on the map at that time. These uncommon enemies are not considered specials for challenges and skills.
Hostage Rescue
- Mają 150 HP and either 70 Lub 170 zbroja.
Hostage Rescue units come in groups of up to 3 and there can only be 3 of them on the map at a time. They appear when there are tied-up hostages, and Shade will tell you when they arrive so you can react. Like regular SWAT officers, they can carry an AR, SMG, or shotgun, and there are Heavy SWAT versions too.
Instead of chasing after the heisters, they look for tied-up or scared hostages on the map and set them free. When they’re going to free a hostage, you can see the hostage’s outline through walls. Once they start helping the hostage, you can see the rescuer through walls too. If you kill them before they finish freeing the hostage, the hostage stays tied up or scared. But if they succeed, the hostage will run away and won’t listen to any orders from the heisters.

Sabotage Specialists
- Mają 150 HP and either 70 Lub 170 zbroja.
Sabotage Specialists show up in groups of up to 3, and there can only be 3 of them on the map at a time. They appear when the heisters are working on objectives that can be sabotaged, and Shade will tell you when they arrive so you can react. Like regular SWAT officers, they can carry an AR, SMG, or shotgun, and there are Heavy SWAT versions too.
Instead of going after the heisters, they focus on messing up objectives by doing things like pulling fire alarms or disabling power boxes. When they’re in the middle of sabotaging, you can see their glowing outline through walls, and there’s a marker on the object they’re messing with. If you kill them soon after they start sabotaging, they won’t succeed in their mission. Just keep in mind that regular and heavy SWAT officers can also sabotage some objectives, but they’re less likely to do so.
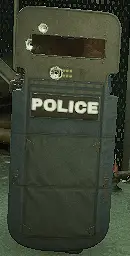
Tarcze
- Mają 160 HP and 180 zbroja.
Shields usually show up in groups of up to 2, and there can only be 2 shields on the map at once. Their main job is to use their big shields to protect regular enemies from getting shot, but they also have a pistol to hurt you. Regular enemies hide behind the shield guy to stay safe. Jeśli podejdziesz zbyt blisko, the shield guy will hit you with his shield to stun you. There’s a small window on their shield that you can shoot through to hit the enemy behind. Throwing a flashbang or grenade makes the shield guy turn to block the explosion, so you can easily kill him.
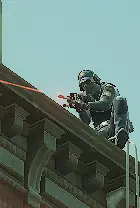
Snajperzy
- Mają 40 HP and no armor.
Snipers usually come in groups of up to 2 and there can only be 2 snipers on the map at once. They pick a heister to aim at and point a laser at them. After a short delay, they shoot, and it takes away a big chunk of armor or health. One sniper shot can instantly knock down a player with no armor or take away 1/1.5/2/3.5 armor pieces (depending on how tough the game is). Snipers almost always hit their target, but if you hide just before they shoot, the bullet can hit something in the way. If they can’t see their target for a while, they’ll switch to a different one or stop aiming if they can’t find anyone to shoot.
Special Enemies
Special enemies show up one at a time, and only one of each kind can be on the map at once. As you do more in the heist, certain tasks will make different special enemies start to appear. For more information, check out the “Heists – Podstawy” sekcja.
You can mark any special enemy by looking at them and clicking the middle mouse button.
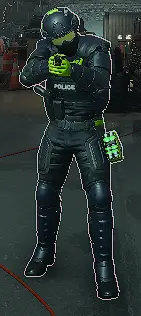
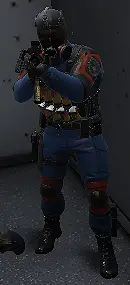
Zastrzelić
- Mają 150 HP and 140 zbroja.
Zappers are special enemies that start showing up as soon as the heist goes loud. If left alone, a Zapper sometimes places a shock mine in a spot where heisters are likely to go. Shooting this mine or getting too close to it will tase anyone within a 3-meter area, stunning them. Zappers also have a yellow battery pack on their hip. If you shoot this pack, it stuns the Zapper and everyone within 5 meters of him.
When a Zapper gets close to a player, they make a high-pitched whine-like sound, then tase the player from a safe distance. Getting tased makes the player unable to move, reload, use equipment, or switch weapons. It also messes up your aim and makes you fire your weapon randomly. If a tased player or an ally shoots the Zapper, he’ll stumble and let go of the target. If you’re tased for too long, you’ll go down, no matter how much health or armor you have. Keep in mind that Zappers never target AI-controlled teammates.
Nader
- Mają 150 HP (zdrowie) I 140 Zbroja (ochrona).
Naders are special enemies that show up after you complete an early task in the heist. This usually happens right at the beginning, and it’s often done before the first big attack starts. Czasami, it’s a good idea to wait until the first attack starts before doing this task, and then Naders won’t show up during the whole first wave of the attack.
Naders have a bunch of grenades on their chest. You can shoot these grenades to make them explode, which hurts and pushes away nearby enemies. When Naders see you and your crew, they try to throw gas grenades at you to force you out of your hiding spots. If you’re in the gas cloud, you can’t run, and it slowly makes your health go down, even if you have armor. But if there’s a regular person or a hostage nearby, the Nader will throw flashbangs instead of gas grenades to avoid hurting the innocent person.

Cloaker
- Mają 150 HP (zdrowie) and no armor.
Cloakers are special enemies that show up after you complete a particular task. This usually happens after the task that brings in Naders. It’s important to note that Cloakers never go after computer-controlled teammates (boty).
Cloakers are different from regular SWATs because they can appear almost anywhere. These ninja-like cops can do incredible things, like running on walls, making super high jumps, and dodging your bullets by sliding and doing flips as they charge at you. They try to sneak up on you and then sprint towards you really fast. You’ll know they’re coming when you hear their distinctive “wulululu” sound, which gets louder as they get closer. If a Cloaker is charging at one player, the others might not hear the sound.
When a Cloaker reaches its target, it dropkicks them, knocking the player down. Następnie, they start beating up the downed player, hurting their health directly, even if the player has armor. If the Cloaker manages to knock the player out completely, they’ll handcuff the player, making it quicker for their team to revive them, reducing the time from 30 seconds to just 15 towary drugiej jakości.
You can stop a charging Cloaker by staggering or stunning them. If a Cloaker is beating up a player, the player can get back up if they’re stunned, but the Cloaker might quickly knock them down again, so act fast! If a flashbang stuns a Cloaker, they’ll swing their batons randomly, which can still hurt a player’s health if they get too close.
W końcu, Cloakers can destroy deployable items that players or bots place by pouring acid on them. They usually do this when they find a deployable that’s unattended and far away from the players. This process takes a few seconds, and during this time, both the Cloaker and the deployable can be seen through walls. This gives you a chance to rush over and stop them. The Cloaker has to finish pouring the acid to destroy the deployable completely.

Bulldozer
- Mają 200 HP (zdrowie) and a hefty 3500 Zbroja (strong protection).
They show up after a specific objective, usually after Cloakers start appearing.
Bulldozers are the toughest and most dangerous special enemies. They walk slowly towards you, taking all your bullets while firing their auto-shotgun, which can seriously hurt you. If a Bulldozer has a clear path to a player and is a certain distance away, they can charge and stun the player for 3 towary drugiej jakości. During this stun, wyrządzają wiele szkód. They can also stun a player by kicking them in the face if they get too close. W przeszłości, the best way to deal with a Bulldozer was to get close and shoot their faceplate, but in PAYDAY 3, it’s safer to use the HET-5 Red Fox overkill weapon from a distance to take them out.
Bulldozers are immune to stuns and staggers, except when you shoot their head while they charge, causing them to briefly stop. Czasami, after dealing significant damage, they might taunt, allowing you to hit their faceplate without them attacking.
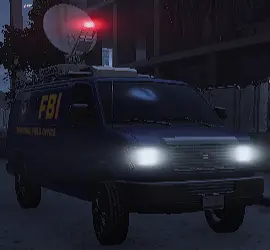
FBI Van
- Ma 300 HP (zdrowie) and no armor.
It appears once per heist, typically at the beginning of the second assault wave.
The FBI Van can appear on various difficulties, and its chances increase with higher difficulty levels. On Overkill difficulty, it’s guaranteed to show up. It spawns at specific locations near the edges of the playable area. Shade will announce when it appears and remind you to take out its antenna.
While the FBI Van is around, the police assault is labeled as “FBI Assault,” and it won’t end until you destroy the antenna on top of the van. This special assault can last longer than regular ones, but ending it is as simple as getting rid of the antenna. Other effects of the FBI Van are not confirmed.
To wszystko, co dzisiaj udostępniamy w tym celu DZIEŃ WYPŁATY 3 przewodnik. Ten przewodnik został pierwotnie stworzony i napisany przez KarmicChaos. Na wypadek, gdybyśmy nie zaktualizowali tego przewodnika, możesz znaleźć najnowszą aktualizację, postępując zgodnie z tym połączyć.