
This guide is designed to assist newcomers in comprehending the ManaSoul universe, explaining how to play and easily progress when embarking on the solo journey. I typically craft numerous guides within Discord communities, but I opted to share this guide on Steam due to its reliance on images and the fact that the game is available on the Steam platform.
The primary goal of this guide is to be informative and offer insights into initiating the game, providing direction on activities you can undertake. For additional inquiries or concerns beyond the scope of this guide, I suggest joining the ManaSouls Discord community.
Pierwsze kroki
This guide is for new players diving into the game, aiming to understand its offerings. It covers vital sections crucial for your journey in this early access game.
Keep in mind that, as of this guide, the game is still in early access. The information provided is based on this status, and as the game receives new content, there may be times when the info becomes outdated.
This guide is tailored to version 0.1 gry, but the information should generally hold true for versions 0.2 and beyond, with necessary disclaimers provided as needed.
When you start playing, you’ll encounter an early quiz determining the gemstone you receive. The quiz suggests one for you, or you can choose your preferred gemstone.
The gemstone is crucial as it dictates the element you can use. The options are:
- Jadeit (Wiatr)
- Rubin (Ogień)
- Sapphire (Woda)
- Topaz (Ziemia)
Each element has unique characteristics. Here’s a brief overview:
- Wind focuses on speed with low cooldowns and cast times, featuring a mobility boost.
- Fire emphasizes burns and is currently the only one with positive buffs/cleanse.
- Water is versatile, excelling in various aspects.
- Earth specializes in stuns and shields.
Początkowo, you might notice your UI being a bit off; obecnie, it’s not fixed. The UI doesn’t scale properly and works only on 1920×1080 rezolucja. Adjust by pressing escape and going to settings.
Tutorial Quest
Let’s start the tutorial adventure. Once you’ve fixed your screen setting, you’ll find yourself in a tutorial room. Open the chest in the room to collect your items, then head downstairs.
Before you continue, check your inventory by pressing ‘I’ or opening the bag icon at the bottom right corner. Wyposaż “event talisman” for a 50% bonus experience gain.

Teraz, let’s complete the tutorial quest. Talk to the academy guide NPC inside the tavern, then head outside and speak to them again. Follow the yellow arrows on the floor to reach your next destinations.

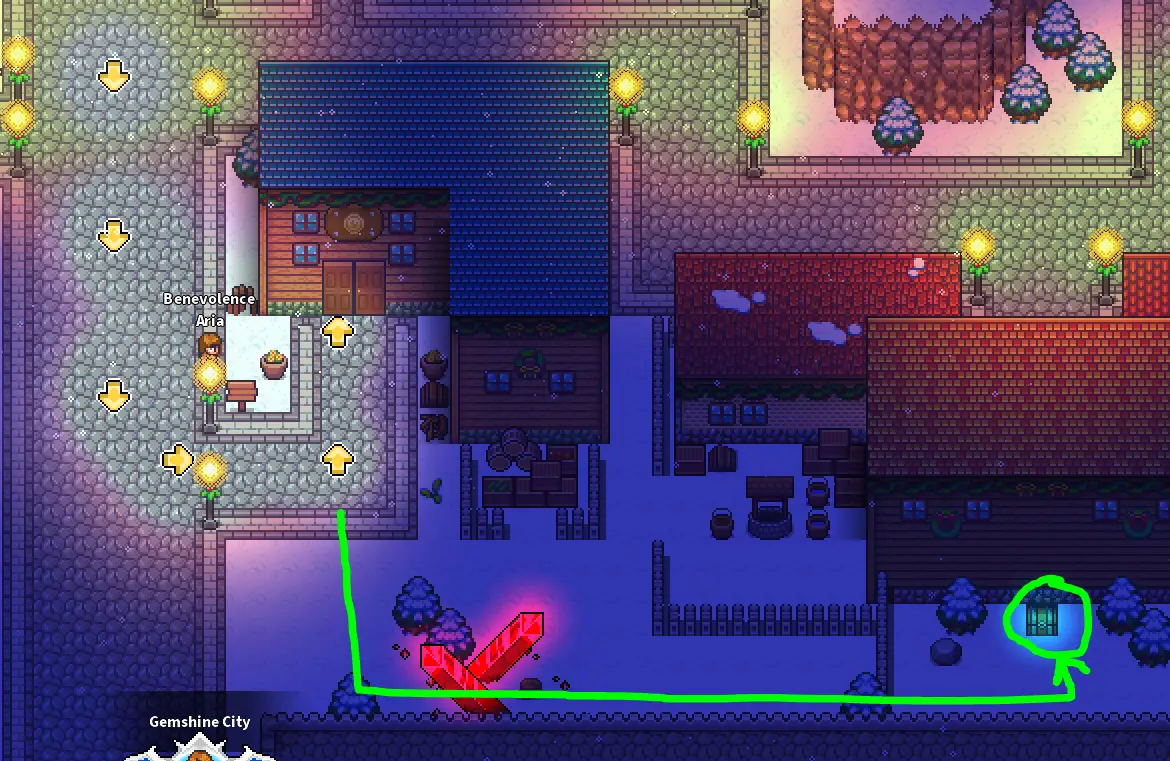
You’ll first go to the bank, but make a small detour to find a hidden chest shown in the image. These chests are scattered around the world and give you valuable items and gold. Grab it, then proceed to the bank.
Speak to the academy guide, then go outside to the general store with the potion icon. Tutaj, you can buy upgraded potions (with infinite use) and scrolls for crafting skills. Repeat the process: talk to the academy guide, go outside, and follow the arrows to the skill forge area.

In the skill forge area, you’ll find important NPCs. The gem smith can upgrade/downgrade gems needed for crafting skills. The gear grinder is less relevant now, but in the future, you can break down epic rarity gear into forgestones for gear upgrades.

A quick note on gear: they come in tiers by levels (5, 10, 15, 20, itp.). When you upgrade gear, you’re moving to the next tier (np., 5 Do 10, 10 Do 15). Gem Smith Orvald can help with this.
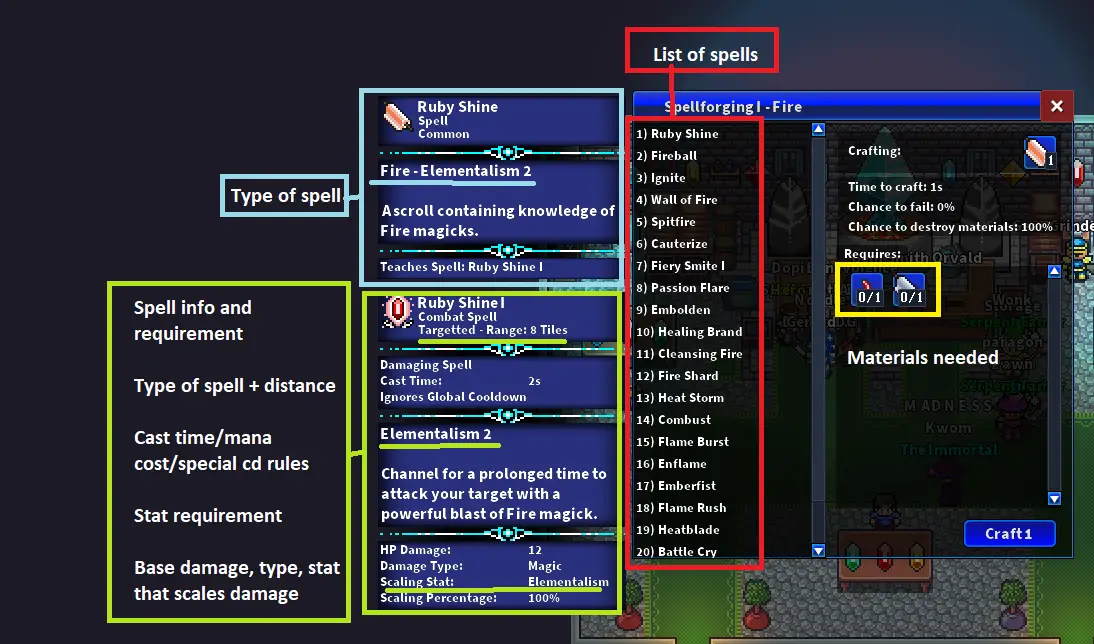
Speak to the Spell Smith and explore the skills available for your element. Focus on Spellforge I for now (as of this guide, Spellforge II isn’t released). Check the spells sorted by elementalism, enchantment, przywoływanie, and martial. Click on a spell to see required materials, and hover over the icon for more information.
You don’t have to decide right now, but it’s important to choose a focus among these types of spells. Here’s a general overview of what each stat type does:
- Wojenny: Primarily deals with melee magic and close-up damage.
- Evocation: Mainly focuses on long-range damage.
- Enchantment: Primarily centered around supportive and healing abilities.
- Elementalizm: A mixed utility class with spells similar to martial, przywoływanie, and enchantment, but centered on the elementalism stat. It often brings out the unique qualities of the chosen element.
Ogólnie, you should pick one and invest all your stats into it. Tędy, you can learn all the spells available for that stat. Masz 8 spell slots, and remember that you can unlearn skills by right-clicking. Consider getting rid of “magic bolt.”

W miarę postępów, keep following your tutorial quest until you reach the final location the NPC directs you to. Look out for a hidden chest behind the spellforge building that you can grab.

After talking to the NPC, you’ll receive a reward called Arcane Lotus. Place this on your hotbar for convenient use. It allows you to tether to special terrain, which is handy when exploring the world.
Pierwszy 5+ Poziomy
Now that you’ve completed the tutorial, your goal is to level up. W tym momencie, you have no resources to craft spells and might be unsure where to go next. You can choose to navigate the game on your own, but if you want some guidance, here’s what you can do to enhance your experience.
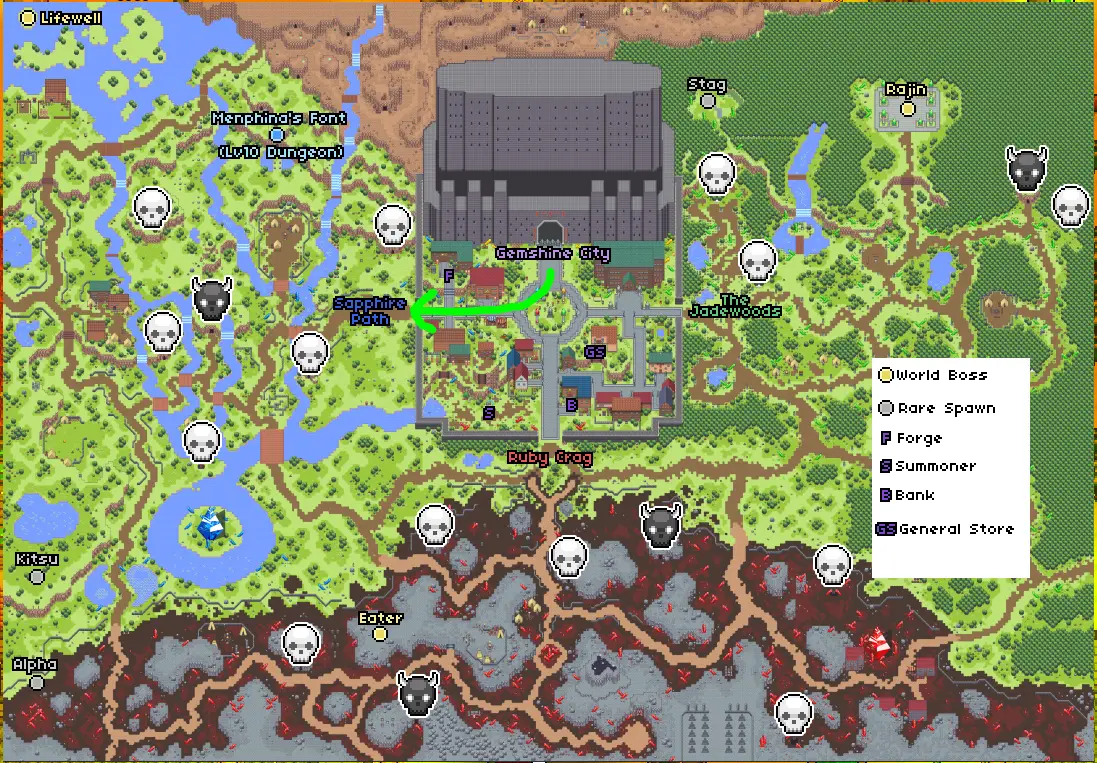
Po pierwsze, use the /map command in the chat to view the map. We’ll head to Sapphire Path first as it offers many quests and chests to quickly gather resources. Sapphire Path is west of town, so start heading in that direction (use the map if you get lost).
The rest of this guide will be image-heavy, with instructions displayed on the images. Our current goal is to collect as many chests as possible and pick up quests for completion later.
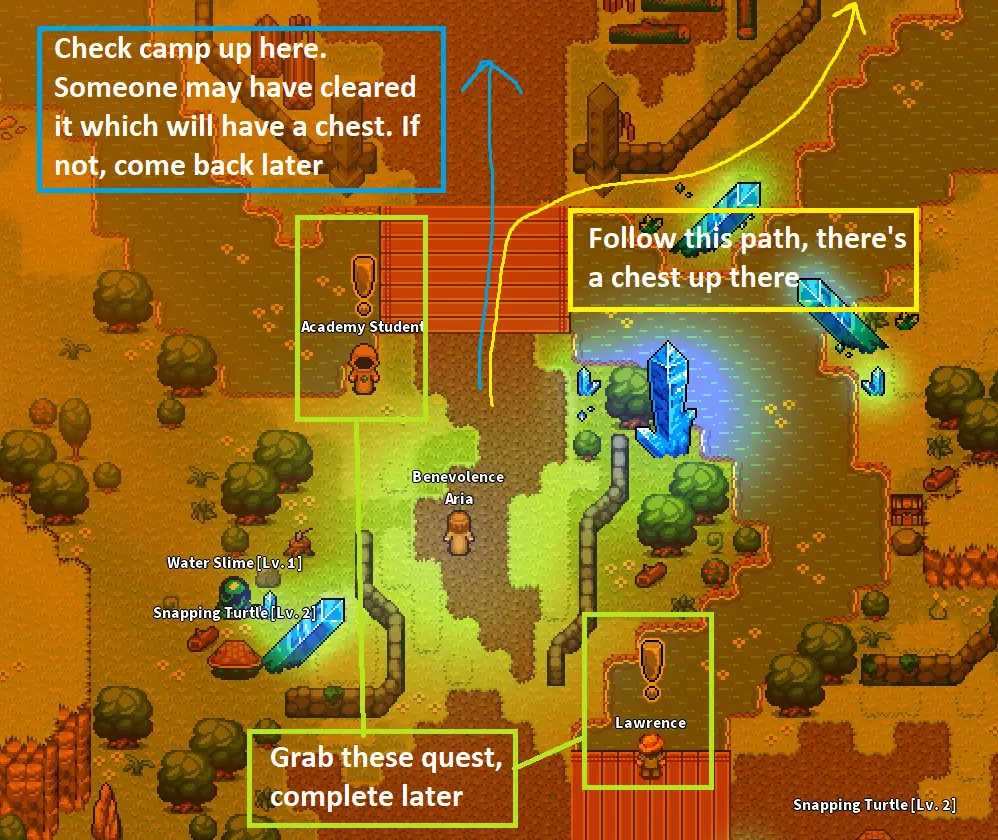
Upon entering Sapphire Path, you’ll find a starting area with sections above and below the path. Begin with the top area above the path; leave the cave for later. South of the path, you’ll encounter Hendrick, grab his quest but complete it later. Below him, there’s a quest and a chest to pick up for now.

Go below the path and find a character named Hendrick. Get his quest but finish it later.

Below Hendrick, there’s a quest and a chest to collect for now.

Return to the path and continue west over the bridge.
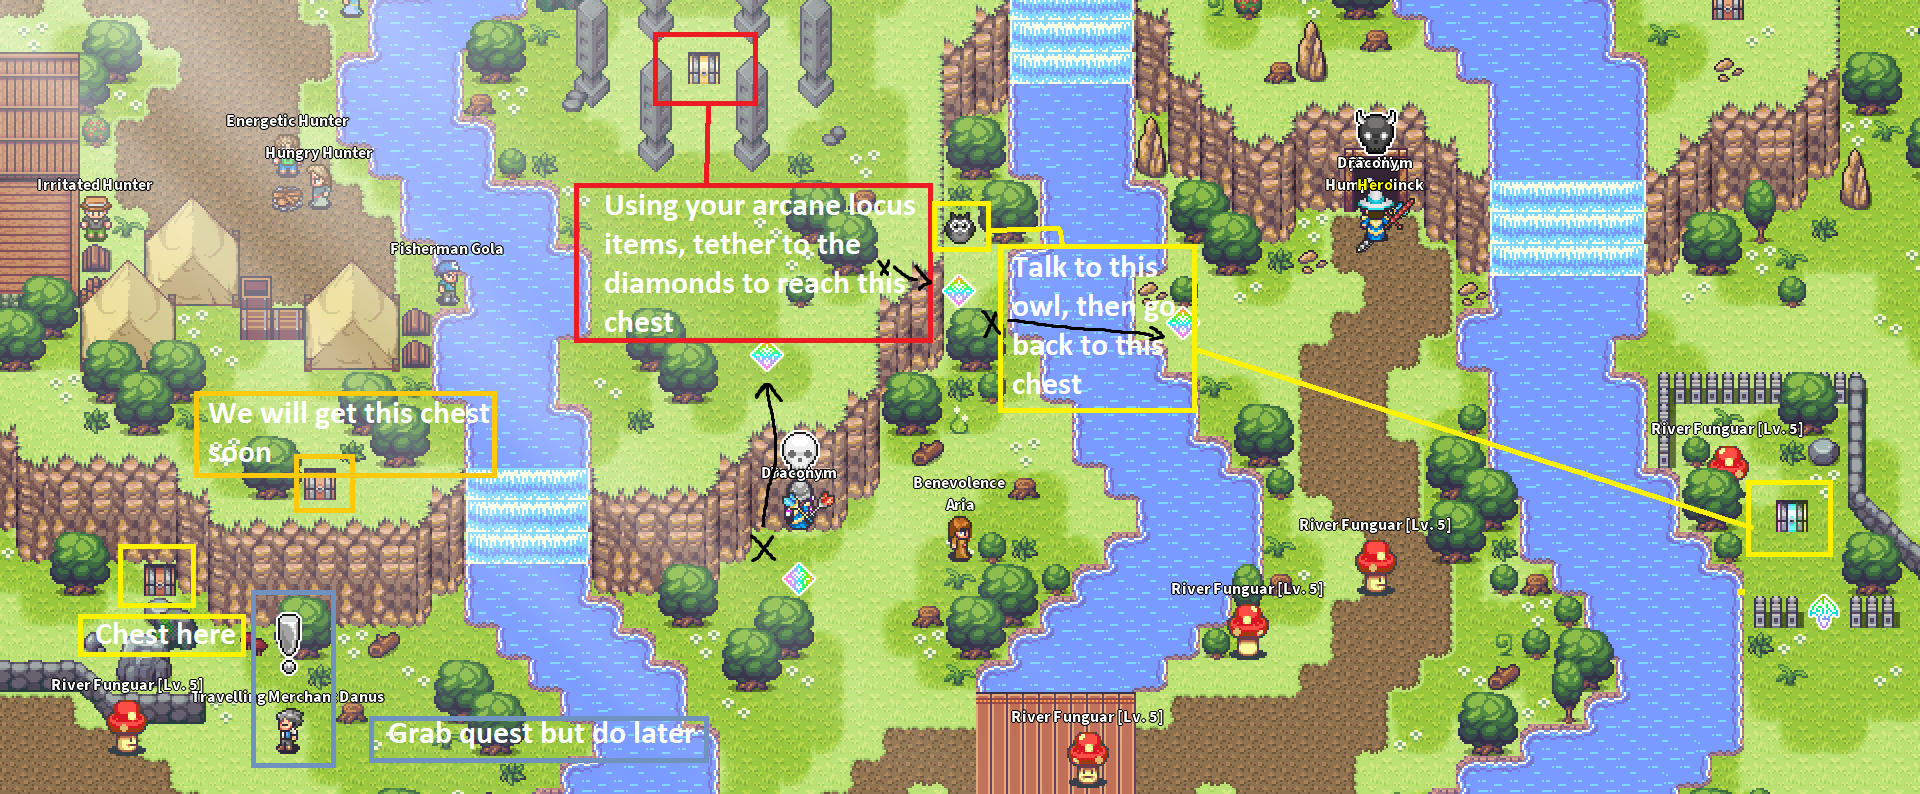
After getting the chest near the goblin camp, go back south and collect the chest in the mini-maze. There’s another chest you can’t reach yet; save that for later.

Head south just a little past the bridge. You’ll find an easy chest to the right. Grab it, then go back towards the camp with the quest you can’t access.

In the next area, use your arcane locus spell. Position yourself under the diamond to connect to it. Activate the owl to reach the chest you couldn’t get earlier.
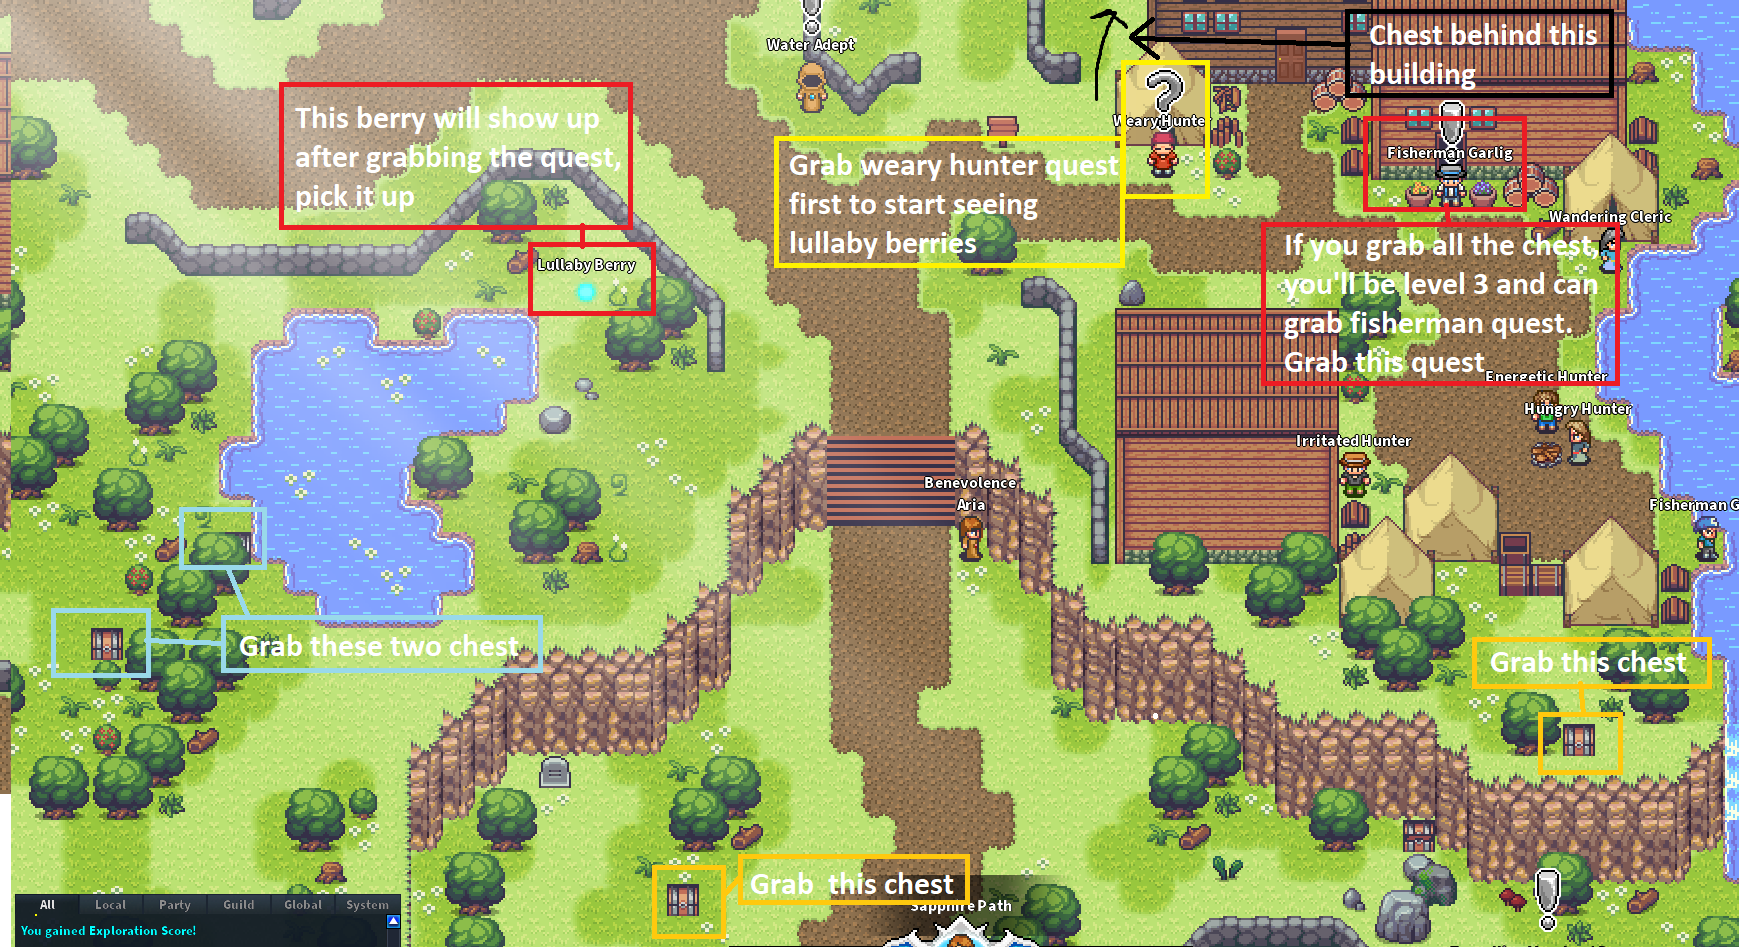
Return to the starting point where the traveling merchant is and go up the path. Explore the area for a couple of chests and two quests. Get the quests from the weary hunter and fisherman; we’ll complete them shortly by exploring points of interest, spawning fishing points and berries. Collect the berries and leave the fishing spots for now.
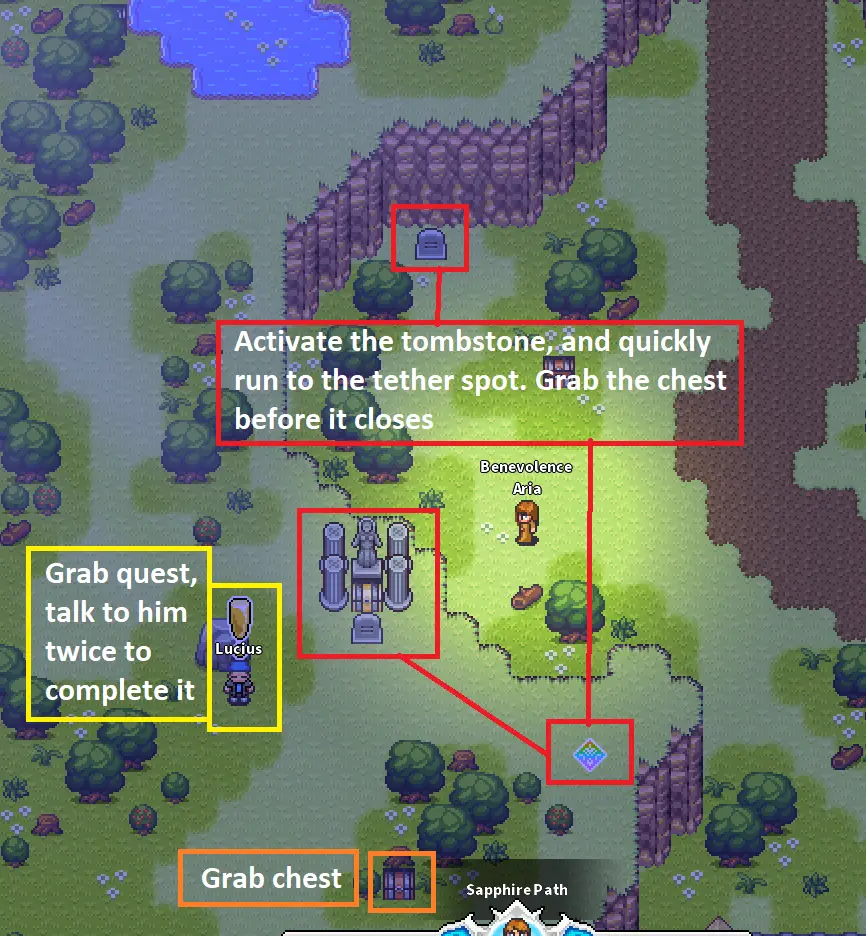
Head south on the path, where there’s a challenge involving a tombstone. Activate it, then quickly grab the locked chest. Talk to the nearby NPC for fast experience. Continue heading south.
Along the way south, you’ll find a chest and a berry. Grab them and keep going south.
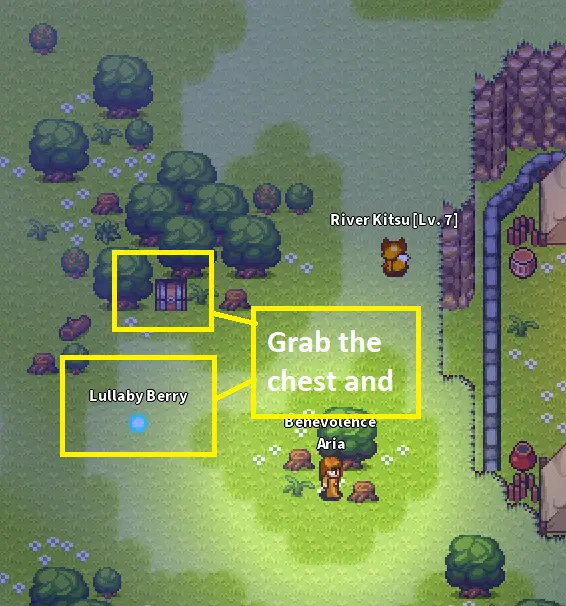
Collect two chests around the lake, ignoring the seemingly reachable chest. We’ll come back for that one later. Once you’ve collected all the chests, start heading back up.

As you head back up, the lullaby berries will have respawned. Collect them again to complete the quest. Turn in your quest for experience. After turning in the quest, follow the path south again to grab the previously inaccessible chest and complete the fishing quest.

Head back up and turn in the fishing quest. You can grab the two chests near the path now or later, it doesn’t matter. Cross the river to the right/east and activate the tombstone, which will be important later. Remember the blue crystal on a hill where a goddess statue sits; it will be needed for the level 9 water adept quest.
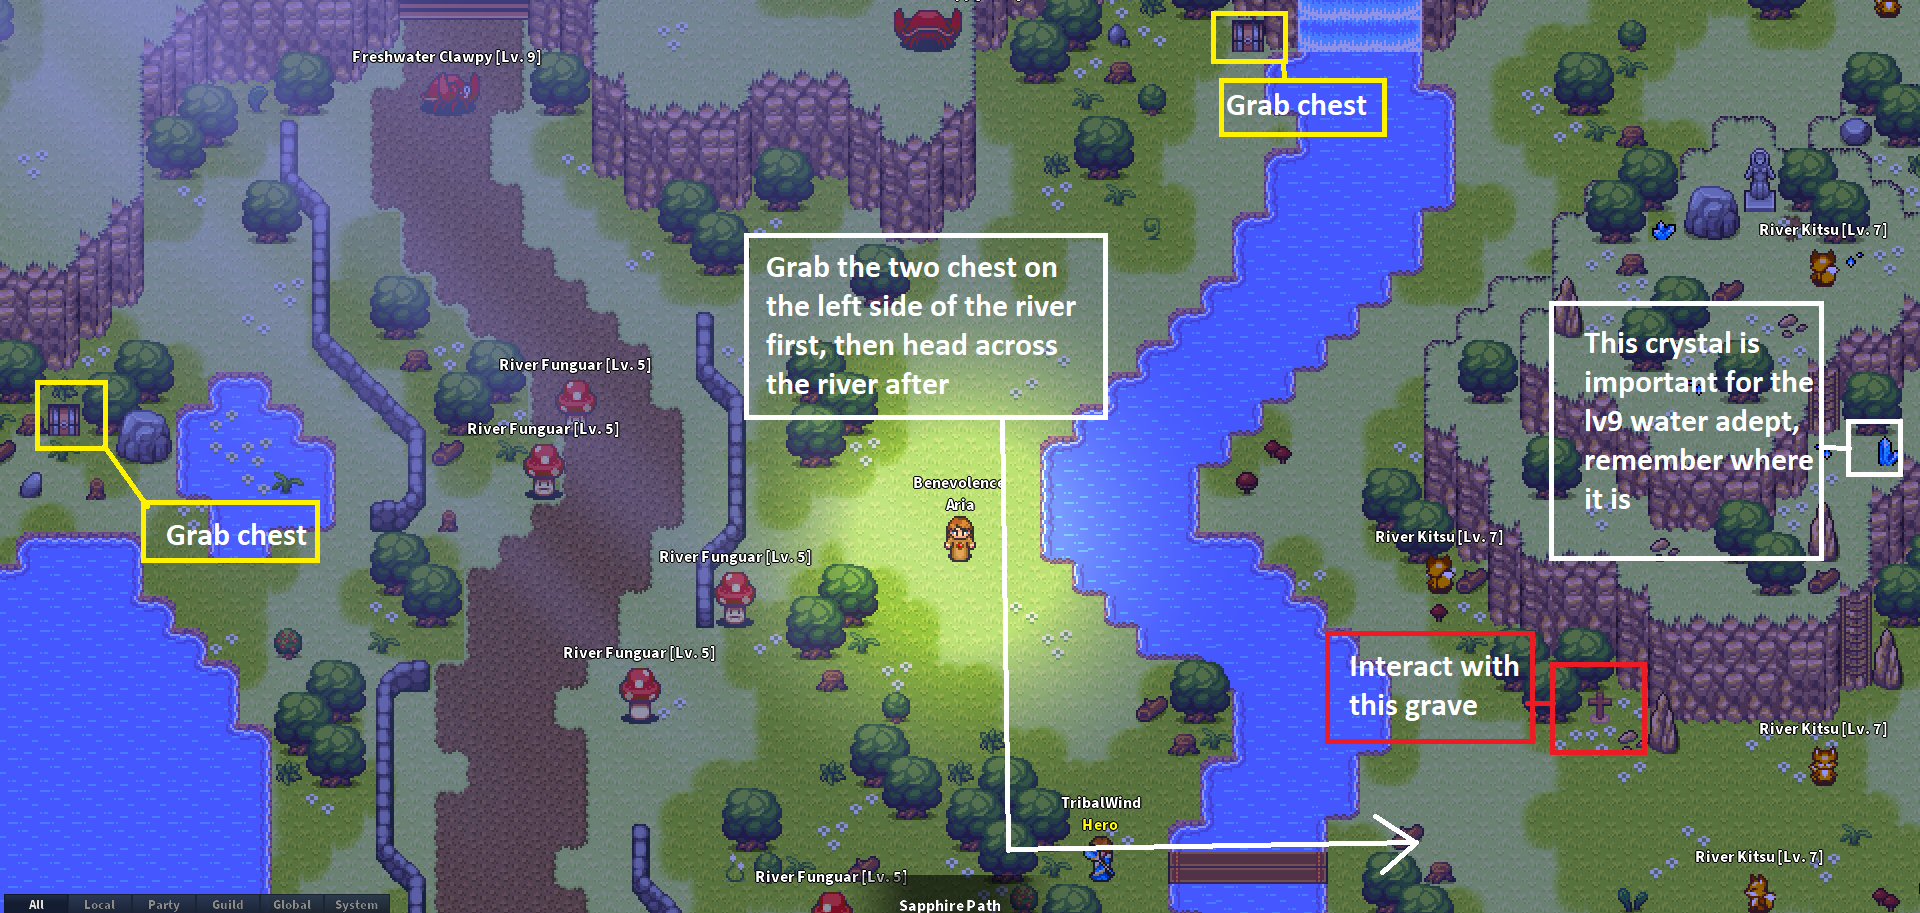
Head east, grab two chests, then go north around the right side of the goddess statue hill.
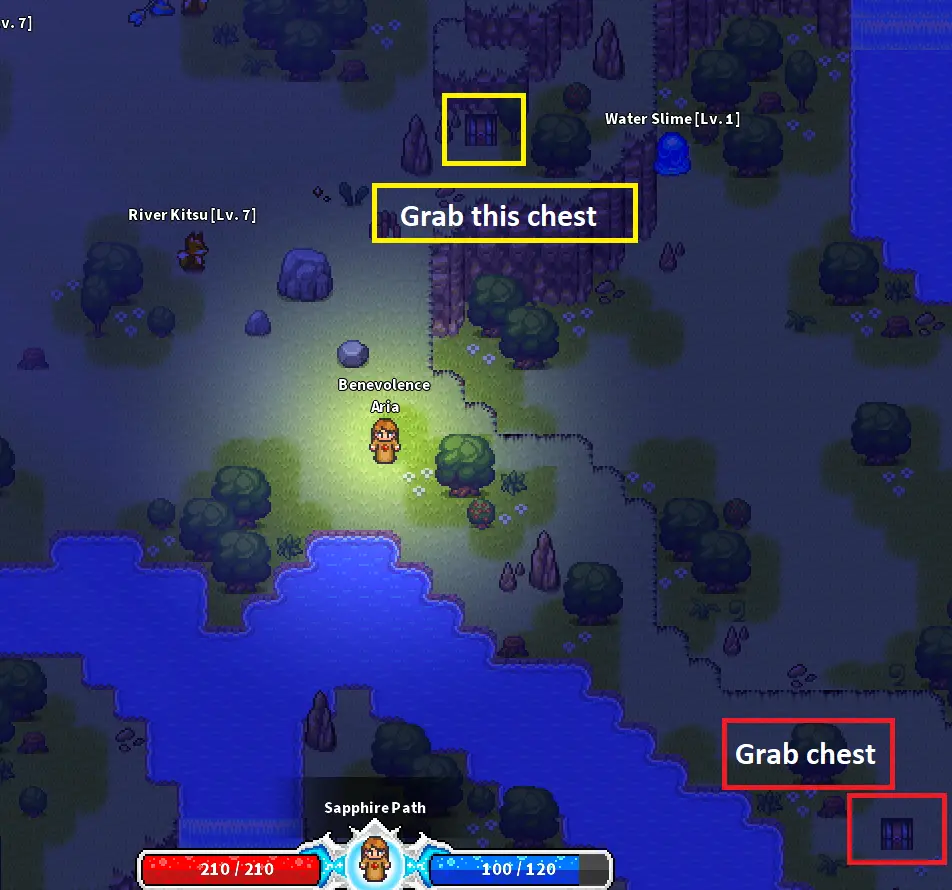
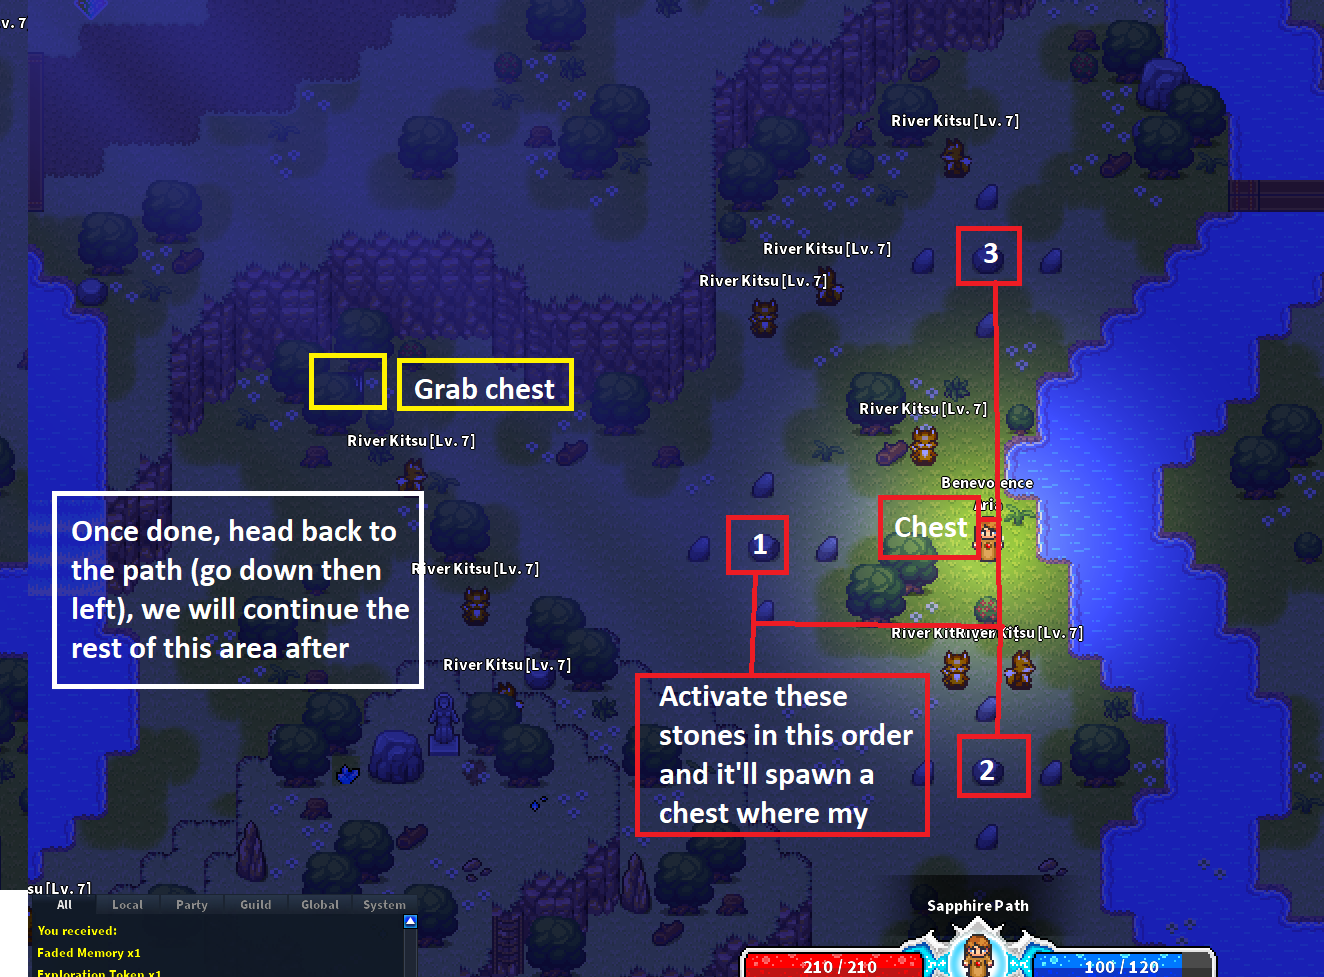
Activate some stones in the right order to spawn a chest. Grab the hidden chest and then head back. Ignore the tether spots/bridges for now; we’ll return later to save time. Head back to the other side of the river, back to the path where we started.
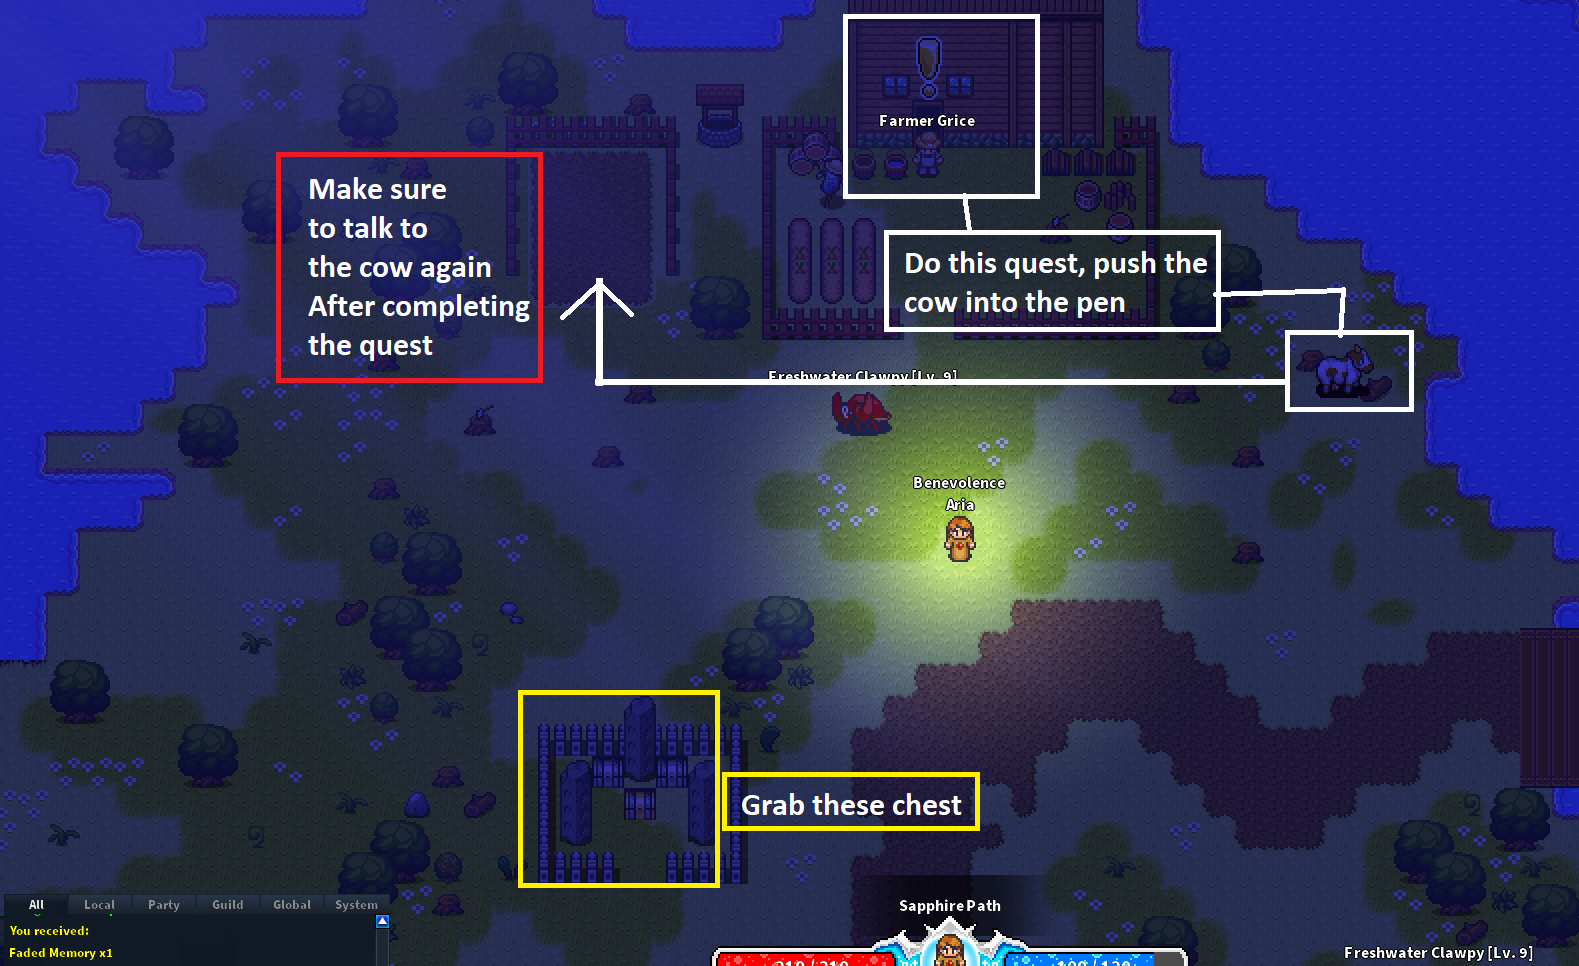
Go north on the path, grabbing chests activated by the tombstone. There’s a quest here to push a cow. Complete it, and talk to Bessie (the cow) again for an extra item reward.
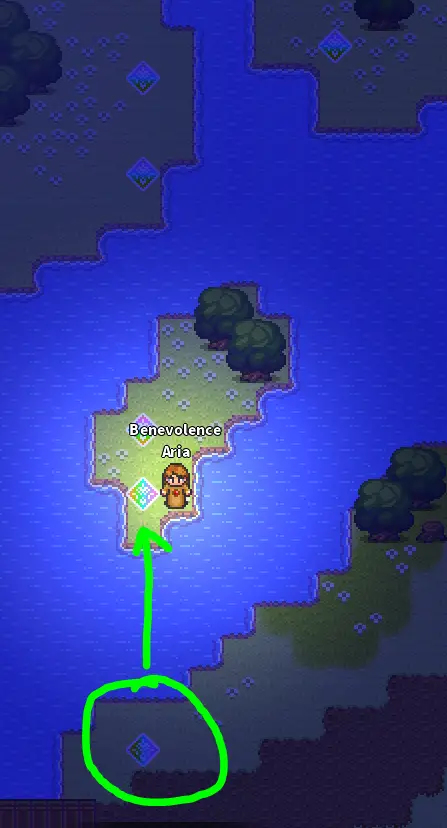
Cross the bridge to the east and start taking the tether path, connecting to various islands.
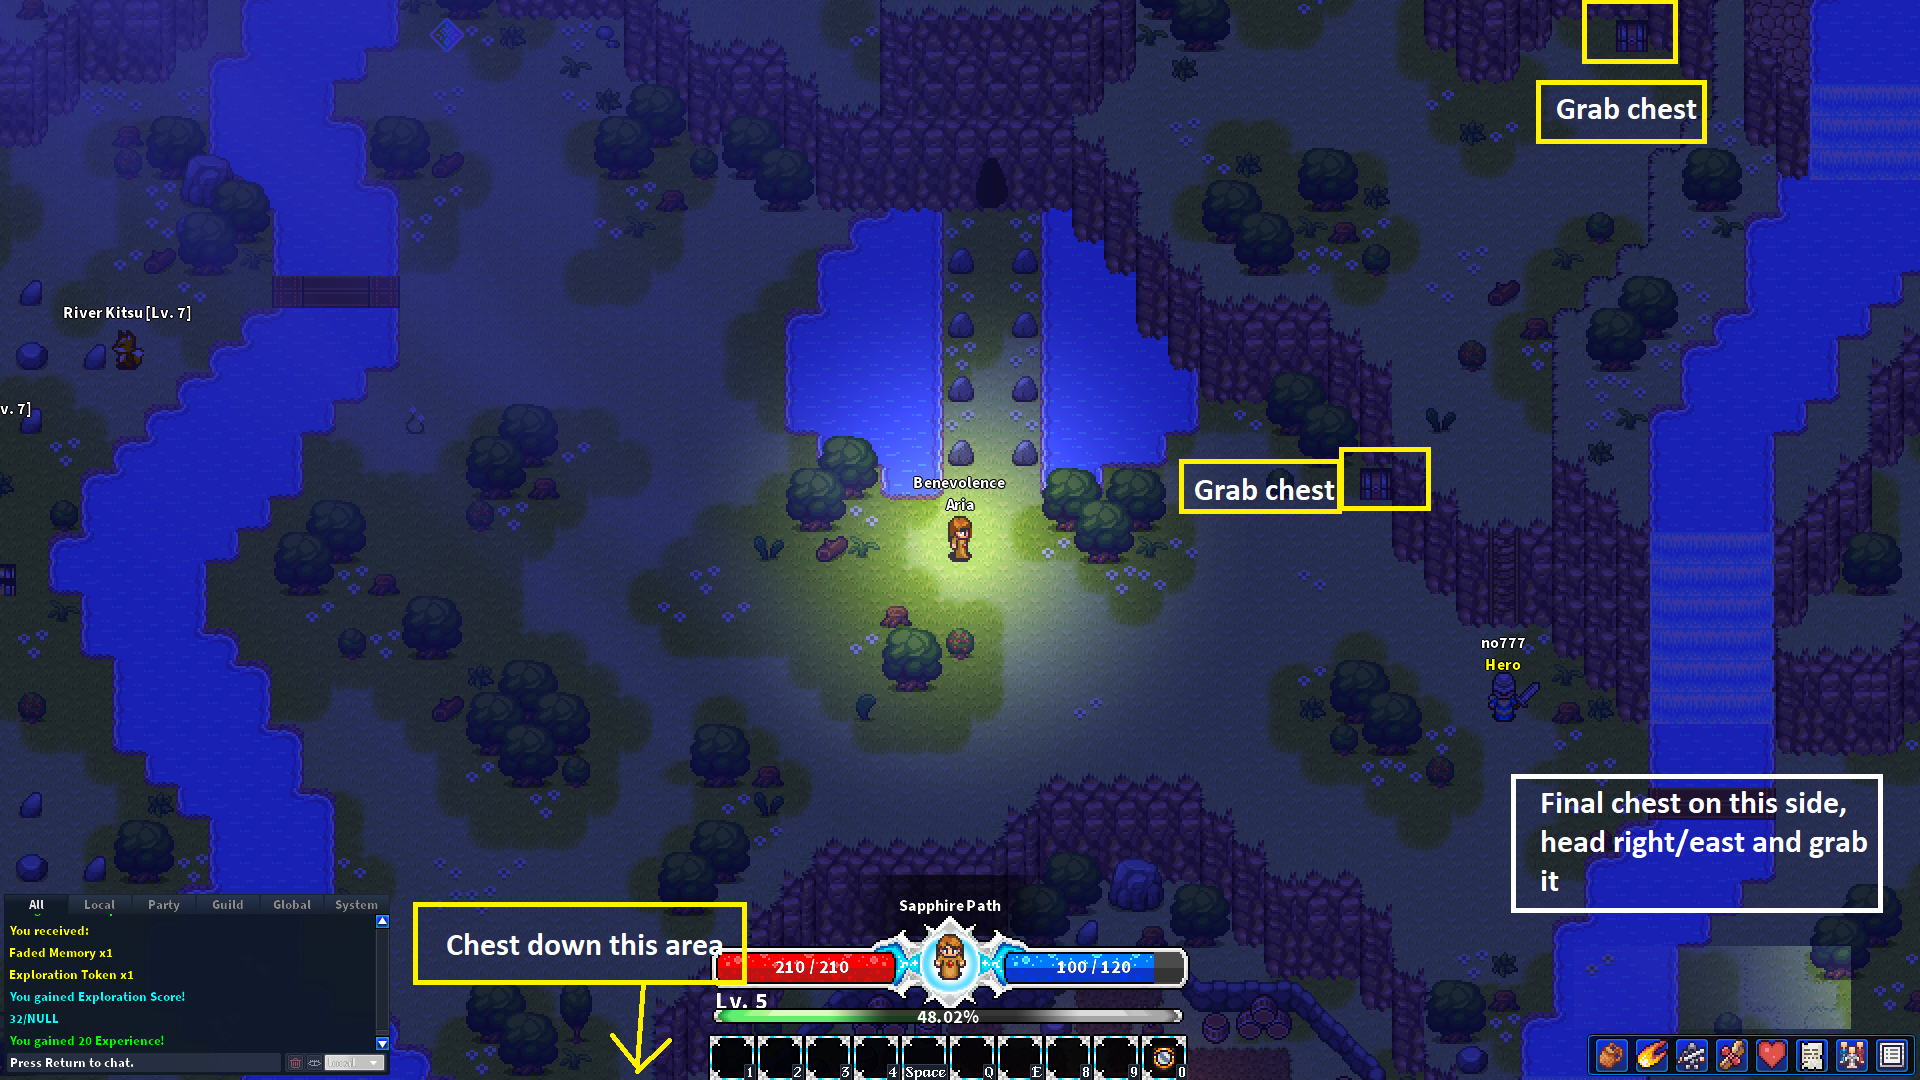
Follow the tether points until you see a branch. Go west to find three chests. Going north leads to a world boss, which you can kill/farm later for event items.

After grabbing the three chests, follow the tether points back to the path. Head east again, then go north across the bridge to collect a chest. Potem, head down, tether downwards to grab another chest, then tether to the right.

Continue to the right, collecting four more chests. Cross the bridge to find the last one.
W tym momencie, you should have enough resources to really get started now that the initial tasks are done.
Grind to Reach Level 11
In the next part of the guide, we’ll share information and tips on reaching level 11.
Zastrzeżenie:
- Please avoid completing your bounty quest at this stage; save them for level 11.
- Although we currently lack the update, the bounty system is undergoing a rework to become an infinite loop for experience, making it a valid grinding method. If this change occurs, you can farm bounty in any way you prefer instead of following the method outlined below to level up.
If you’ve followed the first 5 poziomy, you should now be at level 5 Lub 6, depending on the randomness of the experience gained from chests. Take a look at your inventory to see the resources you have.
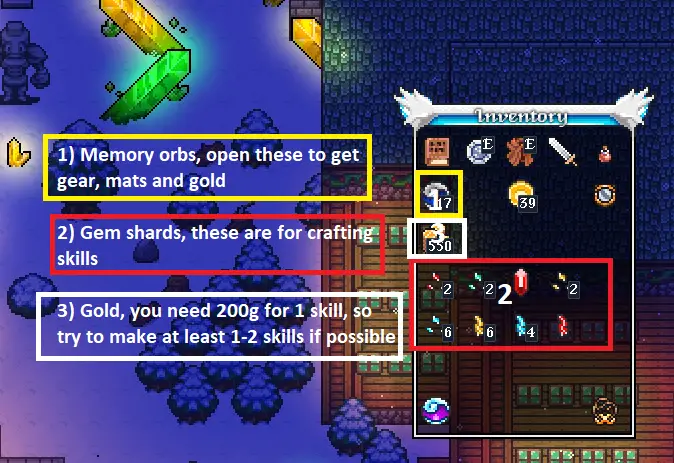
To get gear in the game, open your memory orbs. This is the sole method for obtaining gear. The orbs reward gear that corresponds to your level tier:
- Characters at level 1-9 will receive level 5 gear from the orb.
- Characters at level 10-14 will obtain level 10 gear from the orb.
- Characters at level 15 and above will get level 15 gear from the orb.
Jak na razie, poziom 20 gear doesn’t exist, but it is expected to be introduced in a future update. The pattern for how gear levels work is likely to continue.
The gear you acquire can be either rare (niebieska rzadkość) or epic (purple rarity). If you don’t need certain gear, you can sell it to the store or store it for another character. For epic gear, which has a low chance of being obtained, consider grinding it at the spellforge instead of selling it.
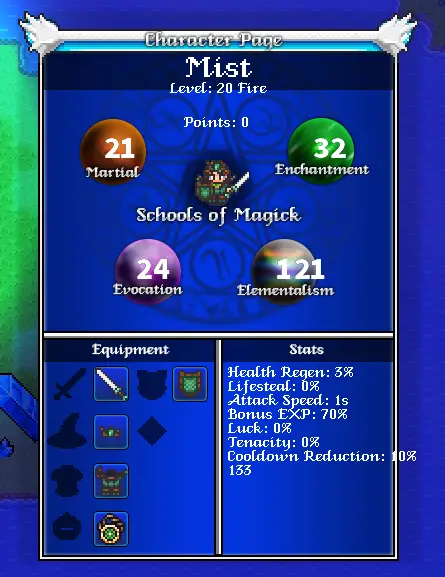
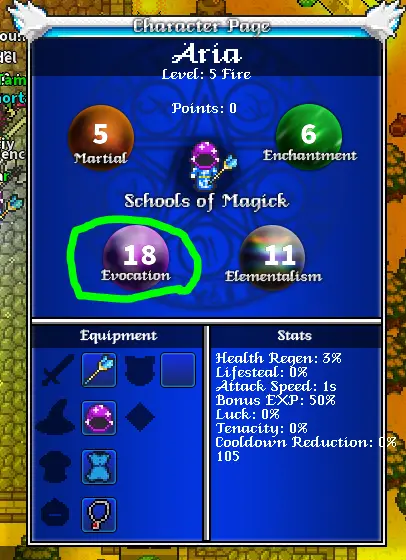
Equip gear on your character that boosts your chosen main stat. Upgrade your stats, and if you don’t see a “+” przycisk, relog due to a current bug. Aim to raise your stat as high as possible. Head to the store and craft your first skill; it’s recommended to choose the earliest spell you can learn from your selected category, along with any extra powerful damaging skill available if you have the scrolls for it.
Below is an example of my character used in this guide, displaying her stats and the gear obtained from the orbs.
Now it’s time to craft your skills and acquire the level 5 potion from the store. When you feel prepared, return to Sapphire Path and complete all the quests we previously skipped. Explore the caves, known as delves or trials (focusing on these for now). Refer to the marked image below for guidance on leveling up. Follow your quests naturally to guide you to these points.

Upon completing a trial/delve, a chest will appear. These chests contribute to a weekly clearing that rewards you with 1 guaranteed level.
I suggest skipping the first chest in the initial cave and saving it for later use, allowing you to utilize this guaranteed level after reaching level 15+. The weekly reset occurs on Friday, so unless you’re playing on Thursday or have limited time, Zostawić 1 chest unclaimed for later.
After finishing the quests on the Sapphire side and clearing most trials/delves, move south to Ruby Crag and repeat the process. I’ve left one black skull unmarked as this delve might be challenging at this point. We’ll come back to it later. Since we’re ignoring it, there’s no need to worry about accidentally using the 1 guaranteed level it contributes to the weekly.
You can obtain 3 guaranteed levels each week from the weekly events during this period.
- Sapphire Path features 5 trials/delves.
- Ruby Crag has 7 trials/delves.
- Jadewood consists of 6 trials/delves.
Completing these trials/delves will also reward you with a mana fragment, which currently serves no purpose but will be important in the future.
After exhausting your quests and trials/delves, open your orbs to acquire more gear. You should be around level 9 Lub 10 by now; if you’re still at level 8, Nie martw się. To reach level 11, we’ll need to embrace the classic MMO experience of grinding.
Trials offer substantial experience, so selecting a trial boss and farming it repeatedly is an efficient way to reach level 11 relatively quickly. I recommend the Watcher Eye boss (bottom left trial on the map in Ruby Crag). It’s a level 8 boss that’s easy to dodge and avoid damage. With moderate HP and providing excellent experience, you can efficiently farm this boss without spending too much time on healing between fights. Grind against this boss or choose any boss that suits your preference to reach level 11.
Bounties to Level 15 and Beyond
Brawo! You’ve hit level 11, completing one of the more time-consuming parts of leveling. Moving on to level 15 isn’t too challenging, so let’s discuss the next steps.

In town, there’s a bounty board (miejmy nadzieję, you haven’t done it yet) where you can pick up quests to defeat trial bosses for a significant amount of experience. Na poziomie 11, it activates the Jadewood bounties, offering tremendous experience rewards. While you might need assistance from other players, it’s generally manageable even with subpar gear at level 11.
You can complete bounties up to 5 times a week, so it’s essential to maximize the experience you can gain.
Zastrzeżenie: The bounty system is undergoing a rework to become an infinite loop for experience, making it a valid grinding method. If this change occurs, you can farm bounty however you like.
Start by talking to the NPC and then interact with the board. You’ll have several choices:
- Jadewood Ghost for around 15k experience.
- Berserked Goblin for around 20k experience.
- Gust Raptor for around 30k experience.
- Jadewood Stag for around 45k experience.
- Lesser Ent for around 60k experience.
Masz 3 chances each week to reroll or skip. Try rerolling Jadewood Ghost or Berserked Goblin to get Gust Raptor or something better. If you already have them, that’s great. Teraz, focus on defeating the trial bosses. The ones that might be tough are Gust Raptor and Lesser Ent, so here’s a strategy for all the bounty bosses.
Jadewood Ghost / Berserked Goblin / Jadewood Stag: These guys are easy. You can easily heal through their attacks with a level 10 napój.
Gust Raptor: This one is a bit tricky because it has a skill that hurts. Try to defeat it before it defeats you. If you’re struggling, run around and wait for your potion cooldown. It will run out of mana eventually.
Lesser Ent: This boss hits hard and has a damaging projectile skill. Walk out of the way to reduce damage. Wcześnie, hit it and kite it around until it runs out of mana. Hit it occasionally to avoid it resetting. Use potions to stay alive. Once it’s out of mana, it’s easy to kill.
Pick up some Jadewood quests. One unlocks at level 11, requiring you to collect garbage. Another is a survey mission, killing bounty bosses in order. Leave one chest unclaimed until you’re level 15+ if you’re doing the survey quest.
The last quest opens at level 15, needing Rajin’s world boss drop. If Rajin spawns, go smack it for the drop and complete the quest for a hefty experience reward.
Complete all three quests (and leave one chest unclaimed) to reach level 16/17 if done right. Once you hit 16/17, finish all weeklies to reach 19/20 natychmiast. If you didn’t hit 17, grinding it out is optional. Event dungeons are good for experience. Hitting 19 is fine, and there will be more weeklies to push you to 20.
Parting Word
That’s basically the end of the guide, and I hope it provides the information to assist you on your ManaSoul journey. The game offers a vast world to discover with a diverse set of skills for you to explore. Teraz, you can hybridize, create more characters, farm items, i więcej. Wybór należy do Ciebie. Here are some exciting things to look forward to in the future:
- Poziom 20 content and gear
- Szczebel 2+ zaklęcia
- More areas to explore
- Additional dungeons to conquer
- More PvE events
- And much more
Feel free to take it easy with the game and enjoy it at your own pace. I suggest joining the Discord community to chat with others and stay updated on the game. The developers are friendly and responsive to the community.
Since the game is in early access, you have the opportunity to witness its growth and be a part of its history. Również, knowing that it’s still in early access, you may also face several crashing problems. To help you cope with this matter, we recommend checking our guide on how to fix ManaSoul crashing issues.
To wszystko, co dzisiaj udostępniamy w tym celu ManaSoul przewodnik. Ten przewodnik został pierwotnie stworzony i napisany przez Arta. Na wypadek, gdybyśmy nie zaktualizowali tego przewodnika, możesz znaleźć najnowszą aktualizację, postępując zgodnie z tym połączyć.