- Tytuł: Elex
- Data wydania:
- Wywoływacz:
- Wydawca:
Informacje o ELEX są nadal niekompletne. Pomóż nam wypełnić szczegóły gry za pomocą tego formularz kontaktowy.
This guide will be showing you the complete steps on how to get all achievements in Elex.
Wstęp
Achievement Difficulty: Średni
Czas 100%: 80-100 godziny
Elex is a roleplaying game with a faction system and a „karma“-system (cold-system) and as such there are a few Achievements that can only be unlocked by having a certain cold-value as well as being part of a specific faction. Due to that there will either be multiple playthroughs, save-game abusing and/or a lot of cheesing. However 100%-ing the game is not really difficult and will take about 100 hours in total.
In this guide we will go the easiest route to every achievement while still trying to give you an immersive experience for your first playthrough. There are however a few things you’ll have to look out for. First of all try to get Caja into your party as soon as possible, do her companion quests and always choose emotional and compassionate answers while she’s with you, she is needed for the Romantic Achievement and that can be a bit grindy, second try to only do emotional answers in your first run, as there are items which can increase your cold value but none that can decrease it and you need a cold value of both under 10 and over 90 for a few achievements. The items that you should keep (never sell or trade them) are Natural Elex and Elex drinks as you’ll use them to increase your cold right before the finale. I also recommend going Berserker for your first playthrough as romancing Caja will be a little easier, but that part is optional, Ty’ll have to join each faction at least once anyways.
You should also pick up everything you find on your travels, explore as much as possible and learn both hacking as well as lock-picking as early as you can. Just like in the Gothic and Risen games your inventory is endless and you should make use of that. And don’t be afraid of being a filthy little thief as your thievery doesn’t affect your standing with your party members nor does it affect your cold value. Free loot yay!
And lastly there are achievements for joining each faction as well as teaching yourself all of that faction’umiejętności, so before you enter a faction you should make a guildless save so you don’t have to replay it all again. Here you should watch out though as some quests you need to join a faction will also negatively reflect in other factions guild-joining process. You should also make a save before fighting against the final boss, as there are three achievements related to the ending you can get.
Without further ado let’s get it going!
Niezbędne osiągnięcia

Up and Away
First Jet-Pack flight
Technically this one is missable, but the jetpack is found really early in the beginning and is used to traverse some regions, so the chance of you not getting this one throughout the game is rather small.

Przetrwanie
Zakończony – Przetrwanie
This one is the first main quest you’ll do, To’s unmissable.

Fencing Master
Zakończony – Stolen Equipment
This is a main quest. It requires you to go to Sandy Pines and talk to Ray, who you can also get to join your party. I’m not sure it is required to finish the game, but you can always do this quest up until the very finale. It is also completable by doing the Quest „Chaos of Emotions“.

Flashback
Zakończony – Chaos of Emotions
This quest requires you to go to the separatists HQ to ally with them as well as visit Ray at Sandy Pines.

Lider
Zakończony – Origin The Power of the Center
For this one you have to visit Origin (Camp in the Center) east of the domed city and complete all quests Lloyd gives you.

Prepared
Zakończony – Zardom’s Battle Plan
This quest is unmissable and unlocks with Chapter 2 of the game and finishing its sub-missions is self-explainatory. Finishing this quest will start Chapter 3.

Turned the world upside down.
Zakończony – Old Obligations
This is the second main quest you unlock in Chapter 3 and it its unmissable. Finishing this quest will start Chapter 4.

Thicker than Water
Zakończony – Showdown with Kallax
This one is also unmissable, you will get this achievement after fighting Kallax.

Visionary
Completed Elex
You get this achievement after beating the game and watching the credits.
Łatwe osiągnięcia

Hunter
Zabity 20 Potwory
You will very likely get this achievement before even visiting the first town. Either way it’s relatively easy. Robots, Mutants and Mechs count!

Zabójca
Zabity 300 Potwory
This one will most probably unlock before you finish the first playthrough of your game. Just like with the Hunter achievement Robots, Mutants and Mechs count towards it.

Big Game Hunter
Zabity 1000 Potwory
Depending on your playstyle and how explorative you are you can unlock this one during your first playthrough as well. If not you will probably unlock it on your second. Just like with the other two Monster achievements Robots, Mechs and Mutants all count. And if you can’t find any more monsters to kill try and progress the main story as each chapter new monsters will spawn.

Thief taker
Zabity 20 bandyci
This one will also probably unlock naturally during your first playthrough. If somehow it didn’t just run around till you find Reavers (To’s what the game calls bandits) and kill them all.

Friend or Foe
Zabity 20 Albs
Technically this one is missable as well, but there are many main quests that involve killing Albs and by the end of the game you should have this one.

Butcher
Zabity 50 ludzie
This one you should also unlock naturally, ale to’s missable. Albs and Reavers don’t seem to count towards this achievement so your best bet is visiting the Southwest of Edan and killing the exiles that live there, as killing them has no negative effect on the story.

Atombouncer
Teleported 20 czasy
Unless you don’t like fast-travel you will unlock this one naturally. To’s also easily cheesable if you just keep on teleporting towards the same teleporter over and over again. To activate a teleporter for teleportation you have to stand atop it at least once.

The Big G
Zdobyte 1000 Elex shards (Elexit)
This one is also pretty easy and you will get it naturally in your first playthrough. Just having them added to your inventory is enough you don’t have to possess them all at once.

Shard Hoarder
Zdobyte 10,000 Elexit
Again the same as with The Big G having acquired that much is enough, nie’t have to own them all at once. You will most likely get this Achievement naturally in your first playthrough as well.

Big Earner
Zdobyte 100,000 Elexit
Now this one will take you a lot more time than the other two Elexit Achievements. Jednakże – Ponownie – just acquiring them is enough so if you want to cheese this Achievement simply quicksave in front of a merchant, sell everything you got, quickload the savegame and repeat until the Achievement unlocks.

Luminary
Poziom zasięgu 20
You will reach this Achievement throughout your first playthrough as ranking up to the factions maximum rank requires you to reach level 25 przynajmniej. You level up by getting EXP, which you get per downed/killed enemy and by finishing quests.

Pack Leader
Mieć 5 companions join you
Simply do all the quests that are found under „Towarzysz“ in your questlog. Watch out though as some companions like dialogue-options others don’T. (Especially if you’re trying to romance Caja don’t have her with you when you interact with Nasty, vice versa).
Possible Companions are Caja (Abessa), Promień (Sandy Pines), C.R.O.N.Y. U4 (The Pit in Edan), Duras (Edan), Falk (Atop the Converter in Edan), Nasty (Fort) and Arx (Abessa).

Carreerist
Zakończony 300 misje
Now this might sound like a lot but considering each mission consists of multiple submissions (the very first tutorial quest you do counts as 8 quests already) you will most likely get this one in your first playthrough.

Safecracker
Cracked 50 safes
This one you will most likely not get naturally, but it is easily cheesable. You need the hacking skill to do this one though. Just quicksave before hacking one, do the hacking minigame and then quickload once you’ve opened the safe. The safecodes never change so once you’ve hacked it for the first time just remember the code and type it in directly when you hack the safe. (You need to press „hack“ first before you type the code in!!!)
Jeśli tego nie zrobisz’t know how hacking works here’s a quick tutorial: The hacked code will always look like * > * < * > * and if you’ve listened during maths class in school you will understand that the code is just an equation waiting to be solved. > means bigger than, < means smaller than and so on. So you randomly type numbers that work within that equation and press enter. Numbers that are shown as red are not in the code, numbers that are shown as yellow/orange are in the code but you put them at the wrong position and green numbers are correct and at the right position.

Pilferer
50 Successful Pickpockets
To jest łatwe. Learn pickpocketing either via skill point or amulet/ring, wait until it’s nighttime, sneak towards a sleeping person and left-click them. Make sure you’re not being seen and quicksave before each try. Every time you pickpocket someone they become more wary when it comes to pickpocketing in the future. Pickpocketing can fail even if you’re not seen.

Locksmith
Picked 100 zamki
For this one you need to learn lockpicking and own at least one lockpick. To’s easily cheesable as well by quicksaving in front of an easy chest (the easy ones only require a single point of lockpicking-skill) and then reloading it after the chest has been unlocked, again try to remember the right pin-combination as it never changes and always stays the same for each chest.
Lockpicking is relatively simple, just move your lockpick left and right until the pins go up. If they stay up you’re on the right track. To’s basically trial and error finding out with which pin to start and which pins you have to choose next.

Splattermaster
Fallen to death 20 czasy
Łatwy: Go up the highest mountain/building you can find and jump off it 20 czasy.

Majsterkowicz
Modified weapons 20 czasy
Just go to a workbench and modify weapons until you get this achievement. You will need the modify weapons skill as well as the fitting materials for this. You can also cheese this by saving before modifying a weapon and then reloading the save to repeat.
Faction Achievements
For the Achievements of learning all the factions skills you always need 20 skillpoints and a specific value for a lot of attributes. If you don’t have enough attributes, you can simply craft Elex Drinks from the Natural Elex that is endlessly being sold at Origins. You will also need a lot of Elexit, o 20,000 powinno wystarczyć. In general getting your attributes to 40-50 and then leveling the main attributes of each faction up to 85 powinno wystarczyć. I generally recommend having as many medium elex drinks and strong elex drinks as possible by the time you make your guildless save.

Akolita
Join the Clerics
This Achievement will unlock once you’ve joined the Clerics.

Beacon of Faith
Learned all Cleric Skills
Po tobie’ve joined the Clerics you’ll unlock a Clerics teacher (Balder). In total you’re going to need 20 Skillpoints for this, so saving some up will come in handy.

Kultywator
Join the Berserkers
This Achievement will unlock after you’ve joined the Berserkers.

Nature Lover
Learned all Berserker Skills
Po tobie’ve joined the Berserkers you’ll unlock a Berserker teacher (Caldrim). In total you’re going to need 20 Skillpoints so be sure to save them up as good as you can.

Biegacz
Join the Outlaws
This Achievement will unlock after you’ve joined the Outlaws.

Master Criminal
Learned all Outlaw Skills
Po tobie’ve joined the Outlaws you’ll unlock the Outlaw teacher (Williama). Będziesz potrzebować 20 punkty umiejętności. Be sure to save before spending them though as Outlaws have the arguably worst set of skills out of all three of the factions.
Cold-Based Achievements

Człowiek
Cold is 10 lub niższy
Just try to always be emotional, even if the emotional answer seems like the more aggressive or evil one. You should try to unlock this achievement by Chapter 4 and especially before the final boss. Kiedy masz wątpliwości: Save before every dialogue and reload if you mess up.

Pure Rebel
Sided against the Hybrid
Raz ty’ve achieved the Człowiek achievement go and fight the final boss, you will automatically get this achievement. Your cold value needs to be under 10 (expressive) za to.

The Third Way
Fed Mana to the Hybrid
As I mentioned in the Introduction of this Guide you probably have a lot of Elex potions as well as natural Elex in your inventory. If you’ve already gotten the Pure Rebel Osiągnięcie, consume them all until your Cold value is either neutral, intuitive or dispassionate and then go fight the final boss. You can buy an endless amount of Elex at the merchant in Origin if you didn’t prepare, but you will need around 500 natural Elex for it to affect your cold enough, 1000 if you want the other cold achievement as well.

Coldhearted
Cold is 90 lub wyższy
Jeśli ty’ve packed enough Natural Elex or Elex drinks this Achievement is easily cheesable. Just consume them until your Cold-value is over 90 (ice cold). Again you can buy unlimited Elex at the trader in Origins. Ostrzeżenie: This Achievement will ONLY unlock through dialogue, so once your cold reached ice cold, just go to the final boss and choose the cold dialogue options, and you will unlock both this Achievement as well as „Beast of Xacor“.

Beast of Xacor
Sided with the Hybrid
See the guide for „Coldhearted“ a little further up.
Różnorodny

Romantic
Started a relationship
There are two romancable characters: Caja the Berserker and Nasty the Outlaw. Jeśli ty’re going for a human run I recommend Caja, jeśli ty’re going for a cold run Nasty is your way to go.
Just have one of them follow you at all times and choose dialogue options they would like (Caja: Emotional and Compassionate / Nasty: Cold and Disrespectful) and do each of their companion quests as soon as you get the chance to. Once they „idolize“ Ty (just ask them how they’RE) and you are in Chapter 3 you will get the quest „More than just friends“, keep on talking to them, get them to „true friend“ status and progress in the story and at some point you will be able to finish the quest and get the Achievement. For me it happened shortly after Chapter 4 started. If you romance Caja be sure to give her Mana after every one of her quests as that will make her like you more as well as balance out the negative effects of the Elex.

Honorary Citizen
Played 80 hours of Elex
This Achievement used to be bugged and unlocked after 80 protokół. Jeśli ty’re one of the unlucky ones who didn’t get the Achievement back then you’ll have to play the game for 80 actual hours. Ostrzeżenie: Nie’t count to be in a menu, you have to actively be ingame for this. Jeśli masz’t gotten this achievement after getting all the other achievements and you just can’t be arsed go on and stand in a town somewhere, turn of your monitor and leave the game open over night.

Earner
Zakończony – Tramp Confederacy
To get this achievement you have to complete the quest Tramp Confederacy, which is a sidequest you can get in Tavar. Talk to Chloe in the Fort to start this quest. Nie’t matter how you complete this quest so long as you complete it. This quest is needed to become an outlaw anyways so you should do both this one as well as the Biegacz Achievement in one go.

Detective
Zakończony – Decaying Powers
This Achievement has a slightly wrong description as there is no quest titled „Decaying Powers“ w tej grze. This Achievement instead pops up once you complete the quest „Subversive Elements“ in the Hort of Ignadon. You get this quest by talking to Reinhold. If you wanna join the clerics you will have to do this quest either way, so doing both the Akolita Achievement and this one in one go is relatively easy.

Sewer Rat
Zakończony – The Claws
To get this Achievement you have to join the optional faction „The Claws“, which are located under the domed city. To be able to join them you have to own a specific claw, the easiest one to get would be Katta’S. Katta can be found on Berserker Island in the ocean South of Edan. Just finish her quest and she will give you „Kattas Claw“. Then teleport to the Small Farm south of the Domed City and climb the cliff next the house on the farm. Behind a bush there you will find the hidden entrance to the sewer system and that’s where you will find the Claws.

Balance of Power
Sealed the fate of Abessa City
To get this Achievement you have to either side with the clerics or the outlaws inside Abessa City (The Domed City). One side (outlaws) will have you sabotage the city’s safety and reparations while the other side (clerics) will have you help keep the city safe and repair the dome’s energy regulator. This will decide the fate of the Domed City, and no matter which side you choose you will get this achievement. You can choose the faction of the Domed City independent from the faction you wanna join up, just because you help the clerics in the Domed City doesn’t mean you won’t be able to join the Outlaws and vice versa.

Calaan
Found Calaan
To find Calaan normally you need to find 9 zdjęcia, piece together the clues and you will find the way and passcode to Calaans location. However the achievement unlocks if you find him no matter if you’ve found the photos required to know the location and code. So teleport to the Castle Ruins of West Ignadon (east of the volcano), find the elevator inside, idź na dół, find the codepad on the gate to your right and enter the code: 7817. The achievement will unlock after entering the room and going onto the balcony. The door to your left uses the same code and inside is photograph #20, which you will need for the Picture Album osiągnięcie.
If you wanna do this Achievement the intended way, do the quests for Eva in the Hort of Ignadon and you will start the questline. The quest is called Secrets of the Past and the submission that sends you after Calaan is called The Road to Calaan.

Natural Survivor
Learned all survival skills
Simply find a Survival teacher and unlock everything. Będziesz potrzebować 20 skill points for this in total. To’s easiest to save then drink 20 strong elex drinks, use all skillpoints and then reload for the other skill-based achievements.

Fightmaster
Learned all fighting skills
Widzieć Natural Survivor further up. Just find a combat/fighting teacher and learn everything, this one also takes 20 skill points in total.

Bohater
Learned all character skills
Widzieć Natural Survivor further up. Just find a personality/charisma teacher and learn everything, this one also takes 20 skill points in total.

Flexible Friend
Learned all dexterity skills
Widzieć Natural Survivor further up. Just find a crafting/dexterity teacher and learn everything, this one also takes 20 skill points in total.
Picture Album (Kolekcje)

Picture Album
Collected 20 kino
Now this is the achievement that will probably take you the longest (next to the 80 hour one of course). I have created a map with all the picture locations on it for you to use as a reference. A more detailled description of where to find them will be written down a little further down. I recommend doing this Achievement before Chapter 2 as there’d be less monsters annoying you on your scavenger hunt.
Just a quick note: On the map the numbers 8 I 9 are switched up, as it was easier to go to Photograph 9 before going to photograph 8, so if it’s just 8 Lub 9 you’re missing please use the more detailled description. 9 Is at Sandy Pikes and 8 is to the east of Sandy Pikes!
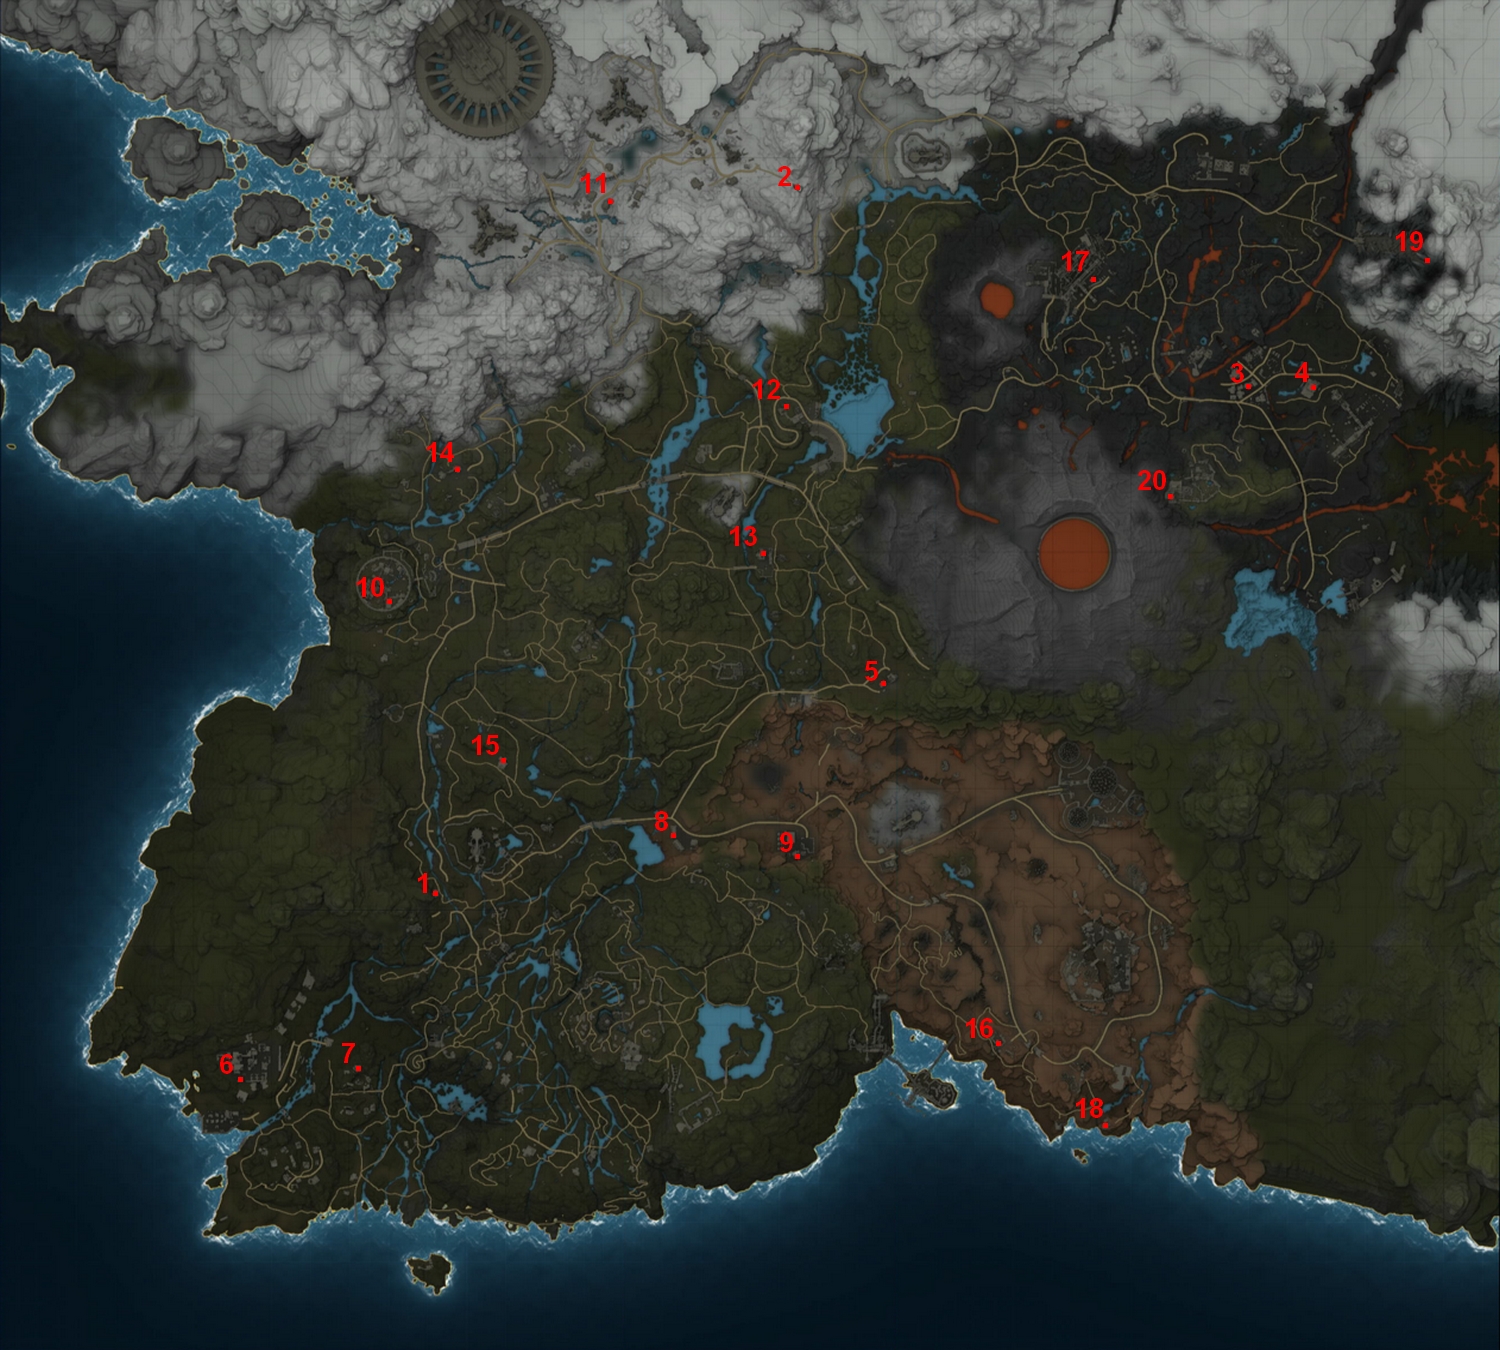
#1 – West of Converter of Edan
There is a small house directly west of the teleporter of the Convertor of Edan. Within the house you will find a few enemies and on the table your first photograph.
#2 – Mountain north of Company Premises: North Abessa
On the mountain north of „Company Premises: North Abessa“ there is a small building left from the Old World, in which you find Lara, Micha, Krogi and on one of the shelves in the backroom there is photograph number 2. You can also find a cheeky Dark Souls easter egg if you check behind the building next to Erol’s body.
#3 – House North of the Crater
Right north of the teleporter „Crater“ in the cluster of houses the second house from the east is the next photograph. Just enter the garage in which an old rusty car is parked and at the wall behind a blue barrel you can find it in the rightmost drawer.
#4 – Factory Building East of the Crater
Right east of the Crater teleporter there is a factory building. In it you will find a few Reavers and below the stairs on a table you will find the fourth photograph.
#5 – East of Tavar Mountains
Follow the road east from the teleporter „Tavar Mountains“ until you make it to two decrepit old buildings. In the one closest to you under the stairs you will find photograph number 5.
#6 – Company Premises West Edan
Teleport to the Company Premises in West Edan and then go to the small building in the South West. Inside the building on the table in the corner you will find photograph number 6, but be quick about it as the entire area is poisoned and will kill you if you stay there too long!
#7 – Hill north of the Valley of the Damned
Teleport to the Valley of the Damned and go up the hill to the north of it. On top of the hill there’s an old world building and right next to the entrance inside a small basket right next to the legendary weapon Gaia’s Wrath you will find photograph number 7.
#9 – Sandy Pines
On the top floor in the North-Western building of Sandy Pine Motel, the second apartment to the left you will find photograph number 9 (To’s 8th on my list and map as it’s easier to get 9 zanim 8 but the item name will be 9) on one of the shelves.
#8 – Factory East of Sandy Pines
In the factory between Sandy Pines and the Converter of Tavar, go into the southmost building and inside on the ground floor you will find photograph number 8 in one of the corners. Watch out for trip mines though!
#10 – The Domed City
Enter the Domed City through the main entrance, go up the stairs to your left and then enter the building immediately to your right. On the table inside that building is photograph number 10.
#11 – North of the Southern Pass in Xacor
A little to the North of the Southern Pass teleporter, past the frozen river, there is a building with a round silo-like part built into it. Go into that round part, downstairs and on a board on the wall you will find photograph number 11.
#12 – The Radio Tower by the Dam
A little to the west of the Dam teleporter you can find a radio tower. Right next to the radio tower there’s a small decrepit building in which you can find photograph number 12 na stole.
#13 – Factory Building South-East of the Converter in South Abessa
To the South-East of the Converter in South Abessa there’s two small factory buildings. On the top floor of the western building you can find the 13th photograph in shelf next to the door. You can reach the top floor easily by jetpacking from the roof of the other building.
#14 – Alb Camp North-West of Company Premises Central Abessa
North-West of the Company Premises of Central Abessa there is a small Alb camp. In the eastmost building of that camp on the ground floor in one of the shelves you can find photograph number 14.
#15 – House North of Edan’s Converter
A bit North of the Converter in Edan there is a family-house on top of a hill. You can find the 15th photograph on the couch in the main room of the top floor.
#16 – Old Windfarm in Tavar
Right next to the teleporter Old Windfarm in Tavar you can find an old decrepit building. Go inside and you will find photograph number 16 on top of a wooden drawer.
#17 – Building North of Company Premises Volcano
Right next to the road the eastern building of the building complex North of the Volcano Company Premises, guarded by mutants and sandbag walls, houses the photograph. Go inside and on the shelf to your left is photograph 17.
#18 – Atop the Lighthouse in Southern Tavar
Right south of the Southern Cliffs teleporter on top of the Lighthouse you can find photograph 18.
#19 – The Archive of the Hort of Ignadon
Teleport to the Cathedral, enter the cathedral and then instantly go right. Downstairs you will find Karl, who may or may not let you through. If he keeps on stopping you and teleporting you back up, just shoot him with a ranged weapon and then run past him through that door. Immediately take a left and keep running until it goes further downstairs on your right. Go downstairs and then to the right, attack every person you find on the way or you get teleported back up again. In the middle of the room in one of the bookshelves is photograph number 19.
#20 – Castle Ruins of West Ignadon
At the westmost part of the Castle Ruins of West Ignadon you will find an Elevator (the same one as from the Calaan achievement). Take it downstairs and then go to the huge door at the back to your left. Tam’s a codelock in which you will type in 7817 to open the door. Go through the giant door, up the stairs and on one of the tables you will find the last photograph. If you wish to get the Calaan Achievement as well, use the same code on the giant door opposite of the one you just opened.
To wszystko, co dzisiaj udostępniamy w tym celu Elex przewodnik. Ten przewodnik został pierwotnie stworzony i napisany przez Qthul. Na wypadek, gdybyśmy nie zaktualizowali tego przewodnika, możesz znaleźć najnowszą aktualizację, postępując zgodnie z tym połączyć.