
- Tytuł: B100X - Auto Dungeon RPG
- Data wydania:
- Wywoływacz:
- Wydawca:
Information about B100X - Auto Dungeon RPG is still incomplete. Pomóż nam wypełnić szczegóły gry za pomocą tego formularz kontaktowy.
An attempt at explaining the esoteric mixing system that is core to the B100X experience. Plus some purely opinion based hints.
Mixing Made Easy
Item mixing is the core game play of B100X, however the instructions in game on how to do Mixing are pretty dismal. This guide will attempt to rectify that shortfall.
Every equip-able item can be mixed and to reach the higher dungeon levels large amounts of mixing is a requirement. Chainmail with Max HP +100 may seem great for the first few levels, but it certainly won’t cut it in the long run.
There are four parts to understand for successful item mixing; Stat Building, Stat Movement, Rune Ability Creation, and Item Level Manipulation. Each part has a simple basis that will be explained in some detail below and together they allow for the creation of completely overpowering items.
Stat Building
The chainmail with Max HP +100 is great place to start. Max HP +100 doesn’t cut it to the end though, but Max HP +10000 zrobiłbym, Prawidłowy? How do we get there? Łatwy, Stat Building!
When you mix two chainmail together, you receive a new item with double the Item Level and now Max HP +150. This is a step in the right direction, but clearly not a large one. Let’s look at the mechanics.
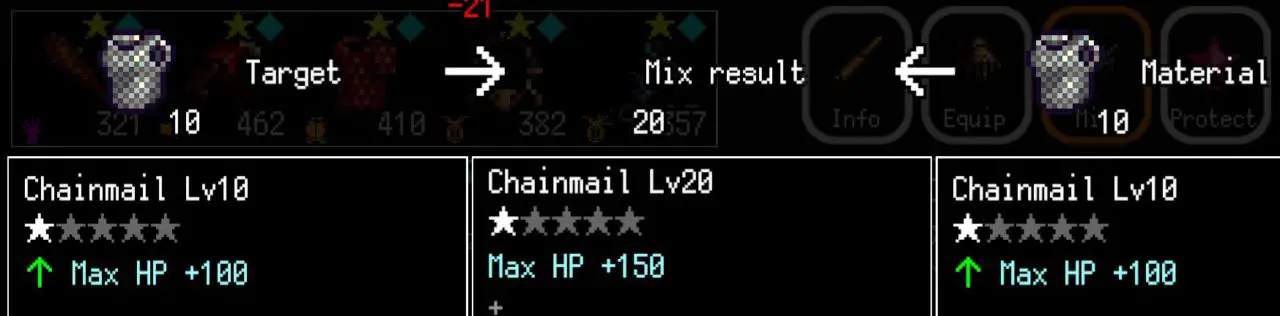
Item Level 10 Chain Shirt Max HP +100 combined with Item Level 10 Chain Shirt Max HP +100 creates an Item Level 20 Chain Shirt Max HP +150. The Item Levels are simply added together and we will focus on this in the Item Level Manipulation section below. The Max HP +100 on each chainmail is multiplied by 0.75 (or reduced by 25% or a quarter, however you’d like to say it) before then being added together. 100 * 0.75 = 75 on each side, 75 + 75 = Max HP +150.
The 0.75 multiplication is the primary limitation for Stat Growth. Mixing a 1794 z 100 actually reduces your final value. 1794*0.75 = 1346 100*0.75 = 75 w sumie 1346 + 75 = 1421. Not a good mix result.

The closer the stats you are mixing are to each other, the better the result will be. A good rule of thumb is a 10% difference. If the smaller value is at least 90% of the larger value, you won’t lose out on too much. Who told you math wouldn’t be useful outside of school?
Mixing our Max HP +150 Chainmail with a normal Max HP +100 Chainmail is a bad idea. 100/150 = 67%. To jest 33% difference, and only yields Max HP +187 which isn’t much of a gain, so what is the solution? Create a second Max HP +150 Chainmail first to combine. 150 + 150 combine to 225. Each of the 150s required two base Chainmail, so the 225 took four Chainmail in total.
From 225, you need to double the amount of chainmail again to mix 225 I 225 to reach Max HP +338. Each new mix requires double the previous mix result because you need two of the same stat to grow together. Think of it like a tournament bracket, only everyone’s a winner! No participation awards required.
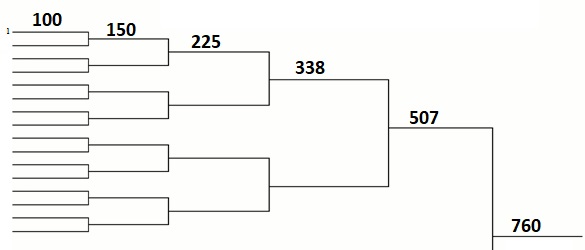
100 = 1, 150 = 2, 225 = 4, 338 = 8, 507 = 16, 760 = 32,1140 = 64, 1710 = 128, 2565 = 256, 3847 = 512, 5770 = 1024, 8655 = 2048, 12982 = 4096
Tak, you read that right. To reach Max HP +12982 with chainmail mixing, you need to acquire 4096 chainmail and mix them together thousands of times. This is a true grind if you are looking for outrageous stat growth, and this has to be done with each of the important stats.
All is not lost though, other items with Max HP + can be mixed in and substituted for the base Chainmail. Remember the 10% rule. Na przykład, a Sallet has Max HP +140 which is close to the result of 2x Chainmail (150). The results will not be the most efficient, but as long as the values being mixed are close there will be positive growth.
Useful consumables for Stat Growth:
Materiał eksploatacyjny: Purification Crystal – Returns item to base item state. This will strip every stat, rune, or modification (Broken/Supreme/Highest). Most useful for removing unwanted runes on rare items so you can mix them with Forged Steel or Orichalcum.
Materiał eksploatacyjny: Forged Steel – Result is the same as mixing two of the same unmodified target item.
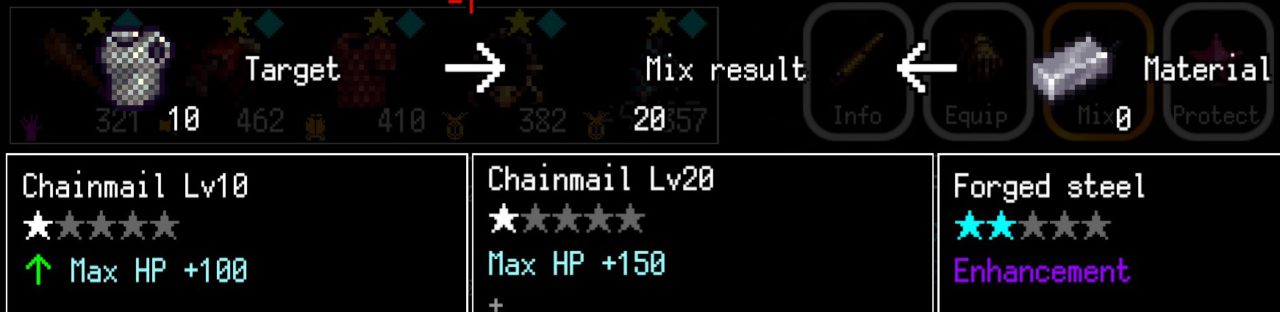
Materiał eksploatacyjny: Orichalcum – Result is the same as mixing four of the same unmodified target item.

With Forged Steel and Orichalcum you can boost the numbers for items that may be harder to find. Don’t actually waste them on chainmail.
Stat Movement
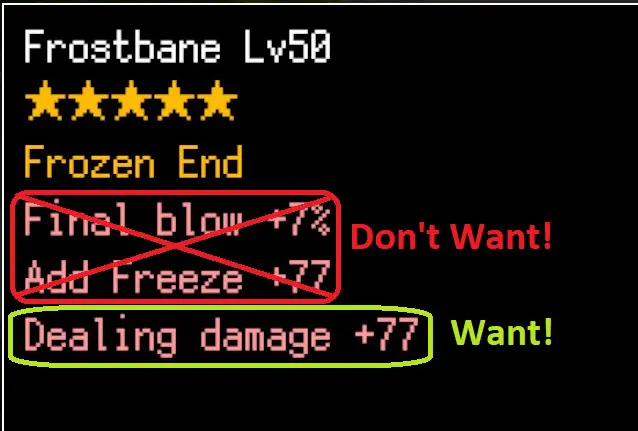
Moving the stats you want to grow from item to item is important. That Frostbane sword’s Dealing Damage stat you want is in the slot under that Final Blow and Add Freeze stats you’re not interested in. How do you get to it? Clearly you need Stat Movement!
Some general rules to be aware of:
- Each item has 8 stat slots.
- The target item is the first one selected in a mix. If the first selection is a consumable, the second is selection is assumed to be the target.
- The material item is the second one selected in a mix.
- Any empty stat slots in the target item will be filled by stats from the material item that the target item does not have.
- Most items have the first stat slot taken by a built-in gold colored stat/ability that cannot be moved, wybudowany, or erased. The one exception to this rule is the Phoenix Feather.
- When items are mixed the stat slots are combined for stat growth move to the top most stat slot. Notatka: This works for rune word golden abilities discussed in the next section as well, although they are not built like regular stats, they will move to the top slot.
- If multiple stat slots match from each item, the stats move to the top slots and remain in the order they were listed in the target item.
So in the example above, the gold Frozen End is the built-in ability of the Frostbane so it can be ignored. To reach the Frostbane’s Dealing Damage stat there are a few of approaches that can be used.
The first approach – Brutalna siła. Use two Abrasive Stones to erase the Final Blow and Add Freeze stats.
Materiał eksploatacyjny: Abrasive Stone – Erases the stat from the items top stat slot.

The second approach — Confuse It. Use a Chaos Stone to reverse the stat slot positions.
Materiał eksploatacyjny: Chaos Stone – Inverts the stat/ability slots. TJ. Bottom slot becomes top slot.

The third approach — Build It. Mix a different item with the Dealing Damage stat like you would while performing stat building. The item you mix in must not have the Final Blow or Add Freeze Stats. The stats will likely not match, but any efficiency you lose is made up for by the fact that you didn’t have to use Abrasive Stones or Chaos Stones you may not have.

Również, notice how all the empty stat slots on the Frostbane above are being filled in by the unmatched stats on the Gram? Filling stat slots is extremely useful for Item Level Manipulation.
Teraz, why the focus on moving the desired stat to the top stat slot? This is the key reason you should master stat movement!
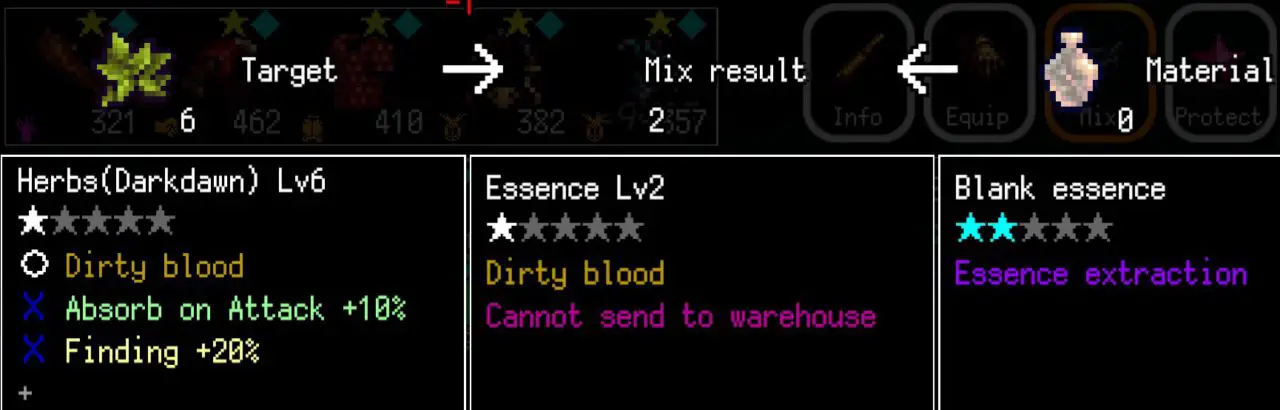
Materiał eksploatacyjny: Blank Essence – Pulls the stat from the items top stat slot, essentially erasing the rest of the item stats and abilities to create a Essence Jar of that stat that can be mixed with another item.
Pamiętać o, you can never pull and save more than one stat from an item. The Blank Essence is essentially destructive to the item you build the stat on. On the other hand you can pick and choose to selectively erase stats on an item with the Abrasive Stone.
One last thing for stat movement; sometimes you may decide to change your build and try something different. Clearly you don’t want to lose all your built up stats, but you want to change the gold built-in ability on the item you are using. Enter the Ghost Eater Bug.
Materiał eksploatacyjny: Ghost Eater Bug – Erases all stats/abilities from item.
Use the Ghost Eater Bug (you could use Abrasive Stones too, but they’re useful other places) to clear the the stat slots of the item with the new gold built-in ability you want. Then use this cleared item as the Target item and mix your old item into it.
Rune Ability Creation
Holly can be equipped with 5 rzeczy, each with a total of 8 szczeliny. Using the Logistics Support skill from the Tamer class and an appropriately modified monster will grant you another 8 szczeliny. Added together what do you fill 48 slots with? Rune word abilities, Oczywiście!
After dungeon level 100, Runes begin to appear. These can be present on dropped items, or drop as separate items alone. Obecnie istnieją 11 runes available, and when combined with a different rune these create gold abilities usually only found on specific items. Na przykład, the Dragon rune combined with the Stone rune creates the Overheal ability found on the Missed Holy Grail. These gold rune abilities however can be moved around just like regular stats.
With the proper runes, one Abrasion Stone, and one Blank Essence you can add a single gold ability to any other item with an empty slot without much difficulty.
1. Collect two identical low level items with only one stat. Buying them from the store is easy.
2. Mix one of the runes you wish to combine on each of the items.
3. Mix the two items with runes together to create the golden ability–it is now sitting in the second stat slot.

4. Use the Abrasion Stone to erase the base item’s original stat in the top stat slot and bring the golden rune ability to the top stat slot.

5. Use the Blank Essence to put the golden rune ability into a essence jar that can be mixed to any other item.
There are multiple places that have the rune words listed, i z 55 to chose from you’re sure to find a few you’d like to try.
As was mentioned above, the Logistics Skill and a friendly monster are extremely useful at giving extra stat slots. Jednakże, once they are in place you cannot build the stats higher so these stat slots require some planning.
One easy solution is to simply place rune abilities on the monster. Since rune abilities are complete and do not need to be built up afterwards like normal stats.

Once your monster is complete, mix it with the Domination Choker and equip the Logistics Skill to unlock the true power of friendship!
Item Level Manipulation
Item Levels are capped to 1000. Any mixes that raise the Item Level above 1000 negatively effect the stats that are meant to grow. So how do you reach truly overpowering gear? Item Level Manipulation! It’s right there in the header!
There are two primary ways to reduce an item’s level. Abrasion Stones, and Blank Essences. As was mentioned above, each item has 8 item slots. Item Levels are spread evenly to each stat slot that is filled. Items with a built-in gold slot are treated as only having 7 item slots when performing Item Level Manipulation.
- Blank Essences are most effective at reducing item level when all the stat slots are filled. Meaning the stat slot you take out with the Blank Essence only represents 1/8 of the item levels and the other 7/8 of the levels will have been erased. Very effective for stat building.
- Abrasive Stones are most effective at reducing item levels when most of the stat slots are empty. If only two stat slots are filled, erasing one with an Abrasive Stone will remove 1/2 of the item levels. Not as effective as the Blank Essence, but Abrasive Stones can be used on your completed gear to reduce their levels while Blank Essence cannot.
Na przykład, if you have an item with a maxed out 1000 Item Level and no built-in gold ability, and each stat slot is filled with a stat then each stat slot will represent 125 item levels. (1000 divided by 8)
Now if you were performing stat growth and only wanted to keep the stat in the top stat slot, you would use a Blank Essence to pull out that stat. The essence jar would be level 125, and the rest of the item along with the remaining item levels would be erased. So that item level 1000 stat you grew is now in a handy item level 125 essence jar and you can keep mixing to reach even higher stat growth.
Continuing on with this example. If you wanted to mix that item level 125 jar, but wanted to quickly lower it’s level further? Add it to a low item level piece of equipment with only one stat. For example the antidote herbs with item level 3. The combination becomes item level 128, with the stat you want in the second slot. Both stat slots represents 64 item levels (128 divided by 2). Use an Abrasion Stone to remove the antidote herb’s stat, and now your item with only the stat you want becomes item level 64.
Take it one more step by purchasing a bunch of cheap items from the store that don’t match the stat in your item level 64 antidote herb. Mix them together until you have seven of the eight stat slots filled and the item level is probably around 30. Mix the item level 64 antidote herb as your base item with the new level 30 item and now all 8 stat slots are filled with your desired stat in the top stat slot. One more Blank Essence (94 divided by 8!) and now your desired stat is in an item level 12 essence jar. Barely a blip on the item level when added to your main gear!
These are the key steps for mixing and reaching crazy stat growth numbers while avoiding the item level cap. How does this translate to the gear you are using? You will have multiple stats you want to keep on your main gear. To keep growing the same gear, use the above processes to control how large the item levels are on the essence jars you add to it.
Eventually even with tight control you will reach a point where the item level on your main gear is too high and you need a way to lower your gear’s level without sacrificing the stats you’ve managed to grow. Here are two methods:
Metoda 1: Throw-away Stat – (More effective 1/7 removal)
Some planning is required for this method, and to this end you should plan your items with a throw-away stat in mind. The ailments stats are good throw-away stats, just having them-even at a low strength-triggers the Influence stat. Idealnie, each piece of planned gear will have one ailment stat.
- A – Use your Stat Movement knowledge to put the throw-away stat into the top slot.
- 2 – Then use an Abrasion Stone to shave away 1/7th of your main gear’s level while preserving all the good stats and the golden built-in ability.
- D – If 1/7th isn’t enough, buy some low level items with a single stat that does not match your gear. Add two, (with the same stat of course) erase again for another 1/7th removal.

Once satisfied, just add the throw-away stat back on with a low item level essence jar you prepared.
Metoda 2: Throw-away Item – (Simpler 1/8 removal)
This does not require any planning or a throw-away stat, it simply needs a copy of the item with the gold built-in ability you are using.
- F – Buy a low level item from the store with a single stat that is not present on your gear and has no golden ability/stat.
- T – Mix your main item into this low level item. Your built-in golden ability will be replaced by the low level item’s stat.
- W – Use an Abrasive Stone to erase the low level item’s stat plus 1/8 of the item levels. Repeat as necessary by mixing into another low level item.
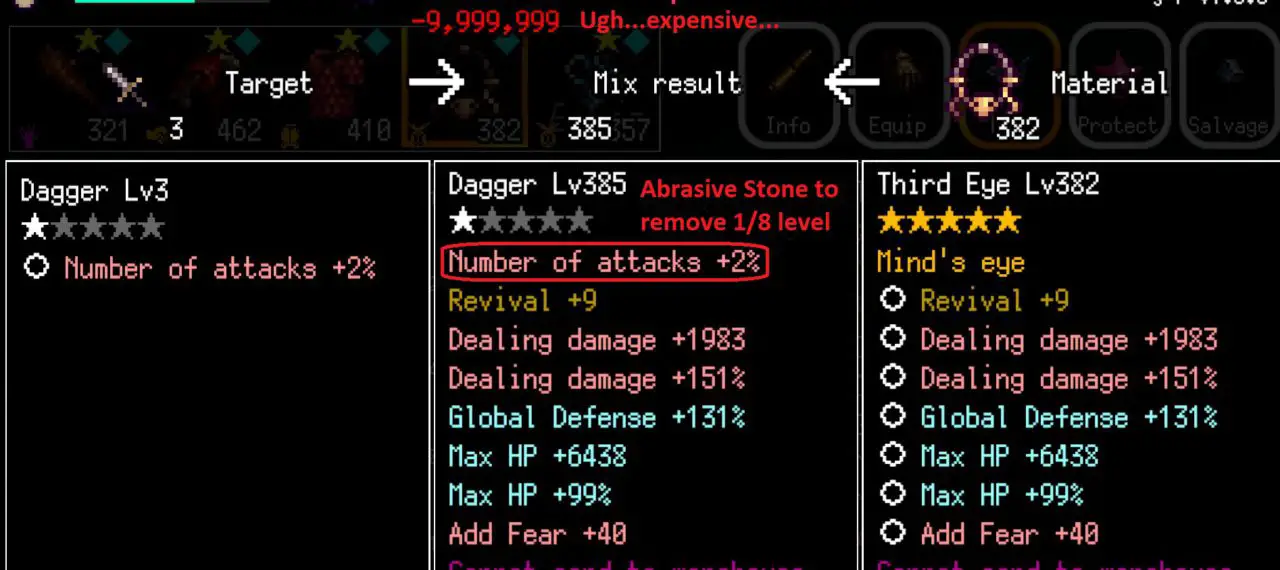
Once satisfied, use a Ghost Eater Bug on the item you want to use the golden built-in ability. In the example pictured above it would be a new Third Eye. Then mix the built stats into the cleared item.
Mixing to the Extreme $$
Once you understand the principles of mixing, you can create the overpowering gear that lets you reach the deepest dungeon levels. One last thing to keep in mind when mixing. As the stats grow to crazy values, the junk cost to perform the mixes will grow at a crazy rate as well! Na szczęście, there is a hard cap for mixing cost. 9,999,999. Tak, 10 million junk is the cap. When dealing with items at that level, it’s best to wait for the half-price events unless you’re also sitting at the 1 billion junk cap… This is an idle game though, so you can get there eventually!
Primary Stats
There are a multitude of stats in B100X, so it’s best to focus on the ones important for every build. If you like to plan your gear but also try different builds try to place these stats on items that you will always be using – or at least are willing to move them together to a new item. Remember to include a throw-away stat so you can keep it growing!
Just a quick note, if a stat has a # (numer) version and a % (procent) version the % version will do nothing if your # value is 0. Przykład: 4000% Dodge does nothing if you haven’t added a Dodge # stat somewhere.
This is where the opinion starts, so leave your panties here if you’re liable to get them in a bunch.
This is a list of stats that are useful for almost all builds.
- Absorb on Attack % and HP Recovery Rate %: 1 Lub 2 szczeliny, this is life steal to keep you healthy, and the values will multiply directly. If your Absorb on Attack % is high enough (you decide), you can scrap the HP Recovery Rate % slot. Of course if you’re not hitting hard enough (or at all), to nie będzie miało znaczenia.
- Dokładność # and Accuracy %: 2 szczeliny, both extremely useful. Multiplied together so grow both. 15,000 accuracy is roughly 85% chance to hit in the 8000+ dungeon level range. There may be diminishing returns involved somewhere, but too much is clearly not a thing. There are synergy builds that can negate the need for this stat.
- Dealing Damage # and Dealing Damage %: 2 szczeliny, this is a combined stat of Attack Damage and Spell Damage. Dealing Damage # is added directly to the Attack Damage # and Spell Damage #, chwila Dealing Damage % is added directly to the Attack Damage % and Spell Damage % before multiplication. You can stack the Attack/Spell Damage stats or save the stat slots and just build Dealing Damage higher. Why focus on this instead of a single one of the other? Future proofing by being able to switch builds and not lose damage stats. Plus check out the Dragon Slayer synergy build below. Seriously broken.
- Global Defense %: 1 slot, this is a combined stat of Physical Defense and Magical Defense. Soft cap is 95% redukcja obrażeń, but it directly applies against Physical or Magical Penetration so higher is better to counter the penetration. (Speculatively) Przykład, enemy has 100% Physical Penetration, Holly has 150% Physical Defense (capped at 95%). The end result is Holly taking a hit with 50% Physical Defense.
- Max Attacks # and Number of Attacks %: Max Attacks # represents the maximum number of extra normal attacks Holly can use per turn. Number of Attacks % is the chance that those extra attacks go off. Minimum is 1, so for example if Number of Attacks % Jest 25 I Max Attacks # Jest 4, Holly will strike once, then have a 25% chance to strike again three more times. Capping the stats at +9 I 100% means Holly will strike 9 times per round. Obydwa Max Attacks # and Number of Attacks % are critical to damage dealing, and ailment accumulation. These stats can also make up for a lack of accuracy to some degree — the whole throwing something at the wall until it sticks method.
The items with Number of Attacks % have low values, but early on it is worth building up some. The cap can be reached by simply leveling Samurai though so an item slot isn’t necessary in your final build.
The Max Attacks # stat is very rare, but caps out at +9. A good option is to mix a Rotten Grip with a Jewel of Dark God to create a Dark God Dagger. The Dark God Dagger has Max Attacks +9 as a base item, so this item can be mixed with the Vial of Bath to create a permanent buff that includes Max Attacks +9 thus saving a stat slot. No other item has a capped stat as a base item like the Dark God Dagger does so it is the best choice for your Vial of Bath buff allowing it to save that stat slot.

- Max HP # and Max HP %: 2 szczeliny, both should be focused on in equal measure as surviving is important.
- Max Shield # and Max Shield %: 2 szczeliny, Ponownie, surviving is important.
That is 10 (Lub 11) of your 48 stat slots. This leaves lots of room to play with equipment, umiejętności, and ability builds! Or you can double up, and for example have Max HP on multiple items which can help immensely at lower levels when runes and junk at are a premium still.
Build Focused Stats
This next list of stats are the ones that depend on the direction you want to take your build. They are useful in specific builds, but not in others.
- Additional Magical Damage # and Additional Magical Damage %: 2 szczeliny, like attack damage, triggers on base attacks. Some synergy builds will benefit from these. Heh, Zabójca Smoków.
- Attack Damage and Attack Damage %: 2 szczeliny, stacks with Dealing Damage stats. For builds focused on physical damage, load it up.
- Unik # and Dodge %: Opposes the monster’s accuracy stat, useful for some synergy builds that trigger on dodge.
- Energy Recovery per Turn: 1 szczeliny, useful when using active skills. Will not protect you from Jinx of Earth alone. This triggers at the start of turn, so if your energy is below 25% at the end of your turn it’s game over man. Jinx of Dawn will also nullify this stat, so to use active skills in dungeons with this jinx you’ll have to rely on Ignore Energy Cost, massive Max Energy, or other ways to gain energy.
- Ignore Cooldown %: Capped at 95%, chance that skill used does not become tapped for a period of time. Can be capped by leveling Martial Artist. Useful for heavy skill builds or synergy builds that trigger with this.
- Ignore Energy Cost %: Capped at 95%, chance that energy does not decrease while using a skill that requires energy. Can be capped by leveling Traveler. Useful for heavy skill builds or synergy builds that trigger with this.
- Wpływ # and Influence % and the various ailments: 2+ szczeliny, influence is added directly to each of the ailments you apply to the enemy. You have seen the rune ability Black Needle (Runes Demonic + Moc) Prawidłowy? Prawidłowy?! Przykład: Add Curse 25 (the throw-away stats mentioned earlier? Might as well make them useful!) + Wpływ 1000 is equivalent to Add Curse 1025.
- Max Energy # and Max Energy %: 2 szczeliny, just like HP and Shield these two are multiplied together. Only useful if you intend to use active skills or are facing and face planting against the Jinx of Earth (fail dungeon if less than 25% energy).
- Physical Penetration % and Magical Penetration %:Useful if you’re relying on Attack Damage or casting spells. You can level classes to obtain +128% Physical Penetration % and even more Magical Penetration %. More than that does not seem to be necessary so not really slot-worthy unless a synergy build calls for it.
- Pursuit # and Pursuit %: Always hit damage meant to represent a pet or summon helping deal damage. Easily eclipsed by Dealing Damage, but some synergy builds focus on it.
- Odrodzenie #: The only gold stat directly from an item that can be mixed and found only on the Phoenix Feather. Useful on long dungeon runs to get past hiccups when your build is not quite optimal yet. Just a heads up though… Doppelgangers are a thing.
- Shield Gain Rate %: 1 slot, any skill or ability that recovers your shields will be boosted by this. Limited use because there is no passive way to regain shields, except with certain synergy builds mentioned below or active skills/spells.
- Spell Damage and Spell Damage %: 2 szczeliny, stacks with Dealing Damage stats. For active skills/spells only or specific synergy builds.
Farming Stats
The stats used to farm XP, junk, or items:
- Drop Item Quantity %: Capped at 100%, increased number of drops.
- Drop Item Rarity %: Capped at 100%, increased chance for higher quality of item (Superior x2 or Highest x4 versions). Can be capped by leveling Mercenary.
- Exp Gain on Killing # and Junk Gain on Killing #: 2 szczeliny, very useful. Capped at 99, Ale 99 czasy 10,000 floors is an extra 990,000 of each and it will be multiplied by your Exp and Junk Gain % values as well.
- Exp Gain % and Junk Gain %: Użyteczne. Capped at 100% and multiplies gains of Exp and Junk. Can be capped by leveling Monarch and Thief.
- Finding %: Capped at 1000%, increased unique drop instead of normal drops.
- Improved Capture: Capped at 100%, increased capture rate. Can be capped by leveling Tamer.
- Scavenger %: Capped probably, increases finished item drop rate. Just say no.
Also There Stats
These are stats that…are there. Not much use to them.
- Ailment Resistance # and Ailment Resistance % Other easier ways to prevent ailments mean there is no reason to build these. If you really have to have some, instead get the rune ability Healthy Living (Fala + Bud) – 25% of ailments Holly accumulates become ailment resistance for the rest of the dungeon run – and call it good.
- Avoid Critical #: Opposed to the monster’s Critical Rate #. More reliable and the same number of slots to just get the rune ability Guardian (Runes Wicked + Niebo) to negate monster critical hits. Not at max HP or above when the enemy hits you? You are probably going to die crit or not.
- Cooldown on Killing %: Capped at 95%, chance to un-tap skills that are on cooldown after killing a monster. Ignore Cooldown % does it better, and doesn’t require a final build stat slot.
- Critical Rate # and Critical Damage %: Jinx of Edge prevents critical hits completely rendering these stats useless. Not worth the slots when they can’t be used in some dungeons. Focus on better stats.
- Elite Slayer %: Deal additional % damage to boss and elite monsters. Not really that pressing. If your Vial of Bath was used with the Dark God Dagger then you already have 47% Tam. You can get another 90% from leveling the Dark Swordsman. Not worth a slot.
- Energy Recovery on Killing #, and Energy Recovery when Hit #: Don’t waste a stat slot, stick to Energy Recovery per Turn. The Jinx of Dawn which prevents Energy Recovery Per Turn can turn these marginally useful if you insist on using skills and spells.
- Energy Recovery Rate %: Only useful if you have massive Max Energy and want to use a skill that dumps all of your energy at once regularly. There are a few skills with extra effects depending on how much energy you use. This multiplies the important Energy Recovery per Turn. The stat Ignore Energy Cost would be a better bet in most cases, and it can be capped at 95% with Traveler class levels.
- Final Blow %: Capped at 75%, once a monster’s HP is below this point subsequent hits will trigger instant death. Not worth a slot, if Holly can already get the monster below 75% then she can beat it the rest of the way down too. There is a skill or item that will raise the cap to 95% but it doesn’t change the useless premise.
- Floor Skip %: Capped at 100%, to jest % chance to skip one floor after each fight. Will not skip boss or elite fights. Why the hurry? This is an idle game.
- Heart Protection %: Capped at 95%, if you end up dying this gives you a % chance to not lose one of your 5 daily hearts. This can be capped by leveling the Great Priest. Not stat slot worthy.
- HP Recovery per Turn #, HP Recovery on Killing #, and HP Recovery on Dodge #: Jeśli masz 10000 Max HP, and recover 100 HP per turn/kill/dodge, do you know what you did? You wasted a stat slot.
- Parować %: Capped at 75%, to jest % chance to cancel enemy attack skill. Can be capped by leveling Sword Saint. Not worth a slot.
- Zemsta % and Reflect %: Relying on the enemy to hit you…to kill them…is dumb. Don’t do it. Unless your entire build is based on it. It’s still dumb though.
Premia: Rune Abilities
Z 55 different rune abilities here are some of the most useful:
Must-haves:
- Long Distance – Runes Heaven + Kamień : Prevents revenge and reflect damage from kicking back on Holly.
- Power Drain – Runes Demonic + Kamień : Steals buffs monsters are applying to themselves, I (possibly?) prevents them from stealing Holly’s buffs.
Użyteczne:
- Dirty Blood — Runes Heaven + Bud : Poison heals instead of harms. Jinx of Wedge causes HP to drop to 1 after defeating a boss. If poisoned, the poison damage will tick before you can swing and Absorb HP to heal back up this rune ability stops that.
- Opiekun — Runes Heaven + Wicked : When at Max HP (or above), receive no critical damage.
- Healthy Living — Runes Wave + Bud : When you take ailment accumulation, receive 25% as ailment resistance for rest of the dungeon.
- Much Learning — Runes Wicked + Kamień : Double XP gained from bosses.
- Overheal — Runes Dragon + Kamień : Healing can overcharge HP to 2x max HP.
- Thorn Road — Runes Heaven + Święty : Double XP when suffering from ailment.
Premia: Synergy Builds
Synergy building is where a lot of the fun in B100X comes from. Creating a mixture of abilities that does something unique instead of just “Holly hit harder!” These are some of the unique Rune/Item/Skill/Jinx! synergies:
- Over Immunity: 2 runy 1 skill/item
Opiekun – Runes Heaven + Wicked: When at Max HP (or above) receive no critical damage.
Overheal – Runes Dragon + Kamień: Allows healing to increase beyond Holly’s max HP effectively doubling her HP.
Umiejętność – Will of Steel (Monarch lvl 3) (or Body Slot – Overlord Robe): Pretty much immune to ailments when at Max HP (or above).
Komentarz: Immune to almost all ailments and critical hits from enemy attacks as long as your HP stays high. If you’re going to get hit, best plan to survive it. - Invincibility for Dummies: 1 rune, 1 skill slot
Zwiadowca – Runes Heaven + Moc: Invisible for first round of each fight. Invisible = Auto Dodge
Umiejętność – Hidden Body (Assassin lvl 7): After dodging, becoming invincible for 3 rundy.
Komentarz: Can you kill the enemy in 3 rundy? Works even when disabled at start of fight. Niestety, Invisible is a temporary buff that can be stripped at start of fight by Jinx of Daybreak. - Stun Locker: 1 rzeczy, 1 rune, stat dependent
Binding Blow – Runes Dragon + Źródło: Sealed ailment is applied when any other ailment is applied.
Body Slot – Vargo – Ecliptic Blessing: Maiden: When an enemy has Seal ailment applied, instead make them Immovable for 3 obraca się.
Komentarz: Any ailment you apply (the stat dependency) will lock the enemy for three rounds. Jinx of Vision causes boss monsters to be invincible to start, but ailments still apply thus they can be locked down even while they can’t be damaged. Niestety, Binding Blow does not activate with Infection Vector below. - Stopping Time (without Time Stop!): 1 przedmiot, 2 rune, 1 umiejętność, stat dependent
Body Slot – Vargo – Ecliptic Blessing: Maiden: When an enemy has Seal ailment applied, instead make them Immovable for 3 obraca się.
Zakażenie – Rune Wicked + Moc: Any ailment Holly receives is applied to the monster as well.
Overlapping Illusions – Rune Wave + Niebo: When Ignore Cooldown triggers, use skill again and apply Sealed ailment to Holly.
Umiejętność – Any skill with a cooldown, probably a buff skill…or an ailment cure to remove sealed?
Uwagi: Dependent on the Ignore Cooldown stat that caps at 95%. Skill triggers Ignore Cooldown. Overlapping Illusions fires the skill again and applies Sealed to Holly. Infection applies Sealed to monster. Vargo changes Sealed on monster to Immovable for 3 rundy. - Settle Down You: 1 skill/jinx, 1 przedmiot, 1 rune
Umiejętność – Desperado (Berserker lvl 9): Attack Damage +50%, Holly suffers from permanent Bleed.
Off-hand Slot – Dirty Meat – Infection Vector: Applies ailments Holly has (including jinx caused ailments) immediately at start of fight to enemy.
Mud Floor – Runes Holy + Gwiazda: Enemies with ailments cannot attack more than once per round.
Komentarz: Greatly restricts the monster’s damage potential by preventing them from attacking multiple times per turn. All dungeons except the Living Woods and the Eternal Depths have an ailment jinx that can be used in place of Desperado. - Death Strike, Proszę: 1 umiejętność, 1 przedmiot, 1 rune, 2 jinxs
Umiejętność – Desperado (Berserker lvl 9) = Attack Damage +50%, Holly suffers from permanent Bleed.
Off-hand Slot – Dirty Meat – Infection Vector = Applies ailments Holly has (including jinx caused ailments) immediately at start of fight to enemy.
Black Needle – Runes Demonic + Power = Striking an enemy suffering from 3 or more ailments causes a death strike.
Komentarz: Several dungeons have two jinxes that leave permanent ailments on Holly. Underground Volcano: Zamrażać + Zatruć, Basin Cave: Zatruć + Paralysis, Spirit Tree Hollow: Paralysis + Sealed, Temple of the Sun: Ślepy + Przekleństwo, Far North Peak: Zamrażać + Zatruć. Adding Desperado’s bleed means Infection Vector is applying 3 ailments to the monster at the start of the fight. Now Holly doesn’t need any ailment or influence stats to perform death strikes with Black Needle. - Enemy Goes Boom (even when you’re not watching): 1 rune, 1 umiejętność, 1 przedmiot
Heat Blade – Runes Dragon and Wave: Attack Damage is converted to Additional Magical Damage.
Umiejętność – Mroczny Miecz (Dark Swordsman-surprise! lvl 7): Spell Damage is converted to Additional Magical Damage, but you cannot crit.
Broń – Zabójca Smoków – Dragon Fire: Additional Magical Damage hits even if your normal attack misses.
Komentarz: Heh. All damage hits all the time? No need to build for accuracy, or the Third Eye accessory. Unsure if ailments are applied on a ‘miss’. - Deflector Dish: 1 przedmiot, 1 rune, 1 umiejętność, stat dependent
Body Slot – Talaus – Ecliptic Blessing: Krowa: Excess Shields are not lost between monsters.
Wall of Ice – Runes Bud + Wicked: After taking damage, odzyskiwać 8% of maximum shields.
Umiejętność – Meat Wall (Summoner lvl 7): Reduced damage if shield is in place.
Komentarz: This is where the Shield Gain Rate % stat will shine along with the Max Shield stats. The 8% Wall of Ice recovery triggers on any hit, even if it doesn’t break your shields. With the Meat Shield skill reducing the damage the shield takes, and large enough shield stats your shield will grow faster than they can do damage to it and continue to grow between monsters! - Polarity Switch: 1 przedmiot, 2 runy, 1 jinx, stat dependent
Body Slot – Talaus – Ecliptic Blessing: Krowa: Excess Shields are not lost between monsters.
Wall of Ice – Runes Bud + Wicked: After taking damage, odzyskiwać 8% of maximum shields.
Blood Armor – Runes Star + Kamień: Ailments do not accumulate, instead they do HP (or shield) szkoda. The damage is proportional to your max HP.
Komentarz: Jinx of Wreckage (Underground Volcano, Living Woods, Eternal Depths) cause Death ailment to accumulate each turn but Blood Armor switches it to a proportional HP (or shield) uderzyć. Leave your Max HP low enough and crank the shield stats high enough and the Wall of Ice recovery triggered by the Blood Armor hit will quickly outpace it. This time growing your shield even without being hit by a monster.
This list is clearly not exhaustive. If you’ve discovered a unique synergy, please comment.
Premia: Intermediate Build Suggestion
A lot of people seem to struggle with figuring out a build that can get them to the point where they can actually start building something more optimal. Everyone starts off with a hodge-podge of gear so don’t be too discouraged.
Here’s a build suggestion that should get you through to that point.
- Broń: Żądło – Poziom 15 Unique Drop — Built-In Ability is Black Needle
- Off-hand: Missed Holy Grail – Poziom 32 Drop — Built-In Ability is Overheal
- Ciało: Overlord Robe – Poziom 50 Drop — Built-In Ability is Will of Steel
- Akcesorium: Third Eye – Poziom 47 Drop — Built-In Ability is Mind’s Eye
- Akcesorium: Evil Eye – Poziom 15 Unique Drop — Built-In Ability is Evil Eye Gaze
This is an ailment death strike build. It relies on high Influence to apply ailments quickly before the monster can kill Holly and then hits them one more time with a death strike.
- Przekleństwo: 1 slot (Evil Eye) – The Evil Eye adds Curse already sorted.
- Paralysis: 1 slot (Missed Holy Grail) – A Spider Tonic (lvl 6) will add Paralysis
- Bleed: 1 slot (Overlord Robe) – A Saber (lvl 10) will add Bleed and this covers the three ailments you need to trigger death strike from Black Needle. No need to build the ailments, focus on the Influence # stat instead.
- Max HP: 5 szczeliny (One on each item) – Is found on all sorts of items.
- Max HP %: 2 Sloty (Missed Holy Grail, Third Eye) – Is more rare, but the Fullface (lvl 29) has it.
- Shield Max #: 3 szczeliny (Żądło, Overlord Robe, Evil Eye): Wizard Robe (lvl 18) has a good value and no other stats.
- Absorb on Attack %: 1 slot (Missed Holy Grail) – Pancernik (lvl 50) is best for this, it has the HP stats you want too. Use your Forged Steel here! Only mix the Dreadnought onto one item so that you can grow all three stats together.
- HP Recovery Rate %: 1 slot (Missed Holy Grail) – The Grail itself or the White Staff (lvl 21) are good sources. This will multiply your Absorb on Attack.
- Wpływ: 5 szczeliny (One on each item) – The Dispensing Mortar (lvl 15) will probably be the best source of Influence. No other stats to work around either.
- Attack Damage #: 2 szczeliny (Żądło + Overlord Robe) – Lots of items have this, focus on the ones that don’t have extra stats that will mix in. Grab the Tachi (lvl 20) for this as well. Tak, you’ll need Attack Damage to actually absorb HPs.
- Number of Attacks %: 1 slot (Żądło) – The Tachi also has this stat. So like the Dreadnought, build it into one item so you can grow both stats together and only add the Tachi to it.
- Attack Damage %: 1 slot (Żądło) – Fire Liquor (lvl 8) has this stat alone, so it is a good source.
- Dokładność #: 2 szczeliny (Third Eye + Overlord Robes) – Start with the Leather Gloves (lvl 5) because they don’t have any extra stats. Once your items are full, start mixing in the Gauntlet (poziom 13) and Bandit Gauntlet (18) to get the numbers higher faster.
That is 26 stat slots worth of suggestions, z 5 built-in abilities you’re up to 31 odjazd 9 stat slots for your choosing. You can start this build without even having any Abrasive Stones to remove stats. Below is summarized view.
- Żądło — Tachi weapons mixed in here.
1: Black Needle
2: Physical Penetration — Remove, or build?
3: Attack Damage #
4: Number of Attacks %
5: Attack Damage %
6: Max HP #
7: Max Shield #
8: Wpływ # - Missed Holy Grail — Dreadnought armors mixed in here.
1: Overheal
2: HP Recovery Rate %
3: HP Recovery on Dodge # — Remove.
4: Max HP #
5: Absorb on Attack %
6: Max HP %
7: Wpływ #
8: Add Paralysis — Spider Tonic - Overlord Robe – Mix the other attack damage # stats in here.
1: Will of Steel
2: Max HP #
3: Max Shield #
4: Exp Gain on Killing # — Remove, or build?
5: Wpływ #
6: Add Bleed — Saber
7: Attack Damage — Saber
8: Dokładność # - Third Eye – Mix the Fullface Max HP % in here.
1: Oko umysłu
2: Cooldown on Killing % — Remove.
3: Dokładność #
4: Unik # — Remove.
5: Max HP #
6: Max HP %
7: Wpływ #
8: ? - Evil Eye
1: Evil Eye Gaze
2: Add Curse #
3: Magical Penetration % — Remove
4: Ailment Resistance # — Remove
5: Energy Recovery when Hit # — Remove
6: Max HP #
7: Max Shield #
8: Wpływ #
Be sure to have something to fill in any slots that you empty to prevent accidentally filling them back in. Also make sure to mix the Dark God Dagger and put it in your bath water as soon as you can to get Max Attacks +9.
Shoot for above 200 accuracy from both slots which will get you to floor 600. Pick the Temple of the Sun which has Jinx of Darkness (Permanent Blind) na poziomie 600 and the Mind’s Eye will make you always hit. With the skill First Strike from Sniper level 1, now you always hit first and you never miss above floor 600. Your attacks per turn and Influence will determine when the enemy will actually be able to swing at you.
Temple of the Sun is generous and has no buff stripping jinxes, so taking the skills Anaphlaxis (Alchemist lvl 5), Dance Macabre (Dancer lvl 3), Beautiful Dance (Dancer lvl 7) will give you crazy buffs. Anaphlaxis and Beautiful Dance give more temporary buffs the more ailments you place, and Dance Macabre gives additional strengthening the more temporary buffs you have. So filling in some of your remaining stat slots with the remaining Fear, Zatruć, Seal, Zamrażać, and Blind would not be a miss. Niestety, I don’t believe the Capture ailment counts.
These skills get pretty funny with all 8 ailments, Anaphlaxis will give 8 buffs increasing your influence for 5 turns so 40 temporary buffs if you can kill in one round. While Beautiful Dance will give 8 different buffs for 10 turns buffering a wide selection of stats while stacking up 80 temporary buffs when killing in one round.
Once they start swinging your HP will determine how long you can survive while the Evil Eye Gaze will prevent your ailment accumulation from deteriorating over the turns. You’ll reach a limit based on your HP and Influence stats, so find a safe level and farm to there.
Add Supreme Supremacy (General lvl 7) you will be able to sky rocket up the floor levels. As you continue to build your stats, you will be able to swap these skills out for other farming skills like Material Analysis (Alchemist lvl 7) and begin your build farming in earnest.
Add the important rune words when you can, and keep building the stats until you can clear floor 10,000. Plan your transformation to farming gear and away you go. Don’t be embarrassed to start a spreadsheet to plan your final build, it’s much more effective than just guessing!
There’s no rush. This is an idle game.
To wszystko, co dzisiaj udostępniamy w tym celu B100X - Auto Dungeon RPG przewodnik. Ten przewodnik został pierwotnie stworzony i napisany przez Rekal. Na wypadek, gdybyśmy nie zaktualizowali tego przewodnika, możesz znaleźć najnowszą aktualizację, postępując zgodnie z tym połączyć.