- Titel: Warhammer 40000: Gladius - Relics of War
- Releasedatum:
- Ontwikkelaar:
- Uitgever:
Information about Warhammer 40000: Gladius - Relics of War is still incomplete. Help ons alstublieft de details van het spel hiermee in te vullen contactformulier.
The Chaos Space Marines can be a bit tricky to understand because they have a unique way of doing things. It’s like solving a puzzle where you need to figure out how to balance sacrificing things and using your special powers to help your units. It takes a while to get really good at playing as them, but I want to give you some tips that will make it easier, especially when you’re playing on Impossible difficulty.
Invoering
At the beginning, I wasn’t a big fan of the Chaos Space Marines. They felt like they needed a lot of work on building stuff and managing units. But then, I figured out the “secret.” You need to use all the special abilities, marks, icons, and sacrifices for your units. It’s like playing a whole new game when you do this.
Nu, I want to make it easier for you to learn and beat the Impossible AI. You might even win! As Apothecary Fabius said, “My children understand that they are part of something greater, and if that means sacrifice, then so be it.”
Faction Traits
The Chaos Marines can be tough to learn and play, but they have some of the best ways to make stuff in the game. They can support up to four big, productive cities with really high loyalty.
Voordelen
- You start with two city builders. With two Chaos cultists at the beginning and the ability to build more, you can have your second city by turn 8 and your third one by the early 20s.
- Citizens are like money. Chaos has an extra kind of money – bevolking. If you learn how to handle your city’s growth, you can make more stuff than other factions.
- They have excellent heroes. Chaos is one of the few factions with four heroes, and they are all very useful. In long games, you might even get a free Daemon Prince, which is a really strong unit.
- The best top-tier unit. Brass Scorpions are huge, sterk, fast units that can regenerate, and they have lots of hit points. They might be even better than other top-tier units like Knight Crusaders.
- Units stay good. Because you can upgrade them a lot, even the basic units are valuable in the late game. Even the simple Chaos cultist can help your army in the end-game.
- Infantry use food. Unlike the Space Marines, all Chaos infantry eat food. It might sound like a problem, but it’s easy to make food. So now, your growing infantry army won’t take away the resources you need for war machines.
Anderzijds, here are the things that are not so great about playing as the Chaos Marines:
Nadelen
- No special boosts for building. Unlike many other factions, Chaos doesn’t have technologies that directly make things faster. If you don’t have enough people, your cities will have trouble keeping up with building things because they focus on making units.
- The best top-tier unit is in DLC. The Greater Brass Scorpion is so good that it makes the Chaos faction less effective in the end game if you don’t have the Firepower DLC. Even the second-best unit, the Chaos Land Raider, is locked behind the Assault Pack DLC. I wouldn’t suggest playing this faction at all if you don’t have at least one of the add-ons.
- They are better at fighting up close. You’ll get the most out of your units if you fight from really close. This makes you more vulnerable to attacks from afar and counterattacks.
- No fast transport. Chaos units can be very fast on their own, but there’s no quick way to move them long distances like the Webway Gates, Ork teleportation, or air transport vehicles.
- Limited air and anti-air. They have the Heldrake, which is a strong flying unit, but it can only attack things next to it. It’s the only air unit they have, and they don’t have special ground weapons to shoot down enemy aircraft, so you’ll have to rely on a lot of firepower to take them down.
Installatie & Cooperative Play
Starting Settings:
- Let’s follow the general guide’s settings, with some tips. Ensure there are plenty of “Tropical” environments for better food production. Having maximum neutral creeps will slow down the AI, and for Chaos, these neutral units are important for building up boons of Chaos, which can transform ordinary units into powerful ones. Extra Jokero camps will help you buy items more reliably, and increased arctic and temperate terrain will assist with research and food production, respectievelijk.
Cooperative Play:
- Chaos Marines might not be the best allies. They lack rapid transport options to help their partners under siege, and most of their support powers don’t affect units from other factions (but they do work on allied Chaos Marines). Echter, the Warpsmith’s and Master of Possession’s healing abilities will work. If playing co-op, quickly expand towards your ally’s territory to create a path for transporting units for mutual defense. Consider building cities closer to your ally to minimize the gap. Use the Chaos units’ relatively high ground speed to send reserves swiftly to aid a besieged colleague. Chaos Spawns, in particular, can quickly traverse the map to reinforce your ally’s forces. alternatief, team up with factions like the Tyranids, Eldar, or Orks that have mass transport capability.
Playing the Story Quest:
- Absolutely, Ja! The Chaos Marines have the most rewarding story line, offering powerful artifacts and the useful early-game unit, the Chaos Spawn. Like with all story quests, make sure you have an “off-ramp” so that you don’t complete it before defeating the AI. It’s recommended to stop at the point where you need to perform the Sacrifice to Khorne, or you can choose to halt at an earlier point where you bestow a Mark of Nurgle to avoid the Tyranid swarm.
Starting Cities
Selecting your starting cities is a big deal in this game, and for Chaos, it’s even more critical because you have two cities to choose. The ideal starting city should focus on research and food, eventually adding energy and ore production. Normaal gesproken, a city should have early access to two significant resource boosts or up to four moderate ones. For Chaos, prioritize research in your first city.
Here’s where Chaos differs. When you pick the location for your first city, also choose a spot for your second city, ideally one that can fill in resource gaps like energy or ore. These cities must be five tiles apart. In most cases, having the cities close together is better to support each other and not attract too many neutral threats.
Example Start
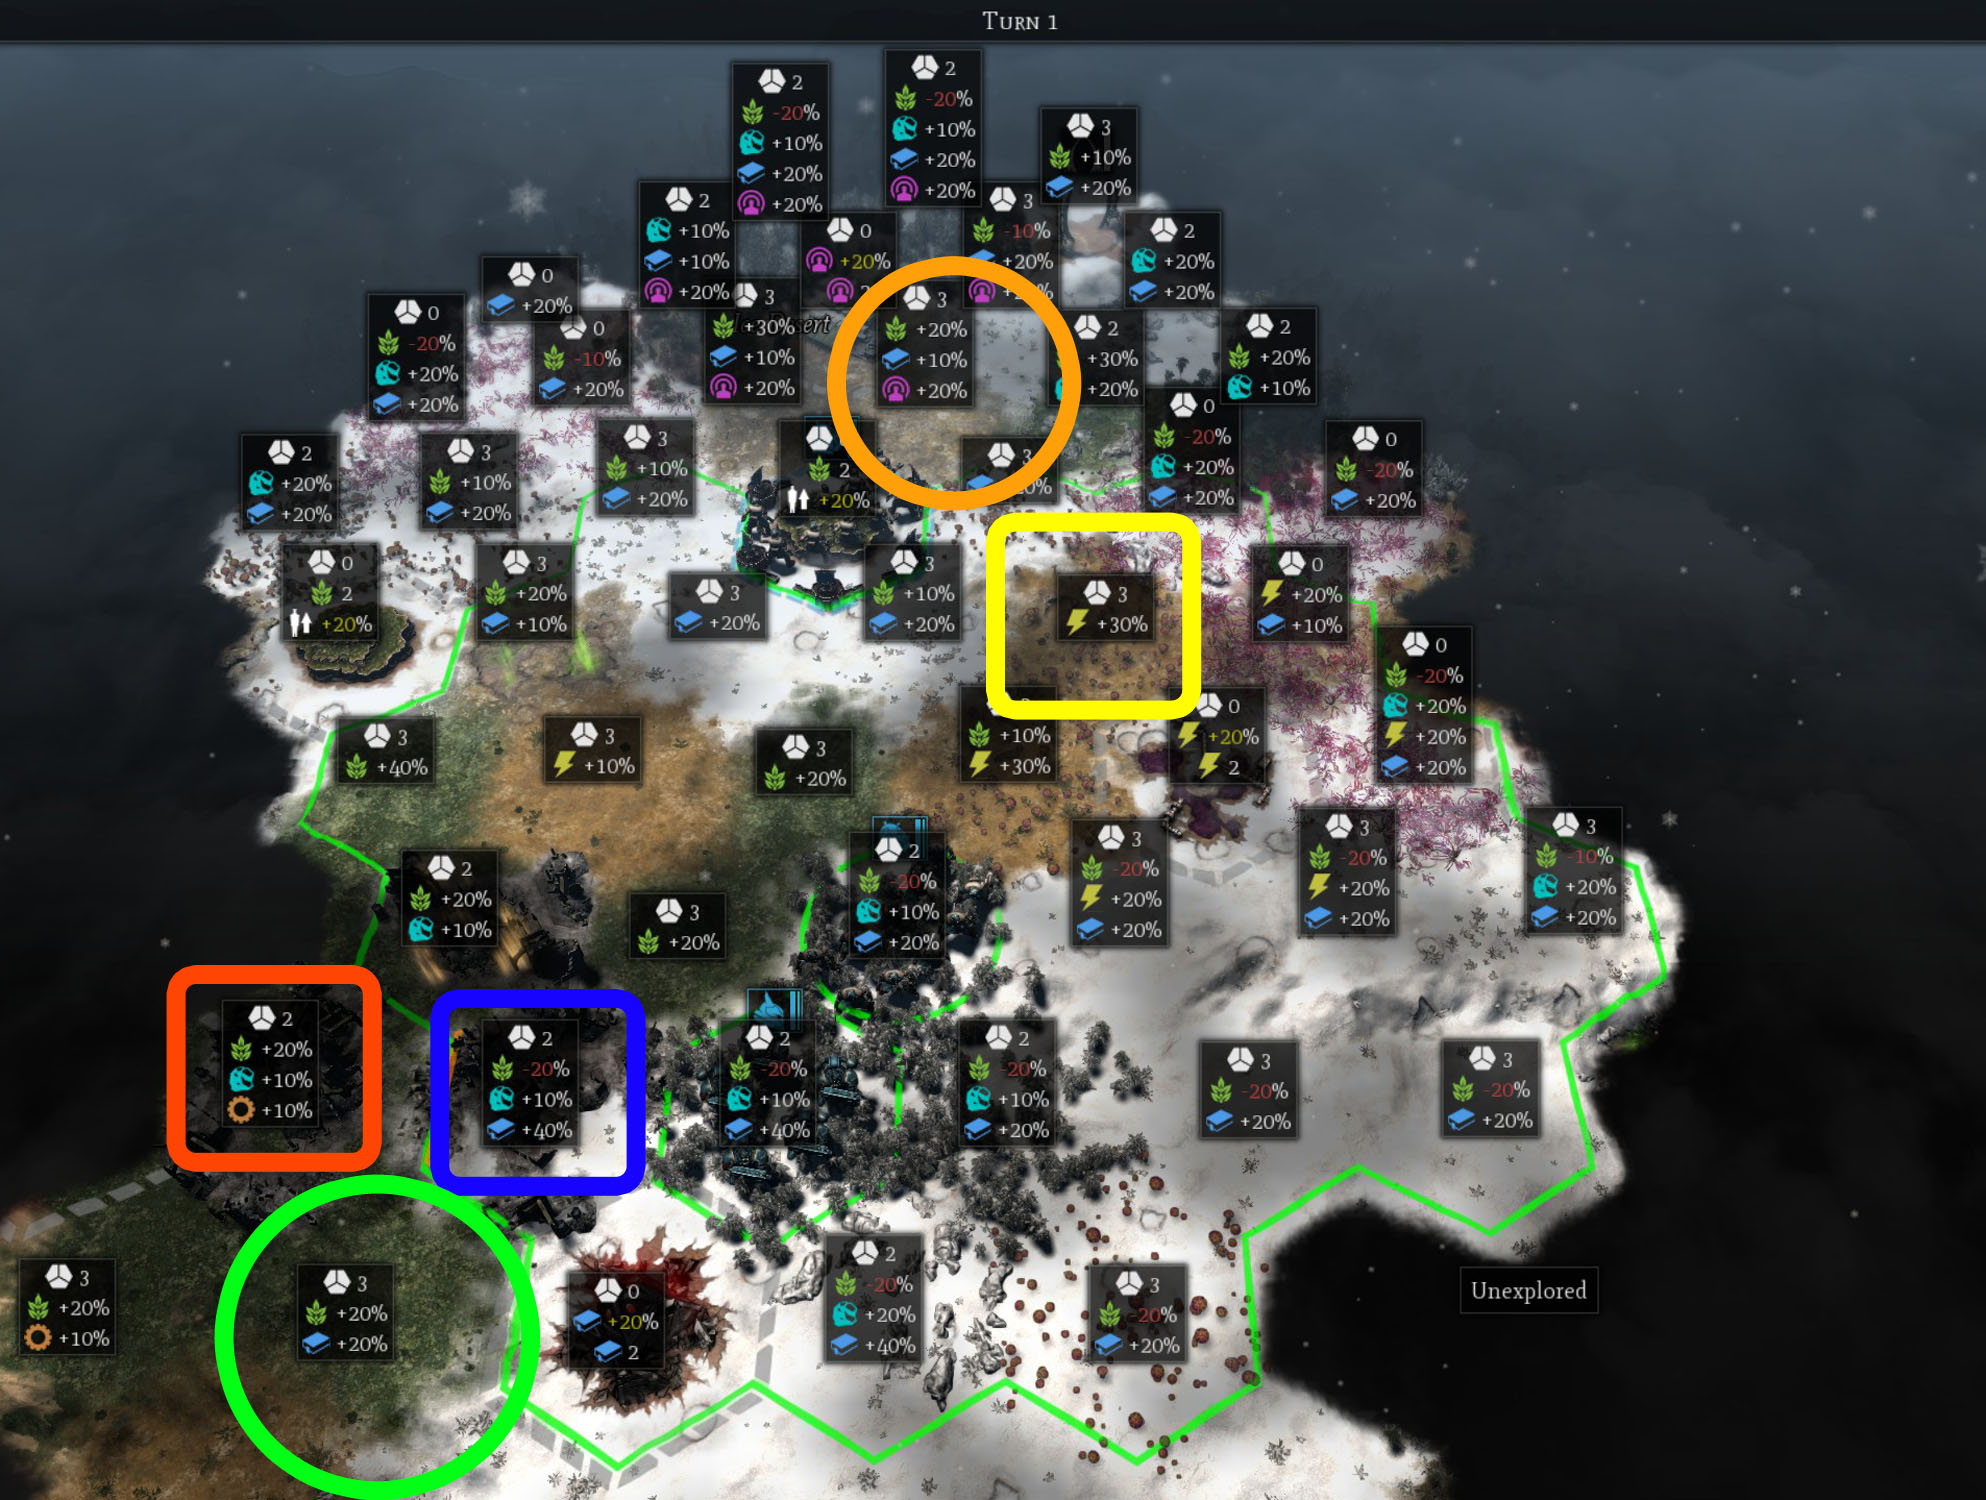
In this example, I’ve selected two starting city locations on turn 1. Stad #1 is in the green circle, en #2 is in the orange circle. Here’s why I chose them:
Stad #1:
- It starts with a small research bonus and has access to a tile with +40% research (the blue square), and a Ruin of Vaul will boost that to +60%.
- Being on a grassland avoids the tundra food penalty and offers a moderate food bonus.
- It’s next to two tiles with production bonuses (red square), perfect for building units.
- The city itself has an extra building space, saving valuable turns for your first building.
Stad #2:
- This city site is fortunate with two adjacent compounds that provide bonuses to influence and food (tot +40% elk).
- The city can generate electricity after expanding the radius once (yellow square), and after full expansion, it can increase that to a total of +50% by acquiring the Promethium pipes.
- It’s next to a fermentation pool, allowing significant growth rate increases. The city should quickly catch up in size and will thrive in the unique economy of population sacrifice.
To ensure you build these cities as soon as possible, make sure you accumulate the 60 influence and ore needed for the second city and avoid accidentally spending it. Note that the seed for this world is 2923997959, but your starting position may vary.
Early game
In het vroege spel, your main goals are to save up for your second city by turn 10 and start producing units. You’ll find that having only one Marine is not enough once both cities are built.
Orde opbouwen:
You can generally follow the suggested build order from the “Algemeen” strategy guide, but with a few adjustments. Take a more aggressive approach toward unit production and be less inclined to build early heroes.
Start by acquiring the best research tile you can find and build a research building on it. For most factions, having your research output equal to the turn number is a good target. This won’t be an issue early on because you have two cities contributing. Begin with an infantry building, like the Abominator’s Genelab, preferably on a tile with a production boost symbol (a gear), and then build another one.
In the second city, consider building a Cult of Chaos as its first building, and maybe the second one as well. These buildings provide units to support your lone Chaos Marine, along with research, loyalty, en voedsel.
You’ll encounter population caps and loyalty issues, so prioritize researching technologies to address these challenges. If you have extra population, consider sacrificing it to Tzeentch to boost your central production building and speed up research.
Unit Management:
At the start, you only have one Chaos Marine squad, and it’s crucial not to lose it. Use the Marine to defend your cities against threats and do limited scouting. Keep the Marine unit close to your cities. While you can capture local compounds, don’t risk losing the Marine trying to hold them until you have reinforcements. Your primary goal in the early turns is to survive and found your two cities. The story quest will send some Astra Guard units after you, and your Chaos Marine can deal with these squads easily.
Once you have cultists, a Chaos Spawn (from the story), and another Marine, you can cautiously expand. I recommend expanding toward the nearest map corner along the edge of the map. This minimizes the number of hidden “surprise neutrals” and gives you a solid base of clear territory.
Look for a third city site and found it as soon as you can afford it. Don’t spend too much time searching for the perfect spot; accept what’s good enough. Cities take time to develop, so obsessive searching might cost you more than you gain.
Technologie (Lagen 1 door 4)
Laag 1:
- Your first priority is the Genelab to start building your army. Follow the story and research Bloated, a useful healing tool, although a bit random. Rite of Change will let you use excess population for further research. You’ll come back to the other technologies later.
Laag 2:
- Aanvankelijk, it’s better to focus on building lots of Chaos Marines rather than bringing in Khorne Berzerkers. Delay researching other infantry until you reach Warp Talons. Captive Pens are essential to expand your population, and Frag Grenades will make your Space Marines immediately more powerful.
Laag 3:
Research Meadows of Sorrow, another crucial building. Your first persistent boon is available now; choose Crystalline Body so your troops can start benefiting from their kills. Skip Krak Grenades; they are rarely better than your regular attack, and time is of the essence.
Laag 4:
- In deze laag, you should invest some time. Eindelijk, you can build Warp Forges, the building that looks like a crane. Research this first, and then build it as soon as possible in all cities. In new cities, this should be the first building you create. It’s an excellent investment, cutting production times in half for all other buildings. The only reason to delay is if you’re out of ore or power.
Daarna, research and recruit your first hero, the Daemon Prince. You probably have plenty of influence, so research the Mark of Slaanesh. This will be the default Mark for all your units because the extra speed helps you coordinate your armies better against new threats and sets you up to place the Icon later, making them more survivable. Take a detour to Tier 5 for Call of the Dark Gods because city expansion is quite late in the technology tree for Chaos, and you’ll need it by this point. Then return to Tier 4 for Rite of Pestilence and Warpborne Bolts.
Middle Game
It’s time to embrace the Chaos Growth Cycle and generate the fuel for sacrifices, which is a unique transition for Chaos compared to other factions. Here’s how you can make the most of this strategy:
Chaos Growth Cycle:
- Continuously build Chaos Cultists. Make sure your first city has at least two Cults of Chaos, and then continuously create Cultists to send to other cities for sacrificing. Keep a Cultist waiting by each city center to maintain the growth rate boost. Extra cultists can support your armies.
- Sacrifice population to Nurgle using Rite of Pestilence. This further increases your growth rate and boosts food production. This might seem unusual, but it supports your growing population and infantry armies. City growth will now push around 20 per turn.
- Use this new population to sacrifice to Tzeench via Rite of Change (and later to Slaanesh with Rite of Unholy Pleasure) to boost research, loyalty, influence, and building production. This creates a positive feedback loop, allowing you to rapidly build housing and loyalty buildings to accommodate your growing population.
The big secret is that by increasing the growth rate, you can have the largest and most productive cities of all the factions. High loyalty increases production of everything by 1% per point, which eventually becomes a massive bonus.
Orde opbouwen:
You’ll have three cities and might consider a fourth if you find a perfect spot, probably for ore production. Build the required infrastructure in all cities, including loyalty buildings, population expansion buildings, and a second building constructor. Start diversifying your army with mid-level units like Warp Talons and Venomcrawlers. This period will see some stagnation as your tech level rises, and you need to research and build the necessary infrastructure buildings. Ensure you have three unit production buildings of each type to rapidly build and resupply your army.
Focus your unit production more on mechanical units at this point, assuming you have a decent number of infantry. Forgefiends are great mid-tier units, but Venomcrawlers are cheaper, tough, and assist your Masters of Possession.
Unit Management:
- Mark all new units with the Mark of Slaanesh, except for Khorne Berserkers, who start with the Mark of Khorne naturally. Consider using the Mark of Nurgle for Chaos Spawns.
Expansion:
- Strategically stay along the map’s edges to avoid meeting the AI too early. Clear any corners behind your cities so that compounds can contribute to your economy even during an invasion.
Tactics:
- Lead with summoned units or units with Daemonic damage resistance to absorb overwatch, and follow with weaker units to finish off damaged enemies or capture unguarded compounds. Let your Champion of Chaos units, mostly infantry, land the killing blows to give them a chance to gain a boon of Chaos.
Artifacts:
- Prioritize artifacts, especially the Siren Caster, which adds two loyalty in all cities, making expansion in the early game less painful.
Prioritizing Targets:
- When choosing targets, it’s usually better to finish off a slivered (nearly dead) neutral unit rather than damage a different one. By destroying the unit, you’ll have a chance at a boon, and the injured unit won’t run off to heal.
Technologie (Lagen 5 door 10)
As you progress into the middle and late game, here are some recommendations for the expensive and powerful technologies:
Laag 5:
- Warp Frenzy is a good choice, assuming you’ve already acquired Call of the Dark Gods to expand your cities. Maulerfiends and Melta Bombs can be situationally useful.
Laag 6:
- Technologies in this tier will significantly impact your ground game with Forgefiends and Warp Talons. Conjoined Weaponry is particularly beneficial in a game with extensive melee activity. Consider Veterans of the Long War depending on your opponents. Havoc Launchers are a great addition to Chaos Rhinos. The Icon of Vengeance can be applied to units with any mark, making morale a non-issue for your infantry.
Laag 7:
- The Venomcrawler is a versatile and effective unit that can heal itself and support your summoners. Extra Vehicle Armor is essential for your war machines. Heldrakes will be necessary eventually, but prioritize the next tier for its robust units.
Laag 8:
- This tier introduces your first end-game units. Obliterators, powered by your significant food surplus, are powerful and essentially free. The Chaos Land Raider, a reliable mainstay, serves as a primary backup to Greater Brass Scorpions. Temporal Distortion, combined with the Mark of Slaanesh, provides substantial mobility for your infantry.
Laag 9:
- Almost all technologies in this tier are useful. Start with Mechanoid to enhance your infantry and heroes’ resistance to heavy attacks. Our Lives for the Gods significantly increases growth rates, allowing you to build new buildings every turn and still have enough left for sacrifices. The Icon of Excess, applied to units with the Mark of Slaanesh, improves their survivability. The Defiler, while not a front-line machine, has its place and can wait until after you have Scorpions.
Laag 10:
- The Greater Brass Scorpion is a powerful and formidable unit, serving as your winning unit if you can afford it. Rite of Unholy Pleasure unlocks the true potential of your cities, powering the economics of the late game.
Late Game
As you approach the late game and prepare for the final battles, it’s essential to proceed with caution and strategic planning. Here’s what you should consider:
- Spotting the Enemy: When you eventually encounter the AI, it often begins with the appearance of a weak-looking scout unit and an introductory message. Resist the temptation to send your units charging after it. Behind that lone scout, there’s usually a massive force of enemy units ready to surround you and cut off your retreat.
- Pull Back and Prepare: Instead of rushing in, pull your units back from the visible range. You’ll have a few turns to begin consolidating and preparing for the significant wave of air units that’s about to arrive. Depending on the AI faction you’re facing, this can be a challenging situation. The T’au, bijvoorbeeld, have punishing overwatch, long-range attacks, and strong air units. If you’re facing the Tyranids, you’re on more favorable ground since they rely mostly on short-range melee combat, and their air units are similar to Heldrakes, making it a more even matchup.
- Unit Positioning: Start moving your army forward, keeping them closely grouped behind your Greater Brass Scorpions and Chaos Land Raiders. Be sure to rotate out wounded units to avoid losing them in the next engagement. A common mistake is leaving your Scorpions at the front for too long. While they have massive health pools, it means they take a long time to heal. Als gevolg hiervan, they can be easily lost if their health drops too low when facing powerful enemy units.
- Support Units: Keep at least one Warpsmith in the rear, ready to heal your wounded machines. This support is crucial for maintaining the durability of your war engines.
- Sieging Enemy Cities: As you advance, you’ll eventually reach the first enemy city. Use your tanks and demon machines to pound it into submission. This marks the beginning of the late-game offensive against the AI.
Herinneren, late-game battles in Impossible difficulty can be challenging, and careful planning and unit management are crucial to your success. Be prepared for a tough fight as you work to secure victory.
Hero Guide
Heroes in Chaos play a supportive role rather than taking the spotlight, and they can be a valuable asset to your overall strategy. Here are some tips and insights into using Chaos heroes effectively:
General Tips for Heroes:
- Equipping heroes with the right items is essential. Consider sending each new hero to a Jokero encampment immediately to purchase a Tantalizing Icon. This item provides a significant influence boost that offsets the maintenance cost of heroes and serves as an investment for future items.
Demon Prince:
- The Demon Prince is a versatile hero. While he’s decent in melee combat, he’s not an effective healer. Utilize his ranged attacks, passive boosts to other units, and his Boon of Mutation power, which guarantees a Boon of Chaos. This power is particularly valuable for support units that may not earn boons in combat.
- From the Jokero Encampment, consider buying the Tantalizing Icon for influence income. If you can afford it, the Scroll of Magnus can be a valuable addition. Enhance his survivability with items like the Adamantium Vest and Zoat Jerkin. An Endurance Implant increases his movement range, allowing him to engage in combat or retreat as needed. Later in het spel, an Axe of Blind Fury makes him a more formidable melee threat.
Chaos Lord:
- The Chaos Lord excels in melee combat. Equip him with powerful attack items such as the Mourning Blade, Axe of Blind Fury, and Dusk Blade (when affordable). Keep in mind that he’s not as durable as you might expect, and the AI often targets heroes, so avoid sending him deep into enemy lines. Use his Worthy Offering ability to gain boons for nearby infantry units.
Master of Possession:
- The Master of Possession is your primary healing hero. He can heal any unit in the game, except himself, including allied units, and he can do this every turn. Echter, using his healing power costs him 2 hit points each time, making the Zoat Jerkin a crucial item for him. In pairs, these heroes can heal each other, mitigating this disadvantage to some extent.
- The Possession power of the Master creates a Chaos Spawn for each kill. To make this more practical, consider equipping him with a Jokero Digital Weapon, which boosts his damage output.
- The Incursion power allows the Master of Possession to summon mid-level demonic units to assist in battle, such as Warp Talons, Heldrakes, or Maulerfiends. These units are excellent at absorbing overwatch attacks. To maximize this ability, pair each Master with a Venomcrawler pet, reducing the cooldown from five to three turns. Met deze opstelling, you can have a summoned demonic unit available consistently.
Warpsmith:
- The Warpsmith is a vital hero, primarily for healing machine units. He can repair up to 24 hit points per turn, making him essential for maintaining your mechanical forces. Aanvullend, he provides passive boosts of 12 energy and 12 ore production (op niveau 6), which is akin to having four free buildings. These boosts are valuable because Chaos lacks other means to increase production in these two resource types. Consider equipping him with an Uncreator Gauntlet to enhance his repair capabilities further.
These heroes play key roles in supporting your Chaos forces and ensuring your armies remain battle-ready and effective in various situations. Properly equipping and utilizing them will significantly contribute to your overall success in the game.
Unit Guide – Infantry
In Chaos Space Marines, infantry units play a critical role in your army. Each unit has its own strengths and purposes. Here’s a breakdown of the available infantry units and their usage:
Chaos Cultists:
- Continuously build Chaos Cultists as they serve various purposes, including city construction and sacrifices.
- Na verloop van tijd, as they acquire boons, they become capable fighters and can absorb substantial damage.
- In the late game, they can clear wire weed and establish defense points with Noctilith Crowns.
- They are cost-effective to build and maintain.
Chaos Spawns:
- While you might not build these often, they have their uses. You receive one for free by following the story, and Masters of Possession can create them regularly.
- They are exceptionally fast and can serve as scouts, bolster vulnerable units, or pick off wounded enemies.
- Marking them with the Mark of Nurgle boosts their hit points, making them more resilient.
- They are suitable for rescuing trapped or valuable units in the late game due to their ability to absorb damage and buy time for other units to escape.
Dark Disciples:
- These units provide an aura but are vulnerable and easily killed. Place them in the rear to protect support units against surprise attacks.
Chaos Space Marines:
- Heavily armored and relatively affordable, Chaos Space Marines are available early in the game.
- They are versatile and can be used to defend and expand your early empire.
- With grenades, boons, and Icons, they remain useful throughout the game.
Khorne Berzerkers:
- These units are less versatile than Chaos Space Marines but excel in one-shotting groups of Kroot Hounds and neutral Cultists.
- They are less effective against late-game enemies due to their close combat nature.
- Late in the game, they can be used to eliminate neutrals away from the main battle with the AI.
Havocs:
- Havocs have the unique ability to shoot at range three, a rarity among Chaos units.
- If you have the time, building a few Havocs can enhance the firepower of your Marine units, especially when you need ranged support.
Warp Talons:
- Warp Talons are tough and highly mobile, making them versatile units.
- They can acquire all the boons, becoming formidable melee fighters after getting some kills.
- Echter, their complete lack of ranged attacks makes them vulnerable to certain enemy units.
- Note that their Hammer of Wrath ability triggers automatically when they use their jump ability.
Obliterators:
- Obliterators are versatile and cost-effective units that don’t benefit from boons but can be marked with Marks and Icons.
- They have both ranged and melee attacks, making them adaptable in various situations.
- Their ranged autocannon is effective against single targets, while the flamer is devastating against groups of infantry.
- Keep them healed, as their effectiveness diminishes as their numbers decrease.
Unit Guide – Mechanized
Mechanized units are a crucial component of your Chaos Space Marines army, offering various strategic advantages. Here’s a breakdown of the available mechanized units and their uses:
Chaos Rhino:
- Chaos Rhinos are affordable and, when upgraded, have valuable properties.
- With Dirge Casters, they can cancel overwatch for adjacent units, allowing other Chaos units to approach safely.
- Think of them as melee fighters (especially against infantry) before acquiring Havoc Launchers.
Helbrute:
- Helbrutes are visually impressive but somewhat underwhelming in battle.
- They have decent single-target damage, but their lack of self-healing means they often spend time recovering.
- They are slower moving compared to other units in the Chaos faction.
Maulerfiend:
- Maulerfiends are useful to have near enemies due to their Fear effect and lasher tendrils that reduce melee attacks.
- They are summoned units from Masters of Possession, and their role is mainly to apply debuffs and control enemy units.
Forgefiend:
- Forgefiends are formidable demon engines with twin guns that deal high damage at a two-hex range.
- They have decent health, regeneration, and good movement, making them versatile on the battlefield.
- They excel at eliminating enemy units like Umbra and Kastelans.
Venomcrawler:
- Venomcrawlers are cost-effective units with a balance of melee and ranged capabilities.
- They are excellent for killing infantry groups and are still capable at range.
- The Well of Daemonic Energy reduces the cooldown of Masters of Possession’s summons, making it a valuable asset.
Heldrake:
- Heldrakes are the Chaos faction’s lone flyer, offering good health, Schade vermindering, and regeneration.
- Their short range requires careful positioning to avoid overwatch and engage enemies effectively.
- Using the jink ability before moving can reduce overwatch damage from unseen enemies.
Chaos Land Raider:
- These are tough, snel, and capable of transporting other units.
- Chaos Land Raiders are superior to their Space Marine counterparts, with added melee components due to their destroyer blades.
- They can lead charges into uncharted territory and provide strong support until better units are available.
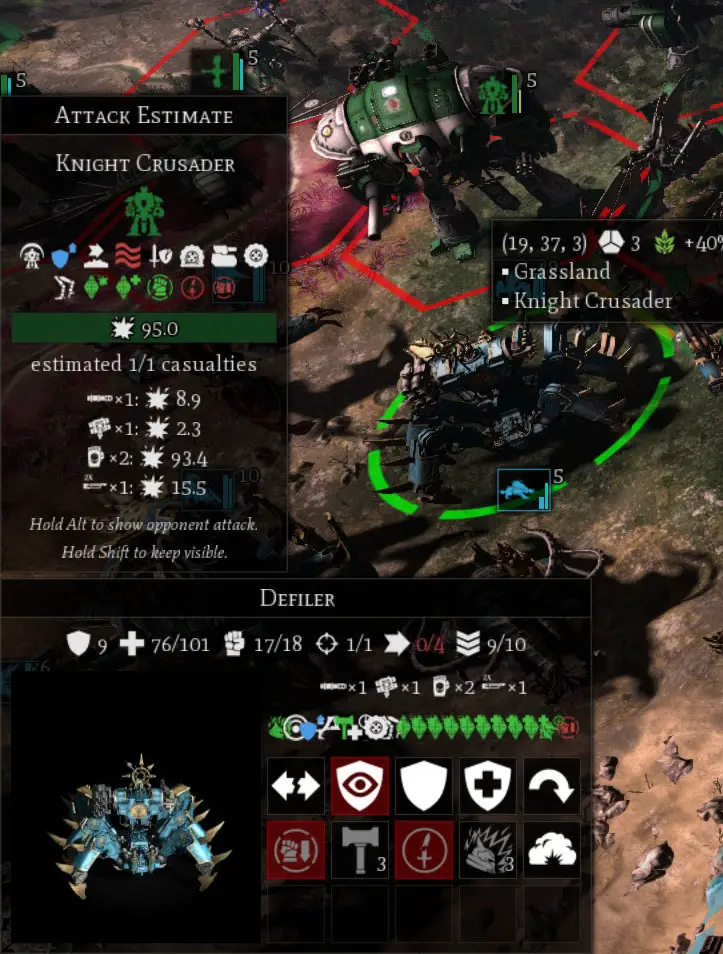
Defiler:
- The Defiler is a powerful and versatile machine with various weapons and abilities.
- It excels as a flanking unit and can deal high damage when following a Scorpion into battle.
- Echter, its health is relatively low for a top-tier endgame unit.
Greater Brass Scorpion:
- Greater Brass Scorpions are the cornerstone of counterattacking the Impossible AI.
- They boast high health, demonic damage resistance, regeneration, and fast movement for a superheavy unit.
- Their powerful attacks make them formidable on the battlefield, anchoring the line and preventing weaker units from being overrun.
- The Stomp attack is effective against infantry units, and the tail guns can deal substantial damage even to air units.
Summary
- Establish your first city with a focus on research and food production.
- Research and construct infantry buildings to bolster your forces.
- Create a second city that specializes in production, voedsel, or energy based on resource shortages.
- Build a small army of Chaos Cultists and Chaos Marines for early defense and expansion.
- Progress through the technology tree, emphasizing infrastructure improvements and infantry enhancements. Seek out a suitable location for a third city.
- Recruit a Daemon Prince as your first hero and start building the mechanical part of your army.
- Boost population growth by utilizing Chaos Cultists and the Rite of Pestilence.
- Engage in continuous combat with neutral forces to earn boons and level up your units.
- Utilize surplus population to enhance research and building efficiency.
- When you encounter the enemy, avoid immediate engagement and assess the situation.
- Temporarily employ Chaos Land Raiders while waiting to field Greater Brass Scorpions.
- Advance toward victory by carefully rotating wounded units and steadily progressing forward.
Snelle tips
- Negative loyalty has a more significant impact than positive loyalty, so avoid situations where loyalty becomes negative.
- Assume that unexplored forests and ruins may hide enemies, so scout them cautiously to avoid overwatch traps.
- Target units you can destroy, as this raises your morale and lowers the enemy’s simultaneously. Plan your attacks strategically to maximize these advantages.
- Move support units forward before finishing off enemies with other units to ensure all nearby units gain experience.
- Try to earn boons with Champion of Chaos units by securing kills with them.
- Equip all heroes with items from the shop to enhance their survivability.
- Many Chaos units have a melee component to their attacks, so don’t hesitate to engage in close combat when necessary.
- Building numerous early-game units like Chaos Space Marines can be a good alternative to focusing on a few mid-game units, allowing you to allocate your research efforts elsewhere.
- Brass Scorpions are powerful units, but remember to pull them back for healing when they reach around half health to avoid losing them.
Dat is alles wat we vandaag hiervoor delen Warhammer 40000: Gladius - Relics of War gids. Deze handleiding is oorspronkelijk gemaakt en geschreven door Doc. Voor het geval we er niet in slagen deze handleiding bij te werken, U kunt de laatste update vinden door dit te volgen link.