Guide to building and playing a summoner alchemist viable for very hard
Invoering
The Alchemist is a magic/summoner based class in Torchlight. It’s maybe the weakest of the three available classes. He has the smallest health pool but the largest mana pool of the classes. The class is very fragile so it’s best to kill everything before it can attack you first. He has three skill trees:
- Arcane, which focuses on spells
- Lore, which focuses on summons
- Battle, which focuses on defense and weapon attacks
My alchemist build is built around using summons to protect you from harm and kill your opponents for you while you hide behind your meat shields and support them from behind. There are two types of summons in Torchlight. Ten eerste, there are exclusive summons from the Alchemist’s Lore skill tree. Ten tweede, there are shared summons from spell scrolls of which you can have up to four on your character and up to two on your pet.
Character was played in regular mode, Very Hard difficulty, self-found gear only.
Lore
Nether Imp
The first skill in the Lore tree, this skill summons a Nether Imp from a defeated foe’s corpse. With one point in the skill you are limited to a single Nether Imp summon. As you level up the skill, the imps will gain health and damage buffs and your summon limit is increased. At maxxed skill level, the summon limit is six.
Imps will serve as your primary infantry in the early going until you get a number of charm summon scrolls to support you. They make for okay pets, not exactly the tankiest of summons, a bit meh in later stages and have the requirement of needing a corpse to summon but they’re permanent, combo well with Burning Bind and fit nicely into a pure pet theme build. I believe there is some sort of respec mod available, so if you have that installed I guess you could spec out of imp later in the game and invest in other skills you’d prefer more.
Thorned Minions
Thorned Minions imbues your summons with crackling energy that reflects the damage foes inflict back upon them. At rank 1, the buff reflects 25% damage and lasts 10s and at rank 10, reflects 70% and last 30s.
It’s a nice buff but Burning Bind is superior buff imo and you lack skill points and hotkeys to really invest in both imo. I suppose you go drop one point in the skill just to use it until Burning Bind is available later.
Pet Mastery
Passive that boosts pet and summon damage and armour and decreases your pet’s travel time. As a summon focused build ,this will be a priority to max as it will provide a nice buff to your entire summoned army. Decreased travel time will help if you like to send your pet back to town to sell goods in his inventory as he will come back quicker but I personally preferred to teleport back to town so I could also check for upgrades to my spell scrolls, gear upgrades from blacksmith, enchant and gamble for gear.
Summon Alchemical Golem
Summon an Alchemical Golem to attack your foes. Makes for a good 1 point wonder permanent melee pet. It’s a pretty tanky pet and is worth leveling eventually but if you’re just doing the campaign dungeon you’ll likely won’t have the skill points to spare to do so. Likely will only do this if you decide to clear through the endless dungeon.
Charm Spell Mastery
Increases the level of all your Charm Magic spell scrolls. A priority to max, it will make all your Charm Magic summons better. You’ll likely have at least two Charm summon scrolls assigned and preferably three of them so you’ll get a big bonus to your temporarily summoned Charm spell horde.
Terror
Terror applies a debuff to nearby enemies that causes them to flee. It’s a vital one point wonder crowd control ability; if enemies manage to bypass your meat shields you can apply Terror and retreat, regrouping and resummoning if required. With one additional point the debuff lasts an additional second, after that every 2 points increase the debuff by a second.
Burning Bind
Burning Bind applies a buff to your summons, increasing all physical and elemental damage done and increasing their attack speed. The buff lasts for 15s at rank 1 and buffs damage by 50% and attack speed by 10%. At rank 10 it lasts 33s and increases damage by 140% and attack speed by 20%.
It’s an incredibly powerful skill that will turn all your summons into killing machines and should be maxxed ASAP when possible.
Barter
Passive ability that reduces vendor prices and increases the value of your goods. You’ll may find yourself somewhat broke throughout the game (enchanting and gambling costs a ton of gold) so a bit of extra cash is normally helpful. Echter, you just don’t have the skill points to spare for this skill with this build as you have so many summon and defence oriented skills you need to reserve skill points for instead.
Summon Beam Golem
Summon an Beam Golem to attack your foes with beams of electricity. Makes for a good 1 point wonder permanent ranged pet. Long term you’ll want to max this pet out but not till you max out your priority passives and grab some defences. Beam Golem should be maxxed before Alchemical Golem I think. You might want to go for 2 points to unlock its static charge reflection ability.
Schatzoeker
Passive ability to boost your gold / magic find chances. More gold is always useful and extra magic find is always useful considering the lack of farmable hot spots for loot. Has the same lack of available skill points issue as mentioned previously for Barter. Ook, if you want to farm unique/sets quickly it’s technically easiest to do that on a Easy difficulty Magic Find character as there’s no difference in drops in each difficulty and you can just swap gear in the shared stash.
Battle
Armor Expertise
Passive ability that boosts armour % and reduces amour equipment requirements. Early on this will help you equip better armour quicker by lowering its level requirement. Later it will help boost your armour stat to make you tankier and, as a summon build you’ll likely be investing heavily in Defence as you don’t need to worry about other stats to do DPS yourself, so should combo well with your high Defence stat. Worth dropping at least few points into, 5-10 depending on how much you like it and how many points you want to spare from elsewhere.
Ember Shield
Generates a shield that absorbs a flat amount of damage before being depleted and grants 100% knockback resistance while the shield is up. A must have skill, it will help protect your fragile self in case you start taking damage and give you time to apply Terror, genezen, enz. Put additional points into the skill as enemy damages increases to keep the Shield still relevant.
Defensive Spell Mastery
Increases the level of all Defensive Magic spells. If you are using Defense scrolls this is useful. You’ll should be using Charms scrolls for summons mostly through for meat shield + DPS instead through so this is more of a really late term term investment at best.
Frailty
A powerful debuff, Frailty reduces enemies Physical & Elemental Armor, slows their attack and casting speed and a tiny bit of poison. Didn’t use in my build, kind of ran out of hotkeys lol but it’s still an excellent skill to pick up if you want.
Ember Phase
Phase to a new location, dealing damage as you enter and exit nether space. Primarily an one point wonder ability for repositioning I believe.
Block and Parry
Passive ability that improves your chance to block with or without shield. Extra survivability is always nice but Ember Shield and Armor Expertise are better for picking up so you likely won’t get this skill unless you go really deep into the endless dungeon and get a lot of extra levels.
Ember Sentry
Summons a sentry crystal to blasts nearby enemies with beams of Ember energy. Not a permanent summon but has a really long summon time and is a good one point wonder summon.
Ember Shock / Martial Weapons Expertise / Infuse
Martial Weapon helps uses wand earlier (you should be using wands over staves so you can attack from distance, much safer and you can stay behind you meat shield), Echter, your pets are your primary source of DPS, wand attacks are only for extra support largely when you don’t have a summon to cast or a buff/debuff to apply. Ember Shock and Infuse skipped as weapon attacks not focus of build and Dual Wielding skipped as you want shield for more survivability.
Arcane
Adventurer
Adventurer is a passive that improves increases the gain rate of Experience and Fame and the potency of potions. In het begin, it can help farm exp and fame faster. Later it helps make potions stronger. Alchemist has a fairly low health pool through and build is designed to avoid taking damage much so health potion sized isn’t much of a big issue. Extra potions sizes are more useful if you’re planning on doing the endless dungeon instead as potions sizes eventually cap out and you need the extra regen then.
If you want to skip Adventurer you can do so and put the points into pet passives or into your golem skills instead.
As for the rest of the Arcane tree, it’s basically skipped for the summon build. Most of the skills are spells which you are bypassing in favour of using pets as primary DPS source. A few skills for wands or critical strikes which aren’t too useful in this case. Offensive spell mastery is useless as you should be using charm spells for summon or defensive spells instead (offensive spells probably useless for arcane oriented alchemists as well as they be doing damage with alchemist spells and still better to use scrolls for summon support and defences imo).
Only Advanced Spellcasting has some worth I guess as it can let you learn scrolls earlier and some mana regen. But eventually you’ll be able to learn any scrolls you need and I never felt I had any issues with mana late game anyways.
Spell Summons
Spell Basics
Spells are special scrolls in Torchlight that any player can pick up and learn. Spells come in three types: Aanval, Defense, and Charm, indicated by red, blue and green color coding. Most spells also come in different ranks, indicated by Roman numerals after their names. Spell level can be increased up to 10 times by putting skill points into Offensive, Defensive and Charm Spell Mastery in the classes’ skill tree. Spells sometimes have a significant cooldown period associated with them, unlike class skills.
Rare spells are more difficult to find and do not come in different ranks.
You can only learn a spell once for each rank. Echter, you can learn multiple ranks of the same spell. Bijvoorbeeld, you cannot have two copies of Summon Skeleton II but you can learn a copy of Summon Skeleton II and a copy of Summon Skeleton I. Different ranks are treated as completely different spells.
The player character has four slots for active spells. An active spell can be unlearned by holding CTRL and left-clicking the spell. This opens up the slot for another spell, but the old spell is lost.
Pets also have two spell slots. Adding and removing spells from pets works the same way as the player’s spell slots. You can’t control when pets cast spells, although putting your pet in Passive mode will prevent them from using spells. Some spells have longer cooldown times when used by pets. Summons, Bijvoorbeeld, you can summon a skeleton every 3s while the pet can only summon one every 30s.
Summons Spells
Summon Skeleton
Summons a skeleton warrior next to the caster who will follow the caster and attack nearby enemies. The skeleton’s duration, health and damage increases with the rank of the Summon Skeleton spell. Increasing charm mastery increases the skeleton’s damage by 10% per rank. Has a cooldown of 3s and you can have up to 5 of them out at once.
Skeletons are good, solid summons which you can quickly spawn out. I’d recommend having at least one of these assigned to yourself at all times.
Summon Archers
Summons up to 3 skeleton archers out of the ground. The archers are completely stationary and will attack nearby enemies within their range with their arrows. The duration, health and damage increases with the rank of the Summon Archers spell. Increasing charm mastery increases the archer’s damage by 8% per rank. Has a cooldown of 5s but you can only have one archer pack out at once.
Archers can be very strong minions but require some care to use. As they cannot move, you need to position them properly so they are within range of enemies and keep positioning new ones as you move. Ook, fewer than the maximum archers may spawn if you position the summon in an area without adequate space to fit them all.
Despite these drawbacks, I feel archers are one of the best options available to you. I’d recommend using one scroll slot for archers.
Summon Zombies
Summons a trio of zombies. Zombies are slow moving but very strong minions that steal health for you on attack. The duration, health and damage increases with the rank of the Summon Zombies spell. Increasing charm mastery increases the zombies health by 10% per rank and the life steal by 1%. Has a cooldown of 30s and you can only have one zombie pack out at once.
Zombies make for decent early minions when you’re first starting out and trying to fill up your scroll bar with extra summons. They’re incredibly slow through and the 30s cooldown means you can’t quickly summon a new pack as you move. Because of this I can’t really recommend them over Skeleton Warriors and Archers. Pets aren’t very useful if they’re often too far behind you struggling just to catch up to actually provide support to you.
Summon Blood Skeleton
Summon Blood Skeleton is a rare spell and summons Blood Skeletons steal life for themselves and the caster when they hit. As a rare spell, it has no ranks. Increasing charm mastery increases the damage the skeleton does. Cooldown is longer than regular skeleton I believe.
Didn’t find during this run but I believe this is a pretty good summon if you can actually find one. Also should be fairly decent on your pet, letting the pet summon something of actual value.
Summon Flaming Sword / Summon Aloe Gel
These two summons are not recommend, primarily because they are not Charm spells. The Flaming Sword is cool looking but has a lengthy cooldown and is an Offensive spell. Aloe Gel is a rare Defensive spell. As a rare spell is has no ranks and it heals you and your allies.
Statistieken
Defence is generally every class’ secondary stat. It buffs your armour and resistances. As a summoner your pets will provide the majority of your DPS so you can go heavier on Defence and get enough of Magic for gear equipping purposes.
Magic boosts element damage you do but as you won’t be doing much DPS yourself it will serve as your secondary stat instead of being a primary stat.
Maybe keep a few points in reserve in case you find yourself needing to grab more of a stat to use a particular upgrade. Anders, you can socket in ember with buffs to the stat you require into free slots. You can check the gem vendor, sometimes they sell useful Chaos Gems.
For gear look for any bonuses to pets (damage and / or armour) if possible. Mana stolen on hit is useful in early game, late game you should have no real issues with mana usage. Otherwise health is useful for making you a bit less fragile and just look around for stuff that provides a lot of bonuses. Check for the blacksmith for upgrades when possible. The gambler is also a good way to get weapon upgrades, if you outleveled content then you can gamble up a better weapon from him – the build is not weapon focused but always good to have a good weapon in case you find yourself needing to burn down an enemy yourself.
Summon Basics
Pet AI and HUD is pretty basic. The AI will blindly try to attack the closet enemies, regardless if it can actually reach those enemies in their current position. This is a big issue in areas with changes in elevation. This can lead to annoying situations where your pets are trying to attack something on a higher level they cannot directly reach while ignoring enemies on a lower level and you have to try to coax/resummon them to get them to attack what you actually need them to.
You can change the stance of your main ‘pet’ (which is largely a loot mule really on Very Hard difficulty) and see their health, feed them fish to change their appearance and stats and heal them with pots and other healing items.
You can select from three modes for pet behavior by clicking the three icons under its status bar:
- Aggressive means the pet will seek out and attack any nearby enemies.
- Defensive means the pet will only attack if the player attacks or is damaged by an enemy.
- Passive means that the pet will never attack or cast spells.
I’d recommend setting stance to Aggressive.
Feeding fish to your pet can temporarily (or semi-permanently) transform it into a different creature, with different stats and abilities. Fish can be acquired via the fishing mechanic. Vendor in town sells fish that can return your pet back to default version if you wish. The new transformations are pretty much all better than the default pet stat/ability wise I think. Fishing is boring through and permanent upgrades are ridiculously rare so you’d need to apply new fish fairly often.
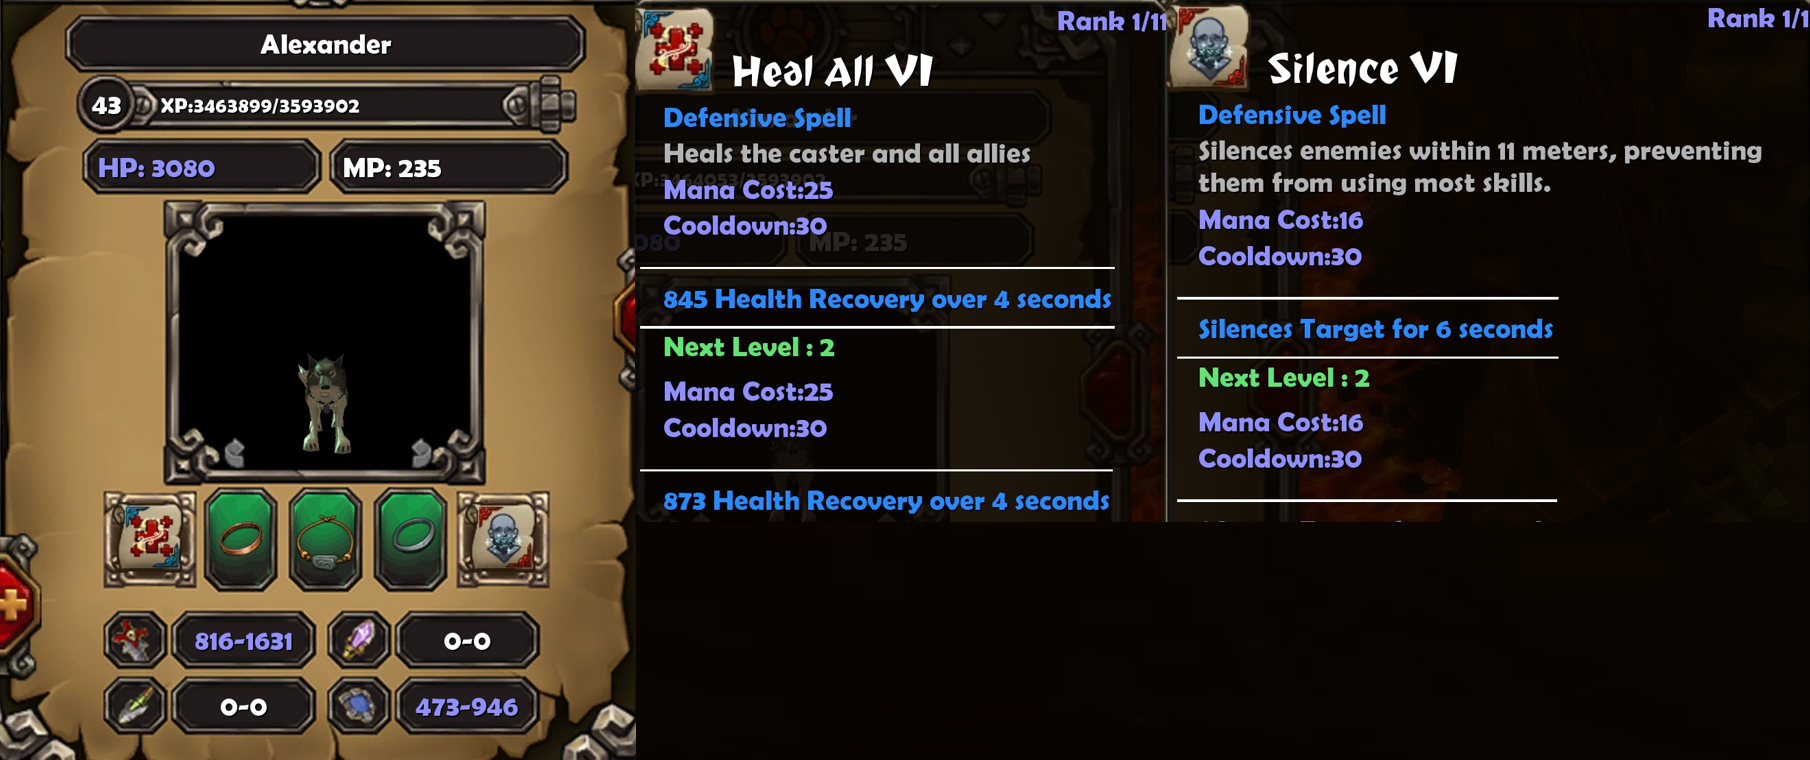
Your pet can be equipped with two rings and a necklace and two scrolls. You can toss your current rings/necklaces to your pet when you replace them with an upgrade. As for the scrolls, I like giving pets largely utility related skills.
Some suggestions:
- Heal All – have your pet heal your posse for you
- Silence – Silence nearby enemies to prevent them from using skills
- Web – Fires a sticky web missile, preventing any movement from its target, useful CC
- Summon Blood Skeleton – Summon a powerful pet
- Summon Skeleton – Not as good as Blood Skeleton and has a long cooldown compared to you but still okay
- Frost – Fires three frost missiles that freeze all enemies within their blast radius
I would not recommend adding Skeleton Archers or Zombies to your pet. Archers require too much positioning to be useful on your pet and zombies are too slow.
Unfortunately there is no HUD in Torchlight for seeing the creatures you have summoned. So if you want to know how many nether imps you currently have summoned, Bijvoorbeeld, you’d have to eyeball it to see if you’re below the summon cap.
There’s also no way to control minions from what I could tell. They just try to attack anything close to them. So you can’t force move them or force them to attack particular targets. You just have to retreat sometime to regroup them or resummon closer to what you want sometimes.
Basic Walkthrough
Mijnen
Set your pet to Aggressive. Stock up on pots in town, try to stay back and try to kill from afar. Ember Bolt will serve as an effective range attack in the beginning before effectively becoming a dead point in your skill tree mid campaign. Replace your starting stave with a wand + shield ASAP, it’s much safer and more effective. Alchemists can die very quickly if enemies get within range.
Put your early points into Nether Imp for your first summon, maybe a few into Armour Expertise to equip gear faster. Put points into Nether Imp whenever an upgrade is available.
Check the gem seller vendor in town for summon scrolls to pad out your army a bit and replace them with upgrade ranks when you find them. Browse the blacksmith, he can be a good source of reasonably priced upgrades at times. The Gambler and Enchanter can be left until later. The Gambler is very expensive but can be good late game if you try to outlevel content in the campaign dungeon from grinding a bit as you can gamble up some better quality gear than you would find farming easier content in story dungeon. Enchanting is incredibly powerful but also incredibly risky and expensive. You’ll want to build up a bit of a nest egg for either of these and for enchanting you’d want a backup piece of gear in case the item gets its stats wiped.
Necropolis
As you level up Nether Imp, starting picking up Ember Shield for more surivability and Pet Mastery passive to buff your pets. Continue what you were doing in mines, summon pets from scrolls, using wand/ember bolt to kill stuff as required. Keep your distance and use your pets as meat shields. If required retreat and regroup.
Keep a special eye out for spectres. These can teleport to your current location and if you’re not careful quickly kill you if you don’t react in time. When you see them vanish, immediately starting moving from your current position. They will appear where you were standing when they vanished so if you move immediately you will successfully avoid them.
If you kill a phase beast you can open a phase portal. These open a small mini-dungeon that are scaled to your present level. You cannot open a town portal here and can only exit the min-dungeon via the portal at the end. Early game these aren’t too bad but if you’ve been outleveling content these can be absolute death traps as they scale to your level and not to the zone they were created. So you might find yourself in a dungeon you cannot escape from, surrounded by enemies that can slaughter you in one hit while you cannot do much damage to them if you’re using lower level gear found in the zones you were in. In werkelijkheid, if you’re playing Hardcore mode I’d recommend always skipping phase portals and if you ever see a phase beast run the hell away from them without even killing them to avoid accidentally killing one and entering the phase portal by mistake.
Map scrolls can also be purchased from the gem vendor. These have particular level ranges that enemies will be and will be scaled either to your level or to the maximum allowed level of the scroll. So if you have a lvl 10-20 map scroll and enter at level 15 it will be scaled at lvl 15 but if you enter at level 25 if will be scaled at lvl 20. These can be decent ways to farm extra exp but safer to try to outlevel the map a bit. Ook, spawns are random so you can potentially get nasty stuff like Dark Zealots early by going into the maps.
Personally I think it’s safer to farm the campaign dungeons. The campaign floors eventually respawn after you clear a number of other floors and you can clear out the lower level content easier and no exactly what enemies to expect.
Esterian Ruins
By now you should have access to Alchemical Golem as an additional permanent summon, Adventurer to speed up grinding exp/fame and Charm mastery to buff your Charm spell scrolls. Drop a single point in the golem to unlock it and drop one point in Adventurer every level up while using fame level ups to level up Pet and Charm masteries with points put into Ember Shield when you feel like you need more defence.
This zone is fairly easy overall but keep an eye out for some of the smaller pygmies as they can be quite and quick and hard to see.
Tu’tara Caverns
Unlock Terror as a one point wonder. Use this to CC enemies that get close to you. You can use it to fear the enemies that spawn from the huts before they can do anything as well. Keep leveling up Pet and Charm Mastery, and maybe a few extra points for Armour Expertise and Ember Shield.
Some of the enemies have charge so try to summon archers in front of you to grab aggro and herd your army in front of you the best you can. If you do get charged, I’d recommend using Terror, re-applying Ember Shield, potting and possibly applying Terror again or retreating. Play slowly and intelligently.
Molten Prison
Start pumping up Burning Bind, it’s an incredible buff and further level up Ember Shield for more survivability.
This is one of the most frustrating zones for a summoner. Lots of changes in elevation everywhere which really confuses the pet AI. Total LOS nightmare. Try to herd your summons the best you can and play very carefully and slowly. Watch out for Goblinhounds as they have a nasty charge attack and goblin archers as the dynamite attack they do can do tons of damage if you don’t run out of its range.
Dwergfort
Drop single point into Beam Golem and Ember Sentry the finish maxxing Burning Bind and Ember Shield if you have not done so.
Honestly a much easier zone than Molten Prison. Not as annoying height/LOS wise and while enemies can kill you fairly quickly if you let them attack you in melee, you should be able to keep them away from you without issues. The only really dangerous enemy here imo are the little laser bots as magic damage is incredibly over-tuned in Torchlight and they can take your health down surprisingly quickly if you’re not careful so you should make sure to keep your pets between them and you.
Black Palace
The final campaign zone and the most unbalanced. Dark Zealots are just bull doing stupid amounts of magic damage. Magic damage has terrible damage scaling, your resistances simply can’t keep up. Their dark lightning can destroy most of health bar in a single hit and is practically impossible to avoid. Their poison attack can kill you if all the projectiles hit but at least it’s actually possible to evade the projectiles. The Blood Disciples can dash towards you and quickly starting killing you so keep an eye out for them. The other enemies are not much of a threat in comparison to these guys.
If you’re in Hardcore I’d recommend doing some serious level grinding first (either farming previous compaign floors that have respawned or using map scrolls which aren’t too high level) before daring to enter. You want max Ember Shield, very good gear that has been enchanted a lot, enz.
Playing normally you can expect to reach the final boss (Ordrak) probably around level ~30-35. This is no where near enough to actually take him on through in Very Hard difficulty. He has a ludicrous health pool and will mass summon swarms of enemies to smite you. He’s insanely more difficult than the Alric boss fight you just completed to reach the final waypoint and his lair. You’ll want to do additional level / fame grinding to at least level 40+. Ook, gamble and try to get some cool Epic uniques or other upgrades and check the Blacksmith for useful upgrades and enchant them up a few times.
My Post Ordrak Char
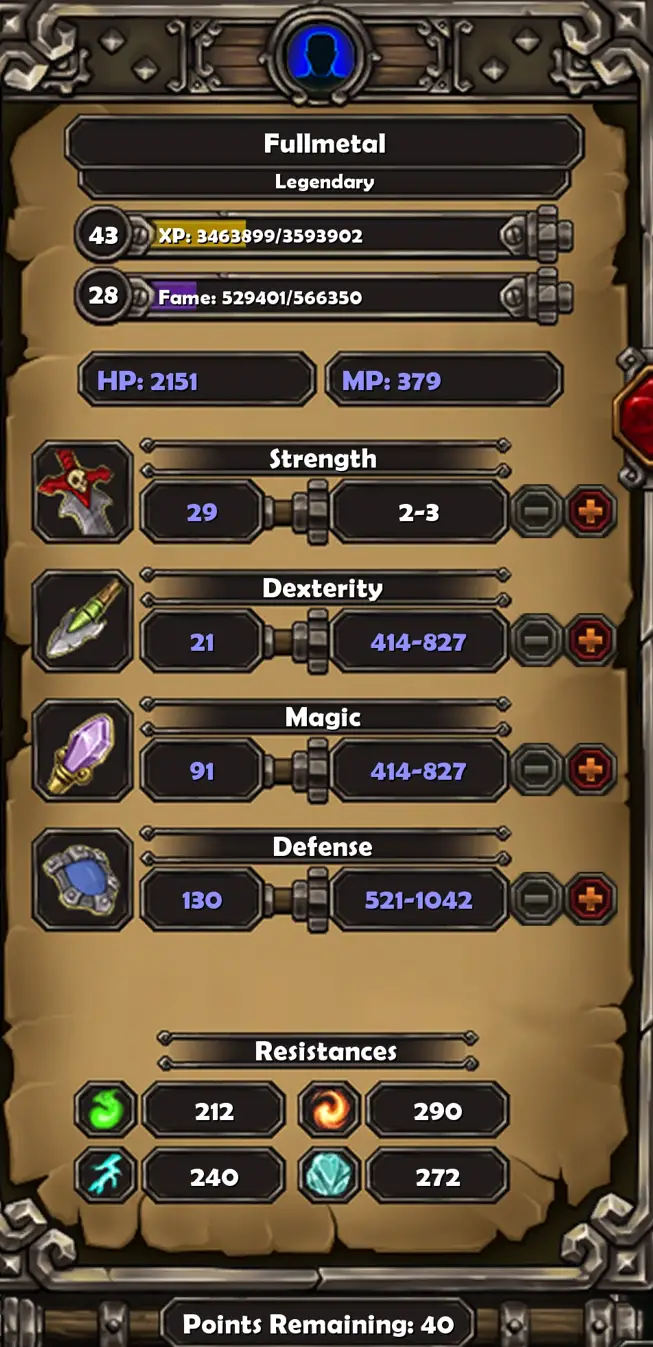
FYI, my final char stats after defeating Ordrak:
Enough points into Magic to equip gear, the rest into Defence. Had a bunch of extra points I forgot to spend as I leveled up a bit to take down Ordrak. I was keeping a few originally in reserve in case I needed to assign a few points to equip new gear.
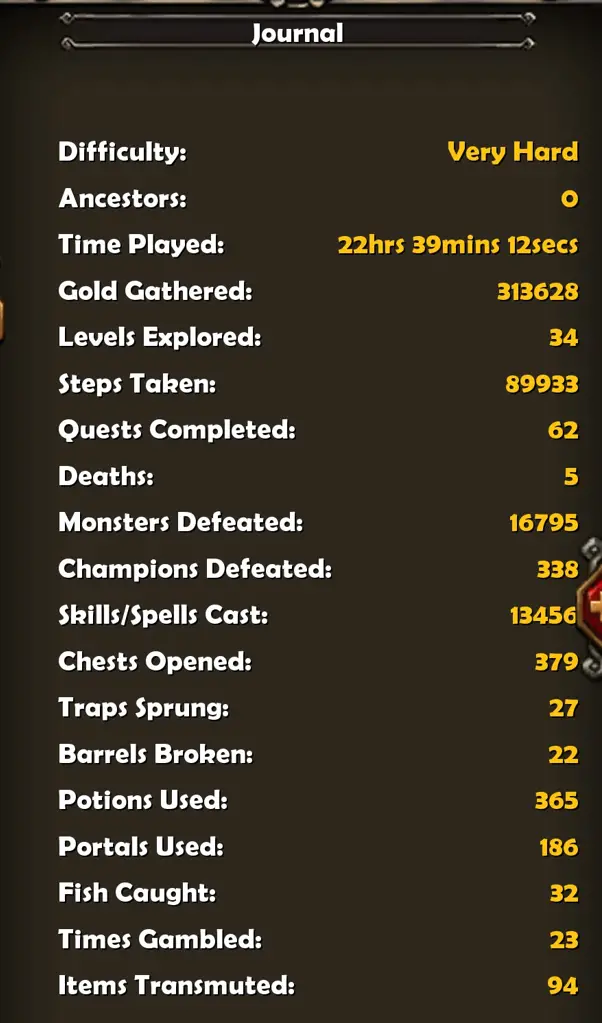
Tijdschrift:
In case you were wondering two deaths were from getting instantly killed in Black Palace (probably by a dark zealot), two deaths trying to fight Ordrak when I first reached him before remembering that he was stupidly OP and one death from entering a lvl 40 map portal and getting 1 shotted by something I couldn’t really see properly in a jumble of bodies.
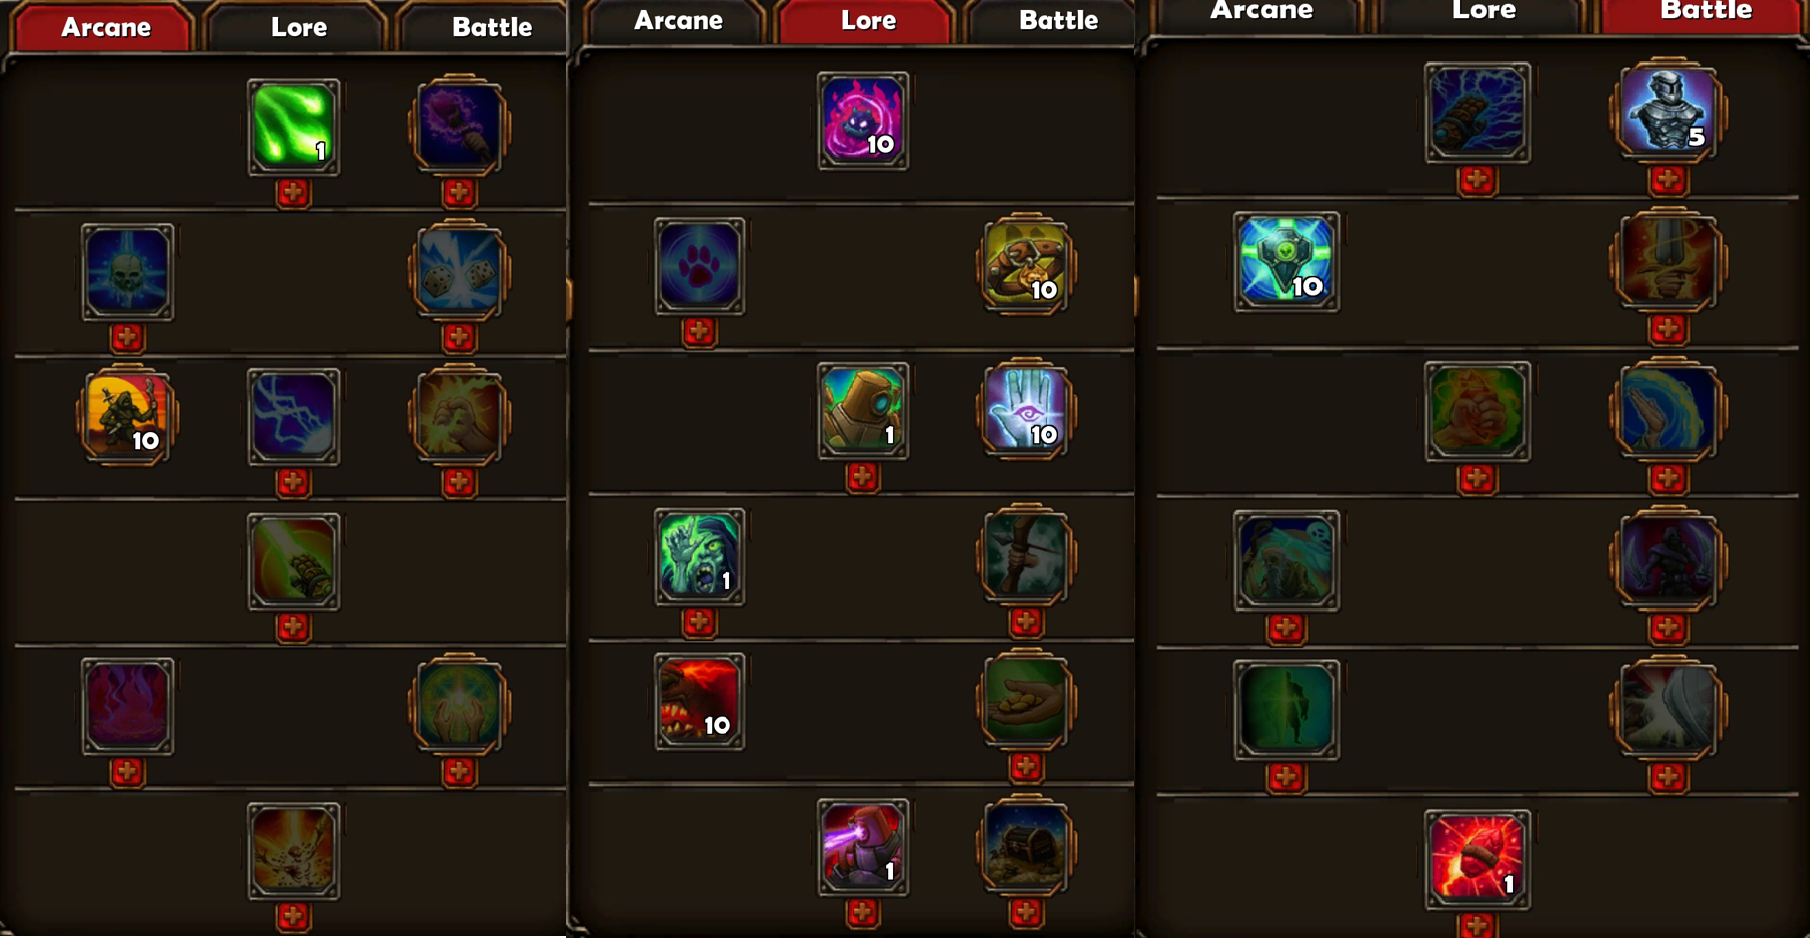
Final skill trees:
Hotbar setup:
Two hotkeys for pots if required. Four for my scrolls. Mouse click is used for Burning Bind buff, tab is used to switch to summon Beam Golem. Don’t have enough slots of Ember Sentry so have to change one hotkey temp to summon it before swapping the key back to normal summon. Do this for Sentry because it has long cooldown.
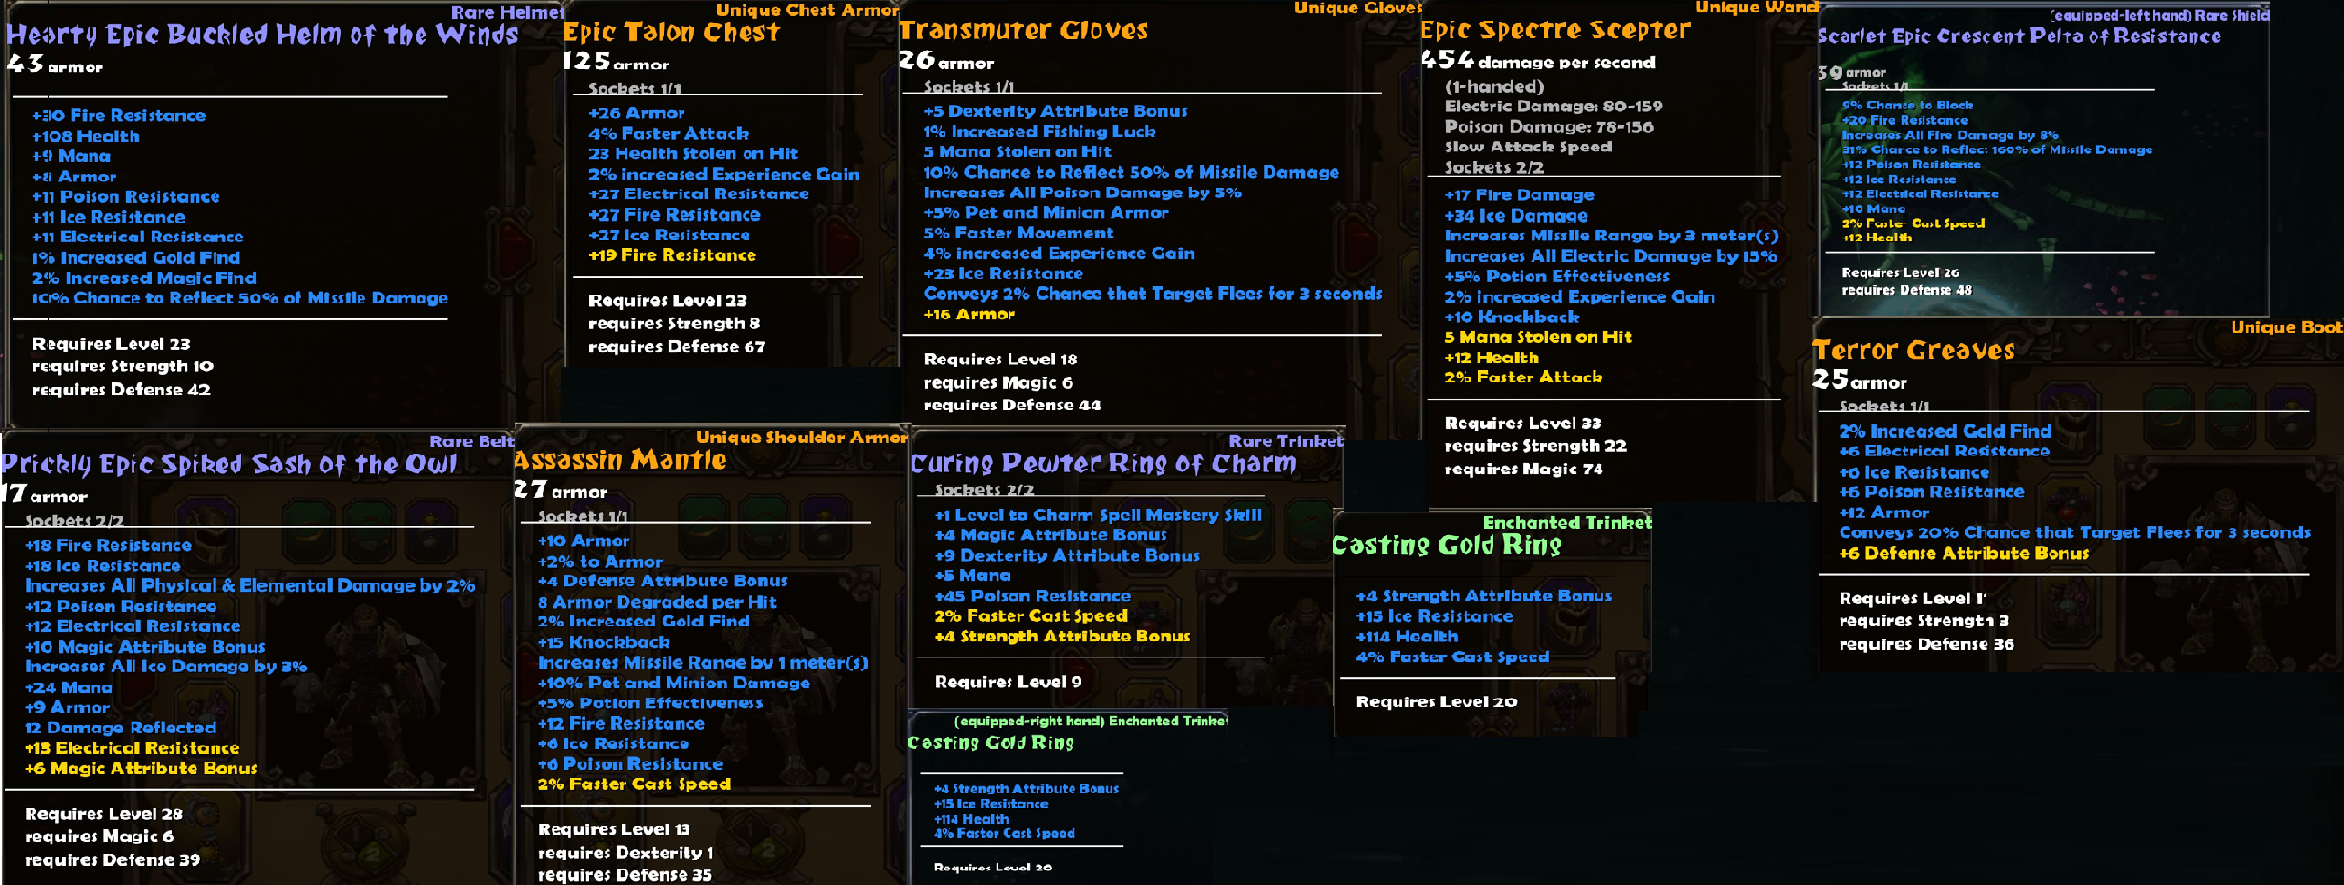
My random collection of gear equipped. I’ve enchanted most of the gear a couple of times but didn’t go too crazy on enchantments to keep disenchant risk at a min. When possible used Shrines of Enchantment for gear that has already been enchanted a couple of times as it has half the wipe risk.
My final spell scrolls. Earlier on I used Summon Zombies but dropped that for using a pair of Summon Skeleton scrolls to quickly spawn out troops as I move. Zombies just too slow at times. If I found a Blood Skeleton scroll I’d probably have used that instead of the Skeleton V scroll. Archers are for positioning in front of me and do good DPS. Heal All just for some extra support. That can be replaced with other defensive or additional summons if required.
My pet stats and scrolls. Using Heal All for healing support for my summons and Silence as utility.
Dat is alles wat we vandaag hiervoor delen Torchlight gids. Deze handleiding is oorspronkelijk gemaakt en geschreven door chris.ferrantegerard. Voor het geval we er niet in slagen deze handleiding bij te werken, U kunt de laatste update vinden door dit te volgen link.
