
- Titel: Night of the Dead
- Releasedatum:
- Ontwikkelaar:
- Uitgever:
Information about Night of the Dead is still incomplete. Help ons alstublieft de details van het spel hiermee in te vullen contactformulier.
Hallo! I’ve been an avid player of this game since its release! In this guide I’m going to be sharing a lot of various tips and tricks I’ve picked up along the way. Spoilers abound, if you’re looking to have a fresh experience with this game then bookmark this guide because you will want it later, but don’t read it now. I’ll try to keep this guide updated with relevant info.
How to have 2 versions of Night of the Dead
One annoying thing that comes up a lot is that the updating of this game takes forever. Ook, sometimes we don’t like the updates and want to keep playing our base on the other version. Geen probleem. As long as you have the hard drive space for it then all you need to do is have two copies of the game.
Simply locate the install directory of your game, Bijvoorbeeld, mine is here:
E:\SteamLibrary\steamapps\common\Night of the Dead
It is the folder which contains the file: LF.exe
Simply make an exact copy of that folder to another location in order to clone that version of the game. Bijvoorbeeld, I simply put mine here:
D:\NOTD\LF.exe
Now create a shortcut to that file LF.exe. Whenever you launch the game from that file it will launch that version of Night of the Dead. You will need Steam running in order to play. It will probably only work in single-player games. When Night of the Dead updates, it will update your original copy only. Steam will not touch your cloned copy.
This means that when the original copy is being updated, you can simply go plug away on your backup copy while it updates, and if you don’t like the updates well…
The other good thing about having a backup copy of the game is that you don’t need to bother copying your character or save data also. It should all automatically be accessible through either version of the game that you decide to play, Echter, sometimes old saves still can not be handled by new game versions so be aware that you may not be able to play your old data with the updated copy of the game. The files will still all be listed for you but they will not load properly. For this reason you may want to adopt a way of marking which saves are for which version because they are mixed in your save screen. 😀
Nu, if you’re searching for an older version of the game, you could look to the BETAS menu. Open the Night of the Dead properties page in Steam (Steam -> Library -> NOTD -> right-click -> properties). From the screen that pops up select BETAS from the menu on the left. If you choose v.1.3.x then close it, the game will want to update (downgrade) to version 1.3. Once you have done this you could make a copy of it then opt back out of the BETA. Then you could always play the old verion 1.3 single-player using the LF.exe shortcut and play the new version 2.0 that Steam always keeps updated in the multiplayer games online.
Playing Night of the Dead
– Establish a camp somewhere near where you start, look for a relatively flat area that you can build a foundation on.
– Be able to build a few traps on a foundation to survive the first night. I made like 5 of 6 traps my first night by following the tutorial and winning a couple trap machines as prizes for completing tasks. You will have to scavenge the copper to make the other trap machines. Break down coins that you find into copper bars then make it into copper wire at the proper work bench.
– Make a wrench as soon as possible. It honestly took me 3 days the first time but that’s awful. You have to do better.
– On night 5 they send the first exploding zombies at you so upgrade your base to stone before day 5 wave so the exploding zombie doesn’t cause a fire to burn down your wooden base.
– Create a dirt bike to explore faster with. first thing to do is to go after some books. Go on foot if you have to. Some research just needs to be done early. Figure out what you need. I’d focus on engineering and being able to build electronic components.
– Build an MRL before the day 10 wave to be able to defeat the giant zombie who’s coming. If you didn’t make it that’s OK, you can take him down with a lot of bullets. Be prepared though, you will now have to defeat at least 1 giant every-other night from now on (with normal game settings).
–
[this is a work in progress]
The Master Circuit
I don’t call it the master circuit because it’s the best ever, but because it’s the nervous system of your base. It’s a crucial component, so let’s have a look at it.
When I build a base I build big so I also need to have a massive electronic power grid. Every time Jackto forces a restart I have to rebuild the base over again and you know, that means also rebuilding the grid. This has been both good and bad, good because it forces me to start over and sometimes I improve the design then. Bad because I have to remember how to rebuild it each time.
So I drew up these diagrams to help me remember the wiring patterns I already have on paper and in my head. I drew these up so that maybe people who don’t understand all the wiring this to that can now take a look at a complex circuit and see what all goes in to supporting a base that gobbles power like a memory leak.
Algemeen, if you’re planning to use more than just a couple plasma shockers then you’re going to have a pretty big need for power. Well I’ve sat and done the math (I know there’s no wiki for all this yet), and this is what I came up with. A circuit that uses a storage and retrieval system that doesn’t leave any battery with power in the backend when power is needed in the frontend.
This grid is not perfect. It has a bottleneck where I combine power into 5 main lines. But I’ve run this circuit under heavy loads and it’s a beast under pressure. That’s why I finally drew it. So I wouldn’t forget.
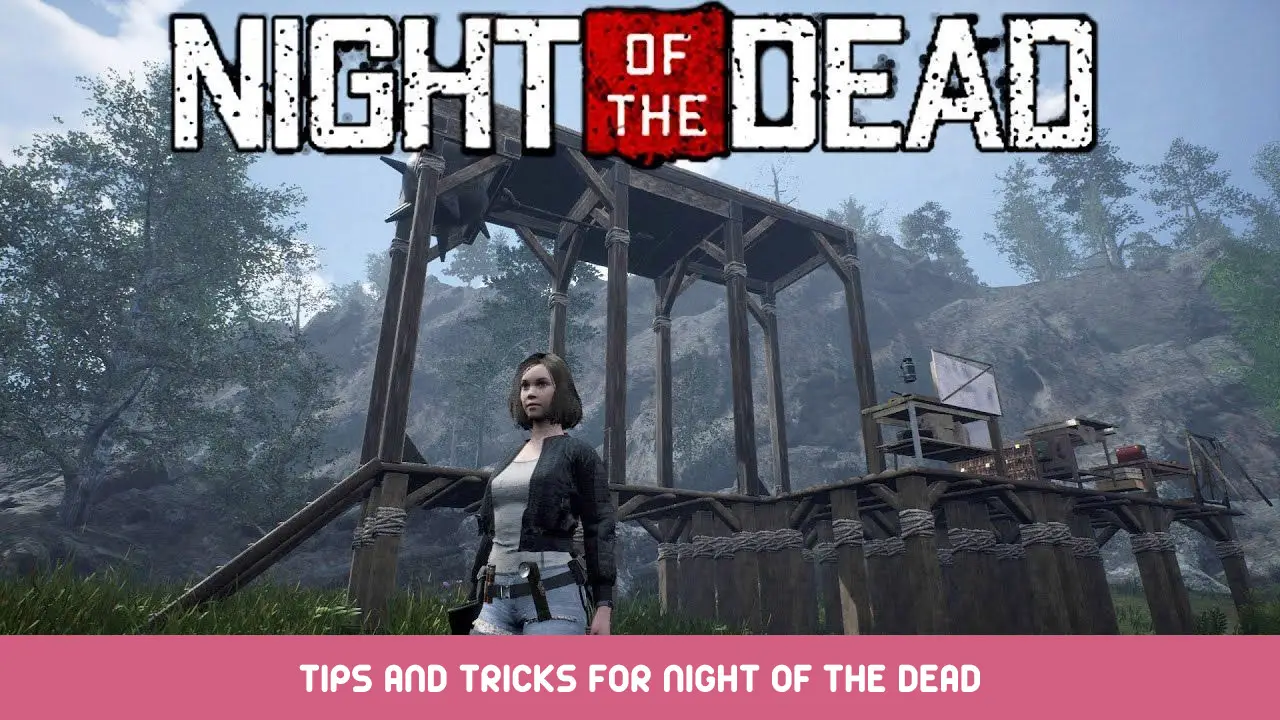
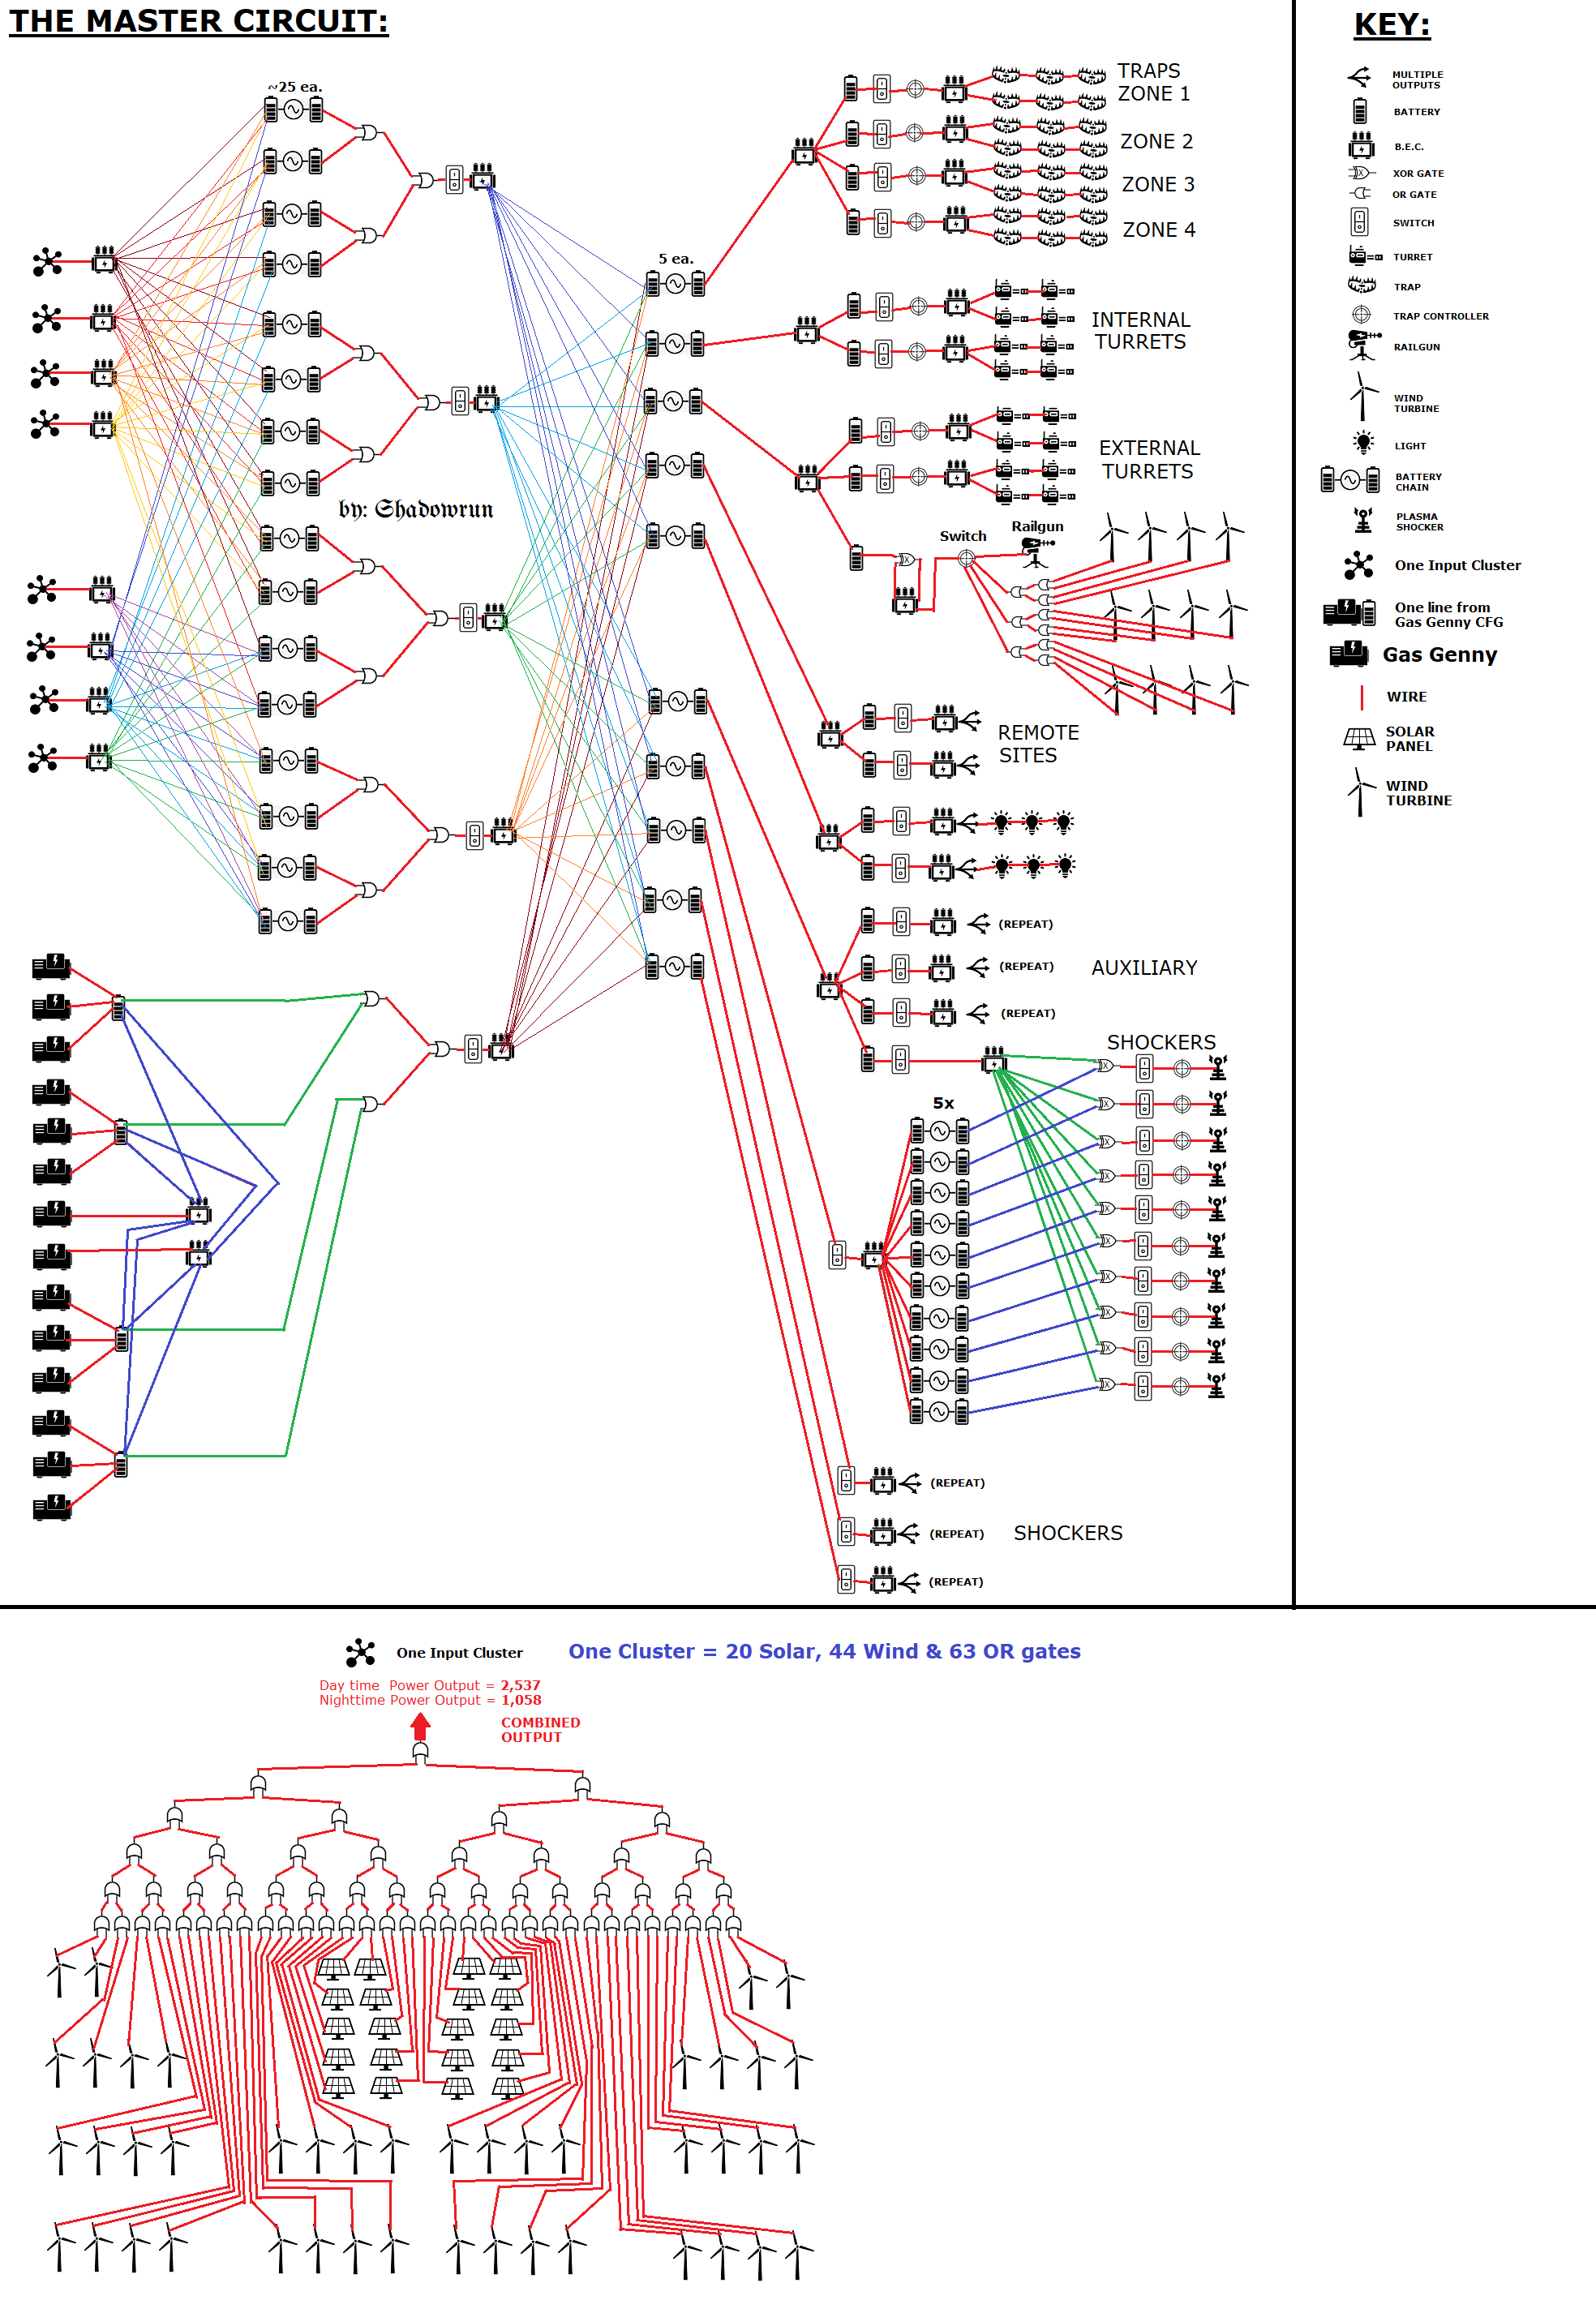
Master Circuit Phase 1: Input Cluster
This is Phase 1 of building a complex master circuit in Night of the Dead. Fase 1 is the creation of your solar panels and wind turbines to create energy. We collect the energy and combine the power using OR-gates until it is compressed into one main line. Most upgraded electronic devices that you can build support a maximum of 2,500 power per second (pps). This setup was designed to create that amount of power in one line (during the day). At night there is still enough power to support all the auxiliary systems (1,000+).
Het neemt 126 wires to connect one cluster. I call them clusters. They look like this:
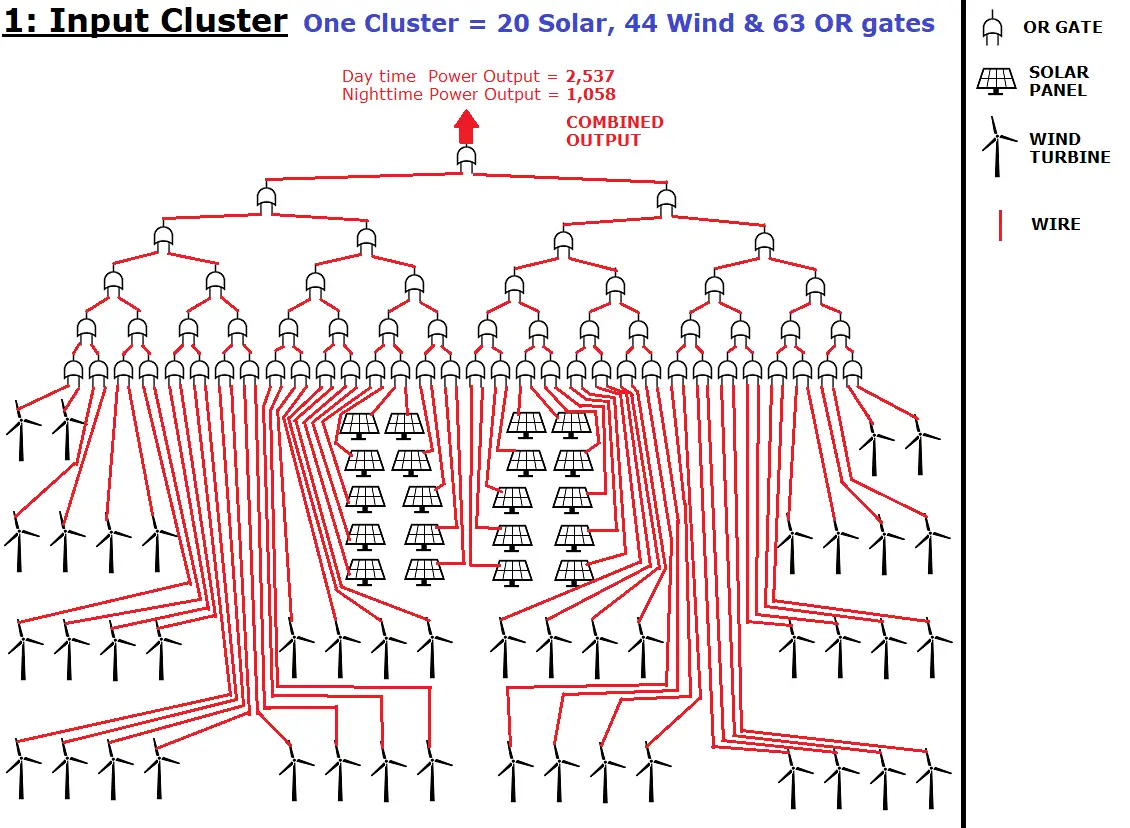
Master Circuit Phase 2: Gas Generator Configuration
Fase 2 of the master circuit. In this config I use 14 gas genny’s and configure them like this. De 4 batteries can be used to monitor how much power has been generated and is awaiting shipment out to the main grid. So they are the buffers. If these 4 batteries fill up then shut off the gennys until they can send the power out.
You also don’t need to upgrade those 2 BEC’s but you should upgrade those batteries for sure. 🙂
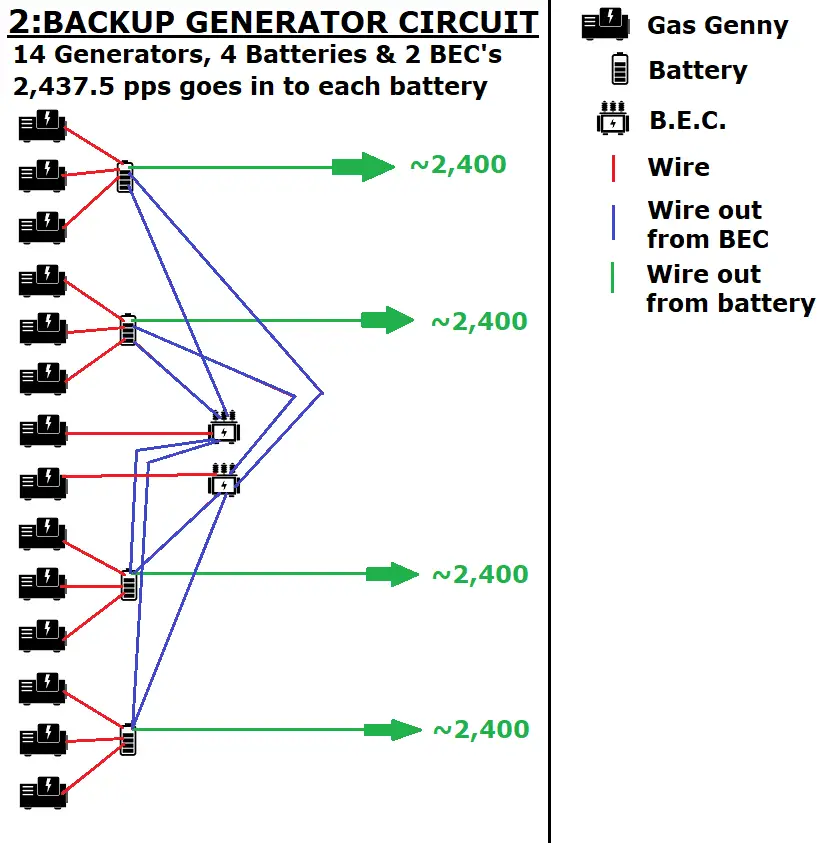
Master Circuit Phase 3 – Storage Method
So Phase 3 is storage. We’re producing power now let’s store it. This circuit allows for a maximum of 8 power input Clusters. I didn’t do the first set of colored wires accurately but it’s close enough. You send each cluster to a BEC then 10 lines out from each BEC to an array of batteries. This array consists of 16 chains, each of mine are usually 25 batteries in each chain (lijn). This would be 400 batteries in the storage array. Make sure they’re all upgraded. The BEC’s too. It all gets upgraded to maximize the power output.
On the output end of the storage array you can see that we combine the chains again back down into 5 lines. Now each of those 5 lines again connects to a BEC which again output to 10 more chains of batteries. These batteries will serve as buffers for when emergencies happen and power loss is great, the buffers can keep some important systems going through the rough time. For me I always build dozens of shockers so the power drain is great. I don’t want those to cause my MRL’s to stop firing or the maze traps to stop working.
The gas generators actually bypass the massive storage array and go straight to the buffers. That is emergency power and I want it to quickly move to where it’s needed, not get lost in the storage array.
You will notice that with this storage and retrieval method, the power can’t really get lost in the array. Each battery chain get accessed by some retrieval BEC at the other end. The only place you will start to see power not being used when you have some system that desperately needs it is right here in these buffers. Buffers hold power in reserve for specific systems. If a massive power drain is caused though, it may be awhile before power reaches this branch again.
Now you have 10 lines going out and in Phase 4 I will show you how I spend all this power we’ve amassed.
183 wires to connect all of this and be ready because the batteries DO drain auxiliary power, so don’t go building a mass of batteries until you have a mass of wind turbines first.
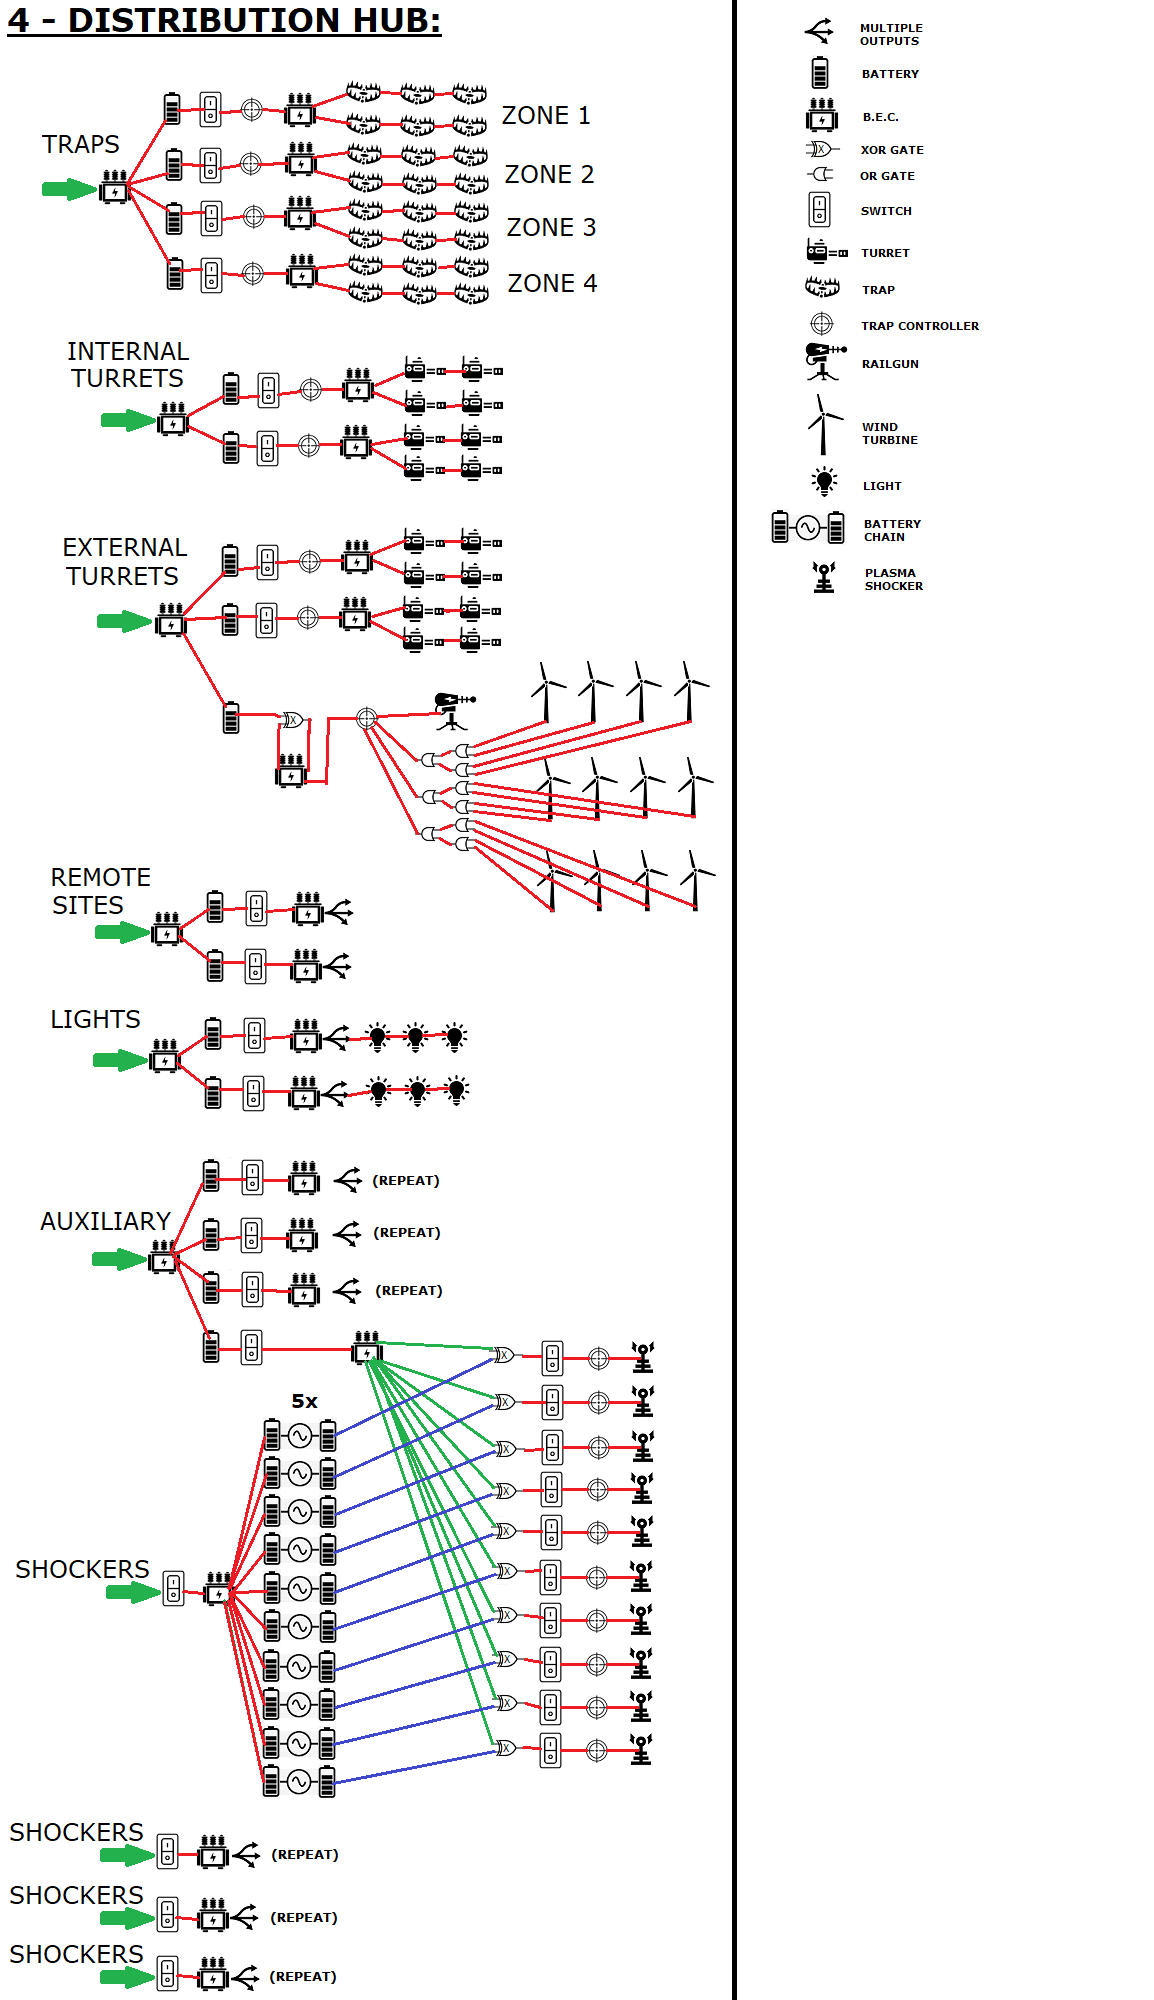
Master Circuit Phase 4 – Distribution Hub
This is the end of the line. This is where power gets spent. This setup can support up to 40 plasma shockers although I wouldn’t recommend running them all at once or all the time for that matter.
OPMERKING: The railgun circuit is included in this diagram so that it won’t always blow the circuit. You can use a gas genny if you want instead of the 12 wind turbines but then you have to pay for the gas bill. Plus you’re way overproducing power then. With this setup the 12 wind turbines exactly cover the auxiliary power needed to keep the thing from blowing up all the time. If it blows up on you too much (it will blow on occasion), then try adding 1 wind turbine and connect it directly to the TC. There should be 1 port open.
OPMERKING: This diagram includes running 10 shockers on 1 switch. Please note that the switch will operate backwards, to turn the shockers on, the switch needs to be flipped off and vise-versa.
The XOR gate requires power from both sources in order to shut a shocker off (the main battery which powers it and the power from the master switch BEC).
If a battery loses power then the shocker will come online drawing power from whichever source still has power. This is not good as it will continually drain power and prevent the battery you need to recharge from charging up. This is why I put the extra 10 switches in (one for each shocker). This was initially installed as fail-safe in case I needed to flip a shocker off in this kind of situation. It ended up becoming pattern control for me because I like to build 4 lines of these 10x shockers.
I’ve had a lot of good fortune working with this master circuit design and I hope that you will too. Enjoy! 🙂
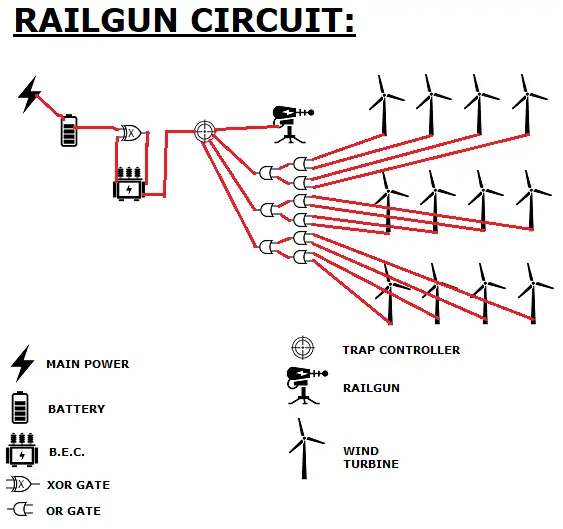
Here is specifically just the railgun circuit:
Here is the entire circuit in one image:
Important locations
Er zijn 6 mineral mines:
1 Aluminum mine near the east city:
45.57N 171.87E
2 Aluminium + Magnesium mines in the desert biome:
38.35N 170.5E
34.9N 163.76E
1 Titanium mine near the southwest city:
37N 158.57E
2 Titanium + Gold mines in the tundra biome:
52.45N 156.55E
53.4N 163.52E
List of Dedicated Server Hosts
I’m going to post this list because the official servers are still plagued with cheaters still and people are still looking for solutions to play this game with their buddies online. I had to go search all this up and it was kind of a pain. No good list out there to reference (well OK a couple).
Pro’s of having a Dedicated Server:
– Your buddies can play even when you’re not there to host the game. Game is 24/7 live if you want it to be.
– Your PC doesn’t have to carry the load of processing everything so the game should run faster / better / more stable, especially when multiple other clients are connecting.
– You can control who gets to play there by using a password and / or the ban filter. No more WeMOD cheaters. You can also flip it off if you don’t want it used when you’re not there.
– If the game gets messed up you can simply restore a backup (similar to loading a save game).
– The official servers can reset at any time to day zero and force you to start over. With your own server you start over when you want to (or when an update forces us all to).
– You don’t have to worry about saving the game all the time, the server is constantly saving automatically for you.
– When my game crashes I worry that I lost progress but I swear each time I log back in and pick right back up where I left off, it’s craaaazy good.
– They’re not that expensive. I eat $10 of $15 a day easily. In one meal sometimes. So in this sense I am willing to buy the hosting company one meal a month for hosting my game for me. Overeenkomst.
I use GTX Gaming. They run out of the U.K. Been using them for months and it’s been a really solid service, I highly recommend them. I chose them because they are the cheapest one I found at the time I was looking that has good Night of the Dead integration.
All these hosting companies have integrated with Night of the Dead already so it’s easy to setup and use. I already checked over each web site to make sure it looks solid. Each link will take you to the hosting companies NOTD page.
GTX Gaming: $9.60 /mo.
https://www.gtxgaming.co.uk/night-of-the-dead-server-hosting/
My Black Box Hosting: $10.20 /mo.
https://www.myblackboxhosting.com/night-of-the-dead-server-hosting/
Zap Hosting: $12.14 /mo.
https://zap-hosting.com/en/night-of-the-dead-server-hosting/
Ping Perfect: $12.28 /mo.
https://pingperfect.com/gameservers/night-of-the-dead-game-server-hosting-rental.php
G-Portal: $14.00 /mo.
https://www.g-portal.com/en/gameserver/night-of-the-dead-server-hosting
Citadel Servers: $14.54 /mo.
https://citadelservers.com/game-servers/night-of-the-dead-game-hosting
Host Havoc: $15.00 /mo.
https://hosthavoc.com/game-servers/night-of-the-dead
Blue Fang Solutions: $15.00 /mo.
https://www.bluefangsolutions.com/shop/night-of-the-dead/
1G Server Host: $15.00 /mo.
https://1gserverhost.com/night-of-the-dead-server-hosting/
4net Players: $15.01 /mo.
https://www.4netplayers.com/en/server-hosting/night-of-the-dead-server-rental/?referer=https://www.nightofthedead.org/
Logic Servers: $15.72 /mo.
https://logicservers.com/game-servers/night-of-the-dead
Survival Servers: $16.50 /mo.
https://www.survivalservers.com/services/game_servers/night_of_the_dead/
GG Host: $25.25 /mo.
https://www.gghost.games/store/nightofthedead
And of course if you know how to do it, you COULD use the Google cloud or amazon AWS. They have a free 30 day trial but after that it could run you up to like $300 a month :P
Or you could also run your own dedicated server if you’ve got the hardware yourself. Volg de gids in the pinned topic about dedicated servers for configuration details.
Dat is alles wat we vandaag hiervoor delen Night of the Dead gids. Deze handleiding is oorspronkelijk gemaakt en geschreven door Shadowrun. Voor het geval we er niet in slagen deze handleiding bij te werken, U kunt de laatste update vinden door dit te volgen link.