
- Titel: The Hand of Merlin
- Releasedatum:
- Ontwikkelaar:
- Uitgever:
Information about The Hand of Merlin is still incomplete. Help ons alstublieft de details van het spel hiermee in te vullen contactformulier.
This is an extensive and detailed guide setting up or debugging AI of units in The Hand of Merlin, written by its game designer Mat.
Invoering
In deze gids, I’d like to walk you through the creation of an AI, which can make an enemy unit use their skills on their own, against your warband.
How does AI work in The Hand of Merlin?
Our programmers chose to use the Utility AI paradigm. This means, in simple terms, that for every ability we let our AI consider, Het’ll try to rank the “utility” value of its casting in every single tile it can cast, and then compare all options, picking the one with the highest utility value. Het’s a great way to consider multiple options at once.
Specifically in our case, elk “Unit Class” has its own “Brein”, where we’ll describe options and the questions the AI makes to each target tile.
If that isn’t clear yet, maffiabaas’Maak je geen zorgen, laten’s go step by step.
Unit Brains
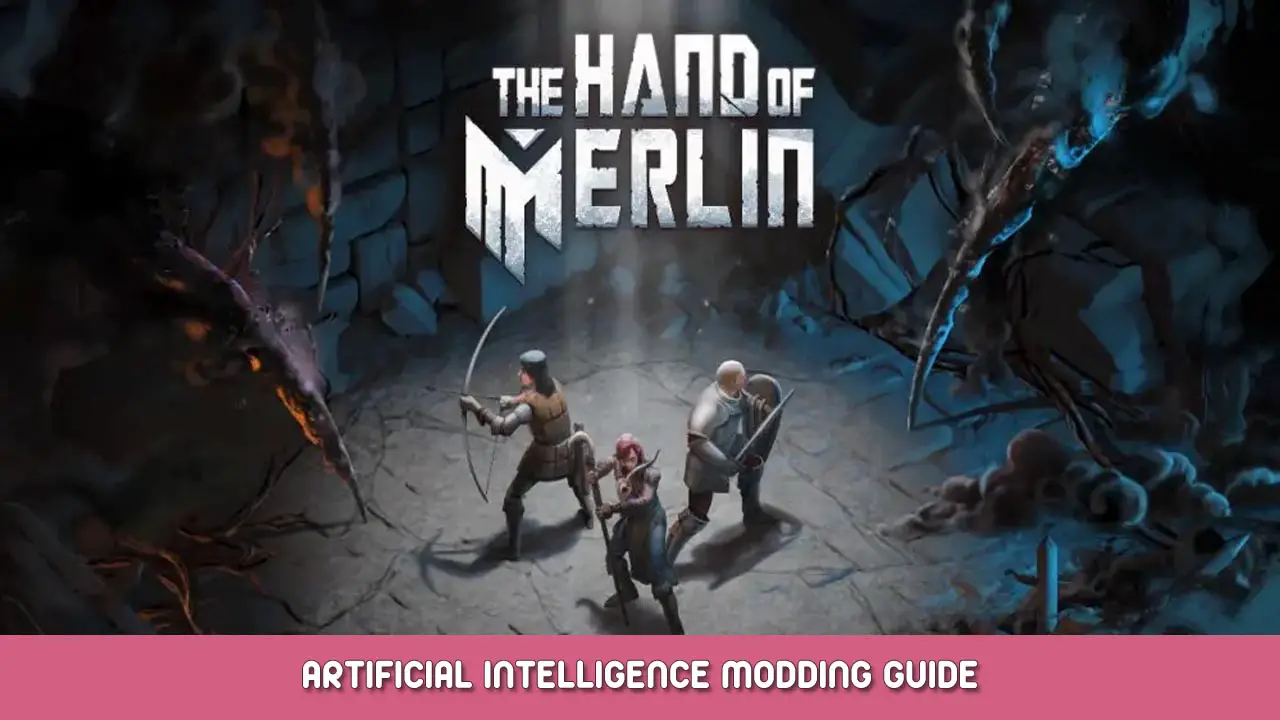
Allereerst, we have to create a Brein. A great way to do it is via the Create Menu (CTRL+N), and then selecting Generic -> (merlin) AI brain params.
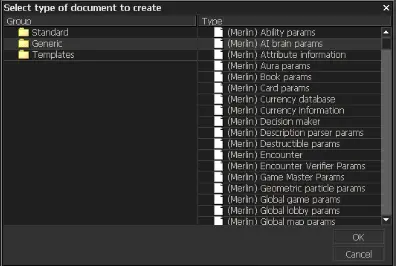
alternatief, if you already have a Unit Class file, you can create a new Brain directly on that file, and then open it separately.
Hoe dan ook, the result is a blank Brain file, like this one:
Be sure to save that puppy (we use the Content\Merlin\AI\UnitBrains folder).

Note that there’s not a lot going on here, as we still have to fill in the Ability Considerations, but there’s already something called a Unit Priority. I’ll take this chance to explain what Priority is.
It is, Goed, our “Utility” value for each action. During an enemy turn, since our game uses Side Initiative, all possible actions from all possible units will be ranked in how high their priority is, and they’ll be played in that order, as long as there are available abilities. As we’ll see shortly, the Ability considerations are the heavy lifters here, but if you ever want a unit to consistently play first or last, you might want to play with the Unit Priority, as this will multiply the priority/utility of everything that that specific brain calculates.
For an example on how that works, Behemoth has a priority of 3, en de Warlock (Support bandit) heeft 0.5. This usually makes the Behemoth play first, and the warlock after all other units.
Consideration Sets
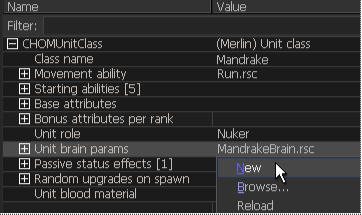
Nu, laten’s look at the Ability Consideration Sets. Hier, you should have at least one for every ability the unit has, but some abilities (like Run!) can have multiple entries.
Think of each Consideration Set as a question your AI can ask. In the example below, “If I am going to use Shoot, how should I use it, and is it more important than other abilities?”
Each consideration has 4 properties:
- A Label is for internal use only. Helps you identify them from afar, and will come in handy when we talk about debugging. Het’s like a name for that set.
- De Vaardigheid is where you list the ability this is in relation to. If the ability is not enabled for any reason (the unit doesn’t have it, it’s on cooldown, or it takes more AP than the unit currently has), this set won’t be triggered.
- You have a Priority to associate with the ability, which is modulated by the Unit Priority and the …
- Decision Maker, which is the actual calculation the AI does with that ability to each possible tile. Note how it actually is a file type on its own, so it’s a modular piece.
Decision Makers and Scorers

Found in the Content/Merlin/AI/Behaviours map, and always named with a `Behavior_` prefix, these are the building blocks of the AI. Technically, you can mix and match between those, but I recommend creating your own Decision Makers, especially if you have a specific behavioral pattern in mind.
Each Decision Maker is nothing more than a combination of Scorers, that take the priority of the ability and multiply it by some value. In the picture above, you can see that the Behavior_OverwatchDefensive decision maker, associated with Mandrake’S Prepare Shot ability, heeft 3 scorers:
- Gate_NoOverwatchAlly, which sets the priority to 0 if there’s an ally of Mandrake’s that is already preparing a shot;
- Gate_CanHitRangedAnyone, which will set the priority to 0 if the unit cannot find a target to hit (d.w.z. Het’ll never use overwatch if there is no one in range, likely preferring to just walk up)
- Score_DefensiveRating, which makes the priority lower if the current tile is a bit too in the open, making the Mandrake prefer to use Prepare Shot only if its behind cover (Wij’ll talk more about Defensive rating in a sec, maffiabaas’Maak je geen zorgen).
Note how they have a specific naming convention. All of these scorers, found in Content/Merlin/AI/Considerations, have one of three suffixes: Gates can set a priority to 0 of 1, almost like a boolean. Score tend to be more subtle, variërend van 0 naar 1, en Bonus can only have 1+ values, making something MORE likely. This is just my personal conventions though, and you can feel free to name them whatever you prefer.
To dive a bit deeper, Laten’s take a look at how Gate_NoOverwatch Ally works:
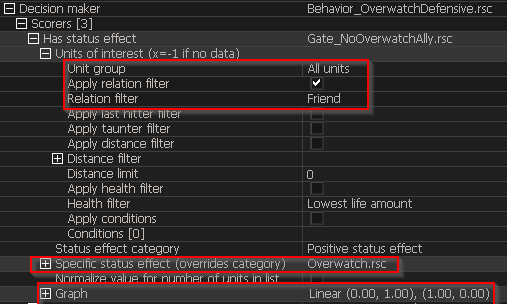
Allereerst, it’s of the type “Has status effect”, which is kind of the category of question. Wij’ll list all the questions and their base properties in a sec. Dus, we have to qualify the question. “WHO” heeft “welke” status effect. De “WHO” here is the Units of Interest. I can set it up to search for all sorts of units, like those inside an area, those with a specific health ratio, those with specifics relations, enz.
In dit geval, Wij’re searching for all allies, so we put All Units in the unit group, and we apply the relation filter, with the Friend filter.
Dan, which status effect? We could use a category (positive/negative/marker/hidden), but for this case, I just wanted to know who has the `Overwatch.rsc` status effect. And there you go.
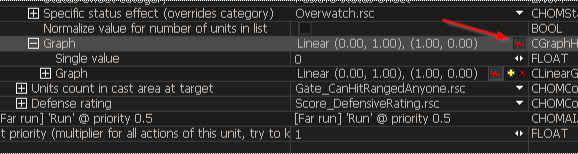
Dus, de Antwoord to this question will be a number of units that are my allies that also have the listed status effect. This will be plotted as the X value in the Graph entry.
To check out this graph in a more visual way, I suggest clicking on the the graph button, hier
Which grants you this visual over here:
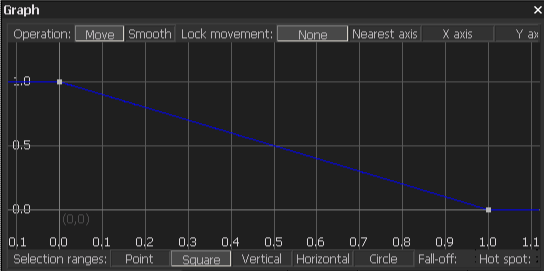
As we said, the X axis is the “answer” to the consideration’s question. The Y axis, Echter, is whatever we decide should multiply the Priority given a X value. In the example above, if the X is 0 (there are no allies with the Overwatch status effect), then we’ll multiply the priority by 1. Als, Echter, er zijn 1 or more allies with the status effect, then we multiply the priority by 0, cancelling the entire operation – Mandrake will not use Prepare Shot.
Hence the name – is a Hek to see if there are allies with the Overwatch effect!
All Scorers work in this same way, providing you with an X for you to decide what the Y should be. Hier’s a quick rundown of all the types, so you know what to look for. Trouwens, questions that are “Yes/no” result in 1 for yes, 0 for no, as expected.
Note that Offensive Rating en Defensive Rating are left for last, since they are a bit special.
Gate Types
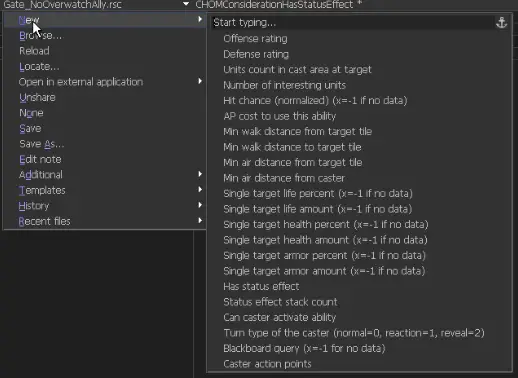
- Units Count in Cast area at Target: “If I aim an ability at a specific tile, what units will the target area of this ability find there?” Great for checking the effectiveness of AoE.
- Number of Interesting Units: “How many units are there of this type?” A more generic way of searching for units. Maybe your behavior is different if your unit is the last one standing?
- Hit Chance: “how likely an ability is to hit a specific target?”. Most ranged units will avoid taking shots against targets in cover!
- AP cost to use this ability: “what does this ability cost if I target this tile?” Useful if your ability can scale off AP, like Run.
- Min Walk distance from target tile: “Starting from the target tile, Wat’s the minimum distance to a unit of interest?” This is useful for movement abilities, to keep other units at a reasonable distance. Cockatrices use this to get close to allies, bijvoorbeeld.
- Min Walk Distance to target tile: “From here I am standing, how far is my target tile?” This works well if your unit wants to minimize/maximize traveling distance. Redcaps love walking around units, and this is what you use for that.
- Air Distance: Works exactly like Walk Distance, but doesn’t consider covers and other movement blockers. It’s a straight line, and uses diagonals well. Better for “proximity” checks, like Mandrake’s preference to shoot nearby units.
- Single Target X Percent/Amount: “At this target tile, if there’s a unit, how much Armor/Health/Life does it have?” Hier, Life stands for adding both Health and Armor. This is a good one if your enemies prefer wounded targets, or if they have armor-wrecking skills, they might prefer higher armored foes! Percent puts it in a 0-1 ratio, and Amount gives you the flat value.
- Has Status Effect: “Does my units of interest have a status effect?” We talked about this one before, but it works well for more complex behaviors if you use hidden status effects!
- Status Effect Stack Count: “How many stacks of the status effect do they have?” We don’t use this one, but it would work well for some “rage”-type effects, rechts?
- Can Caster Activate Ability?: “Can I use this other ability?” Good for checking if your ability is out of cooldown before you do something. Our Rogue bandit checks if their Shiv ability is cleared before it Sprints close, as an example.
- Turn Type of Caster: “What kind of turn is this?” Hopefully the X is self-explanatory here. This gives you a different result if this is the turn the unit was revealed, or if it is a reaction, like those granted by Redcap’s Watchful.
- Blackboard Query: “What information is out there regarding ability use?” this allows you to query which abilities have been used recently. Will help you sort out combos and similar actions!

- Caster Action Points: “how many Action Points I have?” If you want to prefer to do some actions at a specific action point count, this is for you!
- Defensive Rating: “How safe is the target tile?” This is an interesting one. The AI tries to estimate how defended a tile is considering all enemies and their ranges. Having this consideration associated with your movement ability makes enemies more careful, and favor covers, depending on how you set your graph. And yeah – the AI can even see what class each enemy is, and doesn’t care about getting cover against Warriors!
- Offensive Rating: “How good of a shot do I have at my foes from the target tile?” This allows the unit to rank how many enemies it can hit from the target tile. Higher X in tiles where multiple enemies can be hit without cover – add this to get better flanking behavior!
The combination of these last two can do wonders for the “persoonlijkheid” of your AI. Work a good graph to balance between “defensief” en “offensive play!
Do note: if your movement ability determines that the current tile is the best possible tile, the unit will just stay put and pass a turn.
Debugging
Small parting note, to help your testing out. When you are messing with new enemies in your tests, er is een Console Command that can give you some information about the end result of your queries.
To use it, when you are running a simulation, press the tilde key and type
hom_dbg_bEnableAIDebugging = 1
This will make it so that when the AI starts to consider their first turn, they actually print to the screen all actions with >0 end priority. Wanneer je klaar bent, set the same variable to 0.
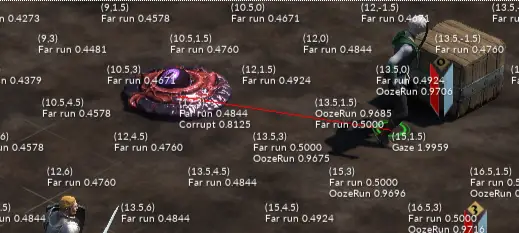
Hiermee, I can see that he could’ve used Ooze Run, Gaze, Corrupt, and Far Run, but Gaze wont out by a landslide, also noted by the red yellow line. Just right click to step through the process of every action, jij ook’ll see how your configuration ended up working!
There you go! Go forth and have some fun creating new brains for your units!
Dat is alles wat we vandaag hiervoor delen The Hand of Merlin gids. Deze handleiding is oorspronkelijk gemaakt en geschreven door Mibs. Voor het geval we er niet in slagen deze handleiding bij te werken, U kunt de laatste update vinden door dit te volgen link.