
Here’s a guide on swiftly establishing passive income with no prerequisite skills shortly after completing the tutorial section. The sooner you establish an initial outpost, the quicker you can commence income generation while actively engaging in the main gameplay. These insights stem from my personal experiences and experimentation during the early stages of the game.
Invoering
A significant update has been introduced to the game, allowing for a clever money-making strategy. By sleeping in a bed for an in-game period, all extractors will activate and fill up with resources. This method can potentially yield a substantial income, and even a short rest of 6-8 hours can maximize your storage capacity. Echter, it’s important to note that cargo transfers are not instantaneous, as the transport ship needs to land to move the resources, although this process will still result in faster gains.
By following this strategy, you can amass around 15,000 credits by visiting three key vendors in New Atlantis: the yellow Kiosk on the landing pad, Jemison Mercantile, and Trading Authority in the Well. Having a larger cargo hold, along with the Payload skill, is advantageous, as it prevents encumbrance and enables you to sell directly from your ship’s hold. You can repeatedly rest to collect ore multiple times, although the original intention was to gather resources intermittently while playing the game naturally, rather than simply generating money out of thin air.
The ultimate aim here is to establish a straightforward early-game outpost that generates a steady stream of resources, which can be sold to generate income for various in-game purchases like starships, munitie, and equipment/weapons. While outpost creation can be time-consuming and resource-intensive, it’s still feasible to set up an effective mining outpost early in the game without delving too deeply into the outpost mechanics. I’ll guide you through the process of setting up your automated mining operation to accumulate valuable ores for selling, especially when you’re short on money and resources. This outpost can serve as a foundation that you can expand and develop further as you progress in the game. Echter, the challenge lies in selecting the right location for your mining outpost, as there are numerous nuances not explained in the game, which I’ve discovered through trial and error.
Locatie
The initial and foremost step involves the identification of a planet containing valuable resources suitable for mining. This task entails a comprehensive survey of various planets and moons to pinpoint the specific ores that command the highest market value and are easily accessible without necessitating advanced skills in the Science tree or intricate Research projects. Natuurlijk, commencing this endeavor within the vicinity of New Atlantis, situated in the Alpha Centauri system, or within the Narion system, where the tutorial initiates, is advisable.
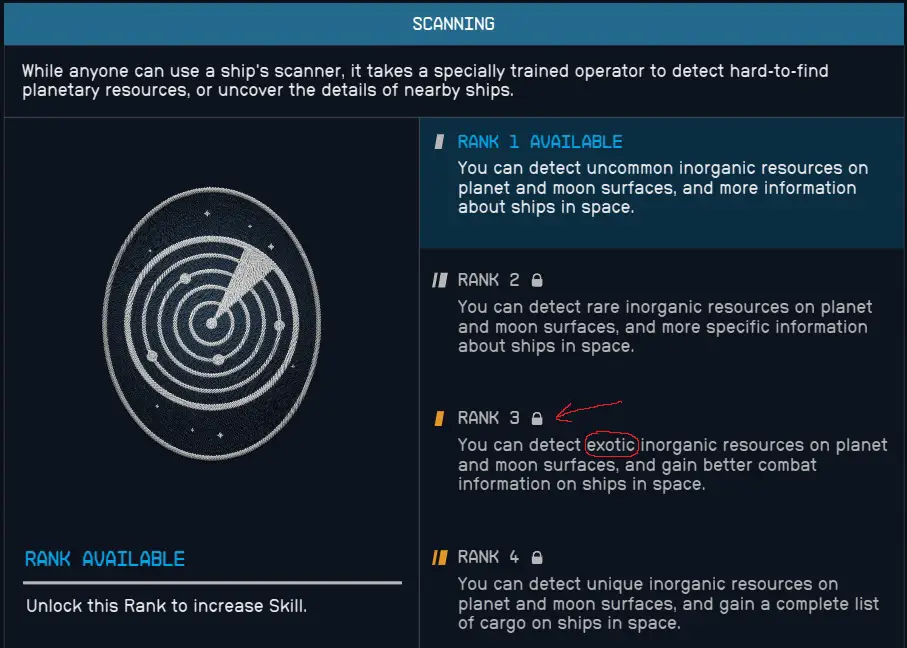
Binnen het spel, mineral resources are categorized into five tiers, each represented by distinctive colored diamonds in the periodic table images. These tiers include Common minerals (denoted by the absence of diamonds), Uncommon minerals (marked with a single blue diamond), Rare minerals (distinguished by two purple diamonds), Exotic minerals (characterized by three yellow diamonds), and Unique minerals (the most coveted tier, identified by four green diamonds). Our specific quest revolves around the pursuit of Exotic Minerals, those adorned with three yellow diamonds in their visual representation, as the highest tier, Unique minerals with four green diamonds, typically remain elusive within the early systems.
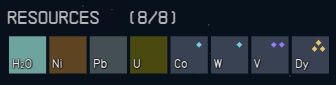
The issue at hand revolves around the scanning process for planets (achieved by holding the R key while in orbit). This scanning operation only reveals the locations of common, the lowest-tier resources, which typically fetch minimal prices in the market. It’s important to note that when you examine an ore in your inventory, you’ll notice a base value, but when you attempt to sell it in any store, you’ll need to divide this value by 8, resulting in your initial sell price being a mere 12.5% of the base value. Vervolgens, common and uncommon ores are usually only worth 1 credit each, making it challenging to generate profits quickly, especially given the rapid accumulation of these low-value ores and their considerable weight.
Rares, while slightly more profitable, still fall short of being truly lucrative, selling for a maximum of 3 crediteert elk. The true goldmine lies within the exotic tier, where ores exhibit the following characteristics:
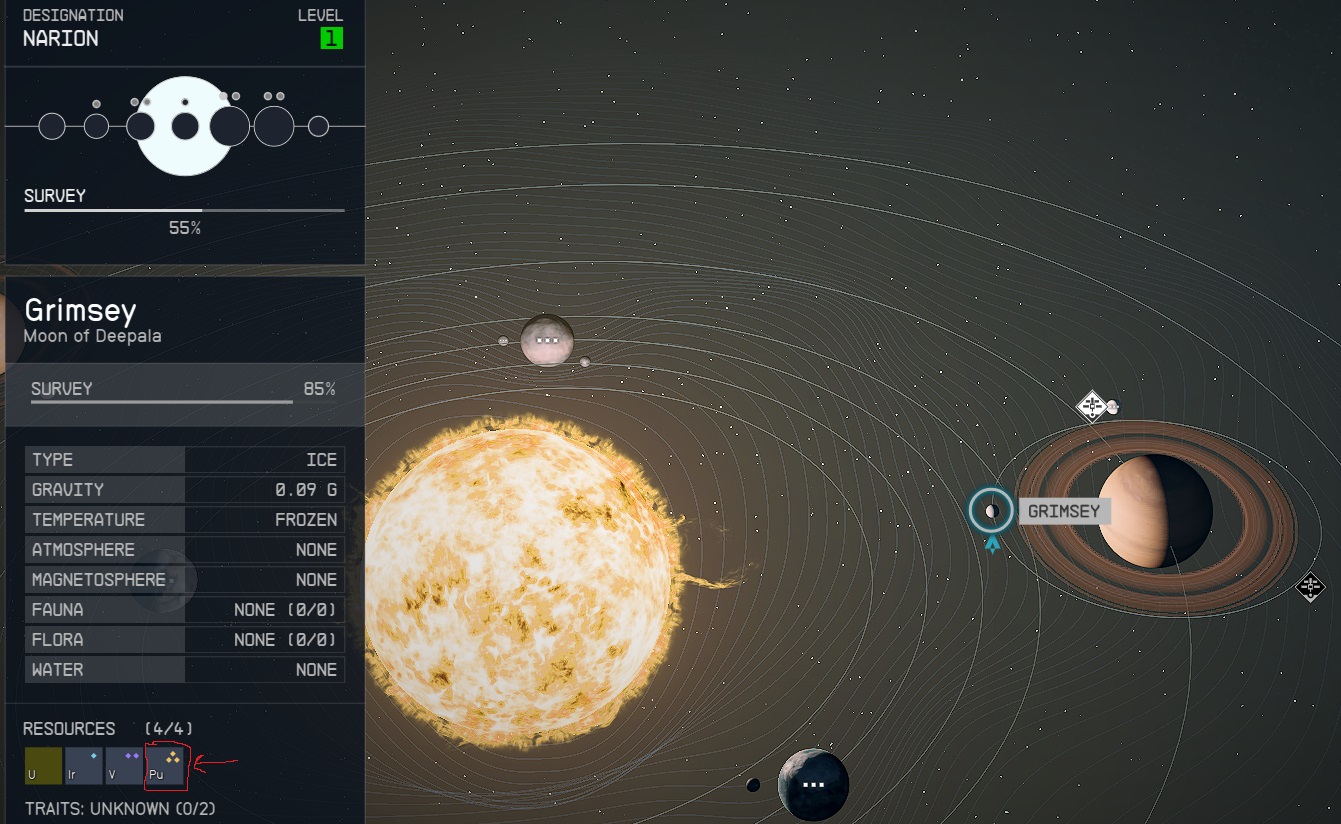
- Plutonium (Pu): Base Value – 64, Sell Value – 8, Weight – 1.6 (the most valuable early-game find per ore)
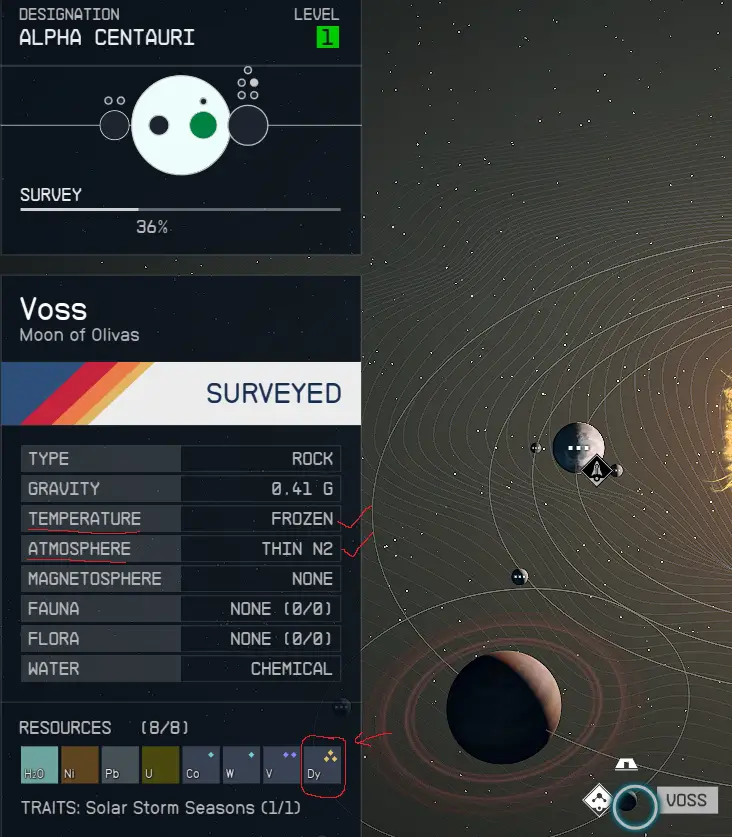
- Dysprosium (Dy): Base Value – 56, Sell Value – 7, Weight – 1.4 (slightly lower value but lighter than Pu)
- Europium (Eu): Base Value – 40, Sell Value – 5, Weight – 1.0 (lighter weight for more efficient storage)
It’s important to note that Ytterbium (Yb) and Antimony (Sb) offer decent ratios, but Ytterbium has a higher weight and lower value compared to Europium, making it less favorable. Palladium (Pd), while not exotic, becomes a viable option as a rare ore due to its comparable value and lower weight.
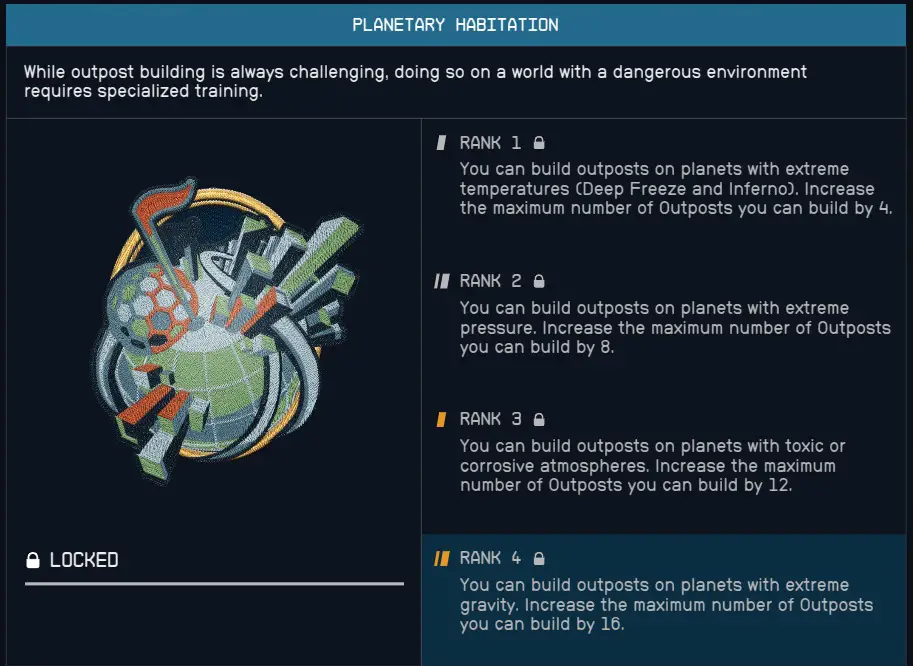
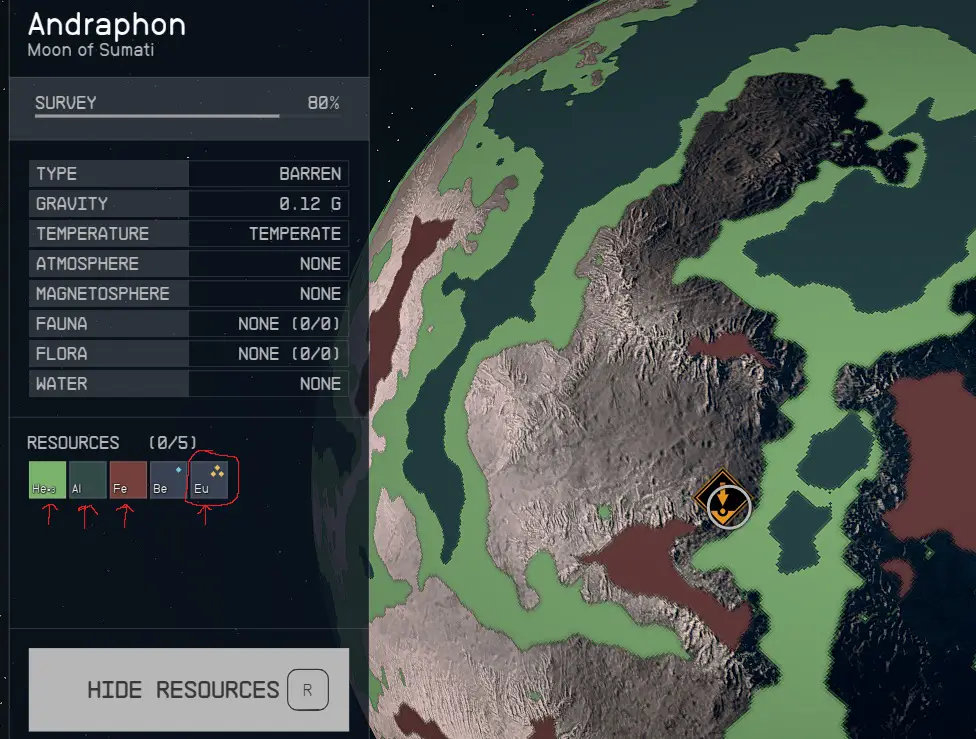
When scanning a planet for these valuable resources, keep an eye out for ores with a two-letter symbol and the presence of 3 yellow diamonds, which signify exotic minerals. Echter, before considering the construction of an outpost, several factors must be assessed, including planetary conditions. These conditions must meet certain criteria, such as the absence of extreme temperatures (Deep Freeze or Inferno) and a non-toxic or non-corrosive atmosphere. To confirm these conditions, you can land on the planet, activate the scanner (F), and then press (R) to initiate the outpost signal. A notification will promptly appear if building on that planet or moon is currently restricted due to lacking the late-game skill called Planetary Habitation.
In the initial stages of the game, you’ll encounter the following starting locations:
Narion System – Grimsey (Plutonium)
Alpha Centauri System – Voss (Dysprosium)
Narion System – Andraphon (Europium)
The distribution of planetary resources doesn’t appear to be randomized, as indicated by discussions on Reddit where players have identified specific planets as resource-rich. Echter, locating these resources can be challenging, especially without access to the level 3 scanning perk, which allows for more efficient resource detection.
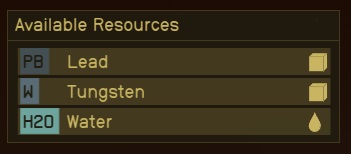
When seeking exotic resources, a strategy is to deliberately land in non-colored locations since they tend to harbor higher-tier resources. Many players opt to land near the perimeters of existing resource areas to maximize their chances of encountering multiple resource types. In the process of establishing an outpost (achieved by scanning with ‘F’ and pressing ‘R’ for outpost placement), the game provides information about the resources available in that location. Daarom, it’s advisable to periodically explore your surroundings to identify and gather resources based on this information.
This aspect might be a bit vexing, but if you manage to discover a suitable location, you can establish an outpost without any cost and subsequently activate it as a rapid travel point, even if you haven’t constructed anything there yet. Aanvullend, removing outposts that you no longer require is a straightforward process. It’s crucial to bear in mind that you should steer clear of Points of Interest marked on the map, as they are surrounded by a no-build zone extending approximately 200 meters in all directions.
Building the Mining Outpost
Constructing an Outpost involves a significant resource investment over time. Echter, in the initial stages, you only require a limited selection of ores to initiate the process. Expansion can be considered later on. Common and uncommon resources necessary for basic structures are easily obtainable through planet exploration using the scanner. Nonetheless, purchasing these early resources in New Atlantis can prove cost-effective and expedite your acquisition of missing items.
I suggest keeping track of missing resources by using the ‘R’ key when an item is selected on the outpost building screen. This marks the missing items for your convenience. You can obtain these resources from two main stores in New Atlantis: Jemison Mercantile in the Starport and the Trade Authority, which is located underground in the “Well.” The latter can be reached via an elevator just behind Jemison Mercantile along the left wall en route to NAT. Iron and Aluminum will be in high demand, so establishing a mining outpost to procure them may be a worthwhile endeavor. Aanvullend, crafting certain materials, such as Adaptive Frames, will be necessary. An Industrial Workstation is available in the Lodge basement, providing unlimited storage for crafting materials.
When you identify a suitable outpost location with multiple resource options, the key is to switch to build mode (press ‘F’ for the scanner, then ‘R’ for outpost) and select the bird’s eye view (‘V’). It’s worth noting that you can zoom out using the mouse by moving it up or down (not by scrolling). Choose the appropriate extractor, and it will highlight the buildable zone. If the zone is restricted by outpost boundaries, delete your outpost and reposition it closer to the resource vein.
At a minimum, your mining outpost will require the following components:
Extractors:
- Ore Extractors: 5 Ijzer (Fe), 2 Wolfraam (W), en 4 Aluminium (Al)
Stroom:
- Solar Array: 2 Beryllium (Be), 3 Koper (Cu), en 4 Aluminium (Al) OF
- Wind Turbine: 2 Cobalt (Co), 3 Nikkel (Ni), en 5 Aluminium (Al) Choose based on power efficiency and affordability in your situation.
Opslag:
- Solid Storage: 6 Ijzer (Fe), 3 Adaptive Frames, en 5 Aluminium (Al) Opmerking: You can craft Adaptive Frames at the Industrial Workbench (3 Fe & 4 Al) voor (1 Fe & 1 Al) elk.
Zoals je kunt zien, Ijzer (Fe) and Aluminum (Al) are crucial for getting your outpost started. Building these extractors first in other outposts can expedite your progress. I also recommend constructing at least one storage crate (4 Structural & 2 Aluminium) under decorations, even the contraband variant, to specifically store any contraband you come across. Many locations will scan for contraband, but it can be safely stored in your outpost for future use.
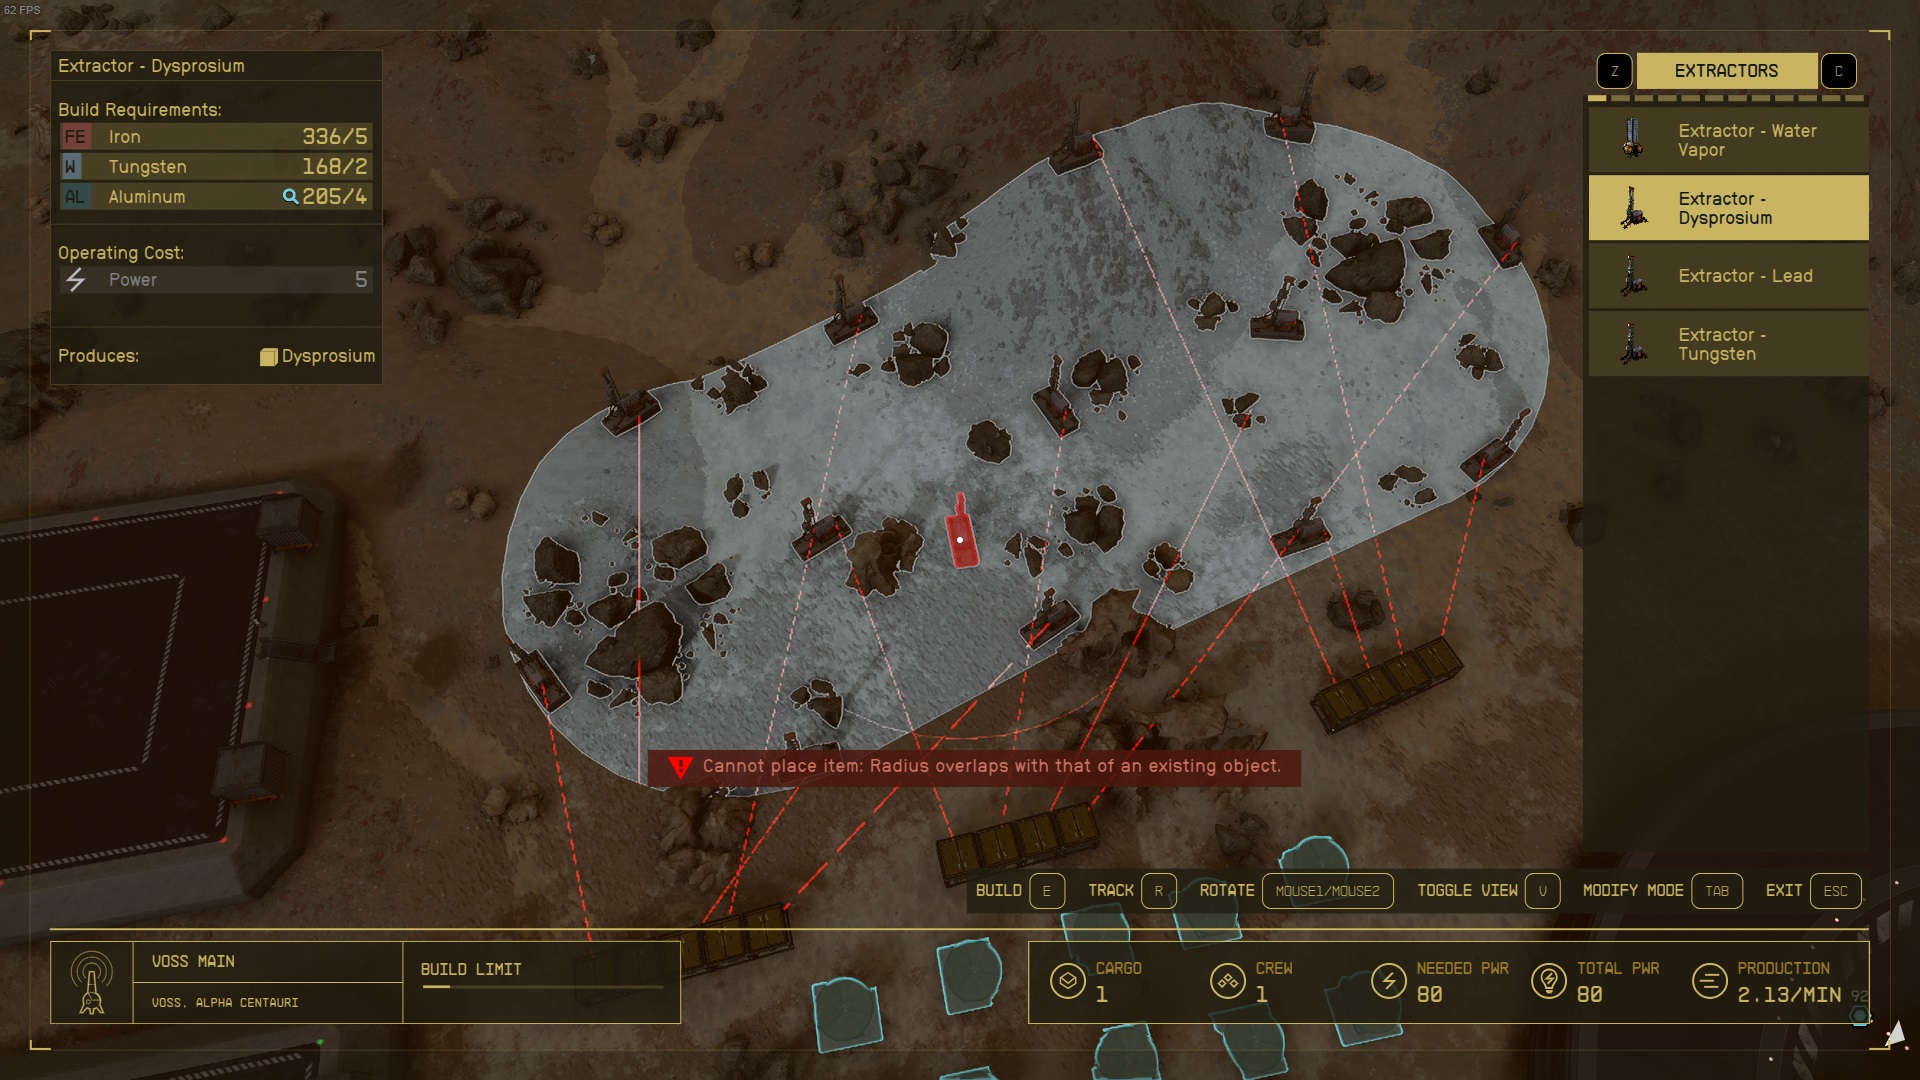
In the provided image, you’ve successfully set up a configuration of 13 Dyposium extractors, each connected to a solid storage unit. Your Dyposium extraction rate is currently one every 80 seconden, and your storage can hold a maximum of 54 Dyposium units. Met deze opstelling, you are generating income at a rate of 13 extractors x 7 Dyposium per extractor = 91 Dyposium every 80 seconden.
Your storage reaches its maximum capacity after 72 notulen (80 seconds x 54 eenheden). Echter, you can potentially double your collection time by linking additional storage containers, allowing you to collect ore over a more extended period. This means that while you’re occupied with other activities in the game, you can accumulate ore worth 4,914 credits every 72 minutes of game time.
Your strategy is optimized for efficiency, as you’ve built a landing pad in your base. This allows you to quickly exit, collect all the ore (even if you become overencumbered), and return to your base due to the low gravity on the planet. Met deze aanpak, you can efficiently purchase all the resources you need from the Trade Authority kiosk in the New Atlantis starport.
Important Tips and Tricks
- Enhance resource mining speed with the cutter by holding the zoom (right mouse) while pressing the left mouse button. This can increase mining efficiency by approximately four times and make the process feel less sluggish.
- When searching for artifacts, such as the first artifact, keep an eye out for the valuable exotic mineral called “Caelumite.” It boasts a base value of 264, with each ore being worth 33 and weighing only 0.3. To mine it more efficiently, apply tip #1.
- Store surplus resources that don’t fit in your cargo hold in the lodge basement. Daar, you’ll find multiple containers and ammo cases with unlimited storage space. Utilize the T button to transfer all resources to your companion for maximum capacity. Avoid storing resources in outposts or the dream house, as crafting containers for them is resource-intensive and provides limited storage (10 for small containers, 150 for large).
- The Trade Authority, in person (not the yellow kiosk), acts as a “fence” where you can sell stolen (red tag) and contraband (yellow tag) items. You may also encounter their ships in orbit and potentially sell to them.
- Prioritize obtaining a ship with a larger cargo hold for storing resources and items intended for sale. You can access your ship’s hold in both crafting and selling screens. For long-term storage, use the lodge basement or other containers like ship crew and captain’s storage in the cockpit.
- Immediately invest in the 1st level of commerce skill. While it provides only a 10% selling buff, it increases your selling price from 12.5% of the base value to 13.75%. Though seemingly modest, this boost accumulates significantly over time. Subsequent skill point investments only yield an additional 5% increase per level, making the first level the most impactful.
- To acquire early ships without disabling them in space (which requires specific skills and EM weapons), look for randomly landing ships while exploring planets. Instead of eliminating all ground enemies, focus on eliminating the crew inside the ship. Sit in the pilot’s chair and take off to claim the ship as your own. Note that stealing friendly ships may require security skills or lead to consequences with your companion if they are part of the core constellation followers.
- Conduct a thorough survey of entire planets or moons to discover all available resources and traits. This not only provides valuable experience and survey data for sale but also accelerates the rate at which resources are acquired. Barren planets, devoid of plant and animal life, are particularly easy to survey.
- Research robots early in the game, as they don’t have skill requirements. This allows you to unlock a sanitation robot, boosting ore production by 10% in your outpost.
- Consider building a bed even outside an airlock, as resting in it grants a 10% experience boost. Aanvullend, short periods of sleep, as little as 6 uur, can quickly replenish your solid storage. Keep in mind that the effectiveness of this method may vary based on the time flow of different planets and moons.
Dat is alles wat we vandaag hiervoor delen Sterrenveld gids. Deze handleiding is oorspronkelijk gemaakt en geschreven door briantherunner. Voor het geval we er niet in slagen deze handleiding bij te werken, U kunt de laatste update vinden door dit te volgen link.