Here’s a simple and speedy guide to help you start playing Quasimorph. This guide also tells you about how the game looks and gives some handy tips if you’re just starting out as a new player.
Space Interface and Stock Exchange
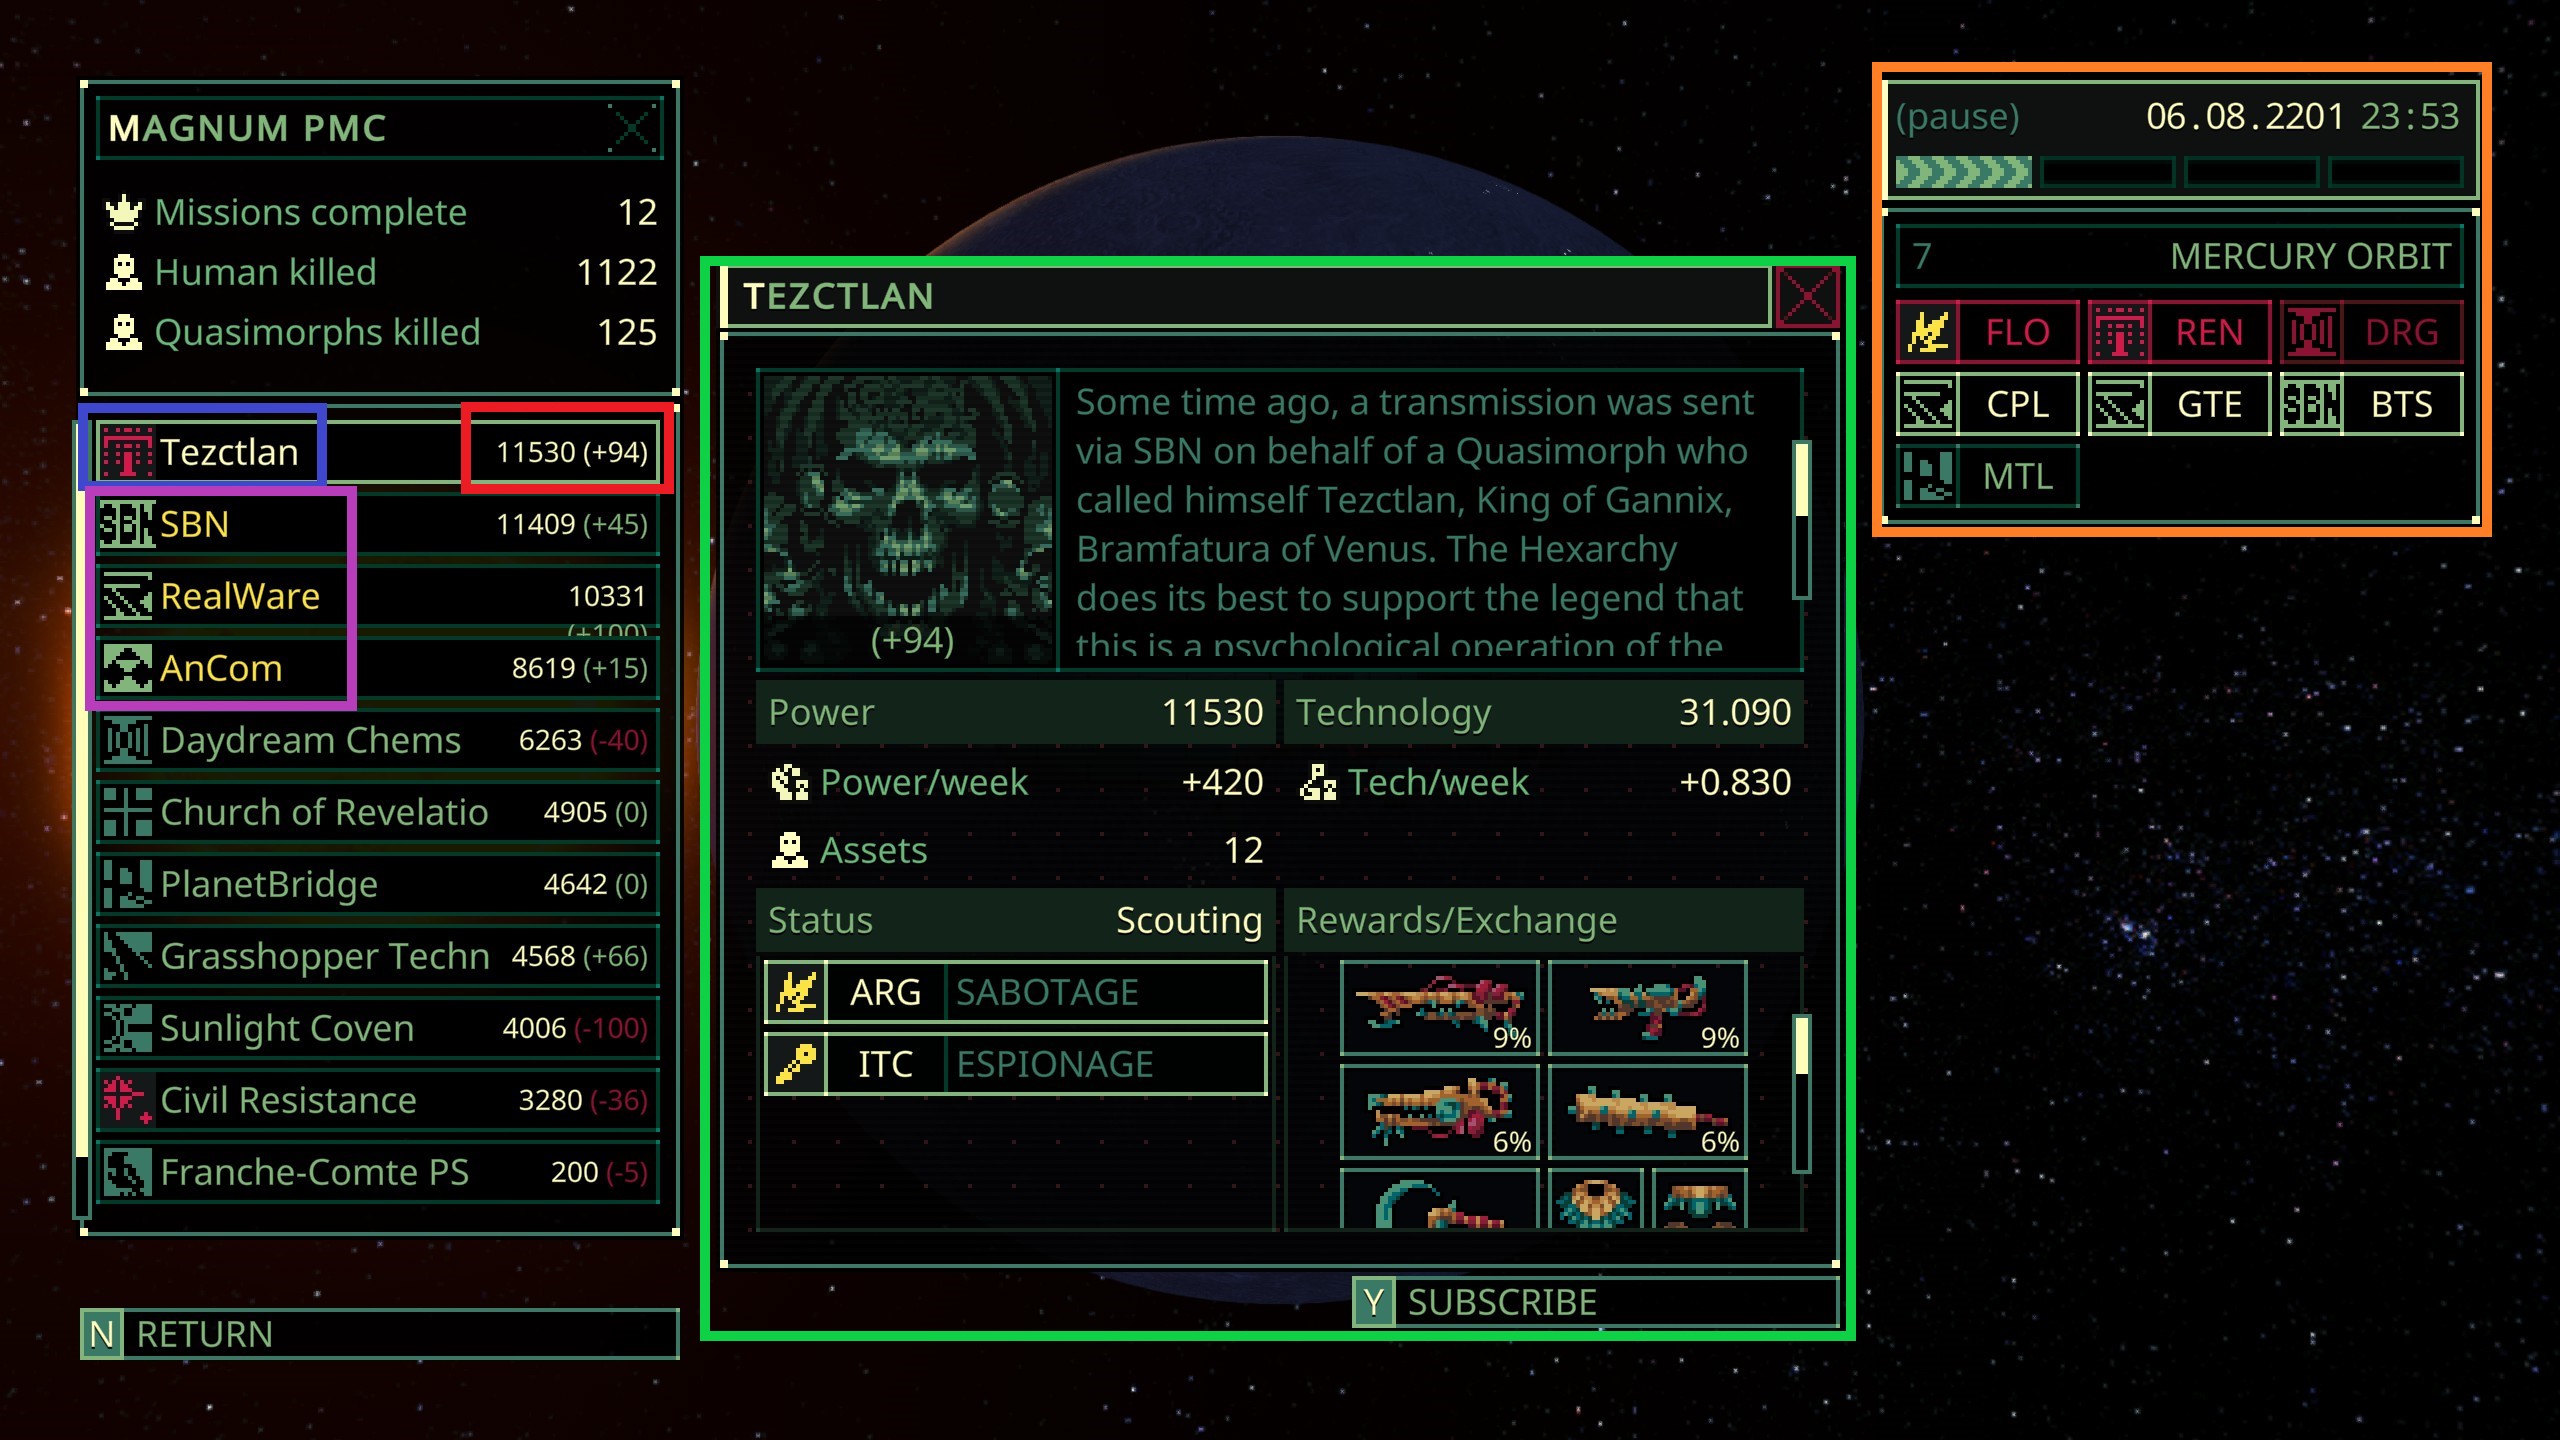
Stock Exchange Area:
- Left Side: This is the stock exchange where you deal with different groups in the game. They have their own screens highlighted in green.
Highlighted Areas:
- Blue Box: Shows the faction’s name and symbol.
- Red Box: Displays two numbers. The big one shows how strong the enemies are when you do missions against this faction. The smaller one is your reputation with them. Good rep (tot +100) gets you better stuff when you trade with them.
- Negative rep stops you from trading with them or visiting their stations. Dus, be nice to factions you want to trade with.
- Purple Box: These are the main human factions. Focus on them for trading and reputation. They offer great items like big backpacks, strong gear, and special chips. Help them by doing missions that boost their tech level. But you can also make trades with other factions if you like.
- Green Box: This is the Faction Information Screen. It has a faction’s image at the top and your rep with them at the bottom. Naar rechts, there’s some cool lore about the faction. Daaronder:
- The Power section shows how much power they gain each week and their controlled stations, which affect power and tech gains.
- The Technology section tells you their tech level, which decides the quality of gear you can trade for.
- The Status part reveals their strategy and mission types. These change as factions interact and as you do missions.
- The Rewards/Exchange area shows what you can get from them through missions or trading. Greyed-out options mean you can’t get them due to low rep.
- Orange Box: This is the Planet Information Screen. It shows the date and time. Each bar speeds up time. Under that, you see the number of stations and the planet’s name. Stations are represented by three-letter codes and icons. Yellow ones have missions, and different icons mean different mission types. Red stations are usually a no-go due to bad rep, except for Tezctlan and Civil Resistance, which stay red even if you have good rep with them and can land.
Mission Information
These are the four types of missions you’ll encounter, each with its own objectives and challenges.
Mission Type 1: Sabotage
- Goal: Find and destroy specific targets.
- Targets are on the last floor of the station.
- You’ll need to damage them a few times to destroy them.
- Look for yellow ‘x’ marks on the map on the final floor.
- Be cautious and use ranged weapons as the targets can explode.
Mission Type 2: Espionage
- Goal: Find a particular item.
- The item is always on the final floor and takes up space in your inventory.
- It’s marked by a yellow ‘x’ op de kaart.
Mission Type 3: Conquest
- Goal: Move through the station and defeat a set number of enemies on each floor.
- The number of enemies you need to defeat is half of the total floor count.
- You can check your progress by clicking the extraction button (radio button on the top right). It shows how many enemies are left on each visited floor.
- No guesswork about the number of floors; it’s always listed.
Mission Type 4: Defence
- Goal: Survive in a small arena for 150 draait.
- Once the turn counter reaches 150, no more enemies will spawn.
- You’ll need to eliminate the remaining enemies to complete the mission and extract.

When you hover over missions, you’ll see some important details about them.
Mission Type:
- This tells you what kind of mission it is.
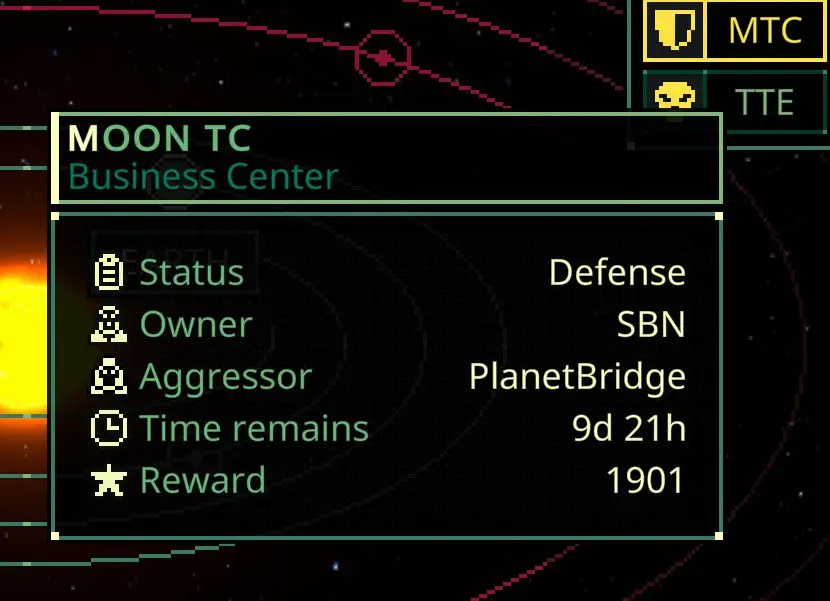
Station Owner:
- This shows who owns the station where the mission is located. It helps you know what enemies to expect and what equipment they have. You can figure this out by looking at the faction’s power level (how strong they are) and tech level (what gear they have). More power means more enemies, and more tech means better equipment.
- Be careful when attacking a faction’s station because it can make them really mad at you. Dus, think carefully before you decide to attack.
- If you’re doing a defense mission, it’s the opposite. You’re helping the station owner against attackers, so your reputation with the owner faction improves, and you’ll face the enemies instead.
Beneficiary:
- The beneficiary is the faction that posted the mission. They’re the ones you’re helping, and they’ll give you a reward when you finish the mission.
Aggressor:
- During defense missions, the aggressor is the faction that’s attacking the station. The strength of the enemies and their equipment comes from this faction’s power and tech levels.
Time Remaining:
- This shows how much time you have left to complete the mission before it expires. Daarna, you can trade at the station again.
Beloning:
- The number here tells you how likely you are to get rewards from a specific faction. A higher number means better chances. You can find this reward pool info on the faction’s stock exchange screen.
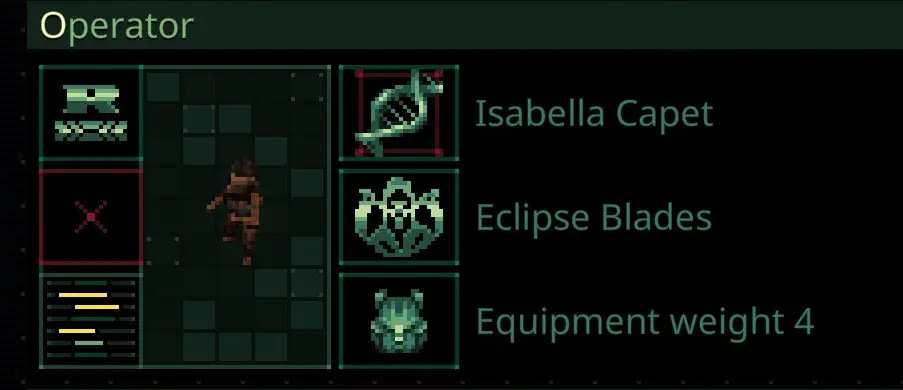
Mission Prep and Character Selection
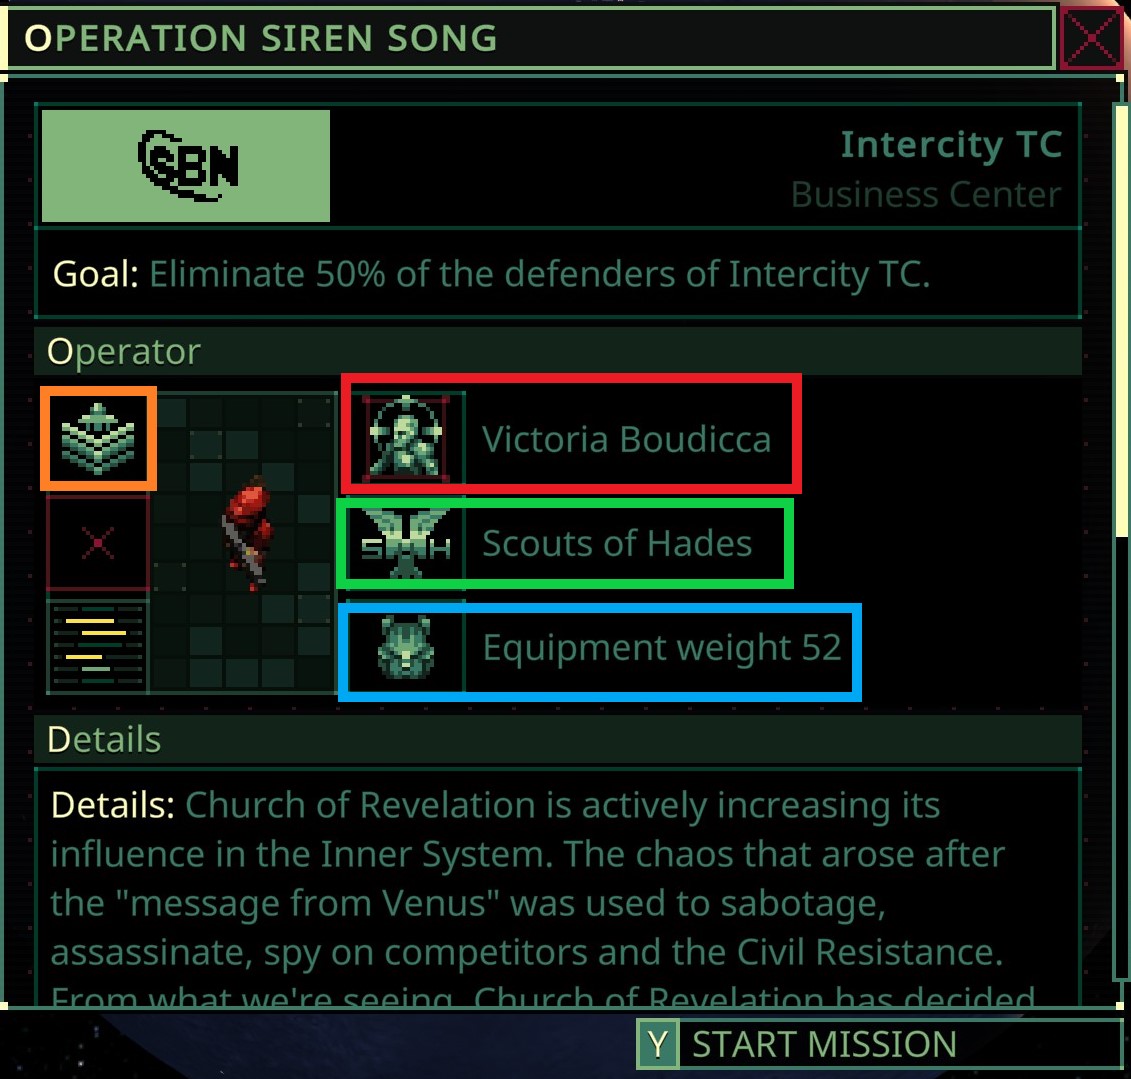
Hier, you can pick your clone for the mission and make changes to your equipment.
Oranje: Character rank insignia
- This shows your character’s rank, but it doesn’t have any use right now.
Rood: Clone
- This is the clone you’ve chosen for the mission. You can only have one of each gene-type at a time. The clone determines your basic abilities and a special trait.
Groente: Class
- Hier, you can see and change your clone’s class. Be aware that changing the class resets your skill levels and experience progress.
Blauw: Apparatuur
- If you click this button, you can change the gear you’ll bring on the mission. The weight of your equipment affects your ability to dodge and how quickly you get hungry. More weight means less dodging ability and getting hungry sooner.
Clone Information

Gezondheid:
- This is how much health your clone starts with. Some classes and items can temporarily increase it, but usually, this is all you’ve got.
Melee-schade:
- This number is added to your melee weapons’ schade. No need for math; any weapons you find during missions already include this bonus.
Melee Accuracy:
- It’s your basic chance to hit with melee weapons. Certain weapons and attack types might change this.
Nauwkeurigheid:
- This is your base chance to hit with ranged weapons. The type of gun and the fire mode you choose can tweak this value.
Dodge Chance:
- Your odds of avoiding attacks. Maar, because of how equipment weight works, it’s not very effective now. A full backpack often means you’ll dodge less.
Starvation Limit:
- It’s the starting calories you begin a mission with and the maximum you can keep in reserve. Eating more than this limit wastes food.
Range:
- Your field of vision as the player. Lighting in some levels can change it. You’ll have trouble seeing far in the dark, even with a large view range.
Pain Threshold Limit:
- How high your pain meter can go before your character is stunned and loses an action. Pain also comes with various debuffs, and this applies to enemies too.
Clone Trait:
- Each clone has a unique trait that can influence how you want to play or build them.
Quickstart Guide and Tips
- Start with the tutorial mission. It doesn’t explain everything, but you’ll get free stuff and a basic game overview.
For your first clone, go with Isabella Capet. Her ability to avoid infections is handy for missions on Mars, Phobos, and Deimos. She’s especially powerful because you can eat meat without worrying about infections, making it easy to avoid starving.
Play Isabella as an Eclipse Blades, focusing on melee combat in the early game. You can take out many enemies by letting them come to you near doorways. But remember to have a ranged weapon, like Flamethrowers or Cutters, to deal with bigger threats on Mars and its moons.
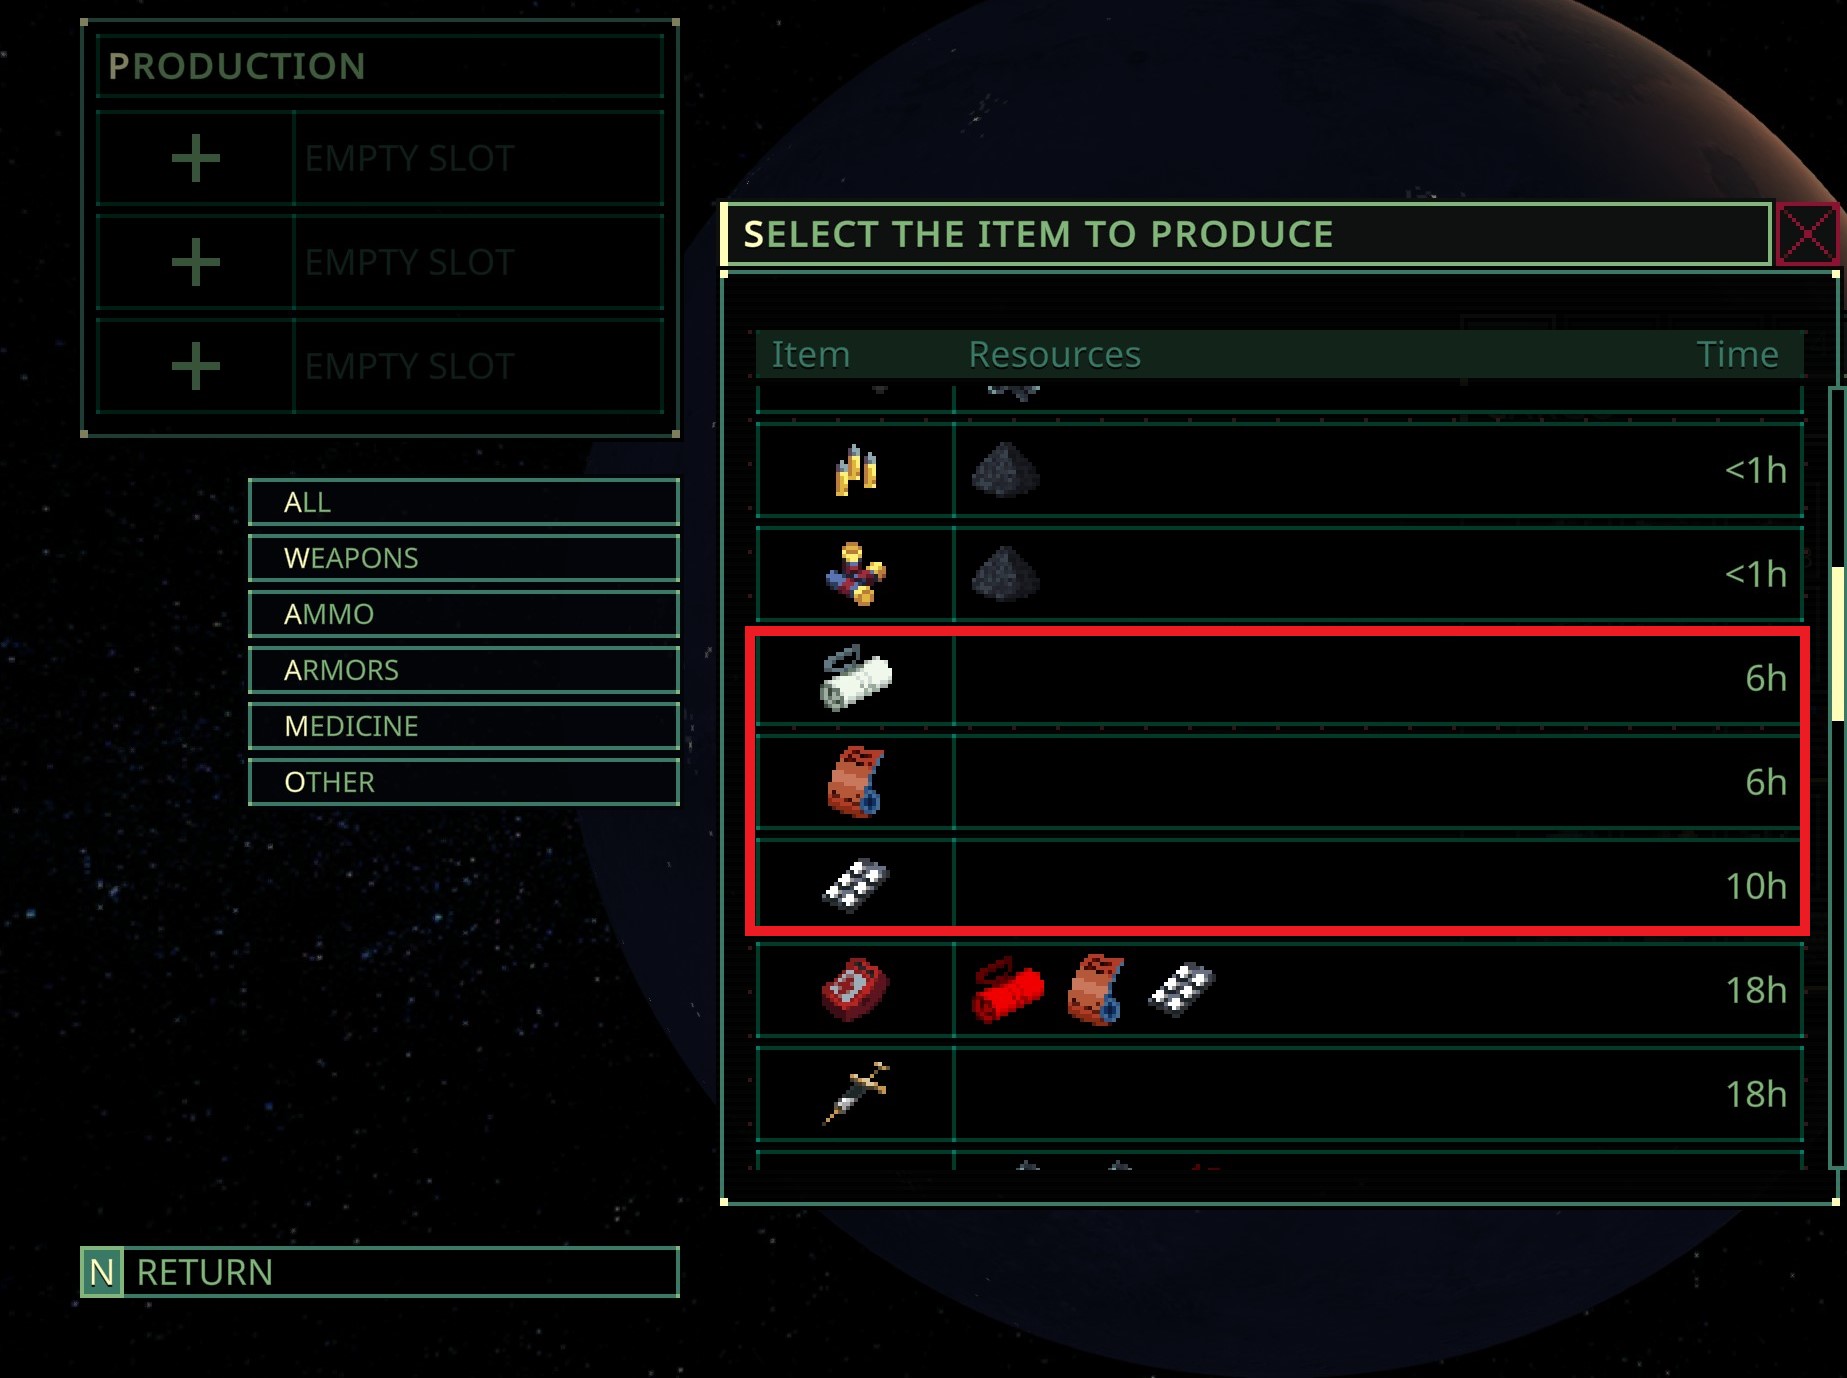
- Craft healing items in your spaceship.
Drukken “I” or click the spaceship button to access the production queue. Make bandages, splints, and antibiotics (you can skip antibiotics if you’re playing as Isabella).
- Go to Mars or its moons. These missions don’t have a Quasimorph timer, so you won’t face space demons exploding from enemies, and there’s no timer counting up as you explore. This makes missions easier and lets you gather resources without worrying about space demons.
Eating raw meat and flesh usually increases the Quasimorph timer, but on these missions, there’s no timer at all. That’s another reason to choose Isabella Capet as your starting clone.

- Pick missions on Mars or its moons to do.
In eerste instantie, skip Defense Missions; they don’t give much loot and are mainly for reputation.
Avoid missions against SBN, RealWare, and AnCom because they offer good trade options. Ook, steer clear of Tezctlan missions as they usually have tougher enemies for beginners.
Take your starting gear and some meds. If you’re not playing as Isabella Capet, bring food and antibiotics too.
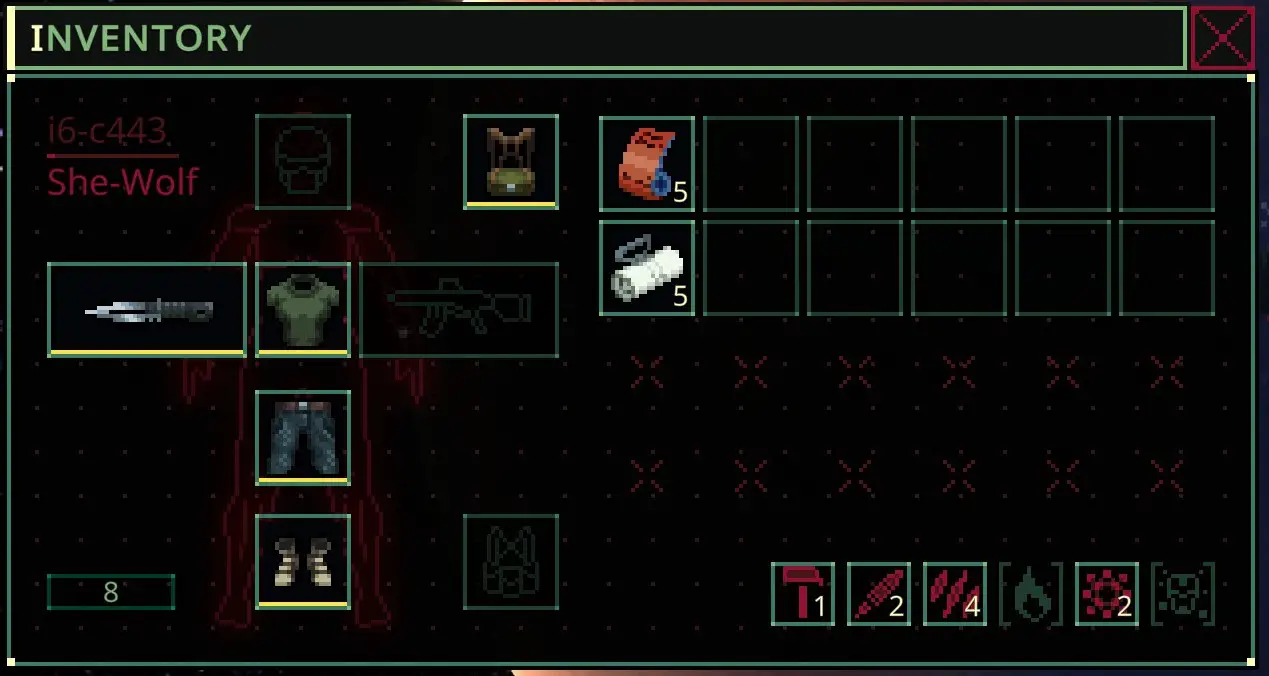
For the first mission, I usually bring just a knife and some meds. You can bring a gun if you want, but you’ll likely find one soon enough.
- Get ready to fight (letterlijk).
Wanneer je begint, there’s usually loot near your ship.

Explore the area until you encounter enemies. Use doors and obstacles to your advantage.
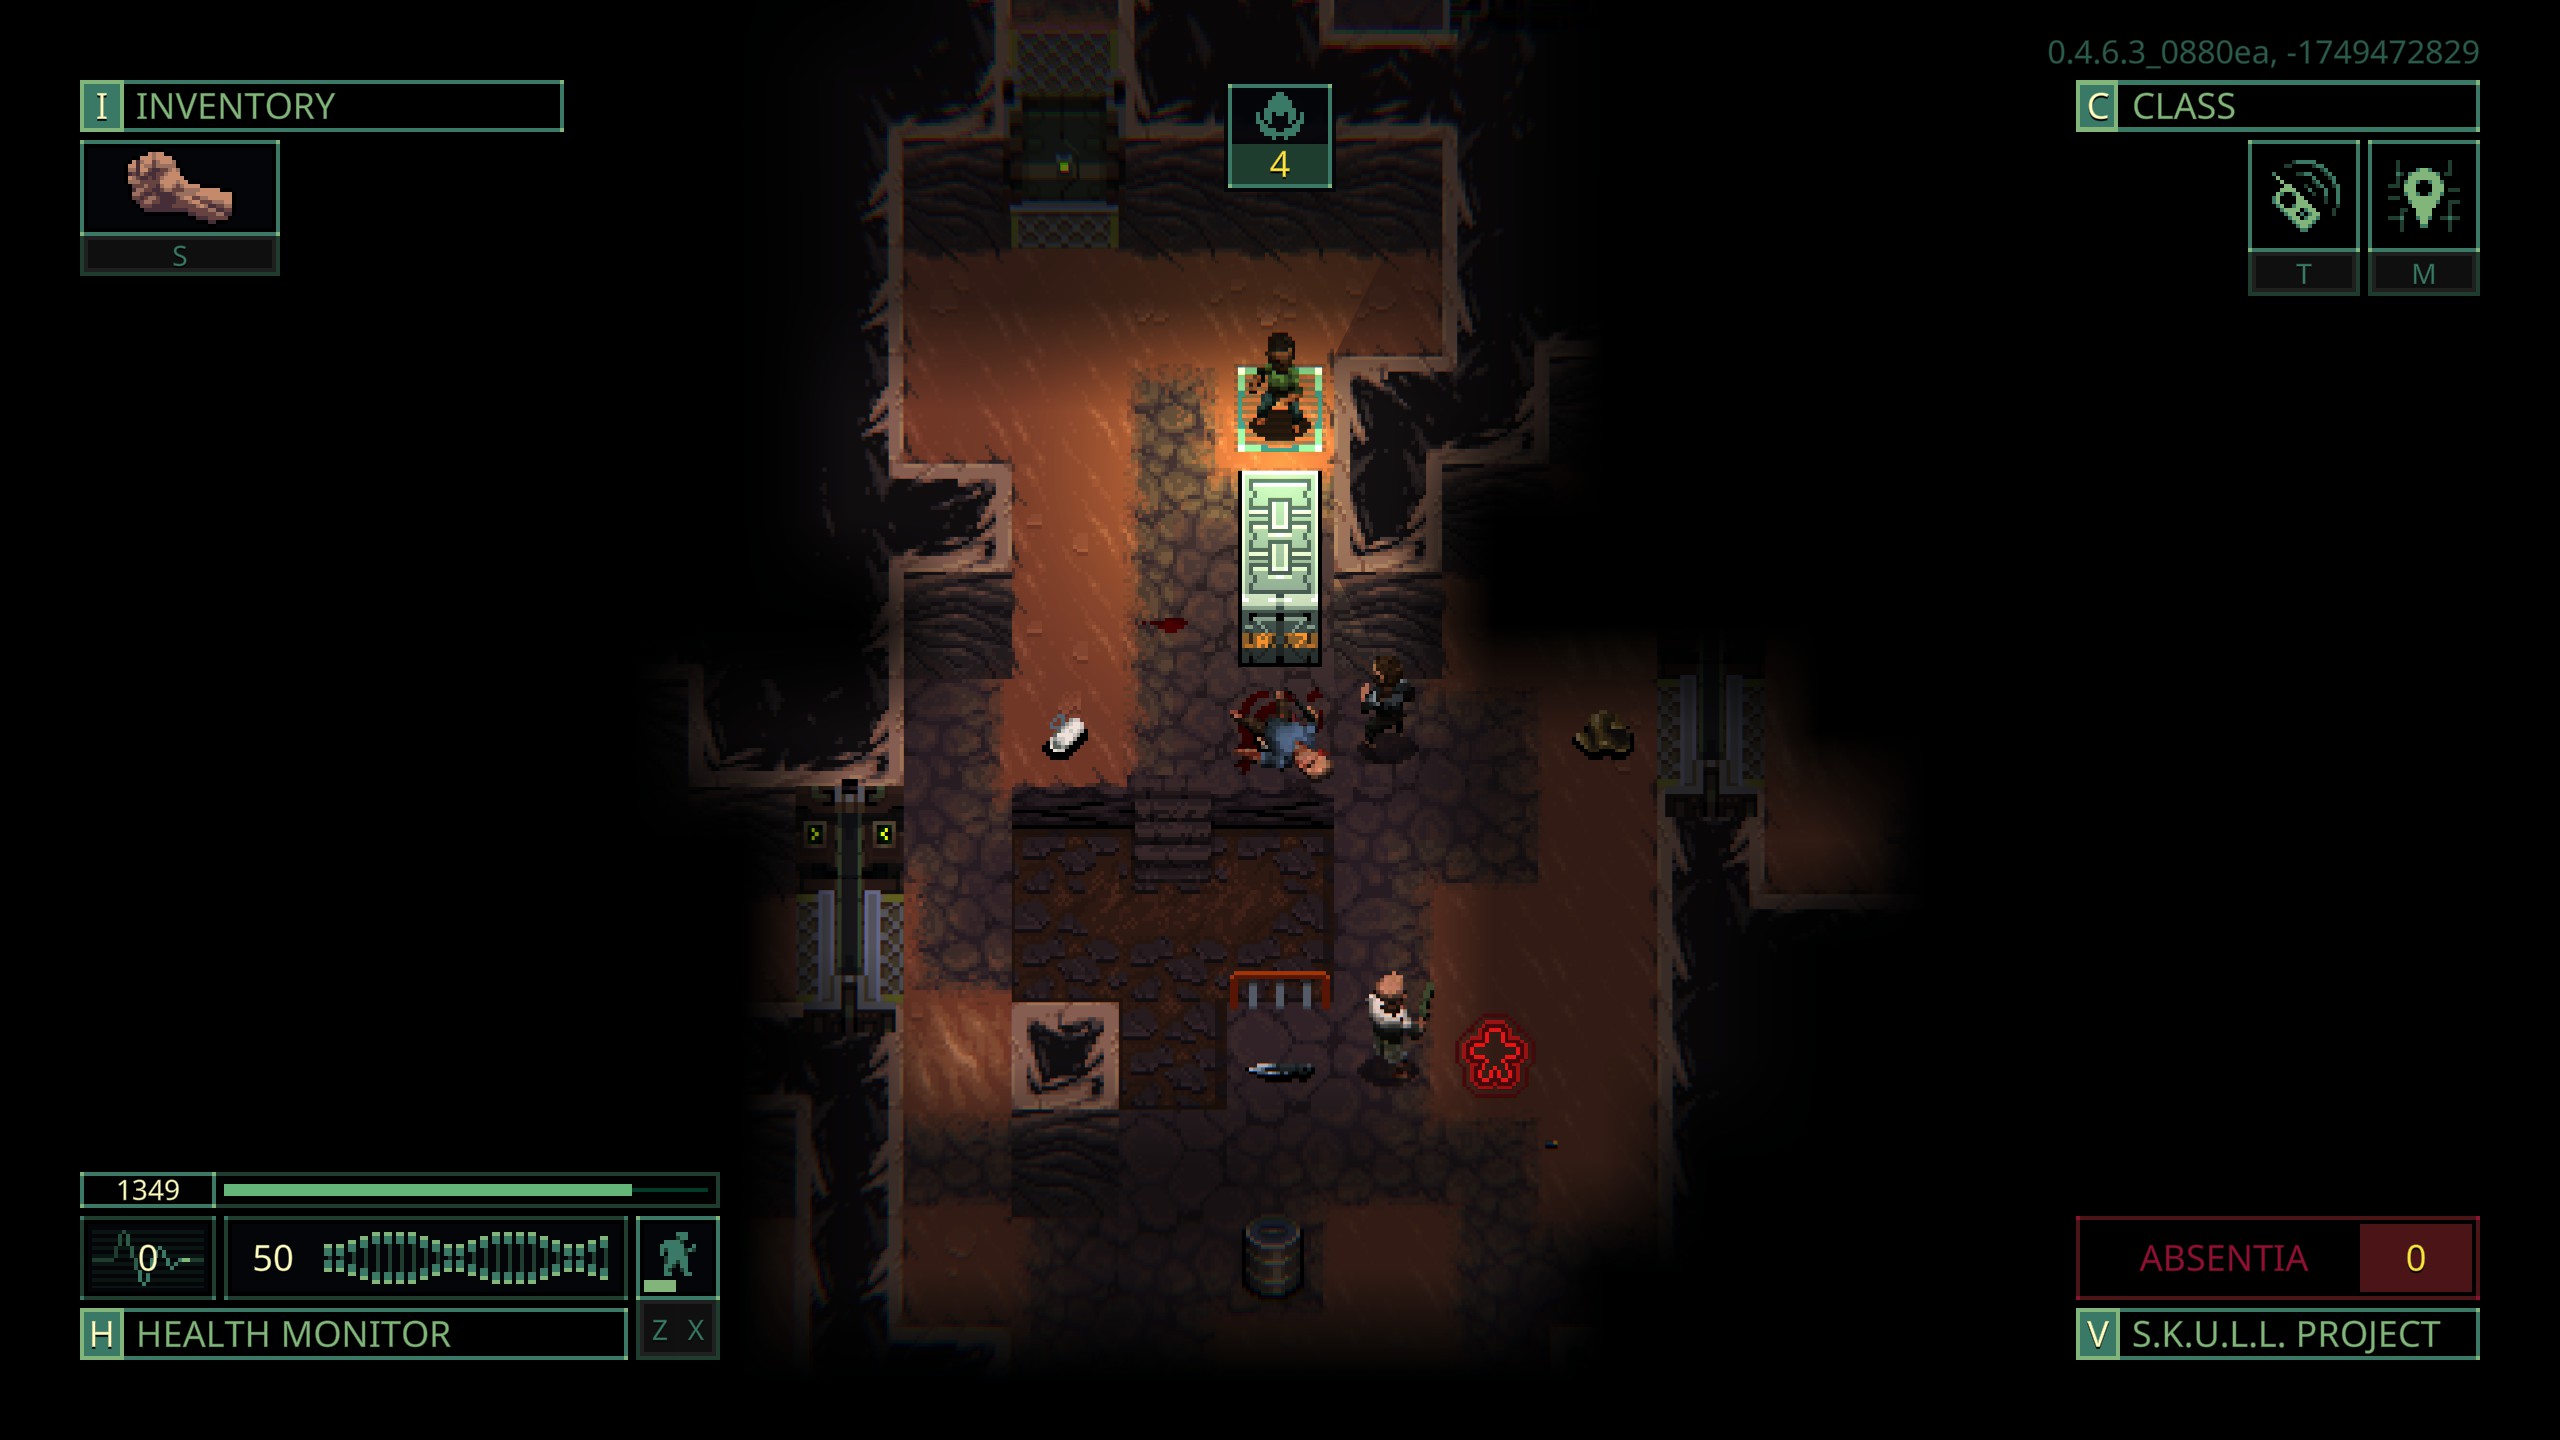
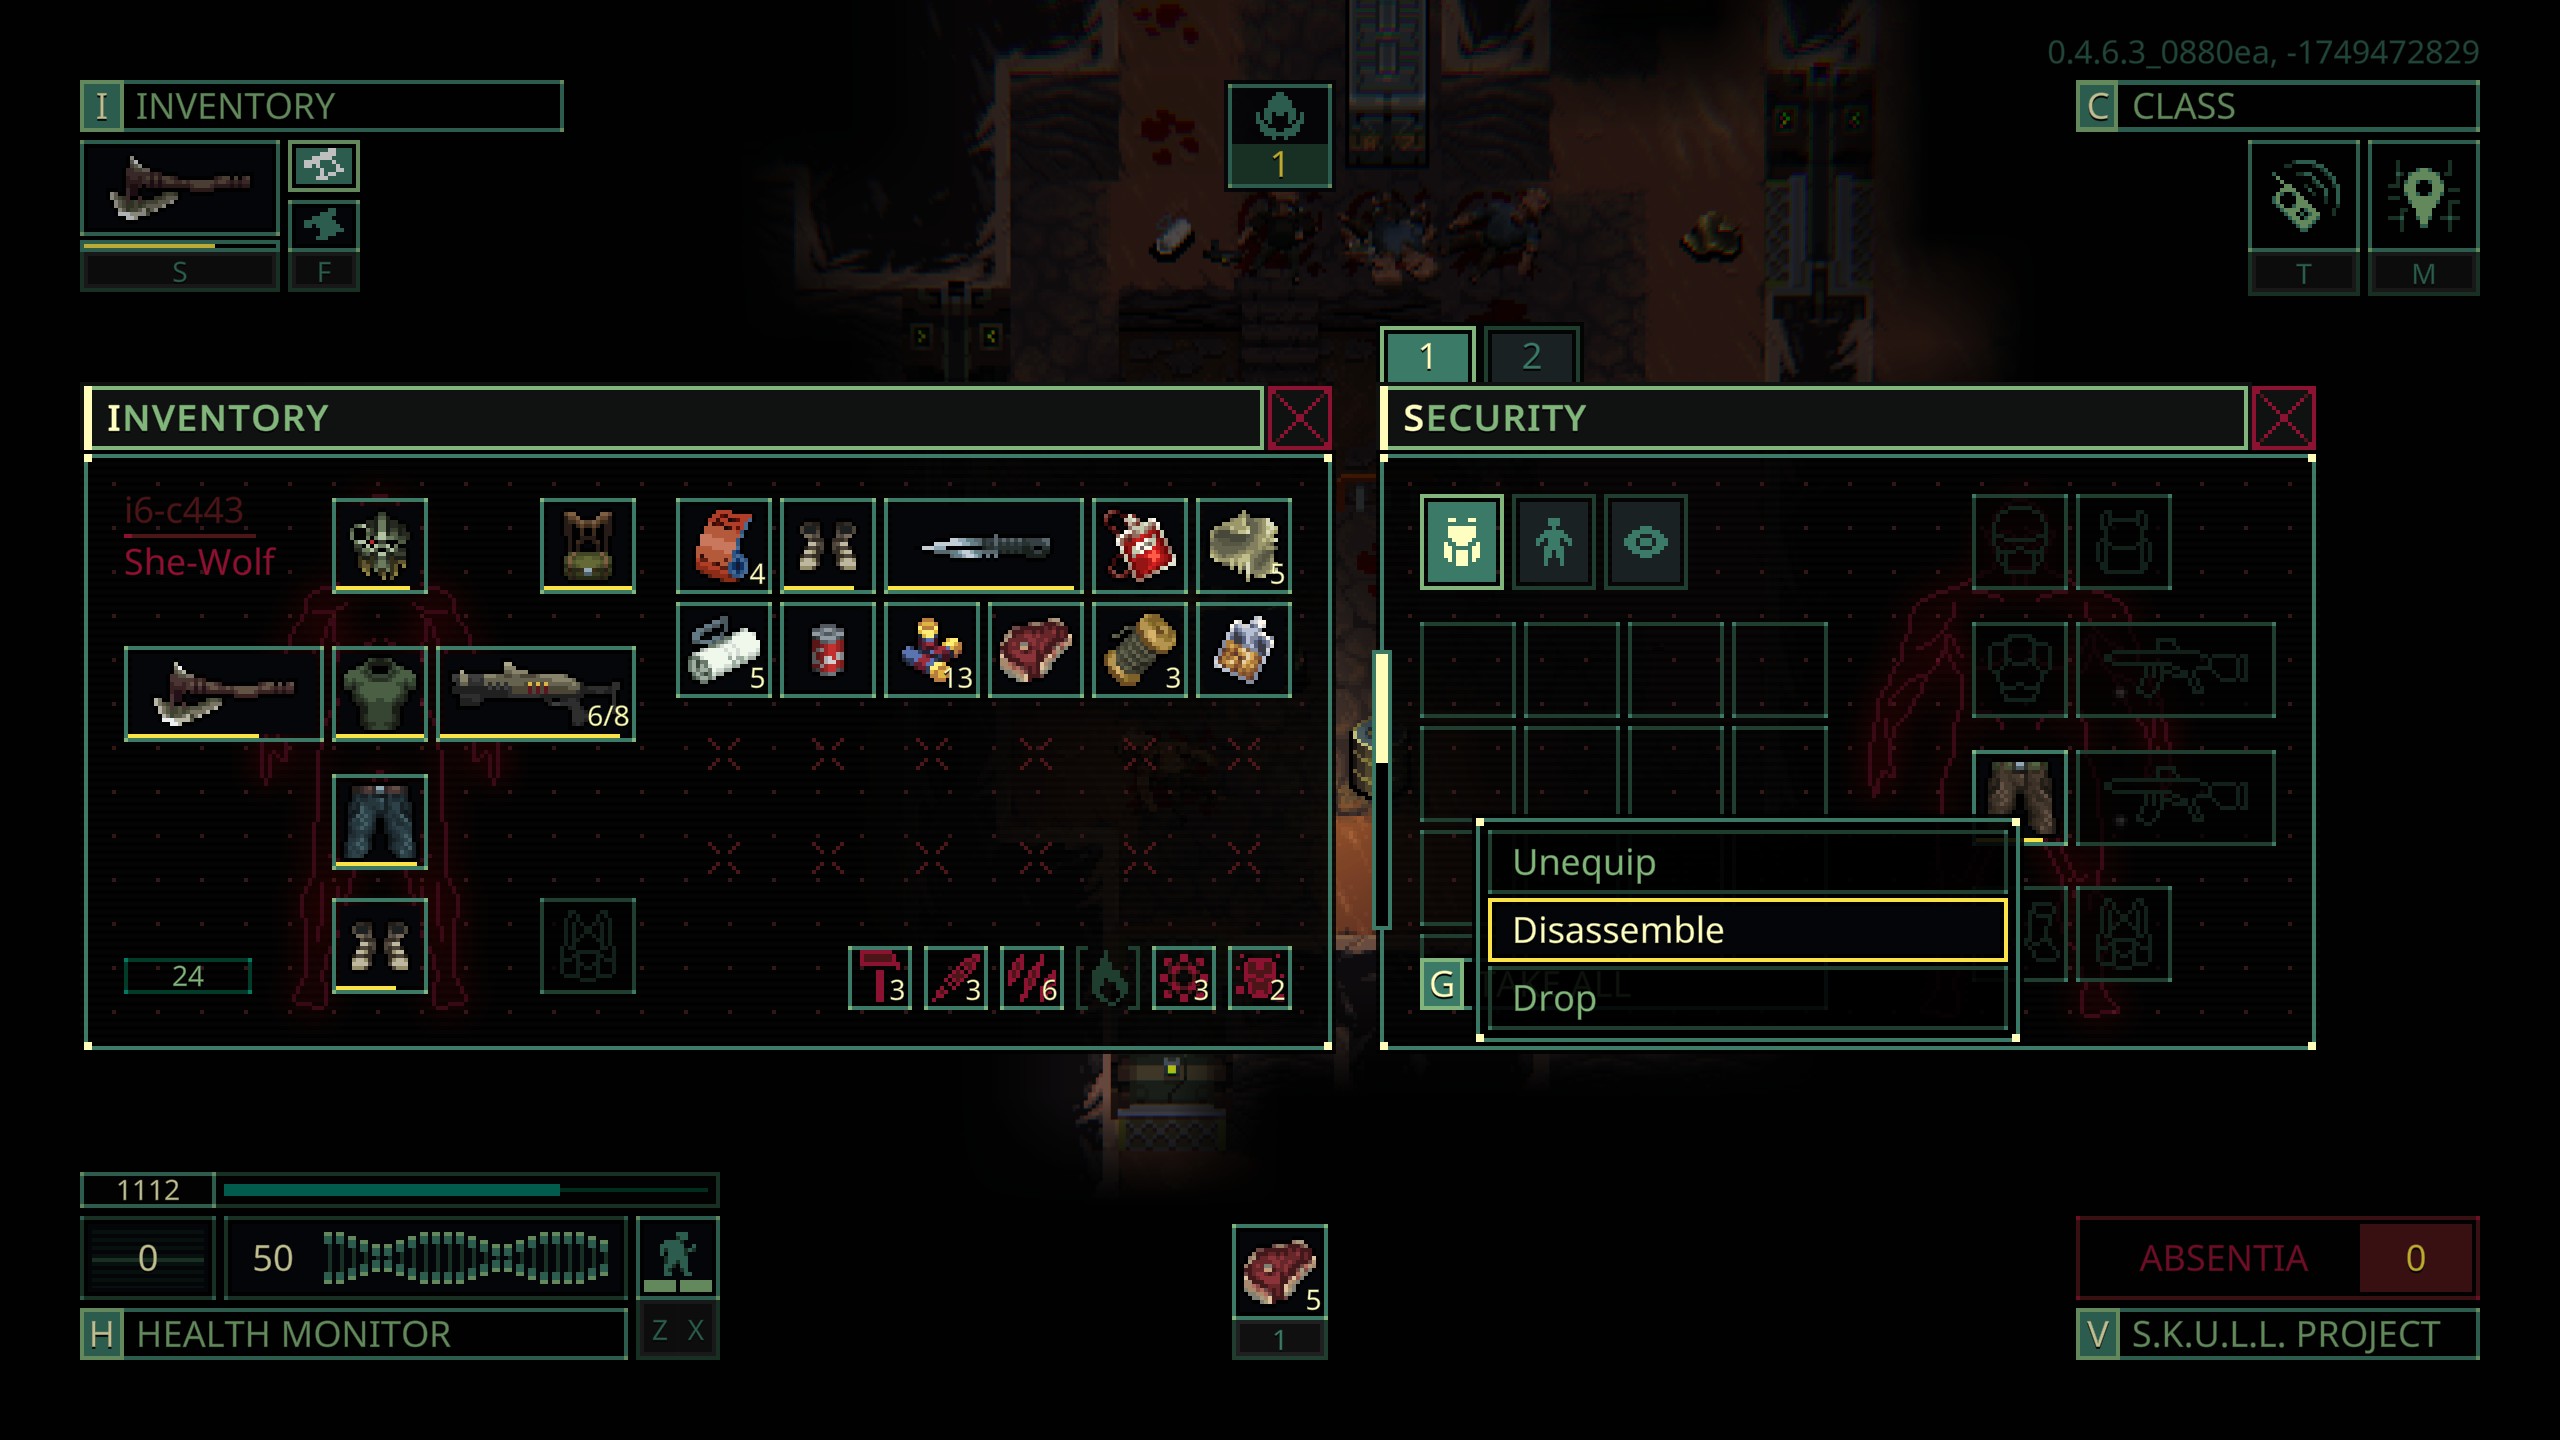
After defeating your first foes, search their bodies. You can break down clothing into rags, which are handy as quick and cheap medical items.
If you’re playing as Isabella Capet, you can get meat by opening the enemy’s body and amputating body parts.
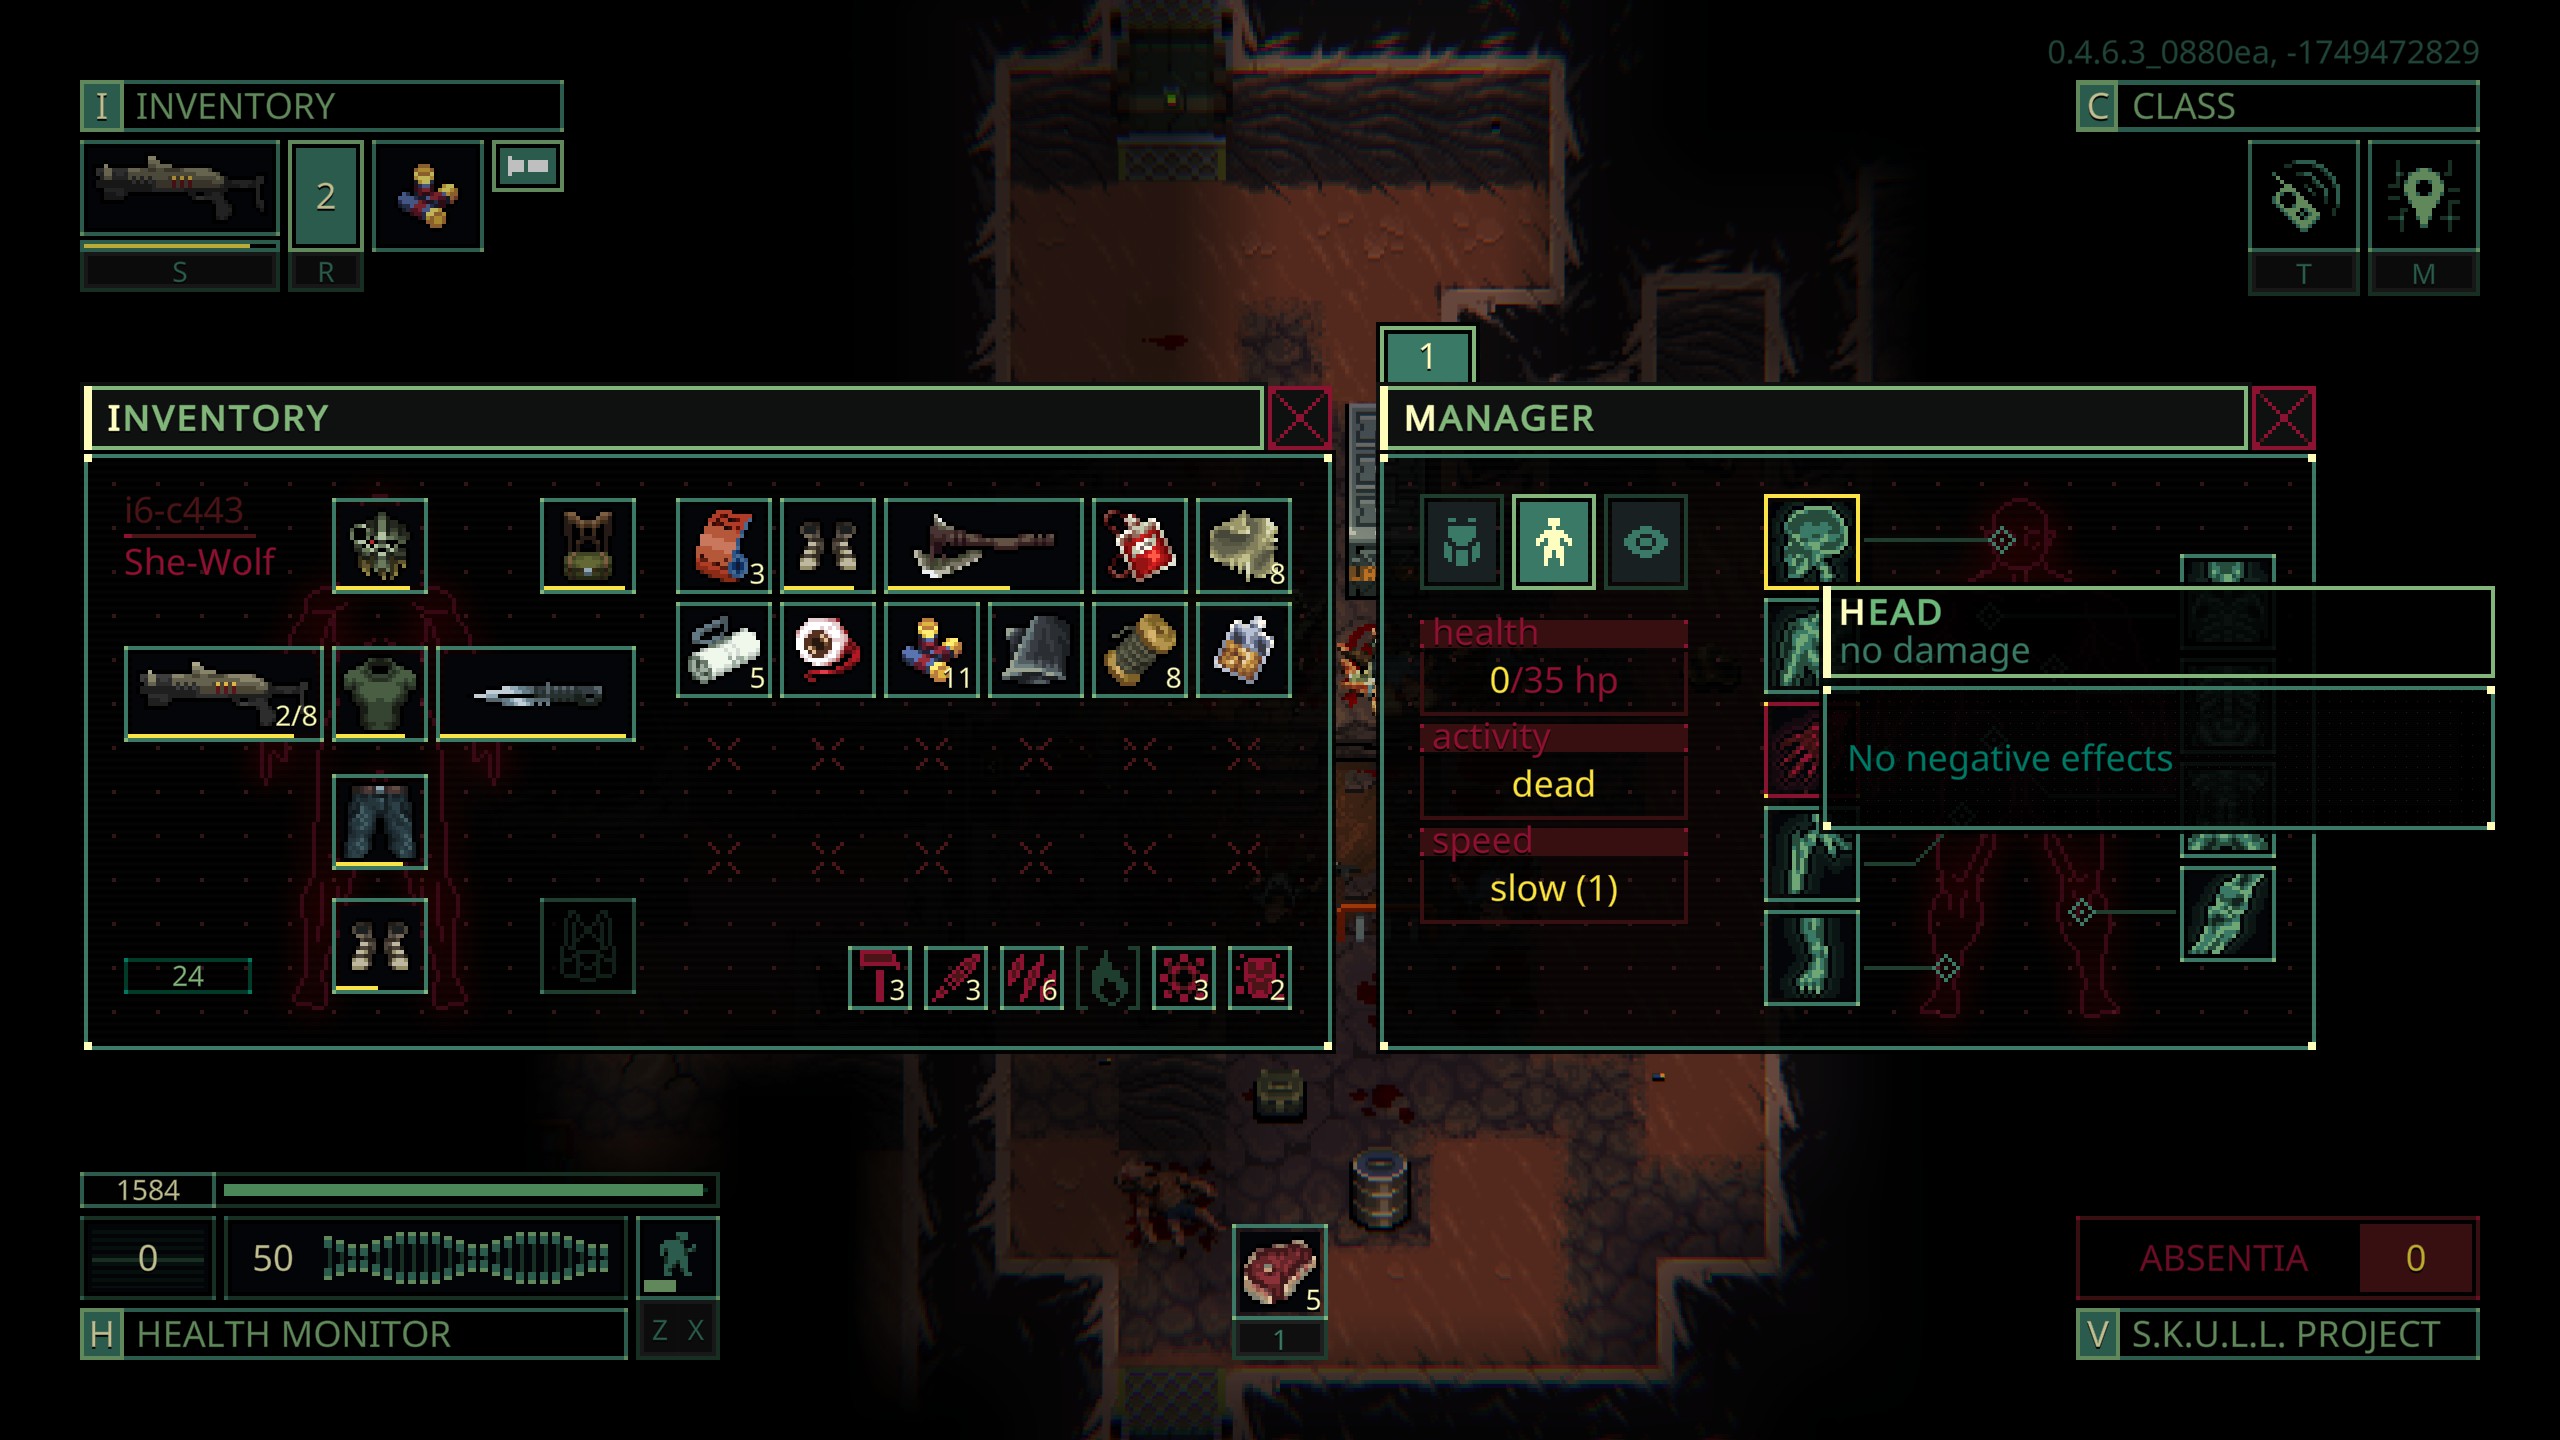
You can also get valuable items like eyes by amputating heads, which can be useful for trading in some stations.
- If you’re hurt, geen paniek.
Check the top of your screen for red injury indicators.
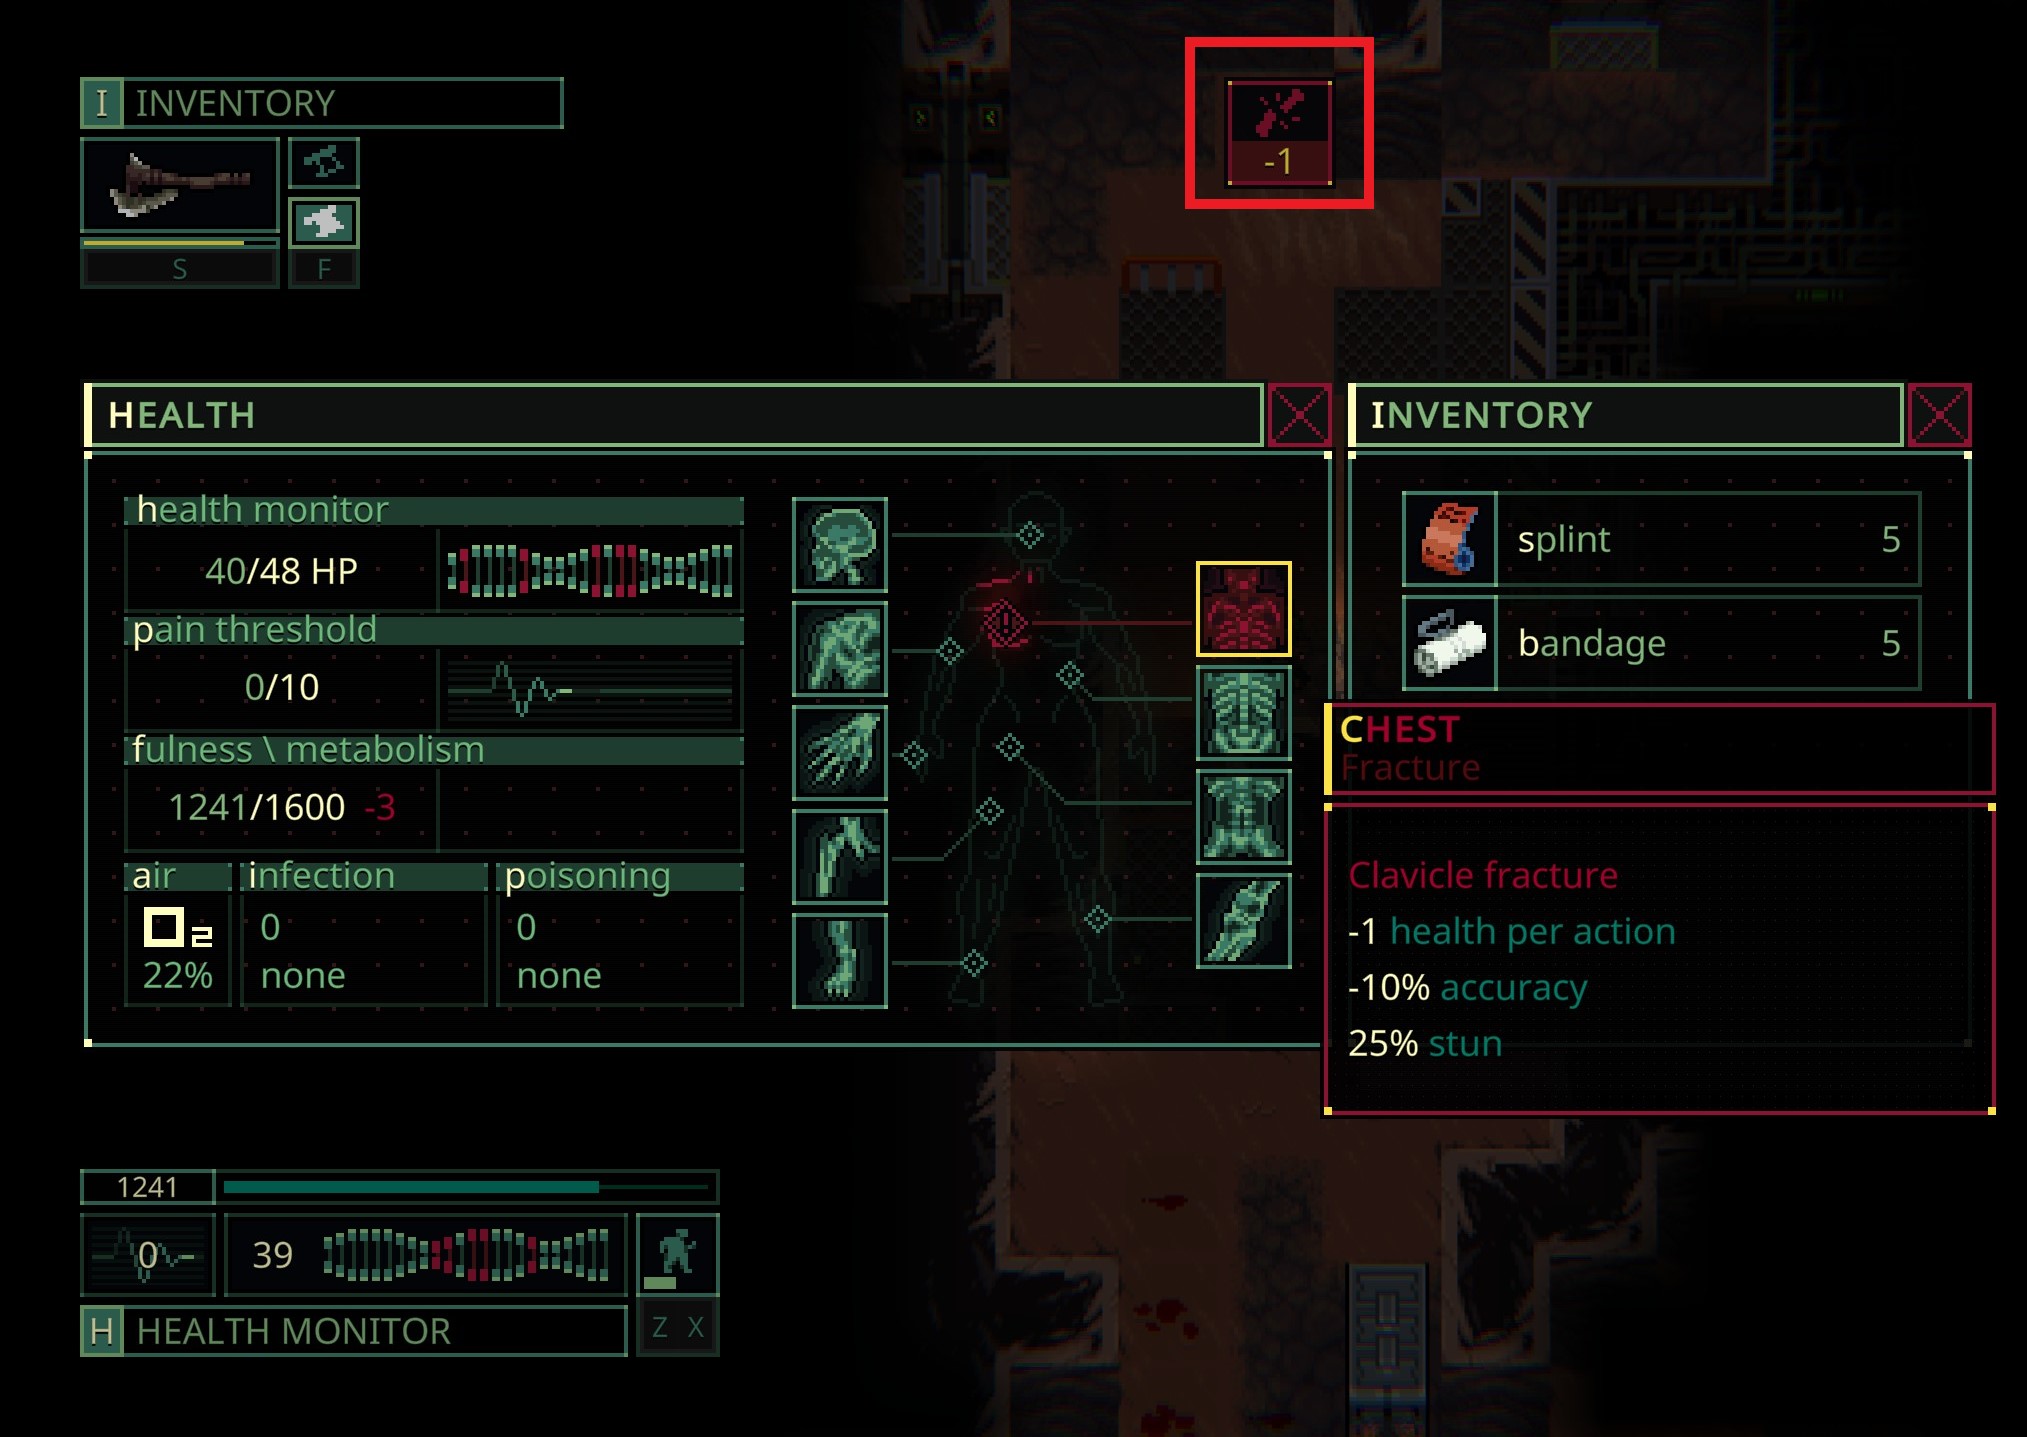
Drukken “H” and choose a healing item from the right side to treat your injury. Bandages work well for pierce injuries and burns, while splints are good for fractures.
Herinneren, it might take a few tries to fully heal, so be cautious in the following turns.
- Actions and Movement
There are three speeds in the game:

Sluipend:
- You get one action point per turn.
- Move quietly and spot some enemy movement.
- Can stealth kill sleeping enemies.
- Uses the fewest calories per turn.
Walking:
- This is the default way to move and fight.
- You get two actions per turn.
- Moderate calorie consumption.
Sprinten:
- You get three actions per turn.
- Voorzichtig zijn, as sprinting reduces accuracy.
- High calorie consumption, so avoid sprinting too much to prevent starvation.
8. Algemene tips
- Don’t use your last action to open doors or walk through them.
- Disassemble gear and bodies to get useful materials for the mission and trading.
- Collect meta-progression chips as you play; they allow you to extract without finishing the mission, unlocking helpful recipes, clones, and classes.
- To pass time on Mars, fly to the moons and back, or simply wait, depending on your goals.
- Before leaving Mars, stock up on gear for multiple clones and level them up. Having items that reduce Quasimorph like alcohol and cigarettes helps on timed missions.
- Enemies have resistances and armor, check their stats and gear by right-clicking them. For robots, use cutting weapons as they are resistant to pierce, blunt, and fire.
- Disarm explosive barrels by left-clicking them and taking out the gas.
- Beware of enemies with cutters and flamethrowers on Mars. Take them out from a distance or sprint through a door to find cover if needed.
Dat is alles wat we vandaag hiervoor delen Quasimorph gids. Deze handleiding is oorspronkelijk gemaakt en geschreven door Leech. Voor het geval we er niet in slagen deze handleiding bij te werken, U kunt de laatste update vinden door dit te volgen link.