
This guide will show you how to properly dismantle items in Going Medieval. After playing this game for a while, I wanted to share my strategy for collecting and dismantling items. The approach is straightforward, and I’ll explain the process.
Workstations
When talking about workstations, there are various options available. Each workstation serves a specific purpose in recycling items. To properly break down items, you’ll need at least two workstations.
To optimize your recycling process, you can utilize a spare Armourer’s Table specifically for dealing with fabric and metal items. Aanvullend, a Woodwork Bench is effective for handling wooden items.
Here’s a list of workstations you can consider:
- Armourer’s Table
- Blacksmith’s Forge
- Bowyer’s Table
- Sewing Station
- Smelting Furnace
- Woodwork Bench
Metal Items
When you’re dealing with metal items, there are three workstations you can use to melt them down:
- Armourer’s Table
- Blacksmith’s Forge
- Smelting Furnace
If you’re in the early game, it’s a good idea to use a smelting furnace. Op deze manier, your metal item processing won’t interfere with your blacksmithing or armor crafting. In the mid-game, consider using a spare Armourer’s Table since it can also handle fabric items.
Wooden Items
When it comes to wooden items, you’ll need a specific workstation to break them down. You can choose between:
- Bowyer’s Table
- Woodwork Bench
To avoid interruptions in your production line, it’s advisable to use either a workbench or have a spare workstation dedicated to breaking down wooden items.
Fabric Items
Nu, for fabric items, you have two options for breaking down fabric materials into leather, wool, or linen:
- Armourer’s Table
- Sewing Station
To optimize your workflow, using a spare workstation is recommended. If you opt for an Armourer’s Table, keep in mind that it can also smelt iron items, providing a dual function. Echter, for breaking down wooden items, you’ll still need a separate wooden workstation.
Multi-Use Stations
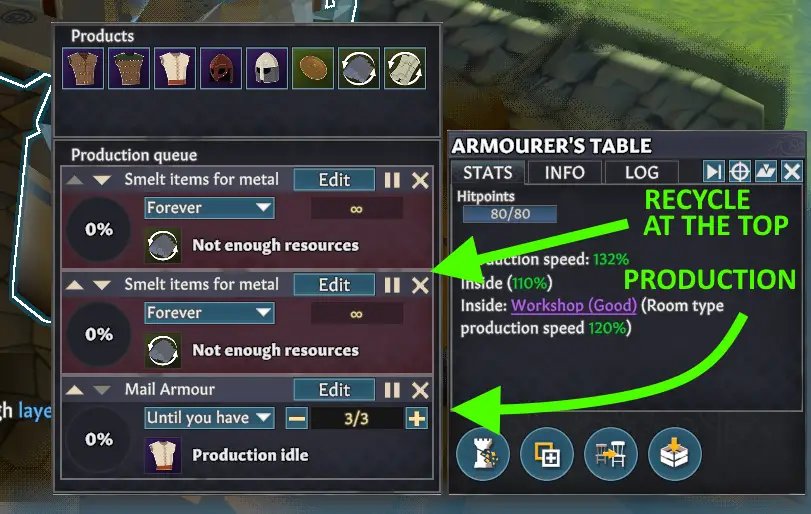
When working with workstations that have production bills, it’s crucial to prioritize dismantling at the top of the list. Placing it at the bottom might cause a backlog of items until the entire production is finished.
To ease the pressure on the production line, having a spare workstation can be incredibly helpful, especially if multiple people are involved in dismantling items. Op deze manier, you ensure a smoother workflow and prevent any delays in processing.
Skill Level
Aanvullend, when it comes to dismantling items, there’s no need to concern yourself with skill levels. In werkelijkheid, it’s recommended to advise people to perform dismantling with a lower skill level. This allows them to gain valuable skill points while carrying out the task. It’s a practical approach to skill development in the dismantling process.
Bill Setup
You just need two bills—one for HP and one for Quality.
At the start, concentrate more on HP than Quality. Use the sliders to set the HP percent and Quality level for dismantling.
It doesn’t matter which one comes first; just ensure they are at the top of your production bill list.
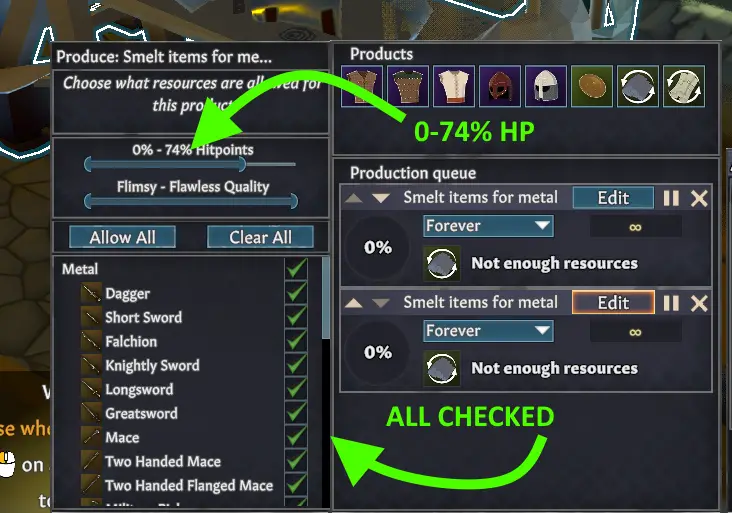
HP Bill
- For HP, keep the range between 0 en 74%. Op deze manier, new items won’t get scrapped immediately after being made.
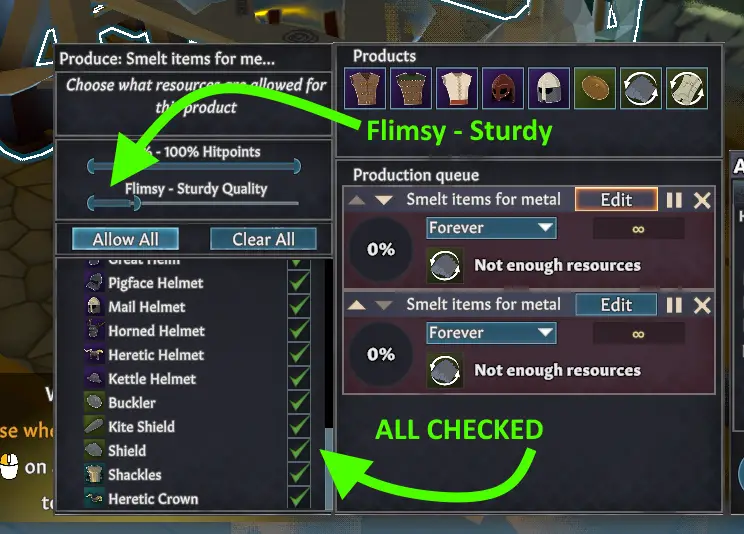
Quality Bill
- Once you have the tools you want, be less strict with quality. Set the range between Flimsy and Sturdy. This leaves anything with Good quality and above as armor for your settlers, as long as it has at least 75% HP remaining.
Item Filtering Bill (Optioneel)
- If you want to filter out specific items like crowns, savage plate armor, wood armor, enz., make a third bill. Choose the types of items in the filter list that you always want to recycle.
While not necessary, it can help later in the game if you’re focusing on specific armor sets for your settlers. In het begin, you might not need this bill and can mainly focus on HP.
Item Management
To control which armor and weapons your settlers use, follow these steps under the Manage tab:
Setting Up Bill System
Using the bill system mentioned earlier, instruct settlers to pick up items with 75% HP (AND) a quality level from Good to Flawless. In het vroege spel, you might allow quality from Flimsy to Flawless, but ensure your bills are configured accordingly.
Setting Custom Rules
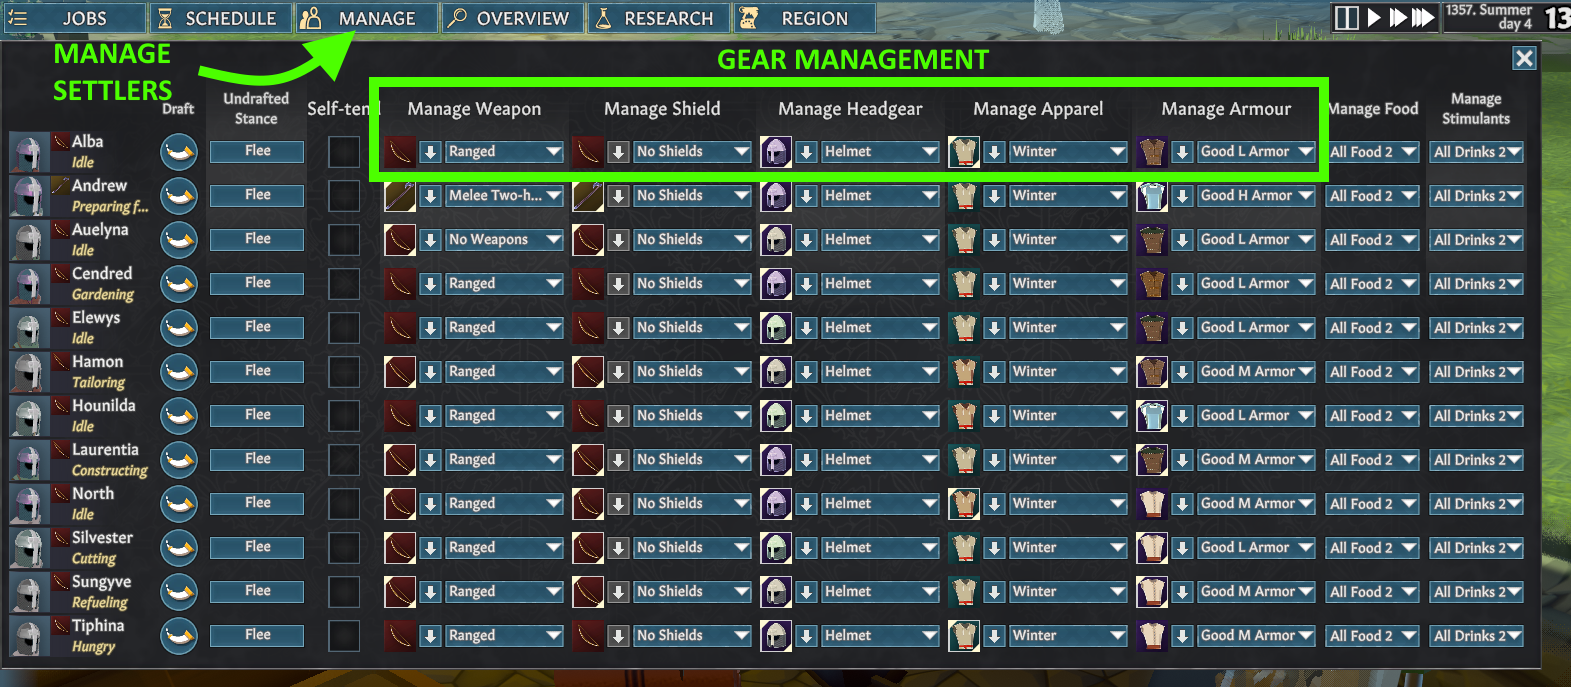
Stap 1: Click on the Manage tab.
Stap 2: Choose one of the types of gear boxes.
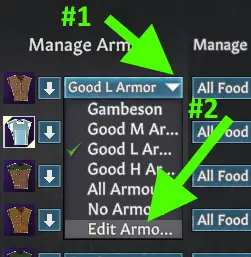
Stap 3: Select the box.
Stap 4: Click the Edit Armour button at the bottom of the list.

Stap 5: Tap the + icon to add a new custom set (Sets can be used across all saves).
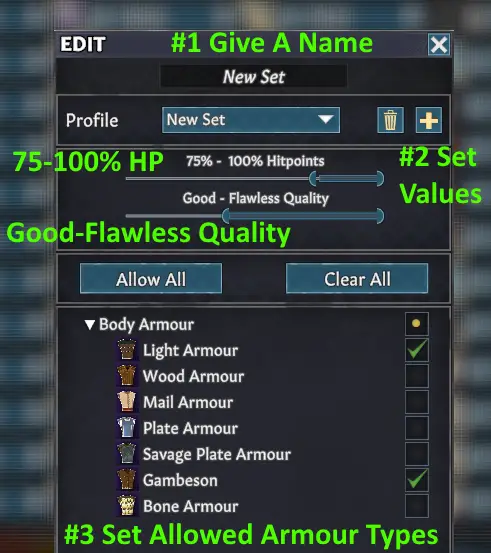
Stap 6: Name the set.
Stap 7: Set values for HP and Quality above what you’re recycling.
Stap 8: Choose the items your settler should use (Consider having different sets for various settler types, bijv., heavy armor for melee, medium armor for bows, light armor for workers, enz.).
Stap 9: Eenmaal klaar, close all windows and return to the main menu screen.
Stap 10: Select the new set you created for your settler.
Laatste tips
Using to Gain Skill Points
In dismantling items, skill level isn’t crucial, but crafting good items is. Ensure that you assign people to work on crafting specifically. After they’re done, disable the task to avoid wasting resources, as keeping them allowed to work on production items might lead to inefficiencies. Hoe dan ook, dismantling items provides some XP, allowing you to improve their skills gradually, akin to instructing low-level farmers to focus on planting crops.
Dat is alles wat we vandaag hiervoor delen Middeleeuws gaan gids. Deze handleiding is oorspronkelijk gemaakt en geschreven door NorthWestTrees. Voor het geval we er niet in slagen deze handleiding bij te werken, U kunt de laatste update vinden door dit te volgen link.