- Titel: Godsbane Idle
- Releasedatum:
- Ontwikkelaar:
- Uitgever:
Information about Godsbane Idle is still incomplete. Help ons alstublieft de details van het spel hiermee in te vullen contactformulier.
Are you feeling lost? Confused, misschien? Not sure what something does or why it matters? Can’t figure out the way forward? Look no further than this guide for explanations for each part of the game!
Character
We will be starting here since this is the most important section to understand. Within this menu, you have your inventory, equipped items, available skills, the stats screen, and several buttons for interacting with unlocked features. I’ll start with stats since each stat plays a role in battle, the acquisition of loot, or gaining resources used in other menus. Met andere woorden, your stats impact literally almost every last aspect of the game.
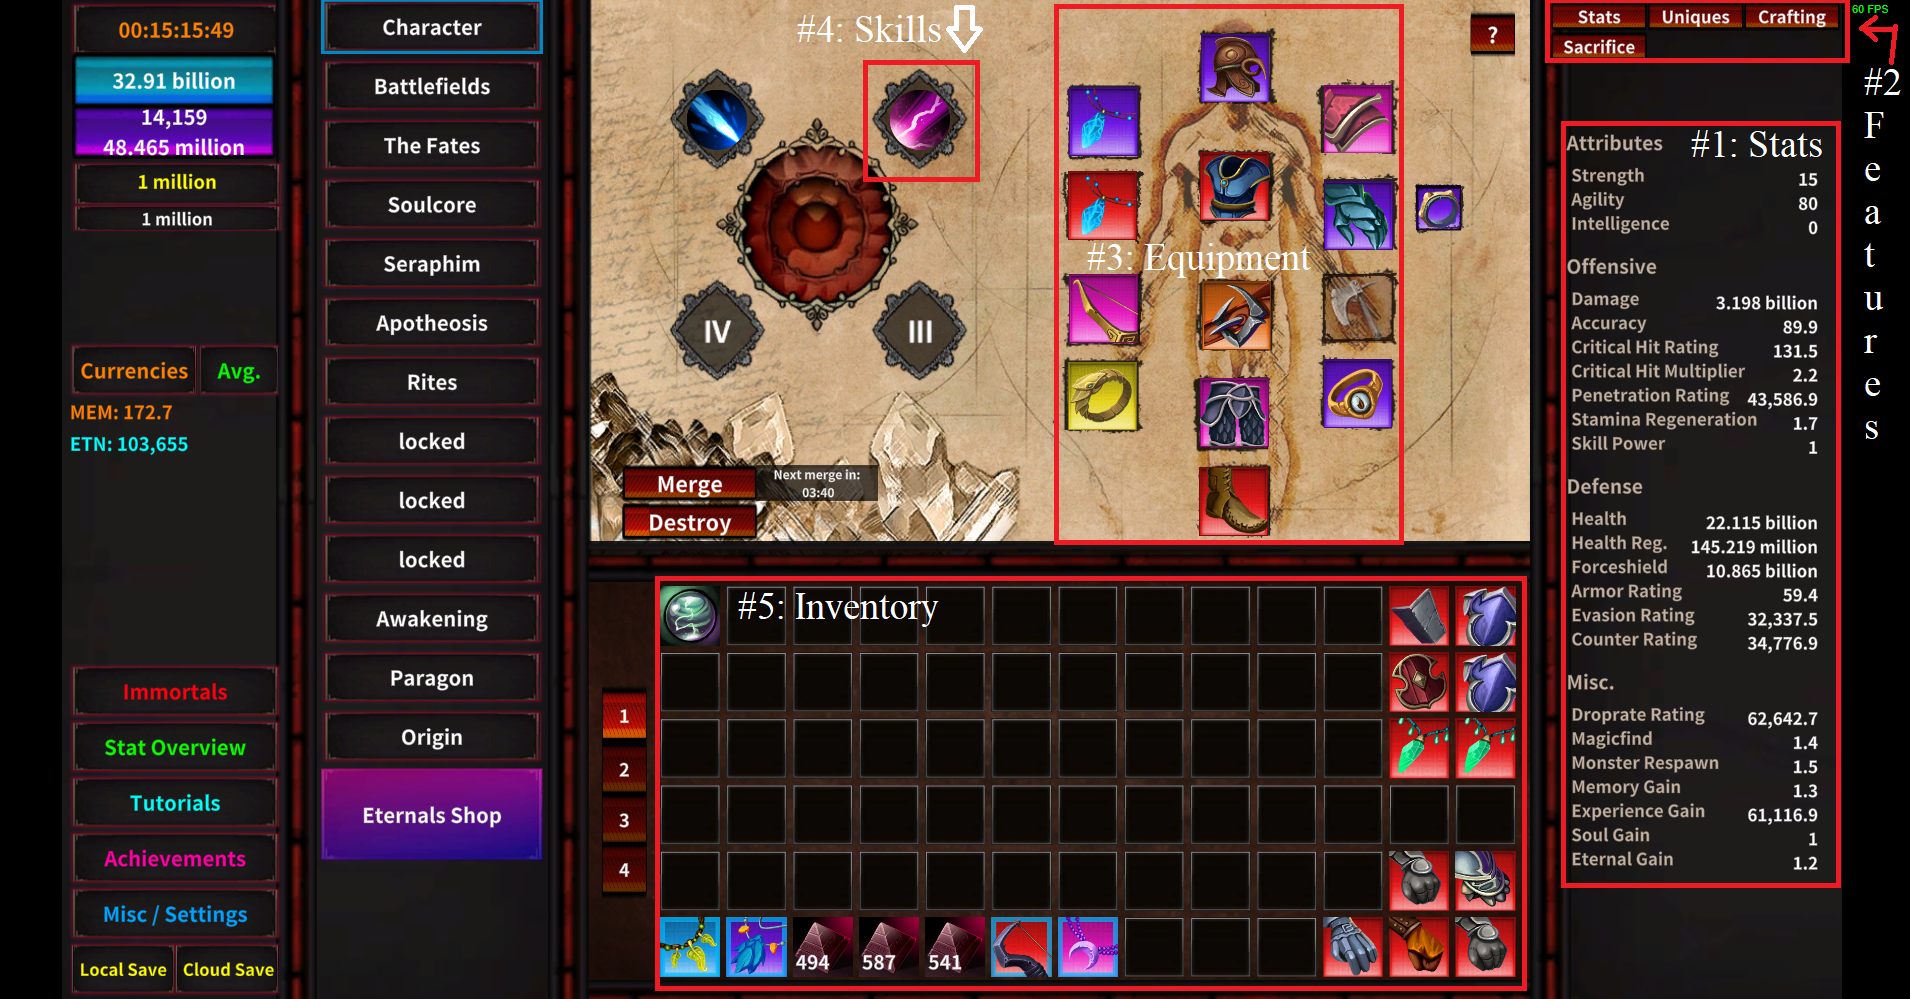
I have marked each section with a red border along with a number and heading name. Please reference the screenshot as needed to find where each section is within the UI.
WAARSCHUWING: Read at your own pace! Take breaks or read in bite-sized bits if you need to! It takes time to learn and rushing the process may leave some people feeling burned out on the game.
Statistieken
To begin with, it’s important to know where to go and what to do when you want more of a particular stat. Insgelijks, it’s equally important to know what each stat does. There’s no need to worry if you can’t remember what something does. Simply go to the Character menu and move your mouse over which Stat you are curious about.
Attributen
The Paragon perk tree is the sole source of flat gains towards Strength, Wendbaarheid, and Intelligence. This ranges between gains like +5 Strength to +15 Intelligentie. Equipment can only provide a percentile bonus to Attribute values. I.E. +X% Agility. Maar, what do these Attributes do for you?
- Kracht: Each point provides a +0.5% bonus to Melee Power, Gezondheid, Health Regen, and Armor Rating.
- Wendbaarheid: Each point gives a +0.5% bonus to Ranged Power, Evasion Rating, Critical Hit Rating, and Droprate Rating.
- Intelligentie: Each point gives a +0.5% bonus to Spell Power, Forceshield, Counter Rating, and Penetration Rating.
Melee Power, Ranged Power, and Spell Power are tied to your skills and has considerable effect as a multiplier to your damage. Verder, these three stats from your Attributes do not care which type of weapon you build towards using. Bijvoorbeeld, you can use One-handed Swords and still build towards Agility to get Ranged Power without any penalties.
Offensive Stats
Your offensive stat category is made up of the numbers that help you make things die. The function of all Stat Ratings like Critical Hit Rating, Armor Rating, and Droprate Rating will be covered in the Battlefield section.
- Schade: Your primary number to make things die and is affected by a myriad of bonuses.
- Nauwkeurigheid: This determines how likely you are to hit enemies for your full damage. Missing an enemy only deals 40%-60% of your damage to them and will be the second largest source of your failure in killing enemies in one attack.
- Critical Hit Rating: Raises the likelyhood of dealing a critical hit. You can see your critical hit chance in the Battlefield.
- Critical Hit Multiplier: This number is what your damage is multiplied by when you deal a critical hit. Seeing a 1.5 here would mean your damage is multiplied by 50% when you deal a critical hit. There are a small number of sources that make this number go up.
- Penetration Rating: Works as a multiplier to your Damage.
- Stamina Regen: This determines how quickly you get stamina. Faster stamina gains means you attack quicker. This also applies to various effects that work completely off your Stamina Regen.
- Skill Power: I am delving into the game code to figure out where this Stat gets it’s effect from. Dus, I actually have no idea where this stat gets anything from. It sure as hell doesn’t seem to come from Attributes or equipment either.
Defensive Stats
Your defensive stat category is made up of the numbers that keep you alive when things really want you to die. Opnieuw, the function of all Stat Ratings like Critical Hit Rating, Armor Rating, and Droprate Rating will be covered in the Battlefield section.
- Gezondheid: This keeps you alive. You die if it reaches zero.
- Health Regen: This is how much Health you recover every second.
- Forceshield: Have you ever wanted a second Health bar like bosses in certain games? Forceshield acts similar to Health and always takes damage before your Health until it reaches zero. You won’t die when this reaches zero.
- Armor Rating: Damage reduction at its finest.
- Evasion Rating: Want to imagine you’re dancing around your enemies while taking no damage? Dan, this Stat is for you.
- Counter Rating: This can help you counter your enemies harder than Miyata Ichiro. You also recover an amount of Forceshield equal to 20% of your damage upon counter attacking an enemy.
Diversen. Statistieken
One might think these stats don’t matter since they’re not related to combat but that couldn’t be further from the truth. Just about all of these stats affect the results of what you get from winning at combat.
- Droprate Rating: You want more frequent equipment drops? This is your Stat.
- Magicfind: You want higher rarity equipment drops? Raise this.
- Monster Respawn: Every bonus you get to this makes monsters respawn ever so slightly faster. Faster kills equals more equipment/resources equals quicker gains.
- Memory Gain: You want more Memories for spending on Soulforce? It’s slow to grow but every bit helps more than you’d think over long periods of time. Bovendien, Memories are relevant regardless of what point in the game you’re at.
- Experience Gain: You want faster Awakening Levels, more Awakening Points, and slightly more Paragon points from killing enemies? Dan, this here is what you want.
- Soul Gain: The higher this is, the quicker your Soul Cap increases from killing enemies.
- Eternal Gain: I actually haven’t found any sources to raise this beyond achievements. The only place you get Eternals is in The Fates where you draw a card every day.
Het knutselen
This is where you’ll unlock features related to Crafting, Uniques, Sacrificing equipment, and the Heartseeker. Everything here either boosts the effects of your equipment, grants powerful interchangeable effects, or raises your Stats considerably with permanent bonuses.
Het knutselen
This feature lets you use crafting materials to improve the power of your equipment. Fully crafted equipment has double the stats of non-crafted equipment, making this a powerful feature when used well. Simply drop off a piece of equipment in the Crafting Slot in the Crafting side-menu and improve it with crafting materials. Don’t forget to reequip the equipment when you’re done! Ten slotte, as you progress further, the Crafting side-menu will unlock additional crafting abilities and menus that allow you to fine tune your equipment.
Uniques
Beat Pertubaros Legacy’s level 10 and one of the things you unlock is Elites and Uniques. Kill Elites, get a max relic stack, and extract it in the Unique menu to create powerful Uniques that are ridiculously powerful. There will be more on Elites in the Battlefield section.
Sacrifice
You know all that useless equipment you’ve been destroying? Unlock this and all those equipments you’re destroying provide a bonus to the permanent stats you get when you sacrifice a set of equipment with the same rarity. It’s recommended you get the bonus just below the Sacrifice button to at least 1.5%. This will help you gain extra bonuses in the second list of Stats. The only restriction is that you can only Sacrifice equipment of Rarity 9 or Rarity 10.
Heartseeker
This unlocks late in the game but it’s still awesome! You know those Heartcore bonuses you’ve been working on the whole game? This feature lets you level up your Heartcore and gives a multiplicative bonus to your Heartcore bonuses!
Apparatuur
In principe, no equipment effectively means considerably less Stats to help you in progressing further. Insgelijks, just about every bonus you gain will multiply everything you gain from your equipment. Each type of equipment has a set of icons that directly relate to the set of base stat effects of the equipment in question. All equipment types have at least one special modifier. I.E. Armor for the Chest slot having the modifiers of +X Max Droprate Chance and +Y Charge Generation.
Weapons are your largest source of Damage. I recommend using Crafting to double the stats of your weapon(S) Eerst. Staves deal element damage(I.E. Blight Damage) instead of Physical Damage. Weapons also have different types such as Sword, Bijl, Schild, enzovoort. Bijvoorbeeld, a bow with the icon of a golden bow with a gold drawstring will always be Two-handed, a Bow, deal Physical Damage, and have the secondary effect of +1 Max Frenzy Charge and +X% more Frenzy Charge duration.
Armor comes with it’s own variation of +X Armor/Evasion/Counter Rating similar to how Weapons come with different secondary effects. There’s a type of armor for every potential combination of Armor/Evasion/Counter Rating. This helps you build up your Defensive Stats in the way you want.
Amulets come with some of the standard fare of offensive and defensive random modifiers. Echter, amulets are the only equipment slot that can roll the +X% Soul Power and +Y% Soul Refill modifiers. Plus, you can wear two amulets at the same time.
Rings are great since they usually come with one or two different types of damage. Hoewel, they have a pretty good set of special modifiers like +X% Heartcore Gain and +Y% Prestige Points. Like amulets, you get to wear two rings at the same time.
Eindelijk, equipment can roll a modifier twice. I.E. two rolls of +X% damage with Sword. Depending on your Paragon build, these kinds of equipments can be useful.
Vaardigheden
Skills are what you use to attack and they also gain levels, allowing you to spend points to improve the way they work. Left click on the icon of the skill to do this. Like the Paragon tree, you can freely reset your skills point expenditures and reallocate the points however you wish. Naarmate je verder vordert, you’ll want to consider increasing the number of enemies your skill(S) can hit per attack. Momenteel, only two out of four skills have been released. Both skills have entirely different perk trees, allowing you freedom to customize how you fight. Take your time to read perk descriptions carefully to make sure you understand their effects.
Inventory
This is where equipment and other items you get from killing enemies will go. If this is full, the equipment and other items you get will be auto-destroyed. This includes items like Trophies. Inventory space becomes a premium once you start killing Elites and have a lot of Trophy drops and no auto-destroy function unlocked.
Dat is alles wat we vandaag hiervoor delen Godsbane Idle gids. Deze handleiding is oorspronkelijk gemaakt en geschreven door shinami. Voor het geval we er niet in slagen deze handleiding bij te werken, U kunt de laatste update vinden door dit te volgen link.