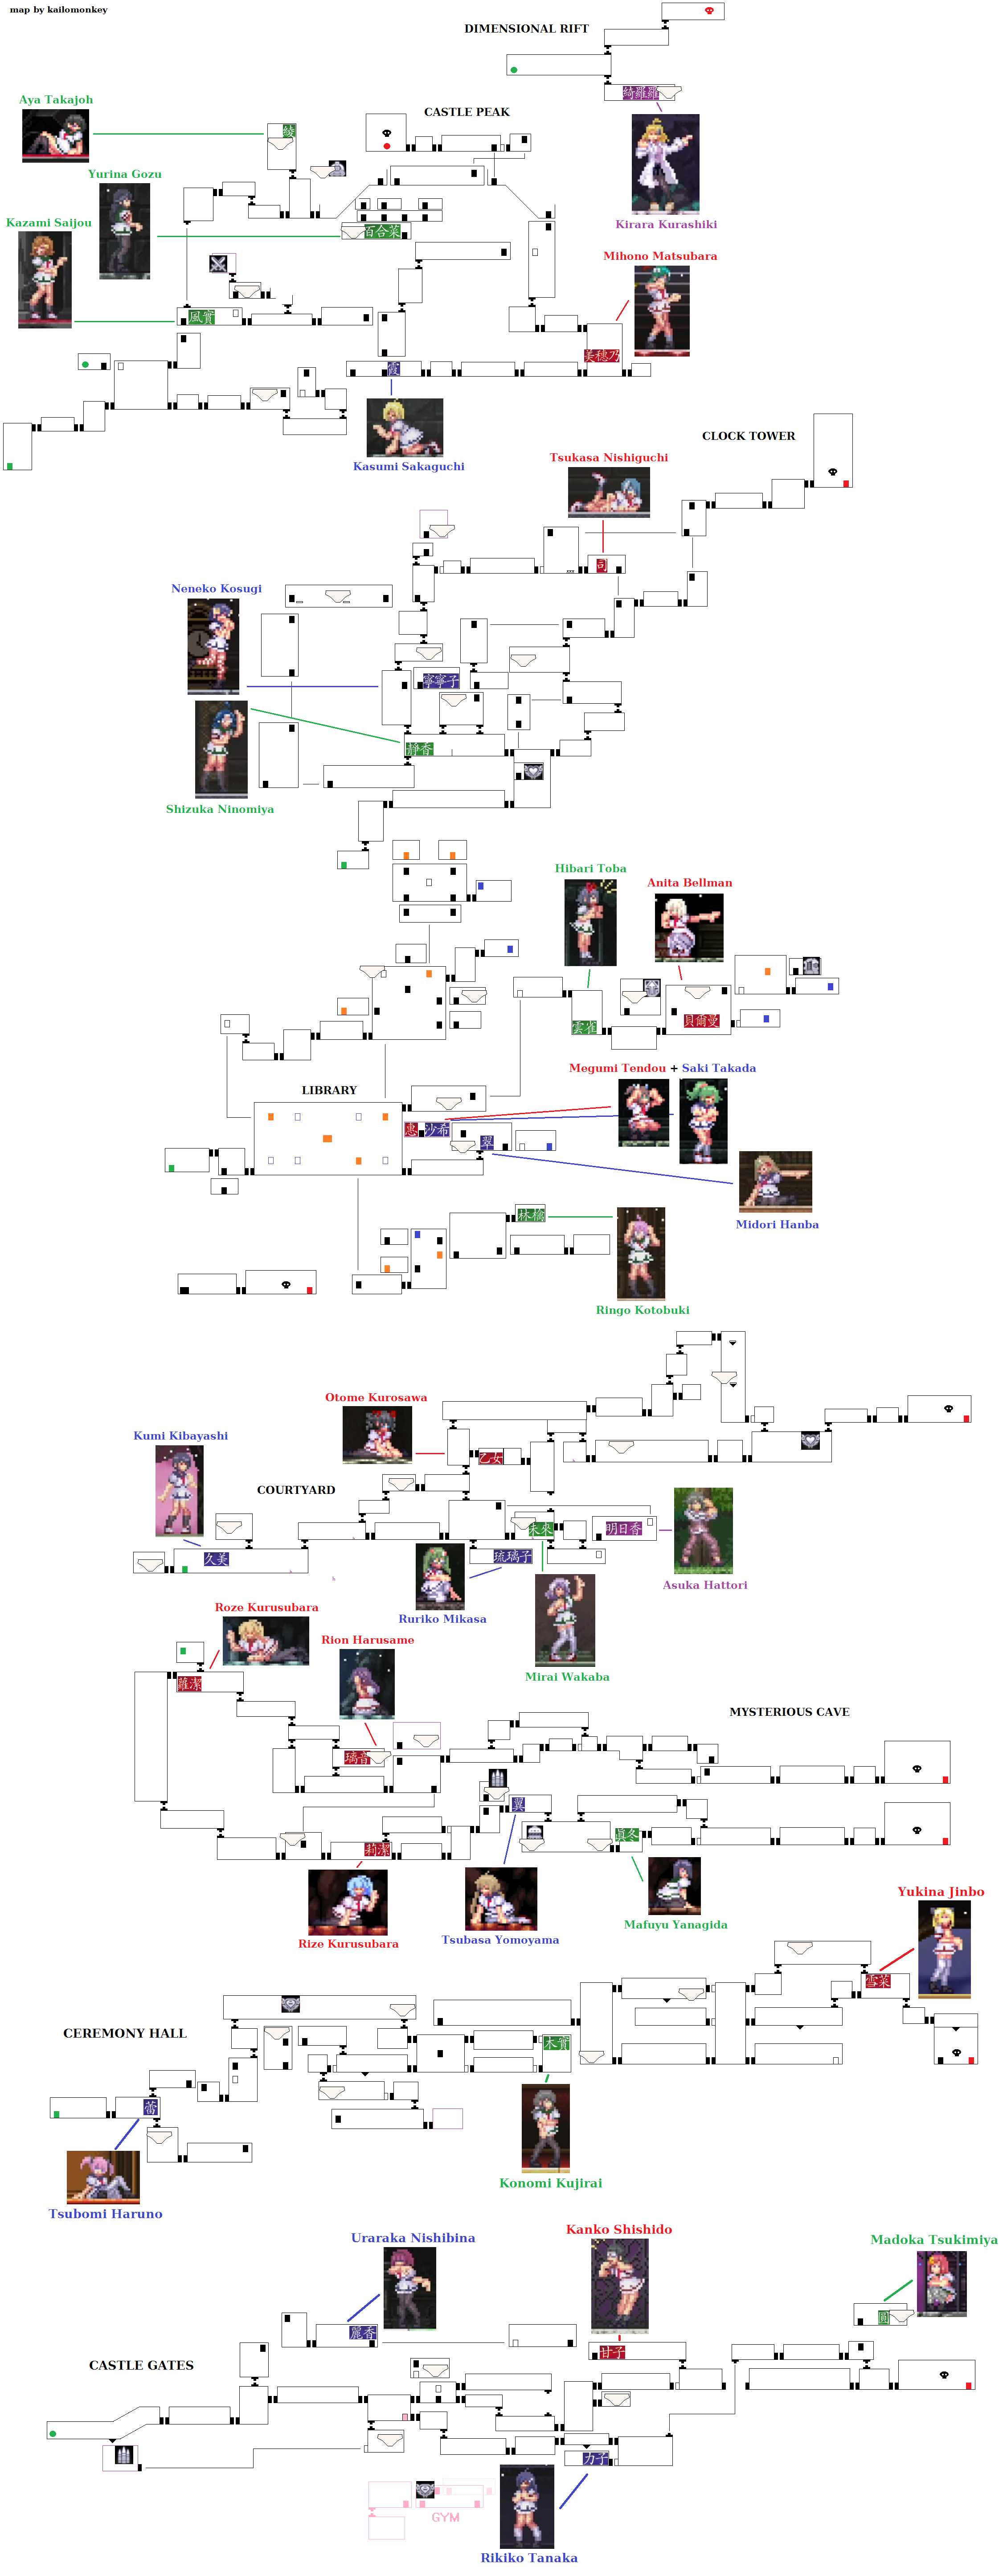
I want to help you find missing collectibles without giving everything away. In plaats van, I’ll provide a Gal Guardians Demon Purge abstract map for you to follow. This is for those who prefer a bit of guidance but don’t want all the answers. You’ll know which stage and even the specific room on that stage to focus on.
Overzicht
SPOILER ALERT: If you want to keep a surprise collectible after completing the game, avoid scrolling down to the map at the end.
In het spel, there’s no built-in way to track the collectibles you’ve found or are yet to discover besides physically going to the locations. Echter, I’ll provide ways to identify the ones you’re missing on each stage. Tegen het einde, I’ll present an abstract map that you can use as a checklist or guide.
Students
You need to rescue a total of 32 students in the game, En er zijn er 3 associated achievements. Getting all of them is crucial for unlocking a special ending achievement.
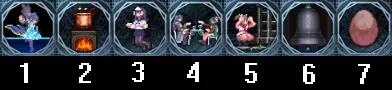
After completing the castle once, a base for the main characters will open up, featuring a door at the bottom right leading to the gym. To identify the missing students, visit the gym and compare it to a reference image of the completed gym, making it easy to spot the ones you haven’t rescued yet.

Each student in the game has a number and a symbol above them, indicating which stage to search for them. If you prefer more guidance, here are specific instructions for finding certain students:
- Roze: Behind the fiery beast right at the start of Mysterious Cave. Consider cooling it off if you’re having trouble passing.
- Rize: In the second pass through Mysterious Cave, use the demon platform that lifts you up to reach her.
- Megumi: Found with Saki in the secret room of the Library. Use explosives to destroy cracked floors if you haven’t figured it out yet. Take the bottom right corner exit from the hub room of many doors and start blowing stuff up.
- Rion: Hidden early in the water areas of Mysterious Cave. Cross an expanse of water going right or maintain height to go up a slope a couple of rooms later.
- Anita: On the second pass of the Library, take the top right corner exit from the hub room of many doors and keep going for about 5 kamers.
- Otome: Take the absolute top route on Courtyard. If you hear her but can’t find her, explore every part of the tree until you reach her.
- Tsukasa: On the first pass of Clock Tower, behind some spikes you’ll have to take damage from. alternatief, reach her safely from the second pass route by going through an optional door on the top left of a tall room later on.
- Mihono: On the first pass of Castle Peak. Stick to the lowest, rightest way to ensure you don’t miss her.
- Tsubasa: You can’t miss her on the second pass through Mysterious Cave.
- Midori: On the first pass of the Library. If you somehow avoided her, take the bottom right corner exit from the hub room of many doors and keep going until you find her. Megumi and Saki are found from the same room.
- Neneko: On the first pass through Clock Tower, in a hidden room behind a ceiling snail. If you’re on the second pass, take a left at your first direction choice. In the far left of the next long room, go up instead of down. Succes!
- Tsubomi: The first student you will find near the start of Ceremony Hall. You can only miss her if you’re actively trying to do so. Incidentally, she’s also the first student you shoot in every Gal Gun game.
- Ringo: In a hidden room on the first pass of the Library. If you missed her, go through the facing bottom right door in the hub room of many doors. The door will be locked, and the switch to unlock it is through the bottom right corner exit of the same hub room. Kill or pass every Mage enemy, hit walls, and you should find her.
- Asuka: You should hear her as you leave the big fountain room in Courtyard. She’s through the facing door above the normal exit. Use the grappling hook or paper swans to reach the door, or on the second pass, take the highest route until you find a fiery beast. Dan, take the exit down into the same big fountain room, and from the very top of the slope, jump right with an umbrella, landing on a squarish platform. Jump and umbrella along all the square platforms until you reach the door.
- Saki: Found with Megumi in the secret room of the Library. If you haven’t figured out how to destroy cracked floors with explosives yet, take the bottom right corner exit from the hub room of many doors and start blowing stuff up. You can use bombs, TNT, Houdai-kun doll, or even Shinobu’s unlocked rockets.
- Kasumi: You can’t really miss her on the first pass through Castle Peak. If you go through the facing door where you find her, you may also miss Mihono.
- Uraraka: On Castle Gates, take the highest route when able. When you find her, do not go through the hidden door until you save her, or you’ll have to start over. If you’re struggling to reach her, try getting on the chandelier demon (alive or frozen), use the grappling hook fired right and jump fast. If these methods are challenging, throw a paper swan, jump onto it, switch to Shinobu’s oonusa (healing stick), hold down the sub-weapon button (to wave the stick), and use directions to navigate.
- Yukina: At the very end of the highest route in Ceremony Hall.
- Yurina: Hidden in Castle Peak second pass. Take the highest route until you are on a slope with 2 wyverns. There will be a blue fan that can lift Maya’s umbrella. Take a risk and drop down there.
- Ruriko: Often missed because the wall she’s hidden behind doesn’t break when shot at. In the room in Courtyard with the big fountain, check closely around the fountain to find her.
- Hibari: On the second pass of the Library, take the top right corner exit from the hub room of many doors. A couple of rooms on, you’ll find her in a room of ghosts. Umbrella over to her or use grappling hook or paper swans.
- Aya: On the highest route second pass of Castle Peak, there’s a big room filled with ghosts. Grapple hook from the right to the top left corner or reveal a hidden floor fan to reach her.
- Kumi: The first student you’ll see in Courtyard. Reach her immediately by throwing a swan from the slope to the right or by freezing the knight and using it as a platform.
- Kazami: On the second pass through Castle Peak, take the highest route, and you’ll see her.
- Madoka: At the end of Castle Gates through a facing door just out of reach. On the second pass, take the lowest route through the stage. alternatief, from Aoi’s shop, it’s in the room just above you. Use grappling hook fired left/right and jumping or paper swans fired against the wall to make your way up.
- Konomi: On a side route in Ceremony Hall. All routes converge on a room with a big facing door in the center to continue. Instead of going through the door, go to the exit in the top right corner.
- Mafuyu: Late on in Mysterious Cave second pass. Cross a lake of fire to reach the room exit to find her. A timed umbrella dash, good use of a penguin, or grappling or paper swans can help.
- Mirai: You can’t really miss her in your first pass through Courtyard. She’s a little out of reach, but there are ways to get up, or you can simply drop down to her after taking the longer way round ahead.
- Shizuka: You can’t really miss her on the first pass through Clock Tower. If you’re on the second pass, take a left at your first direction choice, and she’s at the far left of the next long room.
- Rikiko: Take the lowest route on the second pass through Castle Gates. In the room where your chandelier platforms fall, you will need to fall to find her.
- Kanko: Take the highest route through Castle Gates.
- Kirara: The only ‘student’ in Dimensional Rift. Head down when able and umbrella to the right.
Device Parts and Upgrades
To achieve two optional endings, it’s necessary to collect all three Device Parts, which are typically a bit hidden and only obtainable on the second pass through the game. Aanvullend, acquiring all eight Upgrades is required for a specific achievement. These upgrades are often a little hidden or challenging to reach.
To track your progress, you can access the pause menu at any time, displaying the Device Parts and Upgrades you’ve found. If you want to narrow down your search for a missing item, compare your pause menu to a provided image and go to the stage indicated by it. This will help you efficiently locate any missing Device Parts or Upgrades.
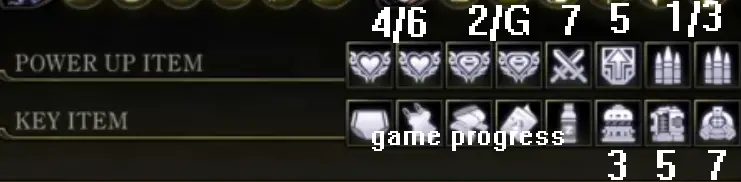
If you need more detailed instructions, continue reading. If you’re looking for the abstract map, scroll to the end of the guide.
Device Parts
For the first Device Part, head to Mysterious Cave. In a long room of lava, notice a space beneath the slope as you enter. To reach it, use a sub weapon to negate the lava, allowing you to crawl through. Think of it as navigating a fiery beast, but with less danger.
The second Device Part is in Library. Take the top right corner exit from the hub room of many doors. In the room with slime falls, hit the switch. Move on to the next room and exit through the facing top right one-way door. Look for a shelf with a flame above it; this flame indicates that you’ve opened a door there with the earlier switch. Destroy the cracked ground beneath the shelf to reveal the door.
The third Device Part is on the highest route of Castle Peak. In the top left of the sloped space with two wyverns and some ghouls, use Maya’s umbrella with the floor fan to reach a moving platform that will help you across.
Upgrades
There’s about one upgrade for each stage, and they include 2x Max Hearts Up, 2x Max Weapon Points Up, Maya Attack Up, Defence Up, and 2x Shinobu Max Bullets Up. Let me go through each one according to the stages.
- Castle Gates / Shinobu Max Bullets Up – Under the drawbridge before entering the castle, there’s a secret. If you can’t open it, maak je geen zorgen. Just use Grenades, TNT, or Doll to blow it up.
- Ceremony Hall / Max Weapon Points Up – Starting from the beginning, go up until you find what seems like a dead end with a fall to the right. In subsequent passes, realize this is a shortcut, and the upgrade floats in the air. Use paper swans and an umbrella to reach it, with a moving platform halfway to assist.
- Mysterious Cave / Shinobu Max Bullets Up – In the room with three floor flames, look for a door directly above you. Grapple to it from the right or freeze the flames to use them as platforms.
- Courtyard / Max Hearts Up – This one is located two rooms before the shop and boss. Use platforms from the left, shield yourself from blood sprinklers with an umbrella, or grapple. On the first pass, freeze the spear lizard enemy to use it as a platform.
- Bibliotheek / Defence Up – Take the top right corner exit from the hub room of many doors, continuing until the room after the falling slime. Break all the cracked ground with Grenade, TNT, Doll, or Shinobu Rockets to find the hidden door leading to the upgrade.
- Clock Tower / Max Hearts Up – You’ve probably seen this upgrade while playing through the Clock Tower. On the second pass, head right until you find spikes low to the ground. Use Maya’s Doll, crawl through, and keep going. You can get it earlier with some backtracking.
- Castle Peak / Maya Attack Up – A platformer challenge awaits in Castle Peak. Head upwards on your second pass, crossing high platforms and a gap. Use the umbrella on floor fans to enter the secret course. Eenmaal voltooid, go up instead of entering the lower door to get the upgrade.
- G is for Gym / Max Weapon Points Up – In the base of operations during your second pass, find the Gym door on the bottom right. The upgrade is above you as you enter. Grapple left and jump quickly to reach it, or take the right path, grappling over a pile of boxes, and go through the facing door to access the upgrade.
Geheimen
While it’s not something you collect, each full stage hides a secret unlocking an achievement. On the map, these are marked in purple, similar to the teleport pillar maps. To find out which ones you’re missing, check your achievements and compare them to the following list.
- Castle Gates – Destroy the drawbridge.
- Ceremony Hall – Opt for the lower route and break the wall behind the steps. Inside the room, use Umbrella Dash to solve the puzzle.
- Mysterious Cave – When the first pass and second pass split, reach the facing door in the top left. Solve the puzzle using oonusa.
- Courtyard – Locate four shelters with tables and two chairs. Press up, switch characters, press up again at any of them to solve the puzzle.
- Bibliotheek – Discover the hidden door behind a bookshelf by exploding cracked floors. This one is specifically on the first pass route. From the hub room of many doors, take the bottom right corner exit.
- Clock Tower – On the first pass route, when you reach the lift to the top of the tall room, jump left and go up even more. Use an attack to ring the bell.
- Castle Peak – On the second pass or later, take the highest route until you reach where high platforms cross a gap. Cross the gap, and in the next room, use the Umbrella to enter the secret challenge. Eenmaal voltooid, go up into the nest and exit the room without breaking any eggs. You can walk left on the edge of the nest without jumping to avoid breaking eggs.
Final Collectible and Map
There might be better maps and guides with screenshots and videos. But if you can understand and follow this one, I hope you can find and check off everything you’re still missing.
I haven’t mentioned the final collectible by name to avoid spoilers since it’s after-game content. Er zijn 40 in totaal, and collecting them all is required for an achievement. Delivering them all is its own reward. Due to randomization, there’s no in-game way to know which you are missing except by going there, so using the map as a checklist might be your best bet. The first will always be Tsubomi’s, the rest will be randomized until the last two, which will be randomly Maya’s or Shinobu’s. You can use this knowledge to know if you’ve reached the 39 marks and are close to completion.
If you’ve kept track of how many you’ve found in each stage, you might be able to use the following list to know where to look next.
- Castle Gates – 4
- Ceremony Hall – 7
- Mysterious Cave – 6
- Courtyard – 6
- Bibliotheek – 6
- Clock Tower – 5
- Castle Peak – 5
- Dimensional Rift – 1
Here are instructions for finding all the final collectibles in one attempt for each stage:
- Castle Gates: To find the first collectible, drop down at the drawbridge. The next room, after leaving through the top right exit, will have one. In the subsequent room, crawl with Maya, go through the facing door to find another collectible. Keep going until you reach a mantis with a crawl space; crawl as Maya, hit the wall, and enter to discover another collectible. When you reach the shop, head up, and in the next room, go through the facing door to find the final collectible.
- Ceremony Hall: At the first split point, go down to pick up a collectible, then go back up and continue normally. In the tall room, leave through the facing top-left door to find another collectible before a stack of snake walls. You can let a snake wall live and use it as a platform. Continue onward until the room with trapdoors. Let the first trapdoor drop you, run left for a collectible, then go up and continue. In the room with the big door in the center, head top left first, then up to find another collectible, and then continue on. After the chandelier demon room, drop to the bottom of the tall hall for another collectible. Nu, get to the top right exit. In the next room, avoid falling through any trapdoors. At the end of the room, there will be a collectible. In the next tall hall, exit top right again, and there will be a collectible before a load of snake walls.
- Mysterious Cave: Start by moving to the right. In the first room where going right at the bottom can lead to drowning, cross the water. alternatief, proceed and use demon platforms to reach the slope. In this room, there’s one on the right. Move downward and continue. At the split between the first and second paths, reach and go through the door facing the top left for one. Proceed on the second path; there will be one immediately. Keep going until you encounter three floor flames. Go through the door above you for one. Continue to the long room with lava. Find one by crossing the lava to the right, and another by freezing and breaking the lava, crawling to the left. Follow this order unless you’re confident in other abilities to cross the gap or die and freeze it again.
- Courtyard: Run left immediately and destroy the wall to find one. Keep going until the stairs going upward. Find one behind a stack of snake walls. Continue on the lower route and get the one in the room after the big fountain. Backtrack and take the higher route to find one before the scythe door. Continue upward to find one in the tall room full of cells with enemies. Be cautious not to end up below the second moving platform, or you’ll need to redo the entire area. Eindelijk, hoofd naar rechts, dalen, and backtrack left. Use Umbrella Dash as a shortcut, and in the next left room, you’ll find one.
- Bibliotheek: Reach the hub room with many doors and exit from the bottom right corner. In the room with spikes to the right, find one in the bottom left corner. Continue to the hub room with many doors and exit from the top left corner for one immediately. Keep going until past the slime falls. There will be one high up in the next room. Ook, destroy cracked floors to reveal a hidden door and find one. Continue to the hub room with many doors and exit from the facing top right door. There will be one immediately. Ga naar rechts, drop down twice, and go through the facing door for one.
- Clock Tower: At the first split, exit to the right. Continue to the room full of ghosts and find one on the left side. Proceed onward to the top right and go through the first facing door you see. Drop down through the next two rooms until you reach the white and gold pillar that lifts. There will be one in the top left corner of the room. Ga verder naar beneden, toen vertrokken, and go up where the path splits. Continue up, and there will be one behind a dog. When you reach the elevator room, do the following in either order: Exit bottom left and use Paper Swans and Umbrella to reach one, then return to the elevator room. Exit top left toward the bell tower where you’ll find one.
- Castle Peak: If you came here by teleport, drop to the lower level of the first main room. If you came from the Clock Tower, continue on and stay on the bottom route. When you reach a room with a tiny platform and a ceiling snail, get up to where the platform leads for one. Go through the facing top-right door, then the facing top-center door, then the first facing door. Exit through the facing door high on the left and continue left until you reach floor fans. Use the fans with the Umbrella to enter a challenging area. Get through to find one. Exit through the facing bottom-left door and continue left across the gap with high platforms. Continue upwards and right until you reach the big room with ghosts. Go to and go through the facing top-left door and find one at the top of the room. Continue down and right to the next area with the slope and wyverns/ghouls. There will be one on the top left. Eindelijk, drop down the floor fan and through the hidden facing door. There will be one through the middle of three facing doors.
- Dimensional Rift: Head right and go down at the first opportunity. Umbrella to the right, and you will find one.
Dat is alles wat we vandaag hiervoor delen Gal-bewakers: Demon Purge gids. Deze handleiding is oorspronkelijk gemaakt en geschreven door kailomonkey. Voor het geval we er niet in slagen deze handleiding bij te werken, U kunt de laatste update vinden door dit te volgen link.