
- Titel: Fuga: Melodies of Steel
- Releasedatum:
- Ontwikkelaar:
- Uitgever:
Information about Fuga: Melodies of Steel is still incomplete. Help ons alstublieft de details van het spel hiermee in te vullen contactformulier.
Roughly put together a guide from my notes to help people more efficiently upgrade the Tanaris’ facilities, later I will likely expand the guide for more sections.
Ruin Loot
Over the course of the story you will wonder, just where can I reliably get all the materials I need, especially that pesky scrap fishing (daarover later meer). Please keep in mind that I might be missing out on loot info at places, but I will try to update this as I’m going through the game again. So without further ado, laten we beginnen.
Each ruin has 3 levels that you can unlock during the travel phase of the missions and some of them will only show up near the end and are as follows. Note that I am not certain yet if the fishing rods have a certain drop chance on earlier dungeons, but is not a 100% chance on the later dungeons. The Materials dropping is fixed otherwise, with the amount you can get from each being random
When you first discover a ruin you will be treated with an image like this:
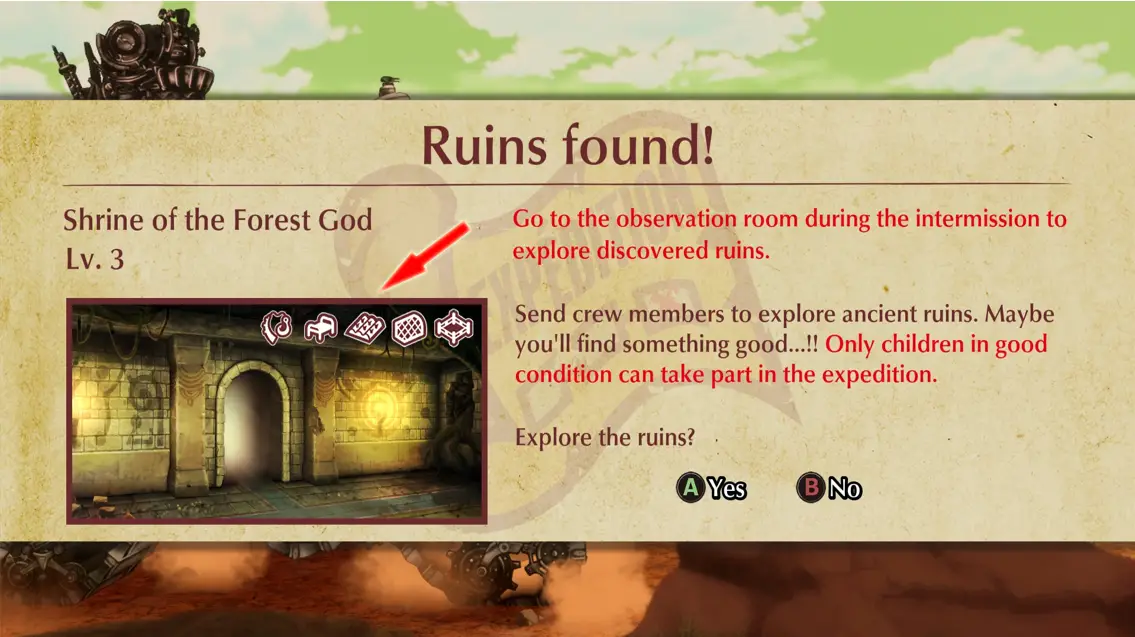
Helaas, you will only see this screen once when you discover it and never again. The Highlighted part is what the potential drops will be from the ruins (Scrap fishing, Dormitory, Tuin, Coop and Pen in this case). Luckily I grazed over this little list for you to enjoy.
Shrine of the Forest God:
- Niveau 1: Crystal Dust, Pinewood, Potting Soil, Birchwood, Wooden Branch
- Niveau 2: Crystal Shard, Oakwood, Fertile Potting Soil, Birchwood
- Niveau 3: Beechwood, Oakwood Fertile Potting Soil, Rough Crystal, Bamboo Rod
Shrine of the Moon God:
- Niveau 1: Old Lamp, Gas Bottle, Crystal Shard, Crystal Dust
- Niveau 2: Gas Cylinder, Gas Bottle, Rough Crystal, Crystal Shard, Energy Lamp, Old Lamp
- Niveau 3: Gas Cylinder, Refined Crystal, Energy Lamp, Rough Crystal
Shrine of the Forge God:
- Niveau 1: Blauwdrukken, Rough Tools, Basic Tools, Crystal Dust
- Niveau 2: Advanced Blueprints, Blauwdrukken, Professional Tools, Basic Tools, Crystal Shard
- Niveau 3: Professional Tools, Advanced Blueprints, Complex Tools, Rough Crystal, Mechanical Rod
Upgrades
With the drops out of the way, lets us get down to what is needed to upgrade each section of the tank. Some of these overlap in materials and it is up to you to decide which one you want to upgrade first (Voorbeeld: Woods are used for Scrap Fishing, Dormitory, Coop, and Pen, but arguably I’d put Dormitory as a priority towards the mid-game. Scrap fishing I found a little point for while Coop and Pen will increase the output of certain resources for upgrades, say moosheep gives 2 milk at lvl 2 pen and such).
The dormitory will become important towards the half part of the game when injuries will be more common place, especially if you make a mistake. It also gives a good boost of experience to up to 6 children when fully upgraded.
Messroom/Kitchen
Arguably one of the important components for your journey, the buffs provided by the food are substantial (while I do not have the exact numbers), case of a point is the EXP/Affinity food…poor kids will all look like Boron when we are finished!
Niveau 2:
| Materiaal | Hoeveelheid |
|---|---|
| Gas Bottle | 3 |
| Rough Tools | 5 |
| Iron Scrap | 5 |
Niveau 3:
| Materiaal | Hoeveelheid |
|---|---|
| Gas Bottle | 10 |
| Basic tools | 5 |
| Metal Plate | 5 |
Niveau 4:
| Materiaal | Hoeveelheid |
|---|---|
| Gas Cylinder | 5 |
| Professional tools | 5 |
| Staal | 5 |
Niveau 5:
| Materiaal | Hoeveelheid |
|---|---|
| Gas Cylinder | 15 |
| Complex tools | 5 |
| Titanium | 5 |
Boerderij
An army marches on their stomach and you’ll need materials for the food, not to mention that it produces the material needed to upgrade the Dormitory too. This is possibly confusing at first as it has a lot of sub-sections for each type of food you can grow. Upgrading the farm itself opens up extra plots for you to use. For ease’s sake, I’ll put all the sub facilities into this section.
Niveau 2:
| Materiaal | Hoeveelheid |
|---|---|
| Old Lamp | 5 |
| Used Battery | 5 |
Niveau 3:
| Materiaal | Hoeveelheid |
|---|---|
| Old lamp | 10 |
| Patched up Battery | 5 |
Niveau 4:
| Materiaal | Hoeveelheid |
|---|---|
| Energy Lamp | 5 |
| Standard Battery | 5 |
Niveau 5:
| Materiaal | Hoeveelheid |
|---|---|
| Energy Lamp | 15 |
| Ancient Battery | 5 |
Tuin
Garden increases the output of Fruits and Vegetables by 1 each upgrade.
Niveau 2:
| Materiaal | Hoeveelheid |
|---|---|
| Potting Soil | 3 |
| Rough Tools | 5 |
Niveau 3:
| Materiaal | Hoeveelheid |
|---|---|
| Potting Soil | 10 |
| Basic Tool | 5 |
Niveau 4:
| Materiaal | Hoeveelheid |
|---|---|
| Fertile Potting Soil | 5 |
| Professional Tools | 5 |
Niveau 5:
| Materiaal | Hoeveelheid |
|---|---|
| Fertile Potting Soil | 15 |
| Complex Tools | 5 |
Coop
Coop increases the output of Cluckens by 1 each upgrade, including Feathers.
Niveau 2:
| Materiaal | Hoeveelheid |
|---|---|
| Pinewood | 5 |
Niveau 3:
| Materiaal | Hoeveelheid |
|---|---|
| Birchwood | 5 |
Niveau 4:
| Materiaal | Hoeveelheid |
|---|---|
| Oakwood | 5 |
Niveau 5:
| Materiaal | Hoeveelheid |
|---|---|
| Beechwood | 5 |
Pen
Pen increases the output of Moosheep by 1 each upgrade, including Wool.
Niveau 2:
| Materiaal | Hoeveelheid |
|---|---|
| Pinewood | 5 |
Niveau 3:
| Materiaal | Hoeveelheid |
|---|---|
| Birchwood | 5 |
Niveau 4:
| Materiaal | Hoeveelheid |
|---|---|
| Oakwood | 5 |
Niveau 5:
| Materiaal | Hoeveelheid |
|---|---|
| Beechwood | 5 |
Werkplaats
If you like booms, this is where you will end up on for the Taranis’ HP, SP, and weapons, upgrading this to level 3 and leaving it there is not a bad idea in my opinion as that is where I got to by the time of my first playthrough of the game.
Niveau 2:
| Materiaal | Hoeveelheid |
|---|---|
| Blauwdrukken | 5 |
| Rough Tools | 5 |
| Iron Scrap | 5 |
Niveau 3:
| Materiaal | Hoeveelheid |
|---|---|
| Blauwdrukken | 10 |
| Basic Tools | 5 |
| Metal Plate | 5 |
Niveau 4:
| Materiaal | Hoeveelheid |
|---|---|
| Advanced Blueprints | 5 |
| Professional tools | 5 |
| Staal | 5 |
Niveau 5:
| Materiaal | Hoeveelheid |
|---|---|
| Advanced Blueprints | 15 |
| Complex tools | 5 |
| Titanium | 5 |
Scrap Fishing

This is the game’s RNG minigame, upgrading opens up new difficulties for better rewards that can be used to upgrade certain parts (namely the Cannons and armor), on your first playthrough this will be less useful than getting all the materials on your journey is not out of this world. You also need to get fishing lines that often spawn in the tank.
Niveau 2:
| Materiaal | Hoeveelheid |
|---|---|
| Wooden Branch | 1 |
| Pinewood | 5 |
| Iron Scrap | 5 |
Niveau 3:
| Materiaal | Hoeveelheid |
|---|---|
| Reed Rod | 1 |
| Birchwood | 5 |
| Metal Plate | 5 |
Niveau 4:
| Materiaal | Hoeveelheid |
|---|---|
| Bamboo Rod | 1 |
| Oakwood | 5 |
| Staal | 5 |
Niveau 5:
| Materiaal | Hoeveelheid |
|---|---|
| Mechanical Rod | 1 |
| Beechwood | 5 |
| Titanium | 5 |
Dormitory
Dormitory gives you a bed to cure injuries and also gives some experience bonus to the kids who use it. Later it is good to max it out as much as you can, just for efficiency’s sake. Each upgrade gives 1 extra bed slot to a maximum of 6.
Niveau 2:
| Materiaal | Hoeveelheid |
|---|---|
| Pinewood | 5 |
| Wol | 3 |
| Veerkracht | 3 |
Niveau 3:
| Materiaal | Hoeveelheid |
|---|---|
| Birchwood | 5 |
| Wol | 5 |
| Veerkracht | 5 |
Niveau 4:
| Materiaal | Hoeveelheid |
|---|---|
| Oakwood | 5 |
| Wol | 10 |
| Veerkracht | 10 |
Niveau 5:
| Materiaal | Hoeveelheid |
|---|---|
| Beechwood | 5 |
| Wol | 15 |
| Veerkracht | 15 |
Dat is alles wat we vandaag hiervoor delen Fuga: Melodies of Steel gids. Deze handleiding is oorspronkelijk gemaakt en geschreven door Ellen. Voor het geval we er niet in slagen deze handleiding bij te werken, U kunt de laatste update vinden door dit te volgen link.