Please remember that a key aspect of this game involves learning through trial and error. Here are some tips primarily focusing on the early stages of the game. These tips are based on the initial Elder choice and before unlocking subsequent memories, meaning at the start of your gameplay journey.
Aan de slag
In eenvoudige bewoordingen, A “strong map” in the game has lots of open space, many forests nearby, and a few stone resources nearby. This means that there are empty tiles next to forests and stones. It’s best to place your town center in the open space, but if you can’t, you can make it work later, although it might be a bit tricky. Open spaces next to stones become even better when you research the ‘mountain spring’ tech, which helps with water extraction.
My first suggestion is to start by researching the station that gives you 2 research points per turn. This doubles your research early on when research points are scarce, allowing you to unlock early technologies like hunting and BBQ. I think the tech tree for benches and dwellings, which improves adjacency bonuses and space efficiency, is better, especially when you reach the third level. Place your town center near forageable items since they provide temporary food support until your population grows. Only collect as much food as you need, so your people don’t go hungry and add to Domain counters with effects that you can’t counter until later.
Focus on woodcutting to build houses, increase your population, and produce more food. Grow your population and assign idle villagers to foraging until you need them for something else. Collect a lot of wood. Building huts also helps expand your territory and is even affected by the +1 territory bonus. Here’s a tip: there’s no benefit to placing houses next to each other, but many things get significant bonuses from being near houses. Building groups of cabins is helpful in the mid-game.
Depending on your difficulty level, prioritize either a population boom or researching the early Domain technologies. These are social buildings, cold/heat items, and health buildings under the Community Tab for Hope. On day 10, you’ll know your omens and Doom. Focus on the Domain buildings that match your omens or Doom event.
If you see that you have no omens in certain domains like Cold or Nature, you can ignore them for now, even if an event occurs, until the event generates two threat. The scale of event failure is related to the red number, and it will only increase to around 5, which results in minor consequences like stunning a villager for three turns. Keep in mind that there’s a delay of several turns before you can start researching and countering a Domain.
On higher difficulty levels, you’ll need to allocate more of your resources to Domain Tech and slow down your population growth and stabilization. After reaching about 6 research points per turn, concentrate on Domain Tech and Food Tech until you feel stable enough to handle potential events from all Domains. You don’t need to stockpile a lot of food, even if the game insists it’s crucial for winter. The ultimate goal is to reach a point where you can sustain Domain buildings and the villagers who staff them well enough to win the game.
Voedsel
Why Foods Per Action?
My perspective on this game is that you can assess everything by looking at ‘what part of my villagers are focused on food.’ The less effort spent on food, the more effort you can put into improving production, increasing your population, conducting research, enzovoort. I recommend thinking about the game this way for better success, even if you don’t follow my specific advice.
Foraging
Everything should be compared to Foraging – Berry Picking. Place a simple building near any tree, and one villager can generate 2 Foods Per Action, which means you can sustain your village throughout the game in any season (Ja, even during winter) if half of your villagers are picking berries. Let’s call this value Foods Per Action (FPA). It becomes even harder to beat after getting the +1 to all outputs with the forest adjacency boon in Prophecy IV.
Tomato Plants
Tomato Plants will provide you with 3 FPA with only water adjacency. ( 24 / 8 = 3, where this is 64 tomatoes; 24 voor 6 harvesting actions, one Forager seed gathering, en 1 water gathering.) With tilled fields, this increases to 4.5 FPA. ( 36/8 = 4.5, waar 68 tomatoes; 36 voor … ) This value goes up slightly with mountain spring or better water tech.
Hunting/Fishing
Nu, let’s look at Hunting/Fishing. Build one hunting lodge per animal tile or fishing shack per fish tile. If there are three within 2 tiles of the location, you can use the upgraded version without adding micro to your turn transitions and wasting early tech/resources. Met 1 Hunting/Fishing, a dwelling, and barbeque, your villagers gain 7 food per turn for 3 actions, resulting in 2.8 FPA with a basic wood camp. A wood stack increases this to about 3.1 FPA.
A word of caution: if you use the Great BBQ (GBBQ) with adjacencies, the food efficiency actually decreases. The difference is 1 fish/7 food for the BBQ, of 2/10 for GBBQ, which could only be seen as gaining a free villager and one wood per turn – dat is, 4.44 FPA with a wood stack at double the cost in raw fish (which can be saved for winter).
Dus, the GBBQ only provides about 70% of the food per fish in addition to requiring 30 research and specialized workers. With upgraded hunting, three BBQs, and a single wood stack, you can generate 21 food per turn, resulting in a combined roughly 4.42 FPA (4.75/21 – 3 BBQs, 1 Hunter’s Lodge, 3/4 wood from wood stack). This is a more efficient use of your villagers than most other food-related jobs. To step back from the numbers for a moment, als je dat hebt 2 sets of these groupings of 3 dieren, you can feed 42 villagers with just 9 villagers. That’s almost good enough to complete some playthroughs. Indrukwekkend, rechts?
Nu, let’s talk about bread.
Windmolens + Bakeries
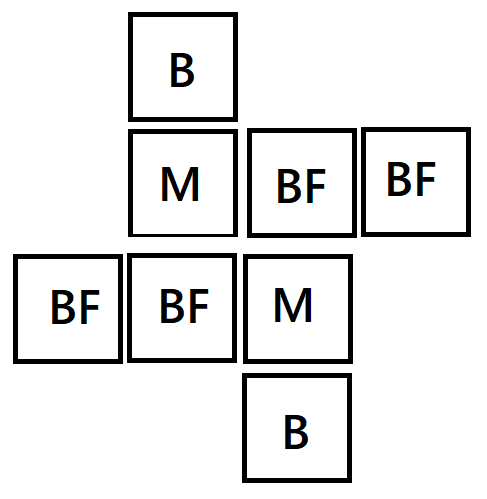
With four Barley fields (BF), two mills (M), and two bakeries (B), you’ll generate 48 Barley over an 8-turn cycle. This allows for a 100% uptime on the mills, as they consume 3 Barley each turn, in totaal 48 Barley, and produce 32 flour over the 8-turn cycle. The bakeries consume 32 flour and, op zijn beurt, produce 400 foods every 8 draait. As a bonus, this method doesn’t require tilling the fields, and you can do that later to expand (Ja, you can till a tile that’s already planted).
In terms of actions, it involves 4 growing actions, 8 milling actions, 8 baking actions, and about 2.66 actions for foraging seeds (8/3) over an 8-turn cycle. Nu, let’s talk about water.
This process requires a substantial 52 water (328, plus 4 from crops) per 8-turn cycle. In terms of technology, at one water per action, this results in 5.3 Foods Per Action (FPA). Bij 2 water per action, zijn 8.16 FPA, and at 4 water per action, zijn 11.1 FPA.
Soy Milk Maker, Milky Bakery, Rain Mills
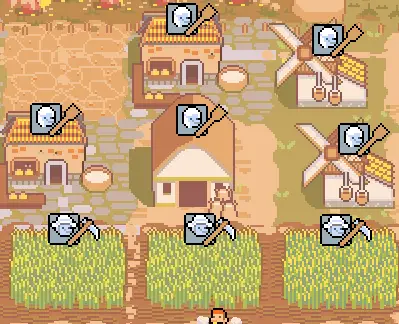
For a basic starting setup with a straight line of 3 Barley fields, you’ll have 60 Barley in an 8-turn cycle, more than enough to keep two Rain Mills running for 8 draait, resulting in a total output of 400 foods over an 8-turn cycle with one spare flour per turn. In terms of actions, this involves 9 growing actions, 3 for processing, en 5*8 for processing, in totaal 52 actions. This setup provides 7.6 Foods Per Action (FPA) in a neat 3×3 arrangement. You can add a couple of fields to the left and place a house in the empty space if you want to expand, especially if you plan to set up a brewery. Keep in mind that this setup requires tilling the spaces.
That’s the basic idea for bread production.
Threat
Threat: This is what the game defines as the total number of pips above your Domain. It impacts the strength of Omen events and acts as an exponential increase in how much of their element they will produce during an Event, which you must overcome. Protection is its opposite, and it’s what you generate.
The Threat tracker increases at specific points during Omen events: 1/3/7/13/20/30/45 for each event. Triggering an omen will always raise the tracker, along with your difficulty modifier. Typisch, having the two highest-tech buildings with the best adjacencies is enough to match or even surpass the 45/turn requirement. Having three such buildings will almost guarantee success with maximum Threat, which is usually around 75-100 pips above Domain, unless you have some severe afflictions adding to the 45/turn Domain value. During the Apocalypse or Doom events, these values will increase further by -/-/-/5/7/10/15 Elke beurt, plus any difficulty modifiers as usual.
Your Protection value will reset after each Event or Doom. There’s usually no need to exceed it because, although the game hints at greater rewards, the exact break points are unclear, doing so can be costly in terms of resources, and the outcome is highly random.
Als je wilt, you can save-scum the result of Domain Events, but there’s currently a visual bug associated with it, which might make the Domain tab very large. To fix this issue, you’ll need to quit the game and restart it.
Final Notes
A word of caution: performance issues may start to crop up when you have around 50-60 pips in your village. Bij 67 pips, you might experience FPS (frames per seconde) drops to 22-30 FPS, even with a GeForce RTX 4060 Ti and a Ryzen 5 3600 6-core processor. This can also lead to temporary freezing during sorting and allocation operations.
As your population grows, the consequences of events and omens become much harsher. Failing a health event at around 60 threat with 70 pips, Bijvoorbeeld, can make about 30 of your villagers sick, toevoegen +30 to the Health Domain Threat per turn. This can be a problem, especially if there’s an event right after that, which could potentially result in the death of 40 villagers. Samenvattend, while having a high population is beneficial, be aware that events can become extremely threatening, especially when they occur in sequence, and you may suffer significant losses.
It’s worth noting that Bourgeois citizens can perform the highest-end jobs, but they can’t do anything else. Dus, avoid creating more of them than you actually need.
Dat is alles wat we vandaag hiervoor delen dotAGE gids. Deze handleiding is oorspronkelijk gemaakt en geschreven door Tzael. Voor het geval we er niet in slagen deze handleiding bij te werken, U kunt de laatste update vinden door dit te volgen link.