- Titel: Diep rock galactisch
- Releasedatum:
- Ontwikkelaar:
- Uitgever:
Informatie over Deep Rock Galactic is nog steeds onvolledig. Help ons alstublieft de details van het spel hiermee in te vullen contactformulier.
In need of assistance with solo missions? Maak je geen zorgen! This guide is your ticket to transforming your Scout into the ultimate lone dwarf on Hoxxes IV.
Here’s a brief overview of what to expect in this guide:
- Detailed configurations for the Scout’s weapons to create the optimal solo build.
And here’s what you should NOT expect in this guide:
- Tips on how to convince your girlfriend to join you in playing DRG (Diep rock galactisch).
Let’s dive right into it:
DRAK-25 Plasma Carbine Configuration
The image below illustrates the necessary configurations for a critical aspect of this build.
This component is essential.
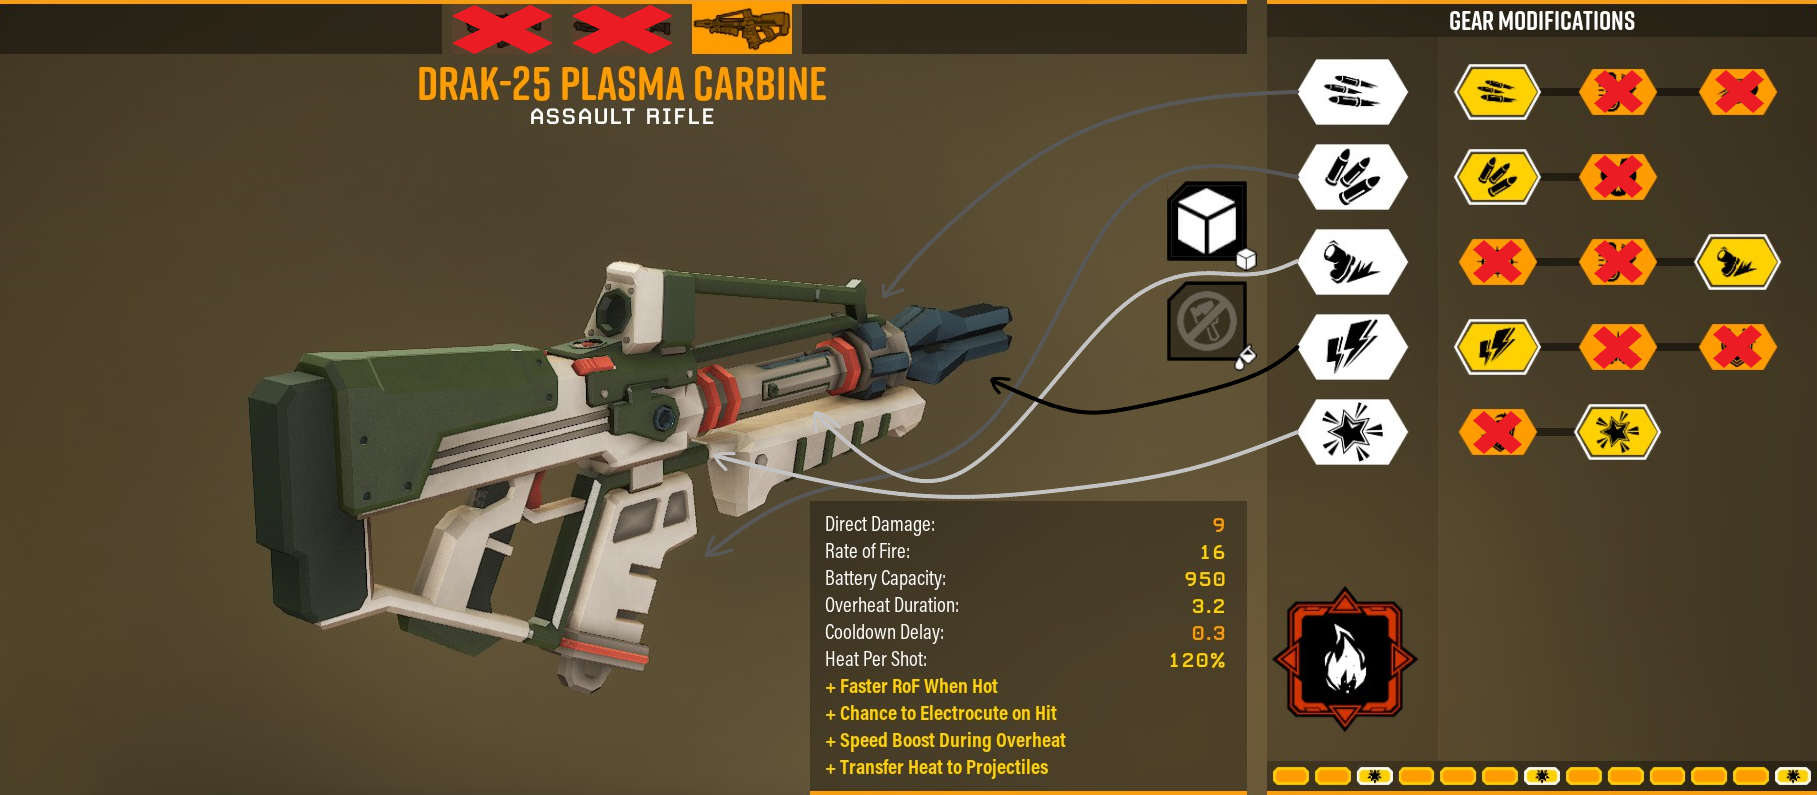
To make it work, you’ll need the “Thermal Exhaust Feedback” overclock. This overclock adds extra heat to your shots when you’re close to overheating. This results in more damage but a faster overheating rate.
If you don’t have this overclock, Goed, brace yourself for some serious RNG (random number generation) grinding. It’s not an easy drop to come by.
Overzicht:
- Your weapon will occasionally electrocute enemies.
- It fires faster when overheating.
- It sets enemies on fire when near overheating.
- When the DRAK-25 overheats, it boosts your running speed. Combine it with Bosco’s cryo-rockets for some substantial damage output. This setup is ideal for hit-and-run tactics.
ZHUKOV NUK17 Configuration
The image below demonstrates the necessary configurations for another crucial part of this build.
This element is indispensable.
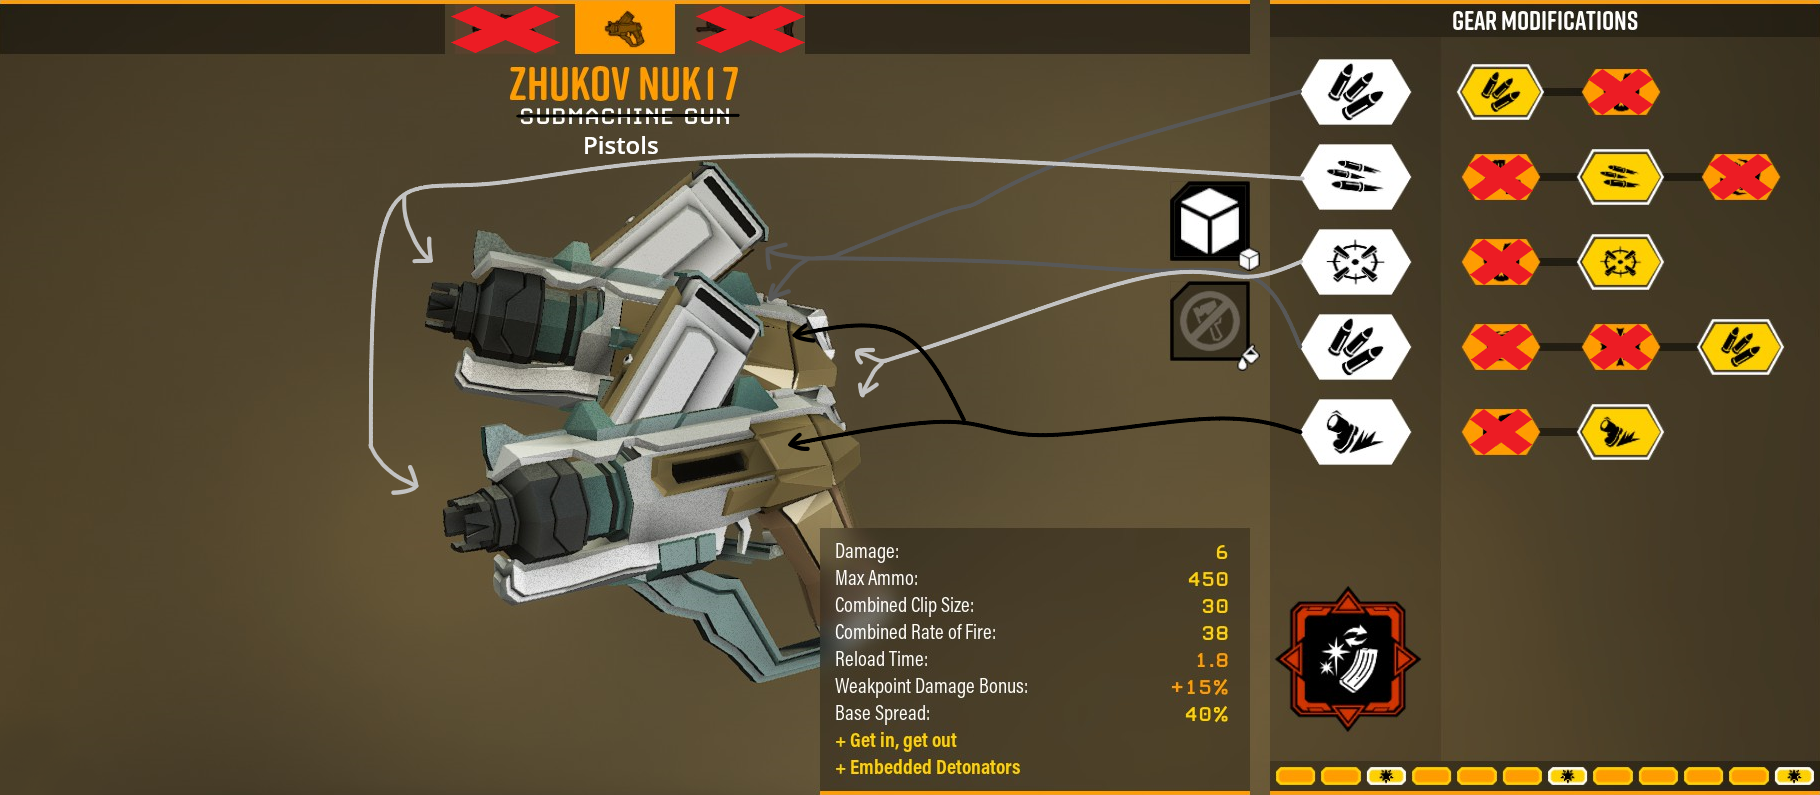
The required overclock is “Embedded Detonators.” True to its name, this overclock embeds detonators into non-armored parts of enemies. These detonators explode when you reload or press the reload button. While it doesn’t have a significant area-of-effect, it inflicts massive damage on your target if you land every shot. Echter, it deals less direct damage, provides less overall ammo, and has a longer reload time.
As with the previous overclock, acquiring this one is a matter of luck. Be prepared for some serious grinding.
Overzicht:
- The more shots you land on a target, the more damage you’ll deal, especially with this configuration. It’s tailored for hit-and-run tactics and can dish out a substantial amount of damage in skilled hands.
Grappling Hook Configuration
Refer to the image below for the required configurations for this crucial aspect of your build.
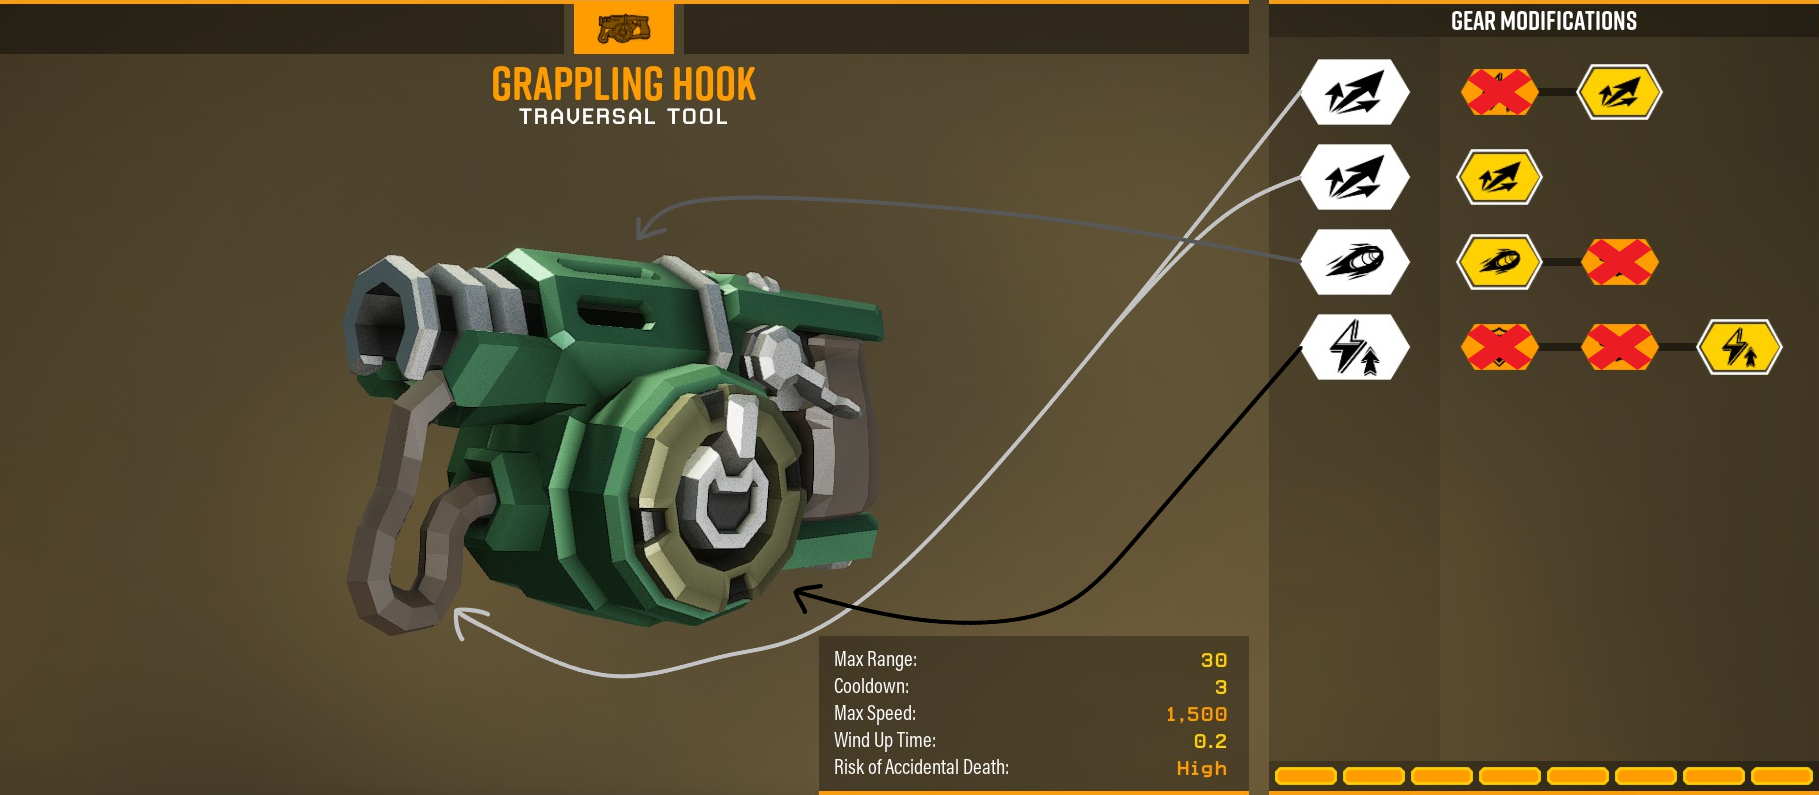
Overzicht:
- This grapple is perfect for hit-and-run strategies because it allows you to quickly reach distant objects and has a reasonable recharge time.
Bosco (APD-B317) Configuration
Check out the image below for the necessary configurations to maximize Bosco’s effectiveness.
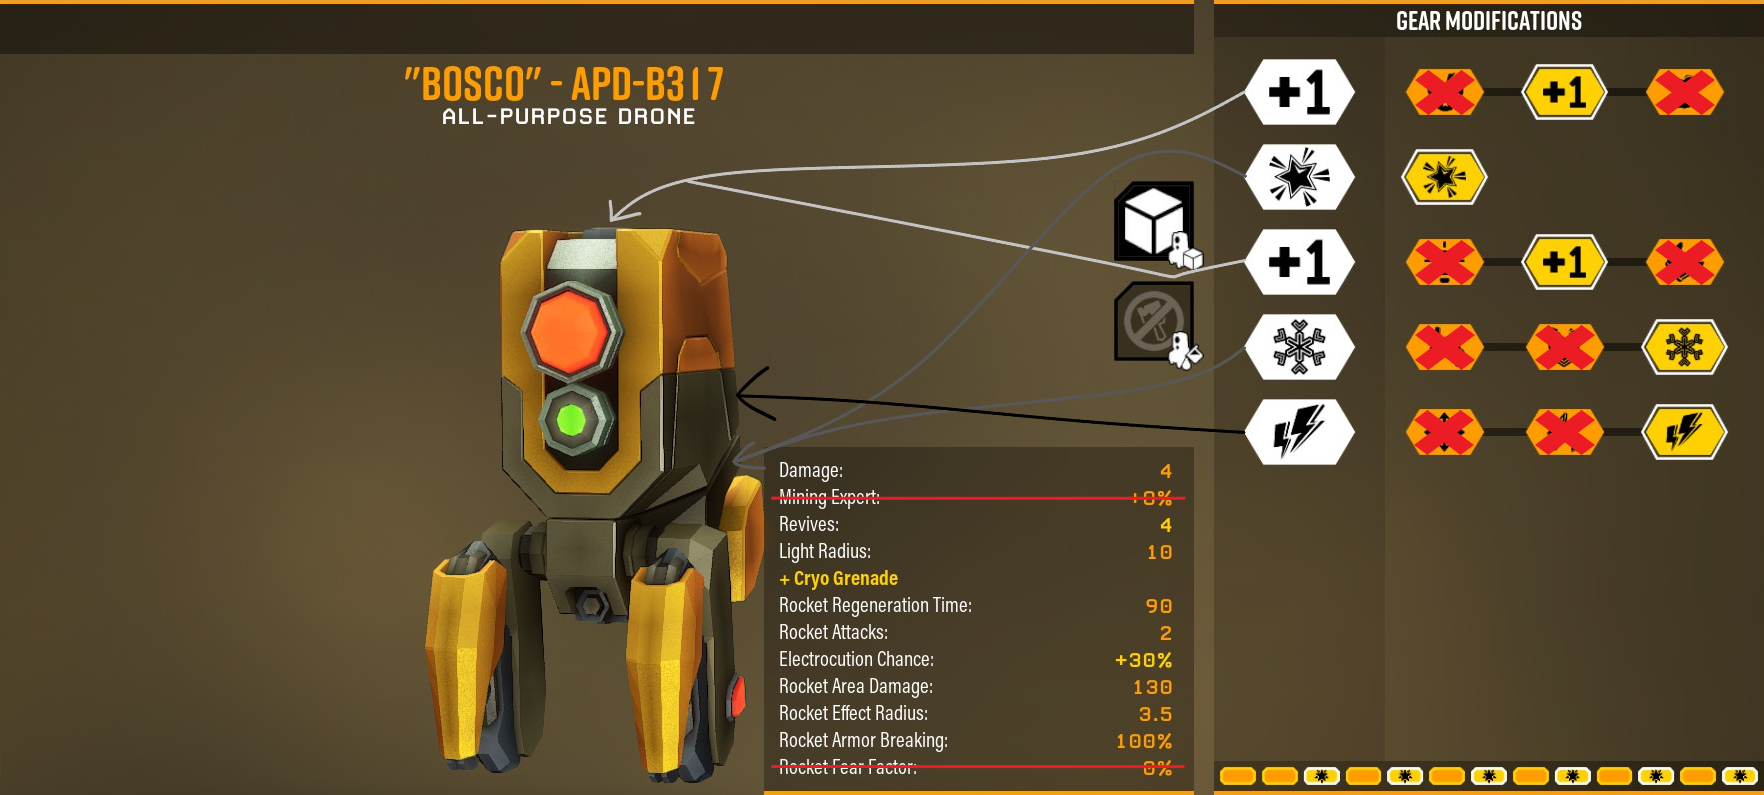
Overzicht:
- Cryo-rocket your flaming enemies, deal significant damage, increase the likelihood of electrocuting foes, and gain two extra revives because everyone makes mistakes now and then. It significantly improves your mission completion chances.
Grenade Configuration
This image below illustrates the configurations needed for this important part of your build.
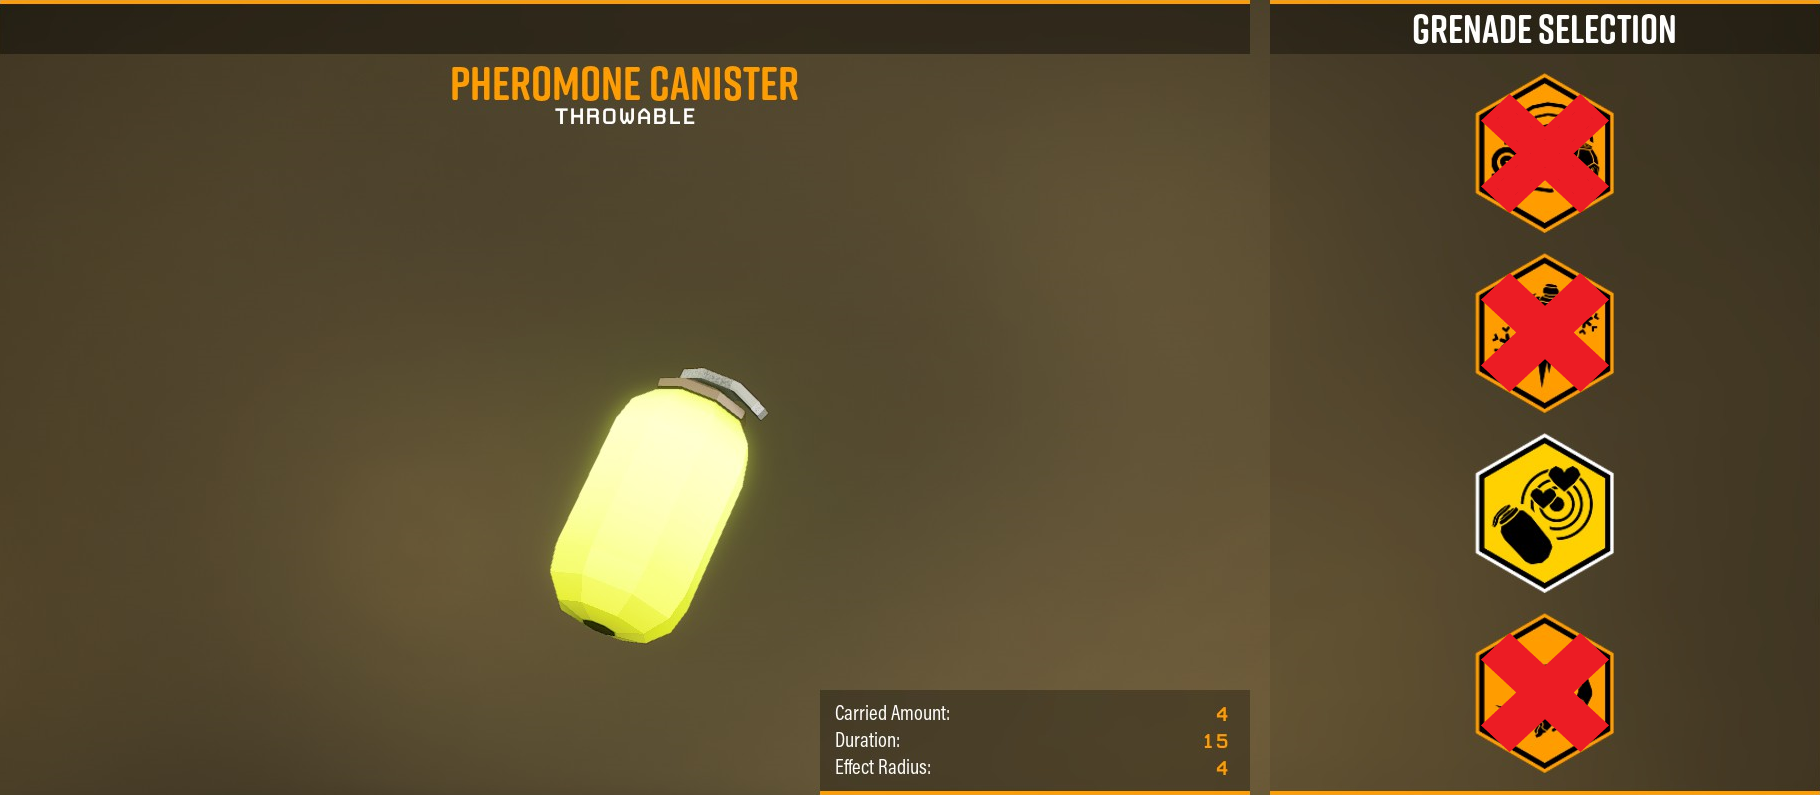
Overzicht:
- This grenade comes in handy when you’re in a tough spot. When resupplying isn’t an option, this grenade, if used correctly, can buy you the time you need. It also creates an opportunity for you to catch your breath and escape while the bugs attack each other. (Opmerking: On Hazard Level 5, the time it takes for the bugs to eliminate each other can be quite nerve-wracking.)
Perk Configuration
Refer to the image below for the essential configurations needed for this part of your build.

Overzicht:
- These perks offer various advantages, such as damaging enemies when they bite you, reducing movement penalties in goo or webs, and improving health and movement when consuming Red Sugar. They can be a lifesaver in tight situations and provide an extra revive under the right conditions.
In multiplayer, it’s highly recommended to replace the dash perk with the ‘field medic’ perk.
Flare Gun Configuration
The image below provides the configurations needed for this minor component of your build.
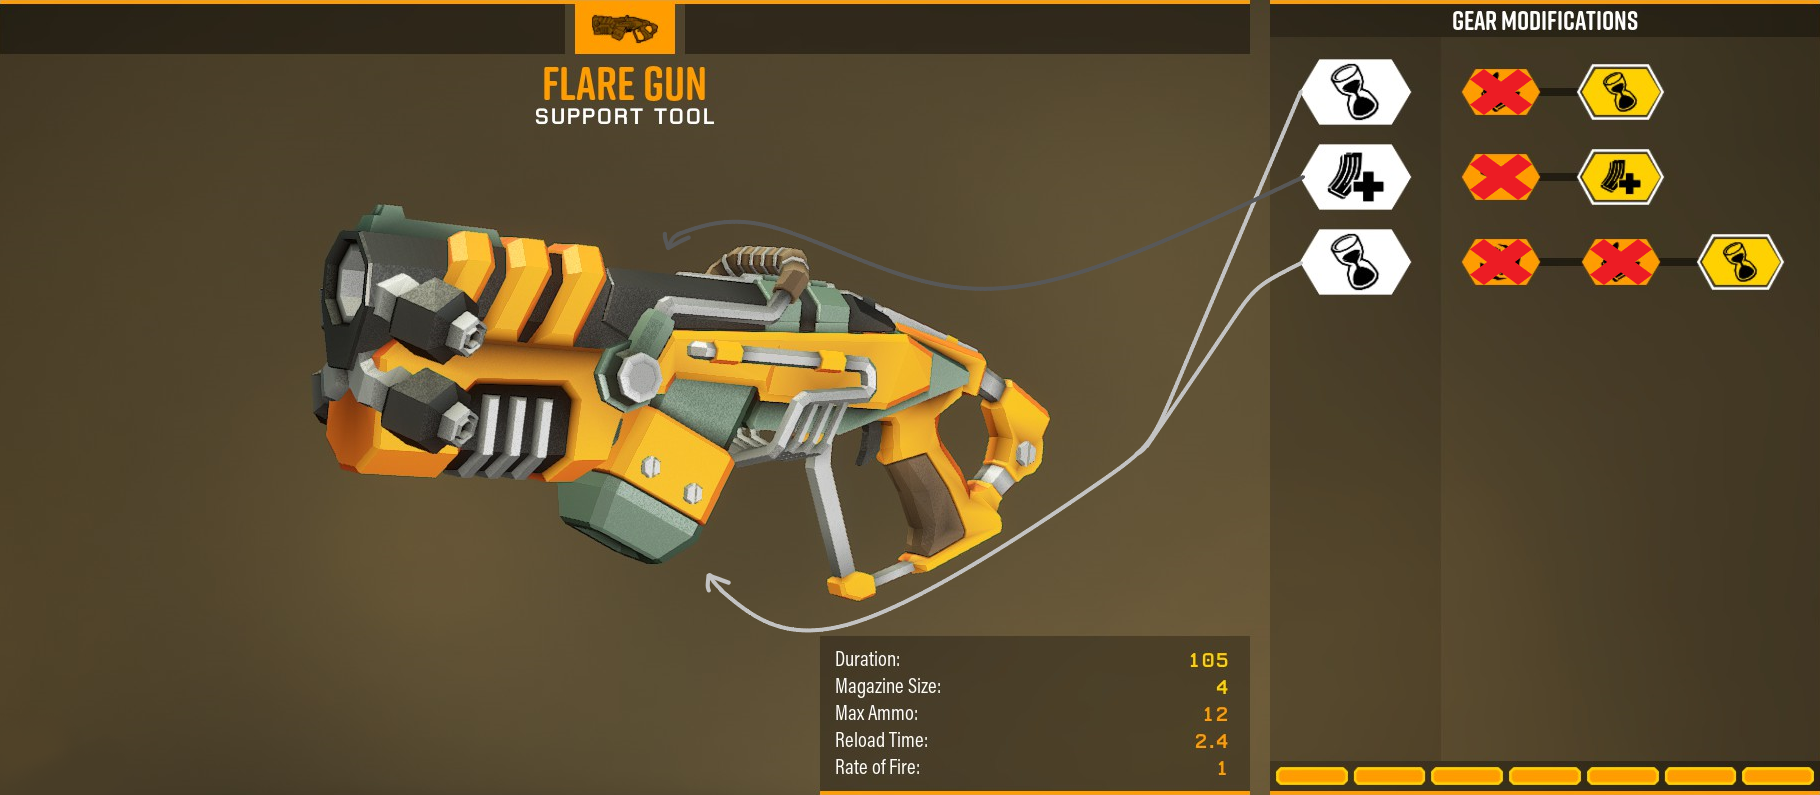
Overzicht:
- This configuration ensures that your flares last longer, allowing you to use them strategically in tense situations.
“Vos” Armor Rig Configuration
Refer to the image below for the configurations needed for this minor part of your build.
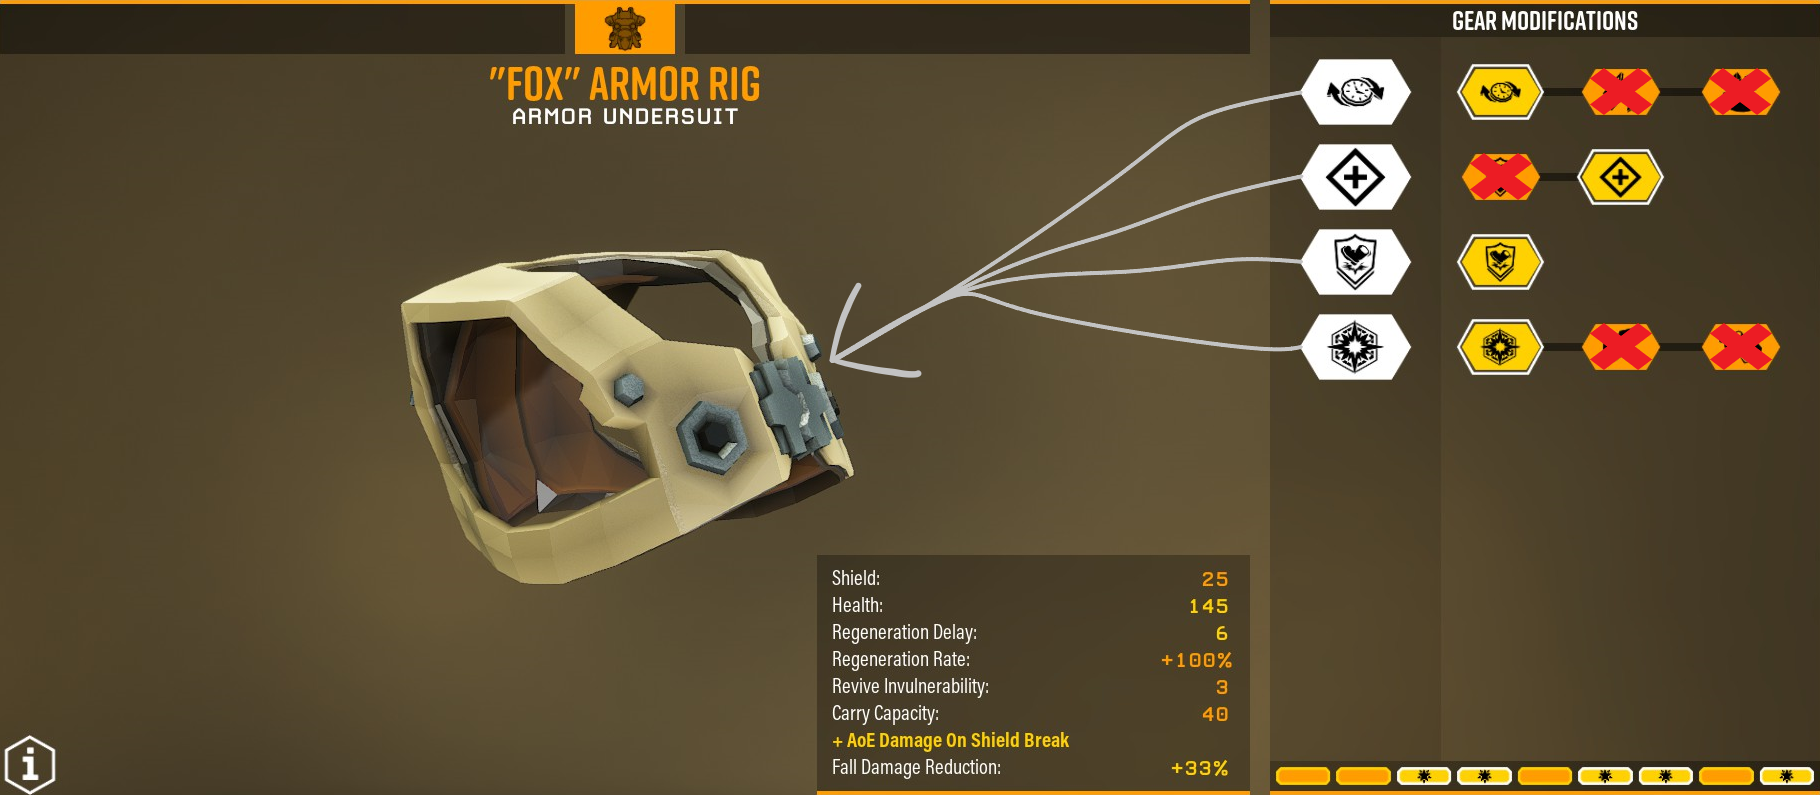
Overzicht:
- When your shield inevitably breaks, this setup releases an area-of-effect damage, and your shield recharges faster. Prioritizing health is crucial, and if you can obtain the ‘Red Rock Blaster’ drankje, you’ll have even more health to work with.
Pickaxe Configuration
Ten slotte, check out the image below for the configurations needed for this tiny aspect of your build.
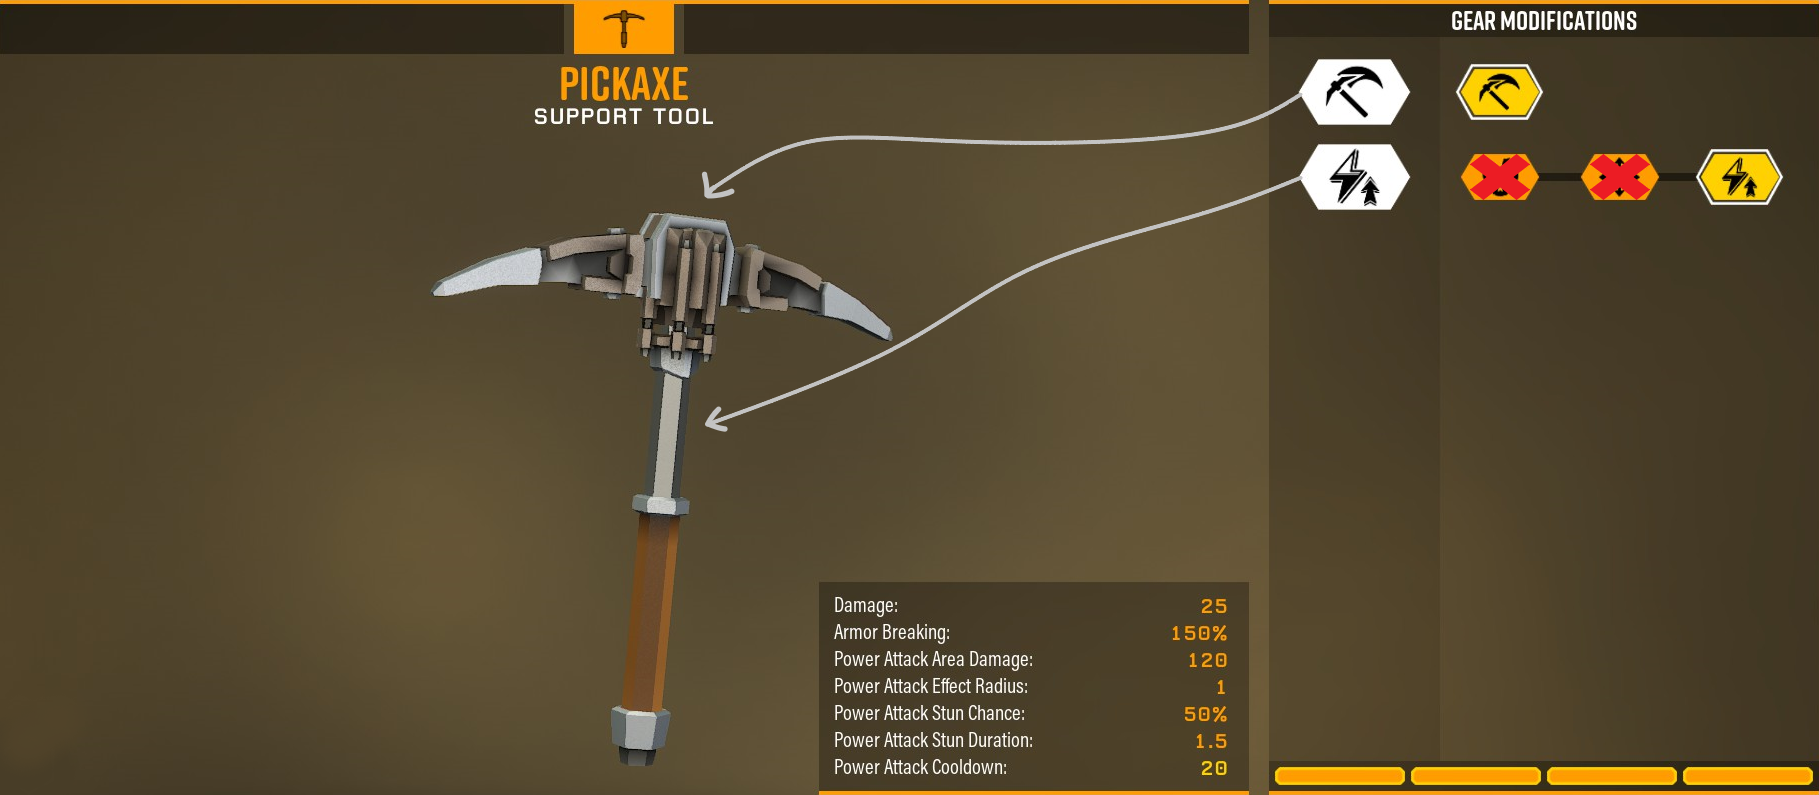
Overzicht:
- This configuration speeds up the power attack recharge, making mining more efficient and providing an alternative when you run out of ammo.
Dat is alles wat we vandaag hiervoor delen Diep rock galactisch gids. Deze handleiding is oorspronkelijk gemaakt en geschreven door MarsmanJJ. Voor het geval we er niet in slagen deze handleiding bij te werken, U kunt de laatste update vinden door dit te volgen link.