Deze gids biedt een grondige handleiding om een uitstekende duiker te worden in de Great Blue Hole. De inzichten zijn afkomstig van een ervaren duiker die met succes alle FishMon heeft verzameld en een aanzienlijke omzet heeft behaald, in totaal voorbij 6 miljoen goud. De gids biedt een uitgebreid overzicht, inclusief essentiële informatie voor degenen die ernaar streven Bancho's topduiker te worden, practical advice for earning money quickly, and a brief exploration of other in-game knowledge that will prove beneficial for catching significant marine creatures.
For those aiming to achieve a Diamond rating on Cooksta, you can access our Discord community. Hier, you’ll have the opportunity to connect with numerous amiable divers for trading Marinca cards and making the most of these strategies.
De basis

Welcome to the fascinating Great Blue Hole! I have a hunch that you’ll really enjoy your time here.
Let’s kick off this guide with a quick section that highlights what I consider to be the most crucial information. This part is dedicated to key points that, even if you don’t delve further into the guide, will give you a solid foundation for having a great time and succeeding in the game.
Eerst en vooral, the top piece of advice I can offer anyone playing the game is to take things at your own pace. There’s no need to rush through specific parts of the game. The only time-sensitive aspects are the Party Events and VIP Events, maar wees gerust, you’ll still have ample time to gather all the necessary ingredients for whatever dishes are required.
Moving on to the second important point, if you’re aiming for a smooth and effortless gameplay experience, consider upgrading from the Basic Underwater Rifle to the Tranquilizer Rifle as soon as you can. Ook, for the later stages of the game, I’ve prepared a brief list (hidden below as a spoiler) outlining a simple 3-weapon setup that will make your gaming sessions much more enjoyable.
- Enhance the Red Sniper Rifle to its third version, the Red Sniper Rifle III, for tackling Boss Fights.
- Progress from the Hush Dart to the Modified Hush Dart to easily secure 3-star ratings for large fish.
- Elevate the Small Net Gun to the Steel Net Gun to achieve 3-star ratings for all other types of fish.
The third point to remember is that you should never hesitate to escape from a fight you’d rather avoid. With only a handful of fish in the game that can potentially catch up to you (assuming you’re not carrying too much weight), fleeing is a viable option. This leads us to the next point.
Point number four emphasizes the upgrades for your iDiver equipment. It’s advisable to prioritize expanding your Storage Box capacity and obtaining a Salvage Drone, unless you’re encountering difficulties in the game. If combat is proving challenging, feel free to invest in extra O2 Tank upgrades as needed.
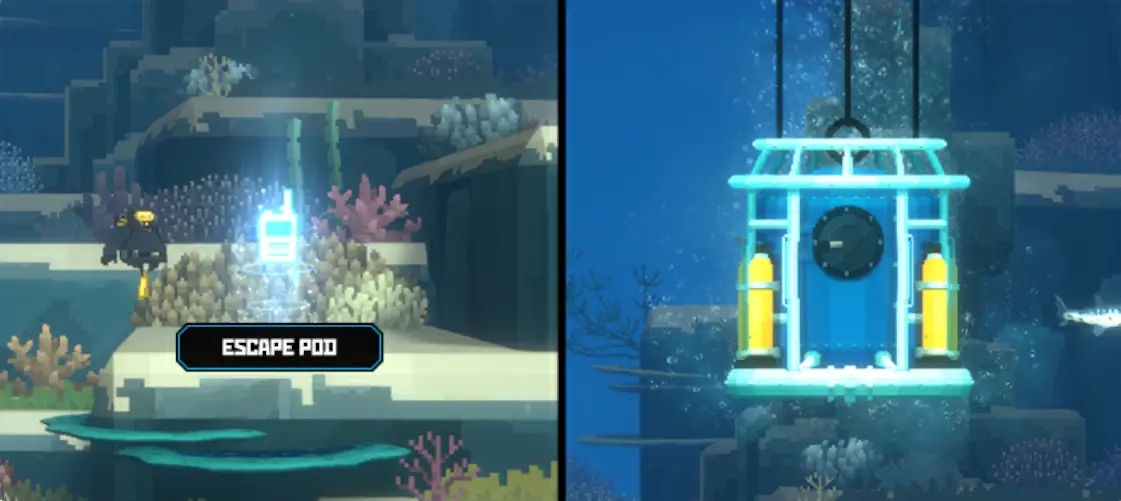
To wrap things up, let’s talk about Point #5, which involves making use of the escape pods to get back to the boat more quickly than swimming up to the surface. There’s really no disadvantage to using the pods, and as you play the game, you’ll end up saving a significant amount of your precious time.
Ten slotte, if you’re finishing up here, I wish you a fantastic time playing the game! And if you intend to continue reading the rest of the guide, I hope you gain valuable insights and have an enjoyable reading experience!
Dave
Now it’s time to talk about our favorite big guy diver!
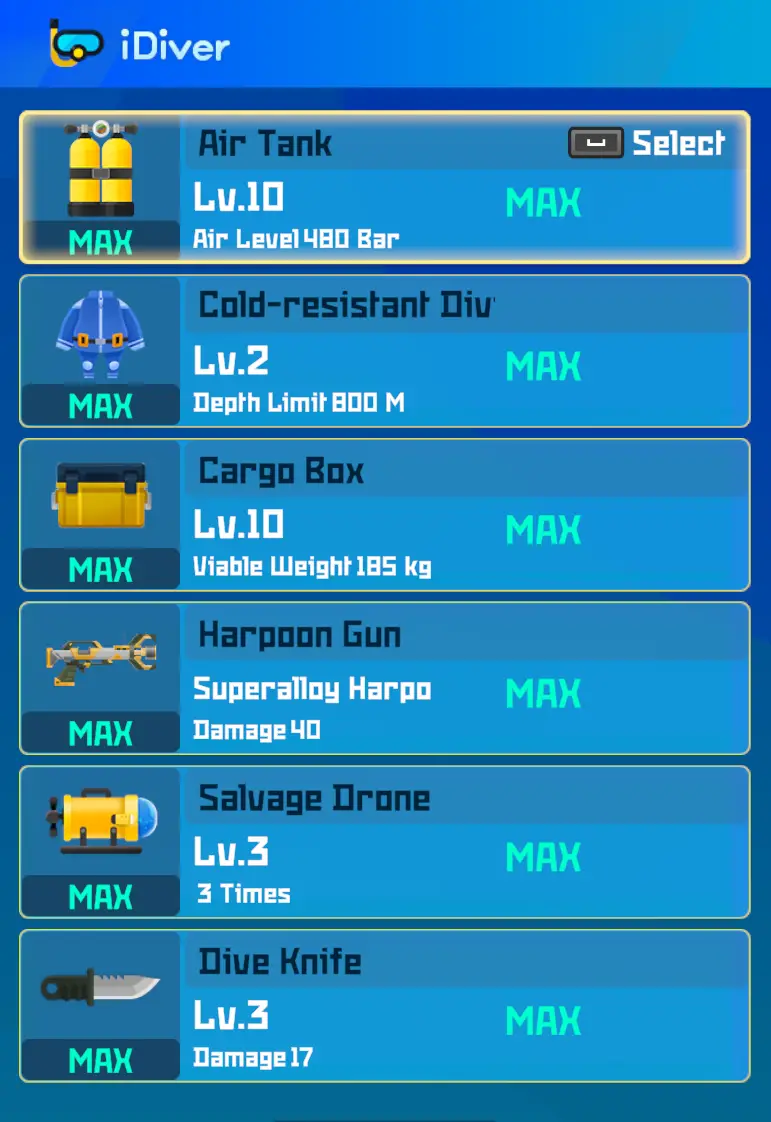
The first and most important set of purchases that you will make is in the iDiver app on your phone. Below is a list of the upgrades that I deem most important to least important from top to bottom.
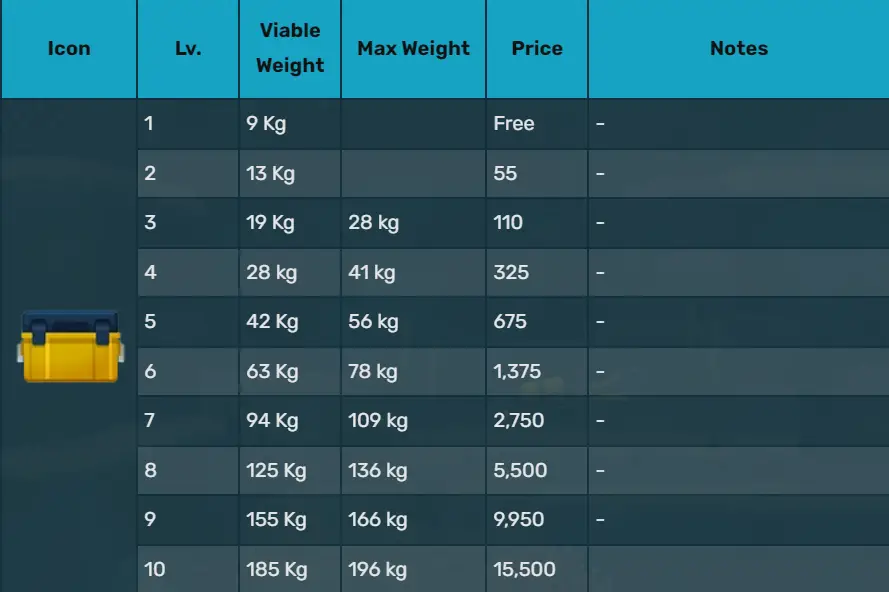
- Storage Box – The collective weight of all items that you can bring back to the boat.
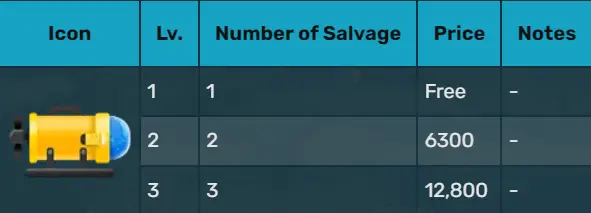
- Salvage Drone – Unlocked later on. The amount of times you can harvest a large fish.
- Dive Knife – Unlocked later on. Let’s you mine gems without a pickaxe and increases damage.
- Air Tank – The amount of oxygen (or life) that you have. Worth upgrading to dash more frequently.
- Dive Suit – Your max depth before you start to quickly lose oxygen. Only upgrade as necessary.
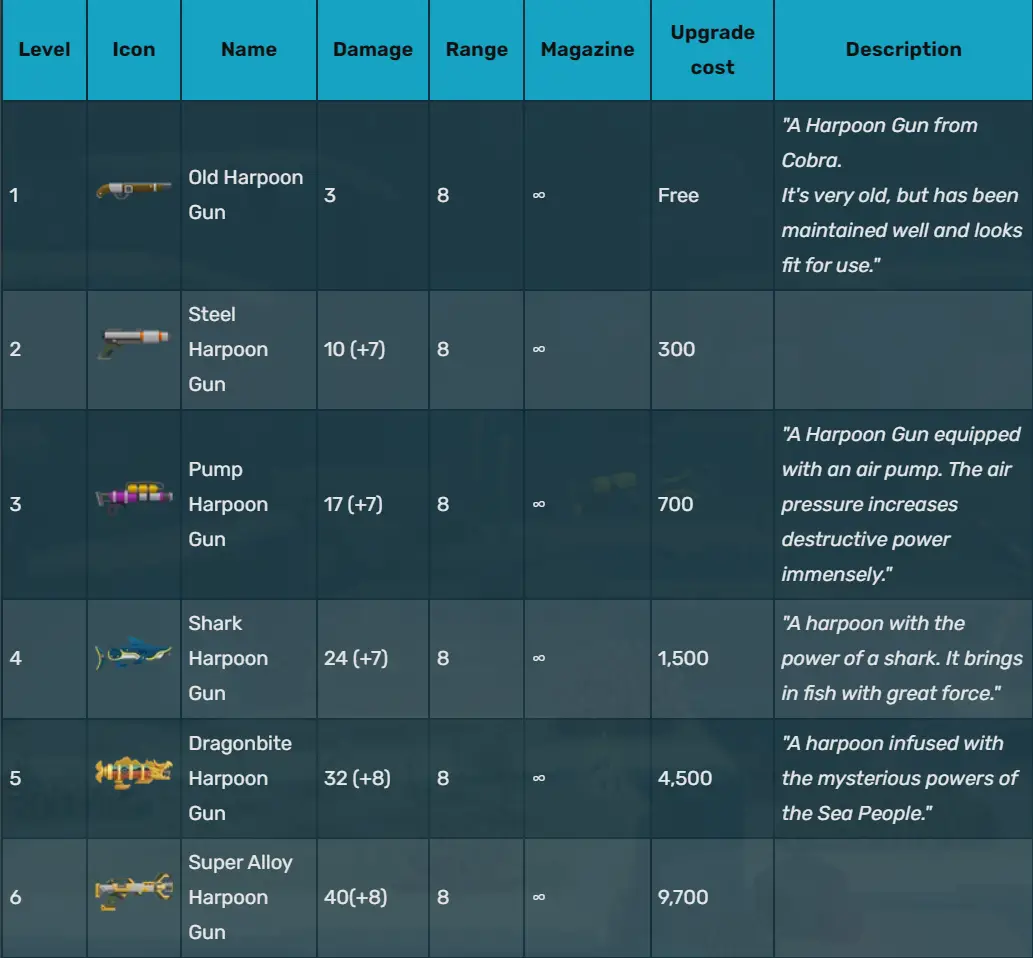
- Harpoon Gun – The damage that your harpoon gun does.
Nu, keep in mind that this list isn’t set in stone. The truth is, even though the Dive Suit is ranked at #5, it’s an important upgrade for finishing the game. I put it below the Storage Box and Salvage Drone because it doesn’t really help until it’s absolutely needed. The Air Tank might be more helpful if you’re struggling with your oxygen or finding the combat too tough. The only things I’m sure about are the Storage Box and the Harpoon Gun.
The Storage Box is crucial for your game experience since without enough upgrades, you’ll progress slower due to lack of money. How can you make money when you can only bring up a few Blue Tangs and a Barracuda (which is close to the default weight limit) each dive?
On the other side, there’s the Harpoon Gun. It might seem like one of the best upgrades in the game. But the thing is, the Harpoon Gun should always be your second choice. There’s only one situation in the game where your gun is worse than your harpoon as long as you have ammo. That situation is if you luckily find a Tranquilizer Harpoon Tip from a Supply Chest and you didn’t bring the Hush Dart or Net Gun to catch the fish alive. Nog steeds, it’s worth getting the first upgrades since they become cheap quickly. It’s good to have a solid backup option.
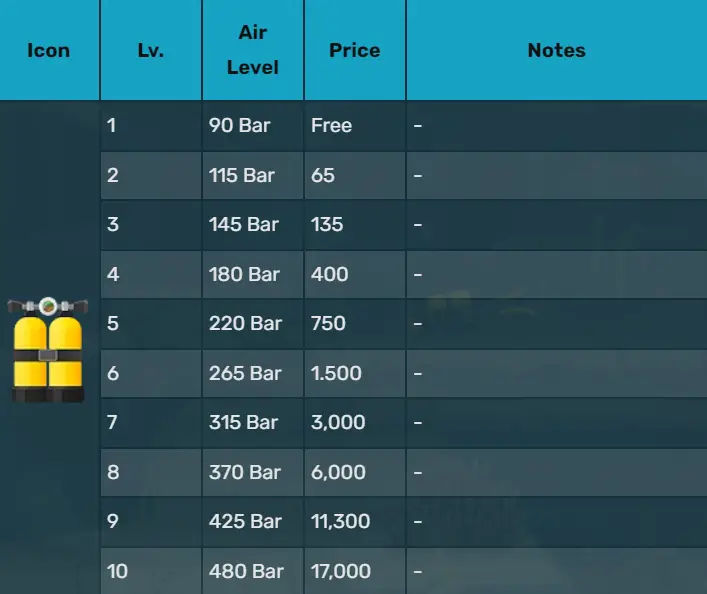
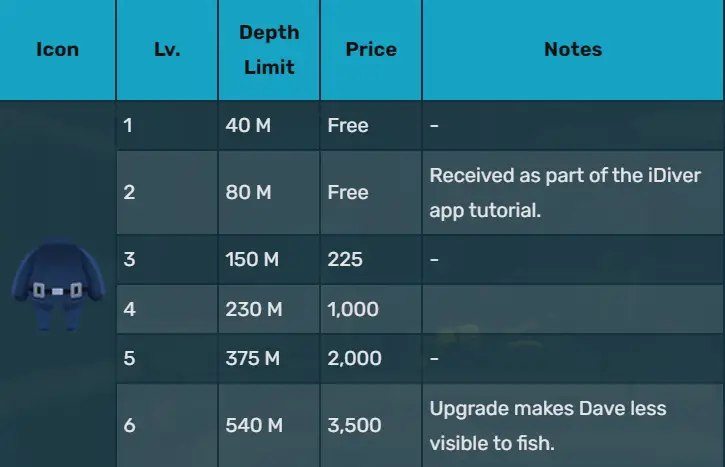
Onderstaand, you’ll find some helpful tables I’ve taken from the wiki. They show the equipment, the upgraded stat, and the upgrade cost. Use this to figure out your best purchases based on the list above.


Cobra’s Shop
Aan het begin van het spel, you’ll gain the ability to access a store run by a character named Cobra. This store offers various items that you can use while diving. These items are the same ones you might come across in underwater supply chests, but Cobra also sells a few special items that are exclusive to his shop. These unique items are marked with a “C” logo, similar to the image below.

Cobra’s store is only open in the morning and afternoon. Each day, he’ll have a selection of 3 random items available for purchase. Keep in mind that any items you buy can only be used during the specific time period you bought them for. Bijvoorbeeld, if you buy a “Doll Decoy” in the morning, you can only use it during your morning dive. If you don’t use the item during your dive, it will be taken out of your inventory when you return to the boat.
Here is a list of the items that are exclusive to Cobra’s Shop.
- Doll Decoy – Distracts aggressive fish for 13 seconden. No Cobra icon but I have not found them in Supply Chests.
- Ink Bomb – Will make you invisible while in the ink cloud. It lasts 7 seconden.
- Lure – Will attract fish briefly to the area. Good for setting up net gun shots.
- Oxygen Tank Expansion – Increases maximum O2 by 10% for your dive.
- Sensor Net Trap – Automatically captures up to 5 small fish when it senses movement.
- Steel Net Sensor Trap – Automatically nets up to 2 medium or fish when it senses movement.
- Underwater Cargo Box – Allows you to secure 10 kg worth of items at any point during your dive.
All of the items in the Consumables subsection can be found in Cobra’s Shop ook.
Consumables
You can find the rest of the consumable items in the underwater Supply Boxes. Among the items listed below, the Oxygen Capsule is likely the most valuable. Think of it as a second chance that can help you out in dangerous situations or during boss fights.
- Oxygen Capsule – On use, restores 50% of your maximum oxygen capacity instantly.
- Underwater Scooter – Movement speed increased by 70% voor 10 seconden.
- Long-Distance Underwater Scooter – Movement speed increased by 50% voor 20 seconden.
- Sensor Bomb Trap – Automatically explodes dealing 40 damage to nearby fish and Dave.
- Trigger Bomb Trap – Explodes when triggered dealing 40 damage to nearby fish and Dave.
- UV Light – Necessary to progress past the tube coral in the Blue Hole Deeps.
Just a quick note: The Supply Boxes will sometimes contain melee weapons too. Echter, we’ll talk about those weapons in the Weapons section later. The only melee weapon we’re discussing here is the pickaxe. It’s handy because it lets you mine minerals in the Blue Hole Deeps until your dive knife gets better.
Personeel
Acquiring personnel is the next crucial investment in the game. Your ability to generate significant profits at both the Platinum and particularly Diamond levels heavily depends on having a staff. Dave alone cannot efficiently handle the volume of customers to unlock the potential for substantial earnings.

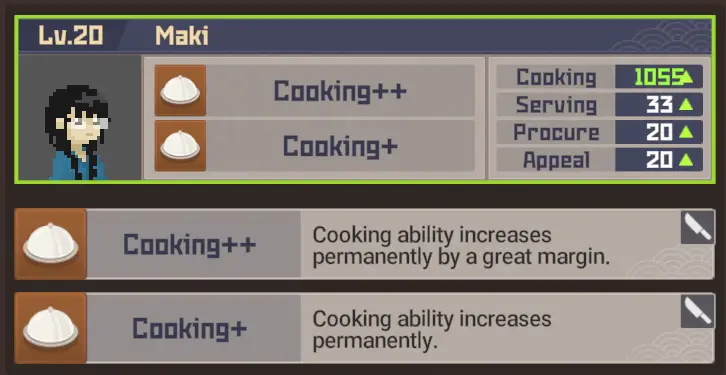
The picture you see when you bring in a new staff member is right up here. This little “kaart” has the person’s name on it, plus the cost to hire them, spots for their two future skills, and their initial four ability stats.
Abilities
- Koken – The amount of time it will take to prepare a dish.
- Serving – How fast they will move when serving dishes to customers.
- Procure – Increases the amount of items they will get when using the “Dispatch” mechanic.
- Appeal – Increases the chance of obtaining bonus items (d.w.z. dispatching for Olive Oil and bringing Sesame Seeds as well) when dispatched.

Cooking Skills
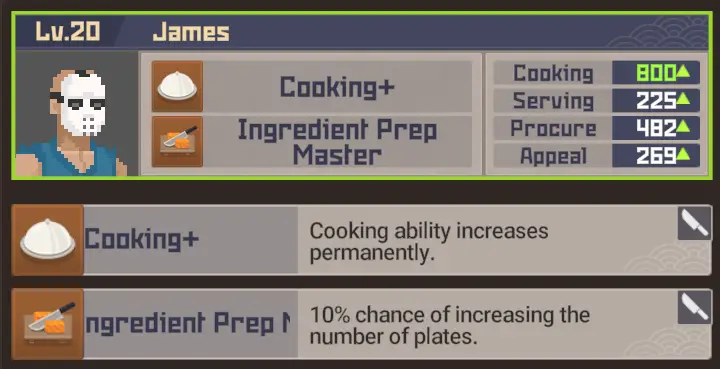
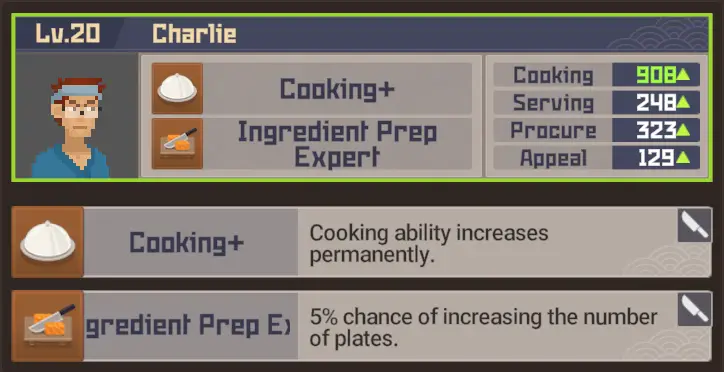
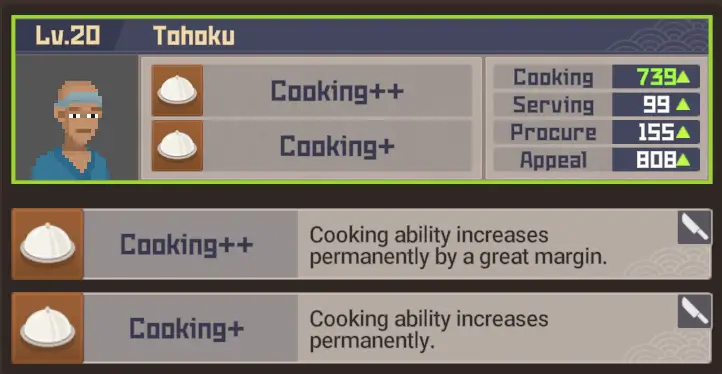
- Cooking+ – Cooking ability increases permanently.
- Cooking++ – Cooking ability increases permanently by a great margin.
- Ingredient Prep Expert – 5% chance of making two dishes from one set of ingredients.
- Ingredient Prep Master – 10% chance of making two dishes from one set of ingredients.
- Master Drink Maker – You can sell beverages at a higher price. (+10 gold per drink)

Serving Skills
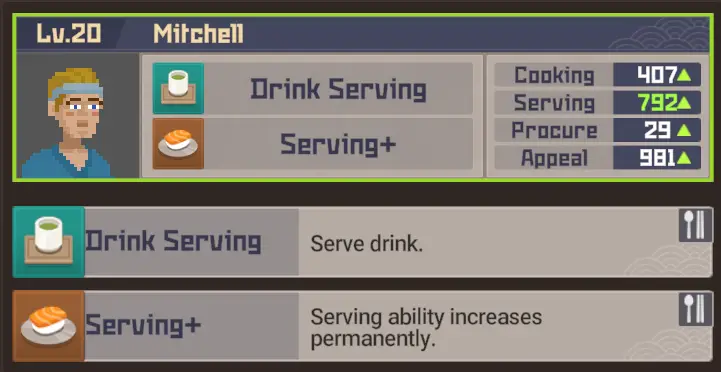
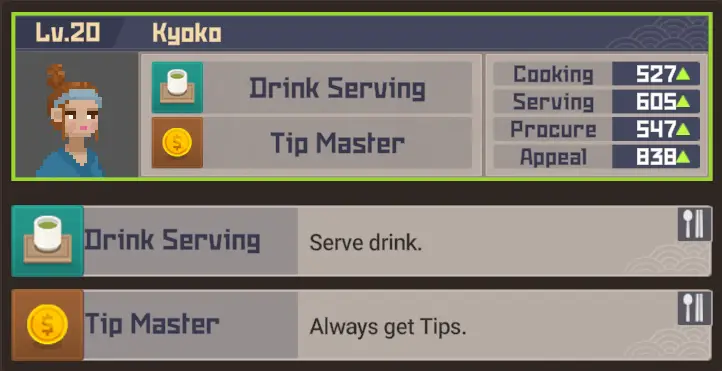
- Drink Serving – Serve drinks. (Tea & Bier)
- Drinking Serving Master – Serve drinks perfectly and much quicker.
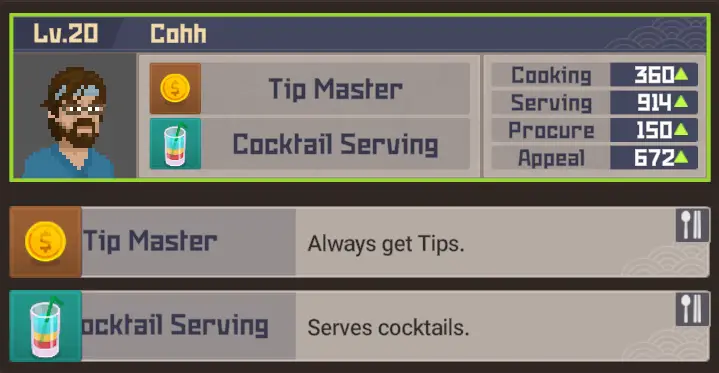
- Cocktail Serving – Serve cocktails. (Cocktails specifically)
- Schoonmaak – Clean up the messy seats.
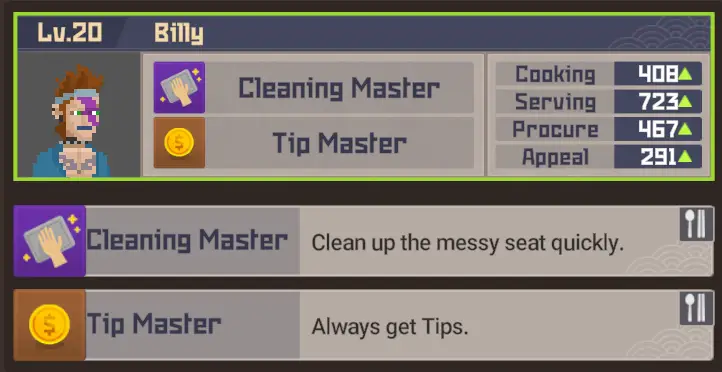
- Cleaning Master – Clean up the messy seats more quickly.
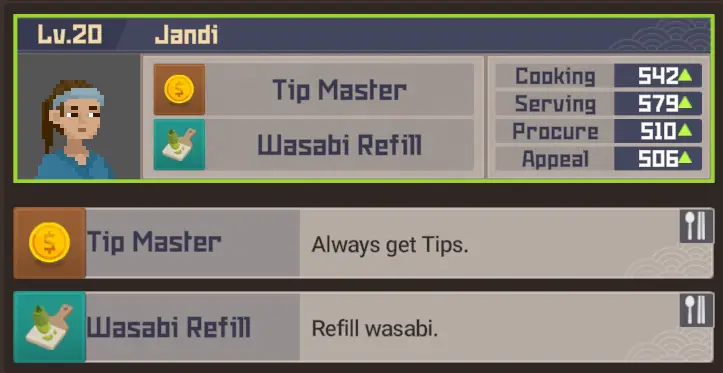
- Wasabi Refill – Grinds wasabi when it runs empty.
- Serving+ – Serving ability increases permanently.
- Tip Master – Always get tips.
Dispatch Skills
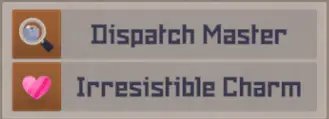
- Dispatch Master – Acquire more items though dispatch.
- Irresistible Charm – Appeal ability increases permanently.
Hiring
Except for Maki, you can hire and fire candidates freely using the “Dismiss” feature in the staff management menu. Just remember that if you let someone go, they’ll lose all their progress. But you’ll only get a small portion of your training costs back.

If you’re not in urgent need of better staff, it’s better to avoid the higher-level hiring choices, like internet ads. They do bring in more candidates, but they’re not very cost-efficient, especially early in the game when money might be tight.
Dispatch
There’s a really handy mechanic called Dispatch that often goes unnoticed. It’s quite simple: just select “Dispatch” in the staff management menu, and choose some staff members to send out. They’ll gather ingredients listed below, which is super helpful for making more complex and pricey dishes.
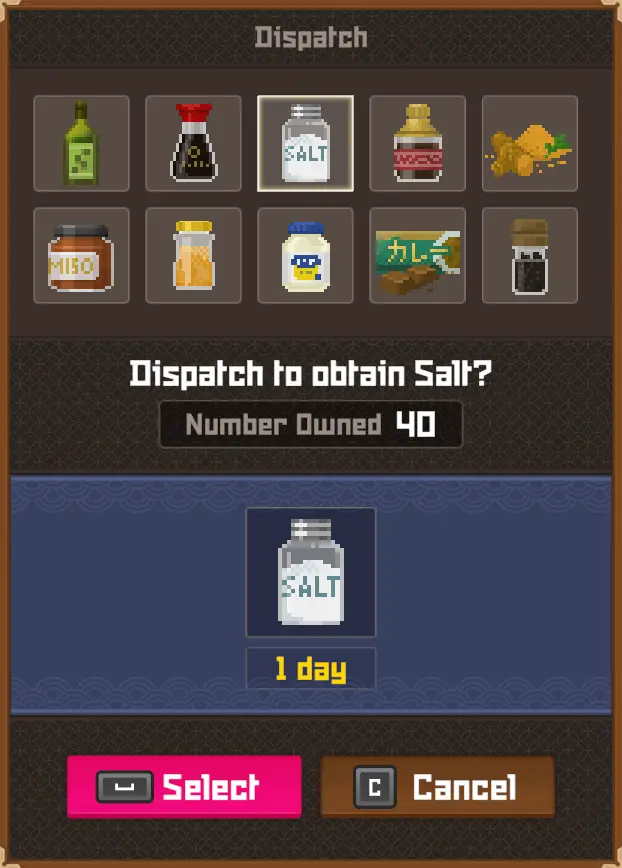
When looking at your staff’s abilities, you’ll find listings for “Procure” en “Appeal.” These stats indicate how many items your chosen staff members will bring back from their trips. You have the freedom to send any staff member at any time, but there are certainly better options available (which are detailed in the section below).
Training
Once you’ve hired new staff members, you’ll have the chance to train them and raise their ability scores, as well as unlock their specific skills. Aanvullend, when they reach levels 5, 10, en 15, there’s a possibility that they will discover a recipe for you to learn in the research section.
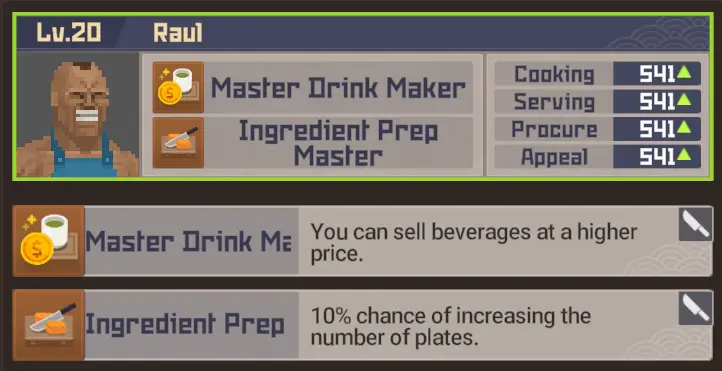
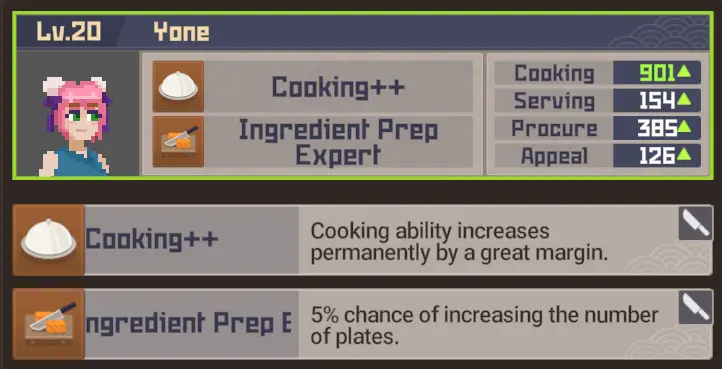
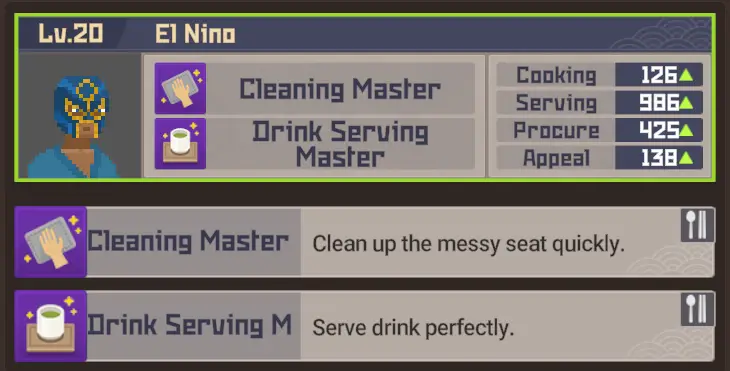
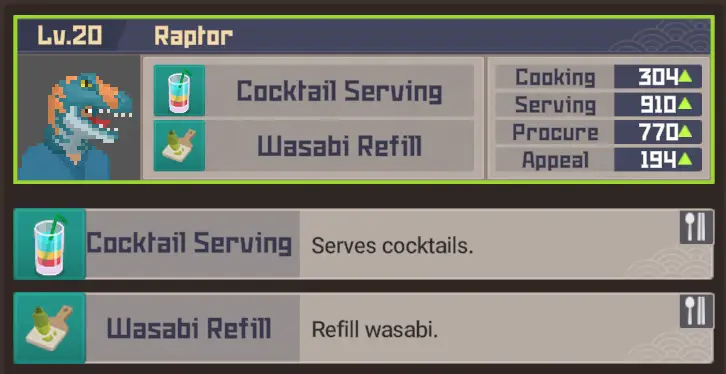
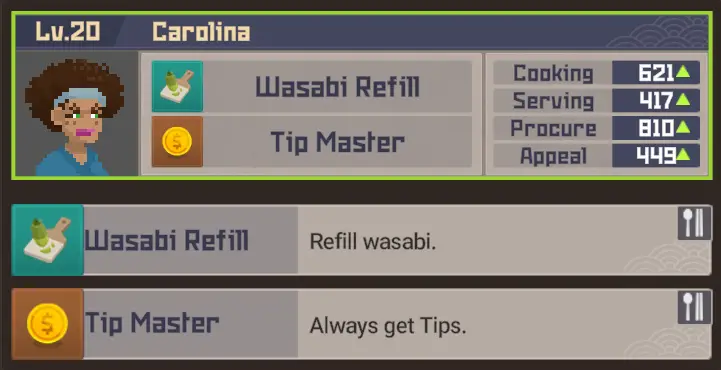
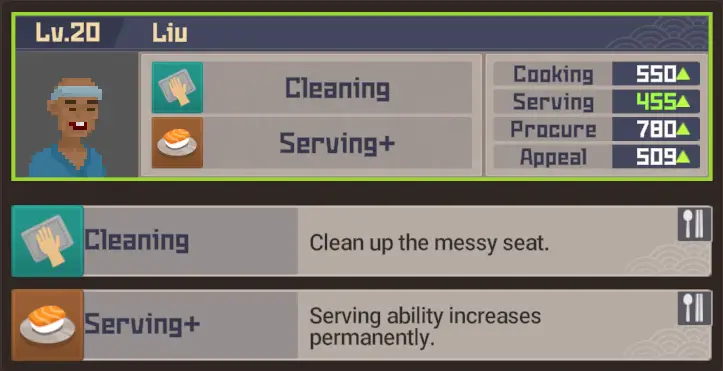
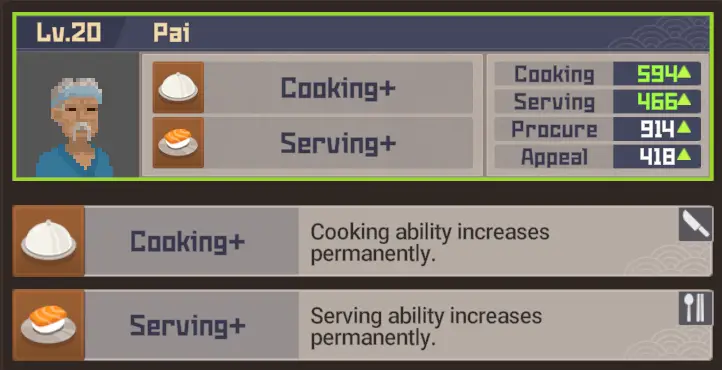
Below is a lineup of the staff members I employed with notable success, arranged from left to right based on their perceived value. Echter, remember that this list can be largely interchangeable with other staff members. The only two individuals I consider “essential” are Raptor and El Nino, as having them manage your serving section automates the process significantly. If they are at a high level, you’ll seldom miss customers, even when aiming for the Diamond ranking.
- Keuken – Raul & Yone
- Serving – El Nino & Raptor
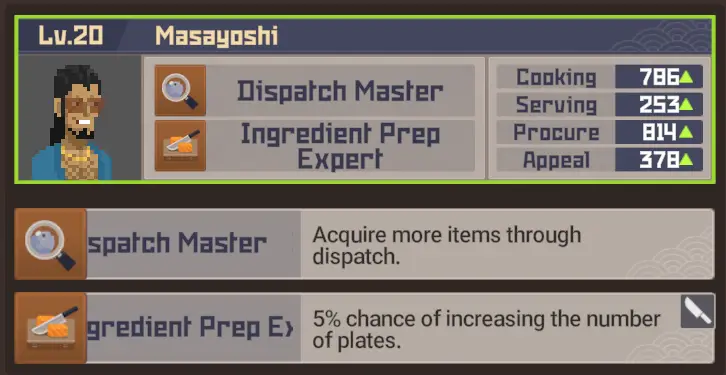
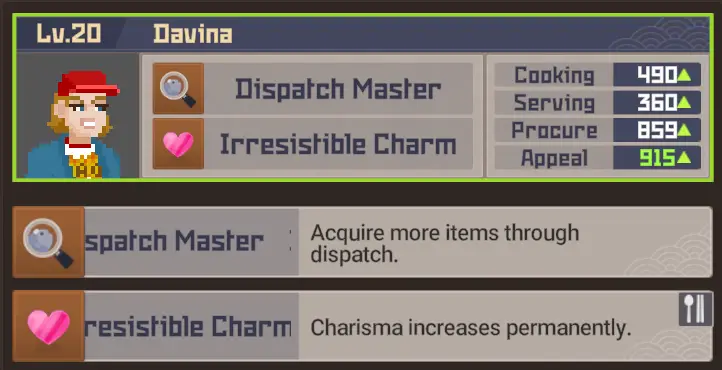
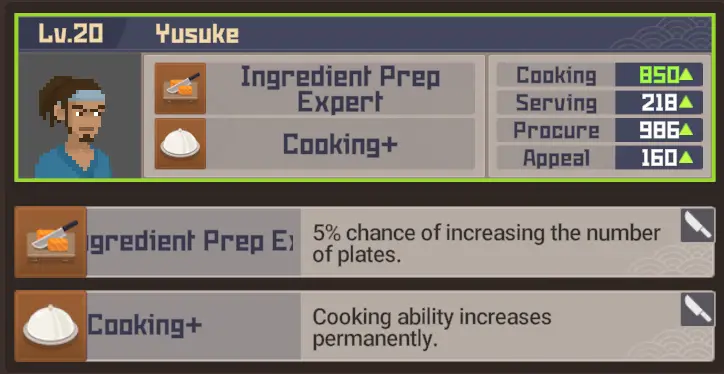
- Dispatch – Davina, Masayoshi, Yusuke, Carolina, Liu & Pai
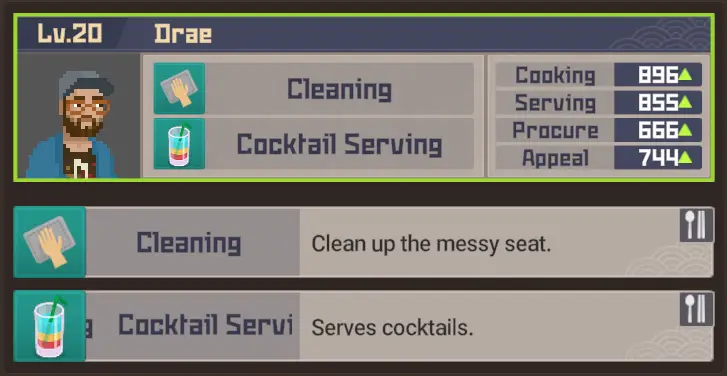
The cost of training your staff rises significantly as their level increases. Dus, I’d suggest getting all staff members to level 7 and your serving staff to level 10; this should suffice to carry you through to the end game. If you’re also lending a hand, you might even manage with lower-level employees. On average, each employee will require around 300,000 naar 350,000 gold to reach level 20, which is the maximum level in the game. Due to this, many players not aiming for 100% completion won’t invest in getting any staff member to level 20. Echter, the images below depict the staff at max level, providing a good idea of how their abilities improve as they progress through the levels.
Employees
The first group of employees is those I recommend utilizing within the restaurant, arranged as per the aforementioned list. The second group encompasses all the staff members I suggest dispatching to gather ingredients for the restaurant. The third group involves a spoiler related to a late-game mechanic. Proceed only if you’re comfortable with a minor spoiler. The third group represents my setup for the Branch restaurant, unlocked towards the game’s conclusion, with Drae as the manager. Ten slotte, the last group consists of remaining staff members who aren’t statistically strong enough to replace those I’ve already recommended. Hoe dan ook, you’re welcome to swap any staff member with another if they’re your first choice during hiring or if you simply prefer their abilities or skills.

Wapens
The majority of this section will be stats and elemental affects to aid you in deciding which weapons will be right for you. Do refer back to my no-sweat loadout at the beginning of the guide if you just want a simple setup that will work for anybody.

Guns
Om te beginnen, you’ll acquire random firearms from the Weapon Crates scattered across the map, depending on how far you’ve progressed in the story and your current location. You’ll also come across harpoon tips with different effects. On occasion, you’ll find Gun Upgrade Kits as well, which will boost your weapon’s damage, decrease the time needed to subdue a fish using the Hush Dart, and fully reload your firearm. The last aspect is significant because it might be wise to hold onto a Gun Upgrade Kit until you’ve depleted your current ammo, allowing you to refill for free when ammunition is scarce.
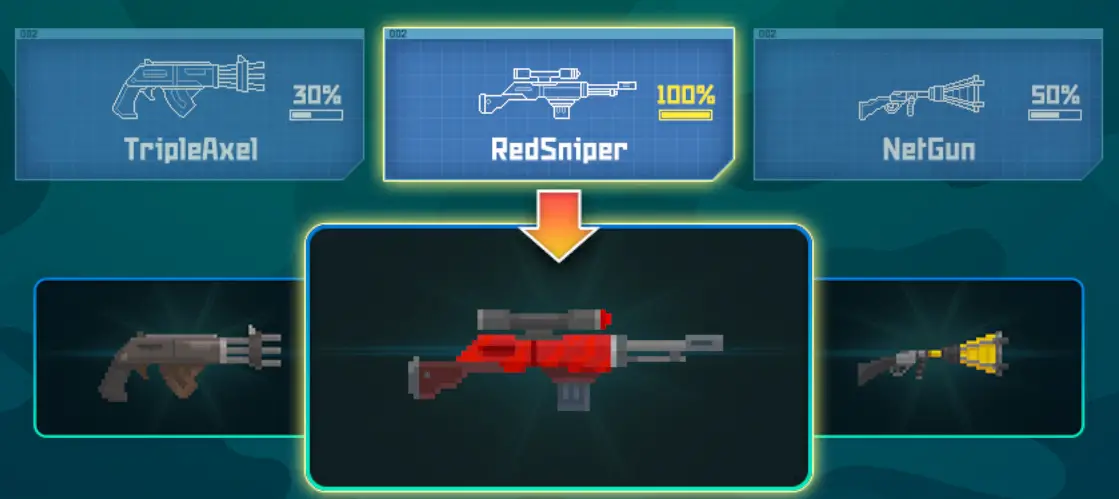
When you pick up a weapon you also receive a portion of the blueprint necessary to craft said weapon. The number varies between 2 en 3 blueprint pieces depending on the weapon, but the exact number will be covered in the table below.
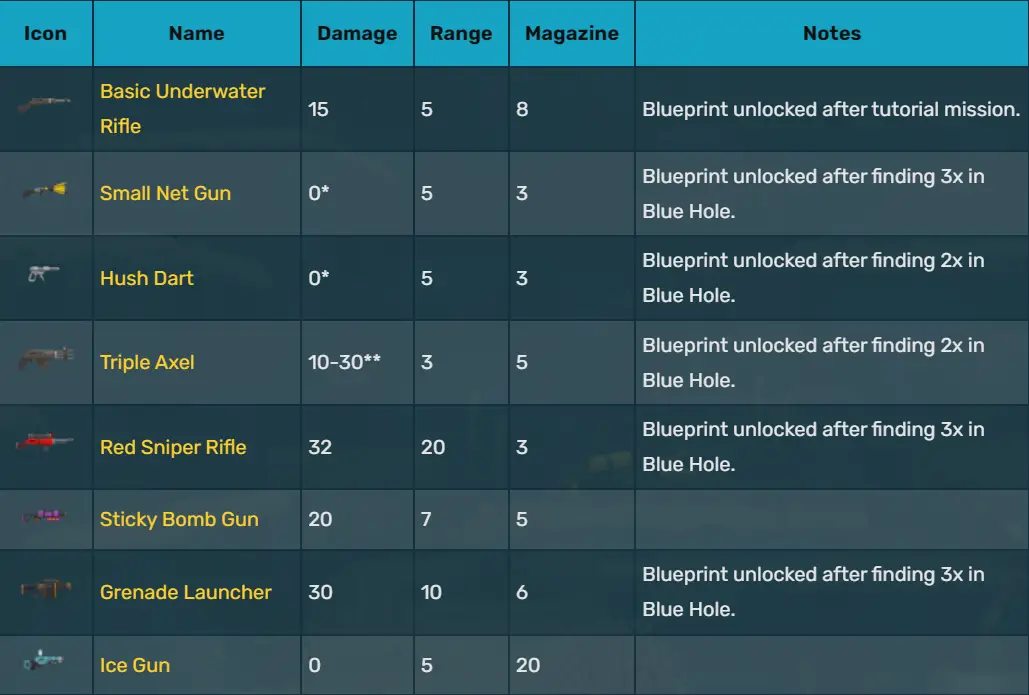
- Another method of catching fish. It doesn’t cause any harm but guarantees a 3-star rating for caught fish.
- The amount of damage varies based on the number of projectiles that hit. The first number on the left indicates the damage per projectile.
Bovendien, both the Sticky Bomb Gun and the Ice Gun can be found in the Glacial Area. Je hebt nodig 3 blueprint pieces to craft them. The Ice Gun, although it doesn’t deal damage per shot, inflicts substantial damage after freezing a fish and breaking them out of the ice.
Mêlee
You’ll also come across several melee weapons in Supply Crates. To be straightforward, most of these are novelty weapons that you should generally avoid. I mention this because getting up close and personal with aggressive fish will likely lead to an untimely end to your dive. Echter, there are a couple of genuinely helpful and enjoyable melee weapons that I suggest everyone give a try.
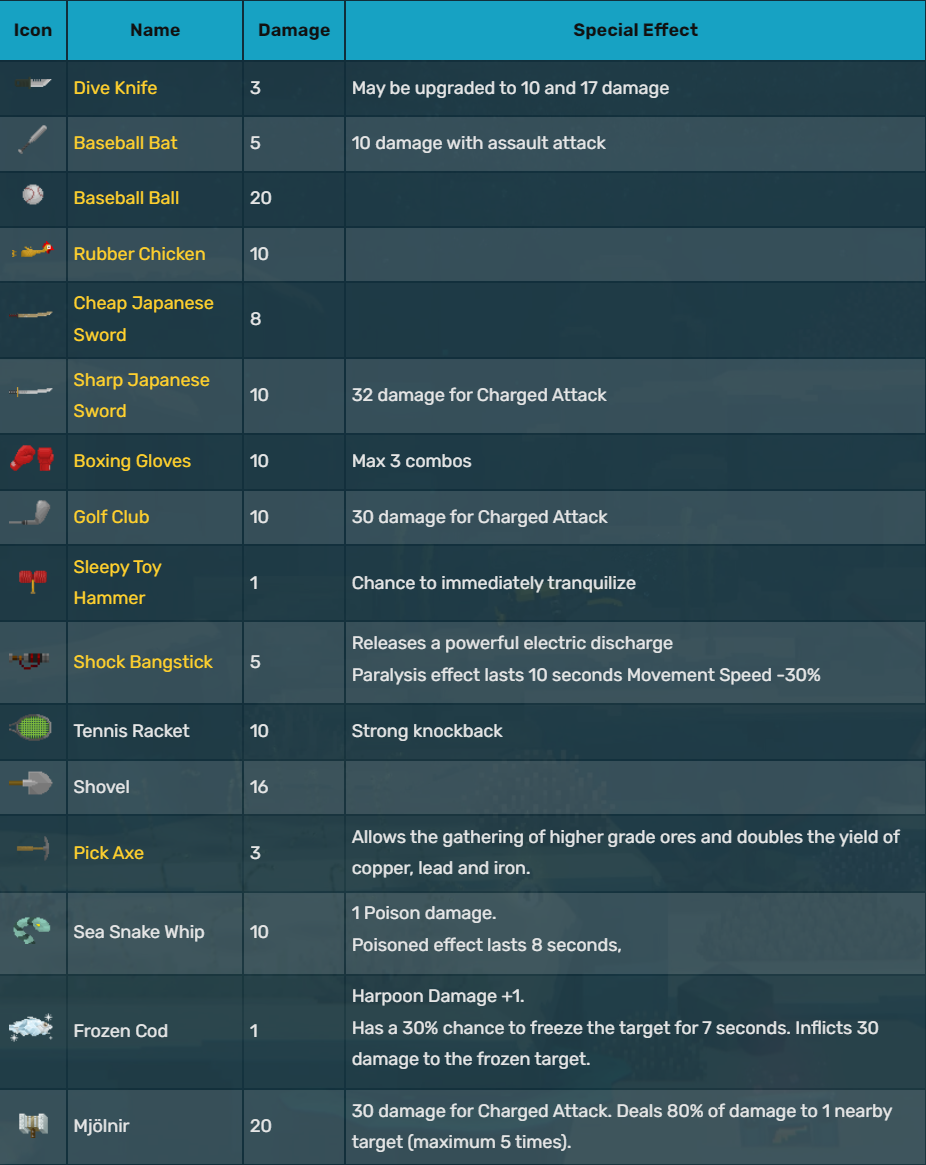
 Starting with the practical and enjoyable melee weapons, let’s talk about the Sleepy Toy Hammer. It might seem unimpressive initially, but it has a good chance of tranquilizing any fish you strike with it. This is especially helpful early in the game, allowing you to gather items like jellyfish before you’ve upgraded your harpoon. It also guarantees a 3-star rating for anything you put to sleep with it.
 Next up is the Pick Axe, which is undeniably useful for mining gems needed to upgrade your firearms at Duff’s Shop. Echter, it’s not particularly effective for combat due to its low damage output.

 Then we have the Tennis Racket and the Shock Bangstick. Both of these have excellent escape potential. The racket pushes fish back significantly, helping you avoid damage, while the bangstick paralyzes fish, greatly reducing their movement speed and allowing you to swim away.
 Ten slotte, there’s the legendary Mjolnir. This rare find in the Glacial Area is both highly effective and enjoyable to use. It deals substantial damage, has significant knockback akin to the tennis racket, employs a lightning effect that spreads damage to nearby fish, and features a charge attack enabling ranged strikes. Without a doubt, it’s the best and most enjoyable melee weapon in the game. It even comes with an achievement tied to it!
Upgrades
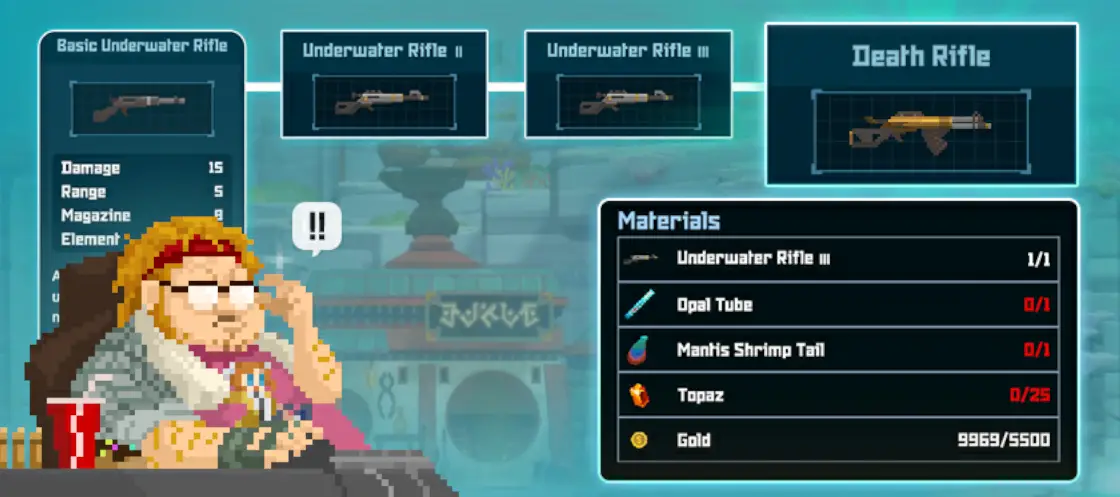
Once you have picked your favorite gun, it’s time to find out what your favorite upgrade tree is. Most damaging guns follow the same upgrade trees. For the broad group of upgrade affects, I have a list below to familiarize you with them. All of these upgrades will also increase your magazine size at varying times depending on the gun.
- Normaal – Raw damage upgrade. Upgrades into “Dood” variants which have a flat 30% chance to instantly kill any fish other than bosses and Gadon.
- Vuur – Delivers damage over time. Upgrades into “Explosive” variants which simply do even more fire damage.
- Tranquilizer – Has a flat 40% chance to tranquilize any fish for 9 seconden.
- Vergif – Delivers damage over time. Upgrades into “Hel Vergif” variants which simply do even more poison damage.
- Shock – Has a flat 60% chance to paralyze the target, slowing their movement and occasionally causing them to stutter and stop moving completely. This and Lightning both upgrade into the “Thunderbolt” variants.
- Lightning – Inflicts 15% of your base damage to a nearby target (tot 4 keer). This and Shock both upgrade into the “Thunderbolt” variants.
- Thunderbolt – Combines the benefits of both the Lightning en Shock variants. Inflicts 35% of your base damage to a nearby target (tot 5 keer) and will paralyze the target for .35 seconden. It also increases your movement speed by 35% while in hand.
There are some other unique upgrades that are weapon dependent. The list below covers them.
- Triple Axel – Upgrades into “Quattro Axel” en “Penta Axel“, which fire 4 en 5 projectiles respectively instead of the normal 3. De “Penta Axel” increases knockback slightly.
- Grenade Launcher – Has multiple unique upgrades. De “Gravity” launcher will suck nearby fish in before exploding, ensuring maximum damage. De “Vergif” en “Gravity” both can upgrade in the “Blackhole” launcher, which combines the suction affect of the “Gravity” launcher and the damage over time of the “Vergif” launcher.
- Sticky Bomb Launcher – Upgrades into the “Sticky Mine’ launcher which will fire 3 shots simultaneously, making it function like a Triple Axel en Grenade Launcher hybrid.
- Net Gun – Each upgrade increases the size of the net fired. The final upgrade is the “Staal” net gun which fires a very large steel net that can capture much larger, higher ranking fish.
- Tranquilizer Gun (Hush Dart) – Each upgrade lowers the time it takes for a fish to be tranquilized. Upgrades into the “Modified” hush dart which will sleep normal fish almost instantly, and can tranquilize any fish in the game with just 2 schoten.
- Ice Gun – Upgrades into the “Ultra” ice gun, but this upgrade simply increases the damage done whenever you damage the fish after they are frozen.
Landbouw
A highly valuable mechanic known as farming becomes significantly relevant during the mid to late stages of the game. Helaas, its introduction tends to occur later than ideal. Through this mechanism, it is often possible to amplify the yields of ingredients to two or three times their typical amount. The game effectively explains the operational aspects of the farm, allowing this segment to focus predominantly on data and recommendations.

Upon your initial acquaintance with the farm, you’ll have the capacity to cultivate a limited quantity of rice. Soon thereafter, you’ll gain the ability to nurture up to 6 varieties of vegetables in the section situated to the right of the rice patch. Eventueel, you’ll unlock both the chicken coop and the option to collect chicken eggs.
The advancement and enhancement of these farms play a pivotal role if your goal is to generate money swiftly and proficiently. Hoe dan ook, if maximizing profits isn’t your primary objective, you can reasonably consider skipping the farming aspect. Beyond avenues for upgrading and unlocking new recipes, the farm offers relatively limited prospects.

Commencing with the Rice Paddy, the benefits are easily reaped since Otto takes charge of the seed planting process automatically. The Rice Paddy can be upgraded through three increments, available for purchase from Otto. Each upgrade increases the size of the paddy and augments the quantity of rice obtainable per harvest. Opmerkelijk, fertilizers and composts can be employed for the Rice Paddy, and details about these are provided alongside the vegetables.
As for the Vegetable Field, the task of planting and tending to each crop individually rests on your shoulders. In the beginning, only the top row is at your disposal, enabling the cultivation of a maximum of 6 vegetables simultaneously. With each upgrade purchased from Otto, a new row (another 6 vegetables) is unlocked. Fertilizers and composts can also be utilized in the Vegetable Field. Bovendien, manual watering using the Watering Can, which has its own upgrades, is required for each plant. The initial two upgrades for the Watering Can increase its capacity, allowing you to water more plants before needing to refill the can. The third upgrade transforms the Watering Can into a Sprinkler that automates the irrigation of all 4 rows in the Vegetable Field. Opting for this upgrade is advisable if you prefer less hands-on field management. Similar to the Rice Paddy, the Vegetable Field can also make use of fertilizers and composts, and details about these are outlined below.
- Growth Fertilizer – Makes your crops grow faster.
- Harvest-Up Fertilizer – Increases the yield of your harvests.
- Pest Fertilizer – Makes your crops more resilient to weeds/pests.
- Nutrient Compost – Enriches the soil with more nutrients.
The final aspect of farming is the Kippenhok. It isn’t quite as useful as the other two farming mechanics, but still necessary for some VIP Events. Every morning, depending on what type of chicken or chickens your own, you have a percentage chance listed below to gain a normal or Grade A egg.
- White Chicken – 10% chance for a Grade A egg.
- Brown Chicken – 40% chance for a Grade A egg.
- Free-Range Chicken – 70% chance for a Grade A egg.
Fish Farming
Fish farming is a super useful trick, Maar het is vrij eenvoudig, so I’ll give you a quick rundown.
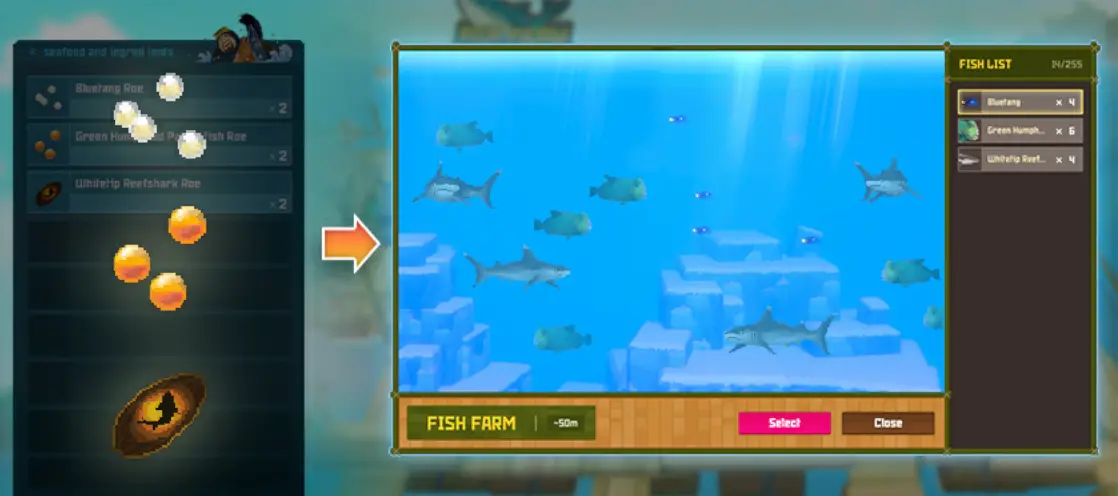
You can start fish farming in the middle of the game, and it’s good to keep doing it even after you finish the game. Whenever you catch fish, there’s a small chance you’ll get eggs, which go straight into your Fish Farm. They grow into full-sized fish, just like the ones you’d find while diving. You can do this with any fish in the game, except for the big boss fish.
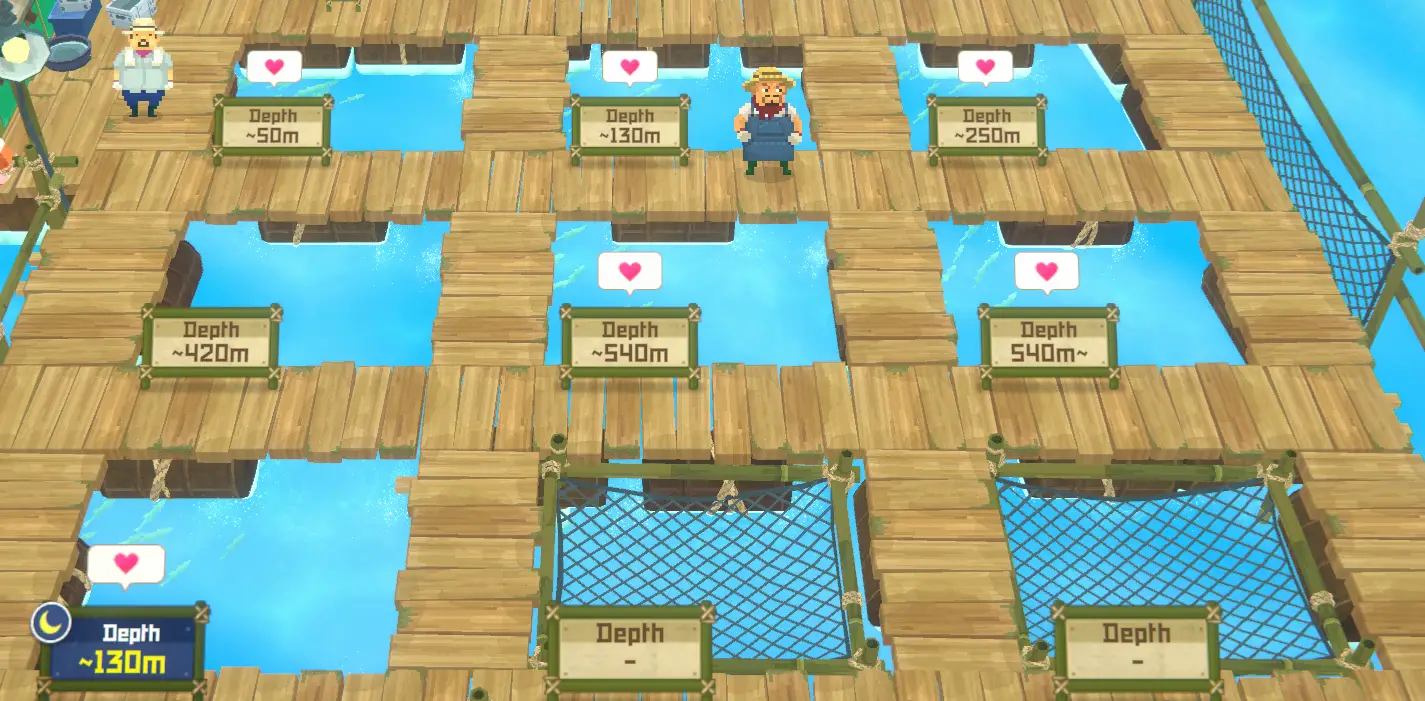
Look at the picture above. Er zijn 7 different areas where you can grow fish from different places. In eerste instantie, you can only use the shallowest area (for depths of 50 meters and more). Each area is for a specific depth, except the nighttime fish farm. That one only grows fish you catch during evening dives, no matter the depth. Here’s a list of what each area is good for:
- 50 meters to surface.
- 130 meters to 50 meter.
- 250 meters to 130 meter.
- 420 meters to 150 meter.
- 540 meters to 420 meter.
- 540 meters and below.
- Night time fish at any depth.
In elk gebied, if you have more than 2 of the same kind of fish, there’s a chance they’ll make more fish during the day. Each of these 7 areas can also get better, so they can hold more fish. This means you can have more types of fish, or your favorites can have more babies.
The best thing to do is to put your most valuable fish from that area into each section. But some folks treat these areas like virtual fish tanks and put in the fish they think look the coolest. You can choose either option – do what you enjoy!
Gyao!
Gyao! are a mid-late game mechanic that is introduced after an optional boss. They are basically identical to old Tamagotchi toys and serve as a fun, albeit sometimes tedious, way to grow your own personal pet versions of some of your favorite fish and sealife.
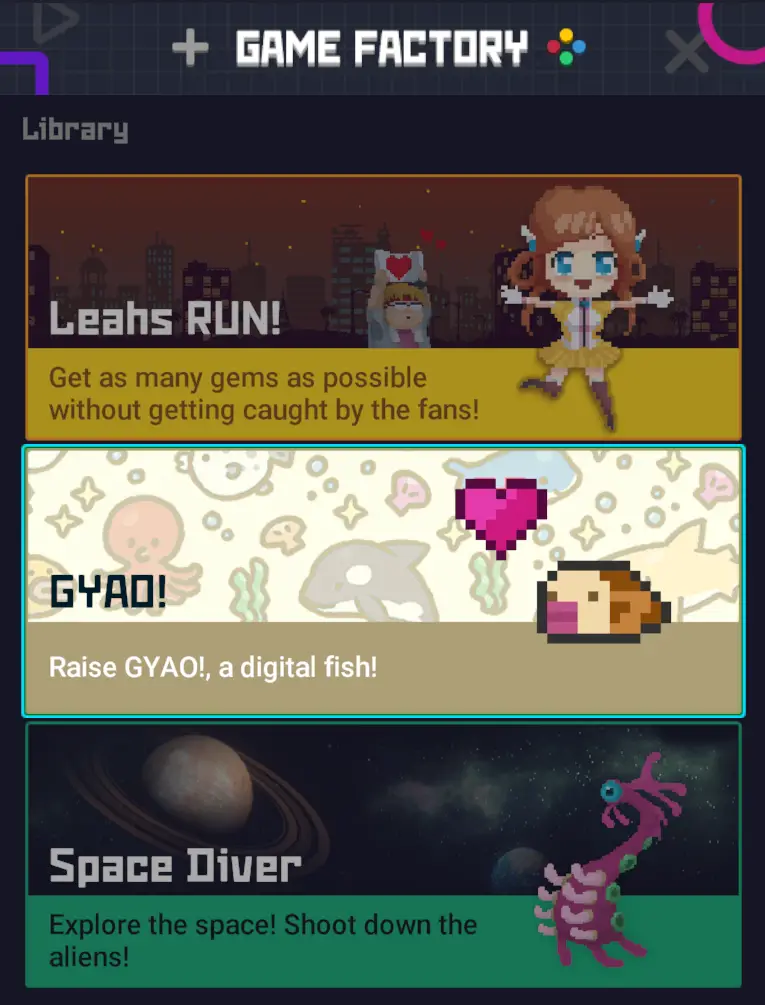
It is one of 3 mini-games that you will unlock throughout the game on your phone. To briefly cover the others, Leah’s Run is a sidescrolling platformer that you unlock after a mission with Duff. The other minigame, Space Diver, is unlocked after beating the game and has an achievement tied to it!
Proper Care
Whenever you are starting out with Gyao!, you should get familiar with the things you have to manage to keep your Gyao! healthy.
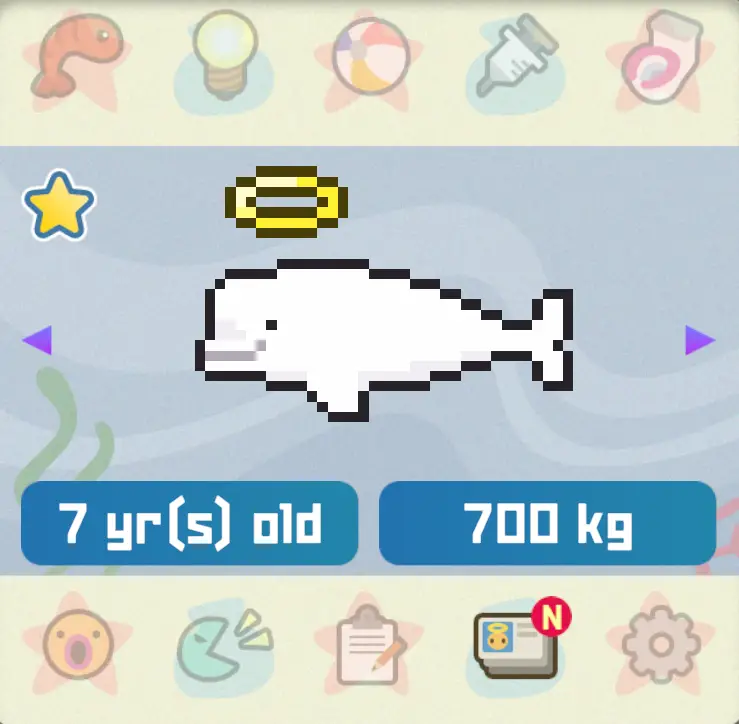
Above is the screen you will see when you open the mini-game from your phone. Below is a list of all the options you have to take care of your new best friend.
Top Row
- Garnaal – This is how you feed your Gyao!. The snack option also raises the affection stat. Keep them well fed!
- Gloeilamp – Make sure you turn off the lights before you start serving at Bancho’s!
- Beach Ball – This is how you play with your Gyao!. It is necessary to keep it healthy.
- Syringe – Whenever you see a purple skull, you need to heal your Gyao! with this.
- Toilet – Whenever you see a poop icon you need to clean it with this.
Bottom Row
- Shocked Face – Shows you that your Gyao! needs some sort of attention.
- Shouting Face – This is how you train your Gyao!. Only available when everything else is good, but the Shocked Face is still lit up.
- Clipboard – Lists the statistics, including hunger, affection, and training.
- ID Cards – A history of all your previous Gyao!, showing their age and weight.
- Cog – Settings to turn your notifications on/off.
Raising Different Gyao!
Depending on how well you look after your Gyao!, you can raise various types of animals.
When you initially begin caring for your pet, it will start as a tiny ball. This stage is brief and doesn’t require any care.
The second stage involves the animal emerging from the ball and needing your attention. This phase is also short, but ensure you tend to your Gyao! based on the desired animal.
Then comes the third stage, where your current Gyao! starts to grow slightly. This phase is similar to the second one, but it’s more crucial as hunger, affection, and training stats will determine the next step.
In the fourth stage, your Gyao! will either evolve into a larger brown fish or a displeased-looking blue fish. It becomes the brown fish if you’ve been taking good care of it, especially when your affection stat is at 3 of 4. Anders, you’ll end up with the blue fish. Keep these options in mind when viewing the image below.
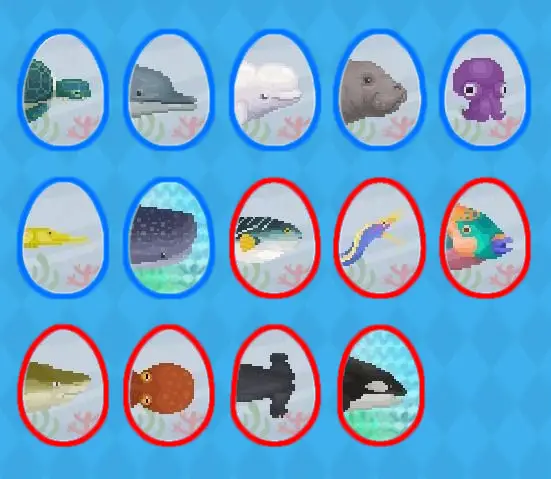
Once you’ve progressed to the fourth stage and observed the fish that your Gyao! has developed into, you’ll gain insight into the group of animals at your disposal for the final phase. Looking at the provided image, the animals outlined in blue will be accessible if you’ve nurtured the brown fish. It has the potential to transform into any of the animals with blue outlines, except for the Whale Shark, which will be discussed later.
If you’ve raised the irate blue fish, your selection will comprise animals marked with red outlines. Similar to the Whale Shark, you won’t be able to raise an Orca unless you follow the specific instructions outlined in the subsequent section.
Rare Gyao!
To raise the two rare Gyao!, you must first have a specific kind of normal Gyao!.

In order to raise the Whale Shark, you must first get the Beluga, and before that you must raise the brown fish. Make sure to keep your affection stat high for the best chance to get the Beluga. After you have one, you must max out it’s training stat as fast as possible. If you don’t max it out fast enough, your Beluga will die and you will have to start over. If you do have it’s training maxed out though, you will be rewarded with the rare Whale Shark!

To raise the Orca, you must first get the Lemon Shark, and before that you must raise the angry blue fish. Make sure to keep your affection stat high for the best chance to get the Lemon Shark. After you have one, you again must max out it’s training as fast as possible. You have more time with the Lemon Shark than you do with the Beluga, but there’s still a risk that you might not train it fast enough and have to start over. If you do max out it’s training though, you will be rewarded with the rare Orca!
Fishmon
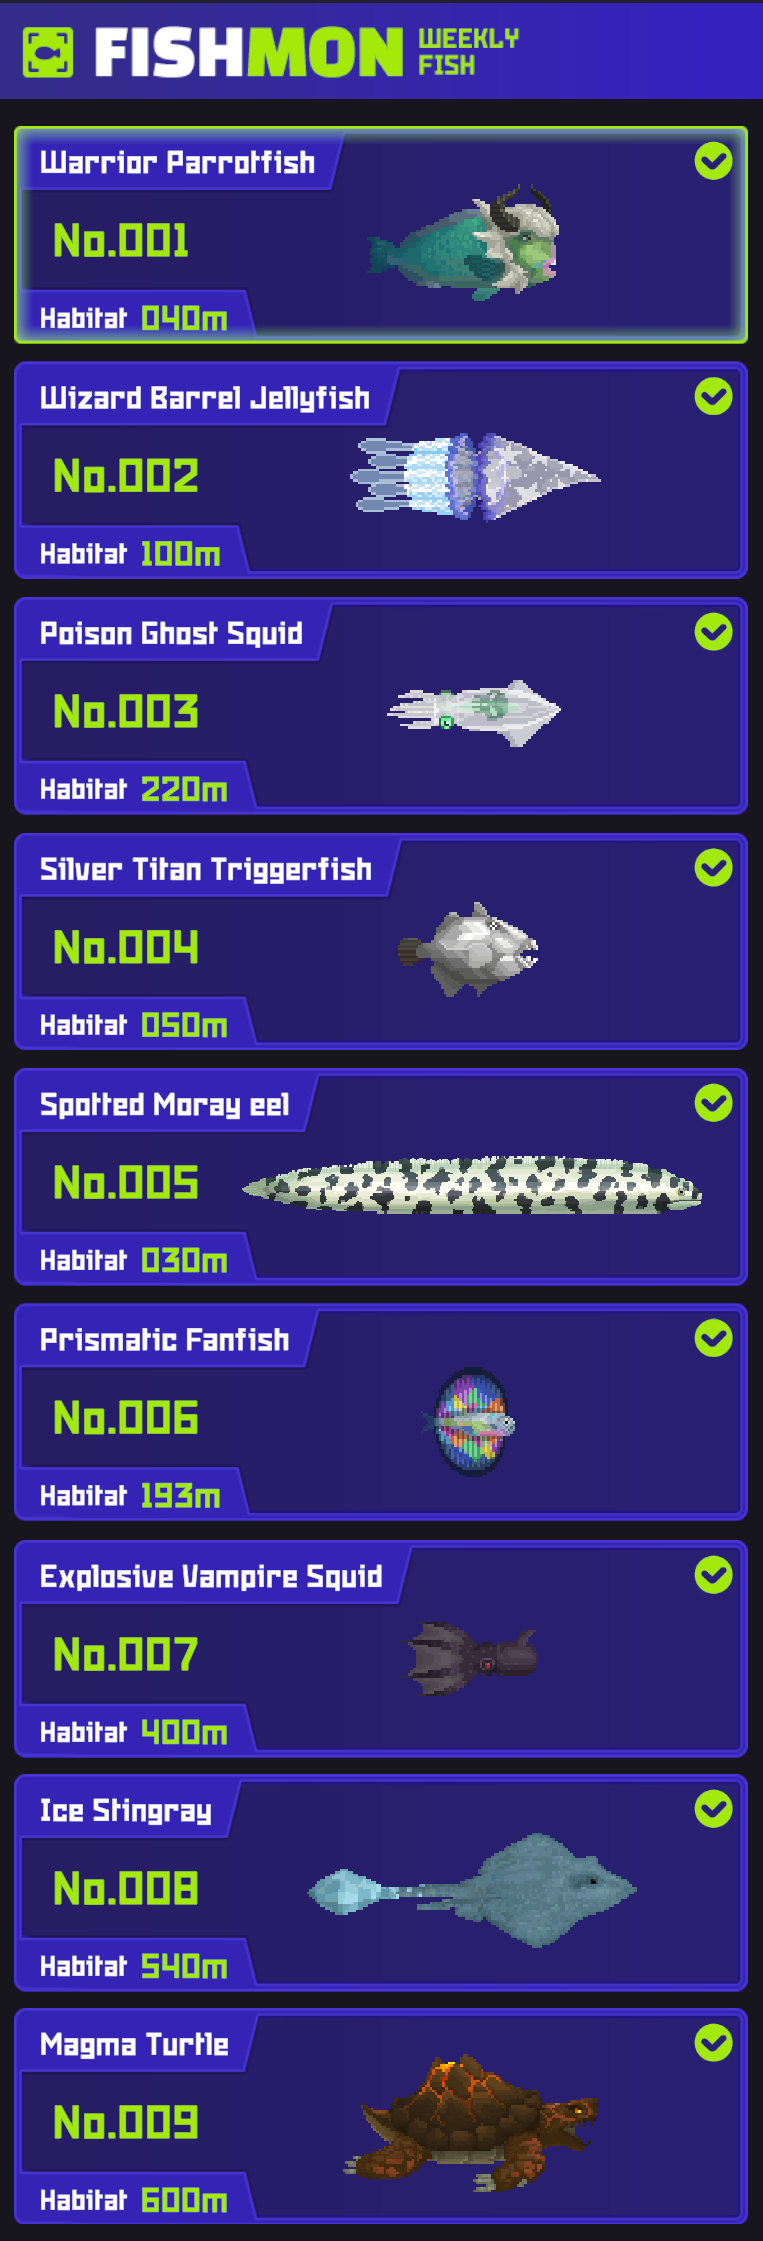
Fishmon serve as a game element that comes into play towards the game’s conclusion, depending on how swiftly you advance through the main storyline. These are uncommon fish that exclusively appear during the weekends. Once you gain access to this feature, each Saturday, you’ll receive information about the latest Fishmon from a character named Udo. He’ll share details about the specific Fishmon, potential locations to locate it, en, if applicable, advice or conditions for successfully capturing it. It’s advisable to act reasonably promptly, as you’ll only have until Sunday night to seize the Fishmon before they vanish, necessitating a wait until the following week.
While primarily catering to dedicated players aiming for complete game mastery, catching Fishmon does reward you with a generous financial boost on Mondays. The amount varies, variërend van 1,000 naar 2,500 goud, contingent on your position on the list.
It’s important to mention that this aspect of the game pertains to the final stages, and none of the information shared here contains spoilers related to areas or events occurring earlier in the game. If you wish to avoid learning about late-game locations and story developments, refrain from reading further.
How to Catch
This part is gonna be a quick rundown of hints and stuff that could help you catch those tricky Fishmon. Voordat we beginnen, keep in mind that from what I’ve tested, you can’t take down any Fishmon with just one shot. Dus, als je kunt, go for the best upgraded sniper you got. Even the Death Sniper Rifle is good because its instant death thing only makes the Fishmon pass out. But watch out not to shoot twice, ‘cause you’ll mostly wipe ‘em out with the second shot.
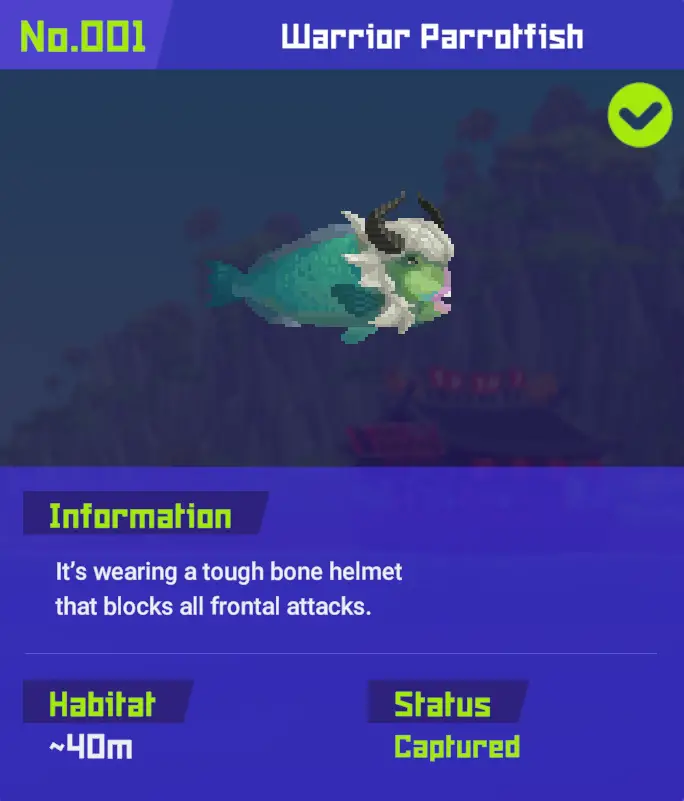
Starting with the very first Fishmon that you’ll catch, we have the Warrior Parrotfish. It resides near the surface with a tendency for the left side of the Blue Hole Shallows. To capture it successfully, you will have to wait for it to charge and shoot it from behind (similar to most other fish in the game) as shooting it in the head will negate all damage.
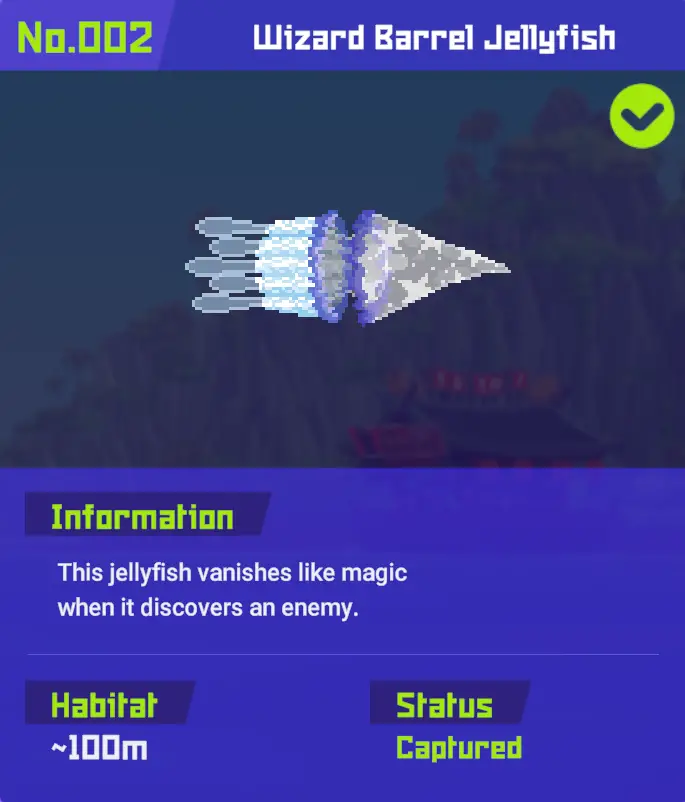
Next is the Wizard Barrel Jellyfish. It will teleport if you get to close to it, so again, make sure you are using your best sniper. It can be found near the Yellow Shipwreck that you visited earlier on in the story.
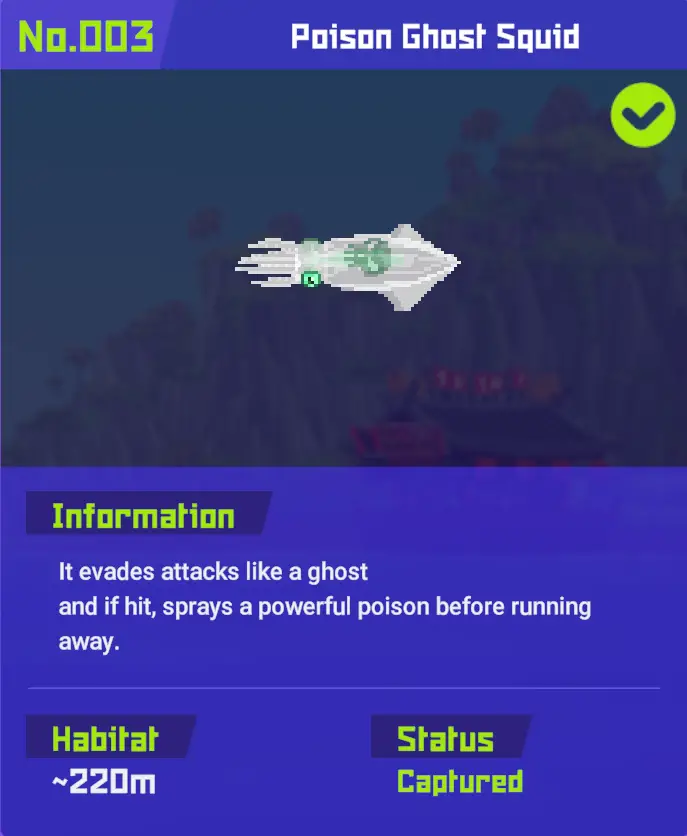
Then we have the Poison Ghost Squid. This can be found in the Blue Hole Deeps en can only be shot once you have shined a UV flashlight on it. I have found a tendency for it to spawn on the right side of the deeps, but I can not confirm.
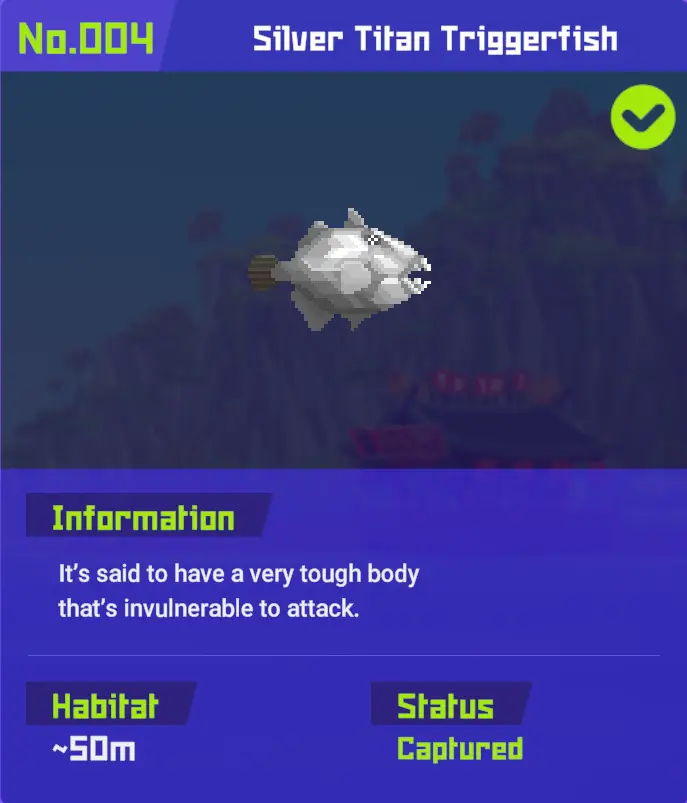
Next we have the Silver Titan Triggerfish. It resides on the edge of the medium depth parts of the blue hole. There have been reports of finding it in a few different areas, but I found mine on the right edge. To capture this shiny Fishmon you will have to bring a Lightning elemental weapon. Any other form of damage will not work.
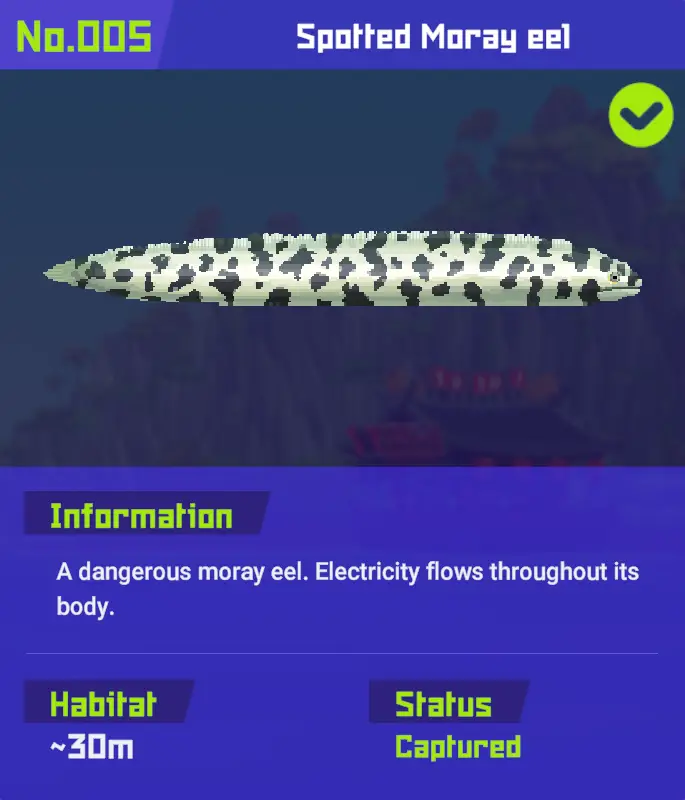
Then comes our one and only night dive Fishmon, de Spotted Moray Eel. Zoals vermeld, you have to go on an evening dive to spot it. Luckily though, it is typically found very close to the surface and doesn’t have any special requirements for damaging it. This is the easiest one to catch in my opinion.
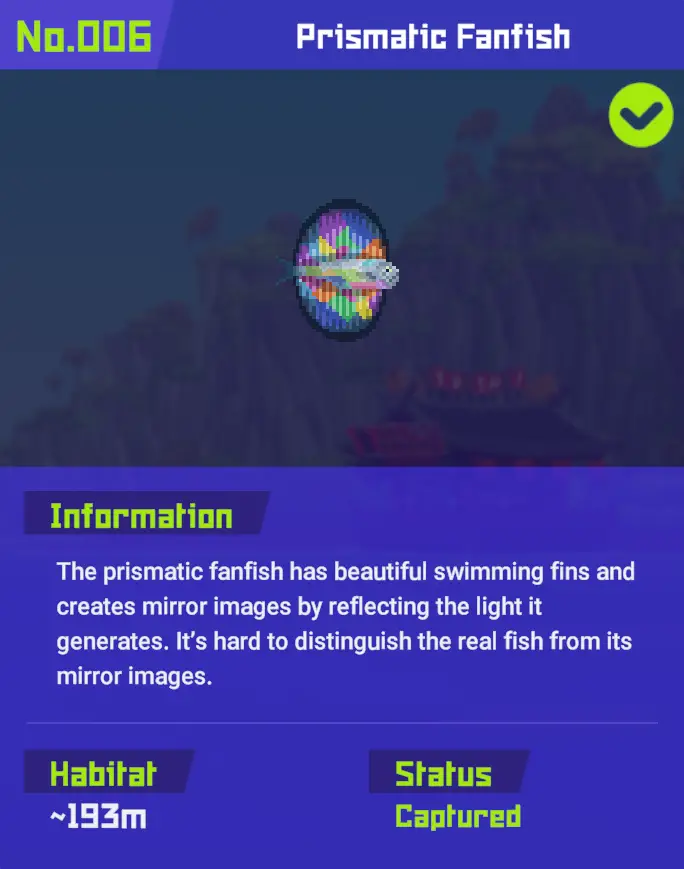
Now we have the Prismatic Fan Fish. It can only be found in the Underwater Lake, which you have probably visited before as part of a side quest for the Sea People. Whenever you find it and damage it, duplicates will spawn and you will have track which one is the real fan fish. They have very low health so just about any damage source will do, but I recommend to bring an upgraded Triple Axel (of Penta Axel if you have one) as each pellet will destroy a clone.
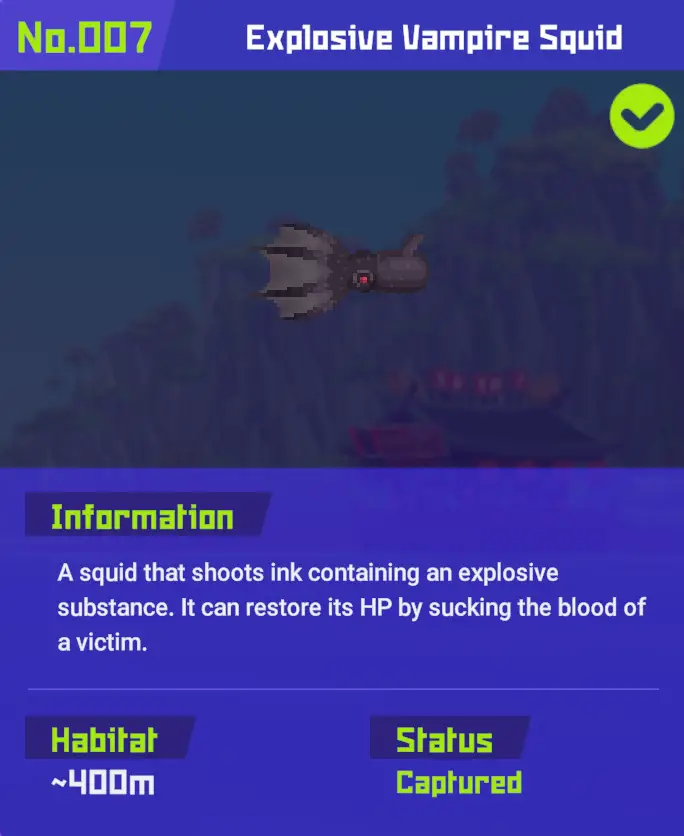
#7 is the Explosive Vampire Squid. This is another easy one similar to the previous moray eel. It can be found in the bottom most section of the Glacial Passage very consistently. Opnieuw, like the moray eel, it has no damage requirement so a Death Sniper Rifle will make quick work of it.
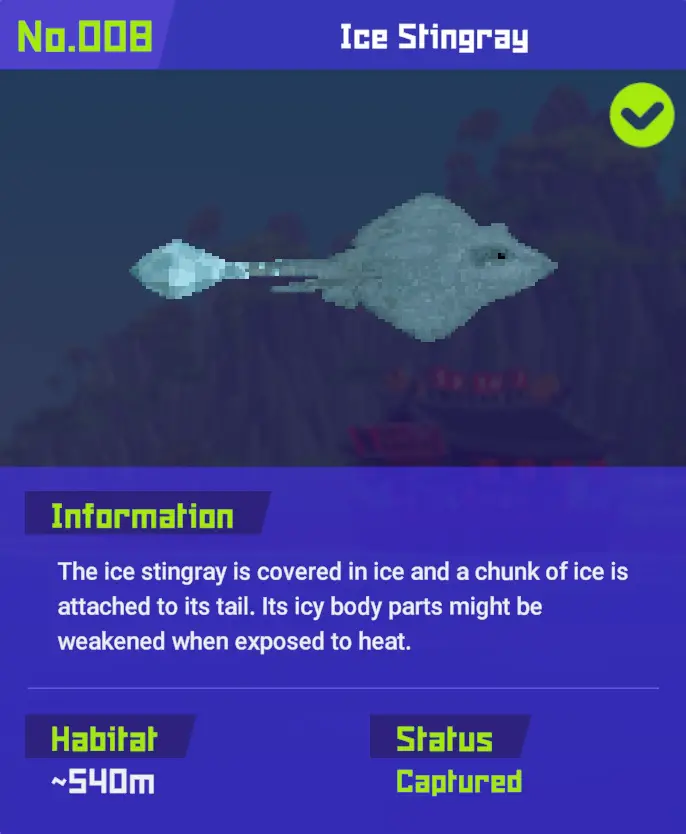
Then we have our penultimate Fishmon, de Ice Stringray. It can be found on the ceilings of the first puzzle room in the Glacial Area (in the top right corner of the area’s map). Due to it’s icy nature, Het must be damaged with some sort of fire or explosive weapon.
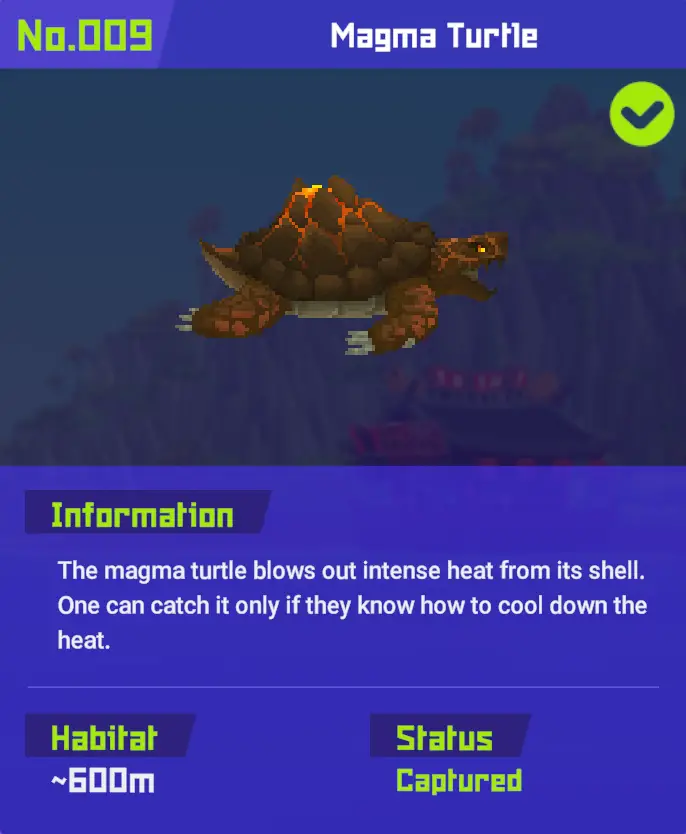
Our final elusive target, #9 on our list, is the Magma Turtle. It can be found in the caves of the Hydrothermal Vents gebied. The easiest way to access this is to simply swim straight down once you start your dive in the Glacial Area, go through the entrance to the cave, en almost immediately there will be a glowing door on the left side. Living for ages in the world’s harshest environment has toughened the turtle significantly, Dus it can only be damage by ice. I recommend to bring an Ultra Ice Gun, but even the Ice Harpoon Tip will suffice if you can find one.
Tips en trucs
This part of the guide offers a bunch of helpful and enjoyable tips and tricks for your journey in the game. These are bits of advice that didn’t fit into the other sections and are presented without a specific order.
- Take Your Time – Herinneren, there’s no rush when it comes to playing this game. It’s unique, enjoyable, well-crafted, and deserves the time you give it. Dus, have fun and don’t hurry.
- Verzamel alles – You’ll find various items scattered on the ocean floor, some of which are quite useful in recipes. These items come in handy at different points in the game. In the beginning, focus on gathering fish due to limited storage. Once your storage space increases, aim to collect everything you can.
- Note Your Recipes – Whenever you unlock or discover a new dish, remember its ingredients. With a good understanding of the game’s map, you can head to areas where the needed ingredients are frequently found.
- Escape and Evade – If you’re stuck among aggressive fish, remember you can often outrun or sneak past them. If that doesn’t work, you can use items from Cobra’s Shop for a quick escape. You don’t always have to fight.
- Maximize Your Menu – As your restaurant advances, you get more menu slots. Utilize all of them to boost your earnings.
- Prioritize Price – Taste is interesting but doesn’t heavily affect the game. It mainly upgrades your restaurant’s rank in Cooksta. Geld, Echter, holds more value for various purposes.
- Auto-Supply Advantage – You might not have encountered it, but there’s an auto-supply feature. When adding a dish to your menu, choose the minimum quantity and then enable auto-supply. This ensures only necessary ingredients are used, saving resources.
- Smart Staffing – Staff are great, but you generally only need 2 for the kitchen and 2 for customer service. Specialized employees can be helpful but aren’t essential for making good money.
- Spot Mission Items – When you have quests or side-quests requiring specific items, they’ll be marked with blue diamonds. This helps you manage your objectives.
- Aim for Achievements – While not a tip, I’d like to point you to our DAVE THE DIVER achievements guide, covering all the achievements in the game. It’s a good resource for completionists.
Conclusie
Now that you understand your responsibilities as the top diver at the Great Blue Hole, you possess sufficient information to venture into managing Bancho’s Sushi successfully and aiding the Sea People. Ongeacht uw keuze, I am confident that you will thoroughly enjoy engaging in this passion project. Feel free to share this information with your friends, either by passing on this guide or highlighting the important points marked in bold.
Dat is alles wat we vandaag hiervoor delen DAVE THE DIVER gids. Deze handleiding is oorspronkelijk gemaakt en geschreven door Analoog. Voor het geval we er niet in slagen deze handleiding bij te werken, U kunt de laatste update vinden door dit te volgen link.
