- Titel: Card Quest
- Releasedatum:
- Ontwikkelaar:
- Uitgever:
Information about Card Quest is still incomplete. Help ons alstublieft de details van het spel hiermee in te vullen contactformulier.
This guide describes the best way to unlock the Adventurer Subclass of the Rogue Class in Card Quest. It features a full description of all possible enemy mobs in your quest to complete this difficult unlock as well as set-up and strategy.
Setup for Unlocking the Adventurer Subclass
The Adventurer Subclass is extremely difficult to unlock in Card Quest because of the setup required and the monsters you face. It can only be unlocked by completing the City of the Undead. Though you can complete it from the beginning should you wish, dit is
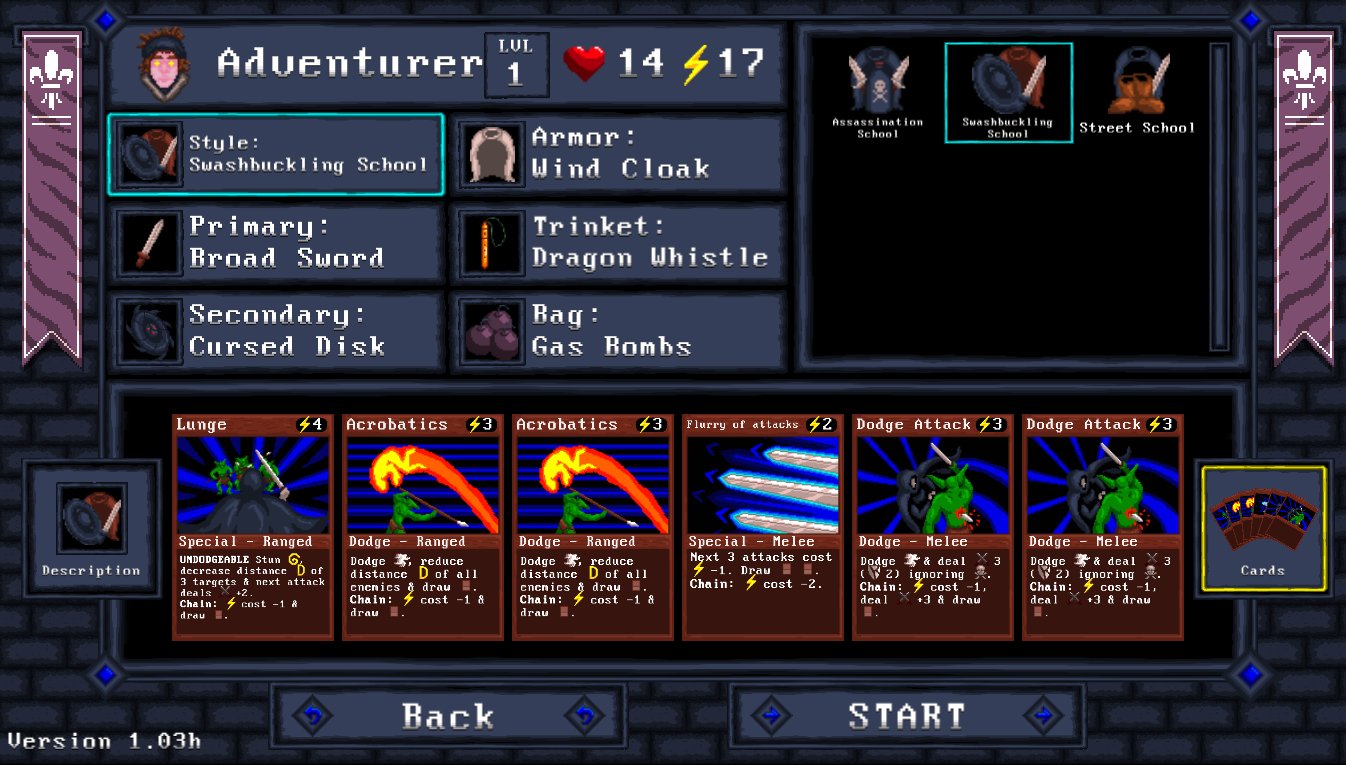
nietrecommended because there is a fair amount of luck in achieving this unlock. Dus, you want to maximize your chances by starting directly on The Arch Lich battle. The image above shows you the setup you need to use. Below is then a quick explanation of why you should choose these particular items as opposed to others as well as the basics of the card function. You should be familiar with how the cards work at this point, so I will not be as detailed as my Serial Killer build for the Rogue Class (see separate guide).
Swashbuckling School
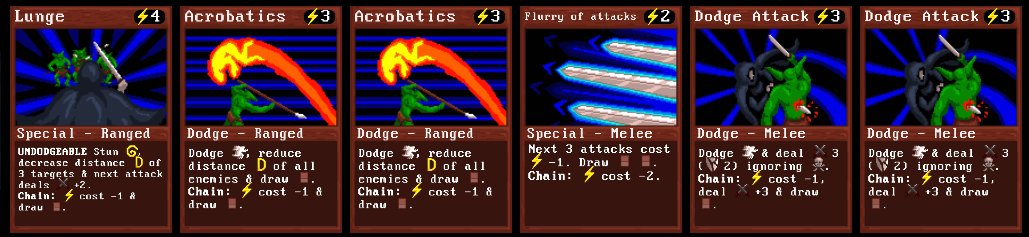
You have no choice but to choose this school, though it is the second best in the Rogue Class. Echter, second best out of 3 isn’t exactly good! The cards are shown above. Lunge is one of the most important to unlock the Adventurer because it enables you to halt enemies for a single turn and increase damage. Best used in a CHAIN, Echter, unless you have no choice. Acrobatics I would avoid using unless you need the 2-card draw it creates in a CHAIN. Anders, it’s a fine defense to use if you have nothing else. Flurry of Attacks nets 2 cards and reduces the cost of the next 3 aanvallen. In a CHAIN it costs 0 STAMINA, so note that. Dodge Attack is costly for what it does, netting 3 points of damage for the first use, but it reduces cost and nets 6 points of damage when in a CHAIN. This makes it an easy way to eliminate enemies with low health during your defensive round.
Primair: Broadsword
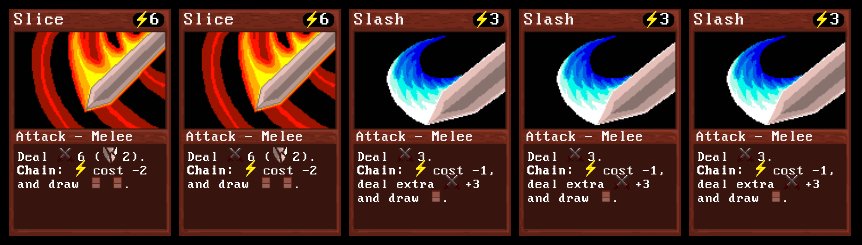
You can also use the Shortsword or the Scourge in this slot, but I do not recommend either. The Scourge can deal STUN effect on enemies with one particular card, but it does not do nearly enough damage to provide sufficient attack in the long run. The Shortsword does comparable damage to the Broadsword but is not as strong, so choose the Broadsword. Slash will be the primary attack you use because in a CHAIN its cost is reduced sufficiently and its damage increases. Slice does heavy damage while ignoring 2 ARMOR, and in a CHAIN also nets 2 kaarten, making it invaluable. In a CHAIN it also costs less and is not a CHAINBREAKER. This makes chaining it with Slice your primary line of attack.
Secundair: Cursed Disk
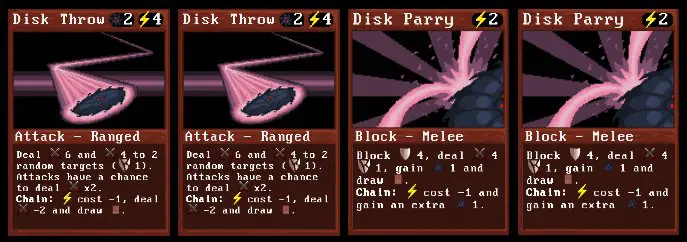
The Buckler is also possible in this slot to unlock this subclass, but though it provides a single attack that can apply STUN effect, it has no real use other than blocking and instead you want to maximize damage, even in defense, which only the Cursed Disk provides. Disk Throw is, naar mijn mening, only useful when it is not part of a CHAIN. The reason for this is, in spite of not dropping a card, it deals higher damage, which is more important. It strikes 2 random targets in addition to your chosen first, which is also great, especially with the POISON feature you will choose for max level when you start The Arch Lich battle. But without a doubt Disk Parry is the most important card of the Cursed Disk set. It will block most incoming damage, but more importantly applies up to 4 points of damage back to an attacker. In a CHAIN it only costs 1 STAMINA as well. You’ll find yourself pairing this with the defense cards that come with the Swashbuckling School.
Pantser: Wind Cloak

The Leather Jacket and the Harpy Cloak are also optional in this slot, but I found the Wind Cloak was more beneficial. The Leather Jacket provides fair buffs but to efficiently unlock this subclass you essentially have to avoid getting struck at all until The Arch Lich. The Harpy Cloak has some benefit, but unfortunately though it can apply STUN to 3 targets, if they can be stunned, it does not provide the benefit of the Wind Cloak, which is providing 5 STAMINA immediately, drawing 1 kaart, and setting up a CHAIN for attacks. It also provides more STAMINA regeneration, which is critical to afford the proper attack and defense to finish The Arch Lich. Daarom, go with the Wind Cloak.
Trinket: Dragon Whistle

You can actually use any Trinket you desire in this slot, however I do not recommend it. In plaats van, choose the Dragon Whistle, which is one of the items you can receive after completing the boss in the Dwarven Mountains. Even though this Trinket only provides an attack on 3 random enemies for 8 points of damage each, which is somewhat useful, the primary reason you need this loaded is you want to start immediately at The Arch Lich battle and nowhere else. Due to the amount of luck in card draws for you to have the best chance at unlocking the Adventurer Subclass, wasting time on earlier levels will only discourage you when you inevitably lose. You’re going to likely need to restart the battle entirely a few times because of unlucky mob and card combinations. You could technically start on Level 4 in any battle and path you wish, but trust me, with the likelihood of failing to unlock the Subclass on the first few tries in the Arch Lich encounters, you will lose your patience quickly. Use the Dragon Whistle to start there immediately and save time.
Tas: Gas Bombs

You can also load the Dwarven Bombs in this slot, but I do not recommend it. They deal great damage to 3 targets but only STUN a single one, and The Arch Lich cannot be stunned! Het, can however, be made UNAWARE, and the Gas Bombs provide this. One trick you should note is you need to try to have 2 full uses of the Gas Bombs ready for The Arch Lich because it can break the effect immediately, though it will remain on the two targets adjacent to it. 2 bombs is acceptable, maar alleen 1 is going to put you at an extreme disadvantage. The UNAWARE effect the Gas Bombs deal on 3 targets is an immense help in the final encounter with The Arch Lich, en 3 uses of it gives
Jijthe edge.
Max Level Perks
I’ve tried different layouts of perks for this unlock, but the following, in order of selection, is what I found works the best. When you use the Dragon Whistle to start The Arch Lich encounters, choose the following perks: Opportunism (5% critical strike), Efficient Ambusher (first card -4 Stamina cost), Expert Dodging (-1 Stamina Point cost for dodge cards for 2 rondes), Damage Mitigation (3 extra health), Stealth Mastery (33% chance to be hidden at the start of an encounter), Quick Thinker (3 attack cards draw an extra card), Swift Attacker (Eerst 3 attacks cost -1 Stamina Point), Poison Maker (3 rounds of 2 points of poison damage applied to each target struck), and Expert Dodging again (this gives a 0 Stamina Point cost for dodge cards for the first 2 rounds because you’ve chosen it twice). Now that you understand the basic setup I will go through each Round of The Arch Lich battle, explaining all the possible mob encounters you can have and how to deal with them using the cards and skills available through the setup indicated above.
Round 1 Encounters
Round 1 Encounters
Starting with the first round I will now go through all of the possible encounters you can have. I have presented these in order of appearance alphabetically starting from the first monster on the left. These mobs appear randomly and there did not seem to be any that were particularly common or rare, witch the exception of one. As with the other rounds of this battle, these encounters are not dictated by what comes before or after, except in rare cases where a mob may drop in one of two different Rounds (it will not appear twice). There is a bit of luck in what you get, and some encounters can ruin your chances of unlocking the Adventurer Subclass, so don’t be discouraged. Round 1 is the easiest. Please note I have also indicated for you what HIDDEN ENEMIES are present for any of these mobs. In some cases there are none, but in most cases there is at least one that will appear and this will affect how you prepare for your defensive turns.
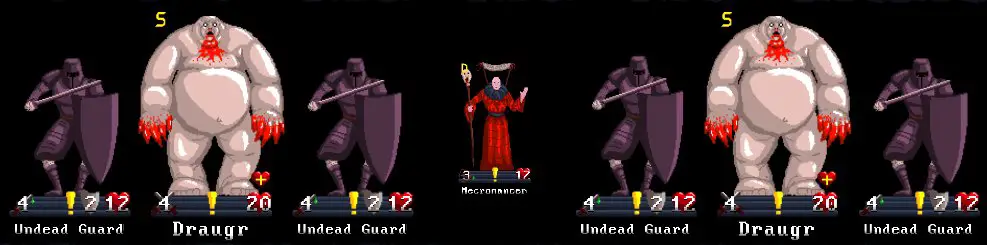
Draugr, Necromancer, and Undying Cultist Mob

Note that the UNAWARE status of this mob in the picture above is due to the Stealth Mastery perk, they are not UNAWARE to start unless it activates. Lucky you if you get this mob at any rate. It is the easiest to deal with though each of the 4 Draugrs have a large amount of health. Gelukkig, they have SLOW as a primary feature and won’t attack at first, giving you plenty of time. What you should worry about at first is the Necromancers, which are DISTANT. This is where the Lunge card for the Swashbuckling School will come in handy. This applies STUN to 3 targets and brings them close. So use that card on both of the Necromancers and the single Undying Cultist to control them for a turn. Dan, use your attacks to whittle away at the Draugrs as much as possible. Luckily your STAMINA regeneration and cards to buff it will help immensely. If you’re in a bind, drop a usage of the Wind Cloak for a quick 5 points of STAMINA fix and a card draw. I found a number of times this single move enabled me to gain and edge and complete an encounter. This mob has no HIDDEN ENEMIES, so don’t worry about them appearing and focus on the Draugrs until you have used Lunge. Zodra je dat hebt gedaan, kill off the Necromancers because when they are no longer in STUN they’ll summon annoying, though weak, undead enemies. If you use the Cursed Disk and attack 3 targets, then will stay in STUN and the poison from the perk you chose will help for future rounds. If this card is in your hand to start, choose one of the Necromancers to cut their HEALTH in half. Note that if the Undying Cultist is struck and killed while in STUN, it turns into a Wight and the STUN effect is removed, as well as POISON, so be careful in case you are low on STAMINA. Since they regenerate 2 HEALTH per turn they’re a bit annoying but only take about 2 attack cards to destroy. You need to avoid all attacks from enemies with POISON in this encounter and others, also note.
Undead Guard, Undying Cultist, and Necromancer Mob
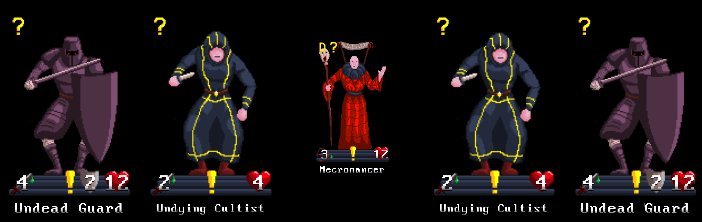
This mob is a little more tricky but can be dealt with in a fashion similar to the one described above. The Undead Guards can take a lot of damage because of their ARMOR, but generally you should not find them problematic. As in the last mob use your Lunge card to STUN the Necromancer and also the 2 Undying Cultists. If you have Disk Throw, als voorheen, toss it at the Necromancer to half their HEALTH. If they are in STUN before this, note that a strike to either of the Undying Cultists will kill them and turn them into a Wight, removing the STUN. But use the cards as they appear, in wezen, to save STAMINA. When an Undead Guard is killed, note it becomes a Wretched Undead Guard. Less life and less damage, but they attack the same. When they enter that phase STUN is removed as well as POISON. Wees voorzichtig, Echter, because there are 2 HIDDEN ENEMIES in this mob. Depending on how many targets are still left on-screen, ultimately you will see the appearance of 1 Ghoul and 1 additional Undying Cultist. If you have 2 Disk Parry cards ready, you can kill the Ghoul in one defensive round and turn the Undying Cultist into a Wight as well. Algemeen, this mob should give you no problems.
Vampier, Undead Guard, and Necromancer Mob
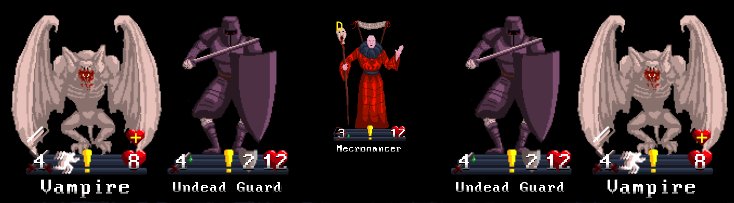
What you learned in my previous two mob descriptions applies here, but this mob, the second hardest you’ll potentially encounter in Round 1, introduces an annoying feature of some monsters in The Arch Lich battle. Namely, the features called DODGE and FURY. DODGE means that the first attack on a target is ignored, only the second and further attacks will deal damage. Annoyingly, the Vampire has this as well as FURY. FURY gives them 2 attacks per round. Vanwege dit, and any other monsters that have FURY, you need to deal with these targets first. When it enters the defensive phase for you, it is extremely unlikely you’ll have enough defense cards ready or draw enough to avoid all attacks. Your HEALTH is very critical for the eventual Arch Lich boss, so you can’t afford to lose much, if any, before then. Since the Vampires are at the far ends of the screen, you will likely only be able to STUN one of them with the Lunge card (it’s thankfully an UNDODGEABLE attack), bringing the Necromancer to the front. Maar, you might get lucky and draw another Lunge through card draws. But don’t count on it, make sure to kill at least 1 Vampire first and then deal with the other. They have regeneration as well, so don’t give them a round to lose STUN and heal, als je kunt. In most cases, this should be easy. This mob also features 2 HIDDEN ENEMIES. Dat zijn ze 1 Undying Cultist, which you learned about in the last mob description, en 1 Cultist. The Cultist just dies when you kill them and do not transform into anything. Most likely you’ll kill them the first time you defend against their attack with a Disk Parry. That’s all it takes. This mob is more tricky than the other two, but still very manageable.
Ghast and Starving Ghoul Mob

Pray for forgiveness if you get this mob, for it is the most difficult in Round 1 and one of two most difficult in the entirety of The Arch Lich battle. Luckily I hit it messing around because I didn’t even know it was something that could appear in Round 1. This is a rare occurrence, thankfully. Echter, it is a common drop for Round 2, therefore I’ll save my description of it for there. Just note it can appear in Round 1 and the same approach applies as you’ll find for Round 2.
Round 2 Encounters
By round 2 you’ll have a good grasp of how your cards work and how to choose the most important for attack and defense advantage. There is still, as you will see, some luck for the unlock, but sometimes luck of the draw, and mob, determines your fate, like it or not. As before, I will describe the mobs in detail alphabetically, starting with the monster on the far left.
Draugr, Necromancer, and Undying Cultist Mob
This is exactly the same mob that you may encounter in Round 1. There is absolutely no difference between the two. It’s a more uncommon mob appearance in Round 2, Echter, so I described it fully in Round 1 (see previous section if needed).
Ghast and Starving Ghoul Mob
This may be one of the most annoying encounters in the entirety of Card Quest, though only because of how you need to unlock the Adventurer Subclass. As I mentioned in the last section, this is a mob that can drop, though very rarely, in Round 1. Typisch, you’ll see it in Round 2 if you’re unlucky enough. The factor that determines how this one goes is if your Stealth Mastery kicks in before the Ghasts can attack, because they get initiative. If they are UNAWARE they will remove that status but not attack. If this does not happen, and unfortunately you only have a 33% chance that it will, you need to hope you have at least 4 defensive cards on hand or which will draw in total because Ghasts have the FURY feature and attack twice! You can use the Mulligan trick at a cost of 2 Stamina to draw a different set of cards, but as I found after 2 or even 3 times of this, you probably won’t get what you want so go with what you have at first or take a Mulligan or two if, and only if, you have no defensive cards. Sometimes you’ll get lucky enough that you draw further defensive cards to stop their attacks when they start, but expect to take at least 1 attack from them and lose 4 HEALTH. If you lose more, it’s pretty much over for the rest of The Arch Lich battle so seriously just restart. Once you get past the Ghasts’ initial attack, the rest is easy. You can use Lunge as you see fit. Note the Starving Ghouls also have FURY, but have less health and you should find a single attack phase is enough to eliminate all of them. One Disk Throw, if not in a CHAIN, Bijvoorbeeld, will kill three of them if it hits only them. This mob also has 1 HIDDEN ENEMY, but luckily it’s just 1 Ghoul. You’ll likely have a Disk Parry handy and it will kill them as soon as they attack you so no worries about that one. Zoals ik zei, this mob can drop in Round 1, but the same approach applies.
Undead Guard Mob
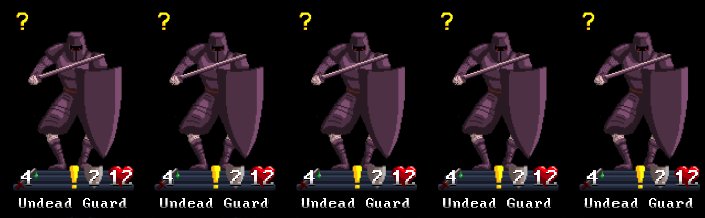
This mob appears to be more common than the one above, thankfully. Though it seems daunting because the Undead Guard has so much defense and fairly high HEALTH, it’s a rather easy battle. It all comes down to using Lunge properly and taking out one Undead Guard at a time. When in STUN, to remind you, an attack will not remove this status until you reduce their Health to 0 or they get another turn. When they die, herinneren, they turn into a Wretched Undead Guard and any STUN or POISON goes away. You need to be aware of that in case you’re running low on STAMINA. This mob features 1 HIDDEN ENEMY, but luckily it is only a single Cultist, which you’ll likely kill with one Disk Parry card during your defensive phase. Algemeen, this is the mob you want to encounter in Round 2 and the only other possible mob. It’s quite easy if you know what you’re doing.
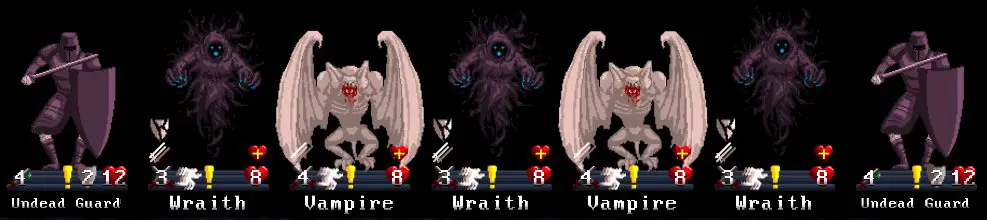
Undying Cultist and Wraith Mob
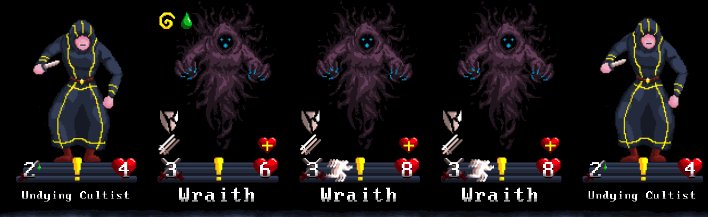
An easy mob to encounter. You know by now what the Undying Cultists do. The Wraiths function just like the Ghasts and really differ only in their appearance and the fact that they can attack from a distance, but that won’t matter anyway because you will not be putting them there and they start in the foreground. Since there are only 3 Wraiths right in the middle, pulling out Lunge when it’s ready, and preferably at a lower cost with a card draw, is ideal. Since there are no HIDDEN ENEMIES once you finish what’s shown here, it’s over. Now to on Round 3.
Round 3 Encounters
At this point you should have the usage of your cards and how to gain an edge with draws down to a science. That will start to be tested further beginning in this round. Mobs are described alphabetically as in the previous two sections of this guide.
Ghast, Undead Guard, and Hulking Horror Mob
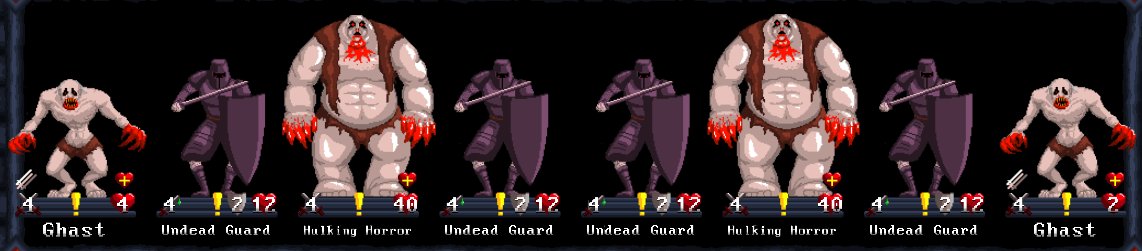
This mob is the most difficult of Round 3. It is a less common appearance, thankfully. Here you have the issue of the Ghast again, as described in Round 2, so that issue still applies and you should take a similar approach to them. The big issue, Echter, are the Hulking Horrors. They RAGE every other round, meaning they strike twice, once for more damage that your Disk Parry can handle, and they are immune to STUN. This makes this mob difficult because you need to take out the Ghasts first to avoid their FURY and then you have to do your best to avoid the Hulking Horrors to slowly eat away at their HEALTH. Helaas, this mob will tax your skills to the limit. You’re likely to get hit at least once, and if you’ve lost more than 8 HEALTH by the end of this encounter, start the entire process over again from Round 1 because it’s already over. Gas Bombs can help you win this encounter because the Hulking Horror is not immune to UNAWARE, but if you waste 2 usages of the Gas Bombs, which you need for The Arch Lich boss, it’s too many encounters to recover more than one before then. Quit in that case as well. The Undead Guard can be dealt with as normal. Luckily there are no HIDDEN ENEMIES with this mob, but you’ll have enough trouble without them.
Undead Guard, Undying Cultist, and Vampire Mob
This mob is probably the second most difficult that can appear in Round 3, but thankfully nothing close to the Hulking Horror mob. You’ve encountered all these monsters before so anything you already learned still applies. The lucky thing about this setup is that the Vampires are both in the middle, Dus 1 Lunge card will STUN both of them, making them easy to get out of the way. Deal with the rest as you would in previous encounters. Note that there are 2 HIDDEN ENEMIES in this mob as well, both Undying Cultists. So be certain to watch your STAMINA points in case they appear and you need to defend.
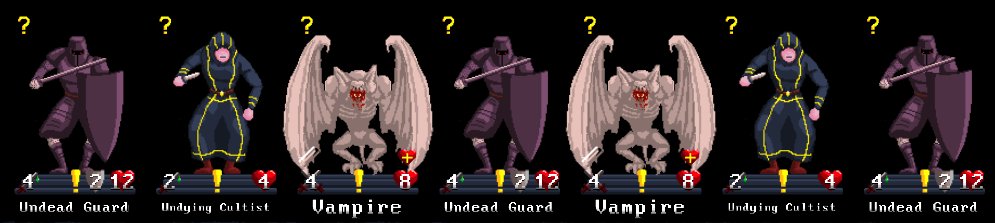
Undead Guard, Wraith, and Vampire Mob
This one might seem harder than the one above, but it actually isn’t because it features no HIDDEN ENEMIES at all. Nog steeds, the Wraiths have DODGE and FURY, so consider them the same as the Ghast. Gelukkig, the Vampires are right in the middle so you can take out 2 Wraiths and both Vampires by utilizing 1 Lunge. Because the Vampires and Wraiths have generally weak health and no additional defense outside of DODGE, you should find that this mob is toast within 2 turns maximum. Disk Throw is amazing to take this one out, because it is likely it will strike and remove DODGE for two targets, making them easy to kill. So you’ll probably save Lunge until you’ve already killed a Vampire or Wraith. Nu, move on to Round 4.
Round 4 Encounters
Though you’re likely a pro using your cards at this point, Round 4 is a slight respite until the next, and second most difficult Round.
Undead Guard, Draugr, and Necromancer Mob
Lucky you if this is the mob that appears in Round 4, because it is the second easiest in the entirety of the Lich battle. At this point you know what to do. Use Lunge to apply STUN to the three middle targets when you’re ready with it, hopefully in a CHAIN at less cost. You can attack this mob however you want, but the Draugrs are best to get out of the way first in my opinion because they have slight regeneration, whereas the Undead Guards do not. Er is alleen 1 HIDDEN ENEMY in this mob as well, a single Ghoul, which is a complete breeze to finish off with one Disk Parry.
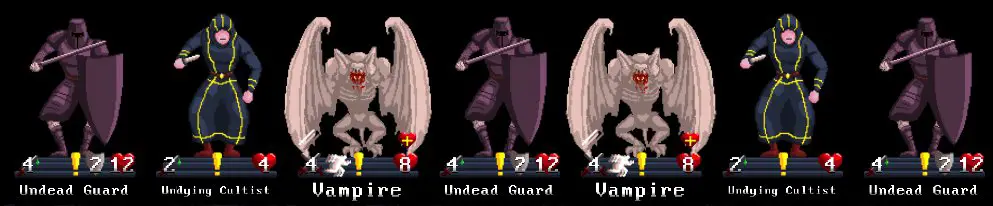
Undead Guard, Undying Cultist, and Vampire Mob

I may have spoken too soon about how easy the last one was, but then I remembered that this mob features a whopping 4 Vampires! Nog steeds, you know the way to take them out at this point. You should center you focus on using Lunge on at least 2 van hen. Do not worry about the Necromancer. They do minimal damage, are easy to defense against, and if they don’t have enough room on-screen they can’t summon undead. Your goal to start this encounter is to take out all the Vampires first, then worry about the others. 2 HIDDEN ENEMIES also appear this round, but they are meek Palebats. Palebats do possess DODGE, but you’ll likely kill them in your defensive phase with a simple application of Disk Parry or Dodge Attack.
Undead Guard, Undying Cultist, and Vampire Mob
This mob is generally easy, featuring monsters you’ve encountered before. Since the 2 Vampires are right in the middle, a simple usage of Lunge will fix them quickly. If you don’t have one in a few draws, it shouldn’t pose too much of a danger anyway. Er zijn 2 HIDDEN ENEMIES in this mob as well, both Undying Cultists. Once you complete Round 4, it gets way more difficult!
Round 5 Encounters
Round 5 is where things can get super hard, and if you’re unlucky enough to get the wrong mob, it’s all over after doing all that work in the first 4 Rounds! Er zijn 2 bendes, in werkelijkheid, that will completely ruin your progress should they appear. I will describe all possibilities as before.
Draugr, Undead Guard, Necromancer, and Tomb Mob
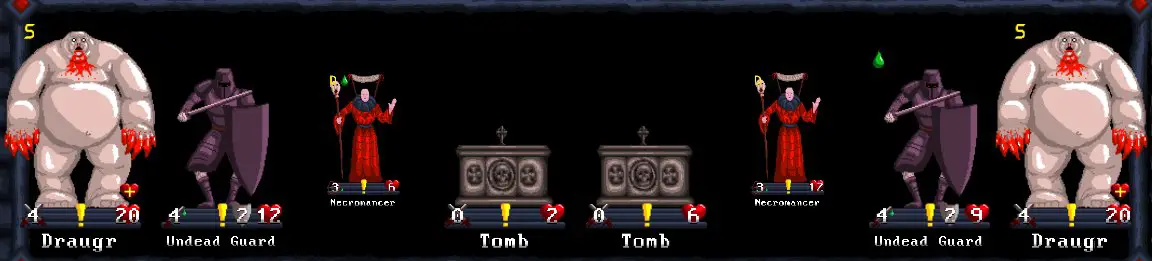
A fairly simple encounter considering how far you’ve gotten, but it also comes with the added benefit of an Holy Relic in the Tomb on the left. Expect at least 1 of the Necromancers to have a turn to summon undead, but if you’re lucky you’ll have pulled out 2 Lunge cards and can STUN both sides of the mob before it happens. You can deal with these enemies as you’ve encountered them before, anders. In the Tomb on the right is 1 Undead Guard, which you’ve also dealt with. Whether or not you hit the Tomb, it will eventually come out anyway. In the Tomb on the Left is the Holy Relic that provides you with 1 Health Point regenerated and removes all negative effects (such as POISON), when used. It can be used only once and is quite useful for The Arch Lich boss, but not required. Note there are also HIDDEN ENEMIES, in particular 2 Geesten, but they’re easy to deal with, as you’ll already know.
Ghast, Draugr, and Undead Guard Mob

Hope to all that is holy that you don’t find yourself facing this mob. It is essentially a death sentence, though still not as hard as the next one. We have, als voorheen, the trouble of the Ghasts, En er zijn er 3 of them this time! It is impossible to pull enough defense cards from your hand to deal with them all. The only way this is going to go down in your favor in most cases, Echter, is if Stealth Mastery activates at the start of the encounter. Anders, forget it, you’re going to take at least 4-8 schade. Bij 8 you might want to quit, eerlijk gezegd, but it is still possible to defeat The Arch Lich boss. The Draugrs and Undead Guard you know how to deal with, but the real curse of this mob is that there are a whopping 5 Undying Cultists as HIDDEN ENEMIES! For every monster you kill, one will fill it’s place. If you’re unlucky enough to kill 5 monsters and have little STAMINA left, it’s completely over for you. The Undying Cultists strike for 4 damage and POISON so there’s simply no way you can survive more than one of them hitting you. Als zodanig, this mob is quite dangerous and expect to restart the entire Lich battle because of it. If you’re careful, it is possible, geloof me, but will tax your skills to their limit.
Undead Guard and Festering Horror Mob
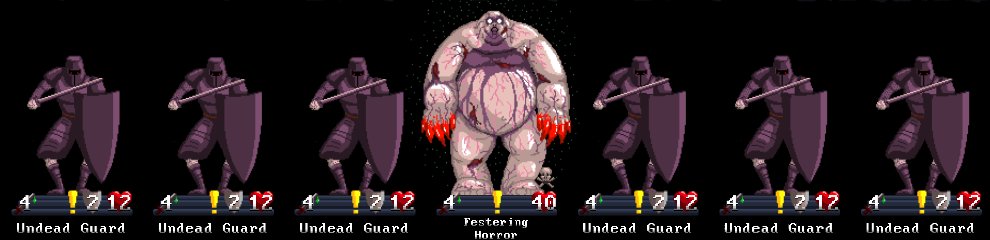
The last mob is extremely difficult to the point that I’m thoroughly convinced it’s a total wash and you should simply restart from Round 1 if it appears. Due to the luck of of what mob faces you it’s going to happen for at least one attempt at the unlock, but if you’re lucky enough it won’t. The good thing is this mob is uncommon in comparison to the other 3 boven. Maar, if it should appear, just forget it. The Undead Guard are not a problem, nor are the HIDDEN ENEMIES, which are just 2 Geesten. The real problem here is the Festering Horror, which with your build to unlock the Adventurer Subclass is nearly impossible. The Festering Horror attacks twice, not to mention that it has MIASMA damage every turn, inname 1 HEALTH since it cannot be avoided. Dit, along with its high HEALTH, make it a nightmare. The only, Ik herhaal, only way you have a chance to get through this without too much damage are to waste Gas Bombs entirely or become lucky enough that you can toss the Cursed Disk at it to finish it off in no more than two turns. Any more than this and you’ll be taking too much damage because unfortunately the Festering Horror also deals STRIKEBACK damage if you hit it with anything but the Cursed Disk. I was able to get extremely close to finishing it in a single turn, but trust me with the Undead Guards standing there you won’t have enough STAMINA to make it anyway. Daarom, naar mijn mening, if you see this mob just quit immediately and start the entire process over from Round 1. If you don’t get this mob, and get one of the others you should be on your way to killing The Arch Lich boss. Round 6 is a surprising cinch in comparison to some of the previous rounds. Let’s move on to it.
Round 6 Encounters
You’ve almost made it! Round 6 is surprisingly easy and only generates two potential mobs any time you reach it, one of which you may get in Round 5 (though not a second time in Round 6). Hopefully you’ve received luck of the mobs and have had good hands up to this point. Take a breather and get ready for The Arch Lich boss after!
Draugr, Undead Guard, and Necromancer Mob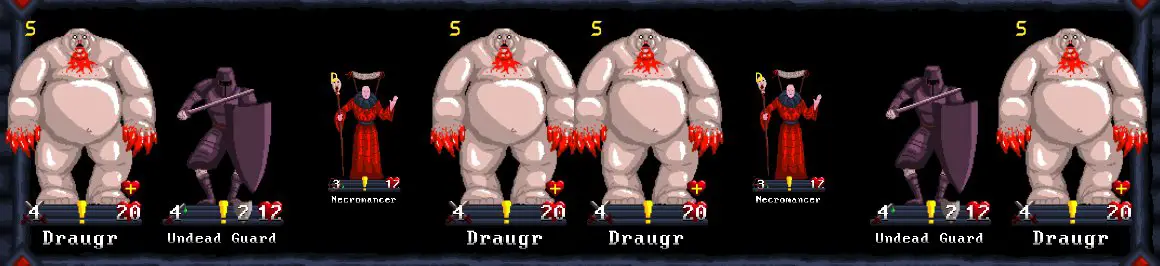
This mob is so easy it will feel like it’s Round 3 opnieuw! You’ve encountered all of these enemies before so you know how to deal with them. The only thing to note is there is one HIDDEN ENEMY, which is a single Palebat. Talk about easy! By the end of this Round you should have all of your Gas Bombs (or no less than 2) and most of your HEALTH. If you were smart and skilled enough you will, in werkelijkheid, have all of your HEALTH! You’re going to need it.
Draugr, Undead Guard, Necromancer, and Tomb Mob
This mob is exactly the same mob as the one that appears in Round 5. If you saw it in Round 5, you will not see it again as far as I found from testing various aspects of the build for this unlock. Zo ja, it must be an extremely rare occurrence as I only saw it once. Play it just as you would as if it appeared in Round 5 (see previous section if needed).
The Arch Lich Boss
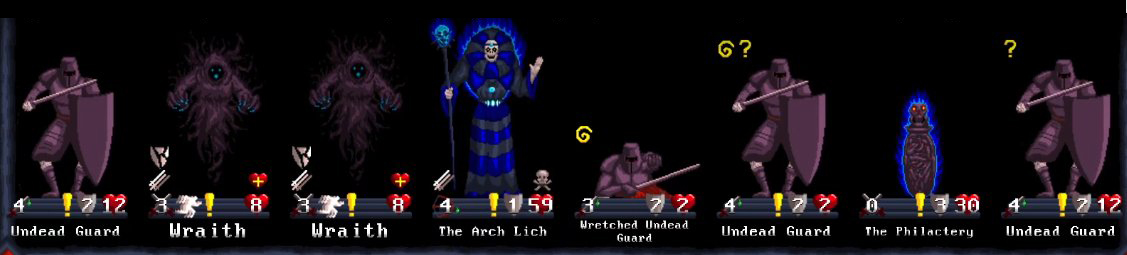
Here it is folks! If you were lucky enough to get to this point with almost no HEALTH depleted and all 3 Gas Bombs charges, your chances are good! Zelfs dan, this is the hardest part of the Adventurer Subclass unlock. Please note that I took the screenshot shown above with another Class. The Arch Lich has a total of 60 HEALTH and the Wretched Undead Guard you see on the right does not appear until the Undead Guard it previously was is reduced to 0 HEALTH. the Wraiths also do not appear until the Arch Lich moves to the foreground and summons them. It can summon 3 on every turn, provided there is space for them on the screen. So the Undead Guard and the Wraith you are familiar with by now. I simply wanted to make sure you could see them to understand this boss as it appears. The key to beating this with the build you need to use is rather complex, but by this point you should be familiar enough with your cards to do it. There is still some luck, Helaas, but this will eventually get it done.
1. The first priority is The Philactery on the right of the screen. Though you can reduce The Arch Lich’s HEALTH without destroying it you cannot kill it unless The Philactery is destroyed first. This is your priority initially.
2. To make sure you finish it off as quickly as possible put everything you have into it for your first attack phase because you start with initiative. Do not worry about the Undead Guards yet, in fact the more of them on the screen the less Wraiths the Arch Lich can summon. If you’re lucky enough, your perk of Stealth Mastery will trigger at the start. Zo niet, it’s still possible to win, but that little edge helps significantly if you get it.
3. Avoid using Disk Throw if you get Stealth Mastery, it will eliminate the UNAWARE effect of the Undead Guards. Save using that until The Philactery is destroyed. Once you have that down, The Arch Lich should have already summoned 3 Wraiths and you’ve probably used 1 Lunge card to STUN three of the Undead Guards. Choose the ones on the right, because The Arch Lich cannot be under STUN effects ever and keeping three monsters away from you for one round is a boon.
4. The key then is to try to beat down The Arch Lich as much as possible with Disk Throw at first. Try not to leave more than 3 open spaces for Wraith summoning, because the more of them on the screen with their DODGE and FURY, the worse it will be for you and nearly impossible to defend against. As you are hitting The Arch Lich, wait until you are out of Disk Throw cards (2 of 3 will be used at most) and then apply the Gas Bombs a single time. Wherever you place it it will make the primary target UNAWARE with POISON, evenals 2 targets adjacent. It has the same effect on all 3 of them regardless of where you put it, so you could, Bijvoorbeeld, place it on a Wraith to the left of The Arch Lich to get The Arch Lich an Undead Guard, enz. under the UNAWARE effect. The Arch Lich will break this its next turn, but the Wraiths and Undead Guards cannot until their turn is over.
5. So the Gas Bombs become critical to earn you some time as you reduce the HEALTH of The Arch Lich. This is why the POISON effects you are stacking are so critical. Eventually you can start dealing direct damage to it, but be careful! The Arch Lich has STRIKEBACK that thankfully does not POISON you but will do damage. With your Broadsword cards and the POISON applied from your Poison Maker perk, Gas Bombs, and your striking, The Arch Lich should be killed in roughly 5-8 turns once you are attacking it. Make certain to keep the Undead Guards and Wraiths under STUN or UNAWARE as much as possible until The Arch Lich is dead, and not before. You can easily kill the Wraiths with Disk Parry or Dodge Attack, but the former is cheap, the latter is not. Some Undead Guards or Wretched Undead Guards may die as the entire process described above is completed, but try to keep the Wraiths down to 3 on-screen maximum or it can get more difficult for you. In time, The Arch Lich will be dead and you can finish off the remaining monsters.
So that’s it! Though there is still an element of luck to what cards you get for this boss battle, you should find it reasonable and eventually will earn the Adventurer Subclass unlock! Let me know if you have any questions or notice anything I missed in creating this guide so I can edit it as necessary. Enjoy!
Dat is alles wat we vandaag hiervoor delen Card Quest gids. Deze handleiding is oorspronkelijk gemaakt en geschreven door Deaf Sparrow. Voor het geval we er niet in slagen deze handleiding bij te werken, U kunt de laatste update vinden door dit te volgen link.