

- Titel: Tijdperk van wonderen: Planeet val
- Releasedatum:
- Ontwikkelaar:
- Uitgever:
Informatie over Age of Wonders: Planetfall is nog steeds niet voltooid. Help ons alstublieft de details van het spel hiermee in te vullen contactformulier.
Since Planetfall’s release, there have been numerous releases and updates to the game, rendering many current Steam guides, YouTube videos, and even the Planetfall wiki obsolete. This guide will be the most up-to-date and comprehensive guide to Sectors and Exploitations as of June 2021. Significant developments in Planetfall are unlikely because the game is effectively complete, which should keep this guide up to date.
Sectors
Every map is divided into distinct, bordered areas known as “Sectors.” The two types of sectors are water sectors and land sectors. Every sector has a “center” hexagon. This is not necessarily the tile’s geometric center, but it is where your colony and landmarks must be located. This is also the hex where you can get more information about the Sector (this opens the Sector Analysis window).
Land Sectors
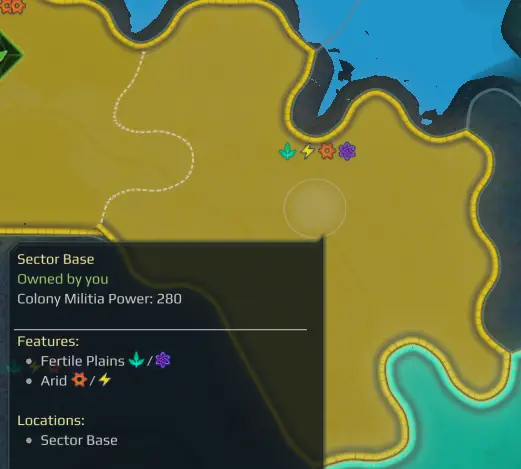
Climates and terrains can be found in all areas of habitable land. This is what determines the potentially exploitable resources. Energie, science, manufacturing, and food are the four types of resources. The various climates and terrains provide two of the four resources.
An arid climate, Bijvoorbeeld, provides energy and 1 production. When combined with the Fertile Plain Terrain, which provides one food and one knowledge, it provides one of each. For land sectors, there are four “standaard” climates and four “standaard” terrains.
Ignoring the above, what this means is that each sector has a combination of 4 resources. It can have 1 of each, 2 of one resource, en 1 of two others or a pair of two resources (due to never having 2 of the same, you will never see 3 of 4 of one thing).
Other than terrain and climate, land sectors frequently include resource nodes, functies, hazards, and landmarks. These will be discussed later. Note some are not habitable and be annexed or colonized. These are quite obvious as they contain no resources.
Annexation
You can annex another sector when your colony reaches a multiple of four. Als gevolg hiervan, a new sector has gained a population of 4/8/12/16. The sector you want to annex must be adjacent to your colony or another annexed sector and no more than two sectors away.
Simply click on the center hex of a neighboring territory and then click Annex to take control of it. Annexing does not necessitate the use of any resources, but it does take one turn. With a population of 16, you can annex up to four sectors. Even with a larger population, the maximum number of annexed sectors is four. Residential exploitation has the potential to increase the number of annexations. These will be covered in a later section. The Colony screen will show 5/5 annexed Sectors rather than 4/4 annexed Sectors, but this is because they include your Colony Sector, which is not technically annexed.
Despite the fact that it displays four resource icons, annexing a sector does nothing but expand your borders. The newly acquired territory will have a “Sector Base” in the center hex with a garrison, but annexing territory will not provide you with any additional resources (Resource Nodes are an exception). (For more information, see the section on Resource Nodes.) To begin receiving resource income from a sector, exploitation must be built.
This is a sector that a nearby colony has annexed. Because there is no exploitation, the colony gains nothing from this sector. Exploited sectors are represented by a resource icon in the center hex, which represents their exploitation. The Sector’s center hex is empty in this case (note that this is only empty in the Economic Overview. The Military Overview displays a yellow flag, indicating that the central hex contains a Sector Base). Verder, because it lacks any other features, particularly resource nodes, this sector is dependent on exploitation to generate any resources at all.
Exploitations
A sector can then be exploited after it has been annexed. These exploits are created in the Sector Production tab of the Colony. The structure was constructed in the sector’s heart. Even if all four resource types exist in the sector, only one of them can be extracted. Other resources are simply underutilized. You can even use a resource that does not belong to the sector! This is not recommended because the gain per turn will be quite small.

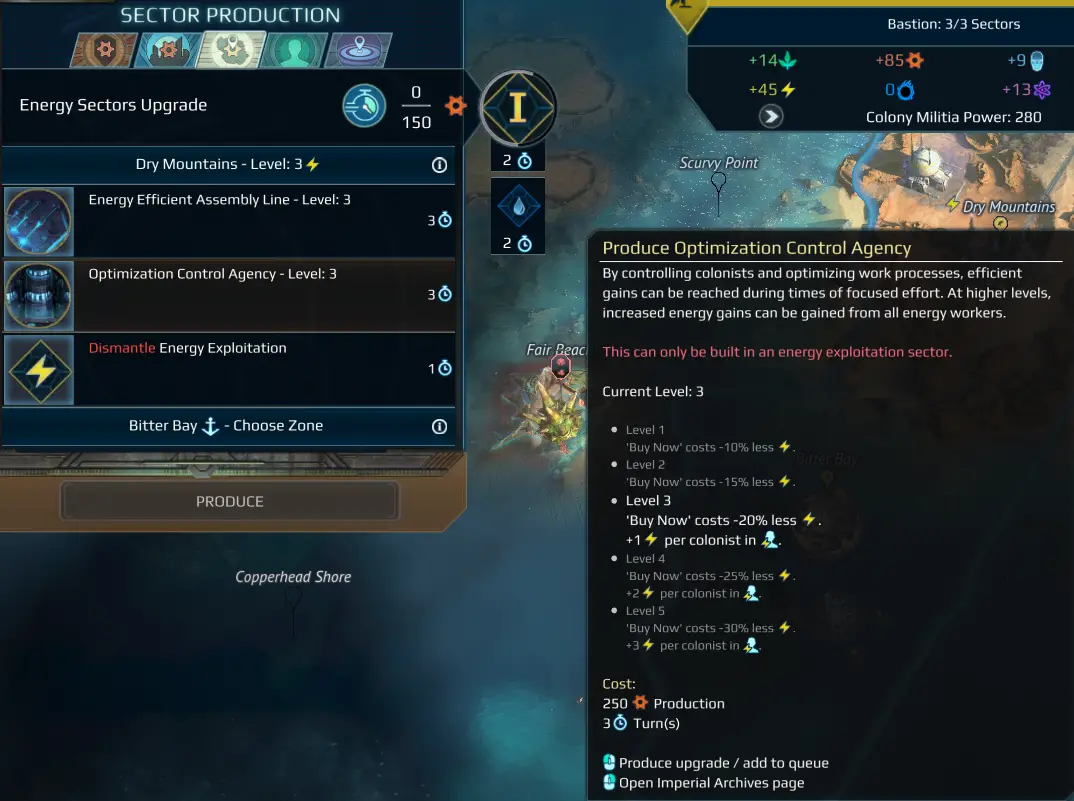
The amount of income you earn per turn from an exploit is determined by the four resources in that sector, which are determined by the climate and terrain, as previously explained. Take energy as an example:
If there are no energy icons in a sector but you still build the Energy Exploitation, jij krijgt 10 energy per turn. If a sector has only one energy icon and you build the Energy Exploitation, you will receive 15 energy per turn.
You will receive 20 energy per turn if there are two energy icons in a sector and you build an Energy Exploitation (as shown in the preceding example). This is referred to as Level 1, 2, en 3 Exploitation. Any other resources (voedsel, knowledge, or production) in that sector are lost. When exploitation is built, it occupies the sector’s center hex, and its level is represented by a Roman numeral.
You may have noticed that there are five different levels of exploitation. How is this possible if a sector can only have two resources? The solution is to conduct research and then build Sector Upgrades in your colony (see the section below).
Another thing to keep in mind is that a colony can only support two people at a time. A colony with two Energy Exploitations, Bijvoorbeeld, can no longer construct additional Energy Exploitations. After constructing exploitation, more advanced structures known as Sector Specialization Structures can be constructed (see the section below). Hydro-exploitations for coastal sectors, residential exploitations, and orbital relay exploitations are some of the other exploitations covered in later sections.
Resource Development Research
Tier II’s “Resource” Development for each of the four primary resources, research becomes available.

The Imperial Archives entry for Food Development can be found here. It has unlocked the Colony Building “Food Sectors Upgrade” on the right. This is constructed in the same manner as any other Colony structure. There are two buildings beneath these: the Bioengineered Food Plantation and the Agricultural Export Center. Sector Specialization Structures are what these structures are called. The knowledge, energy, and product development research entries all follow the same pattern.
Resource Sectors Upgrade
Food/Production/Knowledge/Food Sectors Upgrade I & II are structures constructed on the Colony tab. They increase the amount of that resource type being exploited in all sectors of that colony. Assume you have a sector with twice the energy resources. You annex the territory, which only serves to expand your borders. You then construct an Energy Exploitation, which becomes a Level 3 Exploit that collects 20 energy per turn because you have two Energy Resources.
By constructing an Energy Sectors Upgrade in the Colony, it is upgraded to a Level 4 Exploit that generates 25 energy per turn. Any other Energy Exploited Sectors also advance a level. To advance to the highest level, niveau 5, tier VI Resource Development II technology must be researched and the corresponding Sectors Upgrade II constructed in the colony. After you’ve constructed buildings for a specific industry, you’ll be able to build specialized structures.
Sector Specialization Structure
Each exploit type has three buildings. The first two specializations are investigated in Resource Development I in tier II research, and the third in Resource Development II in tier VI research. Per exploitation, you can only build one of the three possible buildings. Echter, because each colony can exploit two resources, you can have two of the three possible specialized buildings. These establishments provide one-of-a-kind discounts with a military or civil focus. They also benefit from higher levels of exploitation.
These are the two specializations available in Energy Exploitation. It is important to note that Energy Exploitation must be built first before you can choose your specialization.
To maximize exploitation gain, choose which Sector to Annex, which Exploitation to build on that Sector, which Sector Specialization Structure to build for that Exploitation, and finally build the Resource Sectors Upgrade to increase the Exploitation level.
Colonization
Land Sectors can be colonized by transferring a Colony Unit to the central hex. It can only be colonized if it is not occupied by a landmark, an NPC or AI city, or another colony. While Resource Nodes will provide you with resources every turn, you will be unable to exploit the climate and terrain’s resources. Because they are the worst for exploiting, 1/1/1/1 Sectors are ideal for colonization.
Despite the inability to build exploitation in the Colony Sector, the Colony generates a constant amount of resources. Regardless of terrain type, this income is always 60 production, 20 voedsel, en 10 geluk. It’s worth noting that your starting colony, the HQ Colony, receives additional production bonuses.
Colonists
The majority of the resources you gain per turn will be used passively through building exploitation. Echter, your colonies also have colonists who can be assigned to specific resources (in addition to working on “Happiness” and later on the Colony District Buildings). The number of colonists is the same as the colony’s population.
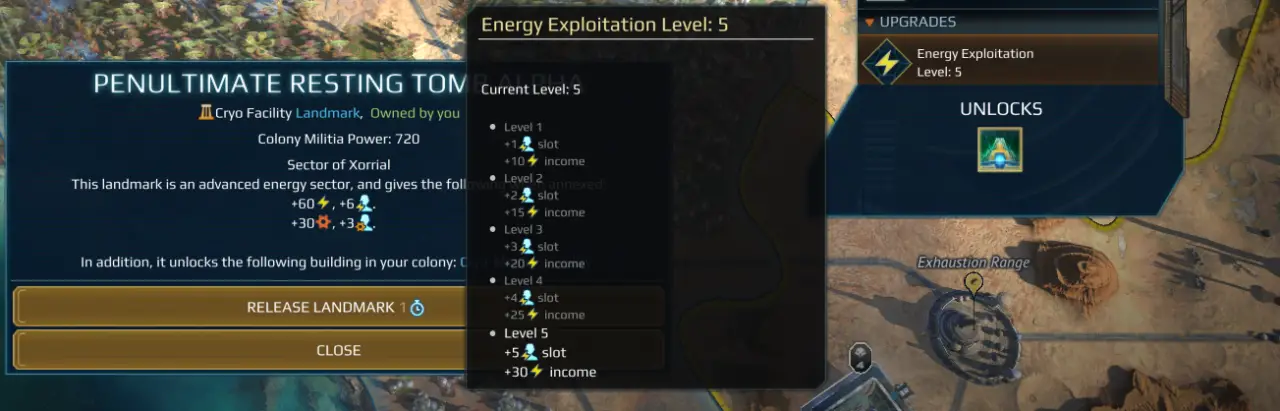
Aanvankelijk, when building a colony, a maximum of 4 colonists can be assigned to a given resource. Building exploitation increases the number of colonists who can work on a resource. Let’s take energy, Bijvoorbeeld:
- If a sector has no energy icons and you build the exploit anyway, you can have one more colonist working on energy.
- If there is 1 Energy icon on a Sector and you build the Energy exploitation you can have 2 more Colonists work Energy.
- If a sector has two energy icons and you build energy exploitation, you can have three more colonists work on energy.
- Exploitation levels 4 en 5 allow for 4 en 5 extra colonists, respectievelijk.
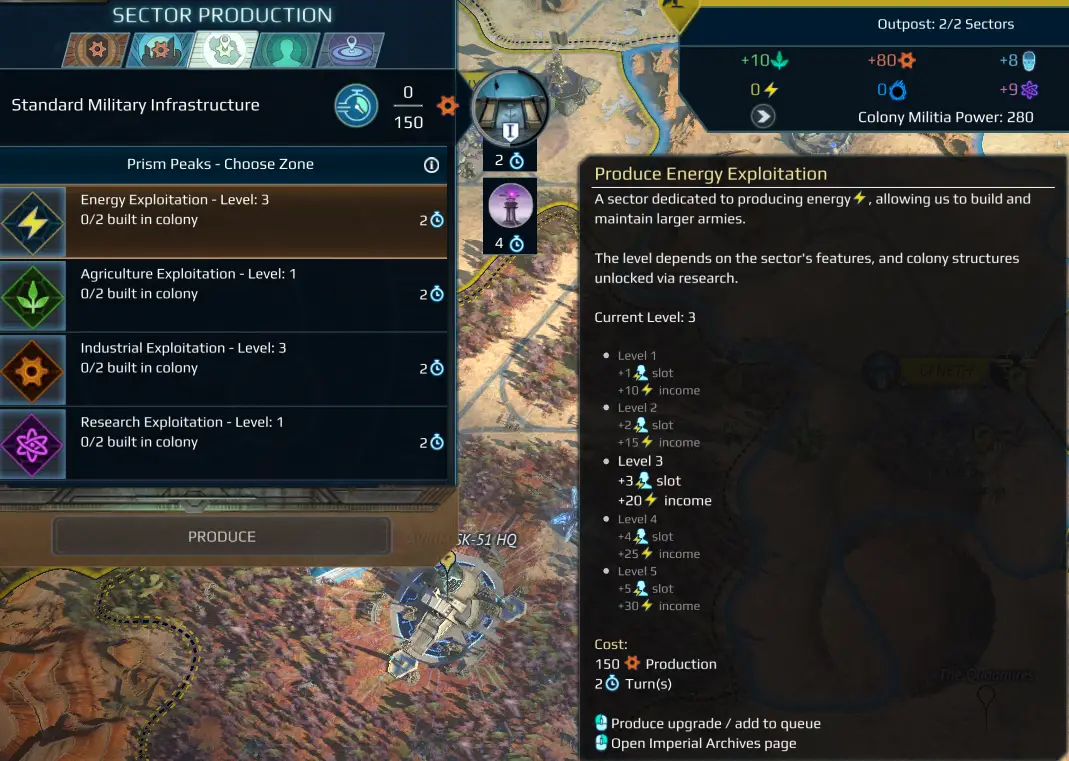
In the above image, the small Colonist icon beneath each level indicates how many extra slots are made available by constructing the exploitation.
Standaard, a colonist generates 5 extra resources per turn. This can be increased by expanding Residential Exploitation (zie hieronder) and building Sector Specialization buildings and landmarks.
Residential Exploitations
Residential exploitation differs from other forms of exploitation. They are built in the same way that Resource Exploitations are built at the Sector Production interface, with the exception that they cannot be built on mountain terrain. They are unaffected by the distribution of resources in the sector (as defined by terrain and climate).
Residential exploitation accomplishes four things:
- Increase the productivity of each colony by one, twee, or three times. Instead of producing 5 energy per turn, colonists now produce 6/7/8 per turn.
- You can annex another residential sector for everyone you own.
- Instead of only being able to annex four territories, you can now annex six. Residential exploitation is effectively “free” in the sense that it is not deducted from your total.
Allow you to annex sectors adjacent to your Residential Exploitation, even if they’re three sectors away from your main Colony Sector. - Increase the level of the specific Colony District Building for each race. Every colony is capable of building basic structures. The fine building can be found on Residential Exploitation levels 1 of 2, but the immaculate building can only be found on level 3.
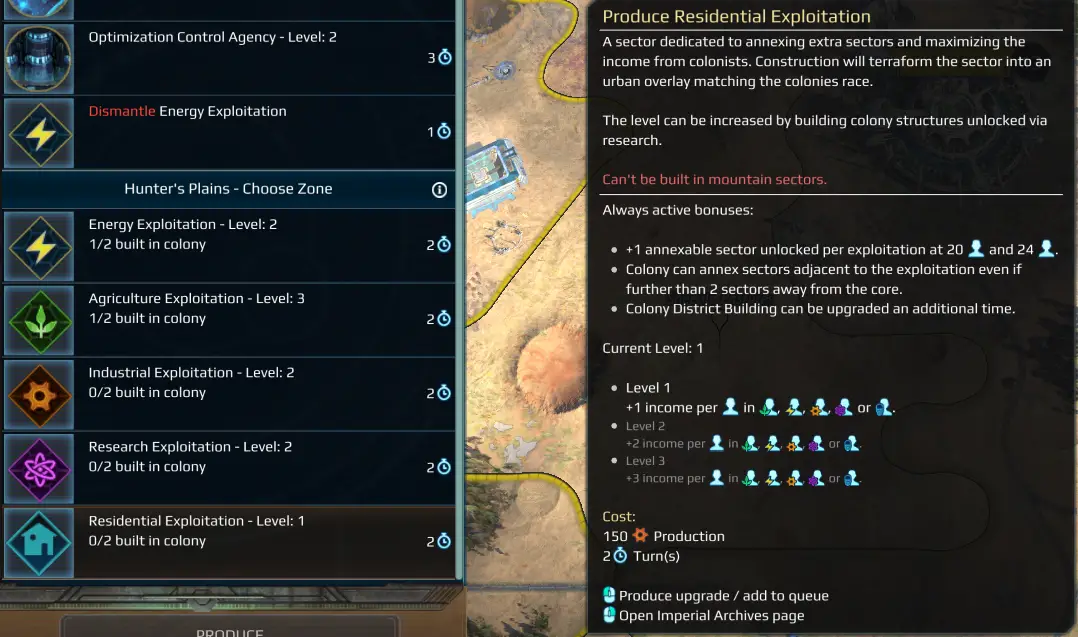
Because there is no “Residential Resource,” the maximum level is 3, which can be increased in the Colony by constructing the Residential Sectors Upgrade (as with other resources). Residential Sector Specialization Structures do not exist.
Residential sectors with a population of 12 of 16 should be strategically built. They only benefit from your colonists’ extra gains because they do not collect flat resources per turn. A Residential Sector with four active colonists, Bijvoorbeeld, will only provide four extra resources per turn, whereas a Level 3 Resource Exploit will provide you with twenty resources per turn. You want a larger population to benefit from the +1/+2/+3 gain before you start building residential exploitations. Residential Exploitation works best in 1/1/1/1 sectors or double resource sectors that you can’t exploit further because you already have two of that exploit types. They can also be constructed to gain access to a third important sector that is three sectors away (ie. a Landmark).
Orbital Relay Exploitation
By researching Tier IV Orbital Relay Development technology, you can gain access to Orbital Relays. They are primarily designed to quickly teleport units across the map.
They do, Echter, benefit your colony in some ways. The Exploitation adds one extra colonist slot to all resources. Because there is no “Orbital Relay Sectors Upgrade” like there is for other exploitations, there are no other levels for the Orbital Relay Exploitation. From an economic standpoint, this is extremely poor exploitation.
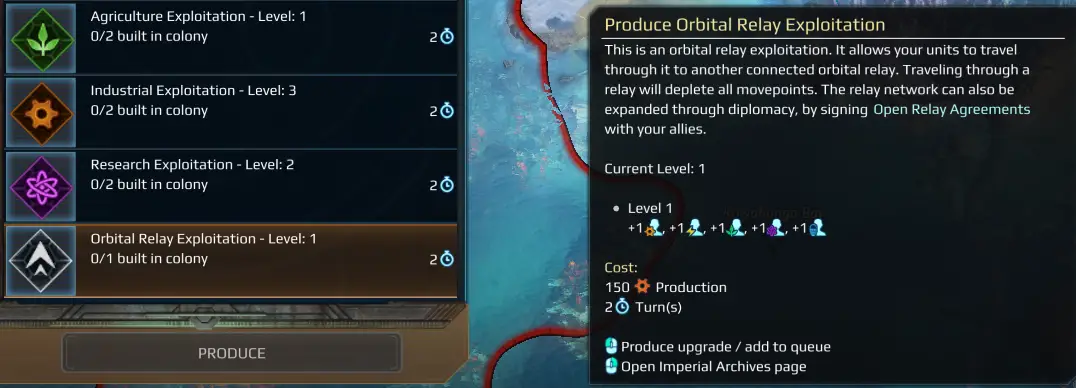
Instead of three, as is typical for most resources, there are four Orbital Relay Sector Specialization Structures. The first two are unlocked at tier IV technology, while the last two are unlocked at tier VII technology. Only one of these has a monetary benefit (shown below).
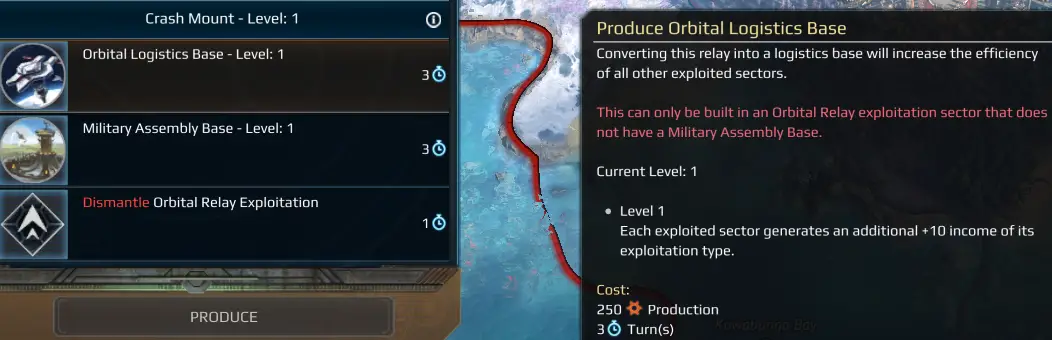
The Logistics Base Sector Structure generates at most 30 extra resources depending on the Sectors’ Exploitations. It should be noted that Hydro-Exploitation and Residential Exploitation do not benefit from Logistics Bases at all. Orbital Relays, as a whole, should be built to increase military mobility rather than for minor economic gain.
Water Sectors
There are two types of water sectors: coastal sectors and ocean sectors. Ocean sectors cannot be colonized or exploited, and are therefore essentially useless except as areas for your armies to move over.
Coastal sectors can be used. Unlike the land sectors, they have no terrain or climate and are all identical. They never have landmarks, but they frequently have resource nodes. Coastal Sectors cannot be annexed at the start of the game and require Tier I technology or higher.

Energie, voedsel, and knowledge are always available in coastal sectors. You do not, Echter, construct energy, voedsel, or knowledge exploitation as you do for the land sector. In plaats van, the only type of exploitation that can be built in the water sector is hydro-exploitation. Never annex more than two water sectors, because the only available exploitation in Coastal Sectors is Hydro-Exploitations, and each colony can only have two exploitation types.
Hydro-Exploitations always start at level 1, but you collect 10 of each resource: voedsel, energy, and knowledge. It should be noted that you gain no production resources from the Coastal Sectors. Verder, they provide one extra colonist slot for each of the three resources.
Op niveau 2, you will collect 13 of each resource, and at level 3, you will collect 16 of each resource (& 2 extra Colonist slots). There is no level 4 of 5 as there is no “water” resource to increase the level beyond 3. Compared to land exploitation, the total income generated from the water sector is 30, 39, en 48. vs Level 3, 4, en 5 Land Sectors, which produce 20, 25, en 30.
Coastal Exploitations also has four Sector Specialization Structures instead of the usual three. These are quite powerful and enhance the production of the other four resources.
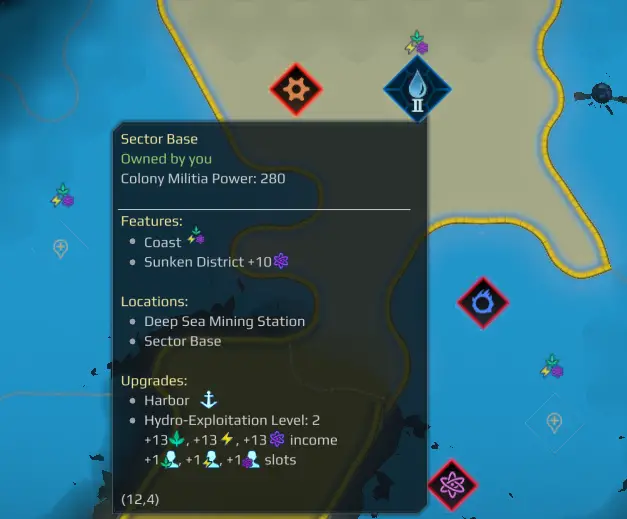
In my building, Zoals weergegeven in de bovenstaande afbeelding, I have built a Water Exploitation Sector and a Water Sectors Upgrade building. This has resulted in a level 2 of exploitation. I am currently amassed 13 of each resource. The brown cogwheel icon represents the “Deep Sea Mining” Resource Node, which I am not currently collecting because it is still actively guarded. The term “Haven” refers to the coastal region where naval military units will be formed when the Colony is built. The only way to build naval units is to annex at least one coastal sector. You may have noticed the “Sunken District” optie. There are two coastal features that do not appear on the game terrain as either a diamond (like a river or lava) or a structure. The only way to determine whether a coastal sector has additional features is to click on the center hex and read the information. A reef is another “hidden” feature that is beneficial to the food.
Resource Nodes
Resource Nodes are diamonds with a resource image on them that are scattered around the map. A sector may have two, een, or no sectors. These are claimed immediately after annexation, as opposed to terrain and climate resources, which are claimed immediately after annexation. They do not need to be exploited in order to survive. Some do necessitate additional research (River and Lava River nodes, Bijvoorbeeld). Others will give you an extra 5 of a specific resource if you build corresponding exploitation, but they will still give you at least some resources regardless of the exploitation. Verder, the sector in which your colony center is located will collect these resources once per turn.
Many resource nodes are guarded, and their resources must be cleared before they can be used. Guarded nodes have a red border and the presence of an army. These nodes frequently contain resources that would otherwise be difficult to obtain, such as happiness, confidence, or influence. Resource nodes are highly sought after. They are a major factor in deciding which sector to annex, and they cost nothing to use except to clear any guard creatures.
River and lava diamonds are technically classified as “functies” rather than Resource Nodes. In practice, they serve the same function. Instead of being guarded, their benefits must be unlocked by researching the necessary technology. The icons do not appear on the Economic Map until the research is completed, but they are still visible in the Sector information window.
Gevaren
Hazards are the inverse of resource nodes. Your colony pays a penalty for annexing them, and they frequently have a negative impact on armies in their vicinity.
Once the tier II technology, Adaptive Conditioning, is researched, hazards can be permanently removed. Move any unit to the hazard, and the hazard will be removed for 100 energy and 15 Cosmite on the next turn. Landmarks are structures found in the sector’s central hex. Als gevolg hiervan, a sector with a landmark can never be colonized; in plaats van, it must be annexed. Unlike Resource Nodes, the Sector cannot be annexed until the Landmark’s guards are removed.
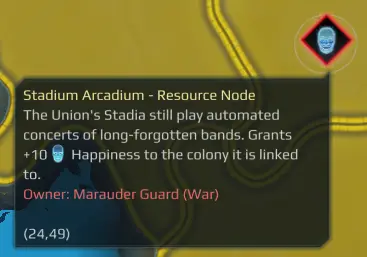
Landmarks
Landmarks are prefabricated “Super” exploitations of one of four primary resources: energy, knowledge, voedsel, or production. When a territory is annexed, the corresponding exploitation is already in place and cannot be changed (but you can still pick a Sector Specialization Structure). If you already have two of the same as Landmark, you will be unable to annex.
Landmarks are classified into three categories: bronze, silver, and gold. This not only represents the defenders’ strength but also the level of exploitation when they are annexed. Landmarks elevate the level of exploitation above and beyond what standard exploitation is capable of. Bronze Landmarks give you +1, Zilver +2, and Gold +3 levels to exploit. A Gold Landmark in a sector with no corresponding resources will still be exploited at Level 4!
It is worth noting that, while a Gold Landmark on a double Resource Sector with two levels of Resource Sector Upgrades would be at level 8, the maximum level is 5. Eindelijk, landmarks provide non-economic benefits. They frequently grant you the ability to build powerful structures that boost the production of military units from that colony in an unusual way. These can be built in addition to the Sector Specialization Structures and are built on the Sector Tab. Some even grant access to new Strategic Doctrines or Operations.
The most significant landmark, the gold one, is depicted above. Despite the fact that this territory only has one Energy Resource (which is not shown in the screenshot), the Landmark is at level 5. (no Energy Sector Upgrades have been built in the home Colony either). It provides an additional 60 energy and 30 production income in addition to the 35 energy income it generates as a Level 5 Exploitation. It also expands the colonists’ slots past Level 5 Exploitation.
But hold on! There’s more to it. It also unlocks a building in the Colony called the “Cryo-Medical Facility” (partially obscured in the image) that boosts the resistance of any military unit produced there, as well as a Strategic Operation that gives you 3 population in a Colony of your choice. Landmarks are extremely potent structures.
Dat is alles wat we vandaag hiervoor delen Tijdperk van wonderen: Planeet val gids. Deze handleiding is oorspronkelijk gemaakt en geschreven door Killswitch1968. Voor het geval we er niet in slagen deze handleiding bij te werken, U kunt de laatste update vinden door dit te volgen link.