If you’re playing Mimic Logic and want to find mimics in dungeons, this guide will help. It’s packed with tips to beat every dungeon. You’ll learn my top strategies and see example puzzles. Since the game is random, I’ll give general advice rather than specific solutions. Let’s dive in!
General Dungeon Tips
- Mimics won’t reveal themselves.
- If a chest says an adjacent box is a mimic, either that box or the chest is lying.
- Hunger isn’t usually a big problem, but if you starve a lot, upgrade your hunger stats.
- If there are multiple solutions, go for chests that aren’t likely to be mimics and skip the 50/50 ones.
- Buy attack and defense candies in the shop for the best results.
- If a statement is repeated more than the number of mimics, it’s true.
- Sometimes mimics make silly claims, like saying there are 2 mimics in a puzzle with only one black chest.
Basic Dungeon Guide
Hello and welcome to your inaugural Dungeon adventure! This Dungeon keeps things simple with minimal mechanics to fret over. Generally, each chest room shouldn’t pose too much of a challenge, though there might be exceptions. Now, onto the ground rules:
- Mimics are habitual liars, while non-mimics are reliable truth-tellers.
- Each floor of the dungeon provides precise information on the number of mimics and loot available.
- A town awaits adventurers every 10 floors, excluding the final floor.
Mimic Pairs:
Now, let’s delve into the most effective strategy for tackling this and similar dungeons: the concept of mimic pairs.
A mimic pair consists of a set of chests where at least one contains a mimic. Essentially, when presented with conflicting statements about the contents of chests, such as one chest claiming another is a mimic while the latter denies it, we can deduce that one of them must indeed be a mimic. This technique helps break down complex puzzles into more manageable ones.
Let’s illustrate this strategy with an example from a Standard Dungeon puzzle:
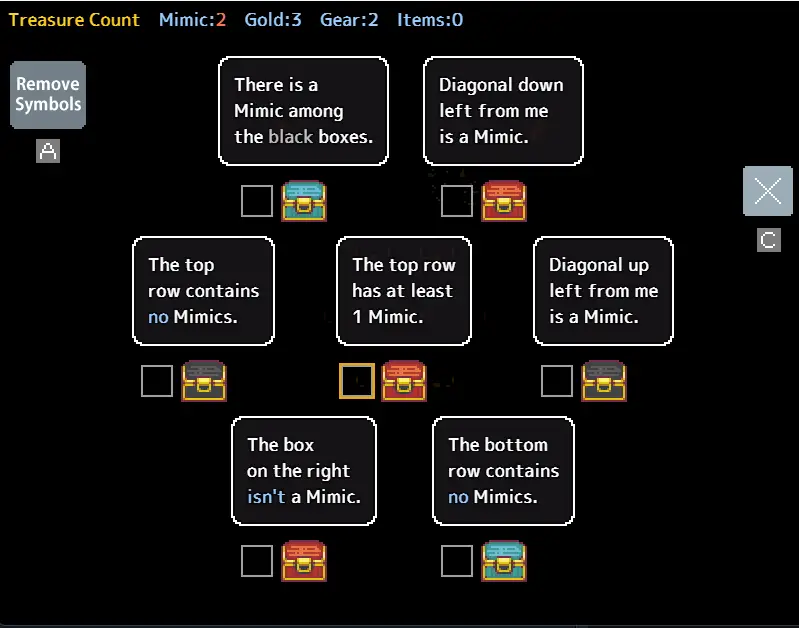
Though facing seven chests might seem daunting initially, this puzzle offers a convenient mimic pair to start with. The chest in the middle right asserts that the chest above it is a mimic, establishing a mimic pair. We can label both chests accordingly (I typically use a 1, but feel free to choose any identifier).
By identifying this mimic pair, we effectively reduce the puzzle from a daunting 7-chest, 2-mimic challenge to a more manageable 1-mimic, 5-chest puzzle. This simplification streamlines our approach and makes the puzzle more approachable.
The joy of 1 mimic puzzles:
In one-mimic puzzles, the solution path becomes clearer thanks to the following principles:
- Any chest claiming a neighboring unmarked chest as non-mimic must be telling the truth. If it lied, it would result in an excess of mimics, violating the puzzle’s constraints.
- Mimics still cannot truthfully self-report.
Continuing from the previous example, let’s examine the five unmarked chests. The bottom left chest states that the chest to its right must be truthful. Since if it lied, both it and the neighboring chest would be mimics, leading to three mimics in total, which contradicts the puzzle’s rules. Thus, we can confidently label both bottom chests as non-mimics.
Moreover, we can identify the two middle chests as a pair, as their statements conflict. Consequently, the last unmarked chest must be genuine, as both mimics must reside within the pairs. This logical progression narrows down the options and brings us closer to solving the puzzle.

Finishing it all off:
Once all mimic pairs are identified and any easily discernible real chests are marked, the following steps can be applied to finalize the puzzle:
- Any statements from unmarked real chests can be accepted as true and marked accordingly.
- All remaining mimic pairs that interact, meaning they influence each other’s statements, can be utilized to deduce the location of the mimic in each pair.
The 50/50 Conundrum:
In some cases, you might encounter pairs of chests with multiple potential solutions. Take this example where there are two possible outcomes: either the top right and middle left chests are mimics, or the middle and middle right chests are mimics.
In such situations, it’s advisable to open all the chests that are safe, then depart. If you happen to possess a blue orb, you can use it to resolve the 50/50 uncertainty after opening all the safe chests. However, if you don’t have a blue orb, it’s best to opt for caution and simply leave the area. The potential reward of 40 gold isn’t worth the risk in this scenario.
But what if I have no pairs?
If there are no pairs or insufficient pairs in a puzzle, alternative quick strategies can still be employed to navigate through it effectively.
Duplicated statements:
Take the following puzzle for example:

So, in this situation, there’s only one obvious mimic pair, but other pairs aren’t easy to spot. However, the puzzle cleverly drops a big hint: both top chests say the same thing. If there are more chests making statements than there are unmarked mimics, those statements have to be true. Let’s say we mark the two top chests first, then the black chests, and finally the bottom right one, which leaves us with 2 chests where the mimics are hiding.

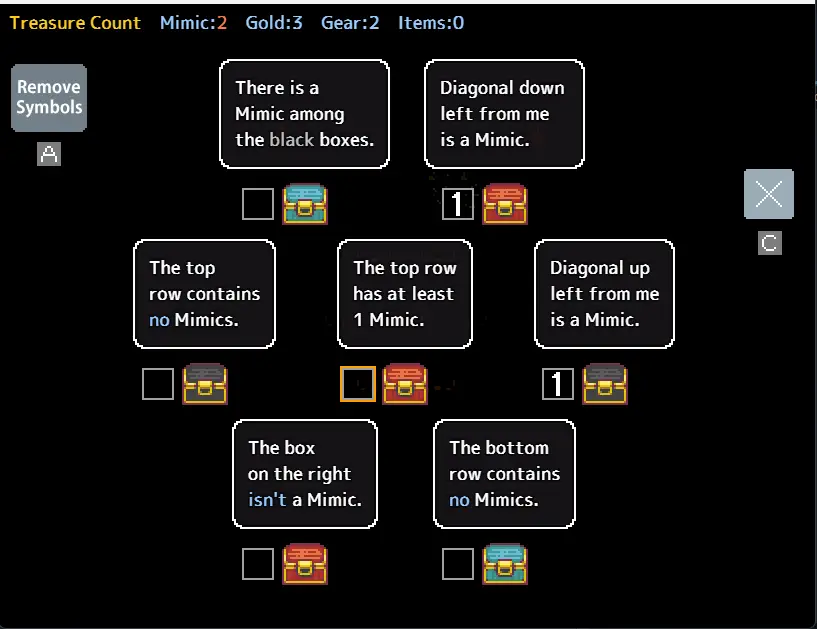
Pair Positioning:
Consider the following Puzzle:
In this scenario, there are 3 mimics and two pairs, but only one pair is marked. However, the arrangement of the pairs helps us crack this puzzle. Since there must be at least 1 mimic in the top row, the chest claiming that the top row has no mimics is lying, making it a mimic. Conversely, the chest stating that the top row must have at least 1 mimic is telling the truth. This straightforward deduction allows us to easily mark the following chests:
Following that logic, you can confidently mark the chest in the top pair stating that the top row must have at least 1 mimic as true. Similarly, you can label the other chest in the top pair as a mimic. As for the last two chests, since it’s a 50/50 chance, you’d leave them unmarked.
Expert Dungeon Guide
Welcome to the Expert dungeon! Most of the strategies remain consistent with the standard dungeon, but there are a few new chest types to contend with. Rather than rehashing all of the standard strategies, I’ll delve into the characteristics of the new chests and offer a couple of more advanced tactics.
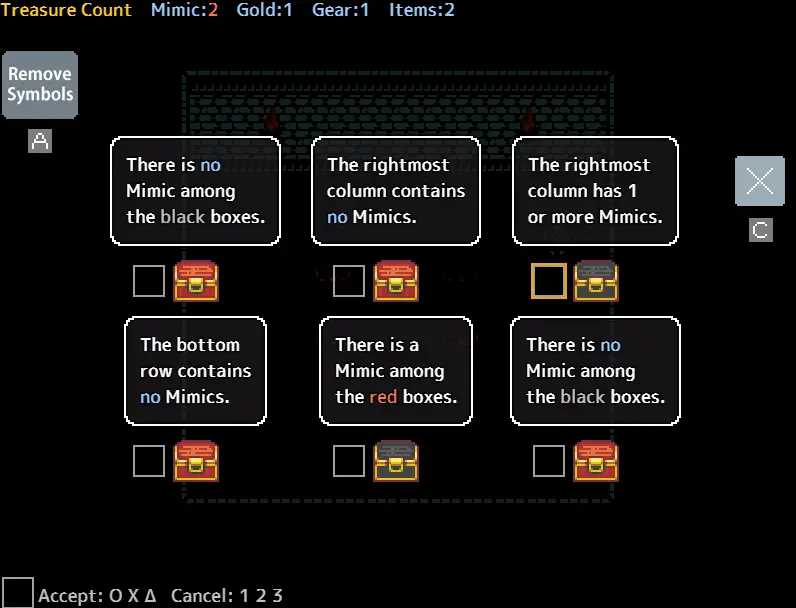
Truth Chains:
consider the following puzzle:

In this scenario, we’ve tackled all the straightforward chests, leaving us with 2 pairs remaining. When faced with such situations, simply reaching a solution might lead us astray, as some puzzles have multiple valid solutions. That’s where the technique of a “truth chain,” or what I sometimes refer to as “trial and error,” comes in handy.
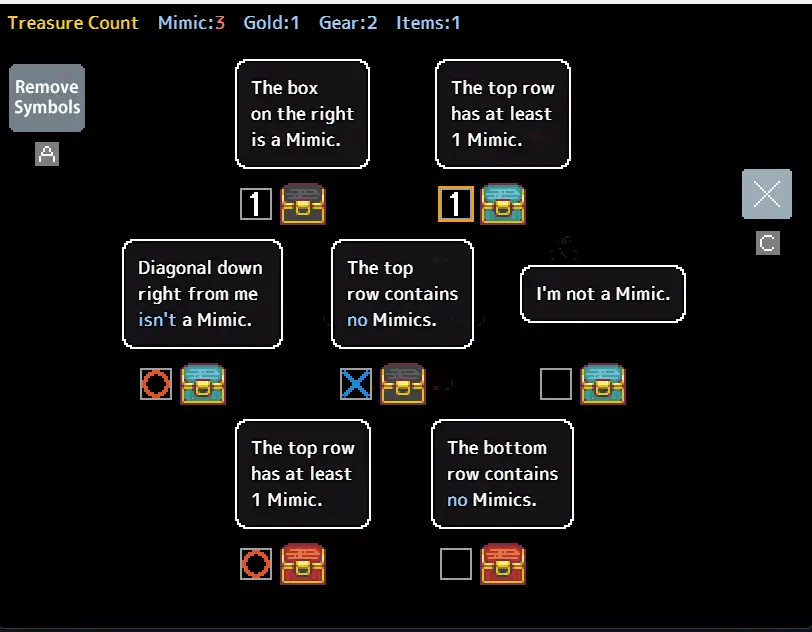
The essence of a truth chain is exploring the consequences of whether a statement is true or false. In this puzzle, a good starting point is the statement “The bottom row contains no mimics,” as it’s made by 2 chests, indicating they both must either be true or false.
Let’s begin by assuming they’re both telling the truth. We’d mark them both as true, along with the other chest on the bottom. However, this would leave us with only 2 mimics when the puzzle actually has 3, indicating this solution isn’t correct. Therefore, we deduce that “The bottom row contains no mimics” must be a false statement.
It’s important to highlight that if your initial assumption yields a valid solution, don’t rush to conclude it’s correct. Instead, you must then test the opposite assumption. Occasionally, both solutions can be correct, resulting in a gridlock situation. This caution ensures thorough exploration of all possibilities before settling on a final solution.
Gridlocks
look at the following puzzle:
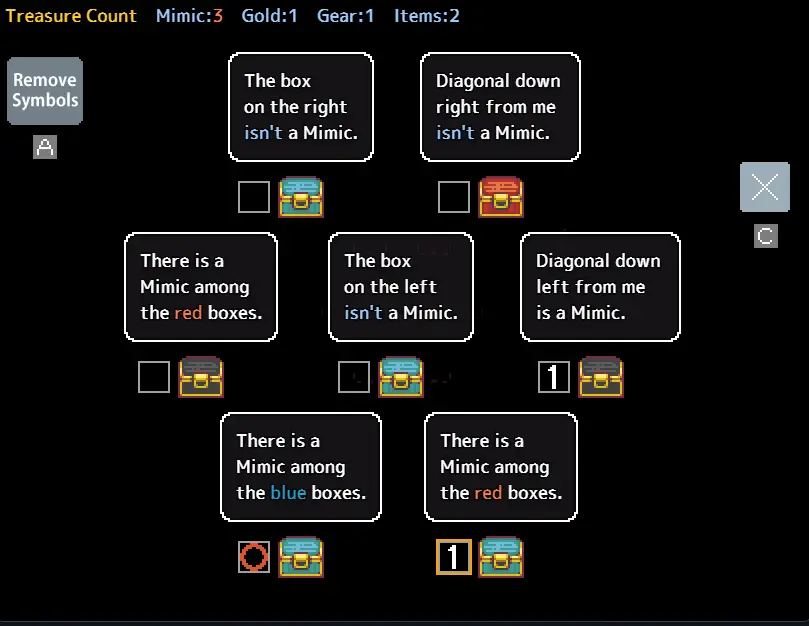
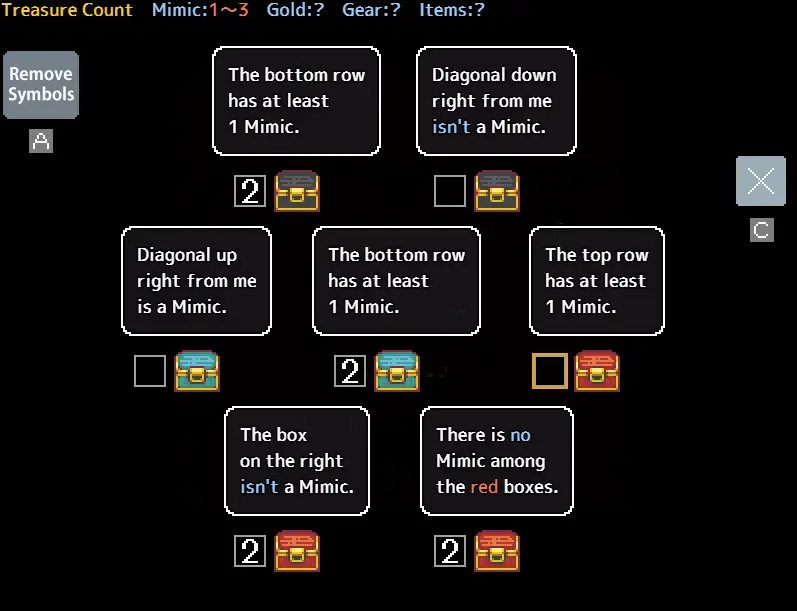
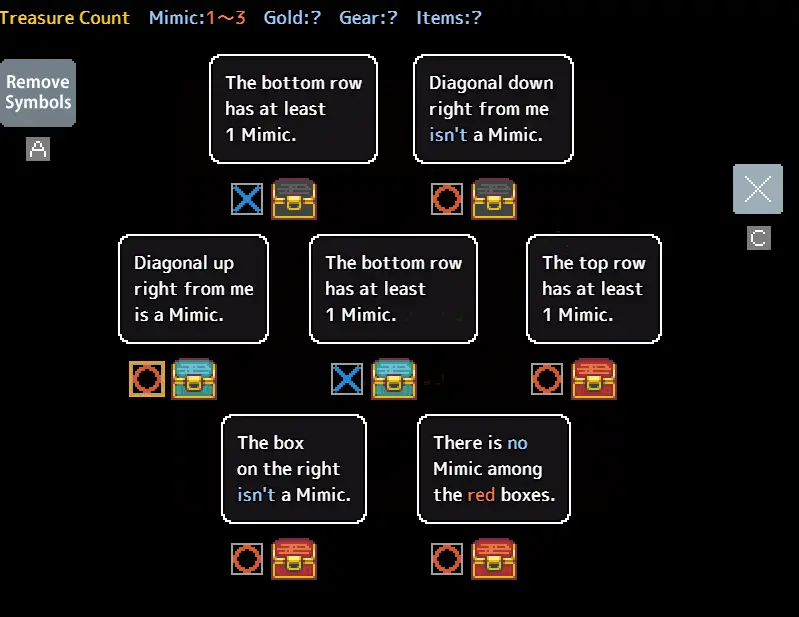
In some cases, a puzzle may indeed be unsolvable. Applying a truth chain to the two boxes asserting that the red box is a mimic results in two valid solutions: either the red, middle right, and top left boxes are mimics, or the bottom right, middle left, and middle boxes are mimics. When faced with such situations, it’s best to move on and explore other deduction methods, such as color-based deduction, to progress further.
look at the following puzzle:
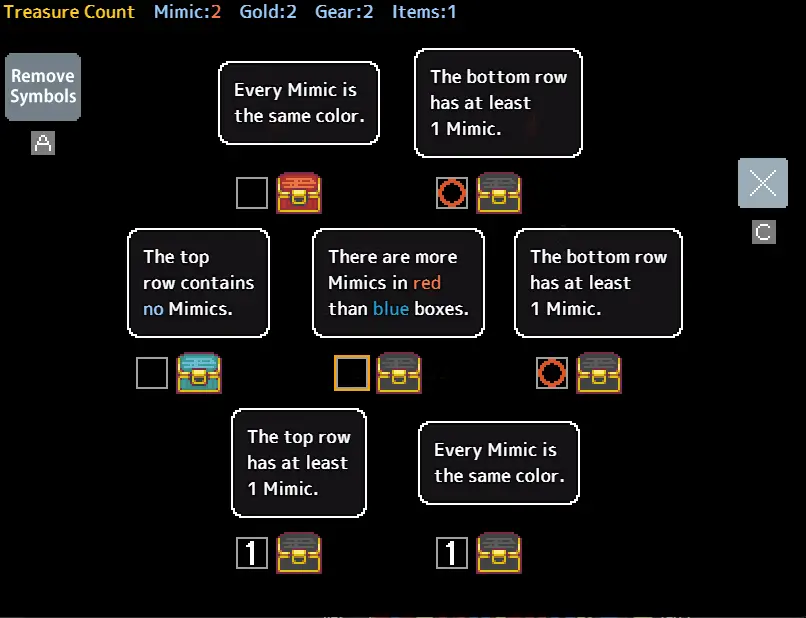
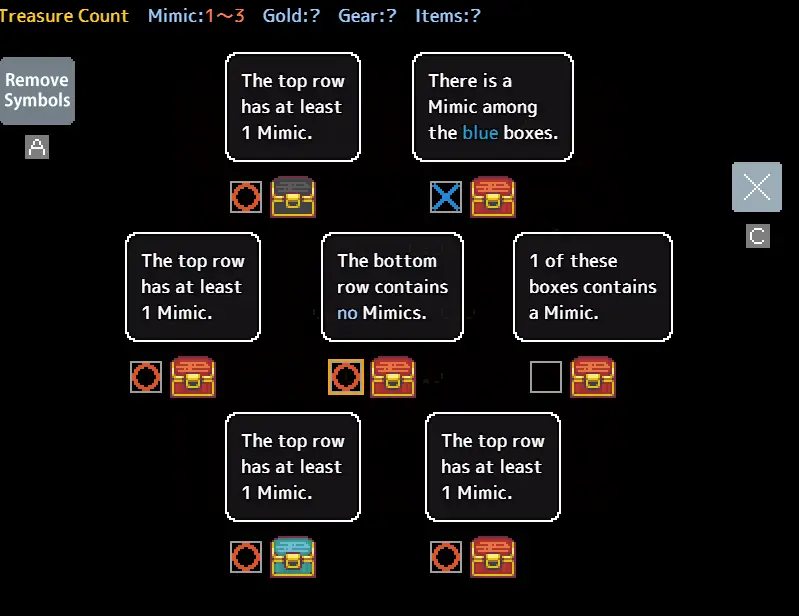
In this scenario, we encounter a set of conflicting statements. The statements “every mimic is the same color” and “there are more mimics in red than blue boxes” cannot both be true. This leads to one of two possibilities: either both of the boxes claiming that the mimics are the same color are lying, or they are both telling the truth, and the remaining 2 black boxes are mimics. In either case, the blue chest must be real, and we can mark it as such. Subsequently, we can utilize the true statement from the blue chest to unravel the puzzle.

Gold Logic
Consider the following puzzle:

Considering that both of the other chests on the right were solvable, and neither contains gold, the chest in the top right assumes significant importance. Employing a logic chain, if it were lying, it would result in too many mimics. Thus, it must be real and contain gold. Consequently, both chests claiming “There’s no gold in the top row” must be lying. This deduction clarifies the status of the chests and advances the solution.
Random Dungeon Guide
In random dungeons, the game introduces a new twist by providing a range for the number of mimics instead of an exact count. Typically, this prompts players to adopt the safest strategy of treating each puzzle as if it contained the maximum number of mimics within the given range. However, certain strategies reliant on precise mimic counts become less dependable in this scenario. It’s a subtle but significant shift that adds an extra layer of challenge to navigating these dungeons.
Basics of randomness
Consider the following puzzle:
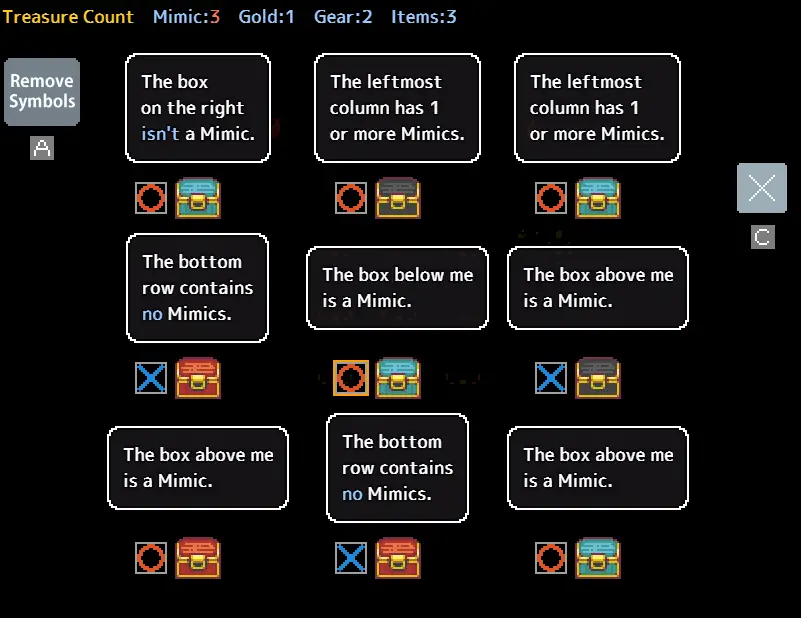
In this setup, either both bottom chests are mimics or both chests claiming at least one of them are. However, we’re still faced with uncertainty regarding whether 2 or 3 chests are mimics.
We can, however, establish that the middle right box is telling the truth. If it were lying, then the box up-left from it would also be lying, resulting in a scenario with 4 mimics. Marking this box as true enables us to solve the puzzle and determine that there are indeed 2 mimics. This deduction streamlines the solution process and clarifies the mimic count.
Single box 50/50
Random Dungeons can have single-box 50/50 chances as in the following:
In this puzzle, the unmarked box may or may not be a mimic. Since we don’t know the mimic count, we can’t determine if it’s telling the truth and there is only one mimic, or if it’s lying and it’s the second mimic.
Robber Dungeon Guide
Robber Dungeons introduced a new type of chest: the robber. This chest always tells the truth, but when opened, it steals 100 gold from you. If you have less than 100 gold, it takes whatever amount you have. Consequently, testing possible robber chests when you have very little gold, such as at the beginning or after visiting a shop, is usually preferable to using the “open all” button. This cautious approach helps to mitigate potential losses and optimize resource management in the dungeon.
Getting robbed for profit
Look at the following puzzle:
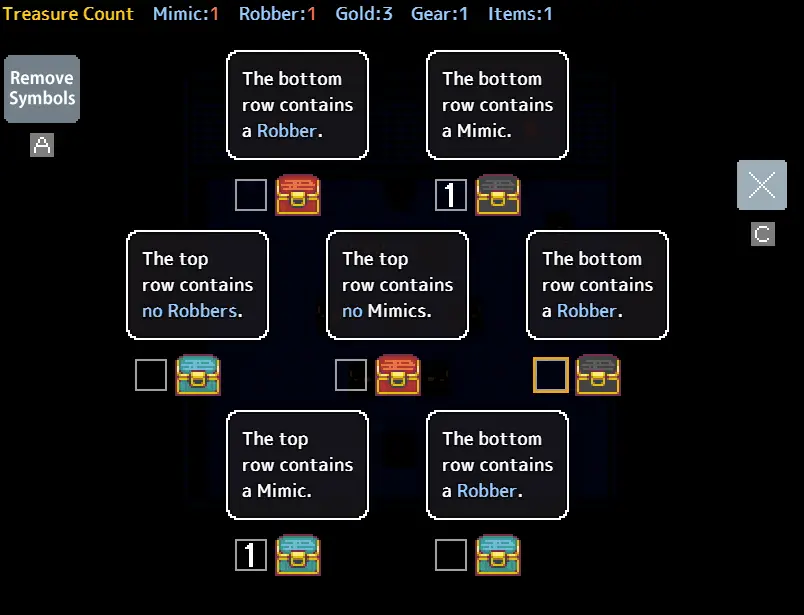
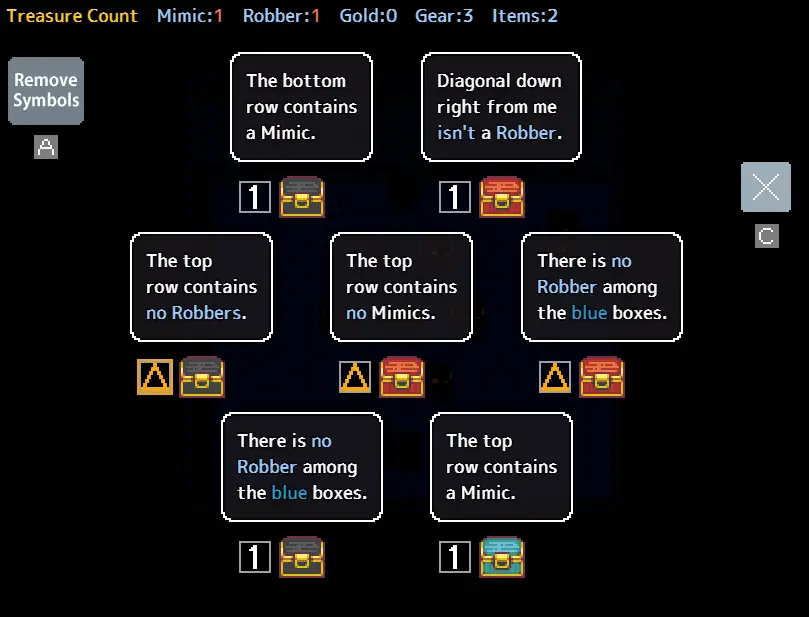
In a situation where several chests are concerned about the robber, the most crucial ones are the marked pair. One of these chests contains the mimic. Additionally, it’s deduced that the bottom row must contain the robber. Therefore, all non-marked, non-bottom chests are safe. This implies that the chest stating the top row has no mimics is true, leaving only the mimic and the bottom chest as potentially unsafe to open (one containing the robber, the other the mimic).

eyes on the prize
Consider the following:
After marking the initial round of mimic locations, the three middle chests are immediately truthful. Consequently, the top chests are safe, and the blue chest is identified as the mimic. Following this deduction, the solution unfolds as described:

What you do next hinges on your gold count. If you’ve just visited a shop or just started, you should cautiously open the triangle-marked boxes one at a time until you find the robber. Since none of these chests contain any gold, you can open all of them without fear of the robber taking anything. However, if you possess 100 or more gold, you need to weigh the value of 2 items/equipment against the loss of 100 gold. This decision is largely subjective and depends on your priorities..
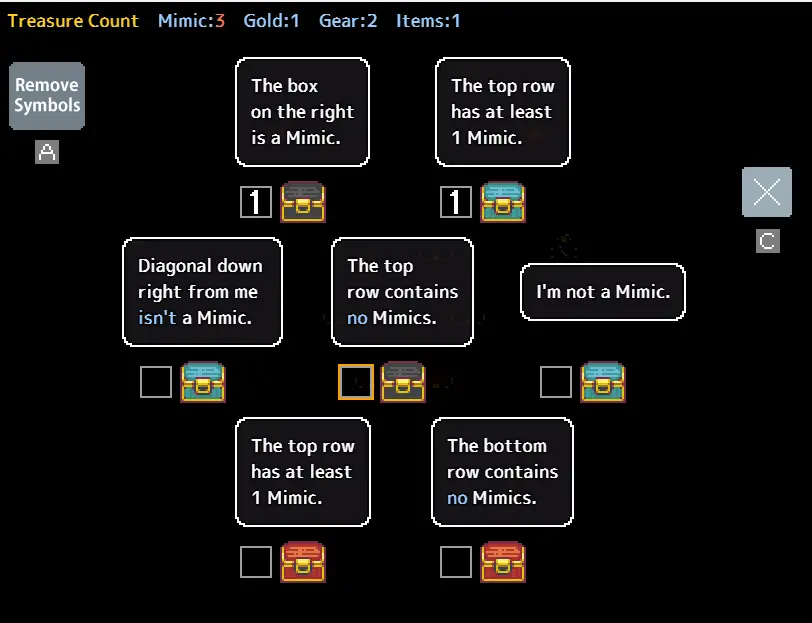
robber reports
In a scenario with only 1 mimic, a chest reporting the location of a robber guarantees a non-mimic chest. This principle is illustrated in the following puzzle:
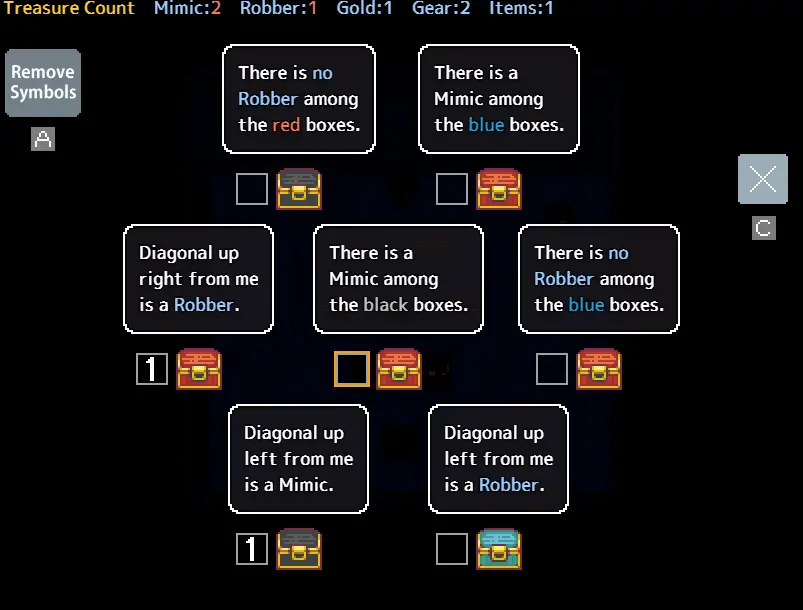
In this puzzle, the bottom right chest claims that the middle is the robber. Since one mimic is already in a mimic pair, the middle chest must not be the mimic. Therefore, either the bottom right chest is telling the truth or it’s a mimic, lying about a normal chest being the robber. Similarly, the chest on the middle right must also be telling the truth, as if the blue chest were a robber, they wouldn’t be able to lie about its location.
I am not the robber
If a chest claims it is not the robber, such as asserting that red chests have no robbers when it is the only red chest, it cannot be the mimic or the robber. The robber is incapable of lying, and a mimic would deceive by falsely identifying a red chest as the robber. Therefore, in such a scenario, the chest making this statement must be safe to open.
Number Dungeon Guide
Welcome to the Minesweeper dungeon. At first, the number dungeon might seem scary, but don’t worry, it’s not as hard as it looks once you understand the basics. In this dungeon, most boxes have a number on them. This number tells you how many mimics are nearby, including diagonally adjacent ones.
How does this number thing even work?
The number on a box indicates how many mimics are nearby. For instance, if a box has a zero, it means all adjacent chests are safe. Conversely, a four means there are four mimics around that box. Because each puzzle is always three by three, a simple strategy can be applied.
Go for the Centre
Focusing on the center box is key to solving many number puzzles. Consider this example:

In this puzzle, the center box must contain a real chest. If it were a mimic, the three boxes with zeros around it would also have to be mimics. This scenario would result in a total of 4 mimics, which is impossible.
Check the corners
When a box with a 3 is in a corner, it indicates that either all the surrounding boxes are mimics, or the box itself is a mimic. It’s usually not too difficult to determine which is the case.
Doubt Dungeon Guide
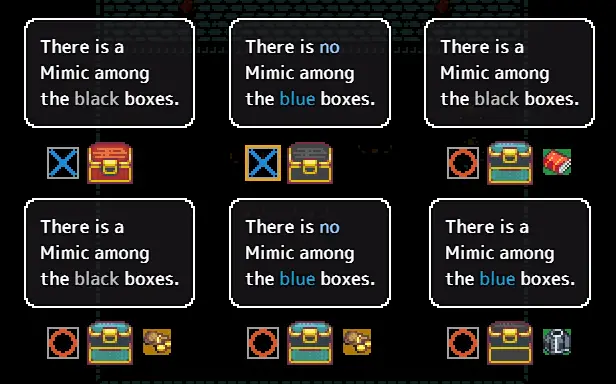
Welcome to the Doubt Dungeon, where confusion reigns supreme. In this dungeon, mimics always tell the truth, while non-mimic chests of the same color as a mimic lie. This twist in the rules can be quite perplexing, but fear not! There are new strategies to navigate this challenging environment.
Color-Based Self-Reporting
Unlike previous dungeons, mimics in the Doubt Dungeon self-report.
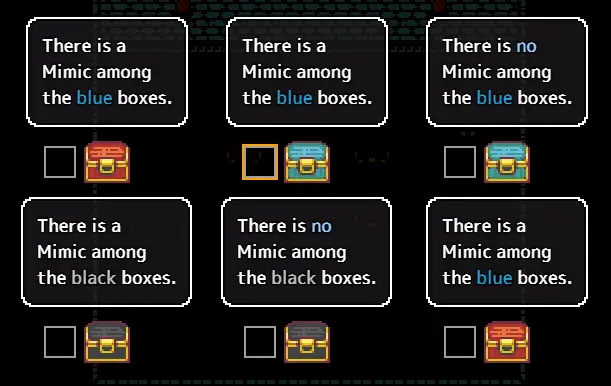
For instance, in the given puzzle, the black box in the bottom left must be a mimic because only mimics can self-report in Doubt dungeons. Similarly, the top middle blue box must also be a mimic.
Reverse Self-Reporting
Conversely, if a chest claims it is not a mimic, it must indeed not be a mimic, although it could be lying.
For example, in a puzzle where the bottom middle chest denies being a mimic, it must be telling the truth because if it were a mimic, it would truthfully report the presence of a mimic among the blue boxes.
Single Color Statements
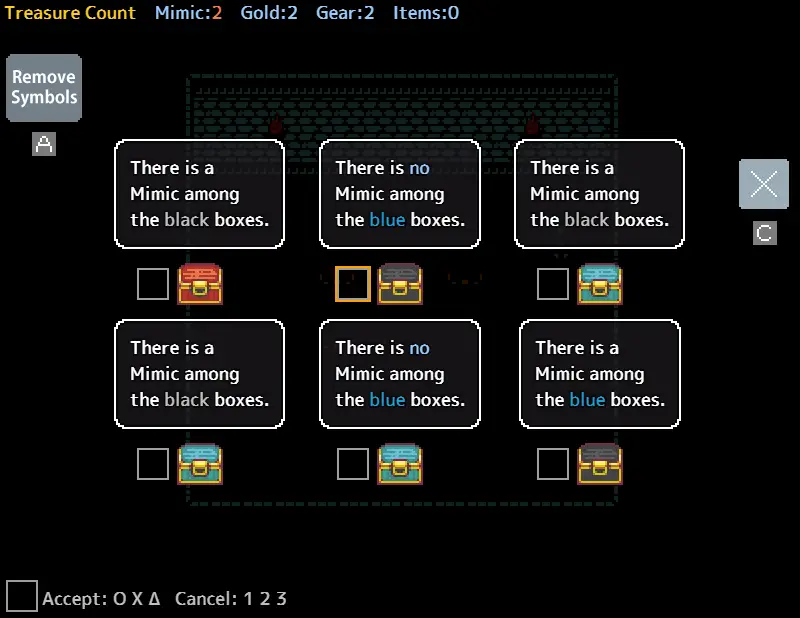
Expanding on the previous puzzle, the statement of the red chest must be true. If a chest is the only one of its color, its statement must be true. Therefore, we can mark both blue boxes as true (since if both were lying, we would have three or more mimics). Then, we can identify the red box as a mimic because only one black box can be a mimic. Finally, we mark the top middle box as a mimic because it is making a true statement, revealing whichever black box is telling the truth as a mimic.
Location of based self-reporting
In order for a mimic to engage in “self-reporting,” all potential mimics of that color must be accounted for in their statement. Consider the following:
At first glance, you might assume the mimic in the top right is self-reporting. However, this is not necessarily true. Since not all possible black mimics are in the right column, it could be a real box that is lying. In this particular puzzle, it is indeed a real box and is telling the truth.
Confuse Dungeon Guide
Welcome to the final dungeon of the game, the Confuse Dungeon. In this dungeon, we don’t need entirely new strategies, just some modifications to the rules we’re used to.
Here’s a quick rundown:
- Statements made more times than there are mimics plus confused chests must be true.
- True statements indicate the chest is real.
- However, a chest being real doesn’t guarantee its statement is true.
- Puzzles can be treated as containing one more mimic for the purpose of mimic pairs.
- If you reach the maximum number of mimics or mimic pairs, all remaining chests must be telling the truth.
- In situations with only one mimic or confused box, all rules that apply to one mimic dungeons work, treating confused boxes as the only mimic.
- Blue orbs are invaluable for solving later puzzles. Additionally, 50/50 situations are more common, so conserve blue orbs and avoid using them on every 50/50 situation you encounter.
- A chest that self-reports must be real.
Basic Town Overview
In the game world, a town is a special location that can spawn on floors 10 and 20. When you encounter a town, you can expect to find the following features:
- An NPC who offers a helpful tip to the player.
- A restaurant where you can purchase two different types of meals that restore both gut and HP. One meal provides a full heal, while the other offers a smaller heal.
- A shop run by a shopkeeper, where various items can be bought and sold.
Additionally, towns have the chance to spawn one of the following NPCs:
- Strange Doctor: This NPC gives you medicine that can either heal you or unexpectedly damage you by 30 HP.
- Lottery Ticket Salesman: Sells scratch tickets for 200 gold each. Prizes include 1100 gold for first place, 400 gold for second place, and 300 gold for third place.
- Blacksmith: Offers to restore 10 durability on your weapons and armor for a fee of 10 gold coins.

Notable Chests
Here’s a list of noteworthy chests you might encounter in the game:
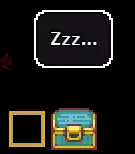
- Sleepy Chest: These chests are asleep and won’t provide any useful information unless you wake them up using a specific item.
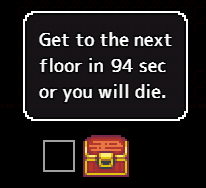
- Countdown Chest: Equipped with a timer that starts at 100 and counts down. If it’s real, you’ll face dire consequences when the timer hits zero. If it’s lying, nothing will happen.
- “Innocent” Chest: This chest claims it’s not a mimic. In most dungeons, this statement doesn’t offer much insight. However, in Doubt dungeons, it allows you to mark all chests of that color as real. In Confuse dungeons, it indicates that the chest isn’t confused.
That's everything we are sharing today for this Mimic Logic guide. This guide was originally created and written by overmind. In case we fail to update this guide, you can find the latest update by following this link.