
- 제목: 노동자 & 자원: Soviet Republic
- 출시일:
- 개발자:
- 발행자:
Information about Workers & 자원: Soviet Republic is still incomplete. 이것을 사용하여 게임의 세부 정보를 입력할 수 있도록 도와주세요. 문의 양식.
Learn how to create high-res textures from satellite imagery and import them into the game.
Finding a nice area
Arguably the most difficult part is finding the right area to get a texture from.
- The area should be 20 ~에 의해 20 kilometers, in order to get a 1:1 scale.
- It should be at least ~25 degrees from the pole, as the polar regions have poor data quality.
- It should not be too mountainous, as it will be hard to get good height maps as well.
- It should be very rural in order to avoid lots of houses/roads in the texture.
- As the script will use Bing maps to get the texture, the area should have high quality textures on Bing maps. Look out for seams, where you can see two images were stitched together.
- Areas with water at different heights are hard to get right in the game, although you could resolve this by editing the height map with a photo editor later on.
Creating the texture
- The code in this GitHub repo can be used to create a high-res satellite image. It downloads tiles from Bing maps and stitches them together.
- If you’re unfamiliar with git, you can click on “code” and download it as a zip. Unzip it in any directory you want.
- To run the script, you need Python 3. You can download that manually from 여기, or use a package manager like pip.
- Open the command line. 창에서, press Start and search for “cmd”.
- Navigate to the directory where you placed the code. 예를 들어,
cd Downloads\Satellite-Aerial-Image-Retrieval-Master
- Run the command
python3 aerialImageRetrieval.py lat1, lon1, lat2, lon2
어디 (lat1, lon1) is the latitude and longitude of the upper-left coordinate, 그리고 (lat2, lon2) is the latitude and longitude of the lower-right coordinate.
- The final image will be in the output folder.
Creating the height map
안타깝게도, I could not find a way to download heightmaps using the same method. But you can download the height map from various sources, such as the Tangram heightmapper. It provides a reasonable resolution for nearly any place on Earth.
Look for the place and make sure the entire region is visible.
If using Tangram, set render multiplier to about 4 그리고 클릭 “render” to generate a stitched image.
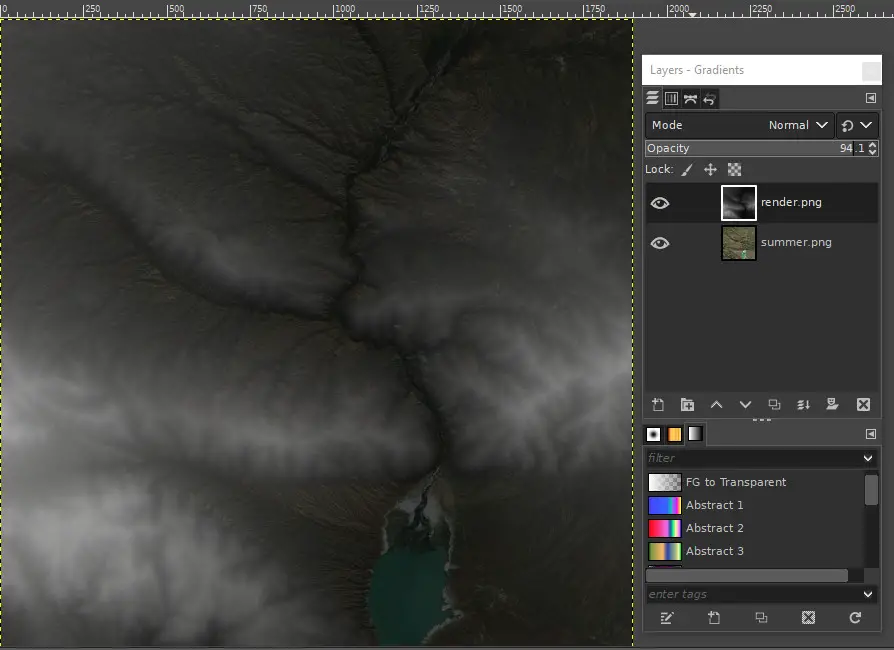
Matching the height map and texture
The next bit is a bit tricky. We have a height map and a texture, but they’re not aligned yet. We’ll need to crop them correctly first.
- Open an image editor of your choice. I use GIMP.
- Open the texture image and crop the square area that you want to use.
- Open the height map as a layer.
- 다음, we need to mirror the image vertically in order to get the correct orientation in the game.
- Hide the height map layer and export/overwrite the texture image. Save it as a .png.
- Unhide the height map. Then select the texture layer and resize it to the approximate size of the height map.
- 지금, align both images using the move and scale tools. You can change the opacity of the top layer to see if they are aligned. Once they are aligned, you can hide the texture.
- If you used the Tangram height mapper, the height map will use 8-bit integer. This is not precise enough. Make sure the precision of the image/layer is set to at least 16 bit integer. Then use the blur tool at a scale of at least 1.5-2 픽셀.
- Save the height map as a png.
Importing it into the game
- Open the terrain editor
- Use the in-game tool to import the height map.
- Save the map. Exit the game (you can leave it running in the background).
- Open the map folder. This should be located in a folder like
씨:\프로그램 파일 (x86)\Steam\steamapps\common\SovietRepublic\media_soviet\save_terraineditor
- Open script.ini, set $TILESIZE1 to 1.000000 그리고 저장. This makes sure that the texture is not repeated.
- Open material.mtl. The value behind $TEXTURE 5 is the relative path to the texture image, starting from mediasoviet. The default texture is grass, but we want to refer to our own image here. You can place your texture image temporarily in the tiles_normal folder and set $TEXTURE 5 to tiles_normal/yourtexture.png. 파일을 저장하십시오.
- 저장을 다시로드하십시오. You should see the texture appear now.
- Of course edit the map, or the texture if you feel the colors are off.
Uploading to the workshop
안타깝게도, you cannot include images when uploading a map to the workshop. 그러므로, we need to upload our map texture as a building texture.
- 게임에서, create a new building texture.
- Open the newest folder in the mediasoviet\workshop_wip folder, and place your texture image here. Copy the item ID of the folder.
- 게임에서, save the workshop item. It should now start uploading the image to the workshop. Subscribe to the item.
- In the material.mtl file in your map save, set $TEXTURE 5 에게
../../../workshop/content/784150/[item ID]/yourtexture.png
- Do the same for material_fall and material_winter (선택 과목). This makes sure your texture does not change. 물론, if you have too much time, you could use separate images for each season.
- If you open the map, you should still see the texture. Upload it to the workshop. Set both items to public, 그리고 넌 끝났어!
이것이 오늘 우리가 공유하는 모든 것입니다. 노동자 & 자원: Soviet Republic 가이드. 이 가이드는 원래 작성자가 작성하고 작성했습니다. roy.bos. 이 가이드를 업데이트하지 못한 경우, 다음을 수행하여 최신 업데이트를 찾을 수 있습니다. 링크.