- 제목: Walkabout Mini Golf
- 출시일:
- 개발자:
- 발행자:
Information about Walkabout Mini Golf is still incomplete. 이것을 사용하여 게임의 세부 정보를 입력할 수 있도록 도와주세요. 문의 양식.
A simple guide to learning how to hold the putter and hit like a real champ. It won’t be enough for you to win the PGA Tour but you may improve in the game… 아마.
Go Get’em Tiger (숲)!
Since I was a kid I’ve always loved golf but either because of the costs or my age, the only thing I could afford was playing at the MINIGOLF, and having now the opportunity to play it IN MY LIVING ROOM is something I’ve never expected.
이것 Walkabout Mini Golf has everything I wanted from a game like this: fun and spectacular tracks, near-perfect physics, cross-platform multiplayer and hidden treasures to fill the dead times. For these reasons I was committed to gather as much information as possible to become a better player, so to lower my handicap and be able to compete online.
Obviously the following is not the “Tiger Wood’s Bible“, but if these tips would make you improve somehow, I’d have achieved my goal. 하지만 기억해: practice makes perfect so, with the excuse of finding hidden balls and unlocking putters, let’s rush headlong into this sport.
The Putter/Controller Grips
첫 번째 단계: pick up the putter, or rather, our controller. In common golf there are different ways to hold the club and since everyone’s hands are different, only by trying them all can you understand which is made for you. The aim is just one: to have as much control as possible, 일명: a secure grip during the swing, the impact and the follow-through.
~ 안에 Walkabout Mini Golf we will use only one controller held in two hands and this is a bit complex ‘cause these things are not made for it, so we need to make a virtue of necessity and imitate reality in the best way possible.
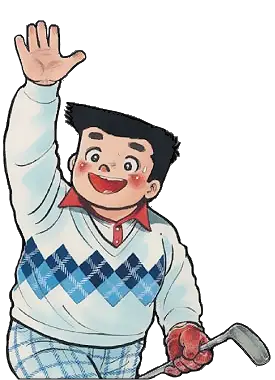
In the image you see:
- 그만큼 10 fingers grip, with the thumb of the lead hand resting on the palm of the trail hand.
- 그만큼 Vardon grip, with the little finger of the trail hand resting between the index and middle finger of the lead one. 사용 Arnold Palmer, Sam Snead 그리고 Gary Player, among the others.
- 그만큼 interlock grip, with the little finger of the trail hand crossed with the index of the lead hand. 사용 Jack Nicklaus 그리고 Tiger Woods, among the others.
- ㅏ Custom VR grip, with trail hand into the lead hand, in case you have a rather short controller or particularly large hands.
몸소, 사용하여 Valve Index and having spent some time with the game, the 3rd grip is the one I find most stable and comfortable, but having seen several friends playing, it seems like the number 4 is the most used. 나는 반복한다: the important thing is having stability and control during the shot.
Note that if you are LEFT-HANDED, you can change the leading hand in the settings: just click the cog on the scorecard or on your Avatar at the counter and look for “INVERT HANDS”.
Posture For The Shot
두 번째 단계: position yourself correctly. Like the grip on the putter, it is important that you find your posture, a good stability with your feet at the right distance, with relaxed shoulders.
Obviously we’re talking about a VR game here, so our reference points are not comparable to those in reality: the putter has no weight, we can’t see our feet and the FOV of our headset may even limit our view when we look down (strap it properly!). But there are also some nice positives: ~에 Walkabout Mini Golf the shaft of the putter will automatically change its length to adapt to our posture, while with the trigger you can instantly teleport to the ball and be ready to hit in an instant.
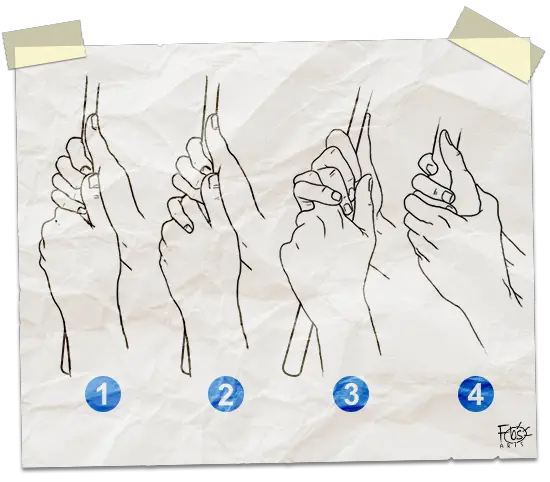
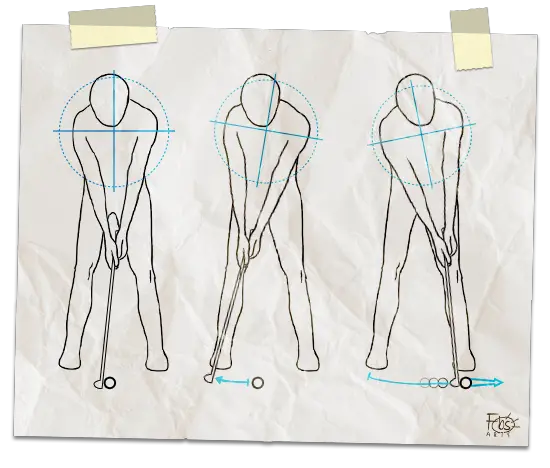
Now look at the drawing. Start by trying to visualize the trajectory for the shot: imagine a straight line that connects the ball to the hole (or to the area you want to reach). Move yourself near the ball and lean forward so to have it directly under your eyes. This is done to decrease the curvature of the movement when you hit. But since this is a videogame, 두목’t feel ashamed to keep your back straight and to stay a little far if you need more strength in it: sometimes the game asks us to use the putter as an iron!
그래도, keep your knees a little bent and your feet open, perpendicular to the trajectory, at a distance consistent with your height (in VR you will have to go blind as you will not see them!). The putter head should be perpendicular to the established trajectory… and THIS is the most important thing! The angle “에이” on the image must be kept perpendicular to the path throughout the swing up to the impact and beyond. This leads to…
The Correct Movement
Unlike golf, the mini golf swing shouldn’t be a problem: it mainly affects shoulders and once you understand the geometry of the shot you should be fine.
After visualizing the route and aligning ourselves as previously mentioned, the whole upper part of your body (putter+arms+shoulders) should rotate all the way AS A SINGLE BLOCK. Like a pendulum: backwards first, then forward until you hit the ball and then BEYOND the point of impact as if you want to indicate the hole with the head of the club. The putter must constantly follow the trajectory as if it would be on tracks and the inclination of its head must remain perpendicular to these tracks.
CURIOSITY: in the history of golf there have been other putting techniques used by famous golfers that could also be used by you. 당신이’re not OK with the classic movement, look online for the Side Saddle method or the Croquet… 좋아요, this one is illegal since ’68 but not in VR.
Settings And Strategies
The following are some trivial tips from someone who has spent his time on the green, but feel free to add more strategies in the comments! You might as well be better than me in this.

Adjust the settings
You can access the settings directly from the counter at the beginning, by clicking on your Avatar, or using the cog on the scoreboard during a game.
아래에 PUTTER 있을 것이다:
- The default strength upon impact. If we increase it the ball will be lighter, in short.
- The angle of the club head when you hold the putter (very important!).
- The ability to make the putter immaterial until you click on the grip button (useful for practice swing, 아마도).
- The invert hands mode, for left handed players (에= left handed).
아래에 MOVEMENT:
- The lock ball position mode, to center the ball in the available space in the room (ON= when teleporting you will always be placed more or less in the center of your playing area).
- The usual Turning/Locomotion options, to rotate the view by some degrees or have continuous movement. You can even change the motion speed.
아래에 AUDIO there are the volumes for effects, music and voice chats.
아래에 OPTIONS:
- The stroke limit to skip a hole (ON= triple bogey maximum).
- The on-screen locator for your ball… in case the teleportation is not enough for you.
- The switch to see the ball trail when it moves.
- The switch to see the names of other players during matches.
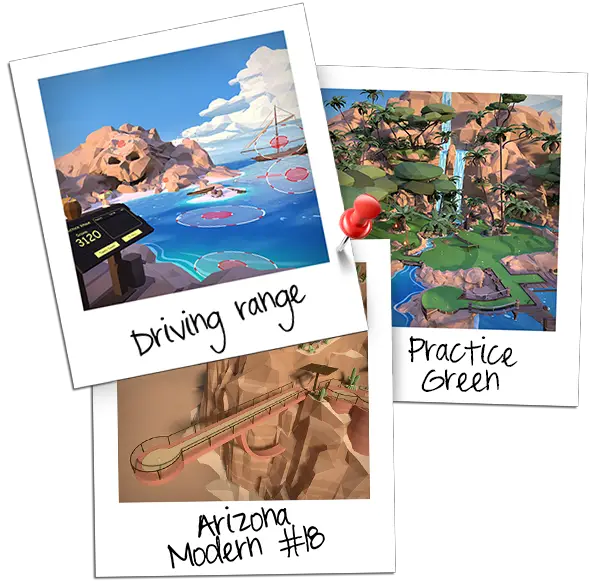
Do some tests in 관행 and retouch these preferences with purpose. 그만큼 hole #18 of the Arizona Modern would be perfect to test all of them: it’s a long course and the shadow of the handrail is a great route to follow.
Train until you’re confident
I understand the desire to play every and each course, but to have good results you need to prepare.
The aforementioned hole #18 of the Arizona Modern is an OK training ground, but the fantastic Welcome Island recently added is excellent. Click on the sign “Driving range” 또는 “Practice Green” to activate one or the other. And with a few friends it’s even more fun!
Keep in mind that during the training you can even pick up the ball pushing the stick down (like a hidden one), you can lob it in the air and catch it, throw it wherever you want, and if you lose it reach over your shoulder stick-down to get a new one. 능숙한! And while you’re at it, why don’t you try to reach the top of the promontory or take a ride on the raft? 당신이 이겼어요’t regret it.
Don’t underestimate the Practice mode of a course, ~도! You can repeat your shots over and over. To reset the ball to its previous position (“Undo”) just push the control stick down. 너’ll see improvements in your swings and game in just 10 분.
Look for landmarks
Perhaps the most important trick of all. It is not always easy to imagine a straight line for a shot, especially if the hole is quite far away and to aim at it you have to rotate your head! 잘… you have the perfect ruler in your hands: the putter!
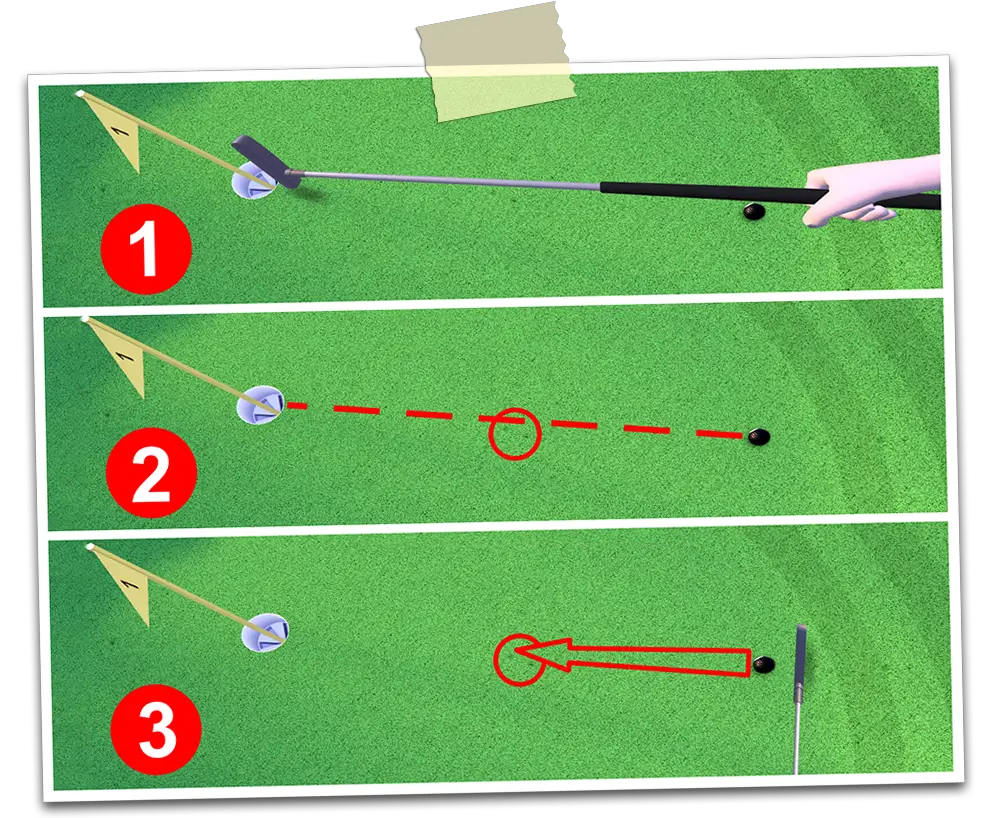
At the beginning of the game choose a simple club (I know you have all of them and you want to show off, but behave!), 그 다음에, during the game, use it to visually align the ball to the hole or to the area you want to reach, in any case (1).
The textures have often details that stand out from the rest, such as pebbles or colored dots. If one of these happens to be on the trajectory you have previously aligned, 당신은 가기 좋다 (2)!
Grab the controller with two hands, aim at the “pebble” above and putt with the correct strength (3). If you do not enter the hole right away you will surely be closer to it than if you had a random shot.
Study the path
It seems obvious, but getting an idea of the slopes and obstacles up to the hole is a must for your strategies. Use the teleportation or the “Flyabout” 방법 (hold the stick upwards for a few seconds… the controller should vibrate). The important thing is to be aware of the 3D space around you, planning the steps required to get in the hole with as few strokes as possible.
Risk vs Certainty
Be confident in your game. I am not saying you should not find alternative routes through rocks or shrubs, but you should do so only after gaining a little experience on the courses. At the beginning of your career in Walkabout Mini Golf the quickest way to learn how the designers think is following the intended path, as more often than not they hide specific methods to get a Hole in one in plain sight…
Hidden balls and treasure hunts
~에 Youtube there are dozens of videos showing where the balls are hidden in the courses or how to solve the treasure hunts in hard tracks. But if you want to find them yourself, I can advise you to use the “Flyabout” mode to move quickly (hold the stick upwards for a few seconds… the controller should vibrate). Even better if in 관행 방법, so you can click on the hole numbers on the map/scorecard to warp there. Note that with the free flight you can also go under the floor to make certain geographical details disappear, sometimes leaving just the hidden ball visible.
Also remember that the treasures are also visible on the overview map, albeit microscopic in size.
Physics Anyone?
알잖아, mini golf is a cross between classic golf and billiards. Several holes in Walkabout are proof and in some cases you will need some imagination and good timing not to bogey badly (damn wind!).
I kept this chapter last because it’s perhaps the dullest. 나는하지 않았다’t want to write a book about physics (some professors would have hated me), so if you want to know more about this, 너’ll have to look for some other authoritative sources online.
It is useful to know how a ball behaves when hitting an inclined surface and if you’ve never thought about it, the rule is quite simple: look at the image. When the ball hits the surface, the entry angle is always the same as the exit one. For convenience I wanted to draw reference points and letters in blue, and identical angles have the same letter on them (a= a, b= b, 등.). 언제나처럼, click on the image if you want to zoom in.
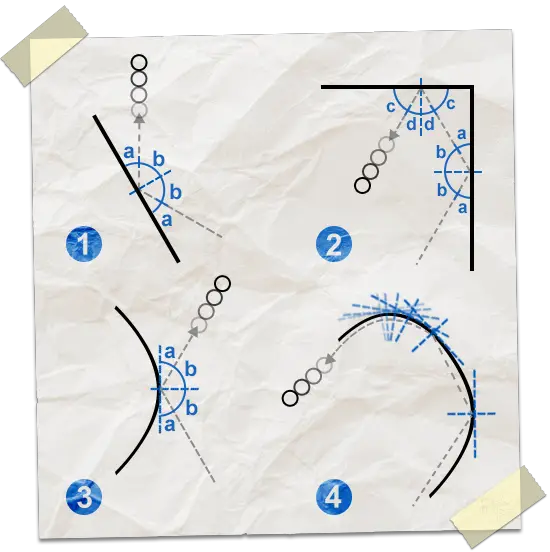
~ 안에 drawing 1 the situation is simple and you can see how the exit line looks like the entrance one “mirrored” by the perpendicular plane (dashed in blue).
~ 안에 drawing 2 you can see a double bounce. Same rule as the previous one, angles and all that jazz.
~ 안에 drawing 3 거기’s the recoil over a rounded surface… 그리고 보시다시피, it works in the same way as the others on a common plane, with the perpendicular line on the impact spot and the entry/exit angles.
A little different is drawing 4, in which the inclination of the ball over the plane decreases with each bounce and ends up following the shape of the surface. Often in Walkabout Mini Golf you will have to use this kind of shapes to steer the ball, so it’s important to remember that the key is the angle of entry: the closer to the plane, the fewer bounces it takes for the ball to follow the surface.
Get up and down
~ 안에 Walkabout Mini Golf sloping surfaces are always designated by a series of stripes. 확실히, the shots in these contexts are the most difficult, since a curved trajectory is harder to conceive than a straight one. There are several variables to take into consideration: the hit strength and direction (평소처럼), then the inclination and height difference between the starting point and the arrival, this changes the potential energy in the ball and therefore its kinetic one.
The following diagrams aim to clarify the concept of conservation of energy.
The idea is that different forces act on the ball at all times, even when it’s still, but their sum remains constant. Gravity, 예를 들어, is canceled out by the floor the ball is resting on but nevertheless provides it with potential energy. When we add kinetic energy to the system through the putting stroke, the position of the ball changes as the balance of forces does, but their sum remains the same until everything slowly returns to the initial state due to inertia.
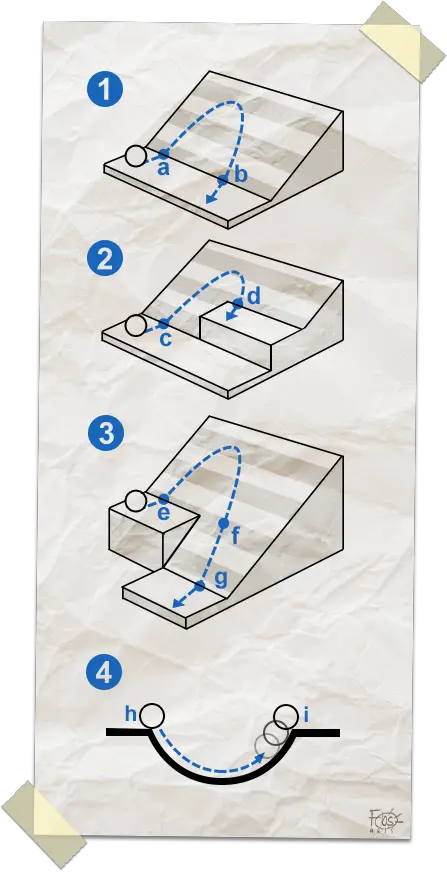
에서 first case the speed of the ball at point “에이” (the base of the slope) is neither more nor less than the one at point “비”, after the parabolic trajectory. At the apex of the arc, the ball has its maximum potential energy and its minimum kinetic energy, 그래서’s stationary. ~ 안에 “에이” 그리고 “비” is the other way around: it has max kinetic and minimal potential. Ongoing with its trajectory, the kinetic energy of the ball dissipates due to friction till the ball stops.
에서 second case the speed of the ball in “기음” is greater than in “디”. The missing speed (kinetic energy) has turned into potential energy. 다시 말해서, since the ball ended up on higher ground, it has more unexpressed energy but this made it stop sooner on the landing.
에서 third case the speed of the ball after the stroke in “이자형” is the same as in “에프”, but then part of its potential energy becomes kinetic! 그것’s added to the one already acting on the ball and the final speed in “g” is way higher.
Fourth case: if the ball in “시간” is released without adding further kinetic energy (즉: without pushing it too much), 그것’ll arrive in “나” at the same height as the start. Then it’ll come back and forth with shorter and shorter oscillations. 그것’ll stop on the bottom only after the friction has consumed all its kinetic energy.
This is it. I hope you enjoyed the guide and that it can help you with your games.
이것이 오늘 우리가 공유하는 모든 것입니다. Walkabout Mini Golf 가이드. 이 가이드는 원래 작성자가 작성하고 작성했습니다. FbsArts. 이 가이드를 업데이트하지 못한 경우, 다음을 수행하여 최신 업데이트를 찾을 수 있습니다. 링크.
Merci pour ce tuto plutôt complet
Il y a une chose qui n’est pas mentionnée, c’est le comptage
Sinon merci pour ces explications