An image-based guide explaining how golems work in Timberborn. Note that this is the newest, most recent addition to the game and is likely to change based on player feedback. I will try to keep the guide up-to-date, but there is no guarantee. Proceed with caution.
The role of golems in Timberborn
Golems in Timberborn are a late-game / end-game system.
Given their “around-the-clock” work hours (with only a short period for some form of refueling), they can boost your productivity in key industries, and they can also unburden your beavers, allowing you to eventually reduce working hours of living beavers to “0”, creating a Utopian paradise where beavers do nothing but enjoy the leisure activities, consume books and visit each other and their places of worship.
It is not possible to make golems until you’ve started Metal block production, since the facilities to construct golem parts require Metal blocks. The manufacture of golems consumes a lot of Gears, so have sufficient Planks and Gears production facilities. Be aware that other industries may also be quite “hungry” for these (such as the Underground Mine, which consumes treated planks and gears).
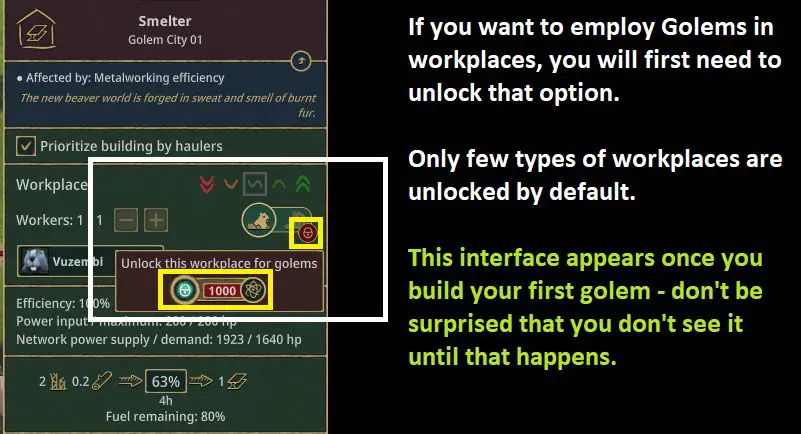
When you produce your first golem, a new interface appears on all workplaces. This interface allows you to switch from beaver workers to golem workers. The interface can have one of three appearances:
- 그만큼 “골렘” portion can be disabled entirely, meaning it is not possible for golems to work here. This is the case with Inventors and Observatories.
- 그만큼 “골렘” portion can be locked with the red padlock, meaning you will first need to unlock the ability to employ golems in this type of building. Once you unlock it for one building of a specific kind, ALL other buildings of that kind can be switched to golem workers (for no additional cost). Science Points are used to unlock this, with the costs ranging from 100 SP for simple industries, all the way to 10’000 SP for the Golem Factory itself.
- The last option is of course “잠금 해제됨” — few industries are available for golems immediately, others need to be unlocked.
Once you build your first golem, your District Center will change as well, adding a new toggle. This toggle determines the default beaver-vs-golem worker setting for all newly constructed buildings. This will probably only make sense if you decide to establish a fully automated District to which you only send golems: If you don’t tell such District Center “Make all new workplaces golem-operated,” then they will be empty, waiting for living beaver workers.
Common mechanisms (both factions)
Some aspects of Golem gameplay are common for both factions, so I will explain them here.
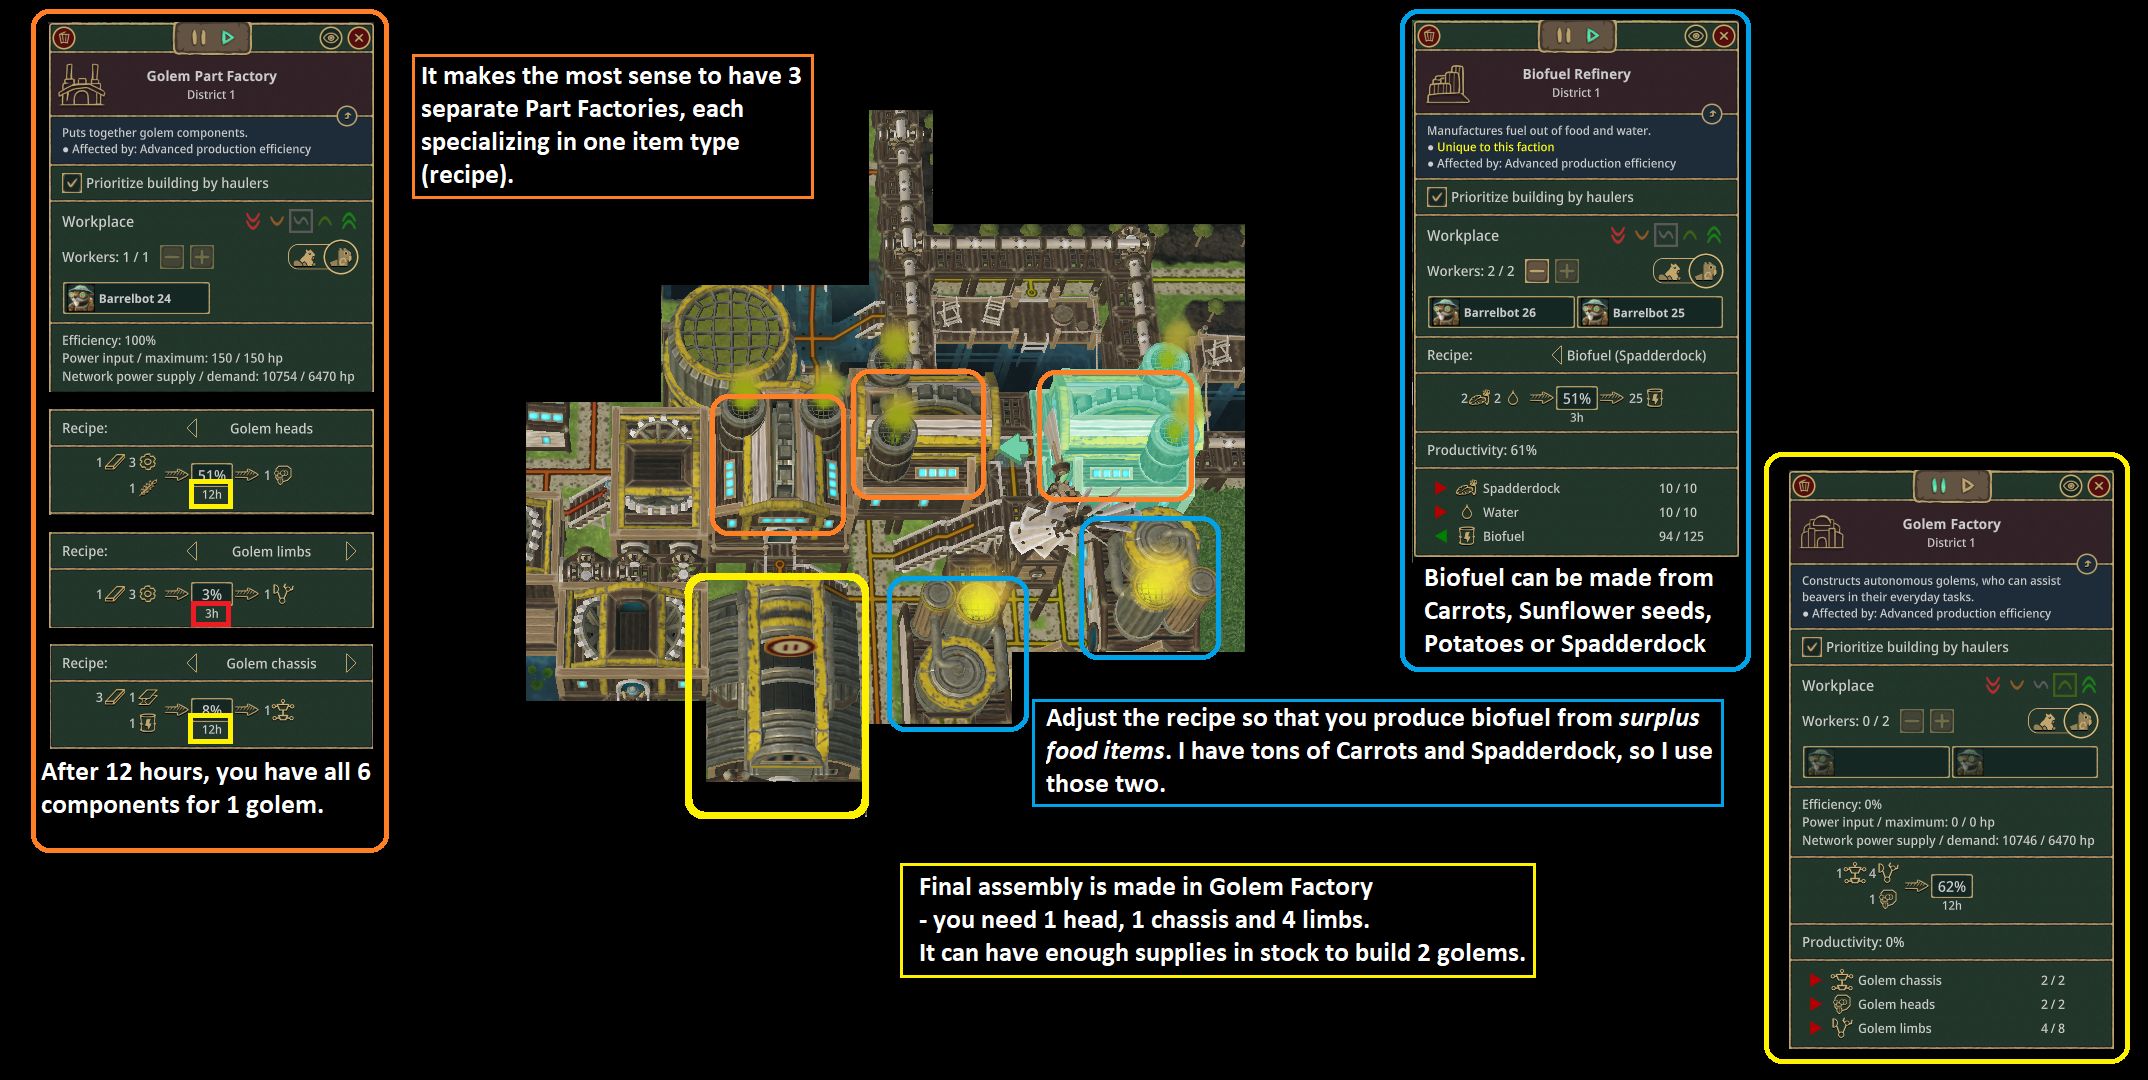
Golem are constructed from PARTS.
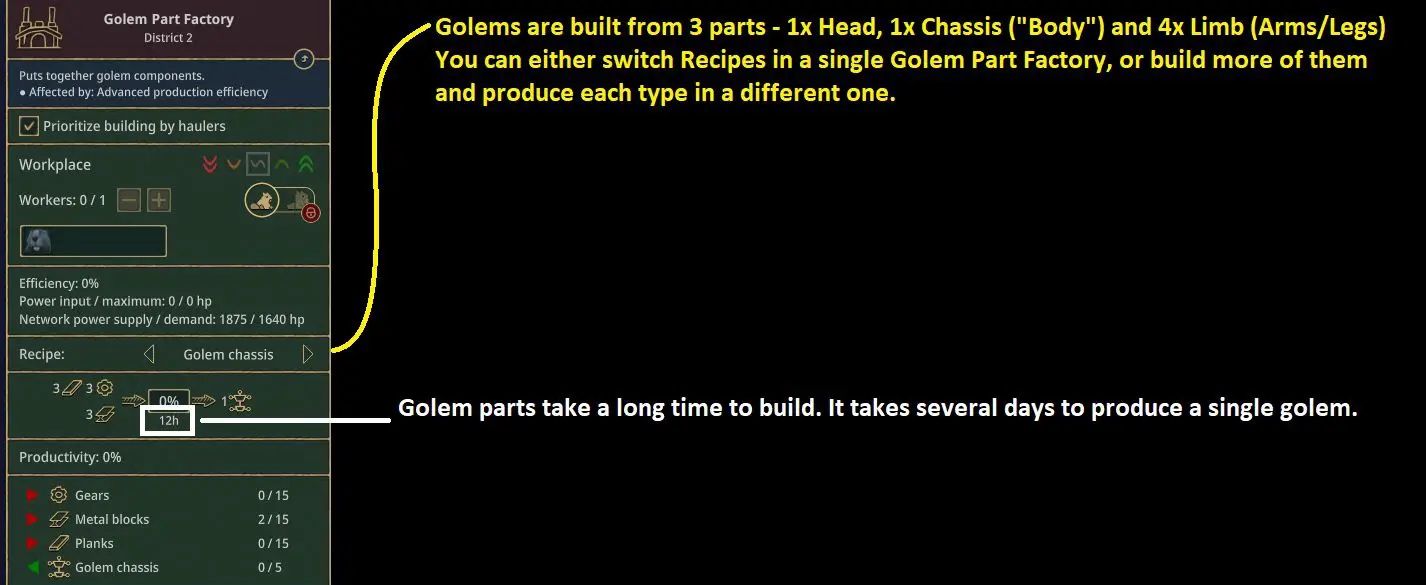
You need one HEAD, 4 LIMBS and one CHASSIS (= body) to build one golem. 현재, Limbs take 3 hours to make and Heads and Chassis take 12 시간, so after 12 hours of work, provided there was enough input, you will have all the parts needed for the golem. With a single factory, you’d need 36 hours to get all the parts.
The specific recipes for the parts differ slightly between the factions, but it’s mostly Planks and Gears, with a bit of Metal or other stuff for added flavor.
The Golem Part Factory requires power to operate.
Golems are then assembled in a Golem Factory. Golem Factory takes 1 머리, 1chassis and 4 limbs and constructs a golem – a Barrelbot for Folktails, or a Coghead for Irontooth.
The Golem Factory requires power to operate.
Golems work (almost) 24 hours a day and are not affected by the typical well-being stuff, such as Campfires, Shrubs, Statues or Monuments. 대신에, each faction has a 영구적인 bonus for specific industries, 그리고 가정 어구 bonus that is activated when the golem fulfills specific condition, and lasts for some time even once the condition is no longer fulfilled.
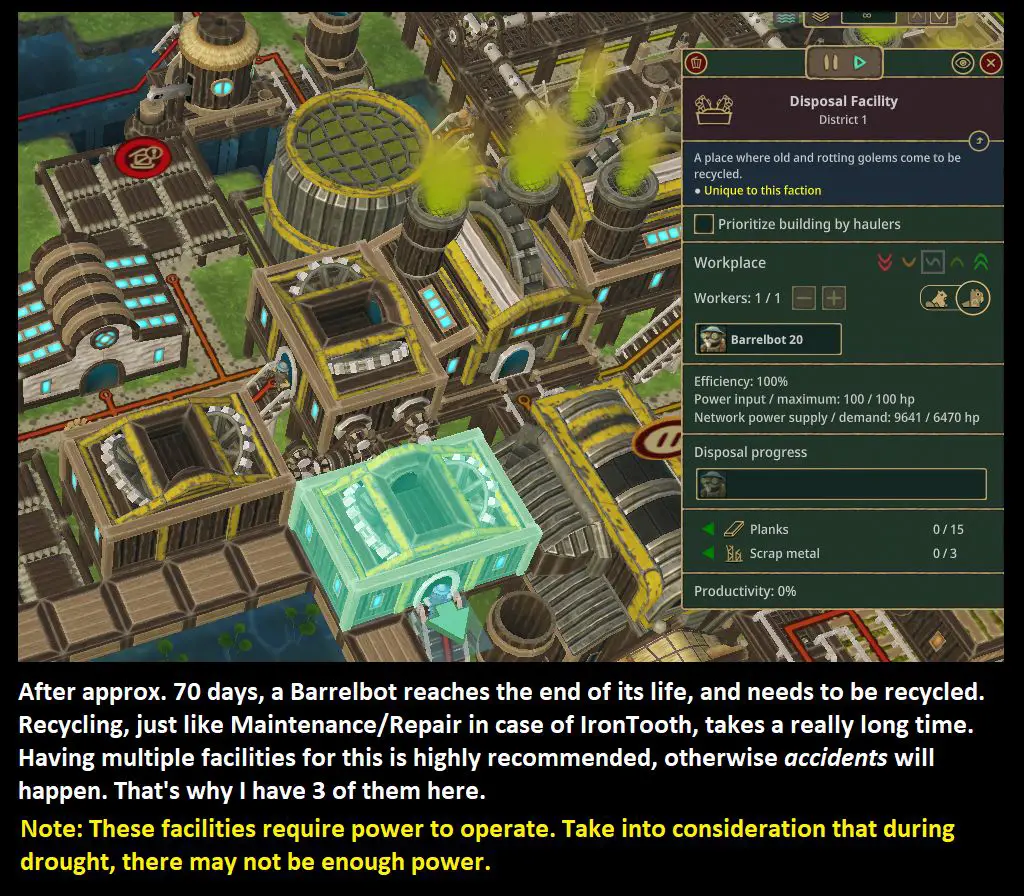
Golems also present danger to the beavers (and possibly each other). At the end of their life span, they need to be treated in a specific manner, otherwise they cause harm to beavers and other golems. The exact mechanisms differ slightly, but the common thread of this is that you need to prepare for the inevitable “end of life” moment.
You have approx. 70 days before Barrelbots reach end of life; with Cogheads, you only have 30 날.
Folktails golems – Barrelbots (unique mechanics)
Barrelbots are the Folktails golems.
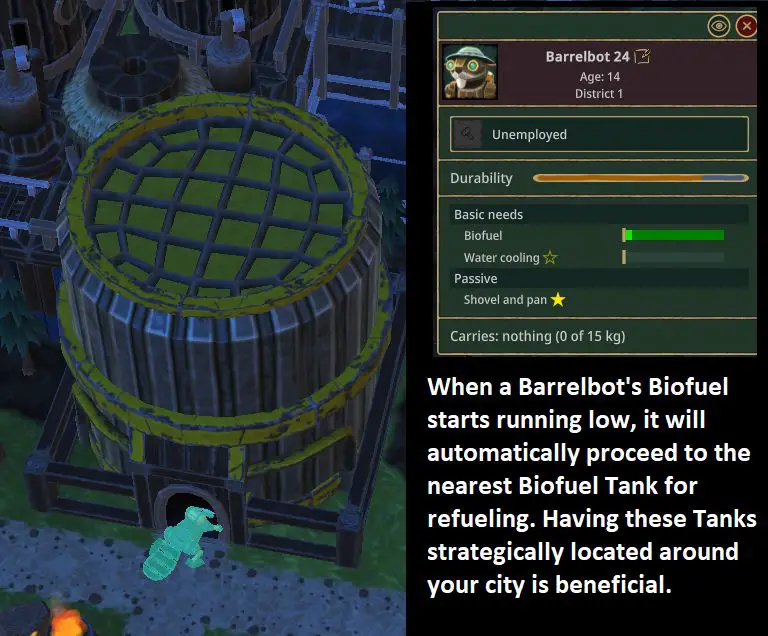
They run on Biofuel, which can be produced in a Biofuel Refinery. This facility converts Carrots, 감자, Spadderdock or Sunflower Seeds into biofuel.
Every once in a while, approx. once per day, Barrelbots need to refuel:
After approx. 70 days of life, they break down and need to be recycled. Recycling will return few planks and some Scrap metal. It is best to have several Recycling facilities ready, so that there is no “wait time” for recycling.
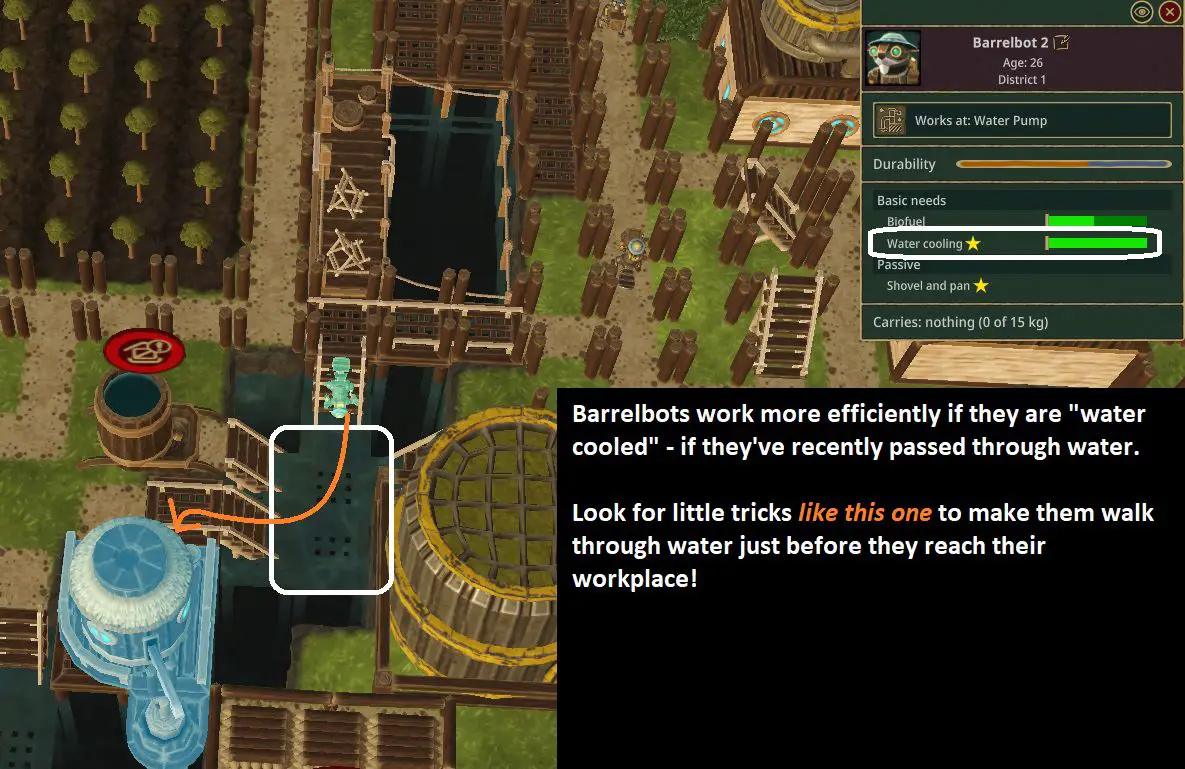
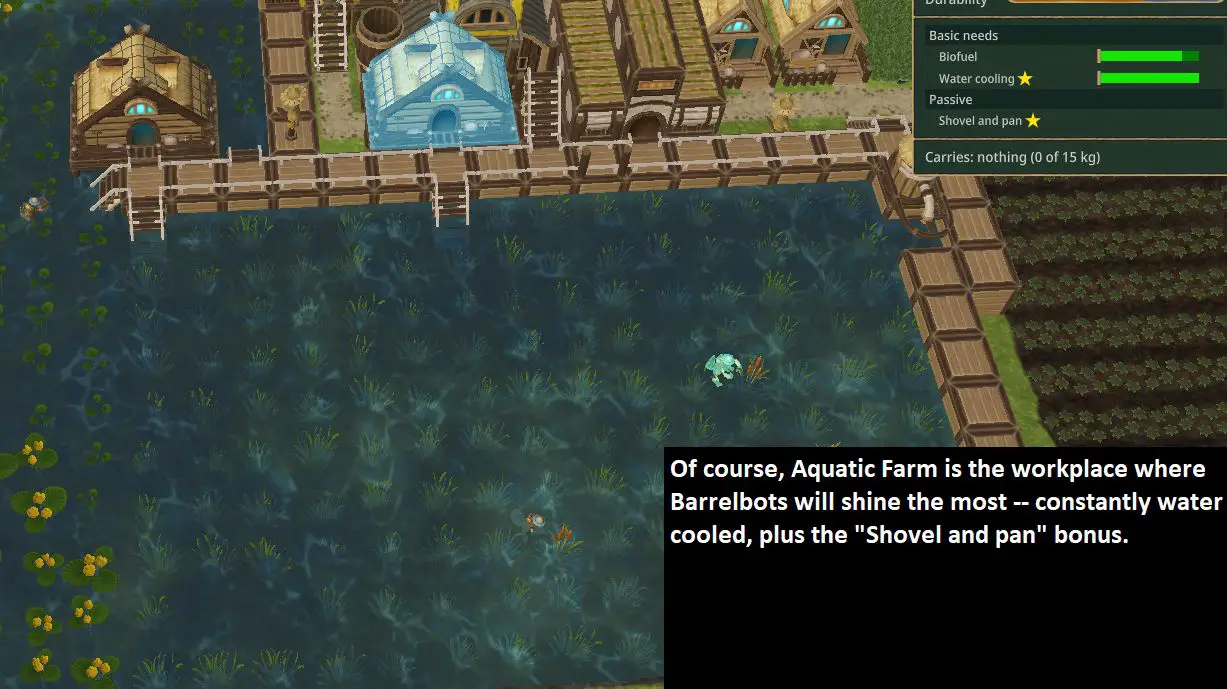
Barrelbots have a conditional bonus for “Water cooling”: If they move through water, they gain extra speed for a while after leaving.
You can utilize it by putting a tiny bit of water in their path, like so:
물론, the absolutely best utilization of this bonus is by having them work in Aquatic Farms – where they will be constantly in water, thus keeping the bonus the whole time:
Irontooth golems – Cogheads (unique mechanics)
Cogheads are the Irontooth faction’s golems.
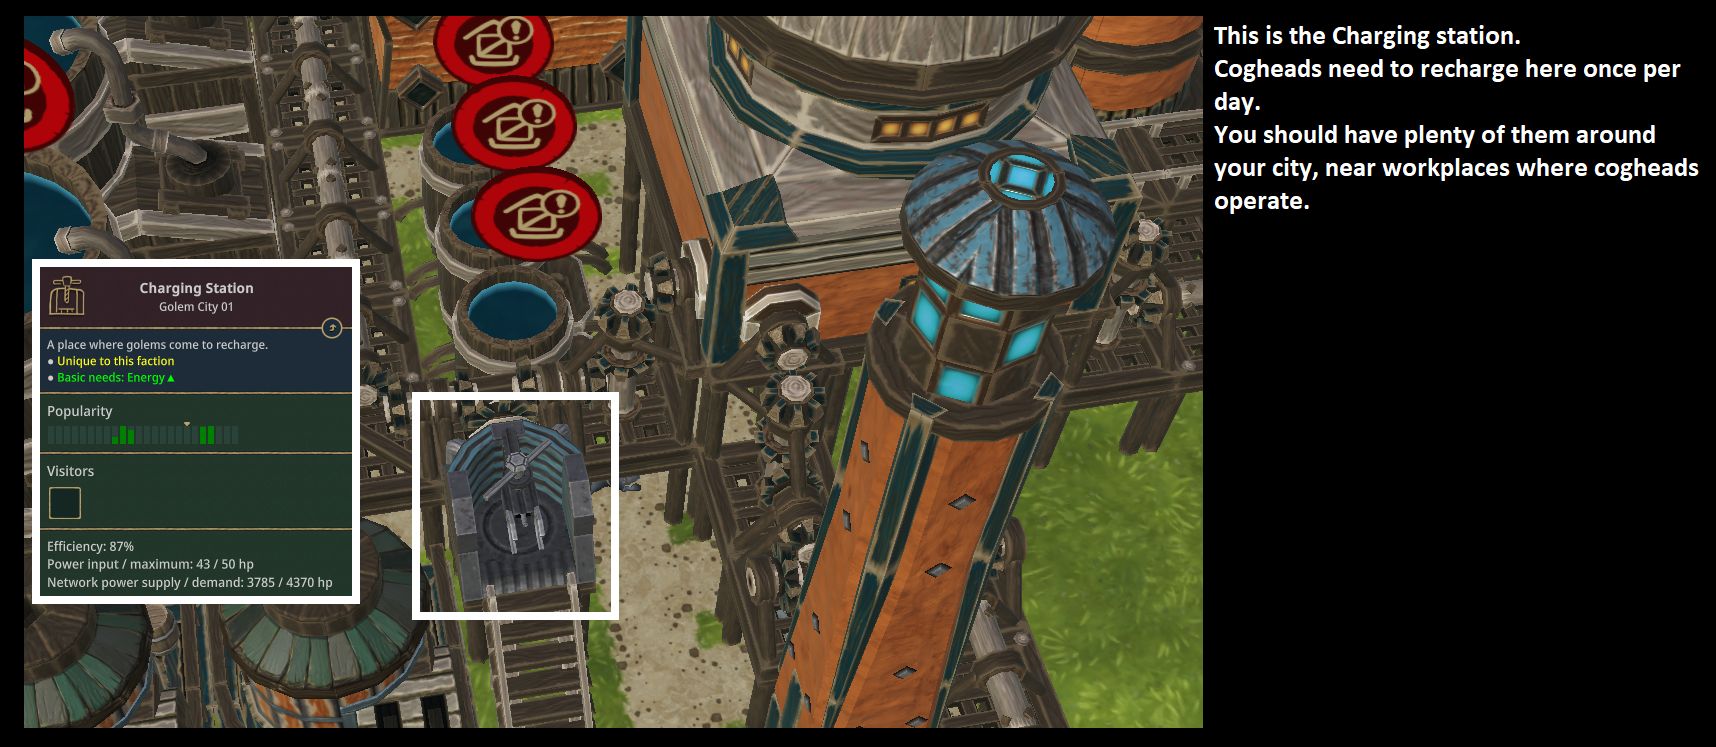
They run on spring-loaded power, and need to be wound up at charging stations.
Here’s how to construct Cogheads:
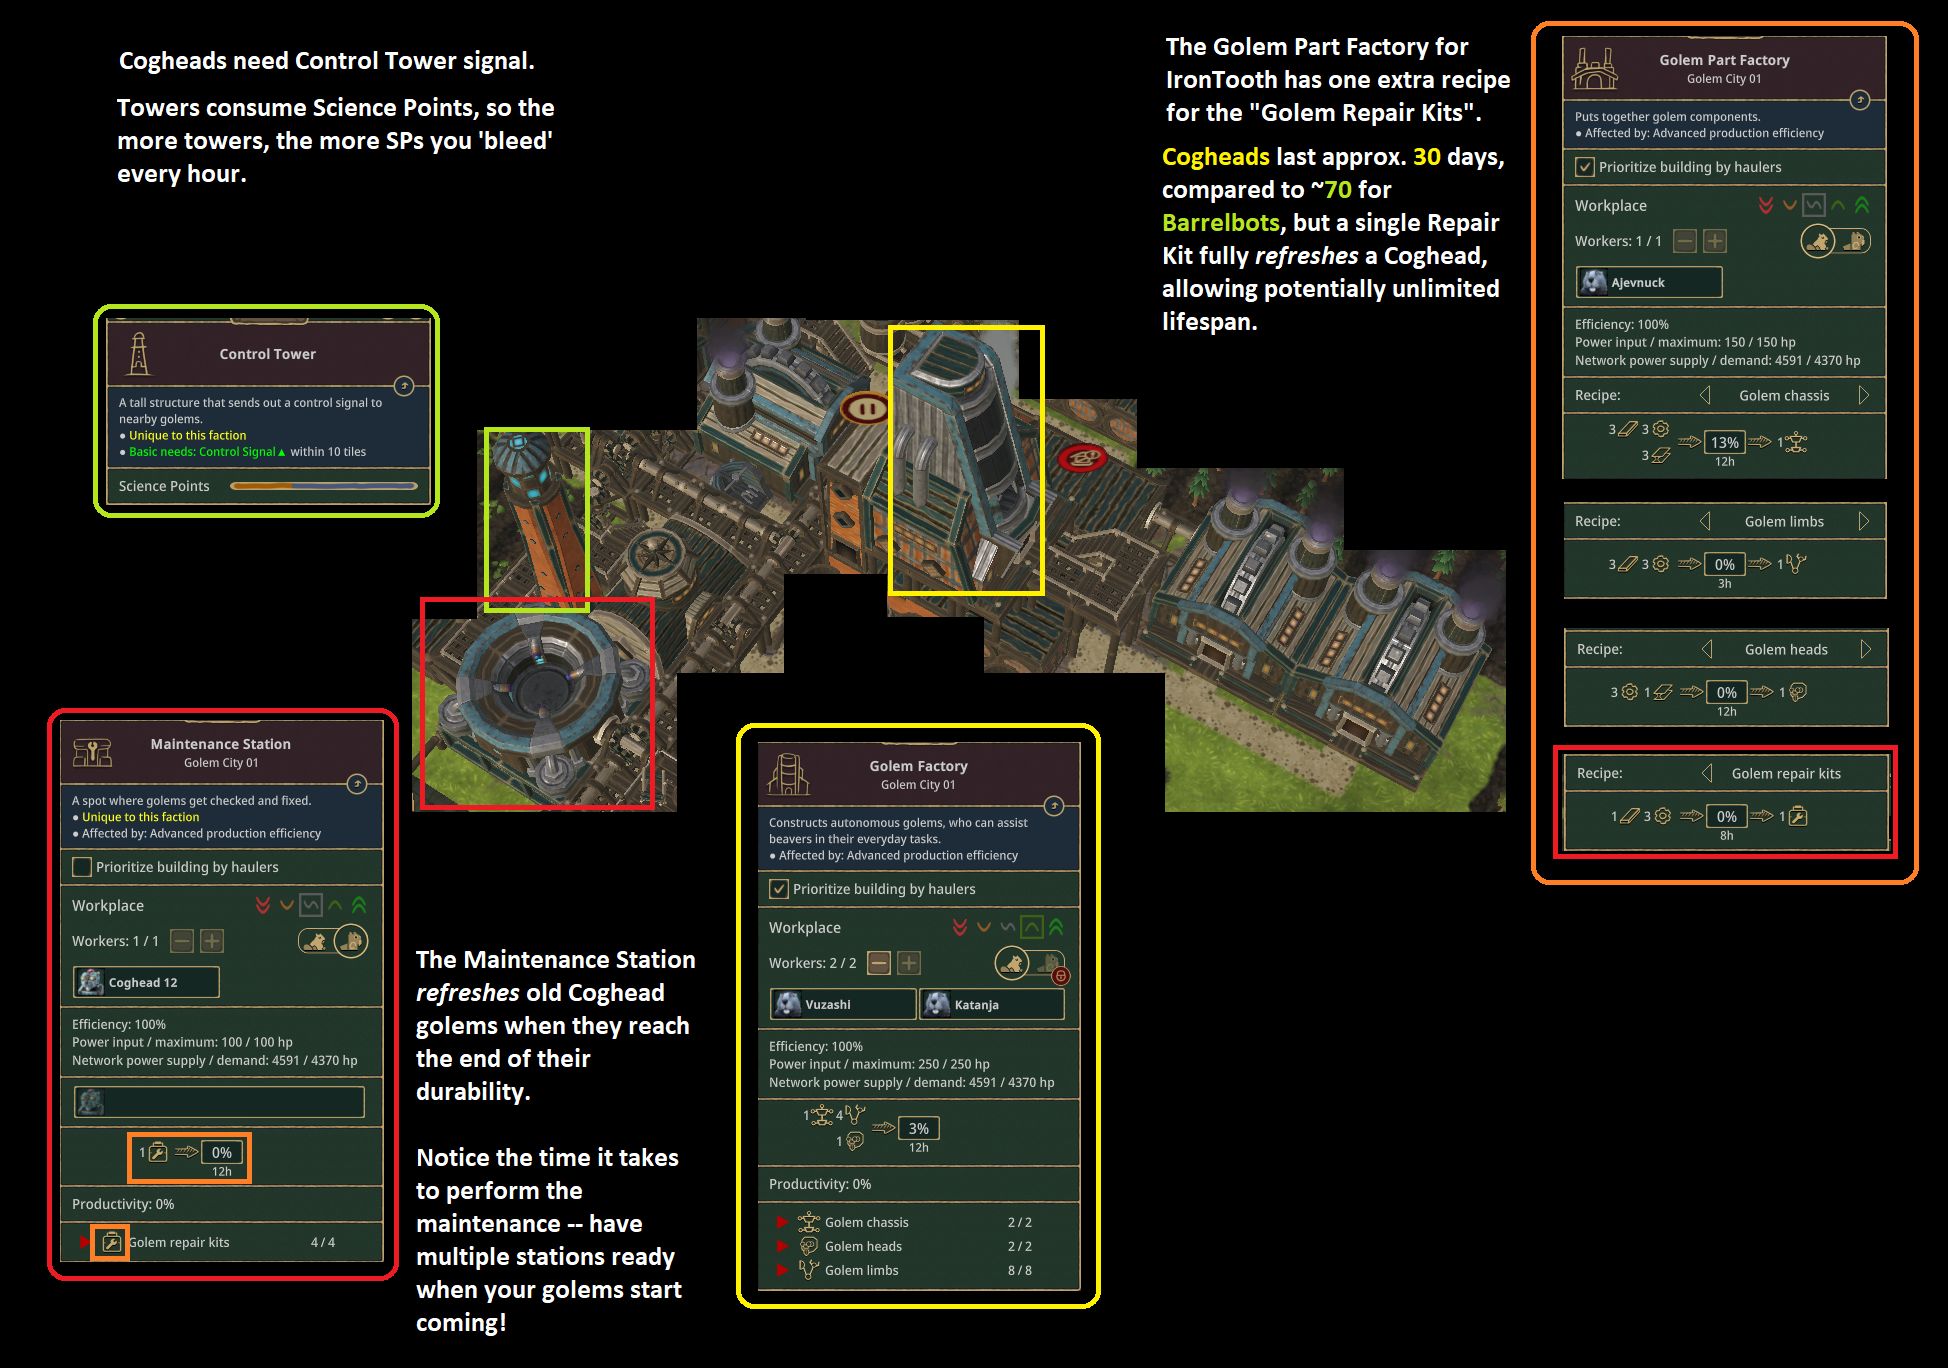
Notice the 4th recipe in the Golem Part Factory — the Repair Kit(에스). They are used for maintenance of Cogheads. Cogheads, unlike Barrelbots, don’t have one fixed life; 대신에, once they reach the end of their durability, they can be maintained/repaired and fully refreshed. This process takes 12 hours and consume 1 수리 키트.
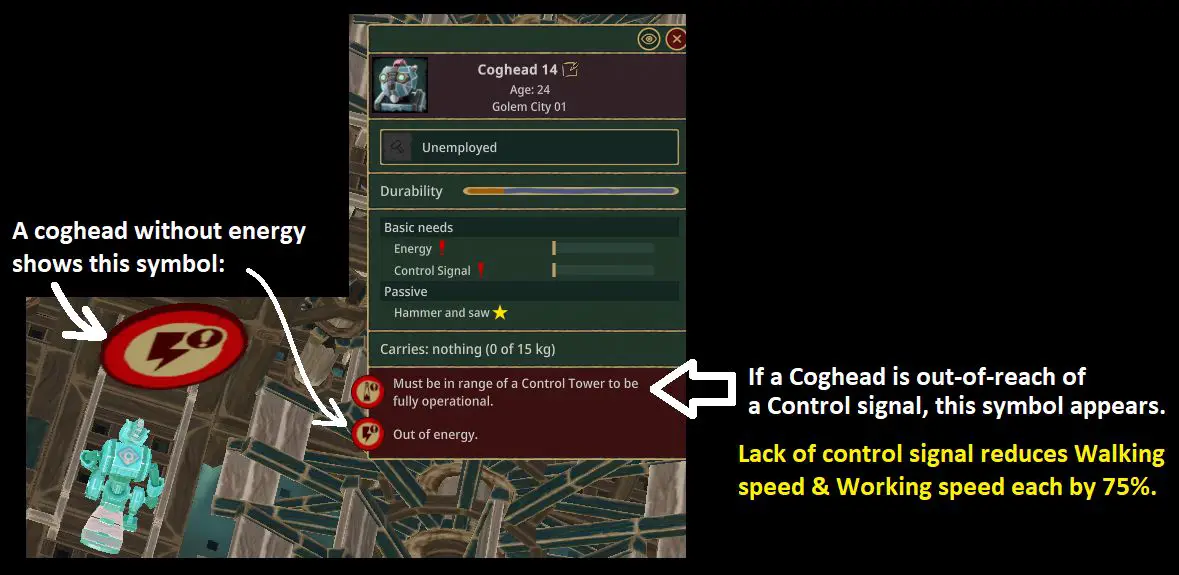
Cogheads need to be controlled by Control Tower signal. Control Towers have a reach of 10 tiles in all directions, including diagonally, so placing a Control Tower approx. 모든 20 tiles ensures cogheads will work efficiently. Cogheads slow down if they pass through water, and get an extra bonus if they work with (scrap) 금속.
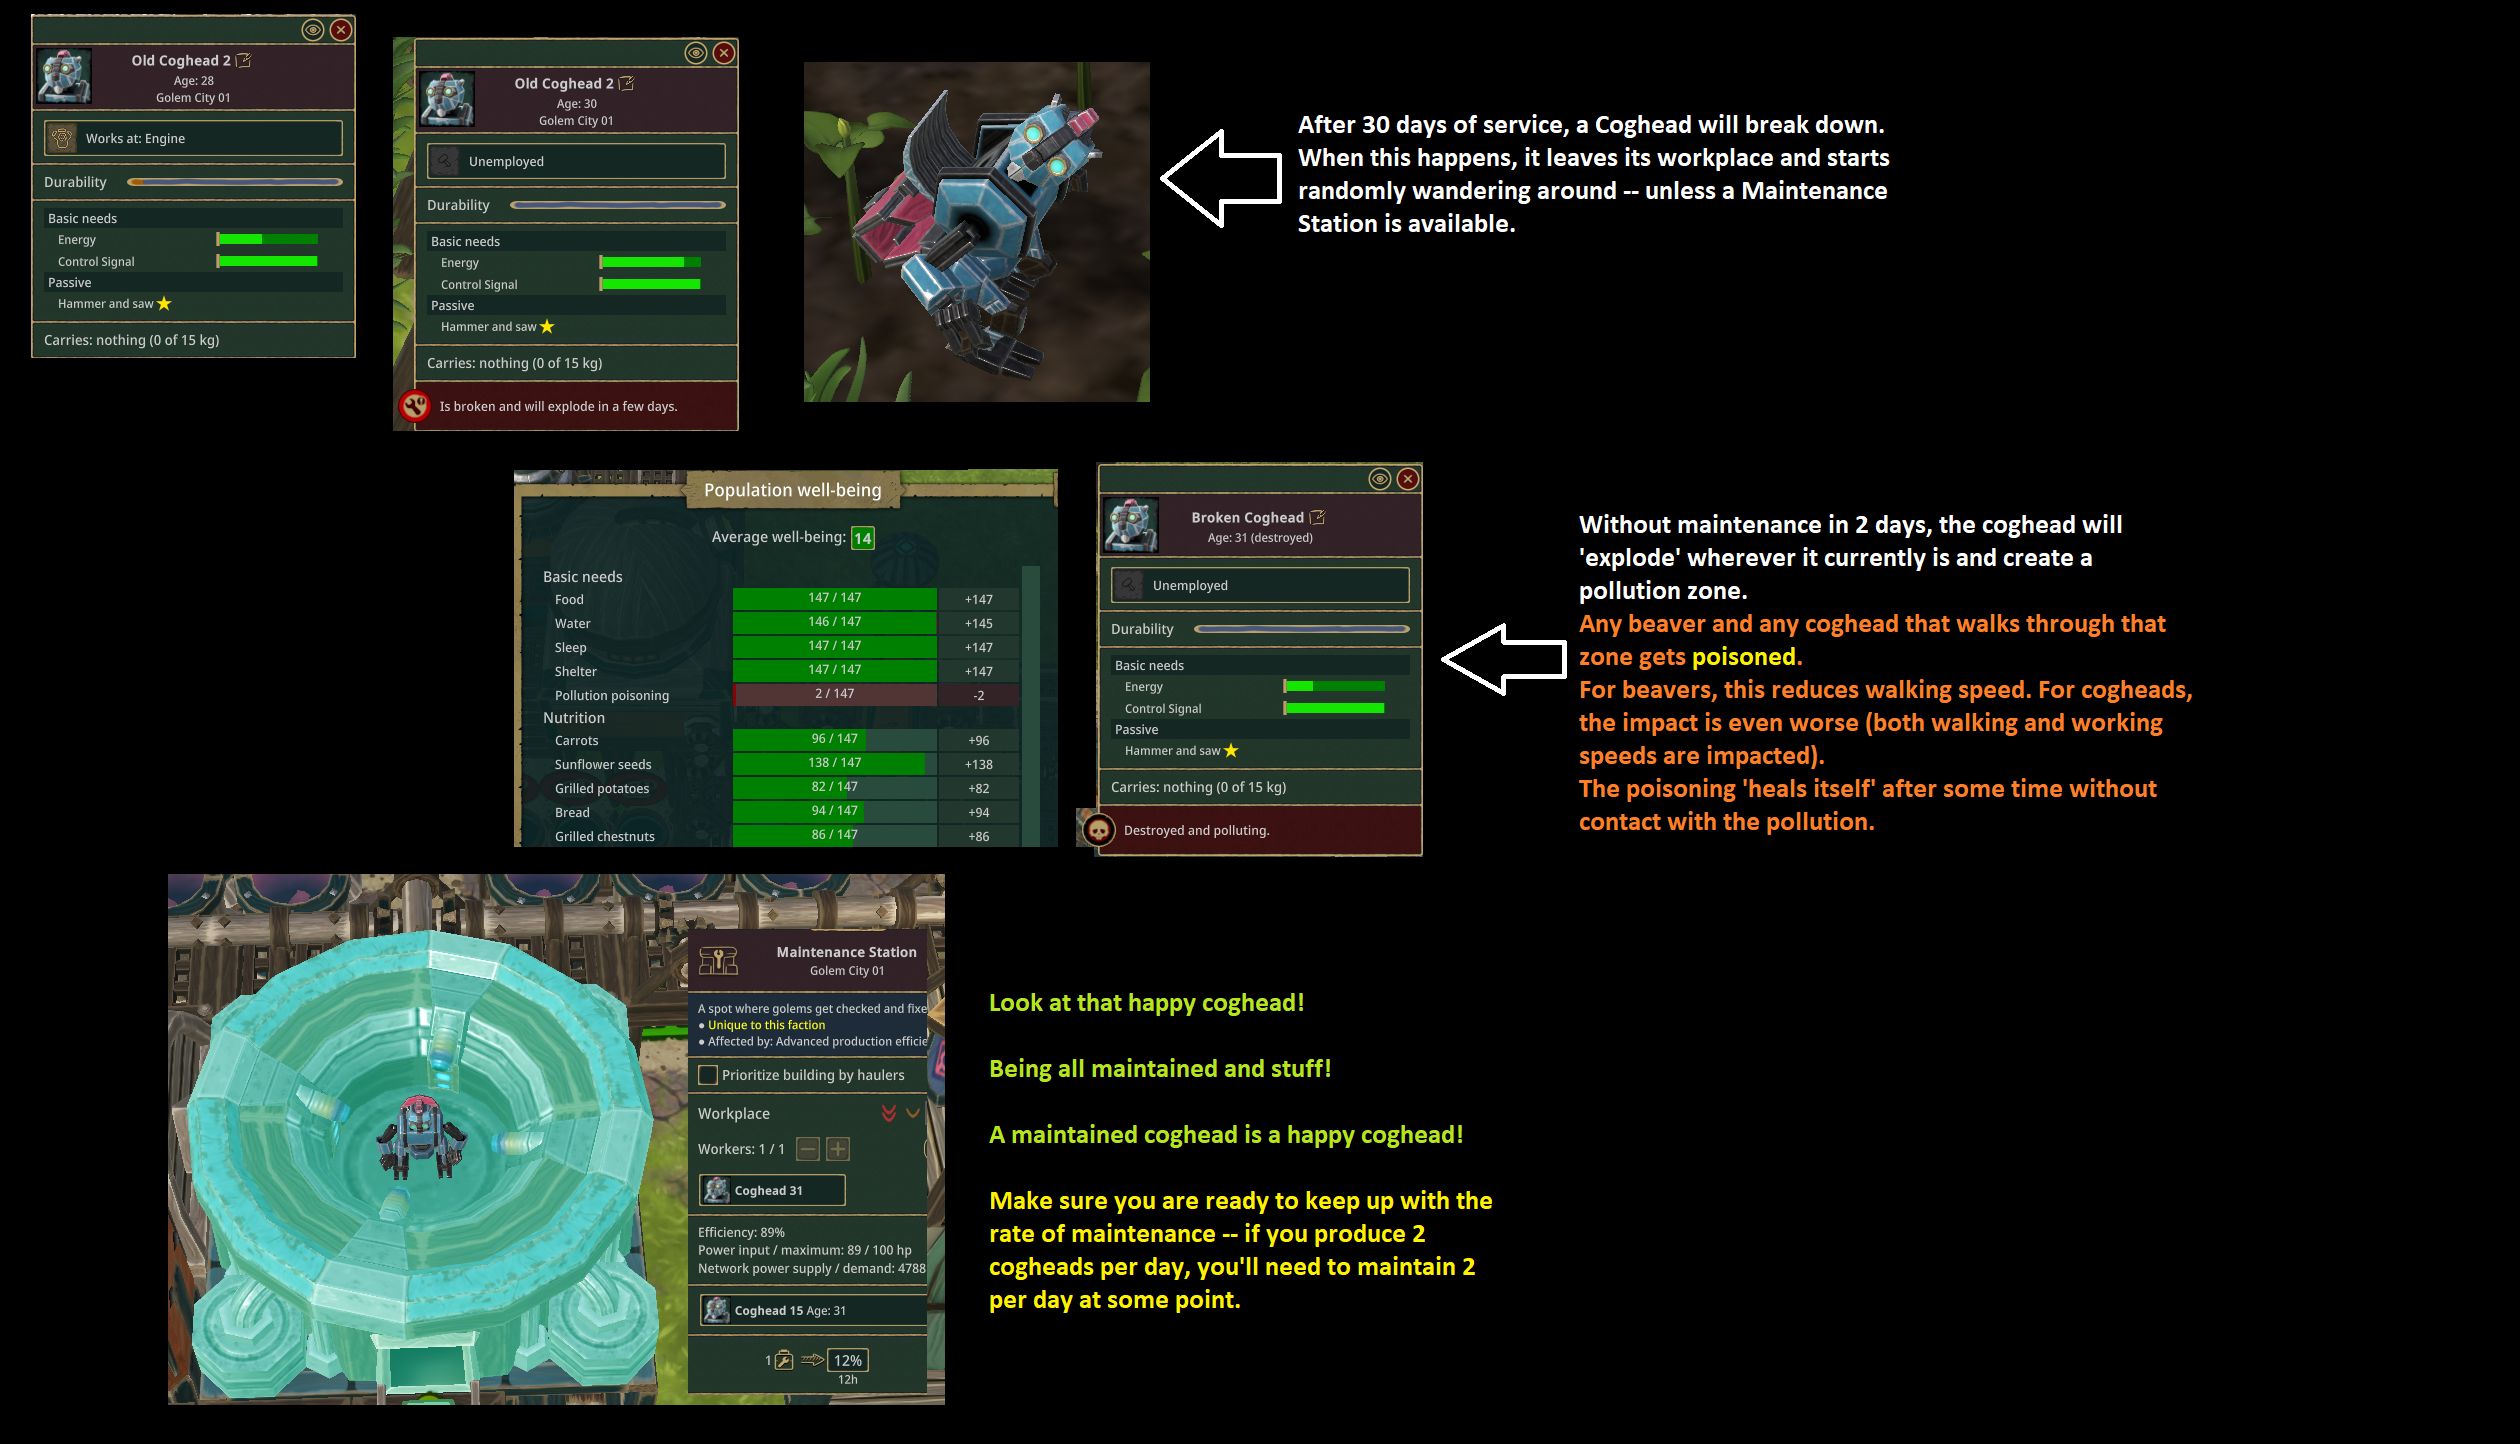
후에 30 날, Coghead starts breaking down and needs to be maintained, or it will blow up and cause pollution.
이것이 오늘 우리가 공유하는 모든 것입니다. Timberborn 가이드. 이 가이드는 원래 작성자가 작성하고 작성했습니다. Alcator. 이 가이드를 업데이트하지 못한 경우, 다음을 수행하여 최신 업데이트를 찾을 수 있습니다. 링크.