- 제목: Pixelarium
- 출시일:
- 개발자:
- 발행자:
Information about Pixelarium is still incomplete. 이것을 사용하여 게임의 세부 정보를 입력할 수 있도록 도와주세요. 문의 양식.
Pixelarium doesn’t have any built-in options to save an image to your computer without going through the Steam workshop, but that doesn’t mean it’s impossible! If you have crappy internet, a dislike for online image hosting, or a bizarre curiosity, you can follow this overcomplicated series of guesswork-based steps to keep your precious pixel art all to yourself.
설정 – File Locations
Pixelarium keeps its relevant files in a few different places on your hard drive. The two that we’re concerned about today are what I’ll call the main data and the local workshop.
The main data is in:
Steam/steamapps/common/Pixelarium
which is wherever you’ve installed Steam, probably Program Files or the like. 호출 된 폴더가 표시됩니다 “파일” and a very large JavaScript file called “main_data.js”. Both of these are important.

Here’s what you should see in that folder.
The local workshop is, as far as I’m aware, ~에:
[your username]/AppData/Local/Pixelarium/workshop/my
so if you can’t find a local Pixelarium folder on your machine there, I can’t exactly help navigate your own file system (죄송합니다!). There might not be anything here if you haven’t touched the Steam workshop yet, but once you do, there will be folders whose names are very large numbers. We’ll be keeping an eye on this “my” 접는 사람.
Saving Locally
첫 번째, copy this guide somewhere, because you’re about to lose contact with Steam for a bit.
Open Pixelarium and hit “CREATE”, then load the image of your choice. I’ve chosen this hastily-drawn smiley face.
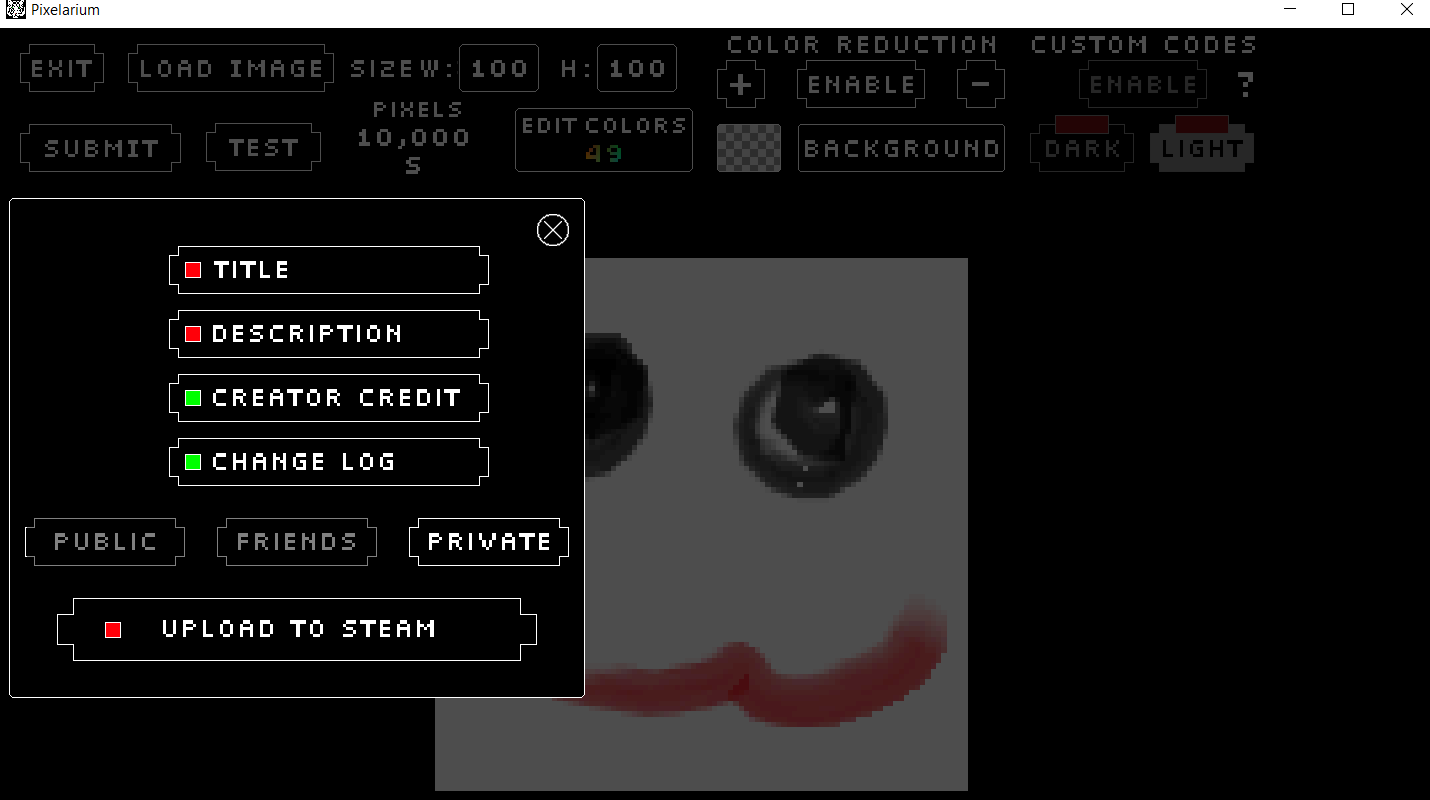
Before continuing, write down the image size (you only need the letter, 좋다 “에스” 여기). 그 다음에, fill in the four required fields however you’d like (it doesn’t really matter). Turn your internet off, 딸깍 하는 소리 “UPLOAD TO STEAM”, and wait until you see an “UPLOADING… FAILED” message on the screen. Then close Pixelarium.
Check your local workshop. Even though we haven’t submitted anything to Steam, the workshop image got saved anyway. There should be a new folder inside!

Open that new folder up. You’ll see three files, two of which are important.

Loading New Image into Pixelarium
기술적으로, we’re all done — the image data file is right there, on your computer alone, and nobody can take it from you. But if you open Pixelarium now, you won’t be able to play on your image, because the program doesn’t know where to look for it. So we’re going to pretend that this is actually one of the stock images that shipped with the game, and update everything to match this new reality. (Please note that this was the most stumbled-into-it part of this whole guide for me, so I can’t confidently say right now what everything does. I am a monkey pulling levers, and I learned what a couple of the levers do, but not many of them.)
이 시점에서, you can turn your internet back on; nothing else is going to happen.
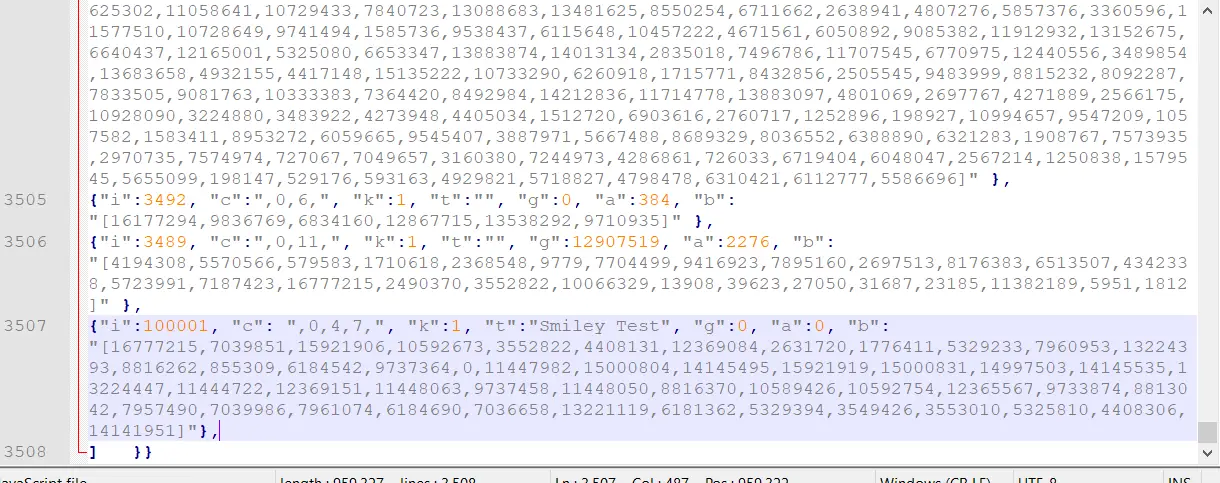
첫 번째, let’s go to your main data folder and open up that file main_data.js in a text editor of your choice. I use Notepad++, but Windows’ standard Notepad should be okay too, provided you have line wrap turned on.

잘, that looks pretty scary. But at least it also looks regular; every line has the same structure, because each describes one stock image in the game.
- “나”: 그만큼 ID number 이미지의. Each image has a unique ID, and our current image will need a new one (or we can use the giant number it started with – let’s come back to that).
- “기음”: 그만큼 categories under which the image appears. The fact that commas are on the beginning and end is pretty weird, but those numbers just correspond to the categories in the order they appear on the menu; 0 ~이다 “PICTURES”, 1 ~이다 “ANIME / MANGA”, 등. Images can have multiple categories, 물론.
- “k”: I’m like 95% sure this describes the 크기 이미지의, in letters. 0 means XXS, 1 means XS, and so on up to 5 for XL.
- “티”: 그만큼 제목 이미지의. 꽤 자기 설명. Seems like you can leave this as “”, the empty string, for no title.
- “g”: This is the color of the image background, expressed as a decimal. 가정해보자 “g”:12907519. If you google “12907519 to hexadecimal”, you get C4F3FF, which is an RGB code. 하지만, for reasons I do not understand, 그만큼 actual RGB color of the background in that case will be FFF3C4 (즉, the two-character blocks are placed in reverse order). Follow these instructions in reverse to turn an RGB code into the decimal number.
- “에이”: I don’t know this one. A bunch of images have this at 0, so we can probably leave it alone.
- “비”: This is a list of large numbers, but each of those is just the decimal version of an RGB code. Seems reasonable enough to say that this is the list of pixel colors.
So we’re going to add one line to main_data.js with the same format as all of these. How do we get the data? 잘, head over to your local workshop, into your new folder, and open that .ini configuration file!
Mine reads like this:
eyAiYiI6ICJbMTY3NzcyMTUsNzAzOTg1MSwxNTkyMTkwNiwxMDU5MjY3MywzNTUyODIyLDQ0MDgxMzEsMTIzNjkwODQsMjYzMTcyMCwxNzc2NDExLDUzMjkyMzMsNzk2MDk1MywxMzIyNDM5Myw4ODE2MjYyLDg1NTMwOSw2MTg0NTQyLDk3MzczNjQsMCwxMTQ0Nzk4MiwxNTAwMDgwNCwxNDE0NTQ5NSwxNTkyMTkxOSwxNTAwMDgzMSwxNDk5NzUwMywxNDE0NTUzNSwxMzIyNDQ0NywxMTQ0NDcyMiwxMjM2OTE1MSwxMTQ0ODA2Myw5NzM3NDU4LDExNDQ4MDUwLDg4MTYzNzAsMTA1ODk0MjYsMTA1OTI3NTQsMTIzNjU1NjcsOTczMzg3NCw4ODEzMDQyLDc5NTc0OTAsNzAzOTk4Niw3OTYxMDc0LDYxODQ2OTAsNzAzNjY1OCwxMzIyMTExOSw2MTgxMzYyLDUzMjkzOTQsMzU0OTQyNiwzNTUzMDEwLDUzMjU4MTAsNDQwODMwNiwxNDE0MTk1MV0iLCAiaCI6ICJWZXJzaW9uIDEuMCIsICJkIjogIkFuIGV4YW1wbGUgb2YgaG93IHlvdSBjYW4gc2F2ZSBpbWFnZXMgbG9jYWxseS4iLCAicCI6ICJUaGVfSnNhdXIiLCAidCI6ICJTbWlsZXkgVGVzdCIsICJ2IjogMy4wMDAwMDAsICJ4IjogMS4wMDAwMDAsICJnIjogMC4wMDAwMDAsICJpIjogIjY4NTY3ODk1NTczMjY1NzUxMjAiLCAiYyI6ICIsYSwiLCAibyI6IDAuMDAwMDAwLCAiYSI6IDAuMDAwMDAwLCAicyI6IDEzMjk2ODk4OS4wMDAwMDAgfQ==
This is base64. We can turn it into normal ASCII text with a converter like this online one, and we get:
{ "비": "[16777215,7039851,15921906,10592673,3552822,4408131,12369084,2631720,1776411,5329233,7960953,13224393,8816262,855309,6184542,9737364,0,11447982,15000804,14145495,15921919,15000831,14997503,14145535,13224447,11444722,12369151,11448063,9737458,11448050,8816370,10589426,10592754,12365567,9733874,8813042,7957490,7039986,7961074,6184690,7036658,13221119,6181362,5329394,3549426,3553010,5325810,4408306,14141951]", "시간": "버전 1.0", "디": "An example of how you can save images locally.", "피": "The_Jsaur", "티": "Smiley Test", "v": 3.000000, "엑스": 1.000000, "g": 0.000000, "나": "6856789557326575120", "기음": ",에이,", "영형": 0.000000, "에이": 0.000000, "에스": 132968989.000000 }
Aha! Not exactly the same format; there’s a few more letters, and the ordering is all wrong. Let’s make some tweaks real quick:
- 세트 “g”:0 그리고 “에이”:0, removing the decimals. I don’t suspect this is important, but you never know. You could set g to some appropriate number if you want a non-black background. 솔직히, if you configured this in your original custom-image setup, it’s probably already non-zero and you don’t need to worry about it.
- Remove the quotes around the “나” 숫자. You can also change this to some other unique value if you want; as an example, let’s set it to 100001.
- Cut out “v”, “엑스”, “시간”, “디”, 그리고 “에스”. I’m sure those were important, but oh well.
- Rearrange everything else to fit the format in main_data.js.
- Add a value “k” in the right spot, where the number corresponds to our original image’s size (S means 1)!
- Change the contents of “기음” to be the categories we want. Let’s say we want to put our smiley face in categories 0, 4, 그리고 7, which are probably not very appropriate, but oh well.
Our new line looks like:
{"나":100001, "기음": ",0,4,7,", "k":1, "티":"Smiley Test", "g":0, "에이":0, "비": "[16777215,7039851,15921906,10592673,3552822,4408131,12369084,2631720,1776411,5329233,7960953,13224393,8816262,855309,6184542,9737364,0,11447982,15000804,14145495,15921919,15000831,14997503,14145535,13224447,11444722,12369151,11448063,9737458,11448050,8816370,10589426,10592754,12365567,9733874,8813042,7957490,7039986,7961074,6184690,7036658,13221119,6181362,5329394,3549426,3553010,5325810,4408306,14141951]"}
(The formatting on this page doesn’t like this, but that’s all supposed to be one line; there’s no line breaks in there.)
Stick a comma on the end of that, and then copy-paste it right after the last big line in main_data.js, before the closing brackets.
거룩한.
마지막으로, we’ll have to change the .pkg file in our local workshop. Set its name to “f100001” (replacing that number with whatever you’ve put under “나”), then cut and paste it into the “파일” folder in the main data folder.
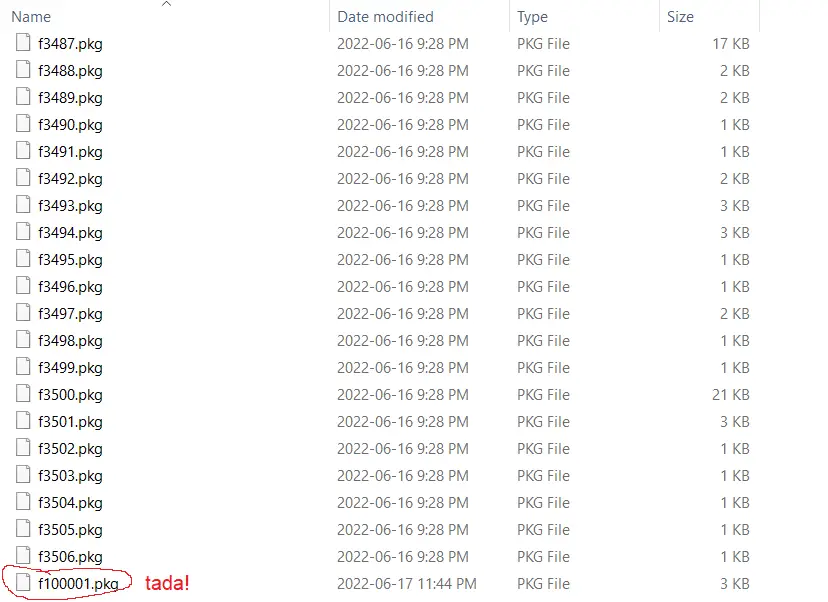
Here’s what that’ll end up looking like.
이 시점에서, once main_data.js has been updated and the new .pkg file is in that “파일” 접는 사람, that’s all we needed to do. 사실은, you can go and delete the stuff in your local workshop, if you really want. You don’t have to, 하지만, 알잖아, do whatever.
Open up Pixelarium, select one of the categories that your image is in, and scroll all the way to the very bottom…
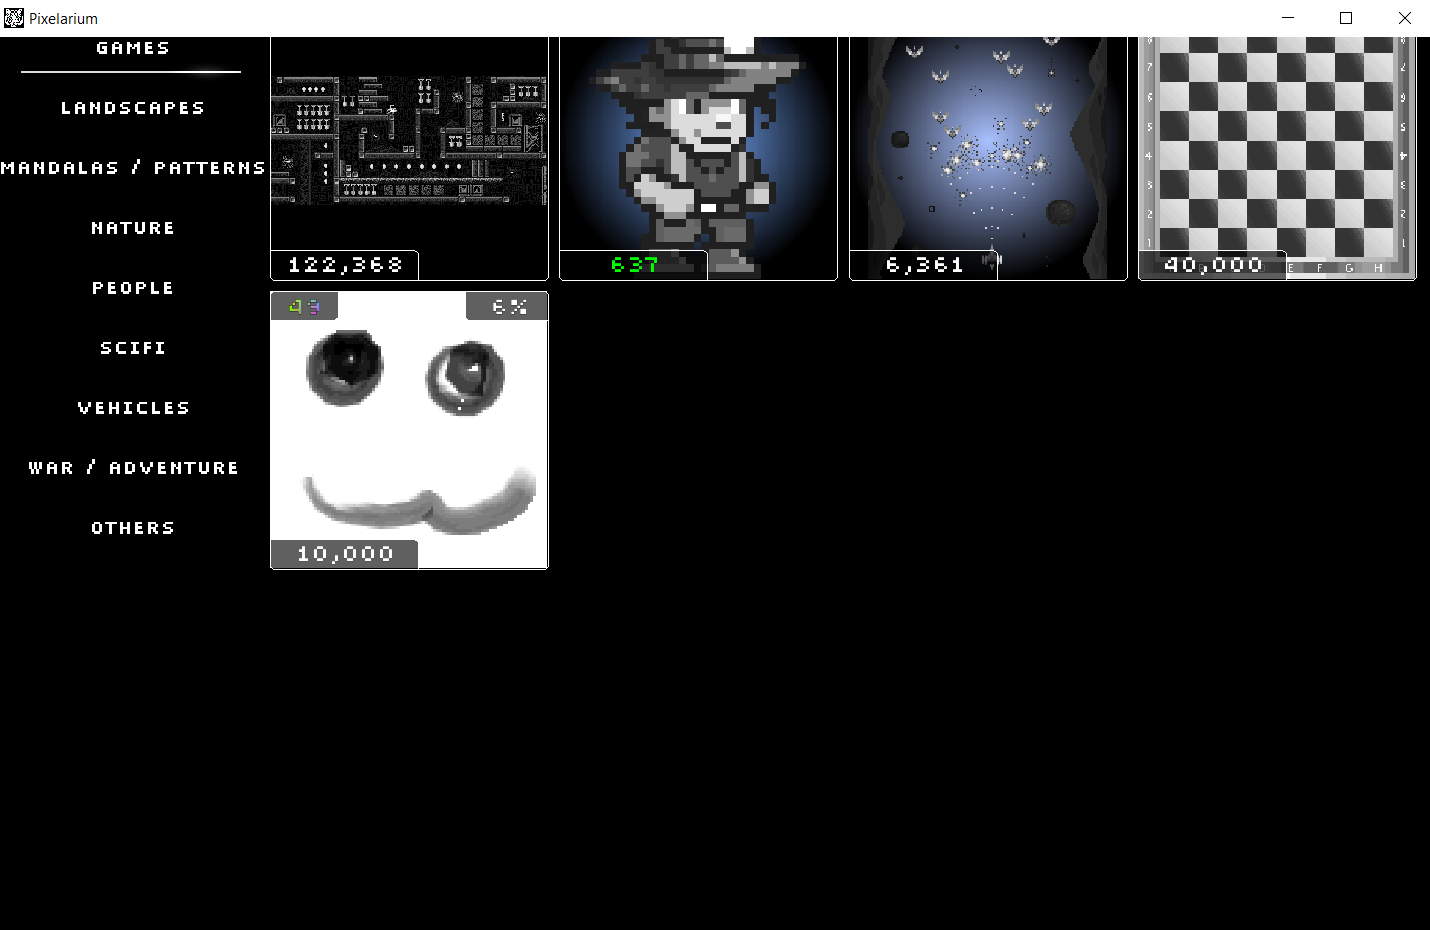
성공! You can hop right into that image and start playing just like normal.
That’s All I’ve Got
If you suffered through all of that, 축하해요! Thank you so much for reading my guide! I don’t even really know what you would do with this information, but consider it yours to keep and pass along!
질문이 있으시면, you can ask them below, but there is no guarantee I can handle anything on your own computer, which could work very differently from my own.
I will, ideally, continue investigating the variables in main_data.js and the .ini files for workshop items, but practically speaking, don’t expect dramatic progress on that soon.
이것이 오늘 우리가 공유하는 모든 것입니다. Pixelarium 가이드. 이 가이드는 원래 작성자가 작성하고 작성했습니다. The_Jsaur. 이 가이드를 업데이트하지 못한 경우, 다음을 수행하여 최신 업데이트를 찾을 수 있습니다. 링크.