- 제목: 던전 디펜더스: Awakened
- 출시일:
- 개발자:
- 발행자:
Information about Dungeon Defenders: Awakened is still incomplete. 이것을 사용하여 게임의 세부 정보를 입력할 수 있도록 도와주세요. 문의 양식.
This comprehensive guide aims to provide both veteran and new players with an efficient progression path, while also covering the various aspects of the game that have been added over the years. Whether you’re a seasoned player or just starting out, this guide will help you catch up and navigate the game successfully.
머리말
The primary objective of this guide is to guide you smoothly and efficiently through the game until you reach the endgame. It emphasizes the importance of key towers in effectively clearing maps. All the strategies and techniques described in this guide have been tested in solo gameplay. 하지만, I will also offer suggestions on how to address the scaling issue that arises when playing with additional players.
If you already have a good understanding of the game mechanics, feel free to skip to the sections on bag filters/loot filters and tower targeting. Once you’ve familiarized yourself with those aspects, you can jump right into the Medium Deeper Well Campaign.
Housekeeping Duties
Before we embark on our journey, there are a few essential tasks we need to take care of, including creating our heroes, setting up loot filters, configuring bag filters, and establishing tower targeting priorities.
Loot filters enable us to automatically collect items from the ground, saving us the trouble of manually looting each item.
Bag filters help us organize our inventory, making it easier to locate the gear we need.
Neglecting these tasks can lead to a lot of frustration as the game inundates us with a vast amount of loot, much of which may be obsolete or irrelevant to our current stage of progression. 마지막으로, tower targeting priorities allow us to customize which types of enemies our towers will prioritize. Certain towers perform better when specifically targeting particular enemy types.
By addressing these housekeeping duties, we can streamline our gameplay experience and enhance our efficiency as we progress through the game.
Loot filters
Loot filters are designed to automatically collect items from the ground based on specific criteria. If an item matches any of the filters you have set up, it will be automatically looted. 그렇지 않으면, it will be sold when the wave starts. To configure your loot filters, 다음 단계를 따르세요:
- Go to the options menu and select gameplay.
- 다음을 찾으세요. “Edit Loot Filters” option and click on it.
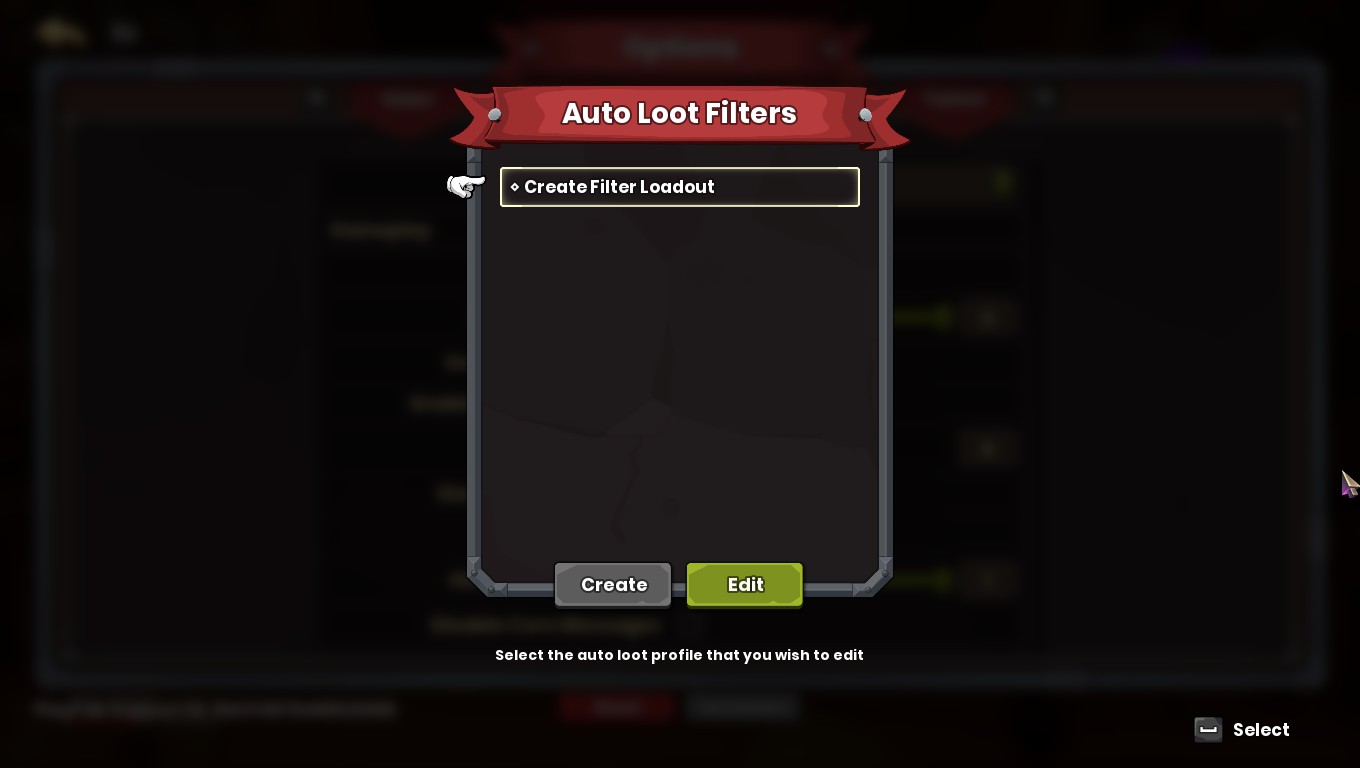
You will see a screen similar to the one depicted in the image. 다음을 클릭하세요. “만들다” button to set up your first filter, which we will name “Weapon.”
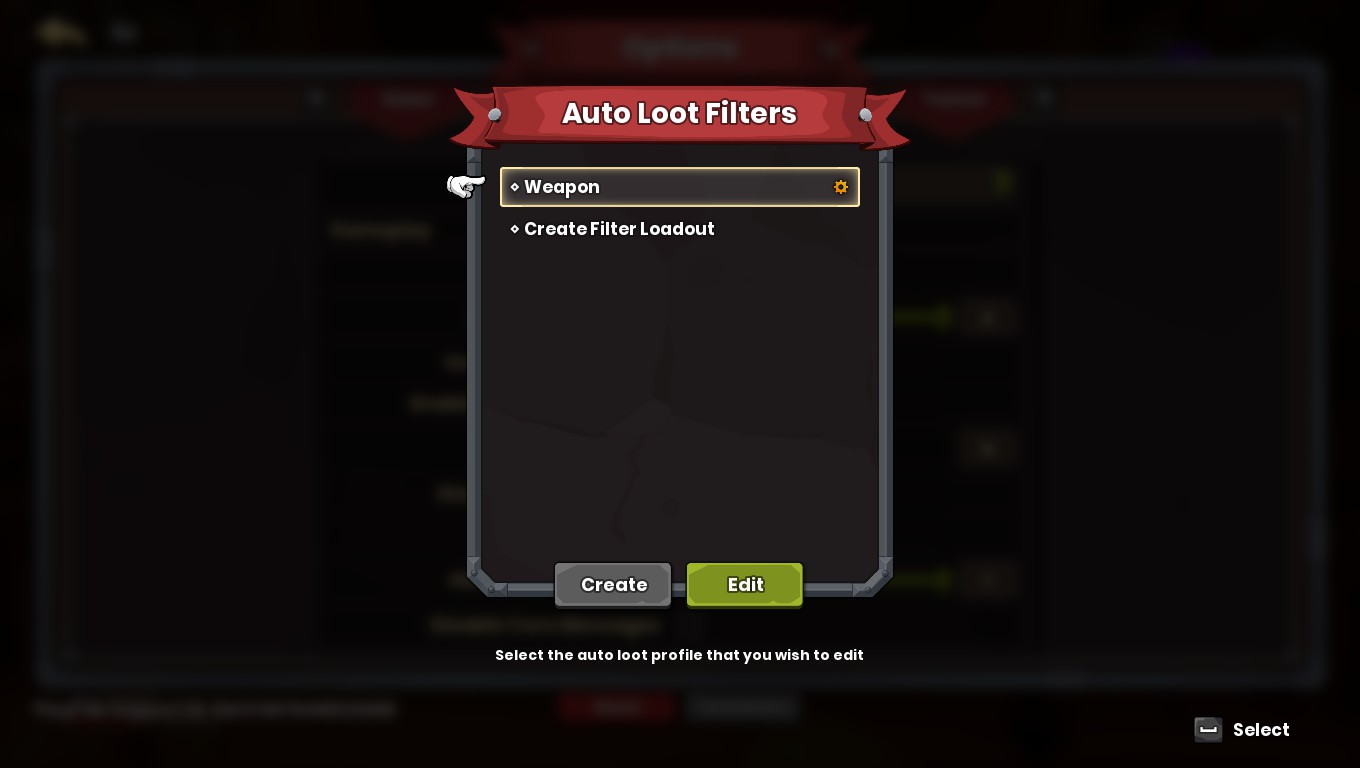
After creating the “무기” filter, you will be presented with a screen similar to the one shown in the image. 다음을 클릭하세요. “무기” filter, 그런 다음 “편집하다” option to customize its settings.
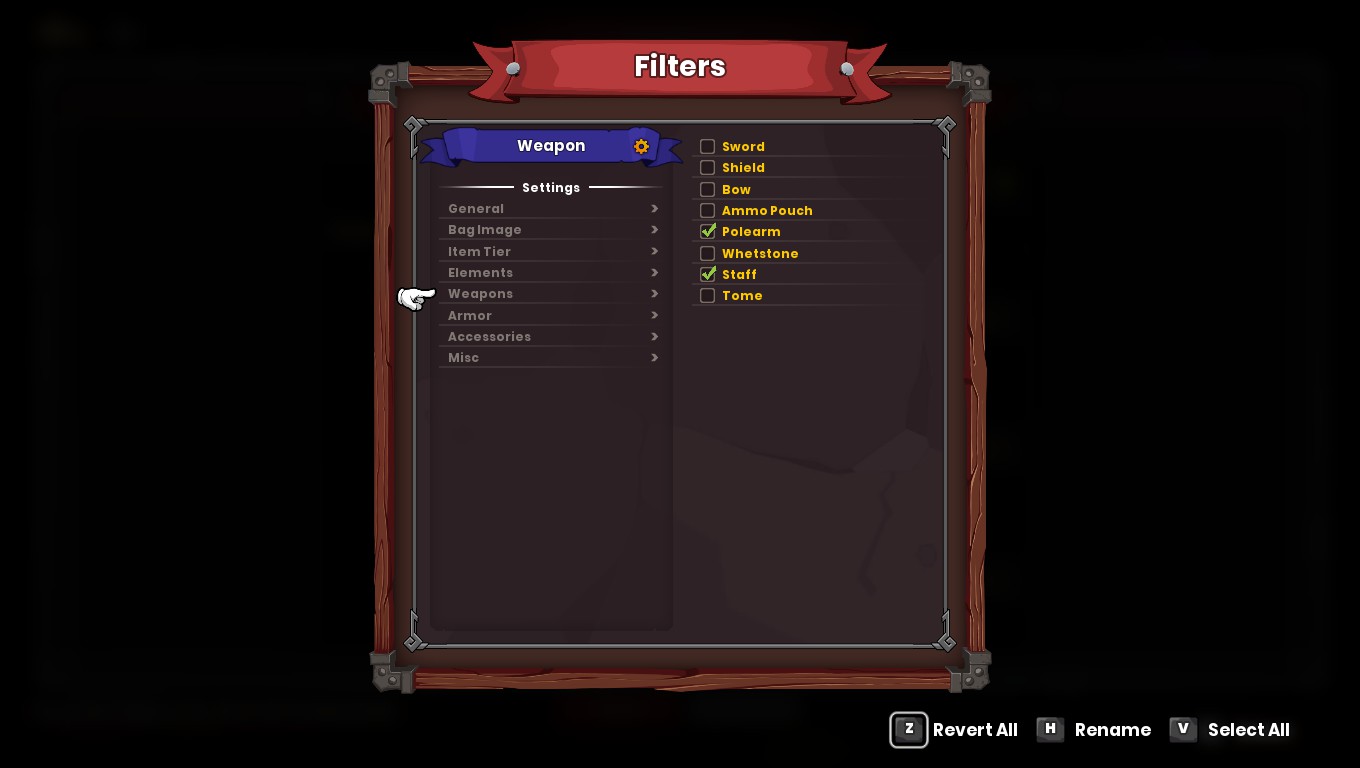
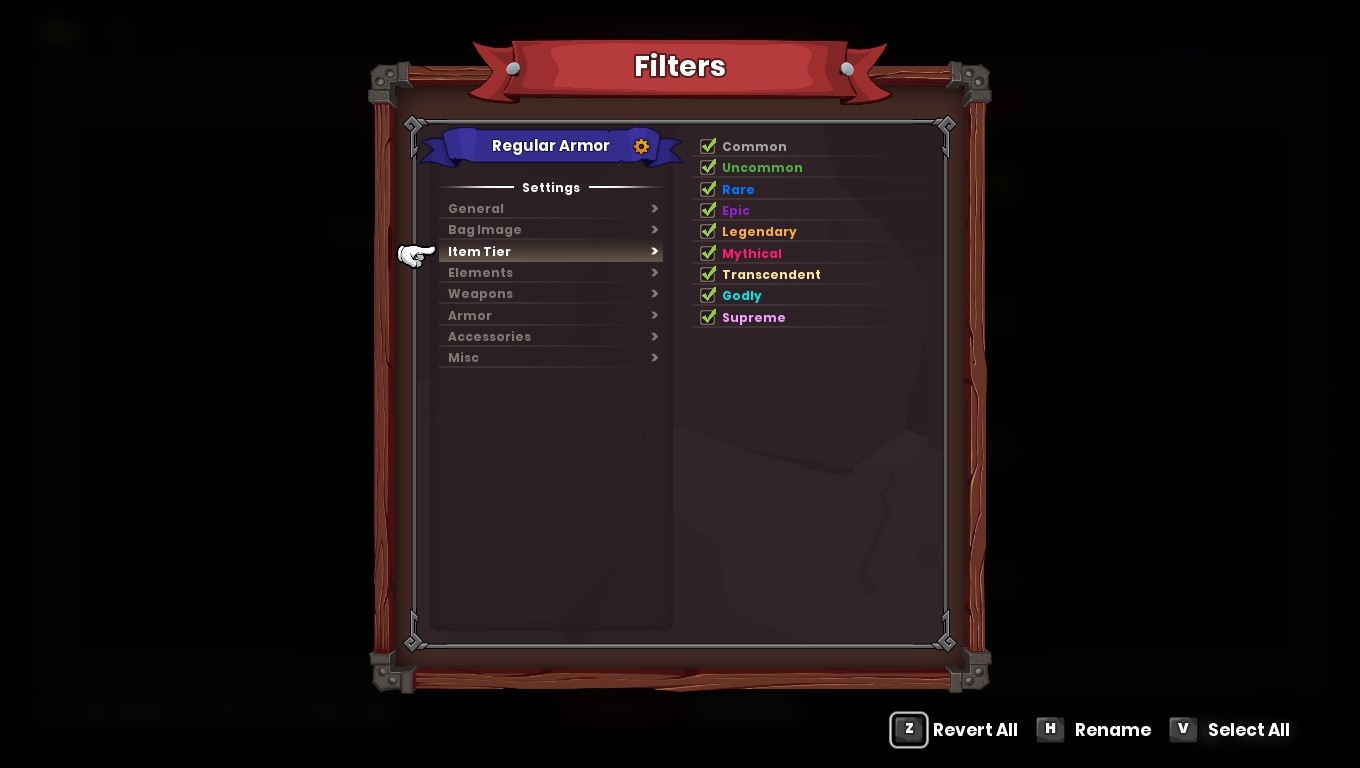
Once you access the “편집하다” option for the “무기” filter, you will notice that there are eight sections of settings listed on the left side: 일반적인, Bag Image, Item Tier, 그리고 더. For the early stages of progression, we will focus on the “Item Tier” 환경. 다음을 클릭하세요. “Item Tier” section to make adjustments.
에서 “Item Tier” 부분, you will have several checkboxes representing different item qualities. 지금은, select the checkbox for “희귀한” and higher. This means that any weapon of rare quality or higher will be automatically looted. If no checkboxes are selected, it implies that the filter will search for items that are not selected, encompassing all item qualities not specified.

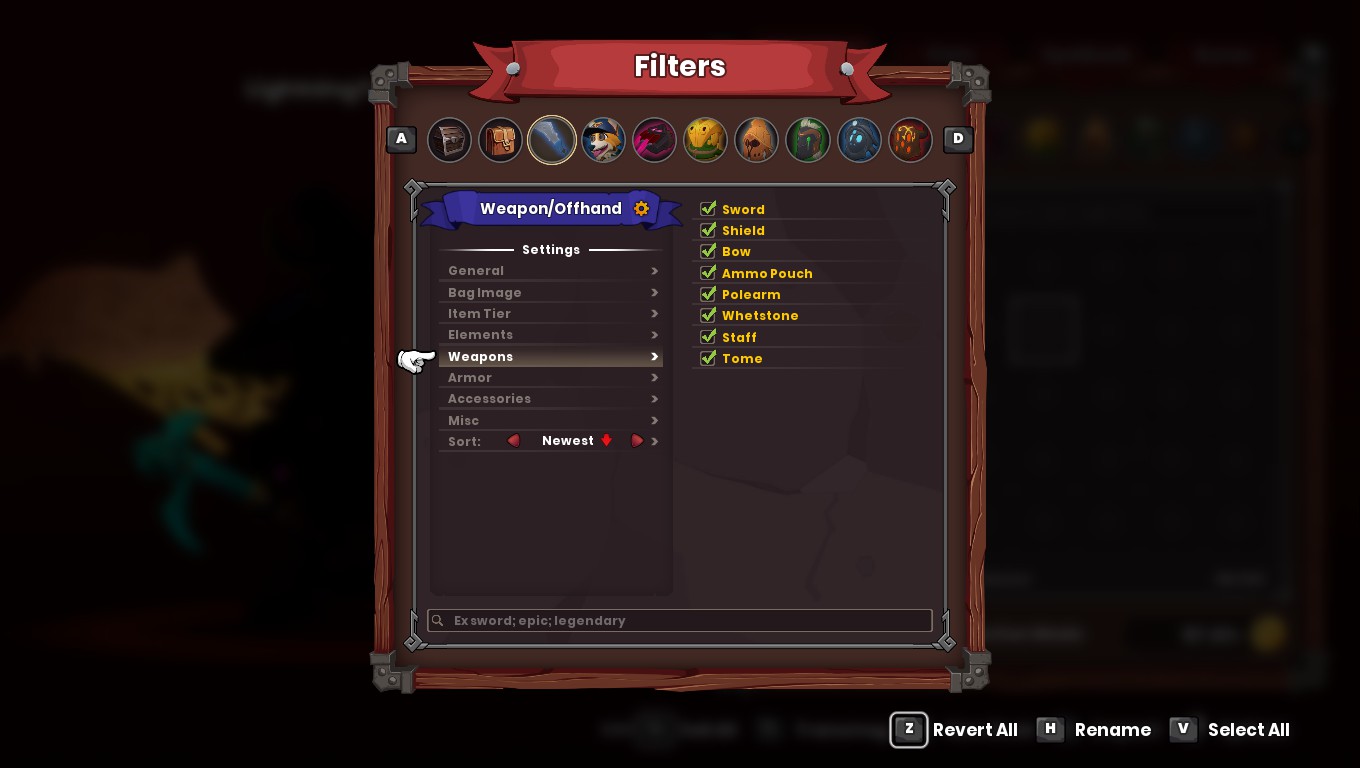
Moving on to the “무기” setting within the loot filter, we will make further adjustments. 구체적으로, we will select “폴린” 그리고 “Staff” as the weapon types to be filtered for now. Please note that this selection can be modified as we progress in the game. It’s important to remember that, 이런 맥락에서, the classifications are as follows: “검,” “절하다,” “폴린,” 그리고 “Staff” are categorized as weapons, ~하는 동안 “방패,” “Ammo Pouch,” “숫돌,” 그리고 “Tome” are classified as offhand items. That covers the configuration of the weapon filter. 다음을 누르세요. “탈출하다” key to return to the main filter screen.
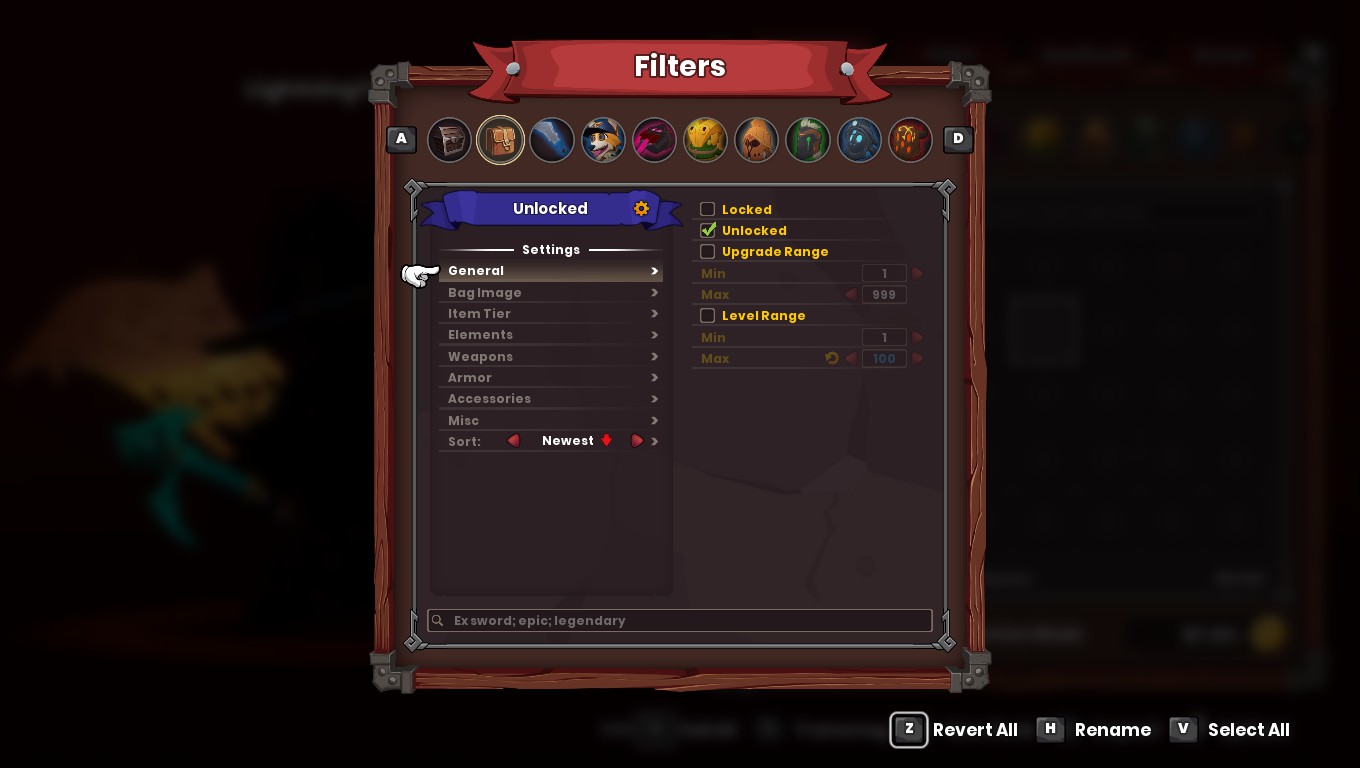
To delete or rename a filter in the loot filter settings, simply click on the gear icon located next to the respective filter, as illustrated in the provided screenshot. It’s important to note that after making changes to your filter settings, you must click on the “적용하다” button at the bottom of the options screen for the changes to be saved. This step is crucial, especially after creating and configuring all of your filters.

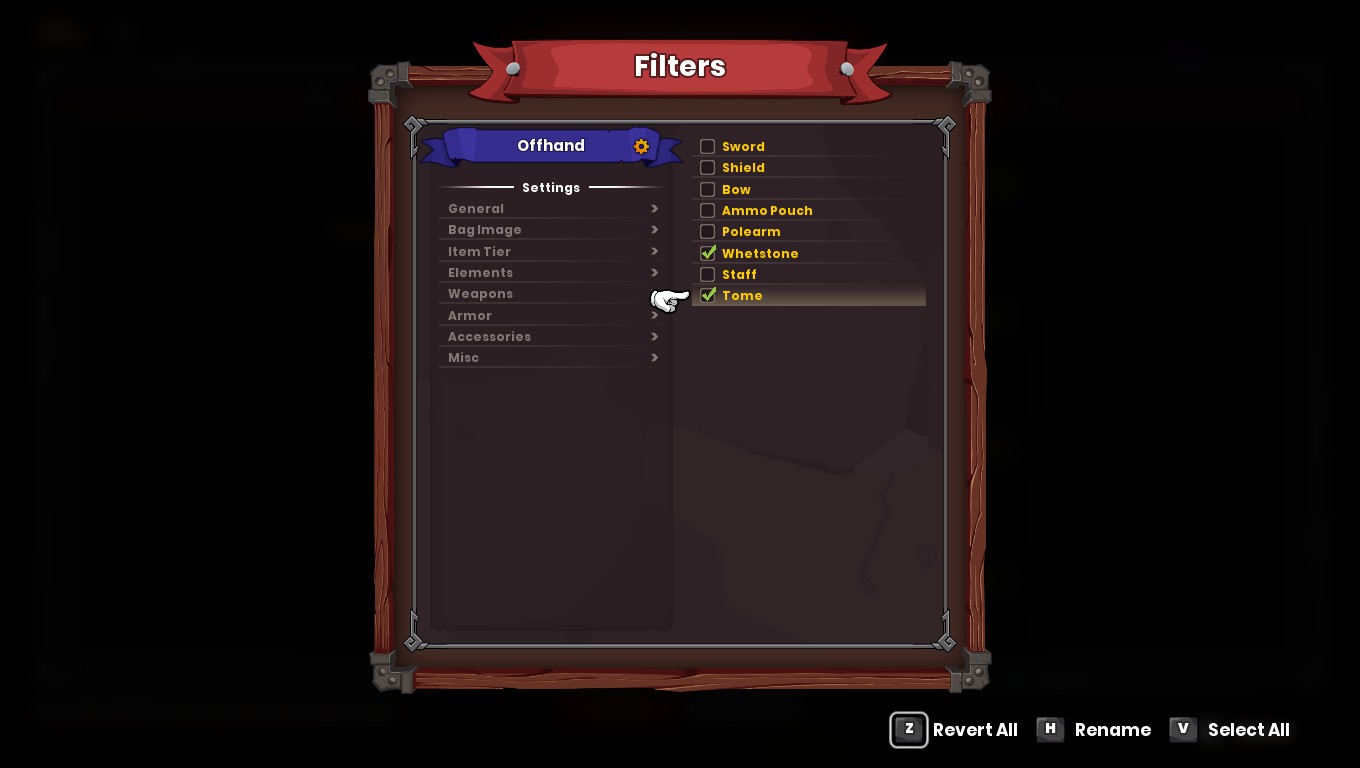
첫 번째, we’ll proceed to generate our secondary filter. 기후, navigate to the item tier section and choose rare or higher, just like we did with the weapon filter.

다음, access the weapon settings and opt for whetstones and tomes. 기억하다, these settings can be modified as needed during the process. And that completes the configuration of the offhand filter. 지금쯤이면, you should be familiar with the process, so I’ll provide a comprehensive list of all the filter settings at once, accompanied by attached screenshots.
- Filter Name: Fused Armor
- Item Tiers: Mythical and above
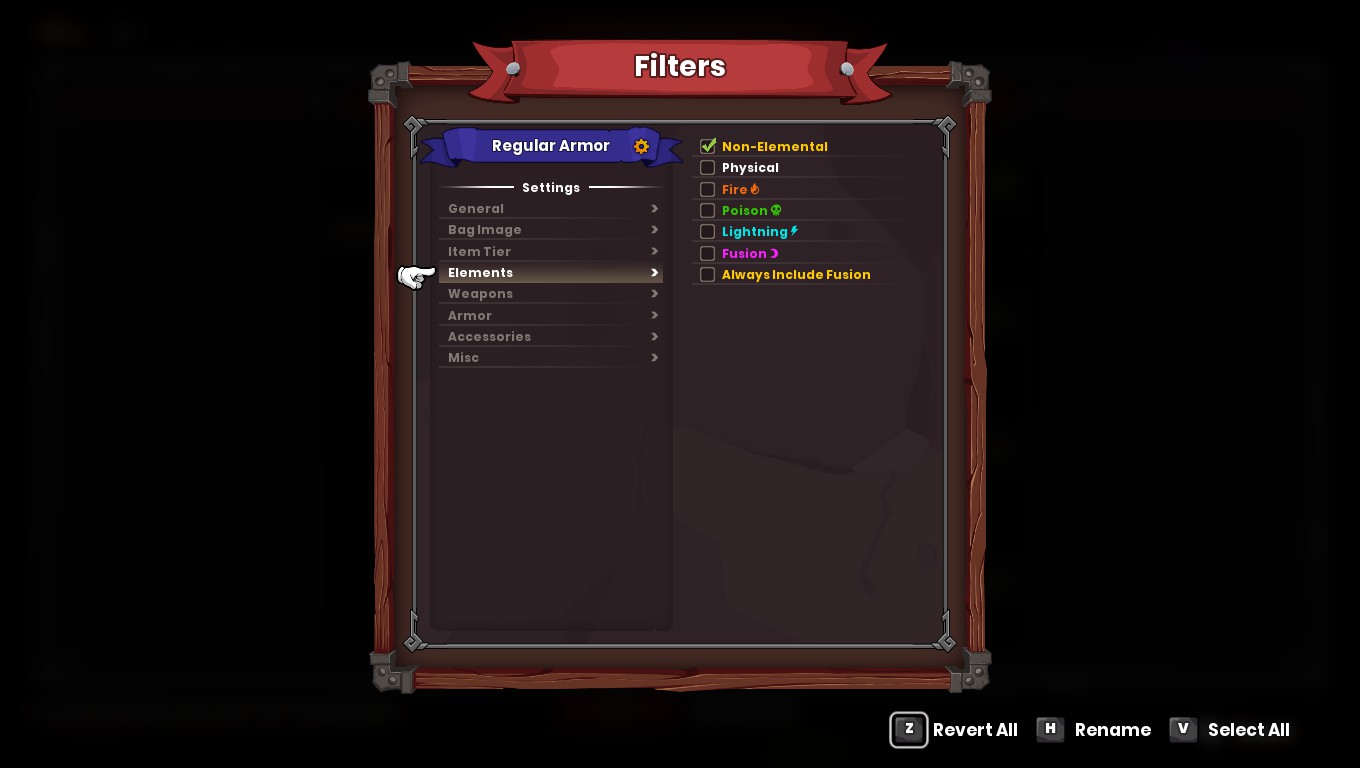
- Element Setting: Fusion
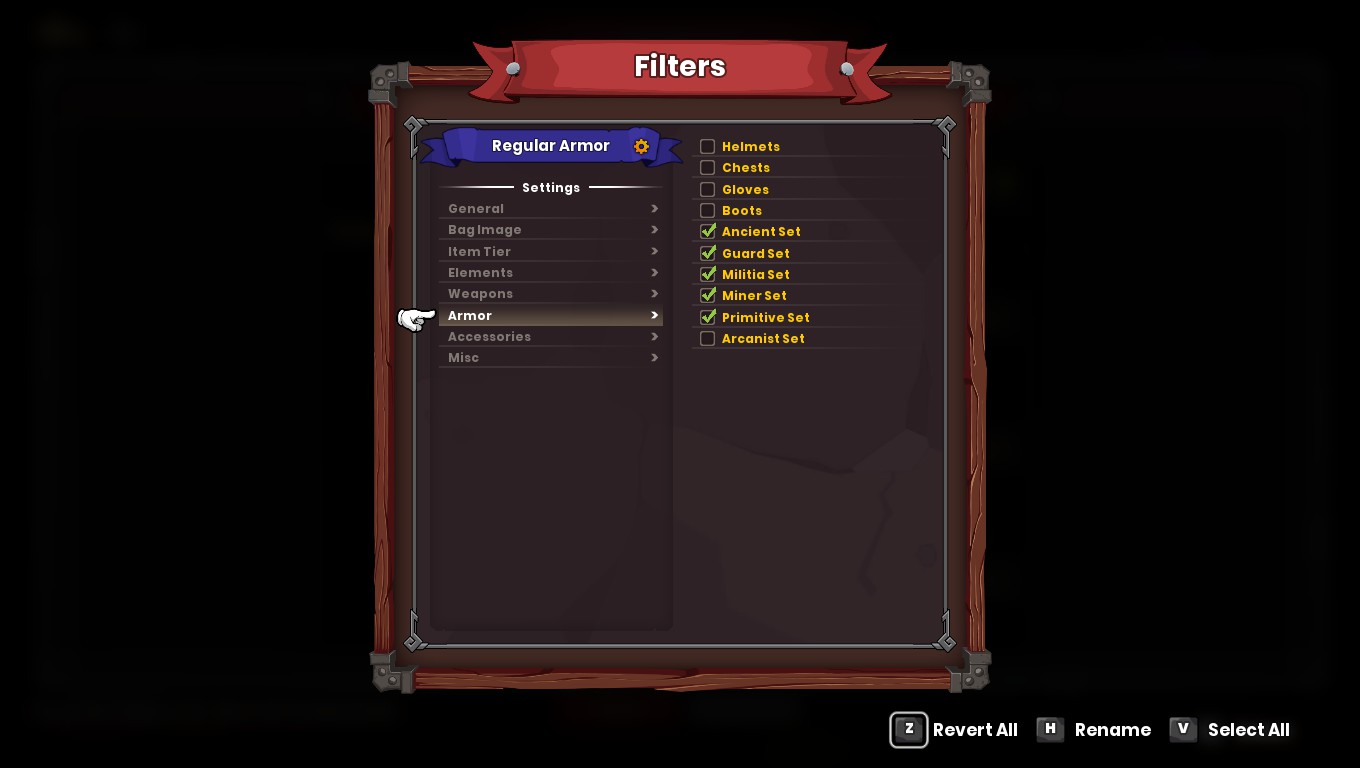
- Armor Setting: Ancient Set, Guard Set, Militia Set, Miner Set, Primitive Set, Arcanist Set


- Filter name: Regular Armor
- Item tiers: All tiers
- Element setting: Non-elemental
- Armor setting: Ancient Set, Guard Set, Militia Set, Miner Set, Primitive Set
- Filter name: 룬
- Item tiers: All tiers
- Misc setting: 룬


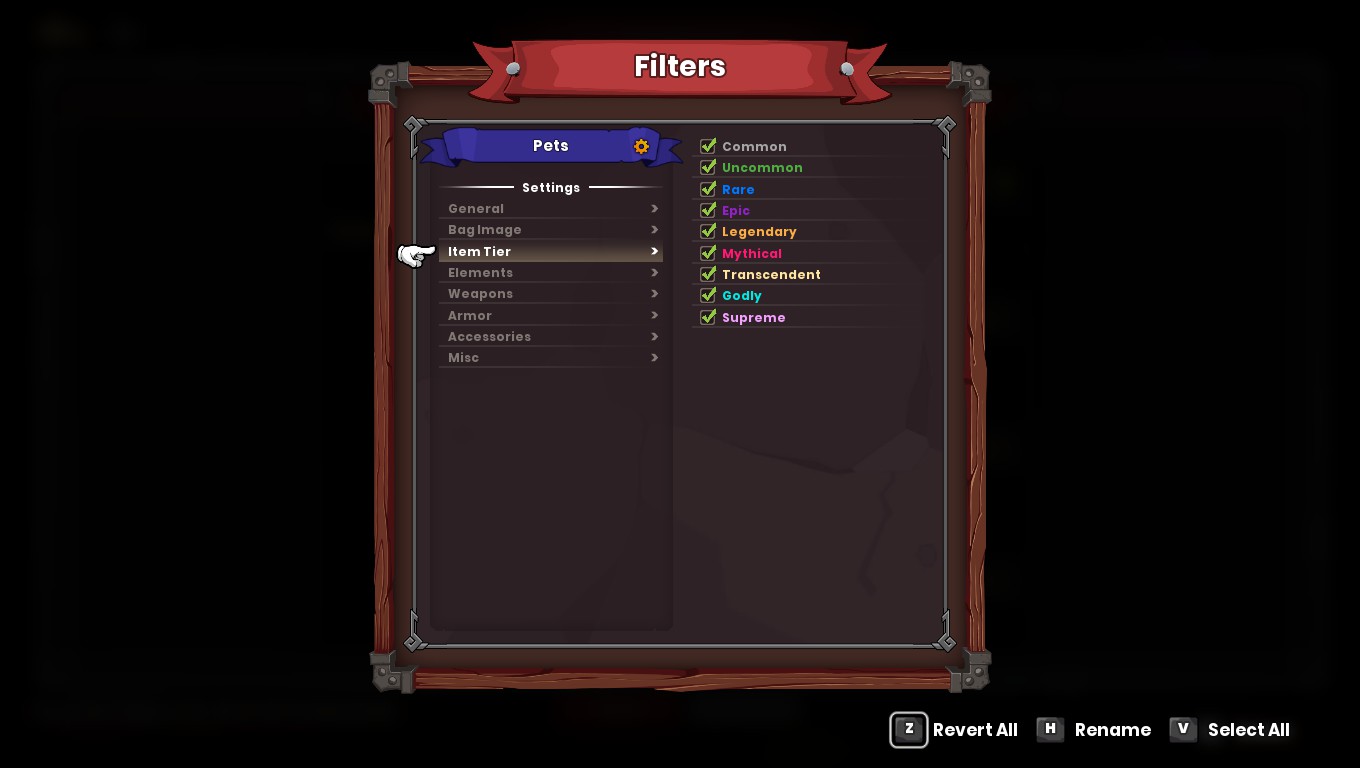
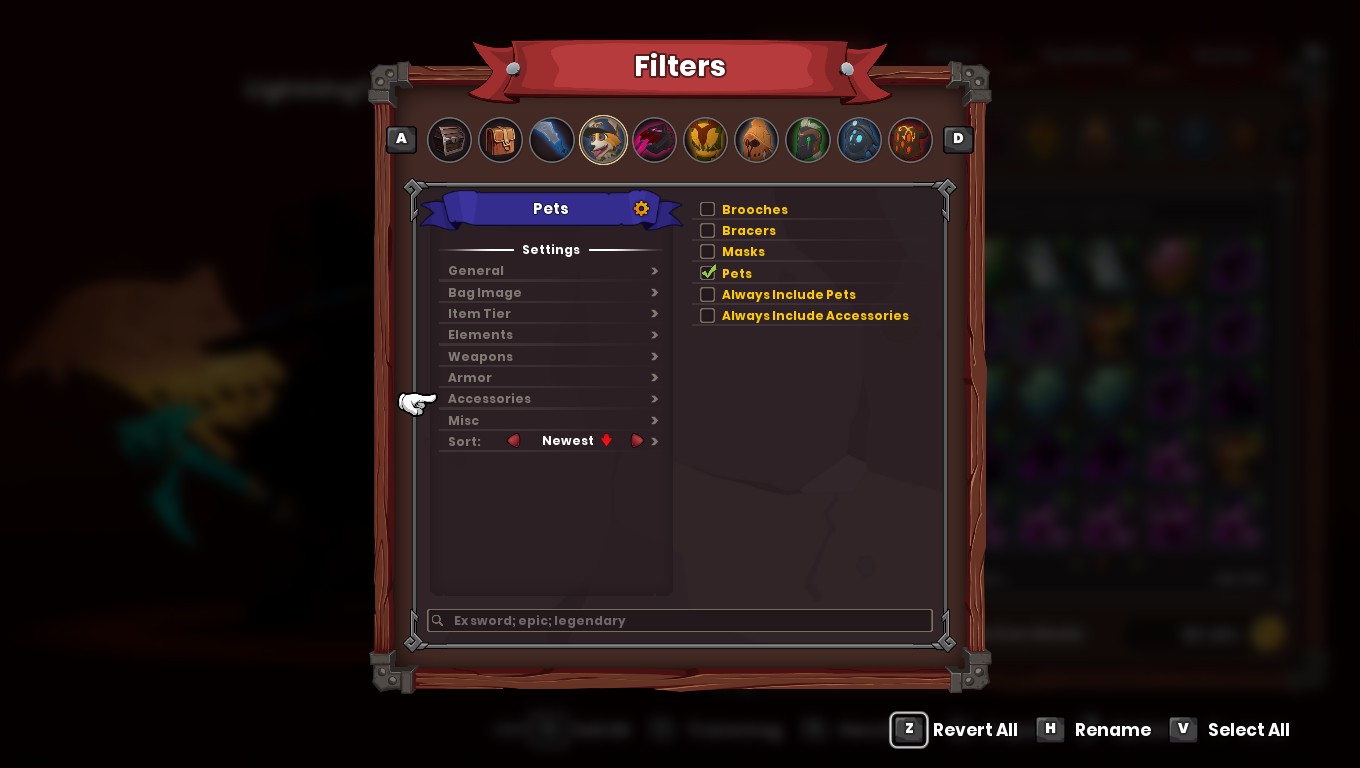
- Filter name: 애완동물
- Item tiers: All tiers
- Accessories setting: 애완동물

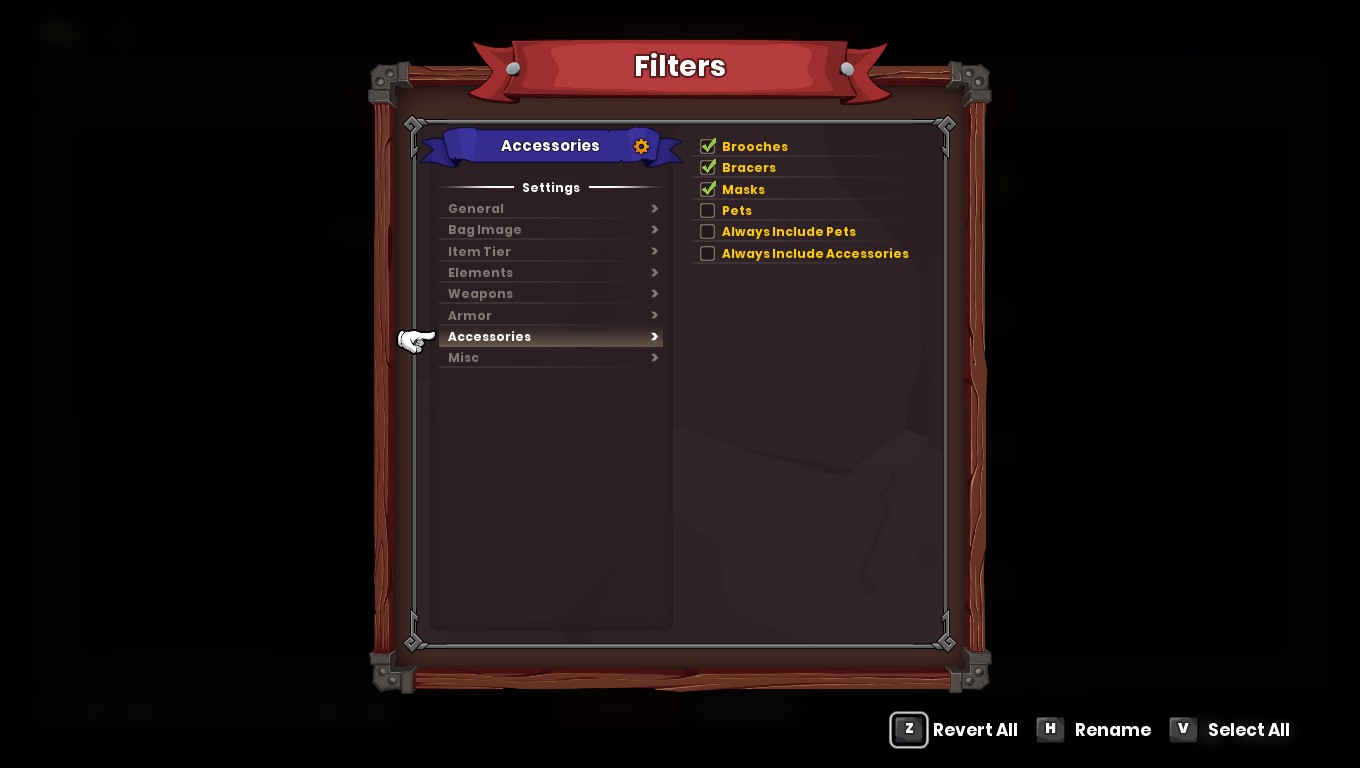
- Filter name: 부속품
- Item tiers: All tiers
- Accessories setting: 브로치, Bracers, Masks

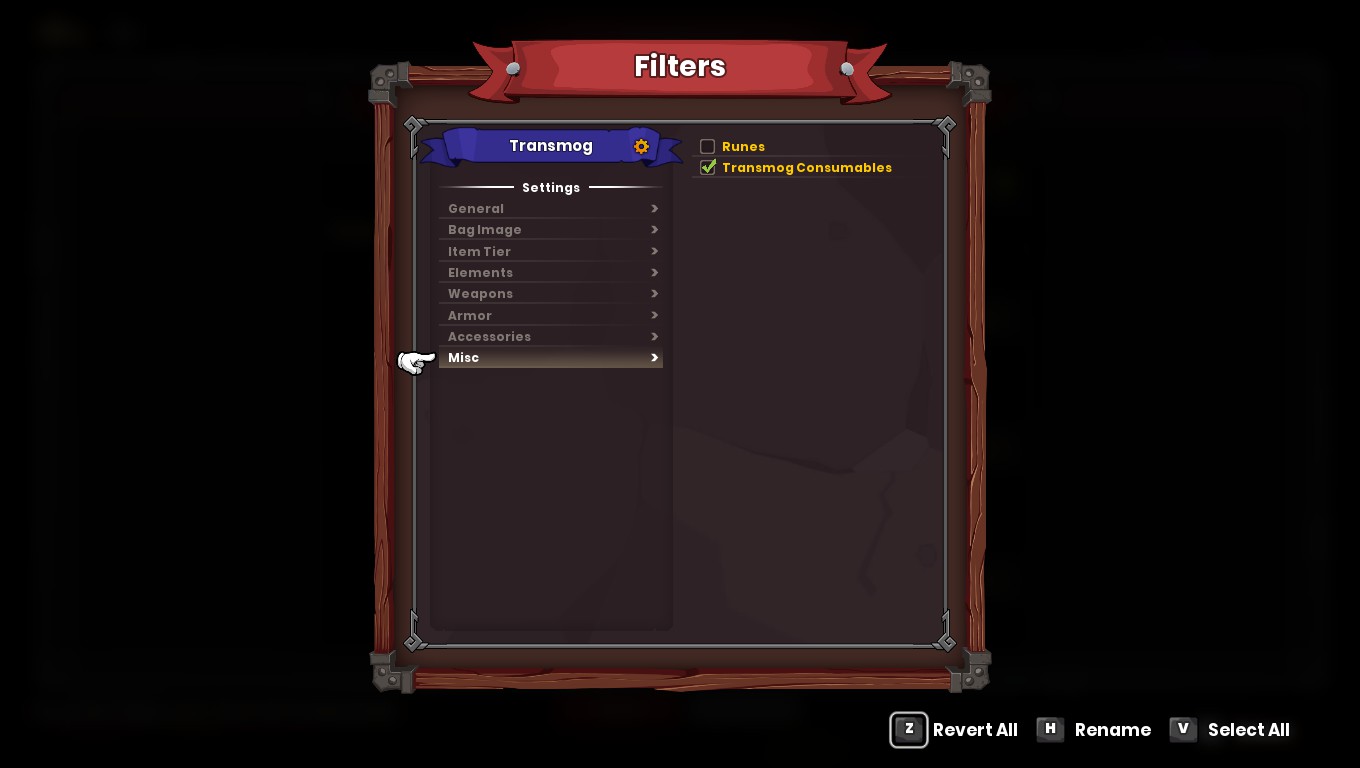
- Filter name: Transmog
- Item tiers: All tiers
- Misc setting: Transmog

Remember to click on the “적용하다” button before exiting the filter menu in order to save your modifications. 그렇지 않으면, you will need to redo the entire process from the beginning.
Bag Filters & Inventory Controls
Moving forward, let’s proceed with creating our bag filters. Access your inventory by pressing the “나” key if you’re using a PC, and then press “에프” to access the inventory filter. 지금, let’s begin by creating our initial bag filter. To rename the bag, simply click on the gear icon located at the same position as the mouse icon, as indicated in the provided screenshot.
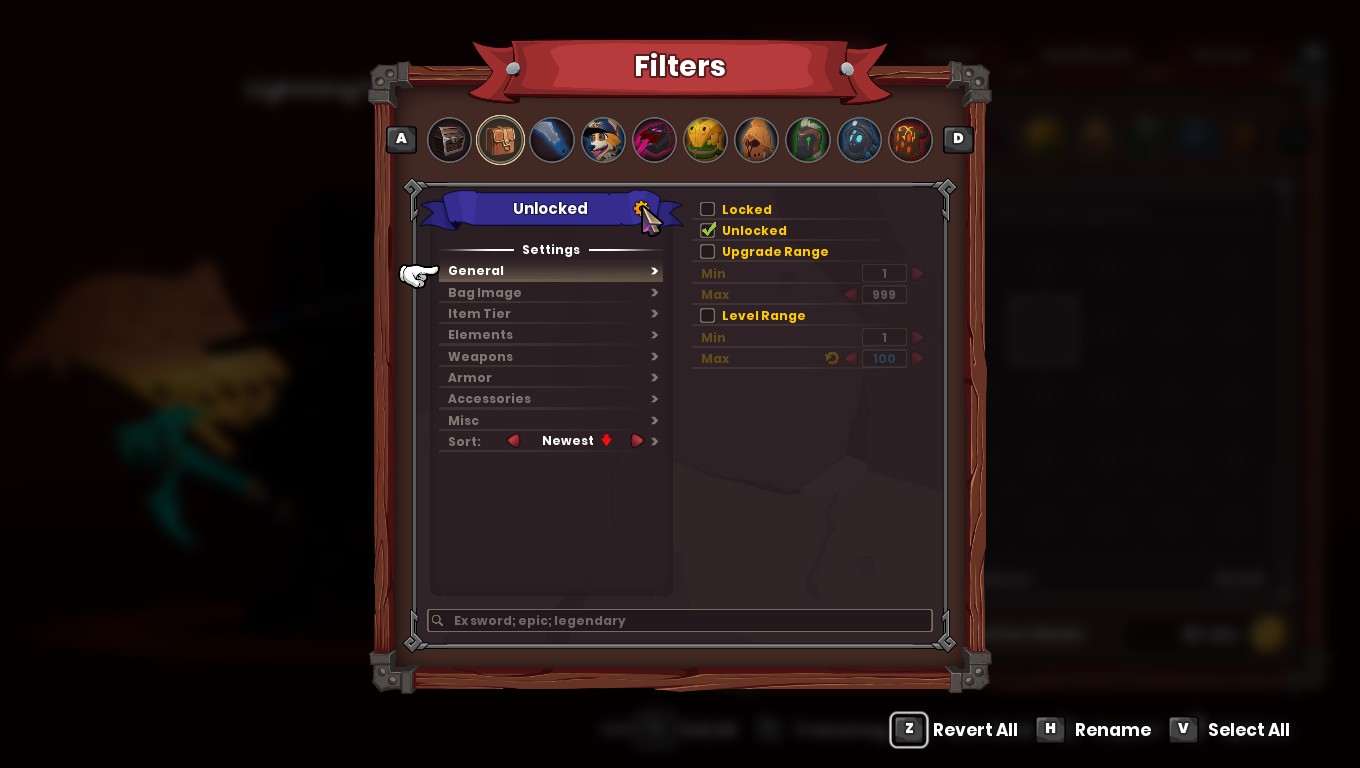
For the first bag on the left, it is advisable to leave it as is, displaying all items by default. As for the second bag from the left, let’s name it “Unlocked.” To aid in remembering the purpose of each bag filter, I suggest setting up bag images. You can utilize the ones shown in the screenshot I provided, 원하는 경우. Arrange all your bag filters in the following order from left to right, as the order is significant due to a known bug that impacts the filters unless configured in this manner.
- Bag name: 잠금 해제됨
- General setting: 잠금 해제됨
- Bag name: Weapon/Offhand
- Weapon setting: 모든 것
- Bag name: 애완동물
- Accessories setting: 애완동물
- Bag name: 부속품
- Accessories setting: 브로치, Bracers, Masks

- Bag name: Ancient
- Armor setting: Ancient set

- Bag name: 경비원
- Armor setting: Guard set

- Bag name: Militia
- Armor setting: Militia set

- Bag name: Miner
- Armor setting: Miner set

- Bag name: Primitive
- Armor setting: Primitive set

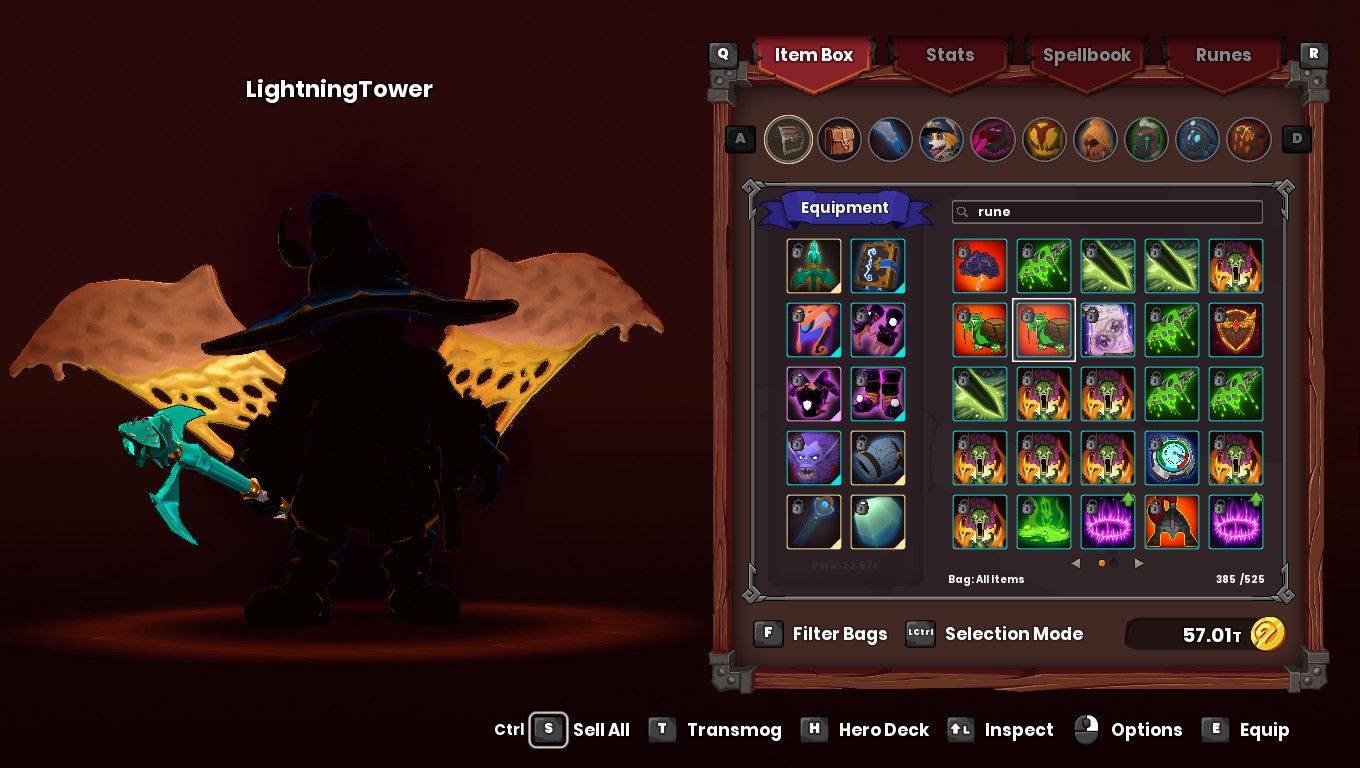
That covers all of the bag filters. To locate Runes, Transmogs, and Arcanist helmets, you can manually type in the keywords “룬 문자” 또는 “transmog” in the search bar of the all-item bag situated on the far left. This will filter and display the items accordingly. You can refer to the provided screenshot to see this functionality in action.
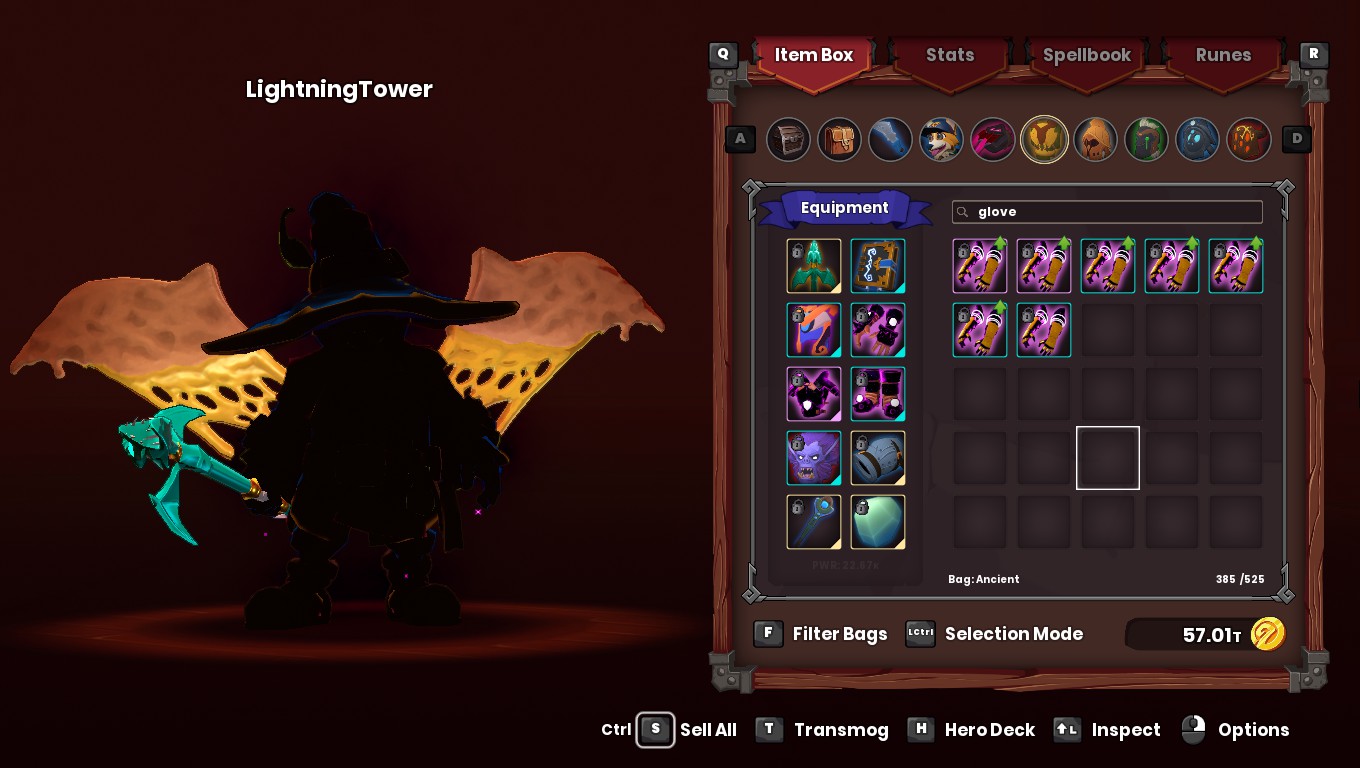
You can apply the same method to your other bags as well. As shown in the screenshot, 예를 들어, in your Ancient bag, you can use the search bar to type in “glove” and it will display only the gloves from that specific set. This allows you to swiftly and effortlessly search and compare potential upgrades for your character. 추가적으로, you can filter items by set bonus type, which will be further explained in the upcoming section.
당신이 “잠그다” an item in your inventory, it ensures that it cannot be accidentally sold. Any items you acquire from looting will initially appear in your inventory as unlocked. This is why we have the unlocked bag, which allows you to conveniently view all the loot you have gathered. While you can search through your other bags to find specific items, the unlocked bag provides a single location to see all the new items you have recently obtained.
Here are some helpful tips and tricks for navigating your inventory. By pressing “left control” (or whichever key you have assigned for selection mode, as indicated next to your currency at the bottom), you can highlight multiple items simultaneously. This enables you to lock, 팔다, or add multiple items to a trade all at once. 추가적으로, while selection mode is active, you can manually select multiple items by left-clicking on each item individually.
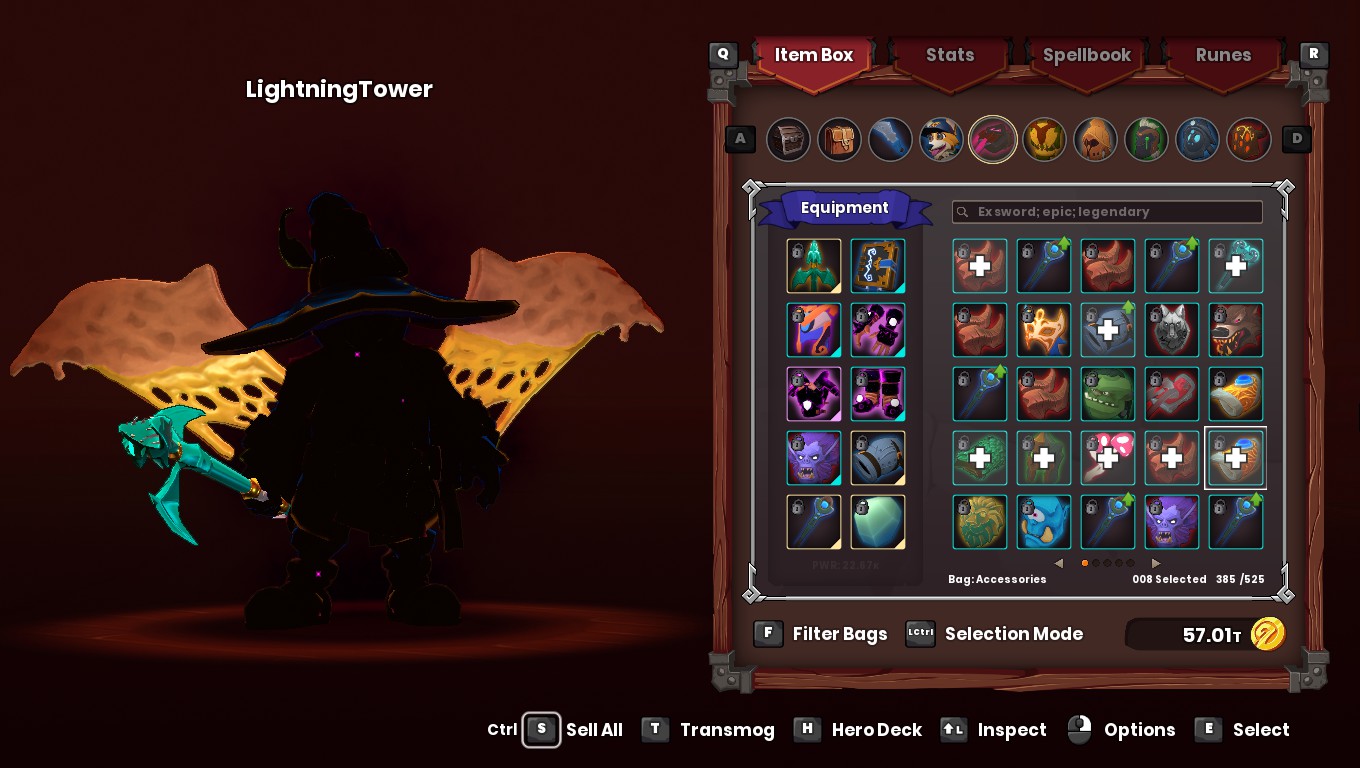
Another useful feature is the ability to activate selection mode (by pressing the left control key on PC). Once in selection mode, you can right-click on any item and select “Select All.” This allows you to quickly choose all items in your inventory. 거기에서, you have the option to sell everything, unlock everything, or lock everything, depending on your preferences and needs.

대안으로, you have the option to hold the control key and press “에스” to sell everything at once. It’s important to note that the commands “select all,” “lock all,” “unlock all,” 그리고 “sell all” will only apply to the items displayed in the currently active bag filter.
If you prefer to sell or lock items individually and quickly, you can hold the “에스” key and left-click on an item to swiftly sell it. 비슷하게, holding the “엘” key and left-clicking on an item will promptly lock it. 추가적으로, you can double-left-click on an item to equip it without the need to drag it to the appropriate slot.
Set Bonuses
Armor pieces offer different set bonuses. As depicted in the provided screenshot, there is a Miner piece with the set bonus called “Miner’s Moxie.” If all four armor pieces share the Miner’s Moxie set bonus, the character will receive a significant 40% increase in stats for each of the equipped pieces.
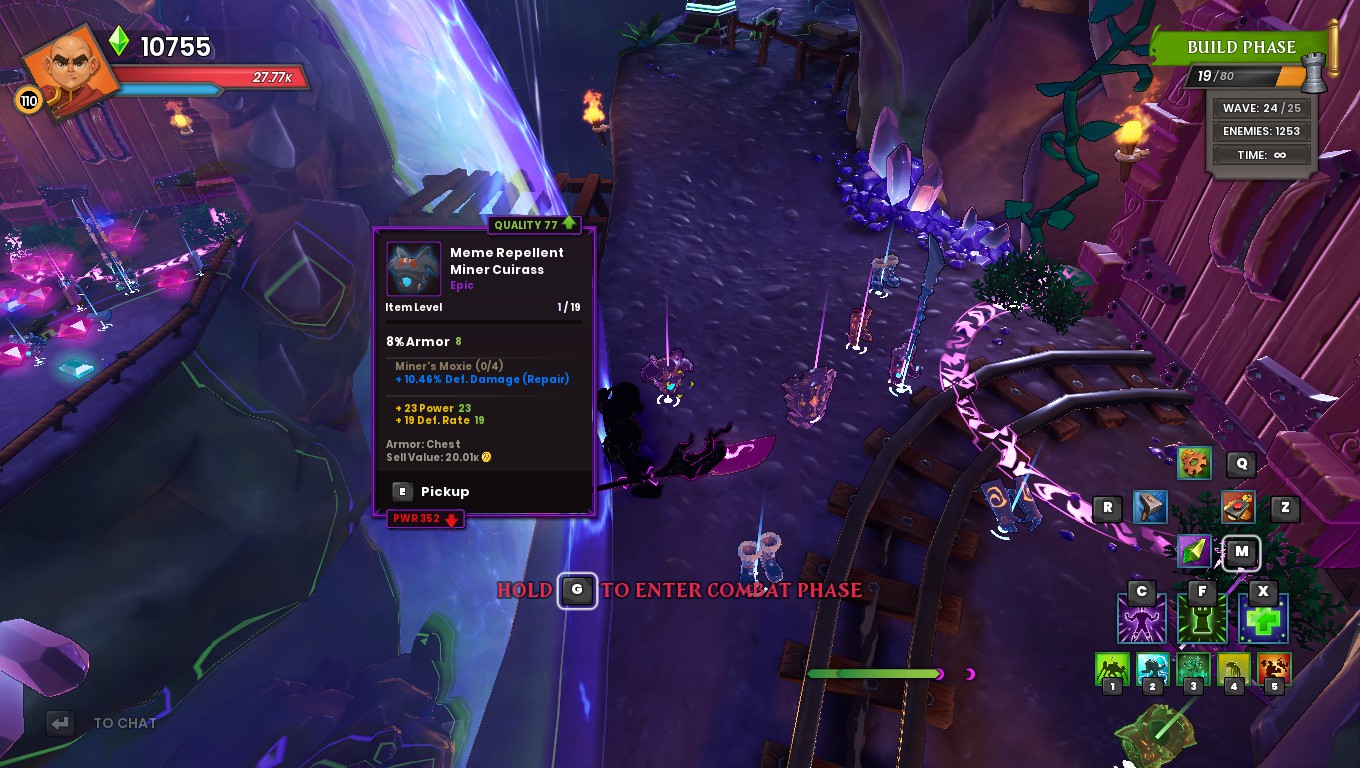
하지만, in the displayed screenshot, this particular Miner piece features a different set bonus called “Plagued Defense.” With a full set of armor pieces with the Plagued Defense bonus, the character receives a 20% stat bonus and a significant 50% increase in tower poison damage.

이 때문에, 그것’s possible to get a full set bonus with different types of armor. For the purposes of this guide, we won’t need to mix different armor types. We will only equip pieces with the following sets in the early game due to the higher stat bonus (40%) we get from them: Ancient Authority, 보호자’s Grace, Militia’s Might, Miner’s Moxxie, and Primitive Power.
Weapons and offhands also have a set bonus of their own, but this won’t be relevant to the progression guide until the very endgame. 요컨대, they provide your hero with a bonus related to hero stats or DPS.
Rift mode and Fused Gear
Rift mode increases loot quality by 10%, changes enemy health, 손상, and have unique properties (such as the dark elf warrior draining ability mana on hit). 하지만, rift monsters (with the exception of the Lycan monster) are not immune/damage resistant to any elemental ailments, allowing you to use elemental towers without any consequence.
In rift mode, fused gear can drop. Fused weapons and pets can deal fusion damage. Though some pets don’t have a fused version. Any source of fusion damage will deal double damage against enemies in rift mode. Fused armor pieces add “rift armor” allowing you to take less damage against rift enemies. Having a fused armor set in addition to a 30% stat bonus, will fuse your towers. Fused towers have varying effects such as dealing fusion damage, making enemies take increased fusion damage, or adding rift armor to heroes and towers. If you build fused towers with a character, then swap it out of the deck, the towers built from that character will lose their fused status.
The fused armor set type determines which tower gets fused. Ancient fuses tower 1, Guard fuses tower 2, Militia fuses tower 3, Miner fuses tower 4, and Primitive fuses tower 5. The tower numbers reference what key you press to build the defense. 예를 들어, for monk tower 1 is ensnare, tower 2 is electric aura, tower 3 is healing aura, tower 4 is strength drain, tower 5 is enrage aura. You can check out this link (under the fusion armor tab) to find where to target farm each fused armor piece.
Offhands, 룬, transmogs and accessories cannot be fused. You cannot mix fused and non-fused armor pieces together for a set bonus.
Arcanist Helmet
A special helmet worth noting. This helmet fuses tower 1 on its own and allows you to fuse another defense simultaneously if your other 3 pieces are the same set (such as fused guard gloves/chest/boots, or fused militia gloves/chest/boots). In addition to that, arcanist helmets offer 10% rift armor instead of 5% like other helmets do. And the base stats for arcanist helmets are the highest in the game. 결과적으로, this is the best in slot helmet in the game. This helmet is found in the chest of keep survival/mix mode on W25+.
서바이벌 모드
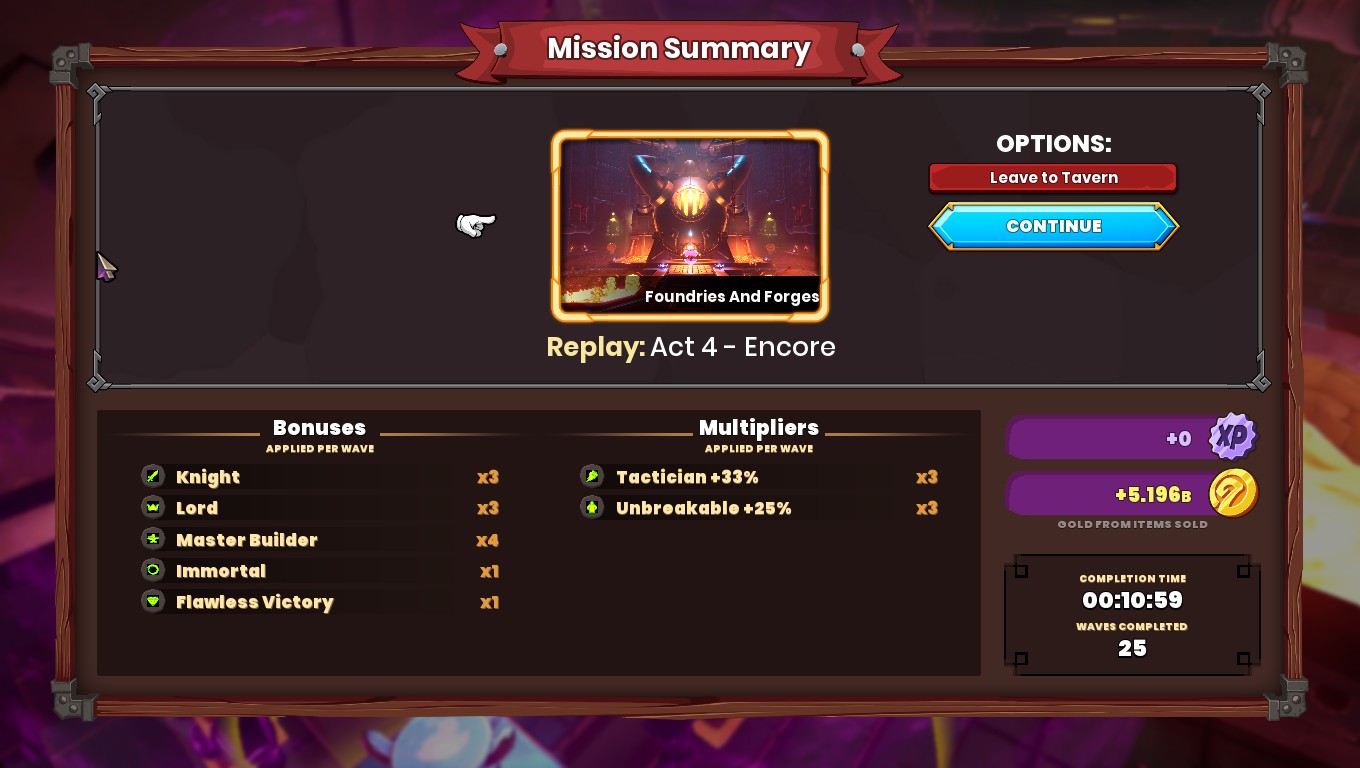
Survival mode allows you to go past wave 5 where campaign stops at. 이것 (and mixed mode) are the best ways to farm exp, 항목, and gold. After clearing wave 25, there is an option to go past wave 25 by clicking on the blue continue button in the summary screen, as shown in this screenshot.
모든 5 waves in endless survival (파도 30, 35, 40, 등) will give a special chest just like wave 25 does. For waves 26 and higher, item quality is scaled to wave 25. Endless survival is ideal for afk farming and to avoid rebuilding. On boss maps, higher scaled bosses spawn on wave 25, and spawn every 5 waves in endless. The higher the wave, the higher the stats of enemies and bosses. Though bosses only gain increased health, and not damage.
Mixed Mode
Mixed mode is basically survival with some key differences. Spawns are random, skeleton enemies are added, 거기’s no endless mix mode meaning it goes only to wave 25, and mix mode gives 6% higher quality than regular survival. Runes also have twice the drop rate of regular survival. Mix mode is ideal for potentially getting the highest quality of item drops as possible. 하지만, something to consider are how many runs per day you can do actively on mix mode compared to how many runs you can do afk farming survival with a macro. (Auto starting waves and auto tower boosting are allowed in this game. Auto building is not allowed). A github link to the macro is provided in the Resource section.
Hardcore Mode
This toggle increases loot quality by 15% from easy-hard difficulties, 20% on insane difficulty, 그리고 25% on nightmare/massacre difficulties. Hardcore imposes the following changes to the game:
- If you die during the wave, 당신은 돈’t respawn until the next build phase.
- Your heroes no longer build instantly like they do with hardcore off.
- All mana dropped from monsters on the floor (not players) disappears upon wave start.
- Heroes lose mana upon dying.
Pure Strategy Mode
Pure strategy is like survival mode except your hero can only upgrade towers and loot items during the combat phase. During the build phase your hero can build, 치받이, and sell defenses. Your hero’s pet won’t function either. Bosses also do not spawn on wave 25. Pure strategy is not worth running due to the lower loot quality of drops from the lack of hardcore mode.
Bonus Difficulties
Maps progressing from act 1 to act 5 generally increase in item quality as you go through the acts. This normally results in the earlier maps being inferior to farm. 하지만, with bonus difficulties you can scale up item quality from the earlier maps with the later maps. Although this also scales up the difficulty of that map from the boss map they occur on. Bonus difficulties can only be applied to survival and mix mode. Note that bonus difficulties are only available in nightmare mode and higher and must be cleared for survival mode and mixed mode separately.
있다 5 bonus difficulties in the game:
Demon Lord (from clearing Alchemical Labs on wave 25)
Goblin Mech (from clearing Throne Room on wave 25)
Ancient Dragon (from clearing Summit on wave 25)
Lycan King (from clearing Keep on wave 25)
Dune Eater (From clearing Forsaken Temple on wave 25).
These bonus difficulties will scale item quality to the respective map where the bonus difficulty comes from. 예를 들어, after clearing Keep on wave 25, 너’ll unlock the Lycan King Bonus. This means you can scale up maps prior to Keep, to Lycan bonus difficulty. 당신은 돈’t have to unlock these difficulties in order and can skip as many as you can.
예를 들어, if you unlock Lycan king you’ll also unlock Demon Lord, Goblin Mech, and Ancient Dragon difficulties. Bonus difficulties cannot be applied to maps following the boss map they occur on, with exception to Foundries and Forges, Castle Armory, 그리고 “Bonus Maps” 부분, which have specifically picked difficulty bases. 예를 들어, you can’t apply Lycan difficulty to the Forsaken Temple, because Forsaken Temple already has better item quality than the Keep.
룬
Runes are items you can equip onto your hero to add special effects to the hero’s towers or abilities. Each hero can equip 4 tower focused runes and 2 hero focused runes (Rogue is the exception with 6 hero focused rune slots). Runes currently have 8 tiers in the game.
Runes drop from both monsters and chests. You use runes in your inventory by right clicking on them and select use. This unlocks the rune, but you must manually equip them by going to the character’s rune menu. You can skip tiers if you find a higher-level rune. Runes above the common tier, cost gold to use. 하지만, despite the tooltip, runes do not give gold upon selling.
If your character has runes equipped and built towers, and is then swapped out of the deck, your towers will lose the effect of the runes (exactly like how fused towers work). 자세한 내용은, check out this link to find where to farm each rune.
또한, favored maps are very insignificant for target farming runes. All this does is give a chance for the chest to drop the rune. 그것’s best to farm your preferred map in the same act as the favored map. 예를 들어, if the favored map for a rune is Ancient Mines, you can also farm Deeper Well, Lava Mines, Alchemical Labs, or Magus Quarters for the rune.
The following runes are detrimental to your gameplay. You can unlock these runes if you wish but equipping them at this time would make the game more difficult.
- Arcane Surge (prevents apprentice from tower boosting)
- Noxious Fumes (limits targets gas trap can be used on)
- Strengthened Field (reflect becomes physically targetable by enemies and becomes easily breakable or cause splash damage onto your towers/crystals)
- Berserker Aura (While we don’t use enrage auras in this guide, this rune makes them worse by reducing the stall effect they inflict)
Hero Creation & 탑
Create the following heroes: Monk, EV, 여자 사냥꾼, 도제, Summoner, 파수꾼, 악당, Squire, 보호자.
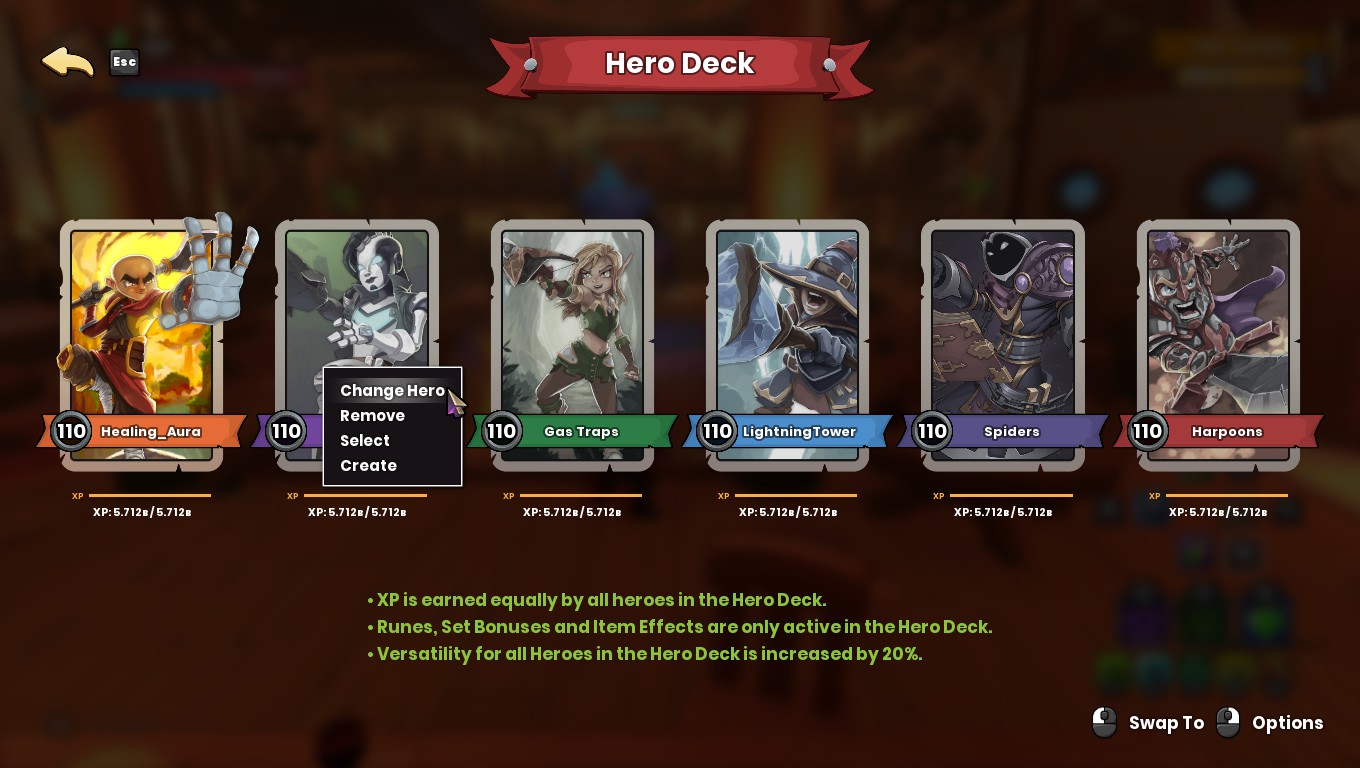
You create a hero by going to your hero selection screen (때리다 ‘시간’ 또는 ‘F7’ on PC), then right click on any card in the deck and click “create” as shown in this screenshot.

You can remove a hero from your deck by right clicking on the hero you want to remove, 그런 다음 클릭 “remove” as shown in this screenshot.
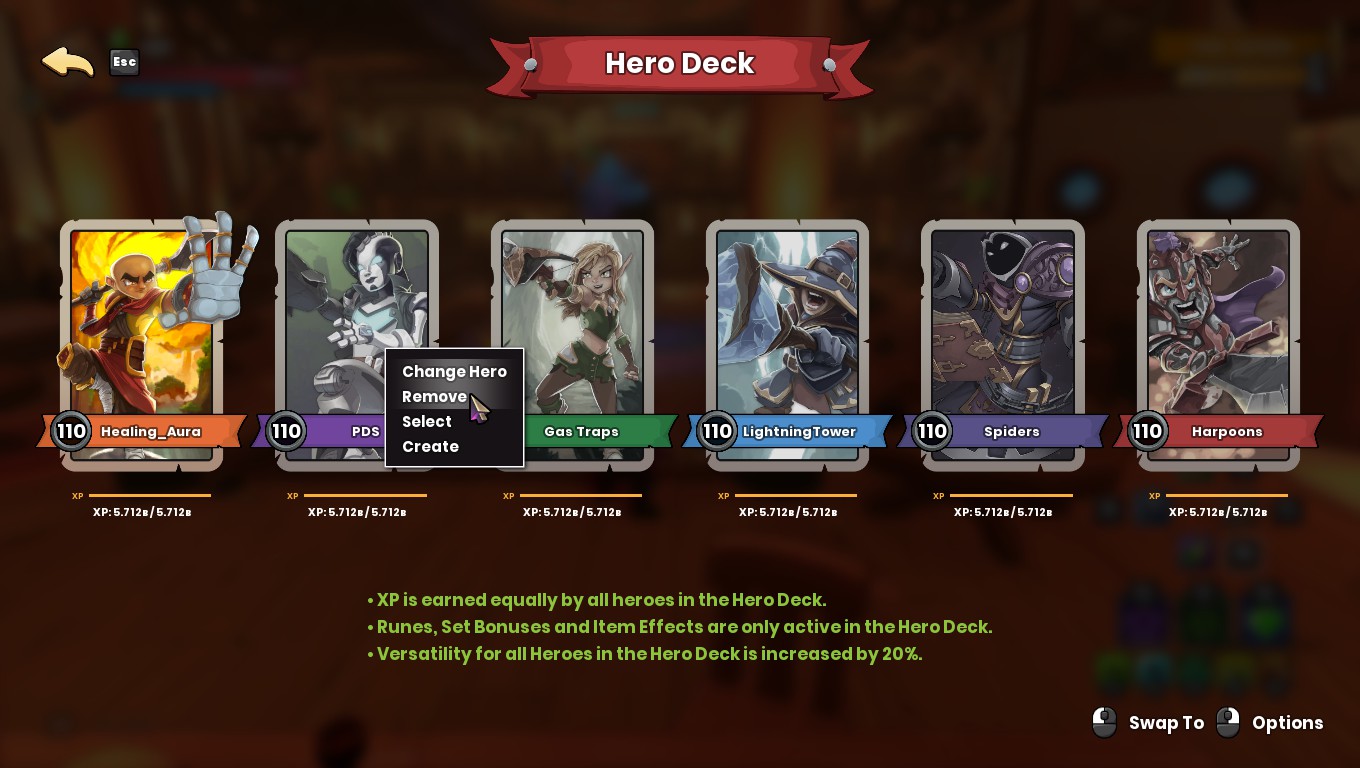
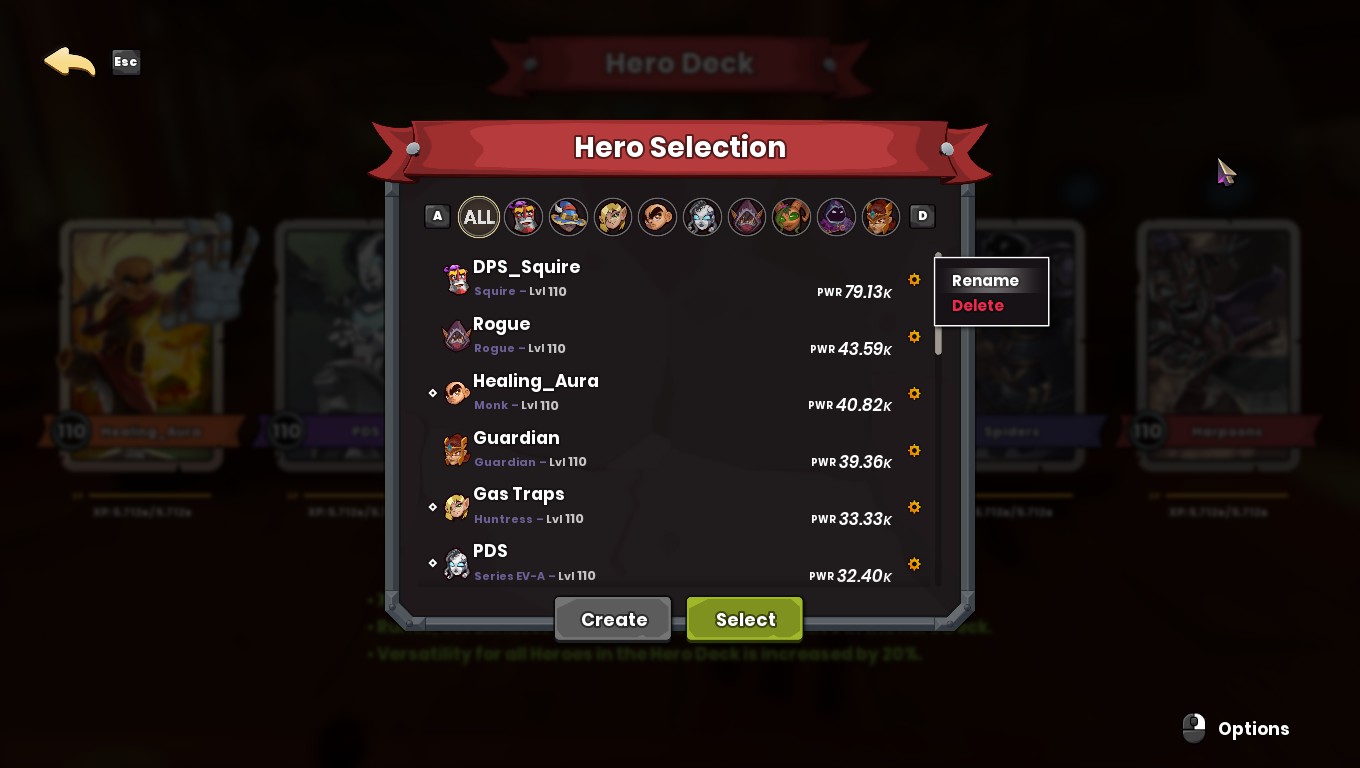
Removing heroes does not delete them, it places them in a reserve where you can select them later. If you wish to delete or rename a hero, you can do so by clicking on “change hero”.
Then click on the yellow gear next to the hero. If you delete a hero, make sure you remove all gear on that hero, or else the gear gets deleted too. Equipped runes are unaffected, as they affect your entire account.
While hero slots in your reserve are limited, it is more than enough to build all the heroes you would need.
Have the following heroes in your deck: Monk, EV, 여자 사냥꾼, 도제, Summoner, 파수꾼. 또한, you can rename and respec (stat points) your hero at anytime without any cost of gold. 다음, I will describe each tower we use with each class in this progression guide.
Monk: We use his ensnares, strength drain auras, and occasionally healing auras. Ensnares are mandatory in nearly every build in the game (except for niche speedrun builds or if you’re overgeared). Ensnares slow enemies down. Strength Drain strips enemies’ elemental immunities and decrease their damage against towers and heroes. 하지만, this does not affect bosses. This aura will allow you to safely tower boost your towers when dark elf warriors rush out and attack you. Healing auras provide a passive hp regen whenever heroes are in the aura. The monk also has a strong tower boost ability that we use in the early game.
EV: We use her reflect and her overclock beams. Reflect beams reflect enemy projectiles (not bosses) which is crucial to preventing your defenses/crystals from being destroyed. Overclock beams buff your defenses by increasing their stats. Both reflect beams and overclock beams are also mandatory in nearly all builds of the game. It’s worth mentioning that the buff beam gets destroyed if any of the towers it buffs is destroyed. Players selling towers doesn’t destroy the buff beam.
여자 사냥꾼: We use her gas traps. Gas traps stun enemies. They get triggered when an enemy walks over the hair trigger (any part of the green circle). The effective range of the gas trap exceeds the hair trigger area. 너’ll see this when you place the gas trap down. While not mandatory in every build, it is a crucial tower for progressing the game, as it can stun some of the most threatening enemies in the game (except for bosses, ogres, and potentially Lycan).
도제: We use his lightning towers late in the game to kill weak/fodder enemies but is used as a tower booster in the early game. While the monk’s tower boost ability boosts damage, apprentice boosts attack rate. If towers hit the attack rate cap (most towers are 0.25 rate for their cap), any extra rate converts into damage. 도제’s tower boost is actually much stronger than monk’s the majority of the time (similarly to how the speedy gem pet gives more damage than the powerful gem pets from the summit map). There are a few exceptions (such as spiders in the very early game, and owls) where this doesn’t hold true.
Summoner: We use his spiders, sirens in the late game, and archers only for campaign bosses on easy difficulty. Spiders are the best damaging tower in the early difficulties. They slow enemies down, make enemies take double damage, their projectiles have an area of effect, and scale attack rate and range extremely well with little to no investment. In the late game they’re still a very strong pick due to the double damage debuff they provide. Spiders cannot damage or debuff bosses, despite targeting them. Sirens with their rune provide a reflective bubble similar to reflect beams. Though at the time of writing this guide, sirens appear to take damage upon reflecting projectiles. Sirens are handy on numerous maps but require the rune to begin with. 결과적으로, sirens aren’t used until the late game when we have access to a high-level siren rune. We use archers only for early game campaign bosses because spiders cannot damage bosses.
파수꾼: We use her roots, blossoms, and sludges. Roots are required to place down blossoms and sludges. Blossoms provide excellent single target damage, especially later on with their rune. Sludges hit hard and provide an aoe for clearing fodder mobs quite nicely. 하지만, sludges fall off in performance for the end game once we have access to other runes.
악당: Is a DPS character with no towers. We don’t have a use for him until we’re trying to clear the keep map on massacre survival. While he can melee, in our progression we use only his ranged attacks to kill bosses. His skill rotation for bossing is to spam his 3 devices (though napalm is the only important one), go into umbral form (4 열쇠) whenever it’s off cooldown, and to spam swift assault (F key) while invisible. His ability stat scales the cooldown of both his swift assault and umbral form skills. More information about ability stat thresholds is provided in the “Gear set up” 부분.
Squire: We use only his harpoons. Harpoons are very strong in the late game once we have the rune to go with it. Harpoons especially excel on maps with portals (act 4 rifted maps) due to its pierce property. Runeless however, it is underwhelming compared to Warden’s towers. For this reason, we don’t start with him in the deck early game.
보호자: Guardian has many useful towers used in varying circumstances. Her bulwark wall fully protects towers within its range (towers must be completely covered in its circle), taking their damage for them. If the tower its protecting and the bulwark wall itself are on a buff beam, the buff beam damage reduction double dips. Her empowering tower dramatically increases your heroes DPS. Her owls hit very hard and have their place on some maps. 그리고 마지막으로, her obelisk tower applies an aoe slow to targets far away; ideal for long lane maps to apply an early slow to ogres or for maps with portals. 하지만, in our early progression we don’t have a use for her towers, so we don’t start with the Guardian in the early game.
또한, you should always have 6 heroes in your deck. Having empty slots does not impact exp gain per character. Something worth noting. Enemy health and counts scale with player count. 결과적으로, this will increase the difficulty of your progression. It is recommended that the extra players are able to tower boost with a monk/apprentice early on, and on a summoner for late game. For the early game, I recommend having 2 active monks in 2p, 2 monks and an apprentice in 3p, 그리고 2 monks and 2 apprentices in 4p. These ratios will change after the early game, so make sure the extra players have a monk, apprentice, and summoner at least.
DPS Rogues are also good choices for your extra players. Both his rune and weapon drop in act 4 which can be conveniently farmed in F&F and Keep. DPS Huntress is not viable in the early game without taking a detour to act 1 to farm for her Focus Fire rune, and running Summit Survival for her weapon. So I would advise avoid using DPS Huntress until after you beat survival temple on massacre.
Explaining Stats and the Hybrid Hero stat system
Stats can fall under 2 general “categories”. Hero stats and tower stats.
Hero stats are stats that impact the hero itself, such as health scaling (활력), 손상 (공격), or effectiveness of their abilities (능력). You can only get hero stats on your weapons, offhands, pets, or speccing your hero points into them. 또한, your pet’s damage scales with your hero’s attack stat and hero abilities that boost damage.
Tower stats affect the towers you build with that hero. Fortify determines the health of your towers, Power determines the damage of your towers, Range determines your tower’s effective range, and Rate determines how frequent your tower attacks or activates. You get tower stats on armor pieces, accessories, or speccing your hero points into them. For Rogue, his tower stats instead apply to his devices.
Recall that armor set bonuses can give a 30% 또는 40% stat bonus to your pieces (for fused armor and non-fused armor respectfully). This has no relation to, or any effect on passive stats (stats immediately below the set bonus). Passive stats are always active unless they have a listed requirement such as the upgrade or repair passives.
If you wish to see details of specific mods ingame, 누르다 “디” button on PC to view the second page while looking at an item.
Tower Stat Priorities
The stat priorities I’m listing here are only relevant for the towers I use in this guide. It does not cover towers I do not use, so take this with a grain of salt outside of this progression guide.
These towers have the same stat priorities.
These towers have varying priorities.
Meta towers/Gear set ups
This section is placed a little out of order to make it easier to refer to the stat priority section above. You can skip this section until you’ve cleared Temple on Massacre Survival.
While most towers are viable for clearing W23-25 on mix mode, 나’ll be listing the highest performing/useful towers in addition to which DPS heroes are meta, as well as their ideal equipment sets/stat priorities. This assumes late game stats (gear farmed on Lycan/Dune eater difficulty), runes are used, (with the exception of the gas trap, enrage, and reflect beam runes) and that you’re building for AFK farming endless survival. Any towers not mentioned can still be viable and have other niche uses, but the ones mentioned are most commonly used. Any DPS hero not mentioned are not considered meta and thus will not be covered.
첫 번째, 우리’ll cover the meta towers. Any tower stat priorities covered in the section above won’t be re-mentioned here.
Armor passives to look out for (any not mentioned are not worth using): Fortify/Power/Range/Def Rate stats, whichever stats your hero is prioritizing, % Def Damage (blue text) for damaging towers. Note this is an additive multiplier for damage when used with the overclock rune.
Monk
Ensnare/Strength Drain/Healing Aura
Electric Aura: (힘>범위>Rate>확고히 하다, needs to be on its own buff beam with overdrive or else the damage drops off too quickly in endless survival. With additional players, this aura becomes obsolete much sooner.)
EV
Buff beam: 목표로하다 3906 fortify to hit armor cap at max upgrades. Fused buff beam is good in combination with Bulwark wall or making defenses tankier against bosses/enemies)
Plasma Defense System: Excellent for killing flyers or anything on big maps.
Heat Cannon: Very niche, useful for spawn killing on Alch labs or F&에프)
여자 사냥꾼
Gas traps
도제
Lightning tower: Spec 1.4 power for every 1 point of rate to maximize DPS
Summoner
Spider and Siren
Squire
작살
파수꾼
Blossom
보호자
Bulwark wall
Owls
Obelisk
Empowering tower (힘>범위>확고히 하다)
다음, 나’ll cover DPS heroes and set ups.
Passives on DPS weapons to look for in order from most impactful to the least. Note that this section is still a work in progress, more testing is required to confirm. But this should give you a good enough idea of what mods to use. Any mods not listed are generally not worth using over the listed mods.
Irradiate > Sunder armor > Double Edge > % 손상 (blue text) > % Attack Rate (blue text) > 여진
For upgrading weapons and pets, assume you upgrade damage and tower/hero boost stats unless mentioned otherwise.
Booster Monk (used only in boss fights in group games, not solo)
- Weapon Set Bonus: Etherian Champion
- 무기: Wolfsbane Cleaver (Keep weapon, Monk is mainly used as a booster, so the weapon is not crucial, just the base stats on it)
- 부속품: MP regen, and HP regen. On the off chance you have spare slots, stability and movement speed are nice mods to have.
- 애완 동물: Cat if no one else is using one, otherwise Obsidian Gemstone (20% drop from throne room survival boss) if no one else is using one, else use a Giraffe/Mista Mine to stack ability for hero boost.
- Stat priority: Spec vitality if your HP is on the lower side (would recommend at least 600k health, depending on the map you’re running), otherwise spec ability.
플레이하는 방법: Turn on hero boost, be close to your teammates. Tower boost towers if you’re close to your towers and/or you have enough MP regen to sustain both hero and tower boosts. Fire projectiles at whatever you need to.
악당
- Weapon Set Bonus: Inspired Assault for solo, Marked for Death in a group (only need 1 player with this set bonus).
- 무기: Wolfsbane Sniper in the bow slot, Wolfsbane Claymore in the sword slot. Claymore is better than Smasher if you’re using Rogue’s spin attack for clearing lanes. 그렇지 않으면, use either Claymore or Smasher if you’re using only Rogue’s ranged attack. Upgrade damage on the bow, upgrade damage on the sword if using the spin, otherwise upgrade stats on the sword. All Rogue weapons are found from Keep.
- 부속품: HP regen, MP regen if using the spin, otherwise stability or movement speed are nice mods to have.
- 애완 동물: 고양이, not Giraffe.
Stat priority: Ability breakpoints for rogue’s dagger throws during invisibility are 1000 ability for 2 throws, 3800 ability for 3 throws, 6415 ability for 4 throws. You may wish to add extra ability if you’re playing in a multiplayer game with latency, or for a bigger window to throw the daggers. Spec your hero points according to whichever threshold you’re closest to. Then spec rest of your points into attack if you’re comfortable with your HP pool.
How to DPS: This has been covered in the hero section above, regarding his skill rotation.
여자 사냥꾼
- Weapon Set Bonus: Etherian Marksman (Ammo Pouch)
- 무기: Dragoon from Summit
- 부속품: HP regen, MP regen. On the off chance you have spare slots, stability and movement speed are nice mods to have.
- 애완 동물: 고양이, not Giraffe.
How to DPS: Turn on Adrenaline Rush, and spam Phoenix Shot while holding the fire button.
Squire
- Weapon Set Bonus: Spinning Steel
- 무기: Path Sword from Throneroom or Wolfsbane Smasher from Keep
- 부속품: HP regen, MP regen. On the off chance you have spare slots, stability and movement speed are nice mods to have.
- 애완 동물: Fused Monkey King with 0.33 attack rate for bossing, else use bombers for non-boss waves. Rocks/Giraffes if you care about spinning for more damage. But I personally wouldn’t use Squire on non-boss waves regardless.
How to DPS: Turn on Blood Boil, and spam Circular Slice pointblank range at your target for spike damage. 당신이’re not in pointblank range, you lose a lot of damage. Hold your fire button while spamming the slice.
Summoner
- Weapon Set Bonus: Etherian Marksman (Tome). You only need a Tome to complete a weapon set bonus. Also look for only the % 손상 (staves) mod for the offhand, as it is currently the only mod that benefits Summoner’s damage with pets.
- 부속품: HP regen, MP regen. On the off chance you have spare slots, stability and movement speed are nice mods to have.
- 애완 동물: Fused Dead Lil Bomber x 2 (with 0.63s rate, 3 발사체, best map to farm from Royal Gardens), Speedy Gemstone + Powerful Gemstones (Summit Campaign, base stats don’t matter due to going into overlord mode, just make sure to cap the boost stat and 4 targets) Note that speedy gemstones will not boost owl DPS in the late game.
How to DPS/boost: To DPS, just turn on Pet Boost and flash heal as necessary. For gemstone boosting, go into Overlord mode and stand close to the towers you wish to boost and spam flash heal.
For some ideas of group DPS set ups (if all heroes are close together)
Ranged DPS Variant
- Rogue with marked for death set (Cat or Obsidian Gemstone pet, whichever is missing)
- 여자 사냥꾼 (Cat or Obsidian Gemstone pet, whichever is missing)
- Booster Monk (Giraffe)
Either another rogue with inspired assault set, or another huntress (Bomber pet may be a good choice for killing spiders)
Melee DPS Variant
- Rogue with marked for death set (Cat or Obsidian gemstone pet, whichever is missing)
- Booster Monk (Cat/Obsidian gemstone pet, whichever is missing)
- Squire (Monkey king)
- Squire (Monkey king)
You can also try something with Guardian as she heals the party and provides armor while DPSing if you like, though HP regen from accessories should remove this need. Guardian would work better with Squire as they are both melee heroes.
Tower Targetting
We can customize what type of enemies our towers prioritize. This is important to ensure our towers are killing the most important targets they need to. 요컨대, fodder prioritizes weaker monsters, strong prioritizes the highest hp targets, air prioritizes airborne enemies, and special prioritizes special monsters.
Tower targeting is done across multiple characters. 예를 들어, you cannot have 2 apprentices with 2 magic missile towers, with one on fodder priority, and another on strong priority. Both towers will have the last targeting priority you set. 하지만, in multiplayer, you can have your missile towers on fodder, and your friend’s missile towers on strong. Some tower’s targeting will be altered throughout the run, so keep this in mind.
You adjust this by going to your inventory and then the Spellbook tab, scroll down and click on your defenses as shown in the screenshot below:

Some defenses won’t have a targeting priority, but most do. Set the following priorities for all of your heroes:
- EV: Plasma Defense System to air
- 도제: Lightning tower and magic missile to fodder
- Summoner: Archer and Spider to strong, Siren to air
- 파수꾼: Blossoms to strong, Sludges to fodder
- Squire: Harpoons to strong
- 보호자: Owls and Obelisks to strong
Tower Boosting/Buffing Towers
Monks buff towers by hitting “에프” on PC. This creates a bubble with all towers in range get a tower damage boost. Multiple monk boosts do not stack on the same towers, and neither do multiple apprentice boosts. 하지만, a monk boost and an apprentice boost do stack together.
Apprentice boosts works by hitting “씨” (overcharge), and then right clicking once to apply the tower buff. Overcharge can be immediately turned off to save mana, until you need to reapply the tower buff. With the overcharge buff, the duration cannot be refreshed until it expires, unlike the monk boost which can be overlapped. Make sure you don’t equip Apprentice’s overcharge rune as mentioned earlier.
This screenshot here shows a tower is being buffed by the buff beam with this type of glow.
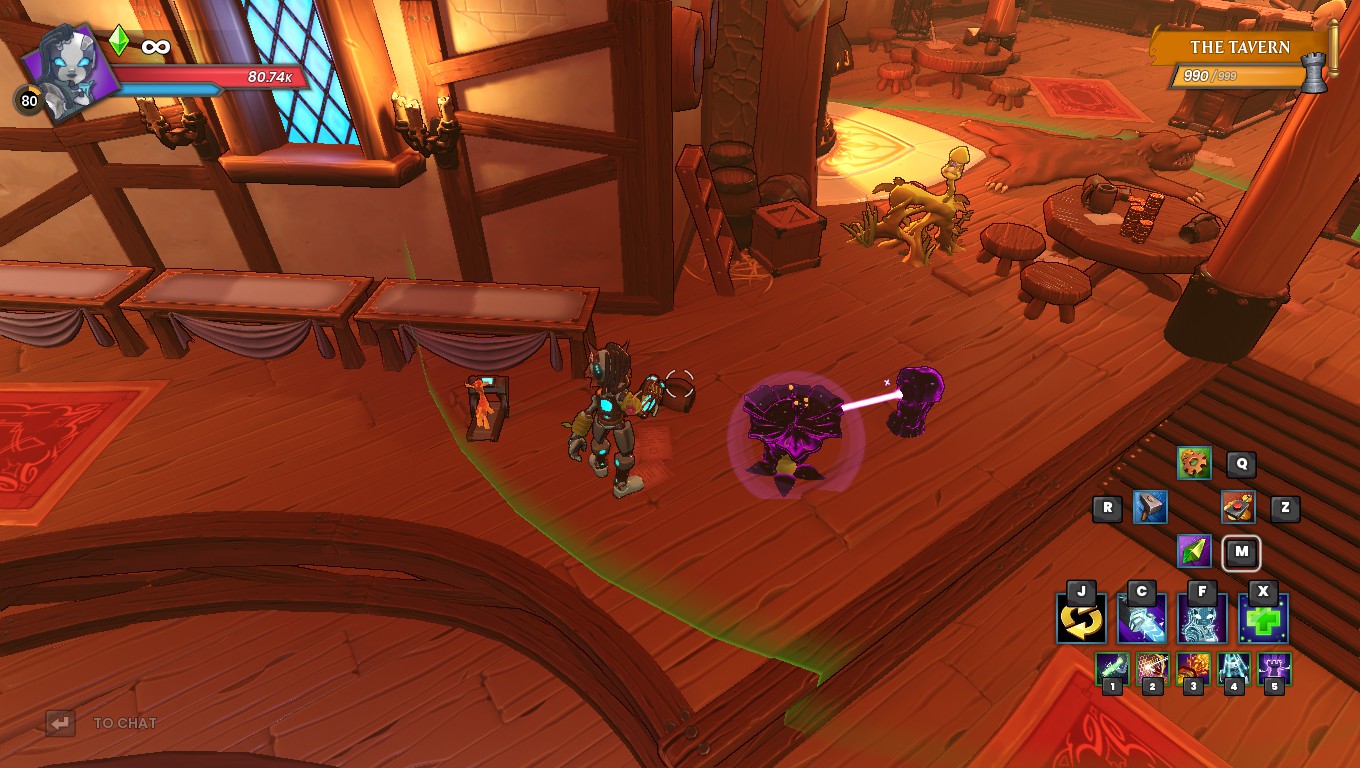
This screenshot shows a tower being buffed by an apprentice.

This screenshot shows a tower being buffed by a monk.
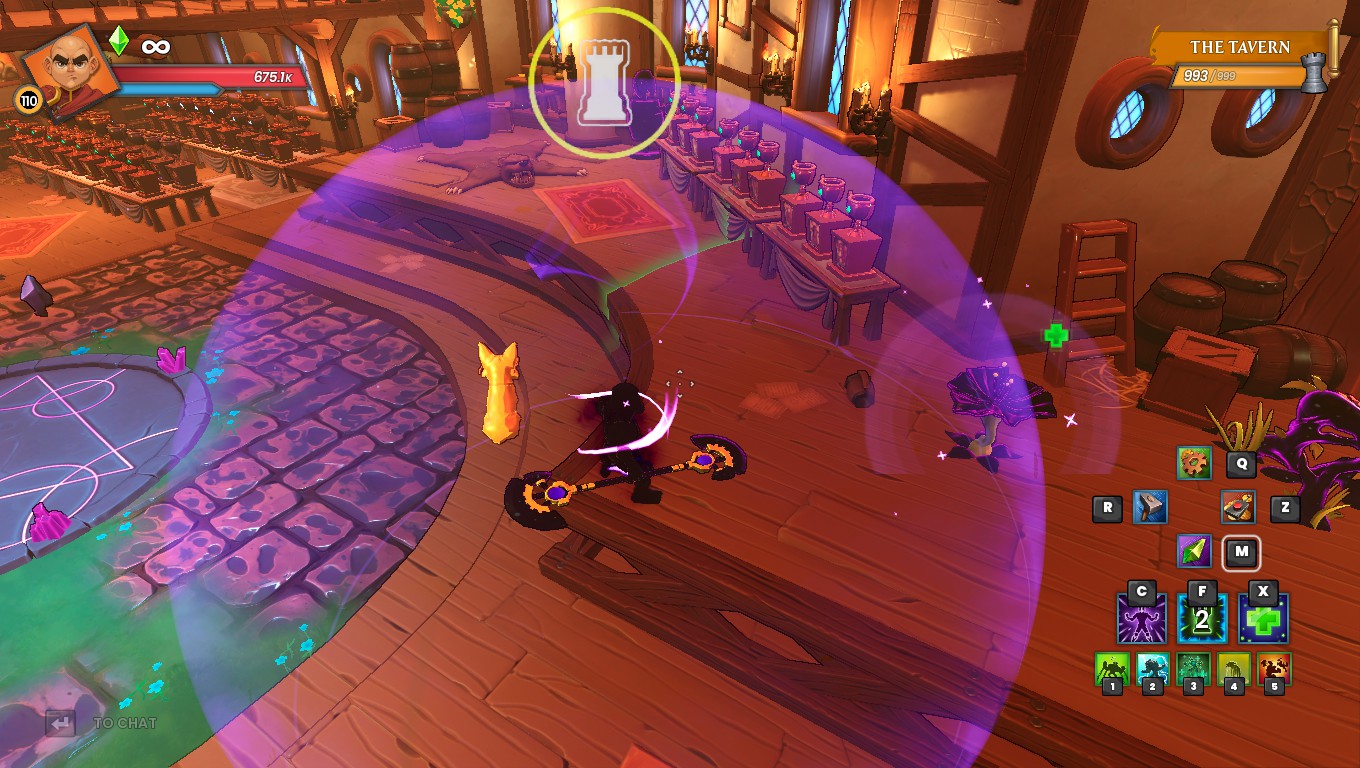
그리고 마지막으로, this screenshot shows a tower being buffed by a gemstone pet (found in summit).
These pets buff up to 4 of the towers closest to your character. Gemstone pets are how you can offset multiplayer scaling if you’re struggling to clear maps in 3 또는 4 player games.
The main pets you’d want to look out for are the striking gemstone (increases tower range), speedy gemstone (increases tower defense rate), and powerful gemstone (increases tower damage). Towers require some defense rate (higher than 0) for the speedy gem to actually function. It’s worth mentioning that speedy gemstone actually boosts more damage than powerful gemstone does, even if the tower is already defense rate capped. Summoner can equip 2 pets, so it would be ideal if your third/fourth players were summoners and equipped 2 different gemstone pets each.
그것’s generally bad to equip 2 of the same gemstone pet on a single character because the pets tend to target the same towers, and gemstones of the same type cannot be stacked on the same towers. Gemstone pets have 2 main important stats: max targets and their tower defense boost. You can only upgrade the tower defense boost stat (this has a cap). Max targets range from 1-4, with the max buff being at around 100%. Ideally the pets you use at early progression will boost a minimum of 3 탑, and even a tower boost of 50% would be very impactful. But of course, the higher the better. You can find gemstone pets as high as around 90% tower boost on hard summit campaign, ~와 함께 4 max targets.
Pets can also gain experience if equipped on your active hero during a wave and gain free levels that do not cost gold to upgrade. To upgrade gemstone pets properly, all you need to do is max out their tower boost stat. With spare points you can spec into anything you want on the pet.
To make upgrading easier, under options you can enable “Smart Upgrade Mode”. This allows you to prioritize upgrading buff beams, followed by damage towers, and then your other towers. You use this by selecting upgrade tower on your character, and then aim at the floor near towers, but not at an actual tower. Keep in mind for the early game, this will make upgrading a little awkward. But when you hit level 60, you’ll be able to fully upgrade towers, which will make this feature will function much better. Make sure you also enable “Smart Repair Mode”.

초기 게임
Medium Deeper Well HC (하드코어) non-rift
Select Deeper Well on Medium, toggle Hardcore for better drops, but turn rift off. While we would welcome the item quality increase from rift, monsters have too much health since we need to melee them on wave 1 due to lack of spiders. Also from here on out, 두목’t use any runes higher than the common quality unless I specify otherwise. It is a huge waste of gold doing so at this point in progression.
A reminder to have your Monk, EV, 여자 사냥꾼, 도제, Summoner, and Warden in your deck. Keep an eye out for accessories with hp and mp regen in their implicits, as well as vitality/ability on your weapons/offhands. We need hp regen for your DPS character later in the guide, and we need MP regen for your tower boosters and summoner. We also need ability on your monk and apprentice to scale their tower boosting abilities.
For early game item drops, Militia/Miner guarantee power as a stat. While Ancient and Guard pieces guarantee Fortify as a stat, and Primitive guarantees defense rate as a stat. Distribute the gear accordingly to your heroes based on the stats they need. When you enter insane survival, 두목’t worry about these specific drops, and focus on putting together the best armor sets on your builders.
Your summoner will be your main damage builder for all of campaign and for most of, if not all of insane survival. Give your best gear with power to your summoner. 하지만, aim to get 20 range on the summoner as soon as you can to make kobolds a non-issue in future maps. 후에 20 범위, you can spec your summoner into pure power. Though extra range doesn’t hurt if it’s on the gear already. Spiders in the early game require no defense rate.
For your monk, get around 5 points into power before focusing primarily on range. More power is of course welcomed, 하지만 5 points for clearing campaign is enough.
For your huntress (though gas traps aren’t required until insane survival), you should prioritize range while speccing some points into fortify and defense rate. The stat ratios are pretty flexible early game, but you can aim for a 2:1:1 ratio for Range:확고히 하다:Defense rate if you like.
For your EV, prioritize power and fortify. While rate and range are welcome to have, they aren’t necessary in the early game. 하지만, EV’s stats won’t matter until you hit level 20 (which you typically hit during throne room campaign) when you finally have access to her buff beams. 또한, EV’s reflects are accessible upon hitting level 2.
If you have extra players, you only need monk boosters until you make the swap to warden’s towers. Apprentice boosting spiders at this point will not affect the spider’s attack rate.
그래도, just follow the DDA planner I’ve linked.
Be sure to read the description for every DDA planner I link for details.
나는 할 수 있다’t emphasize this enough. Just remember for all maps, using up all DU grants an exp bonus, as well as not getting hit during the wave. Asides from wave 1 where you have to melee monsters on this map, avoid running around and getting hit if you can help it.
If you ever get stuck on a map, check out the “Troubleshooting a failed build” near the end of the guide for some ideas.
Hard Ancient Mines HC Rift Optional
After clearing Deeper Well on medium, go back to tavern and change the difficulty to hard, hardcore still ticked on, and rift can be turned on if you wish. Rift mode at this point only serves to increase item quality and remove elemental immunities from monsters at the cost of increased health pools on monsters (including ogres and bosses!). 그래서, 당신이’re playing with friends and struggling with rift mode, you can turn it off until I mention otherwise.
Loot filter update: Change your loot filter to uncommon tiers and higher for your regular armor filter. Feel free to equip any weapons you find on the ground, 그러나 그들은’re not typically worth using until rare tier or higher when they start dropping with actual stats on them.
Your summoner likely doesn’t have 20 range yet, so focus on getting this before going pure power. Equip gear on your Summoner/Monk/EV and then start the map. Follow the planner and read the description to get an idea of what to do and not do. If you mess up and a kobold hits your spider, your spider *should* be able to survive an explosion (even with 0 fortify on summoner) but avoid this at all costs.
Hard Lava Mines HC Rift Optional
You can enter the next map without going to tavern. 이전과 동일합니다, with rift being optional. Follow the DDA planner link and read the description.
Campaign up to Summit on easy, non-rift, non-hardcore
After Lava Mines, go back to tavern and untick hardcore, untick rift if you haven’이미, and change the difficulty to easy. Now start alchemical labs and skip all encore maps along the way. The reason we started Ancient Mines and Lava mines on hard was to drop enough uncommon/rare gear to trivialize the rest of campaign even further on easy. We clear campaign all the way to summit in order to unlock insane difficulty. Clearing campaign on higher difficulties is entirely optional and overall, just not worth the effort. The next step in progression can be done easily with just the levels we get from clearing campaign on easy.
I highly recommend you just try the rest of campaign on your own to experience the game. Just note that for alchemical labs, 왕좌 방, and summit, 너’ll need to use archers to kill the bosses, as spiders cannot damage bosses. 하지만, if you insist on following DDA planners, 나’ve provided rough DDA planners for these maps. Due to how easy the maps are, I did not go into great detail for these builds. And just a disclaimer that these aren’t the only, nor best way to build for these maps. But they work. To speed up the waves, you can just place spiders at spawn points once you have your main lanes covered on wave 1.
Stats I had at the end of summit campaign:
- Fortify/Power/Range/Rate
- Monk: 8/46/98/0
- EV: 39/97/0/0
- 여자 사냥꾼: 25/0/73/40
- 도제: 98 능력
- Summoner: 3/138/24/4
- 파수꾼: 98/0/0/0
Keep in mind your stats don’t have to be exactly the same as mine. This is just to provide you a rough idea of what type of stats to expect.
Insane Ancient Mines Survival Hardcore, Rift Recommended
After completing summit on easy, 너’ll have unlocked insane difficulty. Remember if you’re struggling to clear maps with multiple players, you can farm summit campaign on hard/insane, hardcore with rift off. Rift would increase the item quality, but the boss health would dramatically increase. You can just build towers at each of the boss spawns to damage the boss so you don’t need DPS heroes to do so. You should only “필요” gemstones if you have 3 players or more. Note that it’s impossible to get a max boost stat gemstone on hard summit, and extremely difficult to get a max boost gemstone on insane summit. 하지만, for lower difficulties non capped gemstones will still help greatly if needed early on.
Loot filter check: 너’ll want to change regular armor autoloot to rare tiers and higher. Epic gear starts to show up around wave 6. Likely around wave 8 or so when your builders are in full rare armor, you can update the autoloot filter for regular armor to epic tier and higher. For your weapons/offhand filters, you can likely update them to legendary tiers and higher around wave 15 or earlier. Remember to look for vitality + ability on your weapon and offhand.
Monk tower boosts work more effectively than Apprentice boosts on your spiders in this map, so be sure to use your monk. 너’ll notice I specced into pure fortify on my warden. Only for this map, we use warden as a waller since spiders are our main damage tower. As you start putting together armor sets for all your builders, put one together for warden as well, 그리고 그녀’ll be covering your main tower damage needs and no longer just a waller.
I personally didn’t need to put together a full armor set (with the set bonus) until I was in full epic gear. But if you’re playing in a multiplayer lobby, always play it safe and equip your best gear as soon as you can. I also didn’t need to upgrade any armor until I was in Foundries and Forges, 하지만 당신이라면’re struggling with the build, it may be worth considering upgrading gear earlier.
When putting together sets, you can filter by set name in each armor bag filter to find the relevant pieces to get the 40% stat bonus as referenced earlier in the guide.
The pet you get at the end of wave 25 is a Hippogryph. If you cleared this map on rift mode, 너’ll get a fused version of this pet, which will provide a big source of DPS on your tower boosters. This is why I recommended to opt into rift mode. 너’ll also get a giraffe, which increases the cast rate of your builder. Try to get one for all of your builders at some point (2 for summoner if you wish). Run this map into endless if you can until you hit level 60. I hit level 60 at the end of wave 34 in my run. 다행스럽게도, this will allow you to farm for multiple hippogryphs and giraffes. If your build fails in endless, you can try a wave 23 시작, otherwise if that is still too difficult, try a lower wave start.
My stats at the end of this section were:
- Fortify/Power/Range/Rate
- Monk: 124/74/369/92
- EV: 138/412/69/152
- 여자 사냥꾼: 109/119/389/101
- Summoner: 102/408/95/213
- 파수꾼: 123/458/143/203
- 도제: 235 활력, 0 공격, 313 능력
Mid Game
Nightmare Ancient Mines Survival HC, Rift Recommended
This section is actually skippable. 하지만, 당신이’re playing in multiplayer and/or want a smoother progression path, 두목’t skip this section. This will take around 2 hours or so, similarly to insane ancient mines survival. I would again recommend turning rift mode on as this will give you strong pets at waves 14 그리고 25, as well as giving you parts of fused sets that will make the next map much easier to gear for.
Loot filter check: Myth gear appears to start dropping around wave 8. 너’ll likely be able to skip legendary armor entirely and go straight to myth armor. By wave 15 my builders were in mostly myth sets. 그래서, you can probably change your regular armor loot filter to myth tier and higher around wave 10 정도. You can do the same for your weapons/offhand filters.
Keep an eye out for fused myth quality guard/militia/primitive/ancient armor pieces. 너’ll need these for the next section. Feel free to equip any fused armor on your apprentice booster, as this will grant them rift armor. 파도 16 is when the difficulty begins to ramp up, so be sure to gear accordingly by then.
We switch to Warden towers for our tower damage, using spiders to debuff enemies and make them take double damage. Prioritize increasing defense rate on summoner at this point. Gas traps are mandatory on this map due to Sharken and Djinns. Sharken will sprint past your defenses without a gas trap, and Djinns will desummon your auras/towers without a gas trap. Your pets from insane ancient mines survival will help kill some early wave monsters and the dark elf warriors that pursue you later on.
Ideally you want to apprentice boost your towers instead of monk boosting. 하지만, Apprentice requires 2 mp regen to fully sustain the tower boost the entire wave. Not to mention that if dark elf warriors hit you, you lose even more ability mana. If push comes to shove, just apprentice boost whenever you see ogres on the map. In multiplayer games, you can mix up monk and apprentice boosters as you see fit. Just keep in mind the west section needs an apprentice booster the most, due to the two lanes. 너’ll probably only need to run this to wave 25, but feel free to keep going in endless if you want better hippogryphs.
By wave 20, these were my stats on my heroes:
- Fortify/Power/Range/Rate
- Monk: 618/772/1044/591
- EV: 604/969/410/299
- 여자 사냥꾼: 557/293/774/484
- Summoner: 297/764/301/379 (I forgot to spec into defense rate)
- 파수꾼: 429/864/403/552
- 도제: 240 활력, 216 공격, 530 능력
Stats at the end of wave 25 are provided in the planner.
Nightmare F&에프 (Foundries and Forges) Survival RHC (Rift Hardcore)
Your stats at this point, whether you skipped nightmare ancient mines or not, will set you up to very easily steamroll act 4 campaign maps to unlock Foundries and Forges. Clear act 4 campaign maps on easy all the way up to and including F&에프.
Rift mode is mandatory at this point, because we need to put together fused sets in order to jump to F&F on massacre. 하지만 또한, rift mode will become significantly easier once you put together fused sets. To the point where using fused sets on rift mode is easier than playing on non-rift mode largely from the double damage you get from your towers.
If you ran Nightmare Ancient Mines prior to this, 너’re in excellent shape. 너’ll likely have some fused pieces already, allowing you to complete fused sets much earlier. 너’ll also have a very strong DPS pet that will trivialize the beginning quite significantly, as well as have towers with enough stats to smoothly push through the waves, and you won’t need to re-adjust the build as posted on the DDA planner.
If you skipped Nightmare Ancient Mines, 너’ll have to adjust the build on the DDA planner slightly, as mentioned in the description. Once you get enough tower range to cover your lanes properly (at least around 200 range on warden, 100 range on EV), 너’ll want to reposition your towers as shown in the DDA planner. You want your blossoms/sludges (on a buff beam) to cover at least up to the portals.
Loot filter check if coming from Nightmare Ancient Mines: You can delete the normal armor loot filter if you’re comfortable with your characters myth sets. 그렇지 않으면, leave the regular armor filter on until your characters are in full fused myth sets. Adjust your rune filter based on the current blossom rune you’re on. 예를 들어, if you have an uncommon blossom rune, change your rune filter to rare and higher. You can also change your accessory loot filter to be stricter if you wish. 나는 할 수 있다’t give an exact filter to change to, as your previous accessory drops are pretty randomized. 그래서, use your own judgement for your accessory filter.
Loot filter check if coming from Insane Ancient Mines: You should still be in epic armor. I would advise changing your regular armor, 무기, and offhand loot filters to legendary and higher. When you find you’re oversaturated with legendary gear, you can move it up a tier to myth. 일단 당신은’re in full fused myth sets, you can delete your regular armor filter and you’ll be looking for only fused armor from here on out. Adjust your rune filter based on the current blossom rune you’re on. 예를 들어, if you have an uncommon blossom rune, change your rune filter to rare and higher. You can also change your accessory loot filter to be stricter if you wish. 나는 할 수 있다’t give an exact filter to change to, as your previous accessory drops are pretty randomized. 그래서, use your own judgement for your accessory filter.
If you get unlucky with finding a fused militia set, your build may fail around the wave 16 표시. At which point, just keep restarting at W12 until you find a fused militia set for your Warden (I only had to reset once coming from insane ancient mines). Clearing wave 14 guarantees 2 random fused armor pieces from the chest. Though with clearing Nightmare Ancient Mines, you may not need to reset at all due to your higher tower stats and pets. Also be sure to gear your apprentice in fused armor (any pieces) to increase his rift armor to help him tank hits against dark elf warriors.
Fused armor to watch for: Keep an eye out for a fused ancient set for your monk, fused guard set for your huntress and summoner (prioritize fused spider over gas trap), fused militia for your warden, and fused primitive for your EV. Fused ensnares and gas traps will increase fusion damage taken from your fused towers, fused blossoms will double their DPS, and fused buff beams will make your towers significantly more durable which helps a lot in this small map. With fused miner pieces, you can give them to your apprentice for rift armor. 그렇지 않으면, there aren’t any purposes with miner gear until you find godly miner pieces.
In addition to fused armor pieces, look out for the beaming blossom rune here. Unlock and equip the highest blossom runes you can find here, as this will significantly increase your tower damage. Runes can drop as high as epic tier on this map in nightmare difficulty, though rare runes are far more common. Keep in mind you’ll need around 200 million gold to upgrade your first fused militia set for Warden.
In solo, use your apprentice to tower boost all your towers. In 2p, use an apprentice + monk to tower boost. In 3p or more, have the third and fourth players (ideally summoners with powerful and speedy gemstones) use gemstones to boost your towers. If your extra players have striking gemstones however, they can increase the range of your towers (could replace 3 ensnares with an ensnare, strength drain and healing aura to cover your entire build), potentially allowing you to restructure your build, especially if you’re coming from insane ancient mines with lower stats.
I personally didn’t upgrade any gear in my entire run until the end of F&F to stress test the build. While this was clearable in solo, I would advise upgrading your first fused militia set. If you find you’re struggling to clear far enough to farm fused militia, then you may want to upgrade your non-fused myth. Just be sure to leave around 200 million gold for upgrading your fused militia set.
Stats I cleared with all the way to W25 solo (only blossoms were fused, and none of my gear was upgraded, and used only a 1/8 blossom rune)
- Fortify/Power/Range/Rate
- Monk: 519/451/855/512
- EV: 554/710/261/435
- 여자 사냥꾼: 508/479/979/530
- Summoner: 570/692/473/830
- 파수꾼 (Fused): 569/833/419/598
I hit level 80 around wave 52. With all the trans fused armor pieces, my stats going into Massacre F&F Survival RHC (with upgrading) were:
- Fused Monk: 719/1169/2119/1079
- Fused EV: 1891/2519/1423/967
- Fused Huntress: 866/668/2166/1047
- Fused Summoner: 895/1514/870/1748
- Fused Warden: 1151/3543/1684/1218, ~와 함께 3/8 blossom rune
End Game
Massacre F&F Survival RHC
Loot filter check: Change your fused armor filter to trans and higher, and accessories to trans and higher. Accessories drop consistently in F&에프, so be sure to look out for mp regen and hp regen accessories. This map is a great opportunity to start looking for weapons with cast rate. 너’ll want all of your builders to have cast rate on their weapons to speed up building in your build phase. While this isn’t necessary, 그것’s quite convenient and saves you time in the long run.
Set your weapon filter to include swords and bows, item tier to trans quality and higher, until you get cast rate weapons for all of your builders. 너’ll want 2 swords, 2 staves, 2 이물, 2 pole arms. I personally aim for a minimum of 150 cast rate to instantly build towers, you can try out weapons with lower cast rate if you wish.
After you get all of your cast rate weapons, change the weapon filter to include fusion under the element tab. Make sure you checkmark “Fusion” and not “Always include fusion”. As you get to the late waves, 너’ll be able to swap your fused armor filter to godly and higher.
The build is identical to the nightmare version. Try to keep your gas trap range around 4k. Otherwise with too much range, the gas trap will slow down waves. 또한, if a single ensnare can cover all 3 portals, you can drop the other 2 ensnares and replace them with a healing aura and strength drain aura to make it safer for your tower booster.
Runes to look for: 6/8 focus blossom, 6/8 poison tipped spears, 6/8 poison dagger (선택 과목), though trans runes can drop here without bonus difficulties applied.
Fused sets to look for: Ancient for Monk, Guard for Huntress/Squire/Summoner, Militia for Warden, Miner for Apprentice/EV, and Primitive for Guardian/EV. 너’ll want both fused miner and primitive sets for EV, depending on the map. So be sure to get both.
Note that for the Temple map in the distant future, I prefer fused militia on Summoner over fused guard, as sirens can kill flyers more efficiently than spiders. We will need both blossom runes and the harpoon runes to clear the temple map. The harpoon rune also allows us to clear the keep map coming up which will unlock the lycan bonus difficulty for us.
이전과 동일합니다, upgrade your blossom rune as you progress to make later waves easier. 어느 시점에서, swap out your monk and huntress for your squire and rogue to level them up to 80, and eventually a guardian to level 80 또한 (prioritize the squire and rogue first). Losing fused ensnares and gas traps won’t impact your build too much. 두목’t worry too much about levels either, as long as all of your heroes are at least level 80-100. Very rarely you’ll find a supreme item that requires level 110, but it is not at all necessary to use during this progression. Aim to get 8k main stats on all of your builders, as well as a 5/8 또는 6/8 poison tipped spears rune (aim for 6/8 if playing in a group) before moving onto the next section.
Fully upgrading godly armor sets and accessories seem to cost about 15-18 billion per character, so keep this in mind. 너’ll need your Monk, EV, 여자 사냥꾼, 도제, Summoner, Squire, and Rogue geared up for the keep coming up.
My stats at the end of F&F around wave 72:
- Fused monk: 3399/4072/8385/4544
- Fused EV: 3836/8380/3075/4433 (only had fused primitive here, but you should get miner too)
- Fused huntress: 5488/3618/6657/4261
- Fused apprentice: 4612/7566/4164/5874 (for fused lightning towers)
- Fused squire: 3679/8527/3884/5090 (5/8 harp rune)
- Fused warden: 4175/8121/3617/3565 (5/8 bloss rune)
- Summoner: 1534/2385/1344/2708 (I neglected summoner at this point, 하지만 나는’d advise upgrading his gear anyway for an easier time)
Massacre Alchemical Labs Survival and Campaign RHC
Loot filter check: Make sure your weapon filter is looting trans and higher. You can set your rune filter to epic and higher for now, as there are some helpful runes in act 1. You can also set your pet filter to trans and higher as well.
Before we take on the keep, we need to get weapons with a certain modifier that drops only from bosses on rift mode called “Chance to Irradiate”. This mod grants a chance to inflict irradiate, which deals damage to the target based on a percentage of their maximum health for a given time interval. Even though this effect is reduced on bosses, 그것’s still the best modifier for bossing especially during progression.
We choose to run alchemical labs because it’s the easiest map to kill a boss with your towers alone. The map in survival also grants a pet that greatly increases your damage. In this run we’ll be using the Rogue as our boss killer. The rogue can use both a sword and bow, both whose mods will stack with each other. 따라서, his chance to irradiate mods will stack and will make irradiate proccing more consistent. With your current stats, your towers will melt the boss on campaign, though it will also even kill the boss on W25 survival without difficulty if you decided to go that far.
Either clearing campaign or wave 25 survival will grant you the weapons you need from the chest. Open the chest once as a huntress, and then another time with a squire to guarantee a bow and sword drop respectfully. Now because your stats are so high making both survival and campaign easy, you can actually opt to run survival before running campaign, due to the timer that campaign will have with hardcore being toggled on. Running survival gives you practice with building so that you’ll be prepared to build on a timer for campaign.
You do have some options here that I’ll present. You can either: clear wave 14 survival to get the cat pet, then run campaign twice on massacre RHC for both a sword and bow. Or you can full clear from W1-25 on survival RHC, to get both the cat on W14, and higher quality weapons on wave 25+ for an easier time with the keep boss.
My recommendation is dependent on how you decide to kill the keep boss. There is a cheese strategy where you can attack the keep boss from far away without it hitting you, this ends up being both safer and a faster strategy. 당신이’re planning on using this strategy, then you don’t need to full clear alchemical labs, and campaign weapons are sufficient.
하지만, if you decide to not use this strategy, then I would recommend farming alchemical labs to W25 to get more vitality on your gear, as you’ll need a minimum amount of hp regen to facetank the boss as rogue. If you plan on facetanking the keep boss, then I would recommend farming a cat that grants vitality as well.
지금, you *can* use a giraffe instead of a cat to clear the keep boss if you want, 하지만 나는’d advise against this due to the damage loss you’d have. But in addition to that, 너’d want a cat for the temple boss in the future anyway.
Keep an eye out for pulsator, flash heal, and entangling root runes here. These are helpful to have on your apprentice/summoner/warden, but not at all mandatory to the progression. 당신 이후’re finished with farming the cat on survival (end of wave 14), you can run it twice on campaign now (당신이’re opting out of the wave 25 분명한) for the weapon drops. Upgrade your cat until it hits the maximum hero boost stat and upgrade your weapons into damage. Though you can upgrade your sword into vitality if you wish, as you won’t be attacking with the sword in this guide.
Massacre Keep Survival RHC
Loot filter check: Change rune filter back to mythical and higher.
Prior to the boss, make sure your rogue has your upgraded weapons/cat from alch labs equipped, a rift armor set to get the rift armor bonus, and all of the hp regen accessories you can stack on him.
For the Lycan boss, 너’ll have to do enough damage to the boss with hero DPS (your pet won’t attack him either) before entering the lure phase. 너’ll then be prompted to lure the boss towards one of the chairs with dynamite. At this point his defense drops and both you and your defenses can deal full damage. You have the option to hit the dynamite again to stun the boss to prevent him from attacking you, or you can tank the boss hits and get the boss to take damage for longer.
Tanking the Lycan boss on this difficulty requires somewhere between 38,000 에게 44,200 hp regen (this is without the arcanist helmet, 그래서 20 rift armor). You can calculate your hp regen by multiplying your maximum hp by the hp regen % on your accessories. 하지만, 당신이’re facetanking and you’re playing solo, and you use the invisible ability (4 on the keyboard) then the boss will start attacking your towers instead. Being unable to go invisible will decrease your DPS, so keep this in mind. This applies to all bosses, including the temple boss. 당신이’re in a game with multiple players, you can go invisible as long as one person stays visible within the boss’s line of sight.
대안으로, you can use this cheese strategy where the boss will walk up to a chair and not attack anyone/anything. Note that the boss currently walks much slower than he does in the video.
따라서, 당신이’re facetanking the boss solo, only spam his devices (1, 2, 그리고 3) while holding the firing button. 당신이’re cheesing the boss, or have other players holding boss aggro, follow the skill rotation as mentioned earlier in the guide in the hero section. The poison dagger rune found in act 4 will greatly increase your DPS in this scenario.
멀티 플레이어에서, you might need other players apprentice boosting east and west sections if your build is struggling to hold (including during the boss wave). Clearing this map will unlock the Lycan bonus difficulty which will make farming for godly runes possible on maps prior to keep in survival mode. You also get the arcanist helmet, as well as the best weapons you can get for rogue in this map. Farm this through endless to farm as many arcanist helmets and weapons as you can. Be sure to open the chest with squire and huntress to replace your sword and bow from alchemical labs. Ideally you find a sword and bow with the “inspired assault” weapon set. The sword can be a smasher or a claymore, it won’t matter for the purposes of this progression guide. The fastest attack rate for the sniper is 0.15s for reference.
Over the next maps prior to temple, your goal will be to get as a bare minimum, mythical runes (trans for multiplayer) 게다가 at least 12k main stats. The arcanist helmet here will help you hit 12k stats landmark. The blossom rune, harpoon rune, and poison dagger rune drop on this map as well. Prioritize gearing up your squire with a good arcanist helmet so you can push farther into endless on this map.
Note that the stats listed in the planner do not reflect the stats I had in this run.
(선택 과목) Massacre Summit RHC Campaign
For afk farming, you can farm for gemstone pets on a summoner if you haven’이미. Though I would recommend farming Bazaar for the PDS rune (and ideally Endless Spires for the overdrive rune) prior to doing this if you want an extremely brain-dead build to use. Otherwise summit campaign is still ridiculously easy and trivial with your current stats.
Massacre Endless Spires Survival RHC
Loot filter check: Rune filter to epic and higher, slowly increase the filter until you’re at mythical overdrive rune.
We are primarily here to farm for the overdrive rune. The flaming owl, sluggish aura, pet master, and spider’s poison runes are also good to have. Make sure you turn on Lycan Bonus difficulty from here on out. If you wish to farm on mix mode instead of survival, 너’ll have to clear Keep on mix mode to unlock it. Equip the highest overdrive rune you find on this map, as the build provided is based on having it. Keep farming here until you get a mythical overdrive rune or higher. Worth noting that squire’s best DPS pet drops here: the monkey king. Though we don’t use it in this run.
Massacre Bazaar Survival HCR
Clear campaign on easy for bazaar, all the way to and including Forsaken Temple. Then you can start Bazaar on Massacre Survival.
Loot filter check:
- Rune filter to epic and higher, slowly increase the filter until you’re at mythical reflective screech rune.
- Runes to look out for here: Reflective Screech (두목’t use anything higher than mythical, save any higher tiers you find, as having too much range on the siren rune can be detrimental), Full Coverage, Deadly Gaze, Exploding Aura, Empowering Ring.
- Out of the runes to look for here, only Reflective Screech is necessary for clearing temple. 하지만, the other runes (especially Full Coverage) are quite helpful with certain builds/maps.
- If you already have all the runes/arcanist helmets you need, this map is ideal for getting higher quality chests/gloves/boots prior to clearing temple. 하지만, this map runs slower than F&에프.
- 나’ve provided a build with and without overdrive rune in case you decided to run Bazaar first. Though all of the screenshots are in the non overdrive planner.
(선택 과목) Massacre Royal Gardens Survival RHC
Optional but you may also want to consider farming Royal Gardens after farming the PDS rune in Bazaar if you wish to use bombers for farming F&F on Lycan difficulty (Pulsator rune is optional here):
Massacre Forsaken Temple Survival Rift Non-HC
This is by far the most difficult map in the game for progression. This map will unlock the final bonus difficulty which will allow us to farm the highest quality gear in the game, as well as make godly rune farming significantly easier. Make sure you farm for the necessary runes/stats as listed in the DDA planner. HC doesn’t need to be on to unlock the bonus difficulty, and the loot on this map isn’t worth farming, so HC does nothing for us.
Summary of maps to farm in preparation for Temple:
- Keep for better arcanist helmets and harpoon/blossom runes, masks, and weapons for rogue
- Bazaar for myth siren rune and general armor drops (slower than F&F but higher quality at this point)
- 에프&F on Lycan bonus for general armor drops, harpoon/blossom runes, and accessories
- Endless Spires on Lycan bonus for overdrive rune
- (선택 과목) Survival Royal Gardens for bomber pets
Dune eater boss: In the first phase of the fight, the boss rises from the front middle of the arena on the west side of the map and shoots projectiles at you if you’re far or does a melee attack if you’re close. The projectiles can hit your towers if you’조심하지 않아. If all the heroes are invisible/dead, the boss aggros onto the towers. 그래서, keep this in mind if you’re soloing and you’re tempted to use the invisible skill for dagger throws on rogue. After you do enough damage, the boss will dive underground then summons minions that appear from 5 doors on the map. Number of minions (and their health) scale with the number of players on the map. The minions show up as big red circles on the map. These minions slowly walk towards the middle of the arena to heal the boss and are targetable by towers and heroes. Note that the minions will jump over your towers if they’re in the way, so blocking them is not an option. After all minions die, or minions heal the boss enough, the fight shifts back to phase 1 and rises from a different spot in the middle and repeats.
Things to consider if trying to clear Temple in multiplayer: Farming for higher tier runes/tower stats than described in the planner or farming for bomber pets for your extra players (dual wield as summoner) from Royal Gardens on Lycan Bonus difficulty. Summoners with bombers would be more impactful than dual gemstone pets on this map. Another thing you could try if it’s too difficult, is to clear temple solo, then bring your friends into other maps farming on dune eater difficulty, then return to temple later to unlock the bonus for them. This would likely be the easiest option to consider. 그렇지 않으면, in a 4P group, a combination worth considering would be a summoner with dual bombers at each core, with a single rogue DPSing the boss. Ideally the rogue would have the dagger rune and thus would go invisible, so the summoners would have to watch out for boss projectiles. In 2p or 3p, you can try different combinations of heroes.
Post farming after unlocking DE bonus difficulty
For rune farming, I prefer the following maps.
- 행동 1: Magus Quarter
- 행동 2: Endless Spires or Ramparts
- 행동 3: Royal Gardens
- 행동 4: 에프&에프
- 행동 5: Bazaar
At this point you can start farming for Supreme gear more reliably. For general gear farming, 에프&F is ideal on DE difficulty. 에프&F is the fastest map in the game that also drops all armor types. 그것’s more efficient to farm all armor types on F&에프, and then target farm on specific maps for whichever few pieces you’re missing. Or alternatively just keep running F&F indefinitely due to how fast it is.
For offhand farming, 에프&F would also be ideal. Even with bonus difficulties applied, 행위 4 그리고 5 give the best offhands.
For accessory farming, running Alchemical Labs, Throne room, and Summit are ideal for target farming Brooches, Bracers, and Masks respectfully with 4 guaranteed tower stats. Keep also drops masks but 4 stats aren’t guaranteed.
For pet farming:
- Any map for Giraffes
- Ancient mines for Mista Mine (I personally don’t have a use for this pet)
- Alchemical Labs for Propeller Cat (ideal for Rogue and Huntress DPS)
- Endless Spires for Monkey King (ideal for Squire DPS for bossing)
- Royal Gardens for Lil Bomber (ideal for Summoner ranged DPS)
- Yuletide Village for Penguin (hybrid summoner DPS pet with less range but more damage, however Bombers perform significantly better)
- Summit for Powerful/Striking/Speedy Gemstones (campaign is a much faster farm, and the pets do not require high stats due to being in overlord mode on summoner)
For weapon farming:
- 여자 사냥꾼: Summit for Dragoon
- Squire: Throne room/Keep for Path Sword/Wolfsbane Smasher respectfully
- 악당: Keep for Claymores/Snipers
Troubleshooting a Failed Build
Things to check if your build has failed:
- Tower priority
- Towers losing fusion status/rune effect from being swapped out of the deck or player who built the towers disconnected from the lobby
- Runes and fused armor being equipped properly to fuse towers/utilize runes
- Following the DDA planner description/instructions
- Stats are too low
- 너’re playing with multiple players, and the additional players are not tower boosting/gemstone boosting/DPSing
- Players aggroing ogre projectiles/bosses onto defenses
If you lose a map and you notice the following things, it may hint at what destroyed or got through your defenses/crystals.
- 당신이’re missing a reflect, a Djinn desummoned them.
- 당신이’re missing only a buff beam, either a Djinn desummoned it, or a trap/aura touching the beam died for whatever reason (Djinn desummon or lack of repairs)
- If a buff beam and a tower is missing, either a Djinn desummoned the tower which also kills the beam, or the tower died from other means.
- If multiple of your towers have taken damage, likely they suffered from splash damage from an ogre projectile, a kobold explosion, or rifted skeleton explosions.
- If a mage or an enemy with projectiles are hitting your crystal despite a reflect being on it, it means your reflect is not close enough to the crystal. The mage also may have been buffed by a djinn which in turn becomes immune to all sources of crowd control, this happens very often in rift mode.
Overall if you keep failing a map, keep your map overlay up to pay attention to what exactly is killing your build. On PC if you’re the host, you can open the textbox to see messages of what monster is hitting your core.
이것이 오늘 우리가 공유하는 모든 것입니다. 던전 디펜더스: Awakened 가이드. 이 가이드는 원래 작성자가 작성하고 작성했습니다. .. 이 가이드를 업데이트하지 못한 경우, 다음을 수행하여 최신 업데이트를 찾을 수 있습니다. 링크.