
An introductory guide for new players and tips to finish the scenario. 진행중인 작업. Feel free to leave your thoughts and feedback in the comments.
Top tips
I’ll put my top tips first, so if this is all you want you don’t need to hunt for them; feel free to share yours in the comments and I may add them in.
- Dilbert is the best
- Mine every 4th row to maximise resource collection
- remember your goal, it’s easy to get focused on levelling up and resource gathering (Relic mode)
- If you get the special teleporter, activated with ‘R’ then place it at the bottom of your mine, as you can’t bring resources with you it’s a quick way to get back down these after depositing some.
- Be sure to upgrade whichever modules you get, many start out poor but get alot better with a few low cost upgrades.
- some perks don’t help you or don’t fit you play style, read them carefully before buying them
First game – Relic mode small
The goal of Relic mode is to find an underground vault, activated by two buttons. This vault will be deep underground but can be found within about 20 minutes if you rush to it.
Be sure to balance digging deeper, collecting resources and exploring with defending your dome. Once the dome breaks (as indicated by the cracks that appear) it is game over.
Mining strategy
For your first few games you will want to maximise your efficiency by getting all the resources you can.
To do this mine in rows, mining out any resources you come across, then skipping two rows before mining the next set. See the below image for an example:
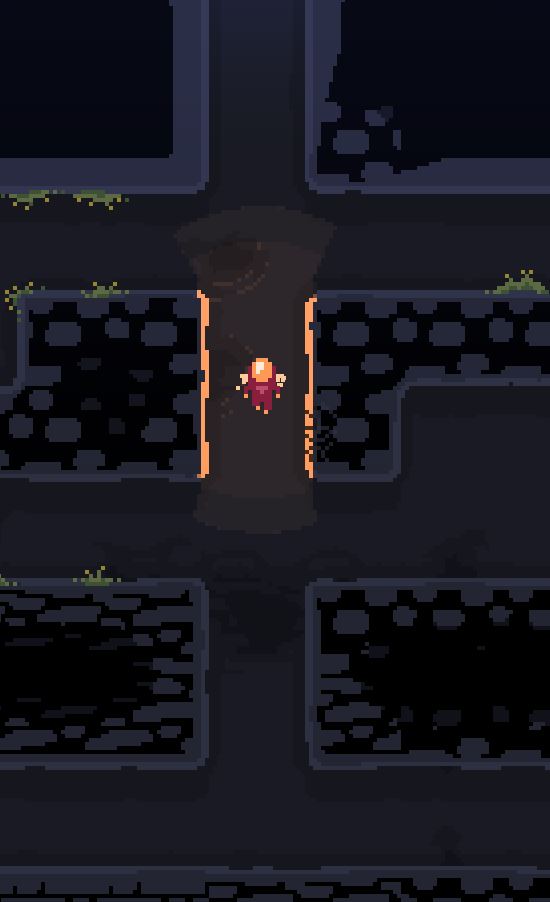
This central column can be extended to be 3 wide if you keep finding resources being caught on the rocks.
Levelling strategy
For your first 3 perks go for the ones that effect your character, faster digging, flight and carry capacity.
The enemies are few in number for the first few rounds and let you get alot of digging done with no worries.
다음, the dome health upgrade and if you have the Cobalt the self repair powers.
Following this if you are really struggling with enemies improve your weapon or the domes initial shield.
Otherwise go for more personal growth. Your focus should be on speed and digging, there are modules which will help you get resources back to the dome.
Enemies Strategy
Focus on the melee ones first. Once they begin hitting the dome they speed up their attacks over time.
Then any of the tiny exploding ones, as they will add up to alot of damage if they all explode on you.
마지막으로, the flyers. If you are struggling to hit them due to ghost mode, wait for them to stop firing, follow to their new spot to hit them.
모듈 – suggested pick ups
This is my advised favourites. 하지만, you may find you like very different ones, and even the lower ranked ones can synergise will with others.
- 1. Dilbert
- 2. Stun gun
- 3. 텔레포터
- 4. Converter
- 5. 승강기
- 6. 폭탄
- 7. Condenser
Dilbert is a great miner, with a few perks he will plow through the mines. My Strategy is to let him dig from one end to the other, drop him down 3 rows then let him carry on as I go back along the previous row to dig out any missed resources.
The benefit of him is you can maximise resources growth, dropping a few treats down easily speeds him up and it frees you up to collect resources.
Synergises will with the lift.
Stun Gun, once you have the AI upgrade you don’t need to be so preemptive with getting back to the dome to fight enemies. combined with the damage upgrade it can clear out a surprising number of enemies.
Synergises will with any other module.
텔레포터, I like over the lift as it can get you around easier. Leave it at the bottom of where you’re mining so that once a wave starts you can quickly get up to the dome and then back again using the receiver in the dome.
Converter is best for the multiple iron upgrade. It’s just a solid more resources to spend upgrade.
승강기, very useful to fully upgrade the orbs and their carrying capacity and then dump all the resources on it to be taken back up. I find it’s still slower than I’d like and while it can help you get back up isn’t very good for manoeuvrability as the teleporter is.
bomb, if you use the sticky upgrade it’s useful. Otherwise I found it hard to fully utilise and it messed up my mining process.
Synergises poorly with Dilbert.
Synergises well with the lift or teleporter.
Condenser, is just a big meh. More water is nice but it feels like such a pitiful trickle. Compared to the others this definitely ranks last.
Synergises best with converter.
이것이 오늘 우리가 공유하는 모든 것입니다. 돔 키퍼 가이드. 이 가이드는 원래 작성자가 작성하고 작성했습니다. Cyber Submarine. 이 가이드를 업데이트하지 못한 경우, 다음을 수행하여 최신 업데이트를 찾을 수 있습니다. 링크.