- 제목: Bloody Rally Show
- 출시일:
- 개발자:
- 발행자:
Information about Bloody Rally Show is still incomplete. 이것을 사용하여 게임의 세부 정보를 입력할 수 있도록 도와주세요. 문의 양식.
Bloody Rally Show features several achievements that do not explicitly mention their requirements, although many of them need to be completed within the Campaign mode. This guide aims to provide a comprehensive walkthrough to help you unlock all achievements with minimal frustration.
When striving for 100% completion in Bloody Rally Show, two main challenges stand out. 먼저, there is one achievement that relies on random number generation (rng), which can make it unpredictable to obtain. 둘째, the game’s distance calculation is not accurately reflected, resulting in the grind for a specific achievement being roughly twice as long as expected.
Campaign Part 1
The majority of achievements can only be unlocked within the Campaign mode, although some may not be immediately apparent.

Full Season
Complete a Campaign
Completing a campaign in Bloody Rally Show typically involves achieving a top-three position at the end of a season.

재향 군인
완벽한 5 Campaigns

Things Went South
Fail a Campaign
If you finish below 3rd place at the end of a season or get killed as a pedestrian without sufficient funds for revival by medics, the campaign will be considered a failure.

Freedom
Repay your debt to SOFACT
Repaying the debt incurred during the campaign requires multiple seasons, and the cost increases with higher difficulty settings. This process is straightforward but time-consuming.

Pure Gold
Finish Campaign Season in 1st place

Medium Rare
Finish Campaign Season in Top 3 with Normal Difficulty

I Like It Rough
Finish Campaign Season in Top 3 with Hard Difficulty

하드코어
Finish Campaign Season in Top 3 in Hardcore Mode
While you have the option to enable all campaign features, it is recommended to disable weapons and the director, 무엇보다도. By conquering each required difficulty level, you can fully experience the game. If the challenge becomes too daunting, you can disable AI balancing options and reduce their skill level to 0% at the beginning of the game, which makes it considerably easier. 하지만, even with these adjustments, winning every race might not be guaranteed until you obtain the highest-tier car.
It’s worth noting that the AI opponents struggle with corners but have a significant advantage with weapons and balancing options. They can quickly regain speed after resets and crashes, which can lead to a player’s first-place position instantly turning into last place.
In Hardcore Mode, it’s important to remember that you start without a car.
To ensure you have enough money to purchase a car by the 5th event and avoid being a pedestrian when other cars have weapons, it is recommended to take high-quality pictures during races. This will provide you with additional funds.

There Is No “나” ~ 안에 “Team”
Win a Co-Op race in Campaign
I believe there is an error in the provided description.
If I recall correctly, in order to achieve this, you have to participate in a Co-Op campaign, and at least one of the players must finish in the top 3 positions by the end of the season. I personally accomplished this by playing with split-screen using two controllers, which essentially doubled the time required.
Since this was one of the first achievements I obtained, I am unable to test it again. 하지만, it might be possible to join as a pedestrian, intentionally eliminate Player 2, ensuring they cannot continue to compete, and then secure a top 3 position as Player 1. I’m uncertain if there are any additional requirements, such as paying for each other or employing some other mechanic. This is merely a theoretical approach I devised after completing the game entirely in order to optimize the process. Undoubtedly, it would be more advantageous to collaborate with another player to accomplish this task.

Twisted Metal
Wreck a car in Campaign

Smoking Miracle
Win a Campaign race with a nearly wrecked car

Grease Monkey
Repair a nearly wrecked car in a Campaign race
Choose an easy level campaign and enable weapons for every race. You won’t face any difficulty in getting your car wrecked. Your health bar can be seen at the top right corner of the screen.
I achieved this naturally, so when you receive a weapon, keep your health low and hope it’s a wrench. Finish first in the race to obtain the other achievement while keeping your health low. I’m not sure about the exact percentage, but it shouldn’t be difficult to accomplish.

On Foot
Participate in Campaign as a Pedestrian
The achievement automatically unlocks in Hardcore Mode. 그렇지 않으면, you need to ‘flip the map card’ and choose to compete as a pedestrian.

Photographer
Take a high quality close up photo of a car in Pedestrian mode
Approach closely and take a picture. It’s a really easy task.

Wonders of Medicine
Get resurrected by medics after dying in Pedestrian mode
Simply get killed as a pedestrian once you have made progress in a campaign. It won’t cost much, somewhere between 15-25K depending on the difficulty. 그래서, avoid dying at the beginning of the campaign. The most challenging achievement for me was the RNG Achievement during the GTA Event.

Grand Theft Auto
Get your car stolen
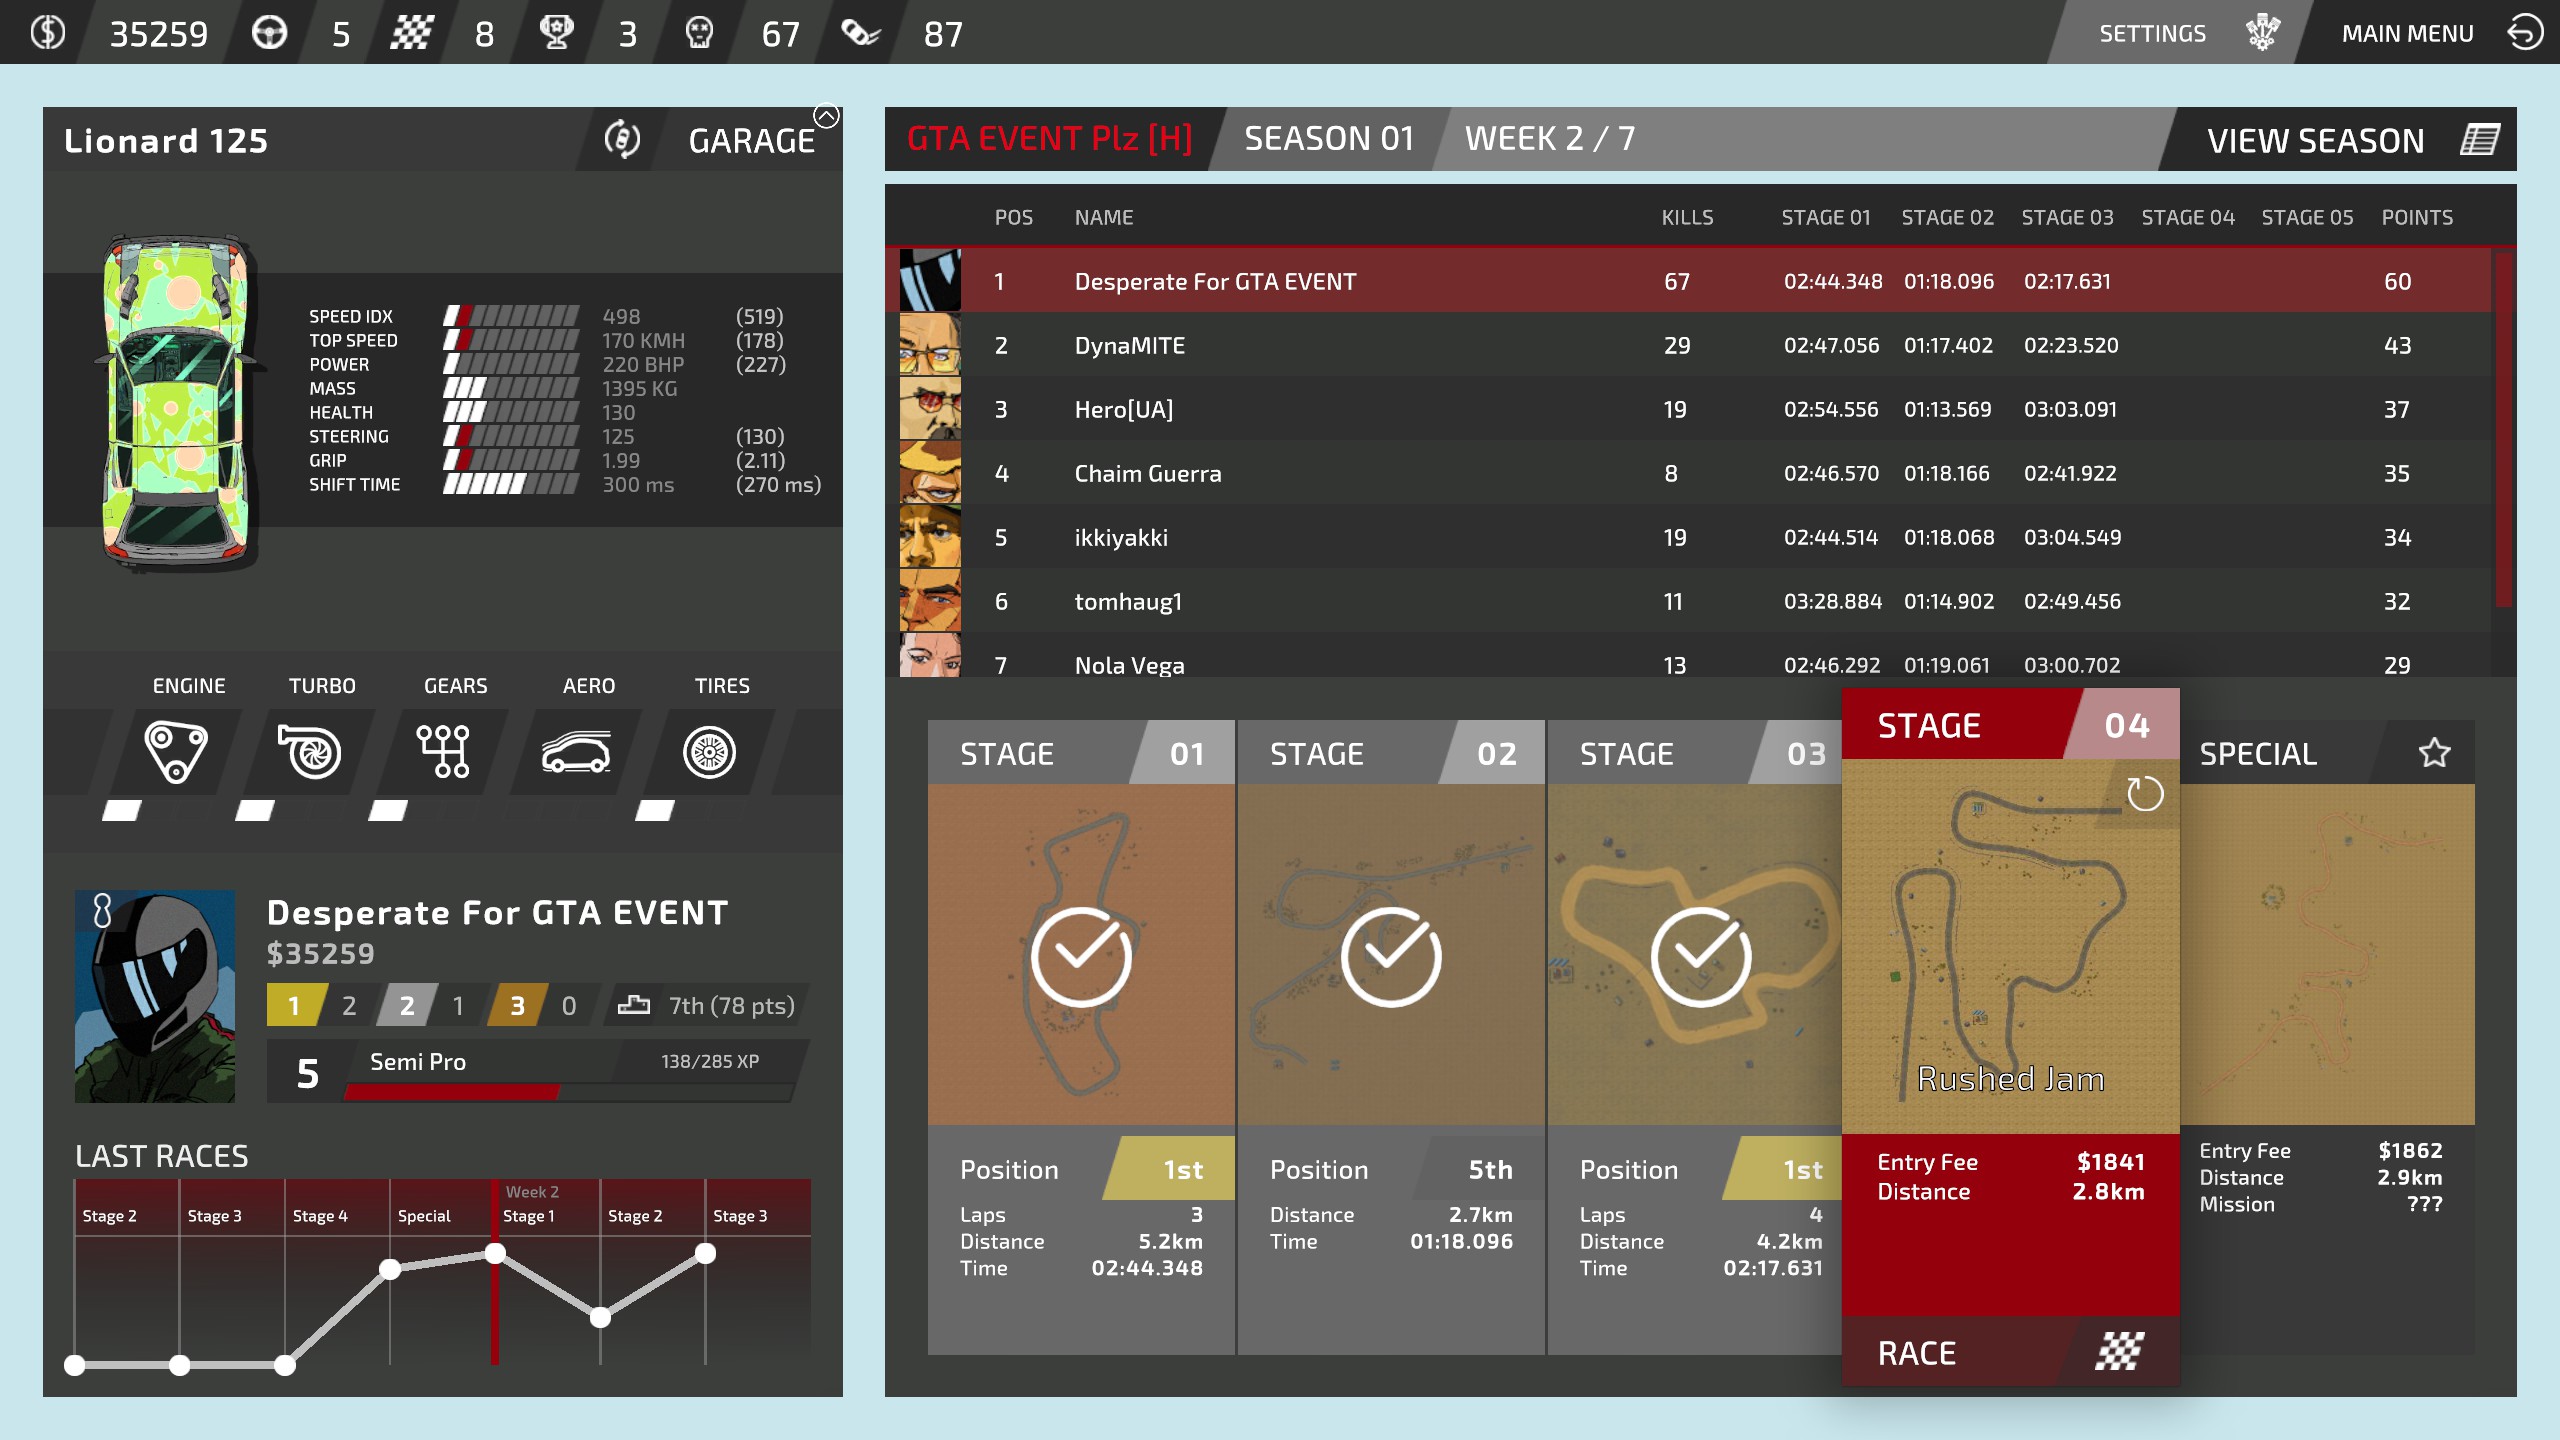
As shown, I became quite desperate to obtain this achievement but finally succeeded on Season 26 Week 5 낮 2 on Hard difficulty. I attempted multiple campaigns on Hardcore mode simultaneously to pursue the achievement, but without any success…
The developer informed me that it might not be possible to encounter the event on ‘easy’ 방법, and I remember reading an old thread mentioning that the odds of encountering the event are higher at higher difficulties.
에 관계없이, it’s a random event, so you need to play with ‘missions turned on’ when starting the campaign.
Based on information from other players, I’ve seen two accounts with 8 그리고 16 hours respectively, where they obtained the achievement. This indicates that you probably won’t need to spend as much time as I did to obtain it.

This is what the mission looks like, where the given tip is a clear indication of what will happen, and the achievement popped up a few moments after starting the map.
The reward for losing isn’t having your car stolen, 그러나 내 경우에는, it was a car upgrade. 그래서, it doesn’t matter if you win or lose; the car will still be stolen.
Campaign Part 2

Transcended Racer
Gain 100K XP

Millionaire
벌다 1 million in cash in a single Campaign
To optimize the grinding process for achieving Transcended Racer, the GTA Event, and eventually reaching 10,000 KM, I recommend creating a challenging campaign without AI balancing, allowing the use of modded cars. 하지만, it’s advisable to disable all weapons while enabling missions, as they provide good XP and nitro. Set the AI skill level to zero, and for every two additional AI cars added in each new season, maintain the same skill level. It would be beneficial to aim for the distance achievements to acquire my car at the end of this particular section. 추가적으로, prioritize eliminating pedestrians in strategic locations for substantial cash rewards and potentially better XP gains.

때리다 & 달리다
Hit someone with your car

Dexter Morgan
때리다 100 people with your car

Mega Maniac
때리다 1000 people with your car

How Do You Even?
Hit 10k people with your car

씨. Mercedes
25x combo!
Unlike the process of grinding for pedestrians, this task is considerably difficult, and I have not attempted it many times.
이를 달성하려면, drive through a large crowd using a relatively fast car, with another car closely following or positioned on the opposite side of the road, utilizing a sliding maneuver. The time window for executing this maneuver is narrow, and typically, there appears to be a higher concentration of pedestrians on the fifth map with the quest for each week.

Certainly, to make the process significantly easier, you can enable custom maps in the campaign and select a densely populated map. I actually created one myself after obtaining the achievement, where you can achieve combos of even 100 또는 그 이상. 하지만, I strongly recommend attempting to achieve the goal without utilizing this method.

Drifter
Drift for 10 seconds in a Campaign race

Drift Master
Drift for 30 seconds in a Campaign race

Absolut Drift
Drift for 1 minute in a Campaign race
Drifting for a duration of ten seconds can be quite challenging, and I haven’t come close to achieving 30 seconds or one minute of continuous drifting.
뿐만 아니라, it is important to note that the entire duration must be completed within a single drift, without swerving from side to side or going off-road.
Certain maps have wider roads that make it somewhat easier, but essentially, to maintain a drift for such a long period, you need to execute a continuous donut or slide in a circular motion. 몸소, I managed to accomplish a 90-second drift without encountering any issues.
If the presence of AI opponents becomes bothersome, it is permissible to let them finish first in order to make the task easier.

Grasshopper
도약 50 미터

Evil Knievel
도약 100 미터

Rocket Man
도약 150 미터
Once you acquire the fastest car, 또는 대안 적으로, if you utilize my car, you will naturally achieve much greater distances while driving, often without even putting in much effort. In case you need an additional boost, you can strategically use nitro to propel yourself further or take advantage of conveniently positioned ramps to launch yourself into the air and cover more distance.

1 KM
운전하다 1 KM

5 KM
운전하다 5 KM

10 KM
운전하다 10 KM

Half Marathon
운전하다 21 KM

마라톤
운전하다 42 KM

100 KM
운전하다 100 KM

1000 KM
운전하다 1000 KM

10000 KM
운전하다 10000 KM
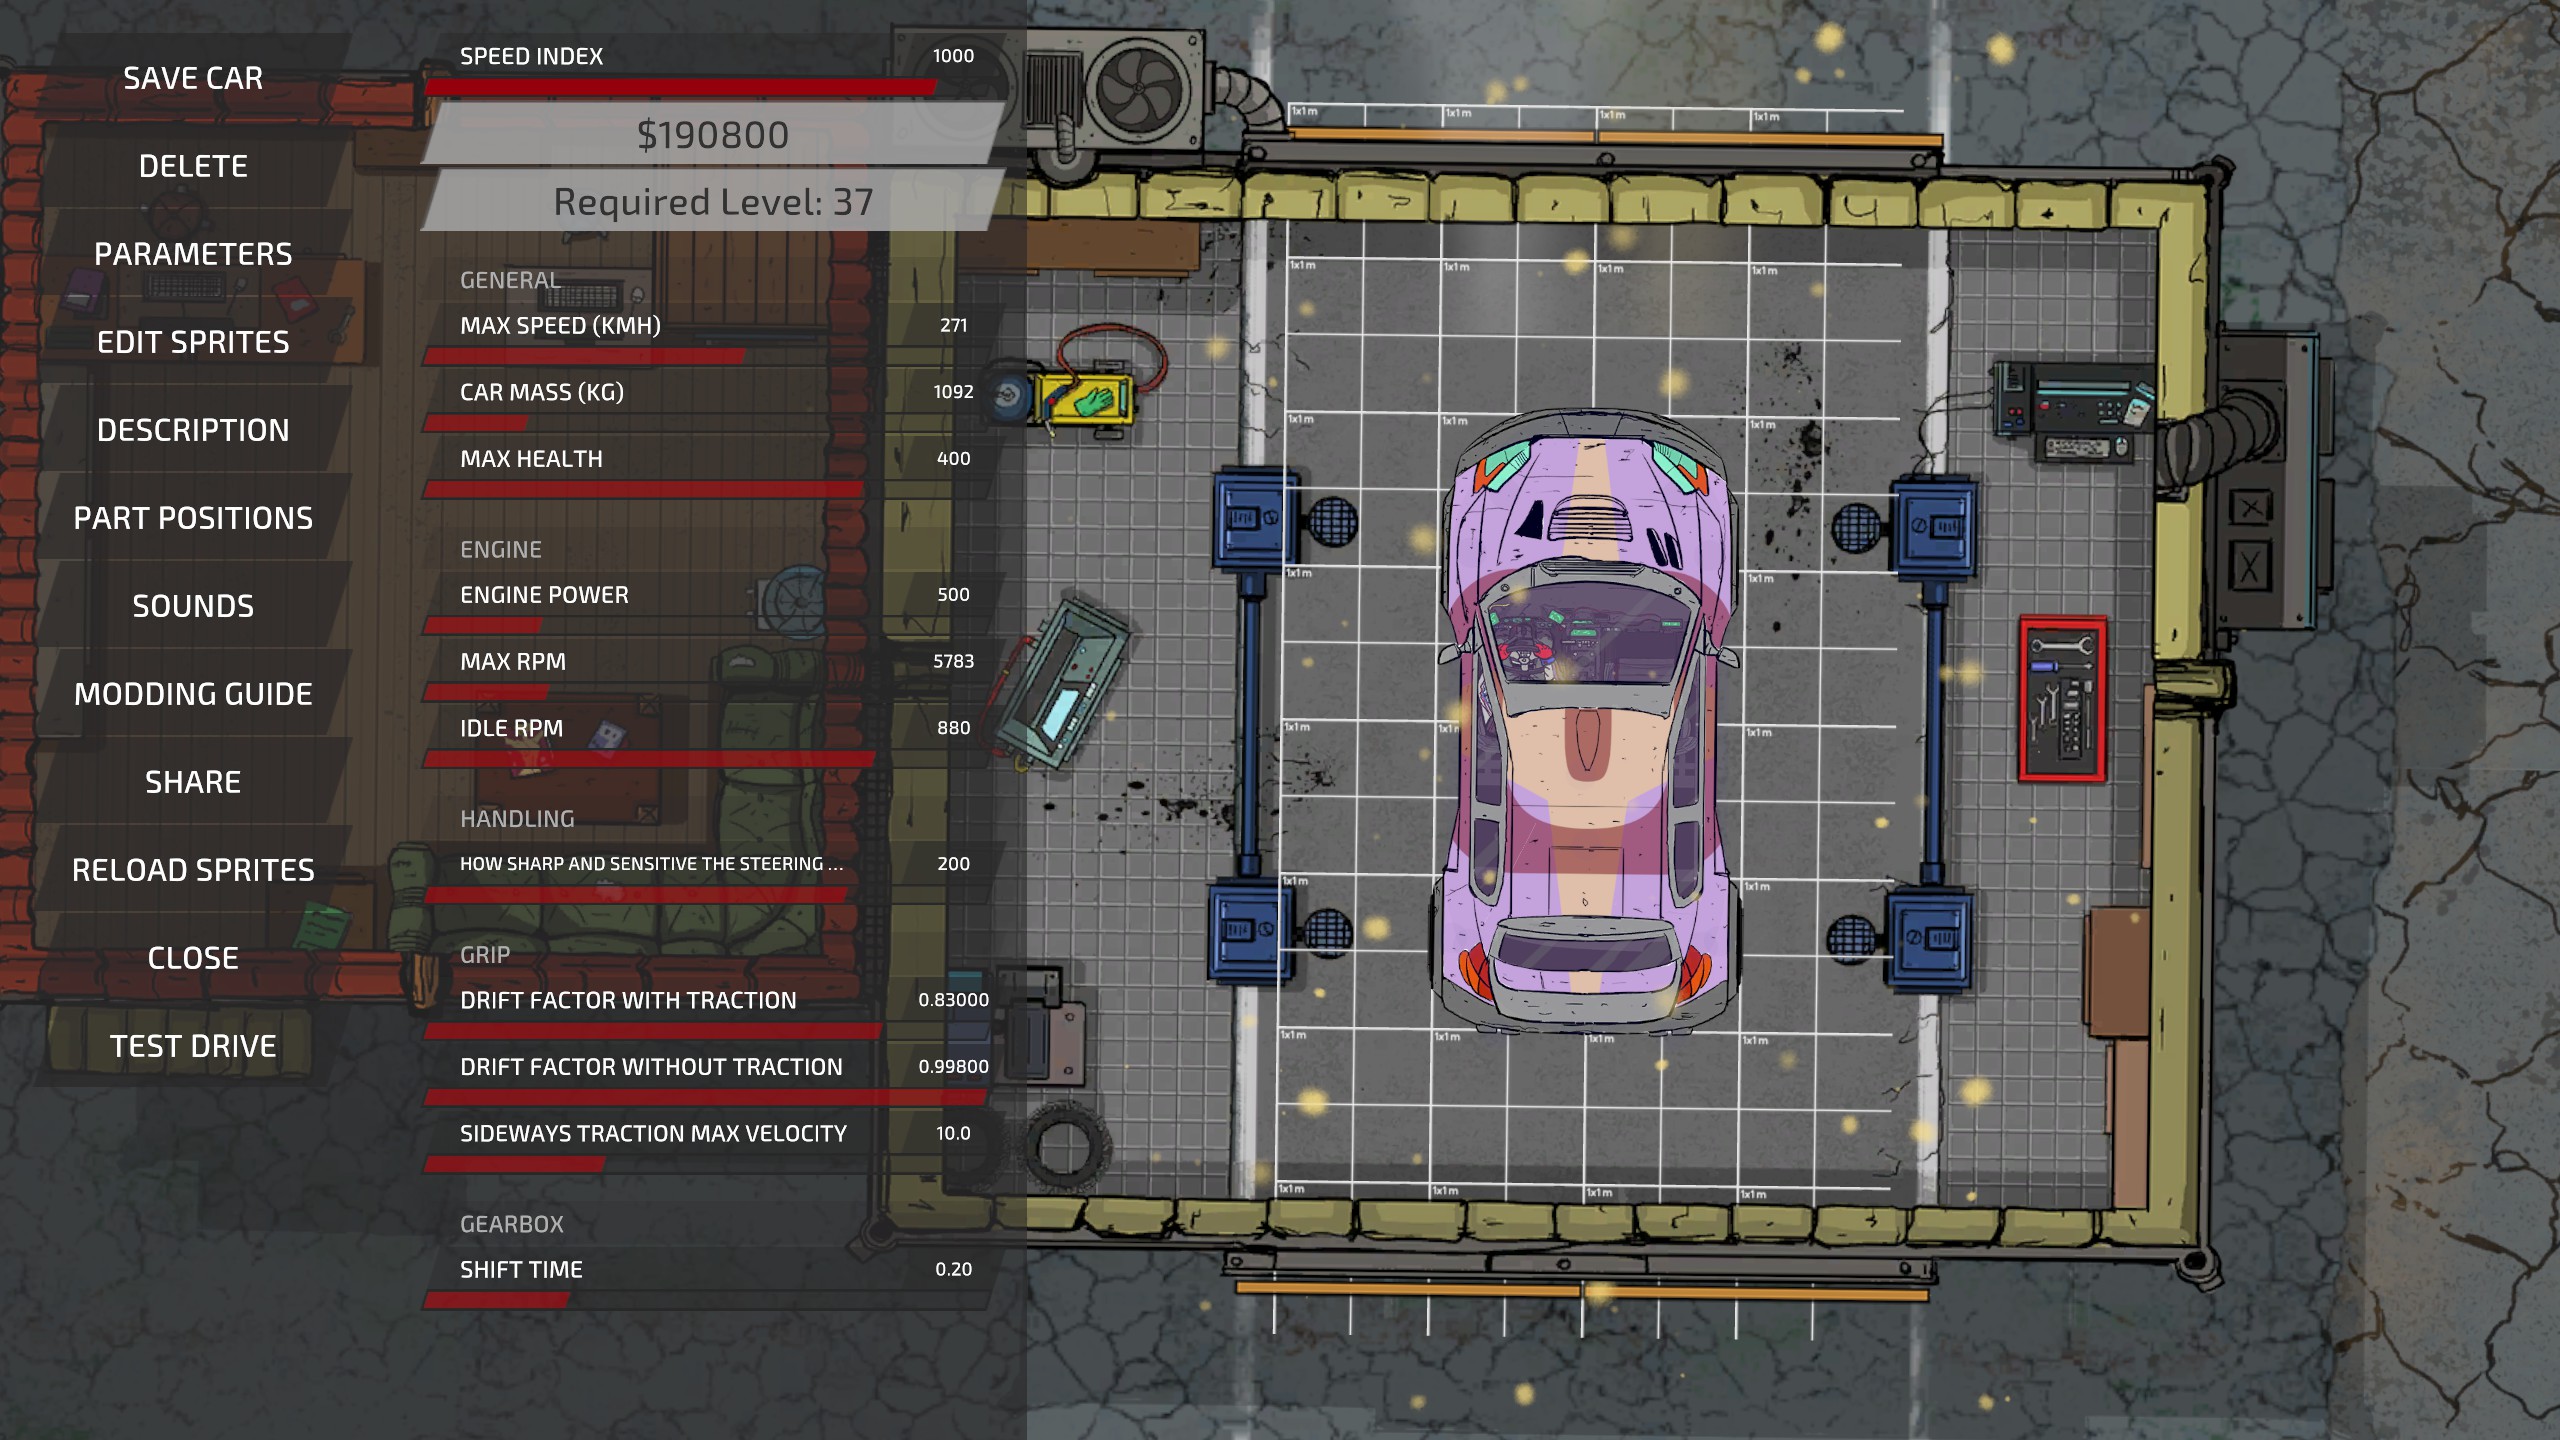
To maximize progress in the “grind campaign” and achieve the related milestones, it is recommended to begin during the first week of a new season. One strategy is to drive outside the map, continuously turning the car, and activating the forward key and shift key simultaneously. By remaining AFK for a few hours, significant distance can be covered. It is advisable to adjust the gameplay settings by disabling camera shake and reducing particles to 1% in order to minimize the chances of a game crash. Although my personal game crash occurred after approximately 8 시간, it is generally safer to AFK for shorter periods, usually around 6 또는 7 시간.
I have customized my car to reach the maximum allowed speed index of 1000 without modifying its appearance. Since uploading generic cars goes against the developers’ guidelines for car modding, I won’t share the car file. 하지만, I can provide an image below so that you can replicate my car design. With this setup, the car can reach speeds of over 250 km/h off-road, which greatly enhances the grinding process.
After extensive testing, I have determined that the game does not accurately track distance. Upon completing a map, I only receive about half the distance covered, and when driving off-road AFK with my 250 km/h speed, I also obtain approximately half the actual distance. Despite these discrepancies, this method remains the most efficient way to grind as it bypasses load times and other time-consuming elements. It is possible to experiment with custom maps, which may offer slightly better speeds, but when factoring in all other time-related aspects, the overall improvement is minimal. 대안으로, one could consider following the car modding guide to surpass the 1000 speed index limit. 하지만, I personally consider this approach as cheating since it is unintended and cannot be directly achieved within the game.
Please note that my car becomes available at level 37, and it is essential to reset and finish the map to ensure that the distance is accurately counted.
Customization

정비공
Create a car in Car Editor
It is fairly self-explanatory that if you decide to use my car, you will naturally achieve the desired results. 하지만, you are also free to create your own car design if you prefer.

Look What I’ve Made
Create your first custom track

Creative
만들다 10 custom tracks

The Architect
만들다 100 custom tracks
몸소, I’m not particularly fond of these types of achievements. In order to grind distance more efficiently during the campaign, I have created several maps, including a challenging one with pedestrians scattered all over.
Prior to implementing these changes, I could only complete around one map per session when attempting to achieve the milestone. After conducting extensive testing, I discovered a method to ensure that the tracker accurately counts the number of maps completed. The process involves starting by clicking “새로운” and then selecting the “generate” 꼬리표. 거기에서, 선택하다 “complete map” 옵션, either of the two types located on the far left, and save the map.
Repeat the process by clicking on “새로운” again and generating additional maps. Simply saving and generating new maps, or renaming maps to create duplicates, did not register in the tracker.
Misc./Secret

Max Damage
Destroy an opponent car

파괴자
파괴하다 100 opponent cars
While it is technically possible to achieve this in the Campaign mode, it is much quicker and easier to do so in Quick Battle. 내 경험상, I consistently managed to get over 10 kills per game, so simply enter the arena and make each kill count, and you’ll complete the objective in no time.

Astronaut
Reach the depth of space!
This particular task can be accomplished in both the Campaign and Quick Race modes. Start a Quick Race or Campaign race, drive towards the side until you reach the “공간” 영역, and the achievement will unlock. You can even venture further into the void if you’re utilizing my distance grinding method, and the achievement will still be obtained.

Grab Them By The Spoiler
Catch a car in main menu demo

While at the menu screen, grab a car as soon as it appears. If you desire, you can even eliminate pedestrians by moving the car into them.

Party Time!
Finish a race with 4 플레이어
According to what I read, this can be done within the campaign. 하지만, I personally achieved it in a custom session using three controllers and a keyboard. 처음에는, it didn’t unlock, so I added a single AI opponent, and the achievement was granted when I started the session.

Ultra Marathon
Finish a race with 100 laps
It’s important to note that this achievement can only be obtained in a custom session. I selected the fastest car available, added one AI opponent, and chose “루프” track. It’s recommended to set the laps to 100. Please keep in mind that only campaign tracks contribute to the distance-related achievements, so this particular achievement will not count towards them.
결론
Bloody Rally Show thrives on chaos and unpredictability.
As you progress through the campaign, more racers are added, which cannot be removed. Enabling all options for the campaign inevitably leads to a constant mess on the track. You find yourself getting spun around, forced to reset due to corner-cutting penalties, and experiencing frustrating collisions. It becomes tedious to navigate through these challenges.
Due to the unreliable distance tracking, I suggest saving the distance-related achievements for last, as I mentioned before. For a challenging campaign, disable most options, set AI skill level to 0%, and disable AI scaling.
Even with these settings, there are instances where winning becomes extremely difficult. I recall a specific map where I couldn’t catch up to the first-place AI, losing by a staggering 15 초, which felt absurd. The AI can make unpredictable and impressive plays, and while they may not be far behind due to rubber banding, crashing at the end can be detrimental. 하지만, overall, with these adjusted settings, the game becomes more manageable, especially since the campaign warns you about the implications of changing certain options at the start.
Driving skills are highly learnable, and contrary to some reviews, the faster cars may feel worse. Despite the heavy nature of the last car, collisions remain a significant issue in the game.
The AI struggles on certain curvier maps, but they don’t suffer as much as the player from being spun around or crashed. They can quickly recover and maintain their position.
If you haven’t achieved the GTA achievement after 20+ 계절, it might be worth starting a new campaign. 나중에, with numerous cars, the completion time becomes similar to the early campaign with slower cars but more frustrating due to frequent collisions.
Creating longer maps with repeating straight sections may not be worthwhile compared to AFK grinding. It’s recommended to complete two seasons per day and focus on obtaining all achievements except for the distance-related ones. This approach yields the best results. 처음에는, I anticipated the game to take around 50 hours for 100% 완성. 하지만, ~ 후에 30 시간, I realized I was far from reaching even 1000 km/h. Upon checking the tracker, I discovered it only registered about half the distance from each map, as mentioned earlier in the guide.
Considering the track generation time, loading time, and quick forwarding of AI to finish the lap, the extended completion time makes sense. I conducted a test where I let the car drive itself for a few hours, and upon checking the tracker, it confirmed that I had only covered about half the expected distance.
내 생각에는, the game should take around 15 hours to achieve 100% 완성, with most achievements obtained within that timeframe. 하지만, it took me 140 시간.
The game, in terms of replayability, may not be particularly captivating. 하지만, it offers interesting aspects through map creation and car modding if you are interested in exploring those features.
Even if the 10,000 km achievement were tracked correctly, I believe that 1,000 km would have been sufficient, considering the short tracks.
If reaching 100% completion seems challenging, settling for 45 또는 46 업적, with some luck in the GTA event, and skipping the 10,000 km achievement could be a viable alternative.
이것이 오늘 우리가 공유하는 모든 것입니다. Bloody Rally Show 가이드. 이 가이드는 원래 작성자가 작성하고 작성했습니다. ECE94FSR. 이 가이드를 업데이트하지 못한 경우, 다음을 수행하여 최신 업데이트를 찾을 수 있습니다. 링크.