
- 제목: 100% 오렌지 주스
- 출시일:
- 개발자: Orange_juice
- 발행자: Fruitbat 공장
에 관한 정보 100% 오렌지 주스는 여전히 불완전합니다. 이것을 사용하여 게임의 세부 정보를 입력할 수 있도록 도와주세요. 문의 양식.
캐릭터 모딩에 대한이 포괄적 인 튜토리얼에 오신 것을 환영합니다 100% 오렌지 주스! 기술 용어에 압도 당하고 어디서부터 시작 해야할지 확신이 없다면, 두려워하지 마라! 이 단계별 가이드는 초보자를위한 맞춤형 가이드입니다, 간단한 언어를 사용하여 프로세스를 안내하도록 설계되었습니다.. 모딩에 대한 경험 수준에 관계없이, 이 튜토리얼에 액세스 할 수 있고 따라갈 수 있습니다.
시작하기
우리가 다이빙하기 전에, 다음 도구가 준비되어 있는지 확인하십시오:
- Winrar 또는 7-Zip과 같은 아카이버 소프트웨어.
- .dds 이미지를 처리 할 수있는 이미지 편집기 (예를 들어, Paint.net 또는 선택한 다른 프로그램).
- 선호하는 이미지 편집기 또는 아트 프로그램.
- 단어 프로세서 (메모장으로 충분합니다).
- 인내심의 꼬집음.
이 가이드는 주로 캐릭터의 기본 텍스처 대체에 중점을 둡니다.. 더 복잡한 정보를 찾고있는 중간 또는 고급 OJ 모더라면, 목소리처럼, 헤어 컬러, 또는 화장품 교체, 이 튜토리얼은 귀하의 요구에 적합하지 않을 수 있습니다.
1부: 모드 폴더 생성
중요한 것 먼저. 여기에서 탐색하십시오:
씨:\프로그램 파일 (x86)\Steam\steamapps\common\100 Orange Juice\mods

컴퓨터에 OJ를 설치 한 위치로 이동하여 레이블이 붙은 디렉토리를 찾으십시오. “개조”.
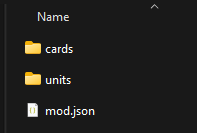
내부에 새 디렉토리를 만듭니다 “개조” 폴더와 선택한 이름을 알려주십시오. 축하해요, 첫 번째 단계를 성공적으로 완료했습니다!
다음, 새로 생성 된 모드 폴더에 액세스하고 호출되는 추가 폴더를 만듭니다. “단위”. 시간이 오면 스프라이트를 수용하는 데 사용됩니다..

이렇게 보이면, 지금은 끝났습니다 — 그러나 우리는 나중에 이것으로 돌아올 것입니다.
2 부: 이미지 포장 풀기
여기에서 탐색하십시오:
씨:\프로그램 파일 (x86)\Steam\steamapps\common\100 Orange Juice\data
이전과 동일합니다, 하지만 이제 데이터라는 폴더로 이동하고 싶습니다..

일련의 .pak 파일이 발생합니다, 다음과 같이 제시됩니다. 자산 100% 오렌지 주스는 .pak 형식으로 압축됩니다. 따라서, 이 파일에 액세스하려면 수동으로 추출해야합니다..
Units.pak 파일을 찾아서 아카이버 소프트웨어를 사용하여 열 수 있습니다..

저장소에는 많은 .DAT 파일이 있습니다. 그러므로, 모드에서 교체 해야하는 캐릭터를 식별하려면 계속 탐색하십시오.. 찾는 데 어려움이 있다면, 이 리소스의 단위 ID를 참조하십시오.
파일을 성공적으로 찾았습니까?? 훌륭한! 이제 지정된 형식을 따르는 이름이있는 파일을 선택하십시오.: [여기에서 형식을 지정하십시오].
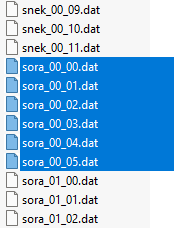
name_00_00
…
name_00_05.dat
제공된 그래픽은 선택한 장치의 기본 스프라이트를 나타냅니다.. 대체 색 구성표와 의상에 액세스합니다, 라벨이 붙은 파일을 참조하십시오 “name_01_00” 등. 편리한 액세스를 위해이 파일을 데스크탑 또는 기타 액세스 가능한 위치에 끌거나 복사하여 붙여 넣을 수 있습니다..
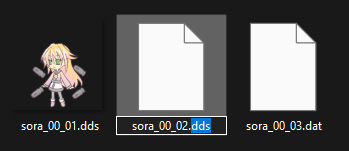
지금, .dat 확장자의 이름을 .dds로 바꿉니다.
Filetype 확장자가 표시되어 있는지 확인하십시오, 그리고 그들을 클릭하면 편집하십시오. 충분히 쉽습니다, 파일 이름 자체가 변경되지 않은 상태로 유지하십시오.
캐릭터 스프라이트를 성공적으로 추출했습니다!
파트 3: 이미지 편집
편집 준비
시작하려면, Paint.net을 시작하고 최근에 생성 된 .dds 파일 각각을 엽니 다..
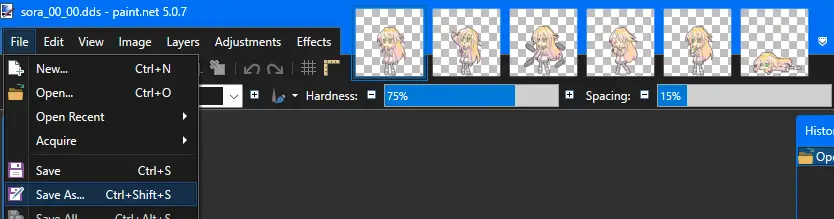
이 작업에 적합한 소프트웨어를 사용하는 것이 허용됩니다., 그러나 사용자 친화적 인 인터페이스로 인해 Paint.net을 개인적으로 권장합니다., 특히 .dds 형식의 이미지를보고 편집 할 때.
일단 완료되면, Ctrl+Shift+S 키보드 단축키를 사용하거나 액세스하십시오 “다른 이름으로 저장…” 파일 메뉴에서 옵션.

이 수정 된 스프라이트를 .png 파일로 저장해야합니다., 이로 인해 향후 편집 노력이 용이 해집니다. 모든 현재 스프라이트에 대해이 과정을 반복하십시오.
지금, 이전에 설정 한 장치 폴더를 상기하십시오.
새로운 .png 이미지를 모드 장치 폴더에 통합. 직접 저장하거나 이동 작업을 수행하여이를 달성 할 수 있습니다..
진짜로 만들었습니다
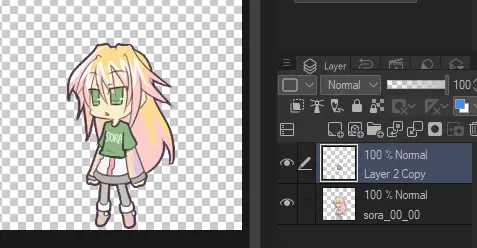
일단 이전 단계를 모두 완료하면, 원하는 편집 또는 아트 프로그램에서 스프라이트를 열는 과정을 시작할 준비가되었습니다.. 선택한 프로그램은 레이어 및 투명성을 지원해야합니다., MS Paint와 같은 옵션을 제외합니다.
이 시점부터, 당신은 당신의 모드에 대한 완전한 창의적 자유가 있습니다. 새로운 기능을 추가 할 수 있습니다, 스프라이트를 다른 게임의 스프라이트로 교체하십시오, 또는 처음부터 새로운 스프라이트를 만듭니다. 전체 스프라이트를 교체하기로 결정한 경우, 기존 스프라이트를 먼저 낮은 불투명으로 설정하는 것이 좋습니다., 크기 기준으로 사용할 수 있도록. 완료되면, 참조 스프라이트를 삭제할 수 있습니다.
모든 스프라이트가 투명한 배경으로 저장되어 있는지 확인하십시오..
이제 하늘은 한계이고 창의력을 발휘할 준비가되었습니다.!


4 부: 모드가 작동합니다!
스프라이트 수정을 마치면, 모드가 게임에 통합되어 있는지 확인해야합니다.. In order for 100% 오렌지 주스 모드가 제대로 작동합니다, 대체 할 자산을 알려주는 .json 파일을 제공해야합니다..
이를 수행하려면, 좋아하는 워드 프로세서를 열고 새 문서를 만듭니다..
그런 다음 제공된 코드를 새로 작성된 문서에 붙여 넣습니다.:
{
{
    "정의": {
     "이름": "---",
     "설명": "---",
     "작가": "---",
     "System_version": 2,
     "경쟁": 거짓
    },
    "복종": {
     "텍스처": [
      "단위/name_00"
     ]
    }
   }
제공된 지침을 이해해야합니다. 다음은 필요한 수정입니다:
- 이름: 수정에 대한 선호도 제목을 선택하십시오.
- 설명: 이 섹션에서는, 모드의 기능을 설명하십시오. 예를 들어, 당신은 말할 수 있습니다, “Marc의 세련된 모자를 소개합니다,” 또는 “양배추로 팝포를 대체합니다.”
- 작가: 모드의 제작자를 나타냅니다, 당신 자신입니다.
.json 구성을 사용하여 다양한 다른 측면을 사용자 정의 할 수 있습니다., 그러나 현재, 우리는 필수 요소 만 유지할 것입니다. 제공된 인용문을 제거하지 마십시오.
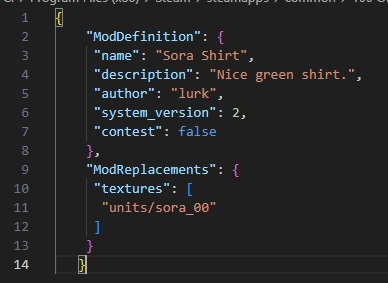
중요한 단계는 다음과 같은 조정을하는 것입니다. “텍스처” 부분: 대리자 “단위/name_00” 스프라이트에 해당하는 특정 단위 ID. 예를 들어, 이 시나리오에서, 내 것이 될 것입니다 “단위/SORA_00”.
교체 된 각 개인 자세를 열거 할 필요는 없습니다.. 이름과 의상 만 제공하면 충분합니다, 그리고 게임은 나머지를 자동으로 처리합니다..
일단 모든 것이 정확해 보인다는 것을 확인한 후, 텍스트 문서를 다음과 같이 저장하십시오 “Mod.json”.
Notepad ++ 또는 Visual Studio와 같은 워드 프로세서는이 프로세스를 원활하게 촉진합니다.. 하지만, 표준 메모장 응용 프로그램을 사용하는 경우, 파일을 다음과 같이 저장합니다 “mod.txt” 먼저 이름을 바꿉니다 “Mod.json”.
마지막으로, 완성 된 것을 배치하십시오 “Mod.json” 아래와 같이 모드 폴더에 파일을 파일하십시오: [여기에 모드 폴더로의 경로를 삽입하십시오].

규정 된 폴더 구성을 달성하면, 작업이 끝납니다, 후속 단계는 OJ의 시작을 수반하여 기능을 평가합니다.. 설정 메뉴 내에서 모드의 활성화 상태를 확인하는 것이 필수적입니다..
그 효능을 즉시 평가합니다, 아바타 설정에서 캐릭터를 검사하거나 맞춤형 싱글 플레이어 게임을 시작할 수 있습니다..

tldr
당신이 그 모든 것을 읽고 싶지 않다면, 다음은 응축 된 것입니다 (그러나 훨씬 덜 상세합니다) 이 가이드의 버전.
- c로 이동하십시오:\프로그램 파일 (x86)\Steam\steamapps\common\100 Orange Juice\mods
- 내부에 새 폴더를 만드십시오 개조, 지명 단위
- c로 이동하십시오:\프로그램 파일 (x86)\Steam\steamapps\common\100 Orange Juice\data
- 열려 있는 단위 Winrar 또는 7-zip
- 교체하려는 캐릭터를 찾으십시오, 그런 다음 파일을 복사하십시오 name_00_00 ~을 통해 name_00_05.dat 데스크탑에
- .dat 파일 확장자 이름을 바꿉니다 .DDS
- Paint.net에서 .dds 이미지를 엽니 다, 그리고 그것들을 그대로 내보내십시오 .PNG 당신의 모드에서 단위 접는 사람
- .png 이미지를 편집하지만 원하지만 원하는 이미지를 편집하십시오
- 새 텍스트 문서를 만드십시오
- 다음을 텍스트 문서에 붙여 넣으십시오:
{
 {
     "정의": {
      "이름": "---",
      "설명": "---",
      "작가": "---",
      "System_version": 2,
      "경쟁": 거짓
     },
     "복종": {
      "텍스처": [
       "단위/name_00"
      ]
     }
    }
- 교체하십시오 — 원하는대로 (인용문을 제거하지 마십시오)
- 이름을 바꾸십시오 “단위/name_00” 캐릭터의 단위 ID와 함께
- Mod.json이라는 이름으로 텍스트 문서를 저장하고 모드의 기본 폴더에 넣으십시오.
- 시작하다 100% 작동하는지 확인합니다, 설정에서 모드가 활성화되어 있는지 확인하십시오
추가의: 하이퍼 카드 아트 교체
당신의 의도가 당신의 개인적인 즐거움을 위해 가벼운 수정을 만드는 것이라면, 더 자세한 설명을 중단 할 수 있습니다. 이 안내서의 후속 섹션은 수정에 최종 터치 추가에만 집중합니다..
이 시점에서, 당신은 개입 할 수 있습니다, “장치와 하이퍼 카드는 어떻습니까?? 이 카드의 작품은 더 이상 내 캐릭터에 해당하지 않습니다.!”
안심하세요, 카드 아트의 교체는 또한 쉽게 달성 할 수 있습니다.! 이 세그먼트는 귀하의 지식을 평가 하고이 단계까지의 진행으로 간주합니다..
첫 번째, MOD 디렉토리에서 Cards라는 새 폴더 만들기.
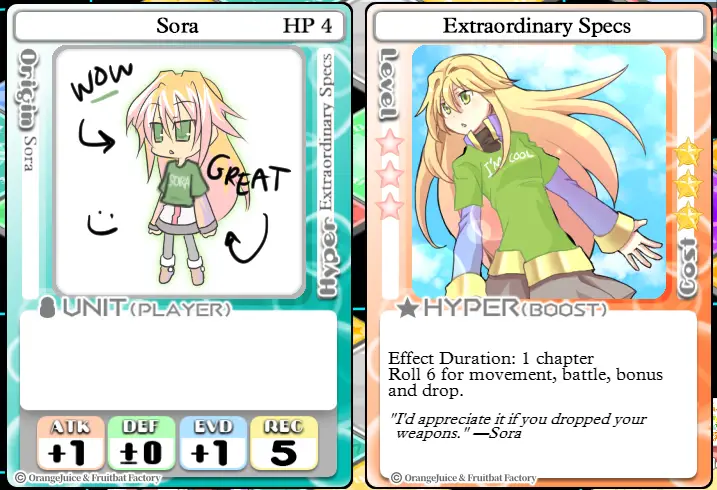
그 다음에, 이전부터 데이터 폴더로 돌아갑니다, 그리고 파일 cards.pak을 찾으십시오. 내부를 볼 때, 그 .dat 파일을 다시 볼 수 있습니다, 그러나 이제 그들은 쌍으로 오는 것 같습니다: “128” 그리고 “256”. 주는 것?
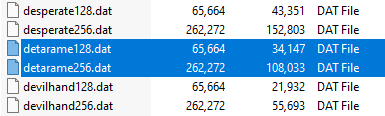
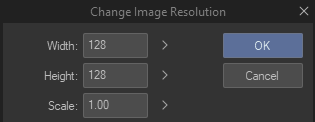
카드는 제대로 표시하기 위해 두 가지 다른 해상도가 필요합니다.. 하나는 128입니다×128 크기의 픽셀, 다른 하나는 256입니다×256 크기의 픽셀. 그러나 둘 다 추출 할 필요는 없습니다.
그래서, 교체하려는 카드를 찾으십시오 (이것을 사용하여 올바른 ID를 찾으십시오).
아카이브에서 더 큰 것을 복사하십시오 — 예를 들어. cardname256. 저것 — 그리고 그것을 .dds로 바꿉니다. 그런 다음 .dds를 .png로 다시 내보내십시오. 지난번과 같은 과정.
지금, 새로 만든 카드 폴더에 .png를 배치하십시오.
당신이 만들고 싶은 것을 변경하십시오. 당신이 그것을 저장 한 후에, 128로 크기를 조정하십시오×128 픽셀. 128.png로 끝나는 다른 버전을 저장하십시오.
이 시점에서, 카드 폴더가 다음과 같이 보일 수 있습니다:

계속 진행할 준비가되었습니다?
돌아가서 mod.json 파일을 다시 열십시오.
아래에 “텍스처”, 이전부터 장치 후 쉼표를 추가하십시오, 그리고 카드를 입력하십시오(에스) 이렇게:
"복종": {
     "텍스처": [
      "단위/name_00",
      "카드/cardname"
     ]
    }

그래서, 내 경우에는, 그럴 것입니다 “카드/디스타르 메인”, “카드/소라”. 숫자를 추가 할 필요가 없습니다.
(목록의 마지막 텍스처가 쉼표로 끝나지 않도록하십시오.)
변경 사항을 .json 파일로 저장하십시오, 그리고 그것이 작동하는지 확인하십시오! (OJ를 실행 한 경우, 클릭해야합니다 “새로 고치다” 모드 탭에서.)
축하해요! 게임의 모든 카드 예술을이 방법으로 교체 할 수 있습니다., 재미있게 보내십시오!
추가의 2: 워크숍에 출판
당신은 당신의 모드를 세상과 공유하고 싶다고 결정했습니다. (아니면 당신의 친구 일 수도 있습니다, 따라서 새로운 캐릭터와 함께 온라인으로 플레이 할 수 있습니다). 문제가 아닙니다!
그러기 위해서는, 메인 모드 디렉토리 내에서 preview.png라는 썸네일 사진이 필요합니다.. 이상적으로는, a 16:9 해결, 그리고 그것은보다 적어야합니다 1 파일 크기의 MB. 이것은 워크숍 페이지에 표시 될 것입니다. (나중에 항상 변경할 수 있지만).

일단 설정 한 후에, 그냥 열어 100% OJ를 클릭하십시오 “게시” 모드 탭에서 버튼. 그것은 당신을 위해 일을 할 것입니다.
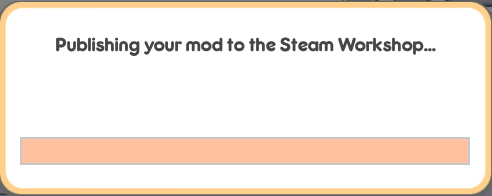
MOD 업로드가 완료되면, 방금 만든 워크숍 페이지로 리디렉션됩니다.. 거기에서 설명을 편집 할 수 있습니다, 시계, 이미지 미리보기, 필수 DLC, 당신이하고 싶은 다른 무엇이든. 업로드하면 가시성이 공개됩니다..
이것이 오늘 우리가 공유하는 모든 것입니다. 100% 오렌지 주스 가이드. 이 가이드는 원래 작성자가 작성하고 작성했습니다. 밀행. 이 가이드를 업데이트하지 못한 경우, 다음을 수행하여 최신 업데이트를 찾을 수 있습니다. 링크.