Ahoy to my fellow captains!
Ships in WarThunder may not have the biggest player base out of the 3 枝, but its my favorite and maybe i can get a few new people to give Naval a try, or oldies to come back to it. This Guide is focused on RB, but it is almost the same for AB.
This Guide will cover the basics of blue-sea naval combat
. Starting with Destroyers (later referred to as DD), Cruisers (カリフォルニア州,CL etc.) and up to Battlecruisers and Battleships (BB, BC, 等)
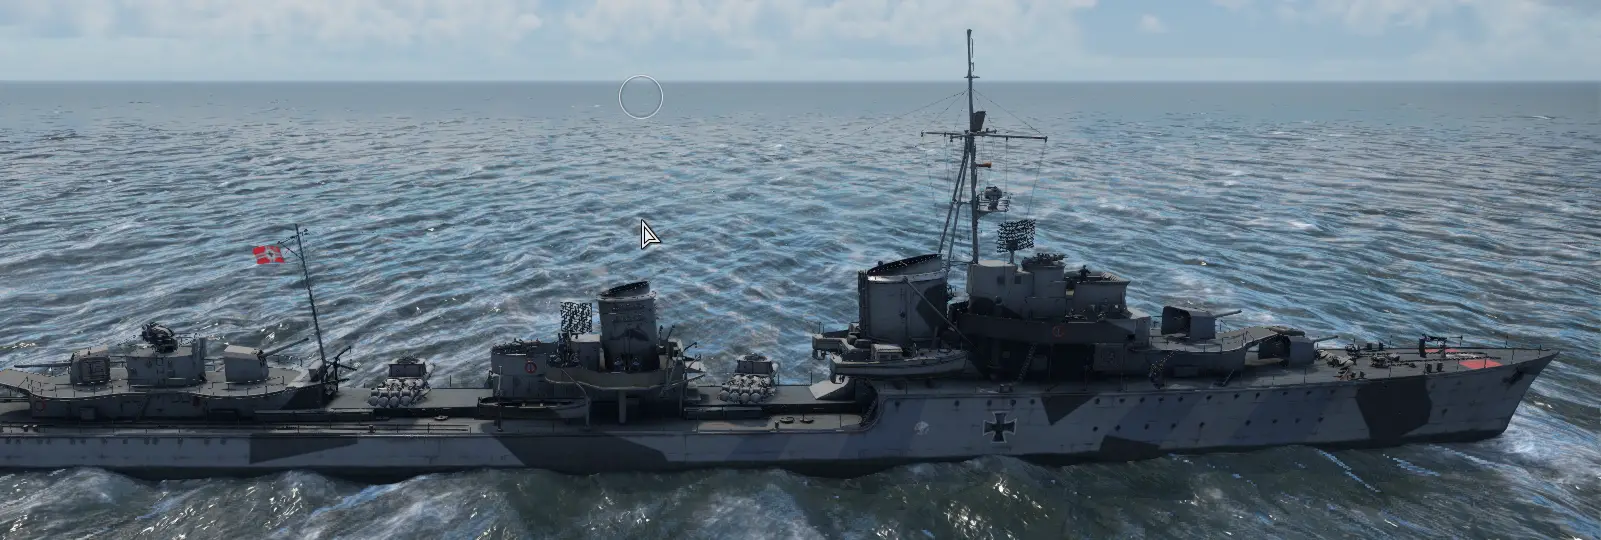
I will try to cover the basics regarding positioning, munition types/usage, aiming and so on. To keep this easy to follow, i will simplify things a lot and will use broad/general terms. German Ships are used as examples in pictures, but the basics hold true for all nations.
Aiming and Ammo
Since aiming and ammunition types are relatively the same on all ships, i will condense it in one section and not explain the specifics for each class in detail. Major class differences will be pointed out here.
Most ppl i talk to about ships in warthunder, tell me that they either can´t seem to hit reliably,
or that they dont do good/random damage. While damage can be a bit random at times, its absolutely possible to take well aimed shots and hit most of the time. And if the right shell type for the job is used, the damage will stick. There are some exceptions where shooting is a waste of ammo, but this will be covered in the specific ship-class sections.
First lets start quick and dirty with the shell types. Depending on your nation and ship class,
some ammunition may not be available for your ship. (Maybe subject to changes)

HE
Your bread and butter shell. Best used against targets that are smaller than you, or lightly armoured. Will almost always do some damage, since it usually has the biggest explosion-mass of all your shells.

AP
You sacrifice explosive-mass for penetration, but has a solid chance for ammo-detonations if used right. Best used against targets that angle against you, for ammo-shots if you dont have SAP, or the target is far away (9+km).

SAP
SAP and similar is the middle-ground between penetration and explosive-mass. Best used for medium distance shooting against angled or armoured targets, and works great for broadside ammo-shooting.

Time-Fused
The timed airburst ammo has a limited use scenario, but i almost always carry some on my ships. It works great against small boats and as an anti-air in a pinch.
Gajin has tweaked ship aiming around a lot. And with the addition of crew added lead indicators and other helpers, you get more ingame help to target than ever before. So let´s cover the basics.
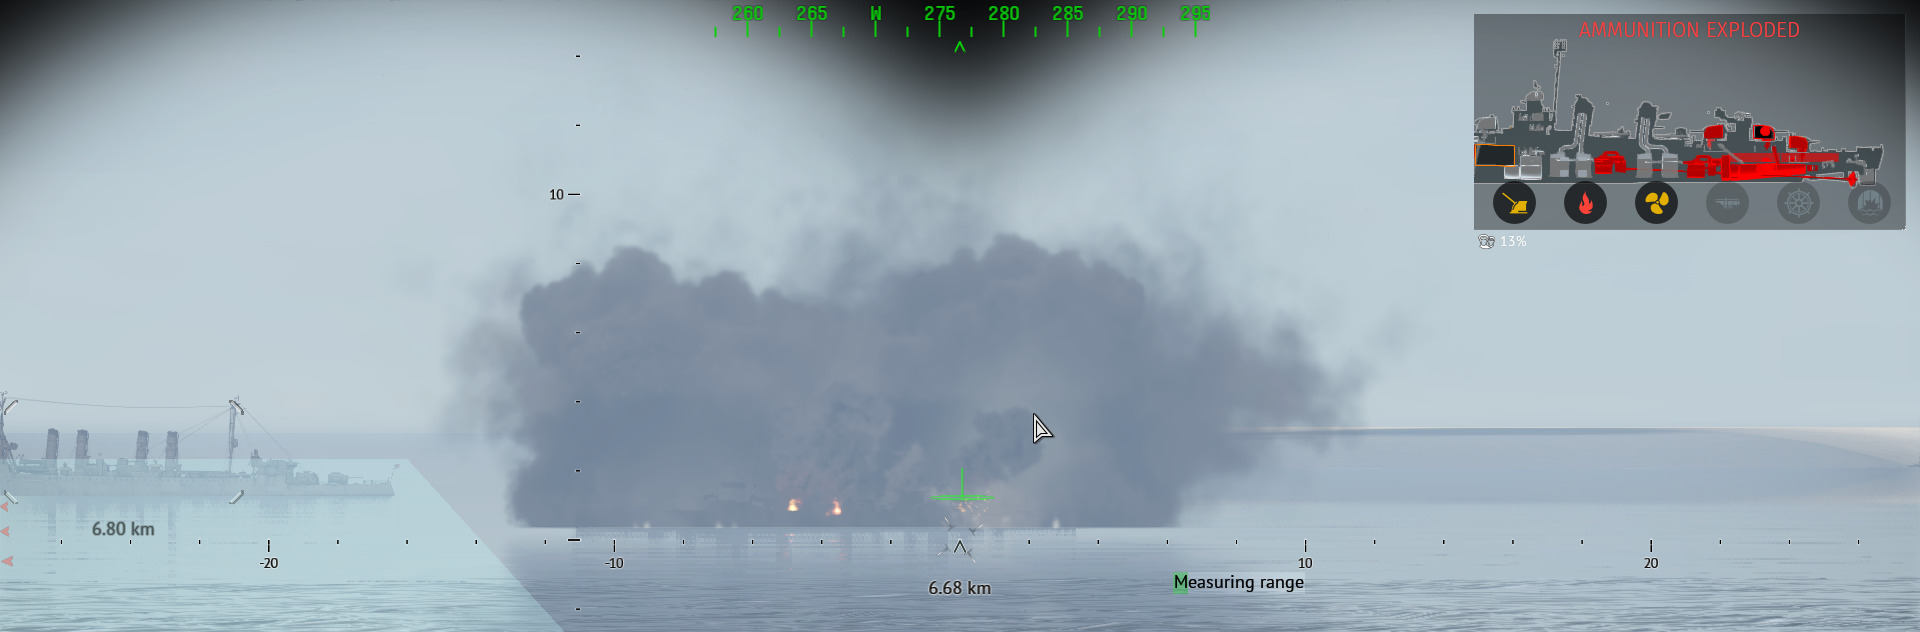
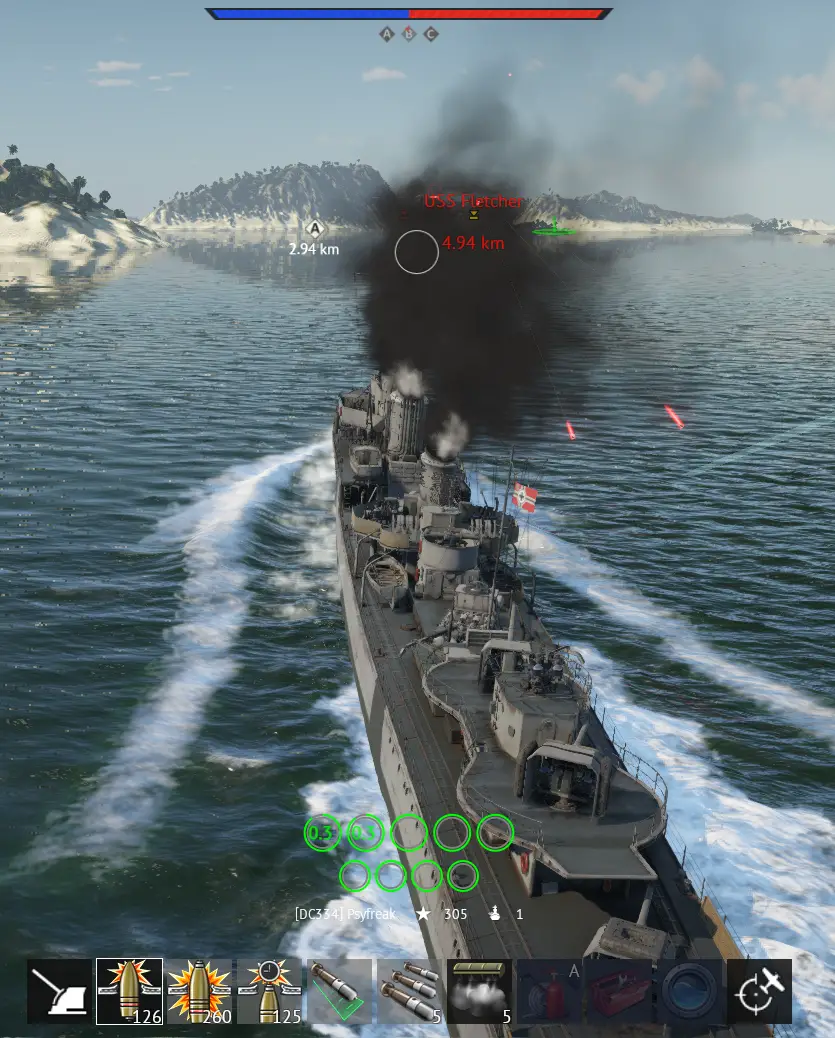
On this zoomed binocular view, you can see the compass on top, the hit indicator on the right, the bar of the crew measuring range on the lower right middle side and the targeted range in the bottom middle.The green circle with the line in the middle is the indicator of where your shells would land if you fire now.
In RB you get no red markers for enemy ships, but the selected target is shown by a small rounded box on the enemy.
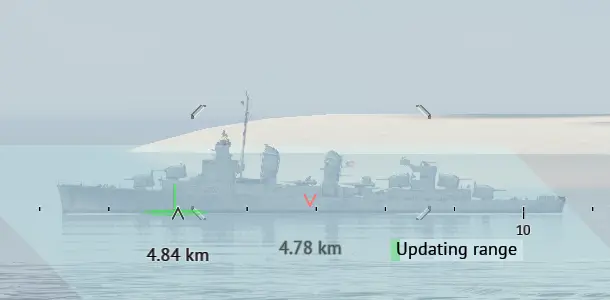
As soon as your crew has finished rangefinding, a small red triangle lead indicator on you scope appears. This indicator tells you where to aim, when you want to hit the target smack in the middle of the ship. But only if it stays on this course and at the same speed. The indicator only shows the lead measured for one point in time, and will update in cycles. Keep an eye out for the timing of the update cycle to know how accurate your lead-indicator currently is.
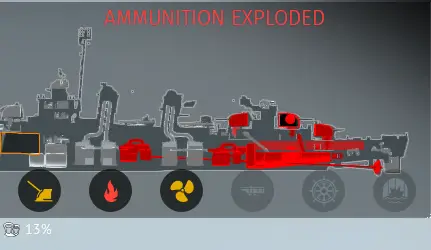
Shooting for ammo storage is a big thing and even if its not an instant kill, an ammo detonation does a lot of damage to any ship. Almost every DD and Cruiser has 2 ammo-storages and they are located under the inner turrets, front and back. Battleships and similar big ships can be different in some cases and some ships have central ammo holds underneath coal bunkers. To hit ammunition i generally recommend to aim for the water line, under the inner turrets, using AP or SAP.
Another good strategy is to aim for the gun-turrets, using either HE or AP shells.
For open turrets, found on many DD´s, HE works great with overpressure and you can disable multiple turrets at once leaving your target with no means to shoot back until repaired.
AP shells can ammo rack turrets and Torpedo launchers are also a prime target, since they can also detonate, albeit with less damage than an ammo bunker hit.
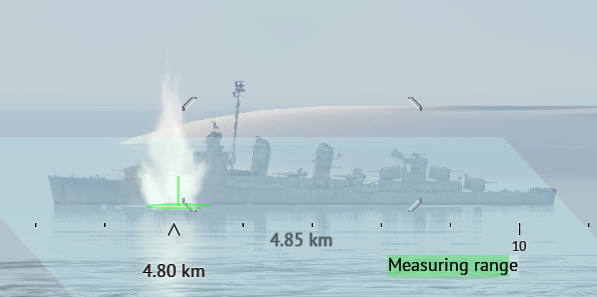
With a little practise, you can reliably shoot on shorter distances without the crew lead-indicator. You get the estimated range to target as soon as you select it, and the torpedo lead indicator gives you a good idea wich direction the enemy is moving. Target has to be in torpedo range for this to work, or you torpedo lead indicator will only point straight at the selected target.
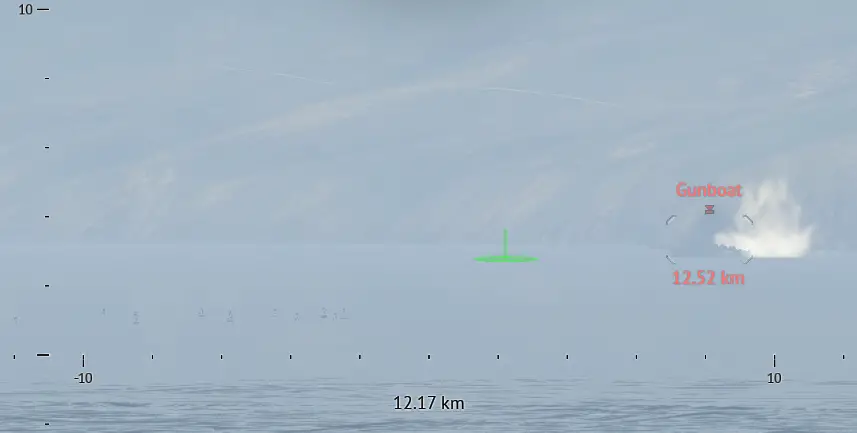
The hardest part for most ppl is relative movement. It is important, how the target moves relative to your own ship. If both sides are closing on each other with full speed and nose on, the range will drop drastically while your shells travel trough the air. So you would have to aim much shorter than the range shown. The opposite is true if both sides move away from each other.
Small boats and ships often dissapear at range, when not looked at through zoomed binoculars. So always keep your eyes open and look around between salvos. This is especially true for the bigger ships.
Repairs and Damage Control
Timing and managing your repairs is vital to stay alive and afloat in every ship.
Each repair type, 火, leaks and module repair, has an individual timer for completion. The shortest repair time is only possible if no other repair type is active. If repairing all three types simultaneously each repair takes longer to complete.

火:
Fire is the most dangerous damage type and the only repair i have on auto-activation.
押すだけ 6 again when not on fire, そして “あ” will appear on the extinguisher symbol to indicate auto-activation. You can still manually start the fire extinguishing if needed, since auto activation need around 2 seconds to kick in. Fire should always be the first damage to be repaired, because it can cause ammouniton detonations for every second it burns, wich can kill you instantly while also doing crew damage. Dont activate other repairs when on fire if not absolutley necessary.

Leaks:
Leaks caused either by explosion or overpenetration will flood your ship depending on size and amount of holes in your ship. Always keep an eye on your ships buoyancy-indicator, shown on the ship damage overview. As long as buoyancy is over 50 % you can let leaks wait for repair until for example a fire is put out. 下 30-35% it gets critial and you have to repair the leaks or you will drown. The speed of your ship has influence on how fast you take on water. When suffering big leaks it can help a lot to slow the ship down asap.

Module Repair:
Module Damage can be any part of your ship, 銃, torpedo tupes, steering or propulsion.
It is the damage type that can be ignored for the longest time, since it poses no immediate threat of killing you, but you can end up with no working guns left on you ship to shoot back if enemies are aiming for your main batteries, or drive into torpedoes because you cant steer anymore.
Now lets move on to the class specific topics.
駆逐艦
一般的な:
A DD´s primary and secondary guns are intended to be used against other DD´s,
small boats or as Anti-Air.
There are a few exceptions, like the german Z32 for example, that use light-cruiser calibers and can do decent damage to armoured targets (CL etc.). But i would only take a gunfight DD vs CL/CA as a last resort option, or if the enemy is occupied otherwise.
Most DD´s carry decent to very good anti-air, wich can be used very efficently against small coastal vessels, but also tends to draw attention fast and gives your position away like nothing else. Secondary management can be key to your survival, especially when uptiered and facing off with cruisers. Sneaking behind islands or hard flanking maneuvers are often spoiled by secondary guns blazing away over kilometers, doing little to no damage. Also managing secondary targets manually (X+2/X+3 by default) can be very helpful when engaging multiple threats at once.
Gunfights:
A lot of people open fire with DD´s way to early. In most cases salvos over 10 km away, have a very low hit ratio if your target is fast moving. You can take some shots if you have a good opportunity and can pen, but dont go full blasting mode on a target you barely hit. Ammo goes fast with most DD´s firerate. Preferred engagement distance should be around 8-9 km and below. You can hit reliably and penetrate in most cases. I prefer a HE heavy ammunition load, since DD´s are very lightly armoured, もしあれば. AP or SAP rounds for steep angles, cruisers or higher distance shooting.
Torpedoes
:
When using torpedoes, ドン´t just fire where the lead indicator points you, point-blank ranges aside. DD´s are ofte torpedo heavy, Japanese Ships in particular have torpedoes with very high range, and predicting that enemy ships will come though some cap-points or between islands is key. Travel times can be very long, wich must be accounted for, but cap-denial with torp salvos can be highly efficient, or the death of your enemies if they push in. Also take into account that torpedoes can ammo-detonate, so it can be wise to drop them all when expecting heavy fire.
動き:
Most ppl underestimate the importance of maneuvering your ship in-between salvos with DD´s. Wich is especially sad since most DD´s excel in movement. Even with the short 2-5 second reload-speed most DD´s possess, you should try to avoid moving in a straight line for too long. You only need to chang your angle by a few degrees between shots, and that can make the difference between getting hit constantly, or dodging most shells. This tactic gets less efficient at lower distance, but is enhanced when facing enemies with low muzzle-velocity. When you have to turn hard, wait for your ship to balance out before firing so your guns are actually on target.
Most DD´s can fire almost full salvos with their primary armament when angled. Total 90° nose on enemy engagements should be avoided and broadside is almost always a death-sentence, except on high-distances when active evasion is possible.
For ppl who want some video footage i have added one of my DD runs.
But keep in mind the footage is outdated, with old scopes etc. Check out this ビデオ.
Cruisers
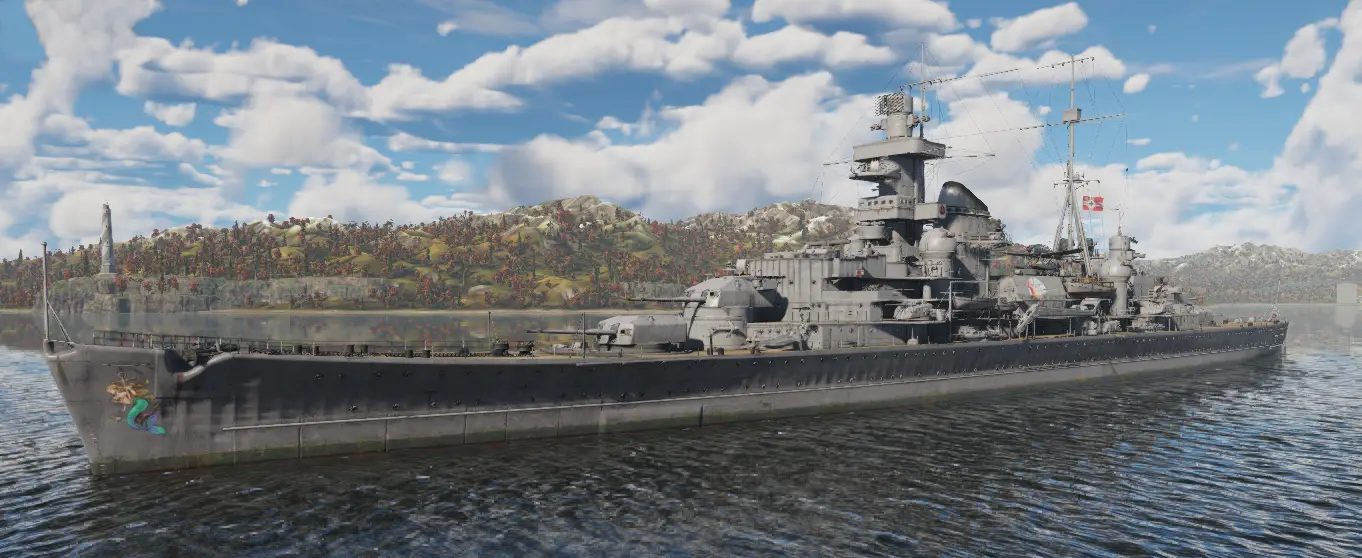
一般的な:
Cruisers are generally destroyer killers and carry some of the densest anti-air in the game,
while still being somwhat mobile. The playstyle shifts more from evading, to tanking/bouncing shells the higher you go in armour class. While some CL´s are just barely harder than DD´s, an armoured or heavy cruiser can bounce a lot, if angled right and at some distance.
あなたはだめです´t want close-range infights with DD´s if it can be avoided. Only Ships your size or bigger can do reliable damage over longer ranges in most cases, torpedoes aside.
Gunfights:
Depending on what you are up against, preferred range for large, slow targets, is around 10-15km if penetration is possible. 7-10km is my preferred range against light targets i.e. DD´s or smaller cruisers since you still have a good chance to evade incoming torps and bounce some shells. Everything under 5km is in the danger-zone and demands immediate attention. Torps gets hard to dodge if you don´t see them coming already, and even DD and small caliber fire can do decent damage. I sunk light cruisers with 20mm anti-air at close range more than once.
Torpedoes
:
Most cruisers carry a decent torpedo load that is best used either in close combat as a last resort, or as prediction fire against strategic points. I prefer to drop 80% of my torps early, against cap points or small island passages and only keep a few on board for later use. This decreases the chance of a torpedo detonation when under fire and still leaves you some options if an enemy pop´s out unexpected.
動き:
Best case scenario is if you can flank the enemy for angled broadsides, while keeping some distance from your targets. Then you keep “cruising” around at your preferred range and dump fire on the enemy. Of course there will be times when you have to push for cap-points and the range game is not possible, then it all depends on what match you are in. If you are top-br and face enemy´s your br or smaller, hard pushes are an option. You go for the cap keeping some angle and outgun your opposition if they start engaging you, or you have team backup. Dont open fire on everything you see when going for a cap, you can avoid a lot of attention if your guns keep silent.
And this is especially important when matchmaking is not in your favor. When uptiered, pushes get a lot harder to pull off with cruisers, and on open map´s they are almost impossible (to survive). Your best bet is to use terrain and keep firing to a minimum, trying to slip by unnoticed.
戦艦
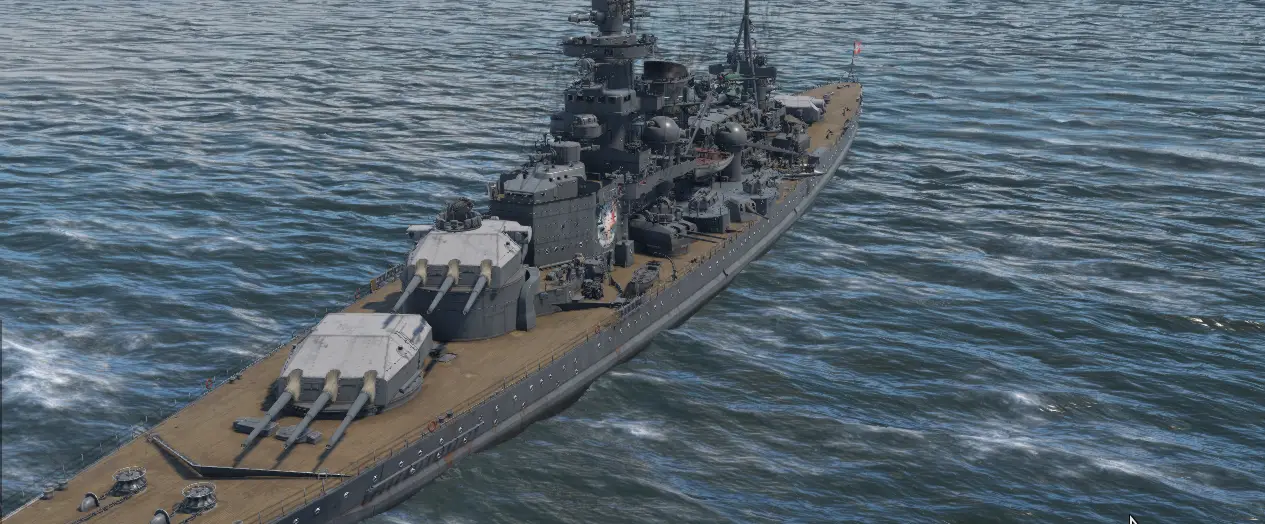
一般的な:
Battleships can in general, kill every destroyer or cruiser they face with a few salvos and only take damage from other Battleships or Heavy Cruisers with large caliber main batteries.
When angled and at range, almost all non BB shells bounce off you, while you can penetrate every BC/CA/CL/DD you see in every position. HE can still do some damage and set fires, but it can take a lot of time to wittle a BB down that way. There are many WW1 era BB´s around wich have little to no anti-air on board and even WW2 Battleships are easy targets for planes if not supported by allied flak fire.
In almost pure BB vs BB battles, combat starts immediately. Ranges of 20-25km are no problem for shooting and you can generally open fire as soon as you spot the enemy ship. With the long reload time of most BB´s it can be good to fire a ranging shot or wait for the crew ranging if you are unsure about the needed lead. Wasted salvos can cost you dearly, so try to make sure you are on point with your aim and that the ship is stable i.e. no leaning to the sides because of a turn.
Gunfights:
Generally i open fire on other Ships around 20-23 km if they are showing broadside, or at least a wide angle. Used ammunition is either AP or HE since the shell angle is so high, that you hit the lightly armoured deck or structures from above. HE has a lot of overpressure-power and AP can penetrate the deck and detonate ammo inside.
で 15 km and under, steeply angled ships also become targets again because you start to penetrate even other BB´s with AP. For ranges around 12-8 km i generally switch over to SAP for more damage because of the higher explosive-mass or HE against light targets.
その周り 8-5 km you are at point-blank range for a BB, a good hit ends almost every ship at this distance. Reliable ammo-shots are possible against any ship from every angle with AP/SAP since penetration is almost guaranteed. Personally i recommend to keep every enemy at least 5km away from you. Many BB´s cant fire their main guns at short ranges, since they cant aim low enough, and the torpedo threat is immense even with BB torpedo-belts.
Torpedoes
:
Many BB´s carry torpedoes, but they should be seen as a self defense/last resort option in my opinion, if they are not used for area-denial as described in earlier chapters.
Since you can expect to recieve heavy fire in a BB in most matches, i tend to drop as soon as the torps can reach just behind the cap-point/gap i want to block off.
動き:
Most Battleships are not on the fast side and tend to turn slowly. There are exceptions with some WW2 BB´s from USA and GB wich can be called “速い” for a Battleship, but they are nowhere as nimble as smaller ship-classes. Dodging incoming fire is only efficient on long engagement ranges, in most cases the angle of your ship is the most important factor. それ´s a sad necessity that Battleships have to cap-points sometimes, but this should generally be avoided if you are not dominating the enemy. Move in flank manouvers while trying to maintain a good distance to target. If your team struggles to push-points its the BB´s job to grab attention and enemy fire. Expose yourself a little or engage the ships shooting your allies. No ship in the game can ignore Battleship shells without dying, so they either have to move or start to focus you.