
General Information for new players
1. Why can’t I progress to the next curse tier?
Accidentally unticked an earlier curse. To proceed to the next curse tier, あなたが必要です 4/10/18/25/34/41 curses.
2. As a new player, should I do overlord/endless?
大君主 3 (red portal) is very good for a new player to get boss crystals and it also helps with getting some experience with fighting 4 bosses at the same time. It goes relatively fast (について 25 試合時間の分). You will naturally reach level 100 for Surefooted and Weapon Expert runes.
Endless (purple portal) is not as efficient.
Once you finished the skill tree and completed Overlord 3 and Endless 3 一度, ignore them and focus on the other unlocks.
3. Which character is so game-changing that I should focus on unlocking?
ある) パラディン (unlocked from all maps 100% 完了) has great skills for survivability and damage. Clear a map with it in under 12:00 to unlock Skill Mastery: 聖なる.
b) Legionnaire (unlocked from Endless 2 完了) and its second weapon (unlocked from prestige level 10 on Legionnaire).
b’) Paladin’s second weapon is also worth making, but it uses the same gold ore as Legionnaire’s second.
You can now pretty much clear everything, including curses and speed runs, with Legionnaire’s second weapon + Skill Mastery: 聖なる.
4. Which early game runes I should unlock for an easier progression?
ある) Completing Overlord 3 will give you 1 extra runic power + Surefooted + Weapon Expert. Weapon Expert is one of the best runes.
b) Clearing a map with Paladin in under 12:00 unlocks Skill Mastery: Holy so you can use the very strong Holy skills for any character.
c) Work towards Multicast Mastery by clearing Curse IV on the 2nd map.
d) 4番目のマップでの呪いIIのクリアリングは、ダッシュマスタリーのロックを解除します.
今、あなたには武器の専門家がいます + ダッシュマスタリー + Skill Mastery:聖なる + マルチキャストマスタリー, どんなキャラクターでもほとんどの呪いを通してあなたを運ぶべきです.
e) 1番目のマップで呪いVIに向かって作業します 1 extra runic power. ジェネラリストのロックを解除する可能性があります (400 領主は殺します) 途中で.
f) 武器の専門家と + ジェネラリスト + Skill Mastery:聖なる + レジオネアの2番目の武器, サブを完了できるはずです 8 功績 1 extra runic power. できない場合は心配しないでください! このビルドは、少なくともサブのロックを解除する必要があります 10 およびsub 9 成果. (次の投稿も参照してください。)
残りのルーンは自然に落ちます.
5. どうすればサブを完了できますか 8 少しの成果?
ある) 呪いでそれをしてください 0
b) 角に行き、そこにとどまります
c) 多くの敵を一度に攻撃するスキルを撮る
d) キャスト速度とマルチキャストのアップグレードをつかみます
e) あなたが持っているダメージングルーンを使用してください
かなり低いロック解除要件の低い努力の例:
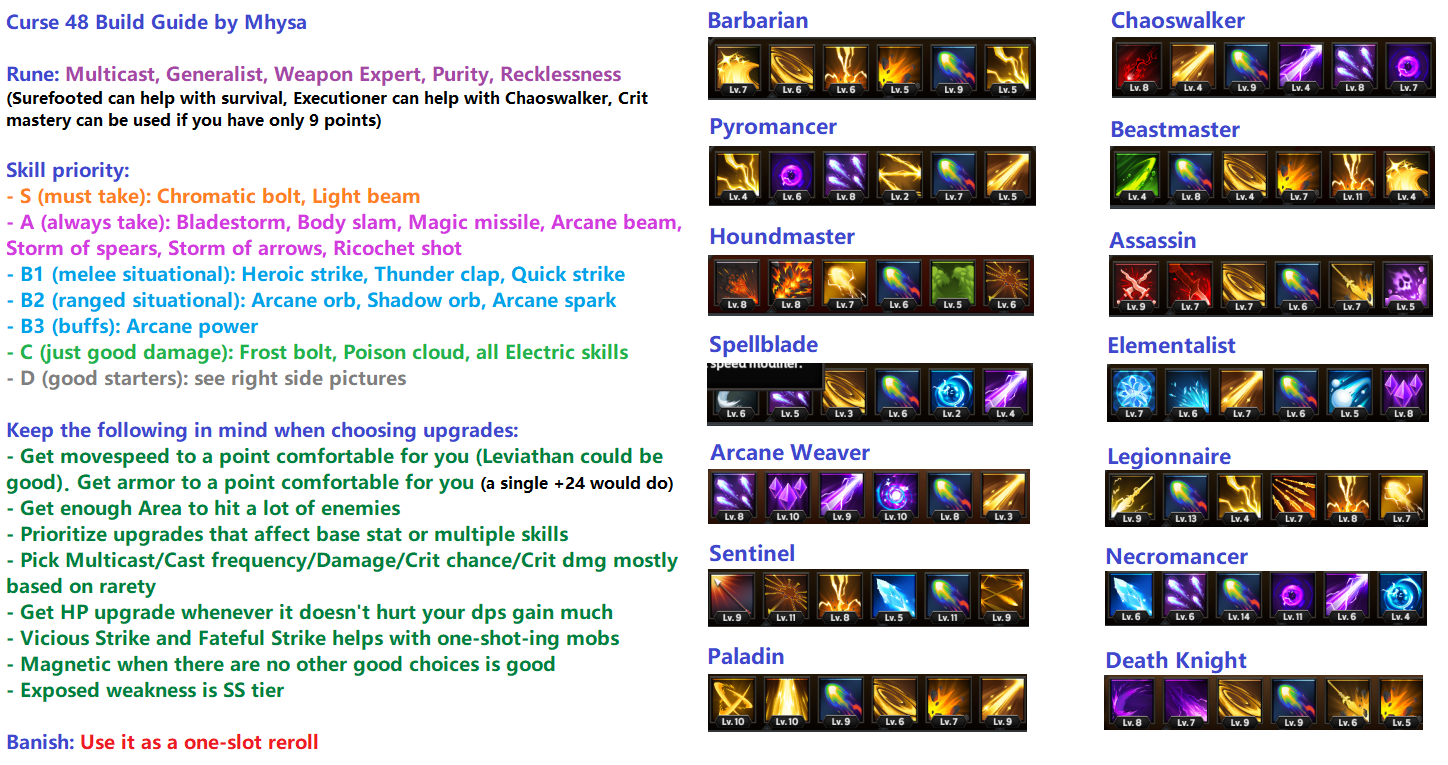
6. Any builds to try for high curse?
かなり低いロック解除要件の低い努力の例:
Builds for different characters: None of the changes affect these much, but new builds might be more viable.
7. What are some useless stuff that might be useful later?
Prestige level, Minor crystals and various materials, スキルレベル.
8. What to do after I “終了した” ゲーム?
Whatever you find fun and/or challenging and/or relaxing.
9. What’s the best way to complete the 500000 kill achievement?
Probably curse 0 speedruns after you have completed everything else.
10. Should I focus on one element when making a build?
Element (例えば. Fire/Shadow/etc) is only one of the many tags a skill has. Instead of focusing on the primary tag, focusing on the secondary tag like Frontal/Lasting/Area tends to result in stronger builds.
ルーン文字
Runes are all multiplicative, and with each other. Below is a list of all of them with comments on what they are good for and a rough order of the importance.. (Equal number = tie and usually pick only 1)
1. Weapon Expert (レベル 100 in a game)
Gives you the weapon’s special skill. Easy unlock. Helps immensely with the early game.
2. マルチキャストマスタリー (Curse IV 2nd map)
Increases the multi-multicast multiplier from 0.4 に 0.6. More multicasts also means more debuffs.
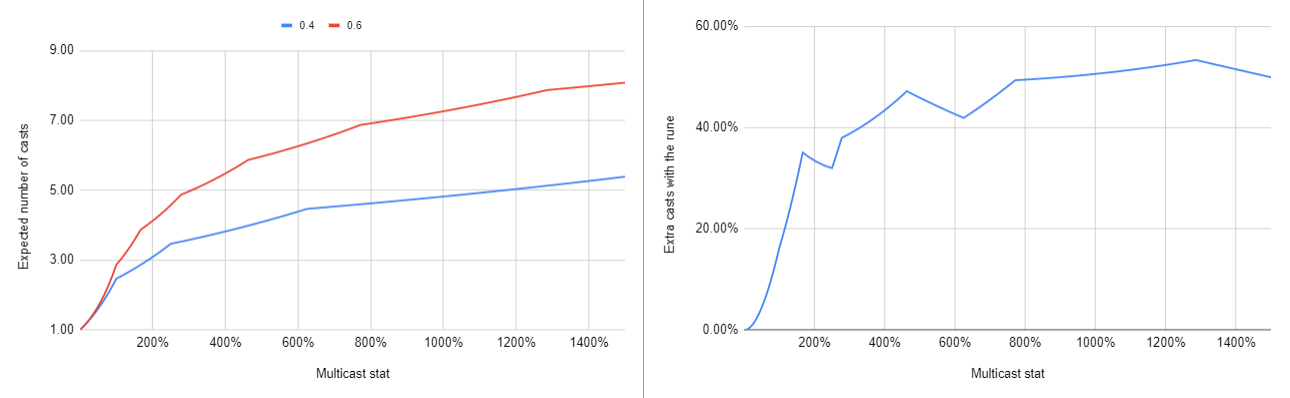
The first local maximum for the effectiveness of the rune is at 168% Multicast stat.
3. ジェネラリスト (400 領主)
与える 5% extra damage for each unique tag across all your skills. Great with Chromatic bolt. Even without Chromatic bolt, you usually have around 10 different tags for +50% ダメージ.
4. 純度 (200000 敵)
与える (50% – 5% * number of status effect) 追加ダメージ. Can’t go below 0. Great to one-shot or two-shot mobs for a quick clear. Pretty much useless if you are going into Overlord/Endless.
All of the above focus on a fast early game. Since mob HP, especially boss HP, scales with time. The faster you spawn them, the less HP they have.
4. 死刑執行人 (Curse IV 5th map)
与える (5% * number of status effect) 追加ダメージ. Great with Chaos skills and if you are going into Overlord/Endless. さもないと, it will do worse than Purity when killing the mobs, but will be better on the bosses.
6. 無謀 (3000 Elites)
与える (0.5% * missing hp) 追加ダメージ. Great damage boost when you stack HP and useful for high curse runs when taking damage is usually unavoidable. Not very useful in low curse runs. For Overlord/Endless, it is very dangerous to stay at low HP and it might be more worth it to take the next rune.
6. Reroll Mastery (500 領主)
与える 1 reroll per 5 レベル. Very useful for high Overlord/Endless runs.
8. Commanding Presence (300000 敵)
Summons do 40% more damage while you do 40% 少ない. Only useful with a summon build.
9. Focus Fire (2000 Elites)
与える 40% extra damage at the cost of -20% エリア. Since runes work multiplicatively, の -20% area basically lowers each Area upgrade by 1 階層. A good damaging rune for low curses. High curses typically favor extra Area.
10. Critical Mastery (Curse III 3rd map)
This is now very good because it uses the dazed/disoriented on the enemies. Once more testings are done, this will likely move up a lot in ranking.
11. ダッシュマスタリー (Curse II 4th map)
Gives extra dash distance. Early unlock to prepare for your first adventure into high curses. Not needed when you are more used to it.
12. Surefooted (レベル 90 in a game)
Gives extra damage mitigation and knock back resistance. Early unlock to help with survivability in high curses. Not needed when you are more used to it or if you take some armor upgrades.
13. Singular Focus (Curse VI 2nd map)
Allows you to take repeats of the same skill. It is nice for making fun builds. 実際に, の 5 points could be spent in other damaging runes for better results. Very good for Light beamx5 + buff build because it increases the brittle application as well as the attack frequency (subject to change next patch).
14. Synergetic (Endless 3)
Increases the Synergy chance from 50% に 70% and make these passives more frequent to appear. Synergy passives are in general pretty bad. There are usually better runes you can take for the 4 runic power it costs.
15. Controlled Chaos (大君主 1)
Effectively increases the damage component of chaos skills by 33%. Generally not very useful because chaos skills’ debuffs do the most work. Could be considered for an all chaos fun build.
16. Center of Attention (8 キャラクター)
Makes some random skills cast on yourself. A bit counter-productive because typically you don’t want to be too close to the enemies. Not needed when you have enough area.
17. Skill Mastery (Clear with the corresponding character sub 12:00)
追加します 6 skills of a certain tag that you wouldn’t have access to. Very useful to get skills from other characters that synergizes well with your own. Good for early game when you don’t have many damaging runes unlocked. Weapon starter skills can be obtained without unlocking the character or unlocking the ability to craft the weapon (should be fixed next patch).
18. Skill Affinity (Prestige level 30 on the corresponding character)
Guarantees that on level 3, you will be offered skills of a certain tag. Useful for getting a certain skill early. Can reset if you don’t get it.
19. Skill Inclination (Prestige level 60 on the corresponding character)
Makes skills of certain tag offered more often. の 3 ルーンのパワーコストは価値がありすぎて、1つの要素に焦点を当てたものを構築するには、通常はそれほど良くありません. うまくいけば、コストが削減されます.
タグ
1. 主要な, 形, 魔法/物理的
この分類は構成されており、純粋に観察からです. すべてのスキルがあります 1 または 2 プライマリタグ, 1 または 2 または 3 シェイプタグ, 1 または 2 魔法/物理的なタグ. イベントスキルには、追加の季節タグがあります. (聖なる火だけがあります 3 シェイプタグ. クロマティックボルトにはあります 9 プライマリタグ)
主要な: 難解な, ブラスト, 爆弾, カオス, 電気, 火, 聖なる, 氷, 自然, 発射体, 影, スラム, スイング, 推力, オーラ, 鎖, 力を与える, 召喚. 最初 14 すべてが最後にスキルルーンを持っています 4 しないでください.
形: エリア, バースト, 正面, 続く, ミサイル, 静的.
魔法/物理的: マジカル, 物理的な.
プライマリタグは、まれなアップグレードのみを取得できます.
シェイプタグは、壮大なアップグレードのみを取得できます.
魔法/物理は、伝説的なアップグレードのみを得ることができます.
2. タグマッサージとは何ですか?
タグ固有のアップグレードは、持っている場合にのみ可能です 2 または同じタグのスキル. それらは、将来のすべてのスキルピックアップに影響を与えます. 高オーバーロード/エンドレスランに非常に便利です.
スキル
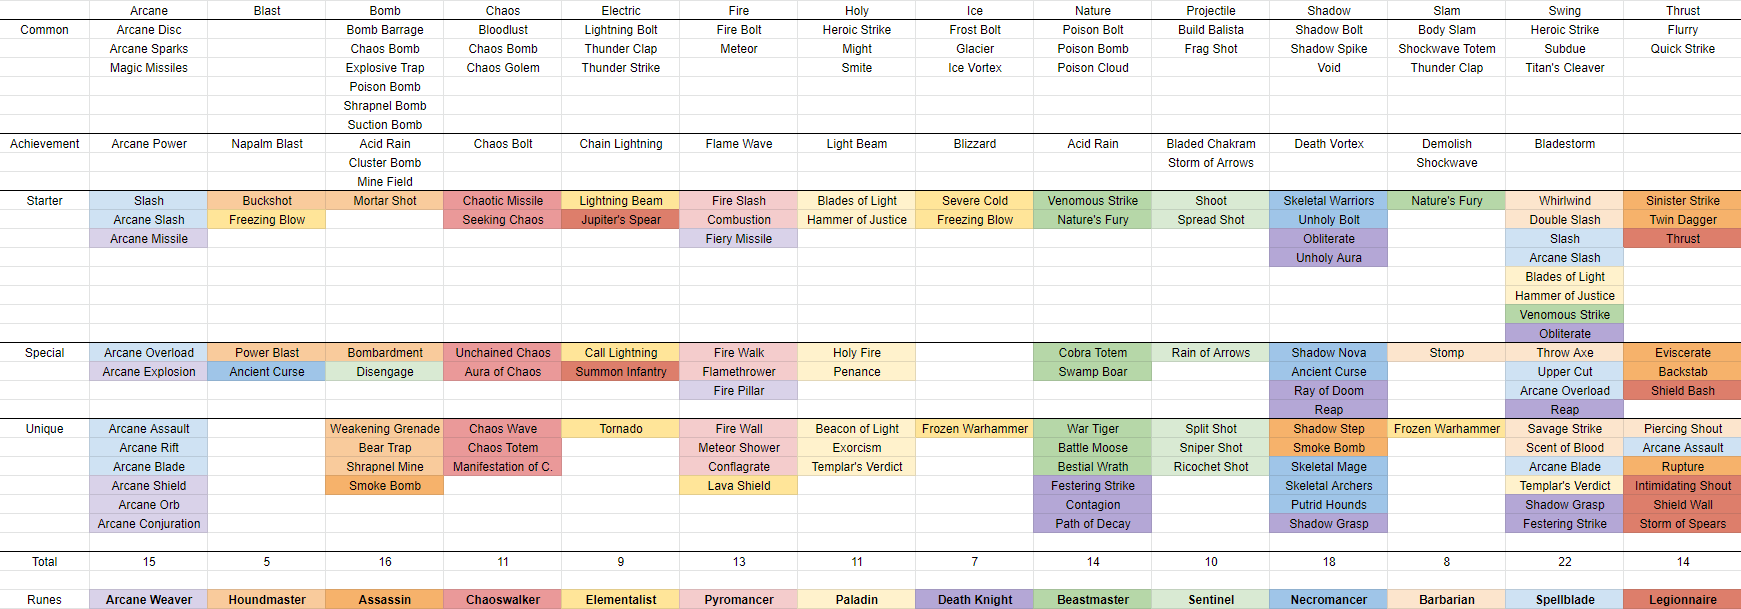
1. どのスキルが利用できますか?
There are five kinds of skills:
一般: any character with the tag can get it.
成果: any character with the tag can get it but needs unlocking.
スターター: the first skill of a weapon. Other characters need a skill mastery rune to access it, but currently no achievement requirement (to be fixed next patch) .
特別: the second skill of a weapon. Other characters need a skill mastery rune to access it and needs unlocking.
個性的: three skills (four for Death Knight) unlocked while leveling the character. Other characters need a skill mastery rune to access it and needs unlocking.
(Missing Death Claw for Chaos Achievement)
2. How do certain skills interact with Area, Cast frequency and Multicast?
ある) ビーム
Beams at base tick every 0.5 秒. Light Beam ticks 18 回, Arcane Beam ticks 14 回, Lightning Beam ticks 10 回. Tick time affected by Multicast. Tick rate affected by Cast frequency and Multicast. (つまり, they work the way you want them to work)
There is an AOE at the point of contact. This AOE size is affected by Area.
b) オーラ
Tick rate is fixed at 0.5 秒. Affected by Area, Cast frequency and Multicast like any normal skill (つまり. overlaps with multicast and with enough cast frequency).
c) バフ
Reapplies when cooldown is lower than duration. Not affected by Multicast. Area is useless if not running summons or if the buff doesn’t affect summons.
Arcane shield’s damage can multicast, is affected by Area and can crit but isn’t affected by the enemies’ status effects (along with many other bugs).
d) Shadow step
Shadow step’s portal making isn’t affected by Multicast or Area. It’s damage is.
Funny note: At more than 1600% cast frequency, permanent immunity can be achieved (but not immune to knock back).
e) Poison Cloud/Tornado/Death Vortex
These skills are permanent. Tick rate at 0.5 seconds base and is affected by Cast frequency. New casts replace the old ones. Affected by Multicast by spawning multiple.
Funny note: Stays on the ground when you are dead.
f) 召喚
I don’t play with summons much so the following might be inaccurate.
They are affected by all of your stat increases and all of your on-hit passives, but they have their own base stat. Their stats are also affected by Curse levels. They are not affected by runes, except for Commanding Presence (and possibly Synergetic).
They target the closest enemy to them. Skeleton Mage and Archers stay around you on the opposite side of your cursor. Otherwise there is no way to control where summons go.
補足: Wild Strike’s base damage is calculated as 300 + 20% * (# of summons). Totems count as summons for this calculation.
3. How are Shield Bash, Titan’s Cleaver, Quick Strike and Body Slam’s modifiers calculated?
They are given by:
1 + (relevant stat – 100) * 0.02.
4. How are Sniper Shot, Templar’s Verdict, Holy Fire, Hammer of Justice, Heroic Strike’s crit damage calculated?
They are given by:
(ダメージ) * (crit dmg stat + extra crit dmg from skill level up) * (crit multiplier (3 または 5)).
5. Can heals crit?
はい. They use your crit chance and crit damage stat. This includes Smite, Exorcism and Arcane Shield’s shield amount (which might also be bugged).
6. A tier list?
Tier lists are very subjective and depend heavily on your play style and what you are trying to accomplish.
If you really want a tier list, take the one in the general info for new player section:
7. How good are the buffs?
It depends a lot on how long you think your run will be.
Sub 10: taking an active skill will be better.
10-15分: Arcane Power is pretty good.
15-40分: this is usually overlord/endless cycle 1 – 7. Bloodlust and Might shine in this stage.
40+: this is deep overlord/endless where you will need some shields or heals to survive. Scent of blood will be needed to progress further.
8. How much debuff does each chaos skill apply?
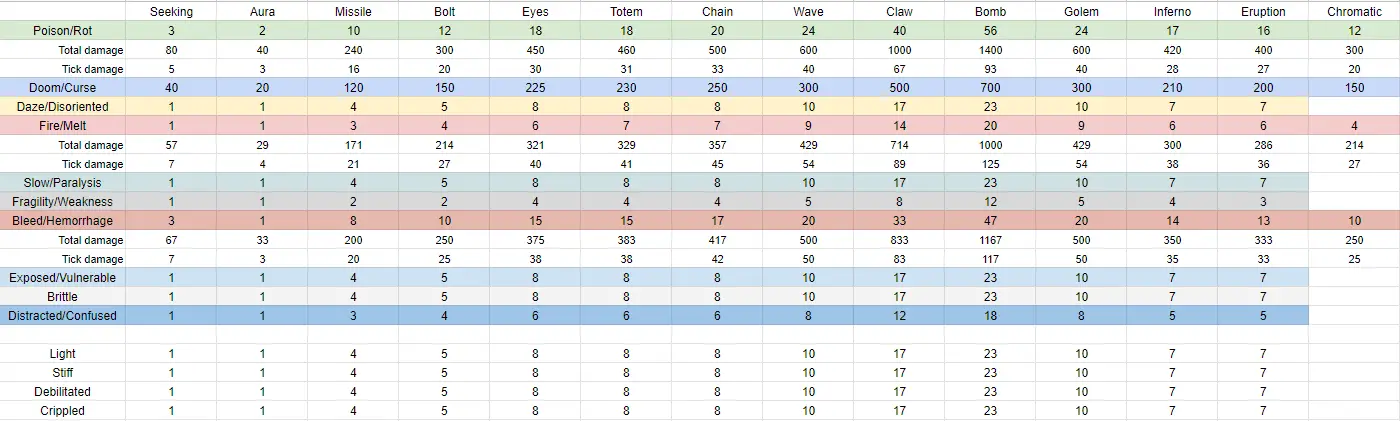
Status effects
1. On-hit passives
ある) What happens when I take multiple of the same on-hit passive?
You have the same chance of applying it and the damage is multiplied. Multiple stacks will appear on the boss but they only matter to skills that apply damage based on the number of stacks.
b) What affects their damage?
They are affected by (skill damage mod + character damage mod) on the skill that applies it. They can crit and are affected by crit damage at the time of the application. The individual tick damage depends on the current status effects on the target.
c) Are they worth taking?
If you are running Executioner, then at least 1 stack of each is good to have.
さもないと: poison and burn are too slow, doom is worth taking for free damage, slow is extremely useful in high curses to slow down enemies and it allows you to take Leviathans more aggressively, fragility is always good to take.
d) Are Synergy chains good?
Generally not. It could be worth it if your active skill is constantly applying a certain debuff.
さもないと, you could’ve gotten the same result just by taking another stack of on-hit passive.
Impending Doom (Doom -> 5x Daze): Good for builds that don’t usually go for 100% クリティカルチャンス.
Desperation (Daze -> 250 やけど): Good for lightning builds.
Thermal Shock (Burn -> 2x Slow): Good for Frozen Warhammer/Ice Vortex builds.
Hypothermia (遅い -> 脆弱性): 常にゆっくりと適用されるビルドに適しています. 氷に触れる + 低体温症は、X2 X2の服用と同じです.
壊疽 (脆弱性 - > 出血) そして残忍なストライキ (致命的 -> 出血): 血の香りに良い.
有毒な血 (ブリード - > 毒): 💩
衰弱するペスト (毒 - > 運命): 毒雲に適しています.
e) 私が聞くステータス効果に対するこれらのキャップは何ですか?
脆弱性/衰弱/混乱したものにはソフトキャップがあります +200% のハードキャップ +300%.
麻痺にはソフトキャップがあります +250% のハードキャップ +500%.
メルトの鎧の減少にはソフトキャップがあります 200 のハードキャップ 300.
露出/脆弱なものにはソフトキャップがあります 800% のハードキャップ 1200%.
Dazedのマルチクリットにはソフトキャップがあります 200% のハードキャップ 300%.
これらのキャップ値は変更される可能性があります.
キャップなしでXをどれだけの量にしたかとしましょう. その後、実際の効果は次のとおりです
× / (1 + (最大(× – ソフトキャップ, 0) / ハードキャップ))
スキルダメージに基づく露出/脆弱性の効力は、最大で計算されます(分(スキルダメージ, 1000)-50,0)/950. 言い換えると, 下に 50 ダメージが得られます 0% ブースト, その上 1000 ダメージが得られます 100% ブーストとスケールの間に直線的に.
f) How does Brittle work?
The dev are changing it for the next update. その間に, you can check this to see how it is working currently:
1. Brittle is affected by the damage mod and the skill mod on the skill that applies it, can crit and is affected by crit dmg (not by disoriented).
2. This brittle damage is added to the base damage of any active skill. Then this total damage gets multiplied by the damage mod and the skill mod on the active skill, by crit and crit dmg, by disoriented/paralysis/fragility/melt. (言い換えると, overall damage boosts like Leviathan increase both the Brittle damage and the final damage multiplicatively, so does crit dmg)
3. Each stack of brittle applied by chaos skills is +5. So Chaos bomb’s 23 stacks of brittle is actually +115
Calculation Example:
Chaos bomb applies 250 stacks at 1400% ダメージ
Light beam applies 400 stacks at 1600% ダメージ
Crit dmg = 1000%
Disoriented = 210%
Fragility = 280%
Paralysis = 250%
Melt = -220
Shield bash = 1800% ダメージ
Armor = 2500
約 7 multicast on average at 0.2s cd = 35 hits per second
Brittle amount = (250 * 5 * 14 + 400 * 16) * 10 = ~240K
Each hit of bash = 240K * 50 * 18 * 10 * 3.1 * 3.8 * 3.5 = 89B
で 35 * 60 = 2100 hits per minute, this is 187T per minute
At e12 armor, we get 187 * 200/(1300 – 220) = 35T per minute, which is consistent with what I was actually doing
これが次のとおりです clip to show its effect.
General gameplay
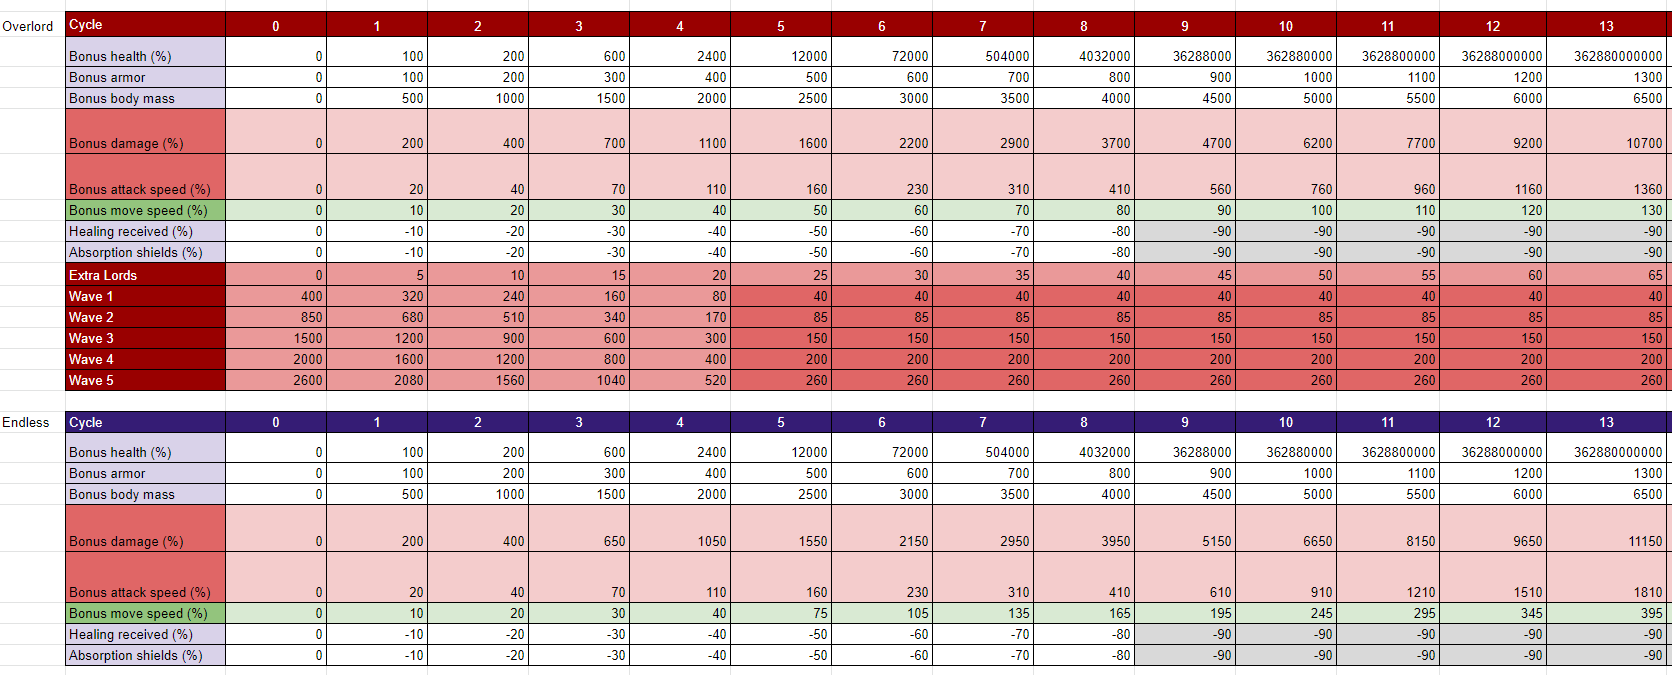
1. Curse and Boss HP scaling
Curse base stat = 5% hp on mobs, 1% 攻撃速度, 1% Movespeed, 1% ダメージ, 20% hp on boss
Actual multiplier = 1 + 呪い * (Curse base stat + Selected curse bonuses)
例 1: Curse VII (48) Boss HP scaling = 1 + 48 * (20% + 10% * 3 House of Lords) = 25x
例 2: Full Curse with one House of Lords unchecked: Boss HP scaling = 1 + 45 * (20% + 10% * 2 House of Lords) = 19x
例 3: Boss HP scalings for Curse 0 -> Curse VII are: 1 -> 1.8 -> 3 -> 6.4 -> 8.5 -> 15 -> 17.4 -> 25
Boss HP = (Time Alive in seconds round up to the next 10) * (1 + 波 #) * (Curse Scaling) * (Endless Scaling) * 40
Bosses belonging to the same wave all have the same HP determined by the above formula at the time of the first one’s spawn, even if some bosses from the same wave spawn at a later time.
2. Pillars. What do they do and should I go kill them?
They shoot red circles at you. If you are ok with dodging them, then staying near a corner would help you kill the mobs and summon the bosses earlier, at a lower HP.
If you are already next to it, then it is good to kill it. It gives a lot of exp.
In the extreme case of High Curse High Overlord/Endless, they take up the spawn cap (50) causing very few mobs to spawn.
3. How do stats interact with each other?
Stats from the skill tree, the character’s base stat, the weapon’s stat, all in-game passive, skill upgrades, bonus from buffs are all additive.
4. How do armor/block work?
Armor reduces the damage taken. Block is basically dodge.
Effective HP = HP * (1 + (鎧 – 100) * 0.5%) * (1 + (ブロック – 100) * 1%).
5. When do I get active skills?
When your level is a multiple of 3.
6. What to banish?
When you roll for upgrades, the rarety is rolled first with weights 50/25/12/4/1 from Common to Legendary. Then an available upgrade of the chosen rarety is picked. Banshing an upgrade banishes it for all rarety.
In non-Overlord/Endless plays, you don’t gain enough levels for banishes to make a difference. So you can just use it as a one-slot reroll.
In Overlord/Endless plays, it matters a lot more. You want to banish useless upgrades that can have Epic qualities, so that if you happen to roll an Epic upgrade, you actually get a good one. 例には含まれます: Duration on buffs, Area on buffs, Expansive.
Going deep Overlord/Endless
This section will likely change with the next patch.
1. How far can I go without going meta?
サイクル 3 is usually where most builds peak. A good build can get to Cycle 5.
2. Which one is harder?
They have similar scaling, with Endless having slightly more.
Overlord x and Endless x+1 have similar difficulties.
Curse VII O/E x and Curse 0 O/E x+2 have similar difficulties.
3. What’s the scaling like in high cycles?
4. What’s the meta build for going super deep?
Since Brittle is likely getting nerfed the next patch, making my build approximately 1000x weaker, I will only list out the build without going into much detail about how to build it.
Scent of Blood: Most insane cast speed scaling. Caps out at around 3100% for this build.
シールドウォール: Most insane armor scaling.
Exorcism: Best healing in the game. Works when you are airborne.
The above three skills will always be mandatory.
Chaos Bomb: Most insane debuff (especially Brittle) applications.
Piercing Shout: Best armor reduction. Works even better when combined with Chaos Bomb’s Melt.
Shield Bash/Titan’s Cleaver: Best multiplier scaling in the game to take advantage of Brittle and Shield Wall’s armor.
With the likely change to Brittle, meta build for the next patch is likely back to Frozen Warhammer / Ice Vortex.
Here is what I have completed with this build:
呪い 0 Endless 13 で 296:43
呪い 0 大君主 11 で 75:12
呪い 45 Endless 11 で 237:00 (approximated, crashed at 228 minutes with 19/20 bosses killed)
呪い 48 大君主 10 で 130:22
これが今日私たちがこの目的で共有するすべてです ソウルストーンの生存者 ガイド. このガイドは元々、次の者によって作成および執筆されました。 Nomad. このガイドを更新できなかった場合, これに従って最新のアップデートを見つけることができます リンク.